
Painting an Awakened Wyldwood isn’t an easy feat. It’s a large set with no less than ten pieces of branches to paint for each tree, so you might need some advice. In this easy to follow 32 step tutorial, I’m going to show you how I painted my set in a striking pink cherry (or sakura) tree style, without the need of an airbrush, with just good old washing and drybrushing.
This tutorial assumes you have a good understanding of how to paint. Underneath each picture are the corresponding instructions. Each step shows the paint(s) I used during that step. I have a rather eclectic paint collection, so when I use a non-GW or OOP paint, I’ll try to provide you with suitable alternatives from the current Citadel paint range [in brackets]. However, if you want to acchieve the exact same result as shown, you might want to expand your paint collection.
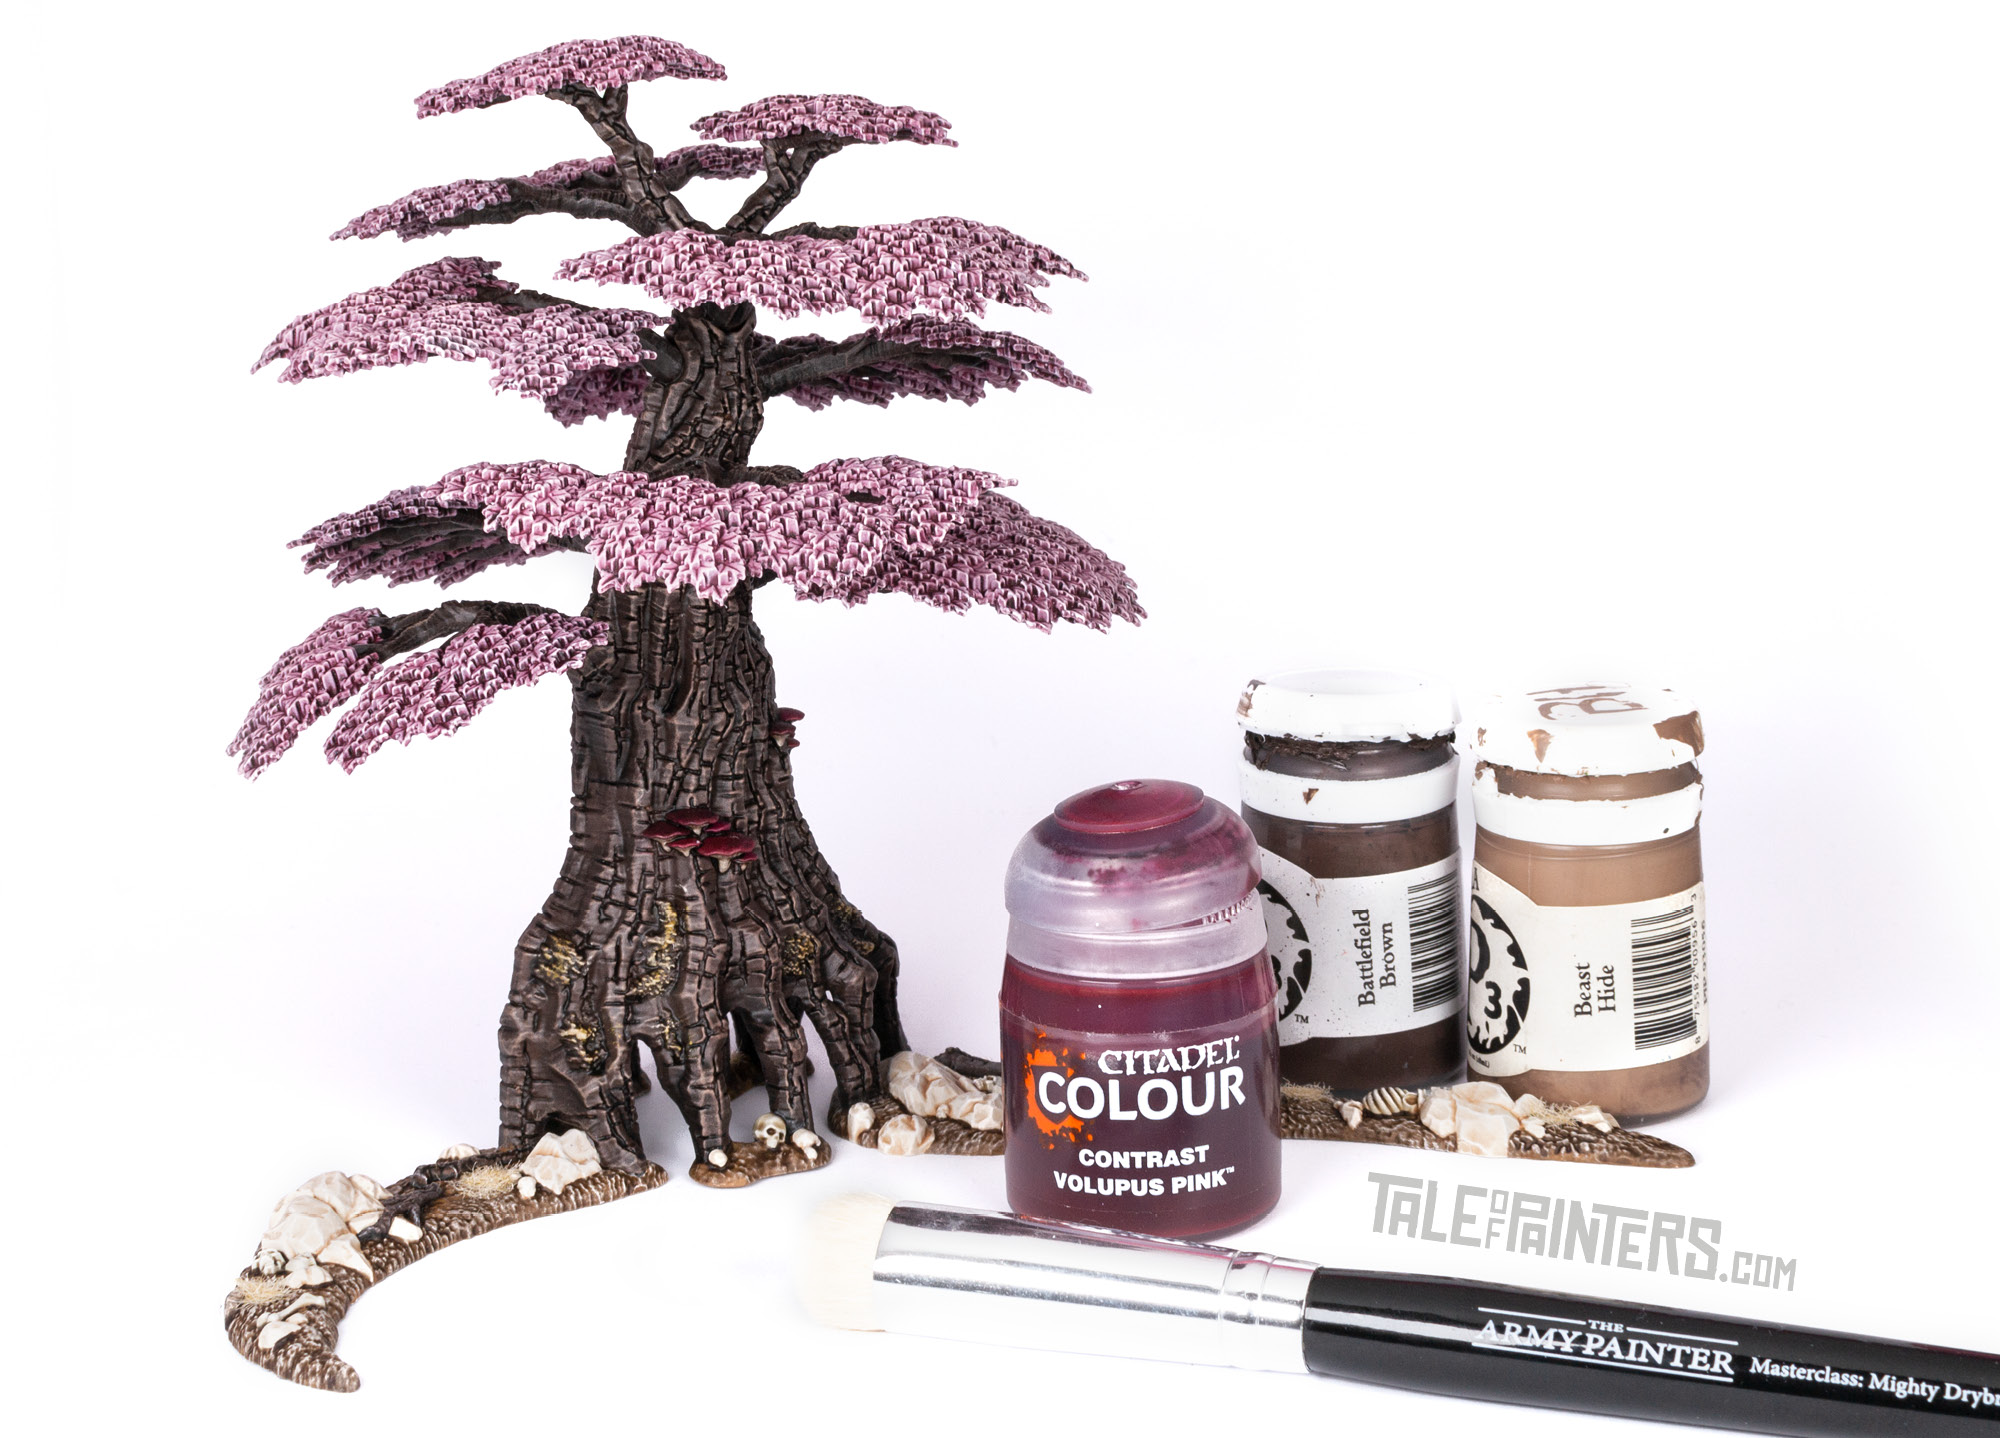
Paints you will need for this tutorial:
Corax White
Gorthor Brown
Averland Sunset
Khorne Red
Screamer Pink
Gal Vorbak Red
Wazdakka Red
XV-88
Agrax Earthshade
Carroburg Crimson
Gryphonne Sepia
Volupus Pink (Contrast)
Wyldwood (Contrast)
Skeleton Horde (Contrast)
Lahmian Medium
Contrast Medium
Formula P3 Battlefield Brown [or Dryad Bark]
Formula P3 Beast Hide [or Baneblade Brown]
Formula P3 Menoth White Base [or Ushabti Bone]
Army Painter Leather Brown Colour Primer and Warpaint [or Mournfang Brown]
Army Painter Warpaints Dark Tone Wash [or Nuln Oil]
Army Painter Warpaints Strong Tone Wash [or Agrax Earthshade]
Army Painter Warpaints Banshee Brown [or Karak Stone]
Army Painter Warpaints Scar Tissue [or Pink Horror mixed with Screamin Skull]
Army Painter Warpaints Centaur Skin [or Emperors Children mixed with White]
Reaper Master Series Polished Bone [or a mix of Rakarth Flesh and Pallid Wych Flesh]
If you need to expand your paint collection to follow the tutorial, check out our partner stores Wayland Games and Element Games, which offer an amazing range of paint brands at decent discounts.

1. Prime the branches and base parts with Corax White spray. Give any areas not covered by the spray a quick coat of Corax White base paint.
2. Keep the tree trunks separate and prime them with Leather Brown Colour Primer from The Army Painter. If you don’t have Leather Brown primer, you can use any other primer as we will paint over it anyway, depending on the base colour you chose, you might just need to apply a few more coats of Battlefield Brown in step 3.
3. For the dark brown bark, basecoat the trunk with Formula P3 Battlefield Brown [Dryad Bark].
4. Next, wash the whole trunk with Dark Tone Wash from The Army Painter [Nuln Oil].
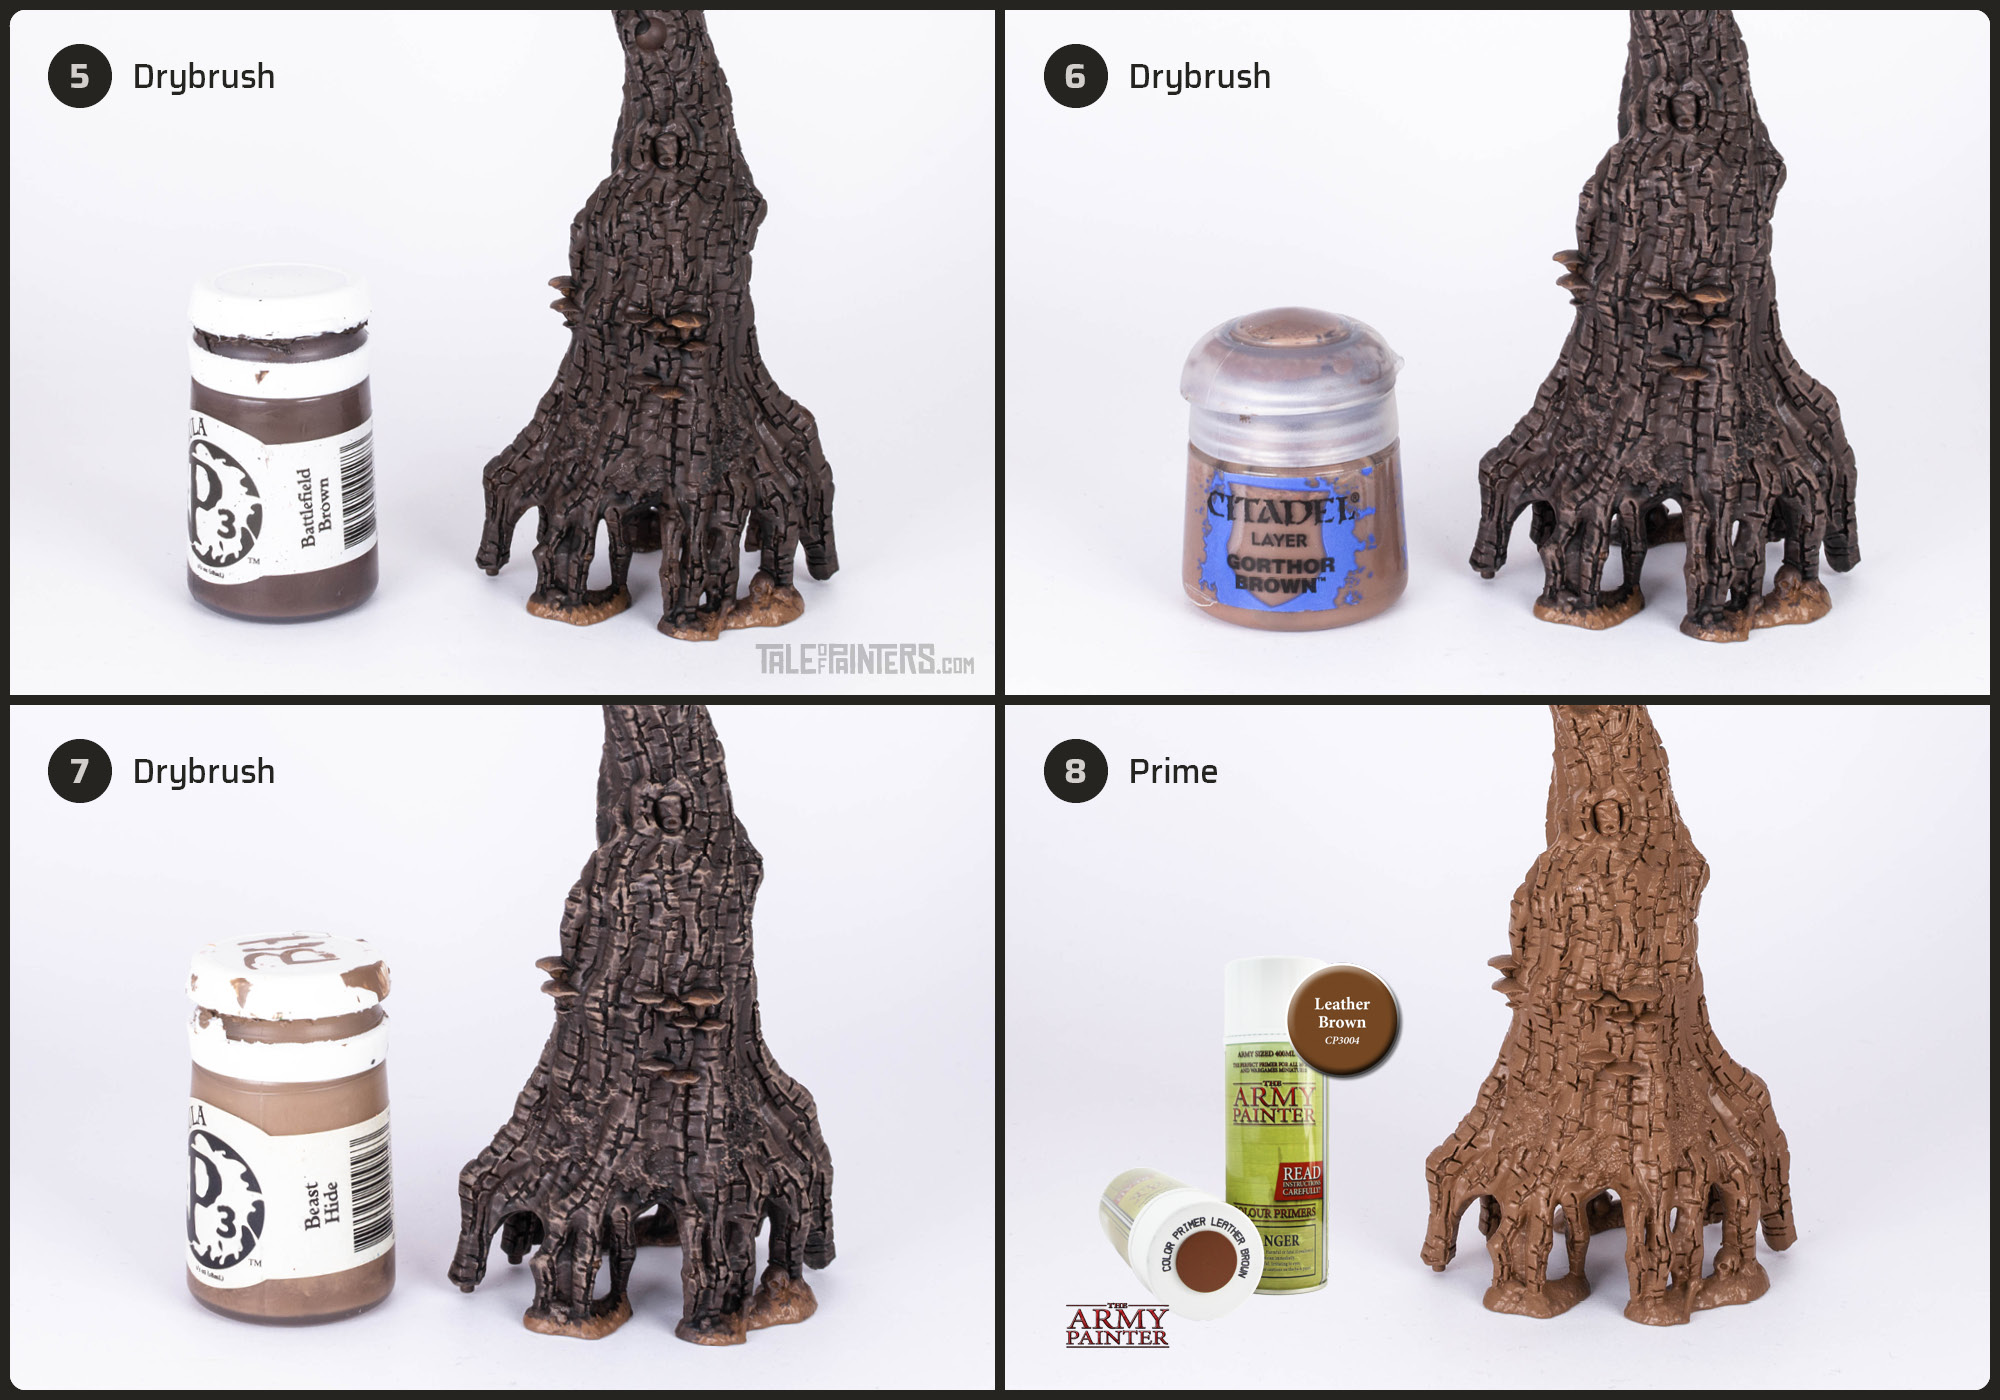
5. Heavily drybrush the trunk with Battlefield Brown [Dryad Bark]. I recommend using a brush with a rounded top like The Army Painter’s Masterclass Drybrushes or similar shaped makeup brushes.
6. Drybrush with Gorthor Brown.
7. Gently drybrush with P3 Beast Hide [Baneblade Brown, though Beast Hide is a bit warmer]
8. For the medium brown bark, use Leather Brown primer and give any areas not hit with the spray a coat of Leather Brown Warpaint [closest Citadel Colour would be Mournfang Brown, though Mournfang Brown is more reddish].

9. Give the trunk an all over wash with Wyldwood, thinned 1:1 with Contrast Medium.
10. Once dry, drybrush the bark with Formula P3 Beast Hide [Baneblade Brown].
11. Lightly drybrush with Warpaint Banshee Brown [Karak Stone would be the closest].
12. With a small drybrush, apply some Averland Sunset to the mossy areas in a stippling motion.

13. Drybrush the moss with P3 Menoth White Base [Ushabti Bone].
14. Wash the moss with a 1:1 mix of Agrax Earthshade and Lahmian Medium.
15. Basecoat the mushrooms with either Screamer Pink, Khorne Red, or Gal Vorbak Red.
16. Wash the mushroom caps with a 1:1 mix of Warpaint Dark Tone Wash [Nuln Oil] and Lahmian Medium.

17. Drybrush all mushroom caps with Wazdakka Red.
18. Gently drybrush the caps with Warpaints Scar Tissue [or Pink Horror with a little bit of Screaming Skull mixed in].
19. Basecoat the mushrom stems with Corax White.
20. Wash the stems two times with Agrax Earthshade.

The branches were painted as described in steps 3 to 7 for a dark brown bark and 8 to 11 for a medoum brown bark. Once you finished drybrushing the wood, paint over any areas you hit with brown paint with Corax White base paint.
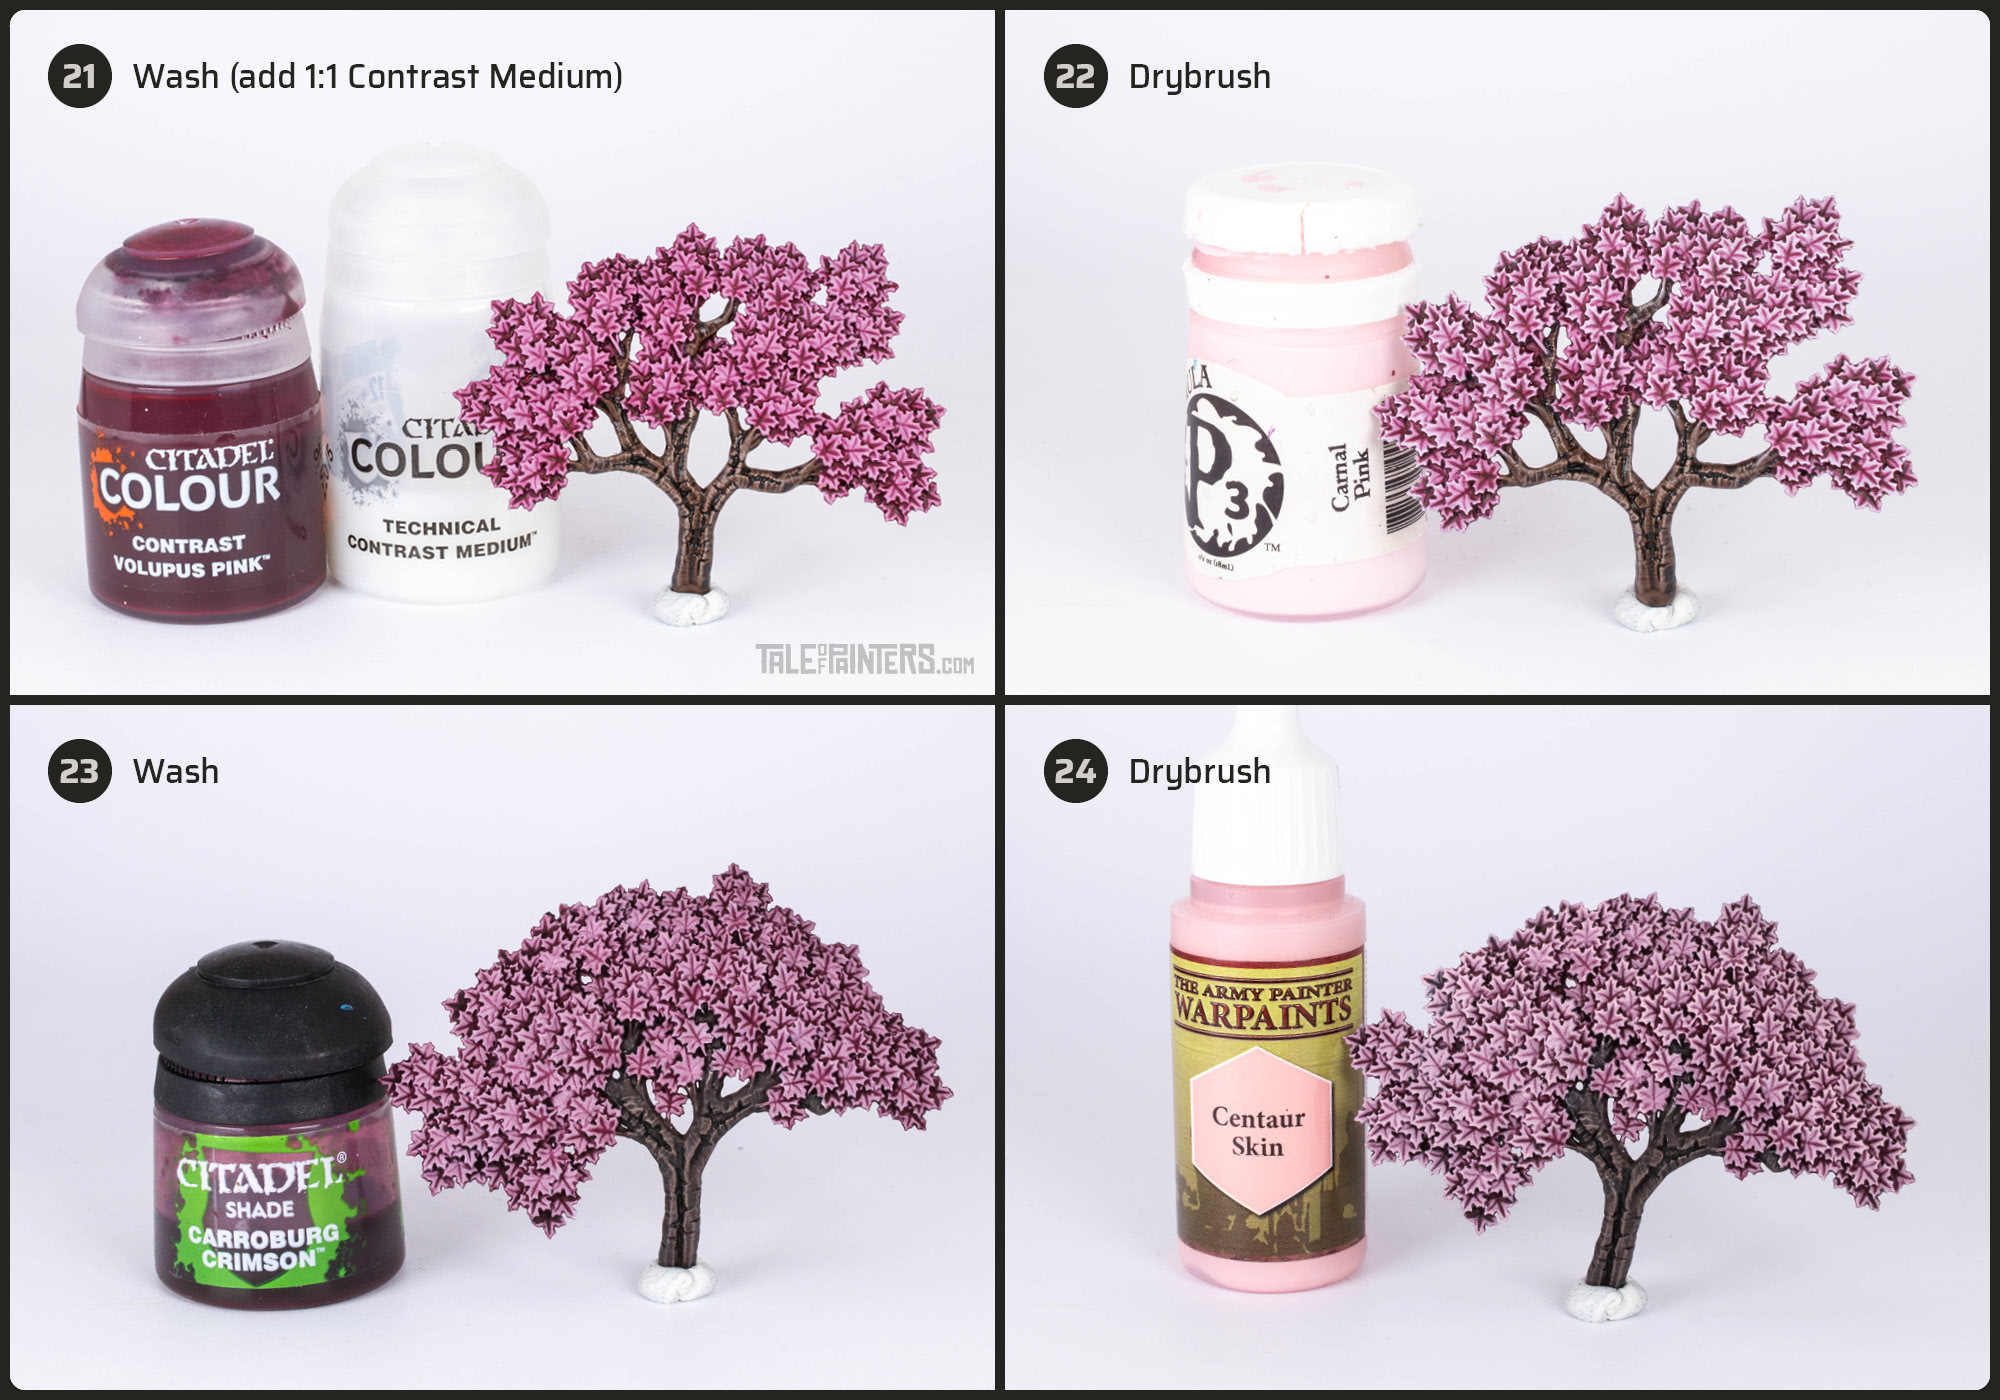
21. For bright pink leaves, wash with a 1:1 mix of Volupus Pink and Contrast Medium over the Corax White basecoat.
22. Drybrush with Formula P3 Carnal Pink [White Scar mixed with a little bit of Emperors Children].
23. For the muted pink leaves, wash Carroburg Crimson over the Corax White basecoat.
24. Drybrush with Warpaints Centaur Skin [white with a little bit of Pink Horror mixed in].

25. Basecoat the sand stone with Reaper Master Series Polished Bone [or a mix of Rakarth Flesh and Pallid Wych Flesh].
26. Wash the stone with a 1:1 mix of Seraphim Sepia and Lahmian Medium. I actually used an older version of Warpaints Soft Tone Ink, but the colour was changed a while ago. If you want to go for Warpaints, use Light Tone Wash instead.
27. Basecoat the base with XV-88.
28. Wash the bone with a 1:1:1 mix of Skeleton Horde, Warpaints Strong Tone Wash [or Agrax Earthshade with a little bit of Nuln Oil], and Lahmian Medium.

29. Drybrush the stones, the base, and the bone with RMS Polished Bone [or a mix of Rakarth Flesh and Pallid Wych Flesh].
30. Gently drybrush only the stone and bone with Vallejo Model Color White [White Scar].
31. Give the base an all over wash with Warpaints Strong Tone Wash [Agrax Earthshade with a little bit of Nuln Oil].
32. Finally, I assembled all the pieces and added some Arid static grass from Gale Force 9. Then I gave the whole tree a coat of Anti-Shine Matt Varnish from The Army Painter.

Attaching all the branches can be a pain in the rear. I recommend starting from the top and working your way to the bottom, with the base pieces left off. Generally, you want to have the smaller branches toward the top and the larger branches toward the bottom. Dry fit the branches before you glue them on and find out which branches you want to go where, you should aim for a nicely shaped crown with the leaves and branches spread out evenly.
When gluing, you might want to use super glue, as it sets much faster than plastic glue. Here is some advice on using superglue to achieve the best results. Put the tree sideways, attach a single branch, and let the glue set and cure completely. Then, turn the tree by 90 degrees, and attach the next branch. Work your way from top to bottom and most importantly, be patient and let the glue of each branch dry completely before you move on. I learned this the hard way, as half of my branches fell off as the glue hadn’t set yet…
Hope you enjoyed this tutorial. If so, leave a comment or reaction below, and if you got any questions, leave them here so I can answer them for you.
3 Comments
Leave a Reply
Tale of Painters is the unofficial Warhammer hobby magazine run by hobbyists like you. Support our work by using the affiliate links from our 🇺🇸 / 🇨🇦 partner stores for your next orders so we can continue to bring you fantastic FREE content every day:


Or support us directly:


[…] The new Drukhari codex inspired me to update a few of my older Drukhari models. Actually, I didn’t remove the original bases but used 32mm base adapters, which I reviewed here. I also changed the colours of the rocks to the light sandstone I also use for the rubble on my Iybraesil bases and on my Wyldwood trees. […]
[…] Tutorial: How to paint a pink “cherry tree” Awakened Wyldwood […]
[…] so here it is. Notice how I painted my Awakened Wyldwood in a matching paint scheme (check out the tutorial here if you want to learn […]