
Painting eyes – isn’t it something we all struggle with? Ever watched a painting tutorial, wondering how it is humanly possible to hit that tiny slit between those eyelids, let alone painting pupils? Don’t worry, I’m here to help. Over the years I developed a technique that makes painting eyes much easier. Check it out in today’s tutorial.
This tutorial assumes you have a good understanding of how to paint. Underneath each picture are the corresponding instructions. Each step shows the paint(s) I used during that step.
Paints you will need for this tutorial:
Your favourite white paint (I like Vallejo Model Color White)
Your favourite black paint (I like The Army Painter Warpaints Matt Black)
If you need to expand your paint collection to follow the tutorial, check out our partner stores Wayland Games and Element Games, which offer an amazing range of paint brands at decent discounts.
How to paint eyes – the Stahly way
In most painting guides I’ve seen, especially the ones you find in White Dwarf or on the Warhammer YouTube page, the face will always be painted first, and then the eyes will be filled in. It’s frustrating because even with the tiniest brush it’s almost impossible to not hit the lids. And with a slip of the brush, it’s so easy to mess up all the hard work you put into painting and highlighing the face.
Over the years I developed a technique that I find much easier to get perfect looking eyes. Ever wondered how I achieved a paint job like this Space Wolves Blood Claw? Basically, I paint the eyes before I layer and highlight the skin. This way, I can easily go back and forth until I’m happy, then move on to paint the skin. Shockingly, I also don’t start by painting the eyes white, but black.
So here is my technique for how to paint eyes on human-sized miniatures more easily:
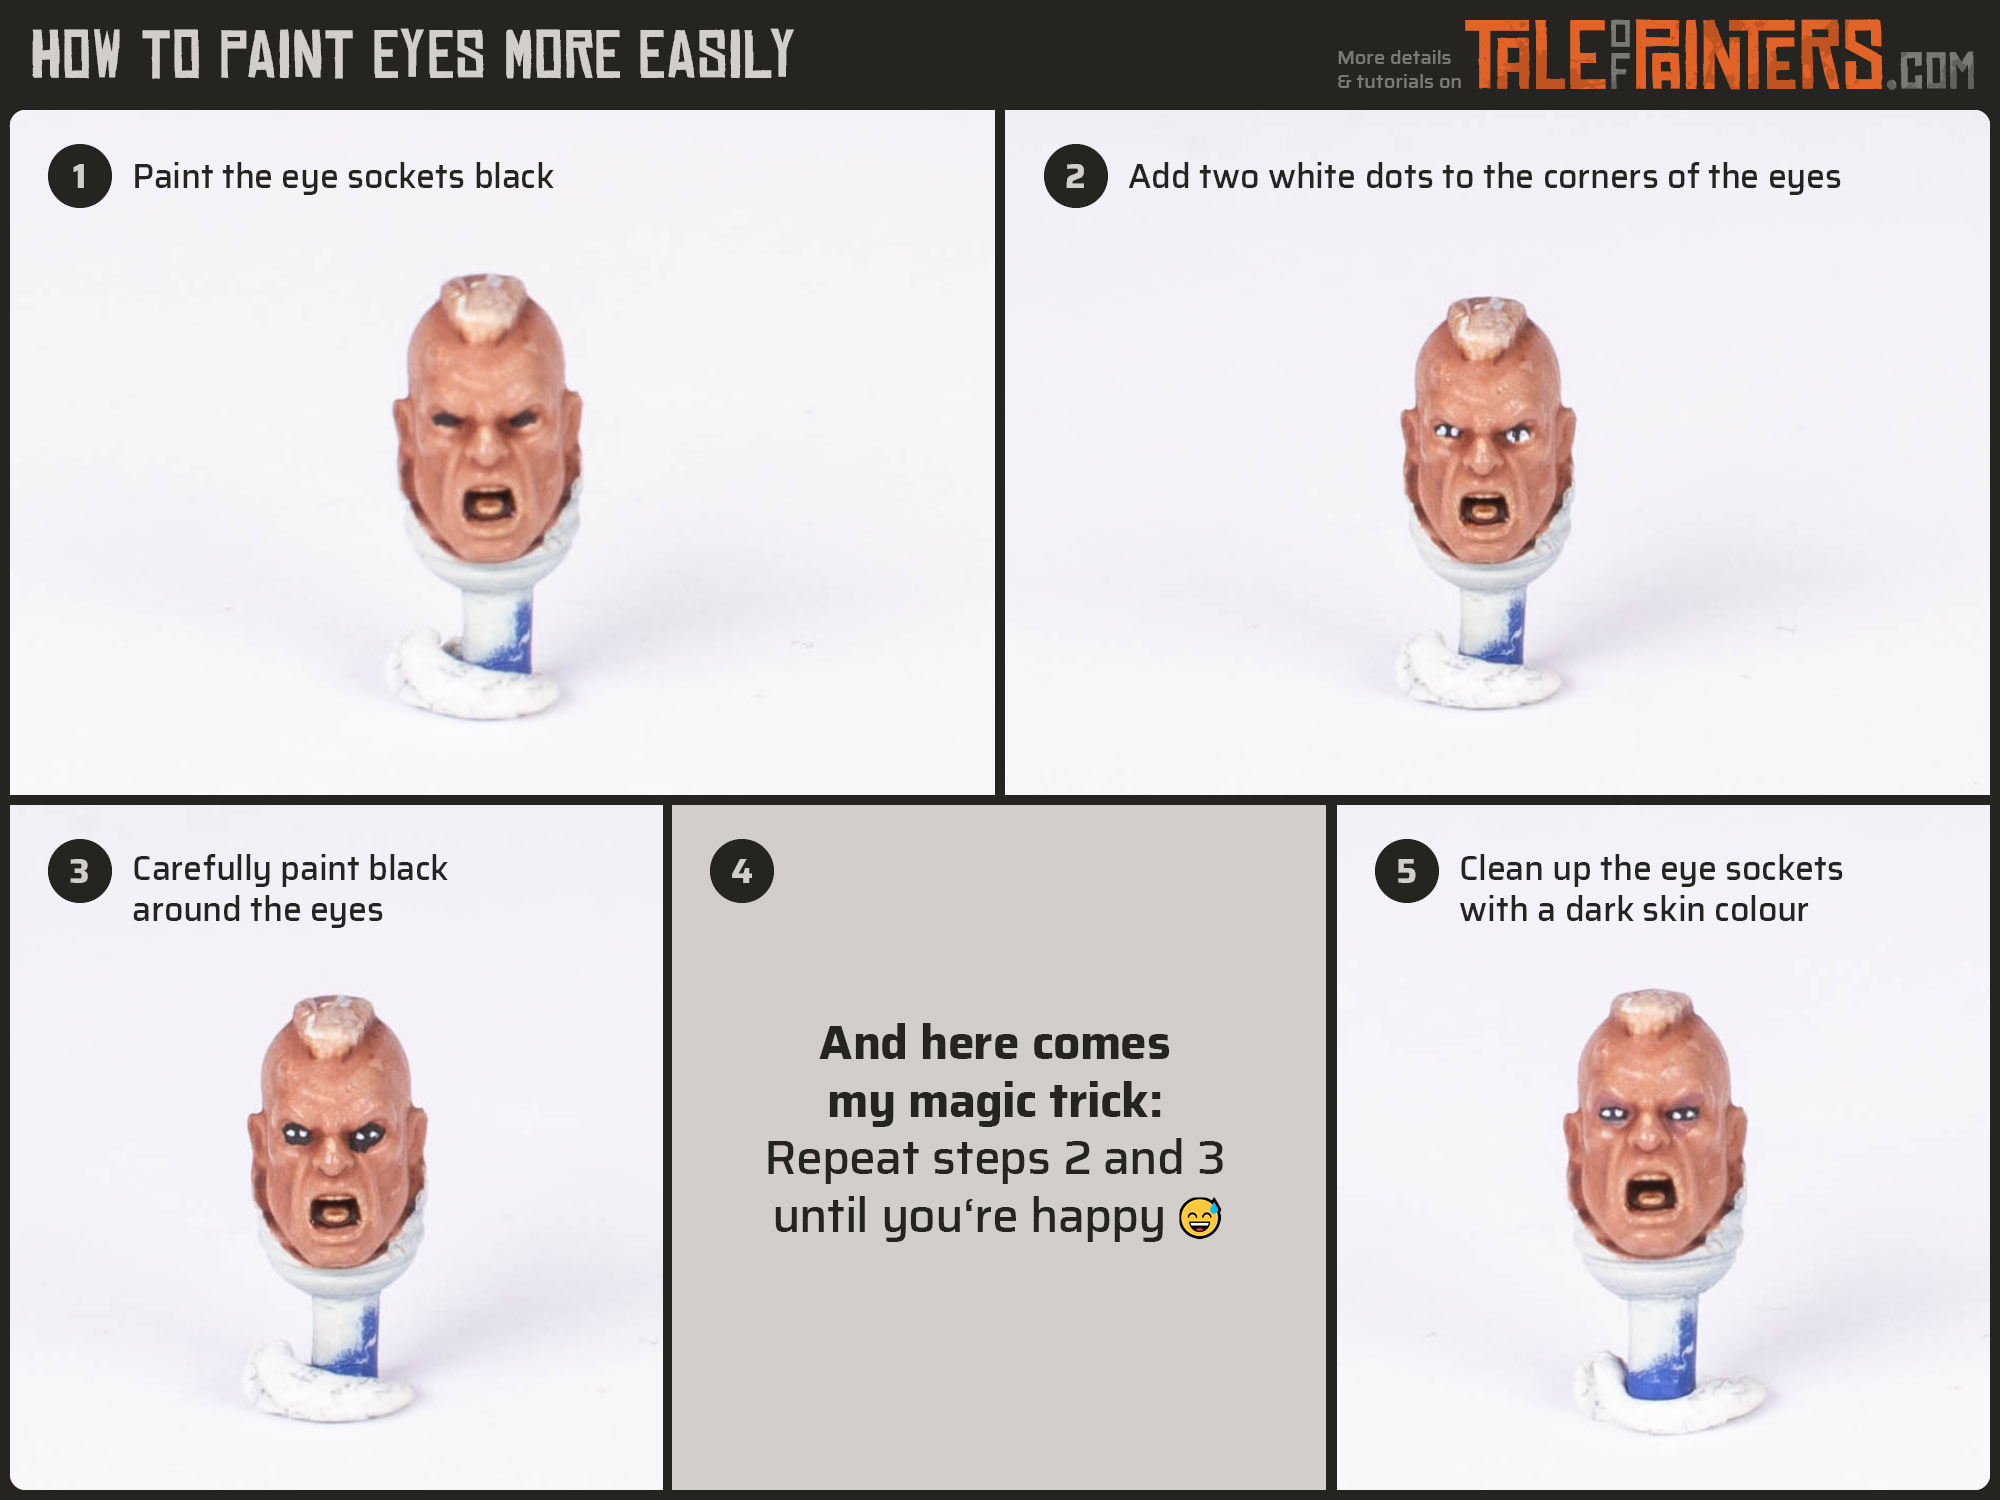
1. After you’ve basecoated and shaded your face, carefully paint the eye sockets black.
2. Add two white dots to the corners of the eyes while leaving a black line in the middle of the eye. The thickness of your line should be as similar on both eyes as possible. When working on eyes, I like to use the smallest brush I can find, which is a Winsor & Newton Series 7 M 000.
3. Bring out the black paint again and carefully paint around the eyes, until the shape of both eyes is as similar as possible. If you like the Alice Cooper look, stop at this step. Just kidding, remember that on most models, the upper and lower lid is defined in the sculpt, so the eyes must be confined to the slit in between.
4. And here comes my magic trick: If the eyes still look uneven, I go back and repeat step 2 and 3 until I’m happy. Sometimes, it can take two or three tries. I know, I know.
5. Once you’re happy, bring out a colour that is close to the shaded areas of your face and carefully paint the upper and lower eye lids of your model, and paint around the eyes until only a super thin black line remains for definition.
Congratulations, you can now go on and layer and highlight the skin as you please.
If you prefer a more realistic painting approach, use an off-white like Pallid Wych Flesh and a dark brown such as Dryad Bark instead of pure white and black. This way, the eyes won’t contrast as much with the rest of your paint job.
Hope you enjoyed this tutorial. If so, leave a comment or reaction below, and if you got any questions, leave them here so I can answer them for you.
5 Comments
Leave a Reply
Tale of Painters is the unofficial Warhammer hobby magazine run by hobbyists like you. Support our work by using the affiliate links from our 🇺🇸 / 🇨🇦 partner stores for your next orders so we can continue to bring you fantastic FREE content every day:


Or support us directly:


[…] Tutorial: How to paint eyes on your miniatures more easily […]
Regardless of technique I will always, always hate painting eyes, and I keep trying to convince myself that I’m just not going to do it anymore!
Is there a reason that you prefer to paint white dots, rather than a solid line and then adding the pupil back in?
Might be my personal preference. I like to start with the white dots, and if the resulting black pupils aren’t similar enough, then I’ll go back with black and change the pupils. It’s up to you, I’d just recommend painting the eyes first, then line black around the eyes, and then paint the face, not the other way round like in most painting guides.
The ‘eyes first’ thing I definitely like – once or twice I’ve come across suggestions to do the eyes messily after base layers, but certainly never first. Not sure why I’ve never seen or considered it before!
Skin in general is something that I recently decided I need to up my game on (bare heads are a nightmare for me), so maybe I can work on my eyes at the same time. =]
Dude this is a great tutorial. Some awesome ideas here. But, in my best Edna Mode voice, I’m still of the “No Eyes, darling. No EYES!” Camp. For me it usually gives the minis an eerie quality. Or like they just sat in a cactus feel. But…. I’ll give it a try. Who knows, you just might convince me.