
Is being efficient the same as cutting corners when painting? Does quality have to suffer if you save time? In this article, I’ll explore this by talking about how I approached painting my Aeldari Falcon grav tank. I’m going to share with you my work flow and what techniques and strategies I employed to make the process as efficient as possible without sacrificing quality.

Firstly, efficient doesn’t mean you have to sacrifice quality. For example, these are still expensive models and I want to treat that fact with respect. I don’t want to rush it and finish it in a day, but then I also don’t want to spend a whole day painting a single shuriken cannon. With this in mind I decided I would paint the pilots. It would save a lot of time if I paint the see-through canopy a solid colour and skip painting the pilots but like I said, I’m not trying to save time. I’m trying to be efficient, it’s totally different.
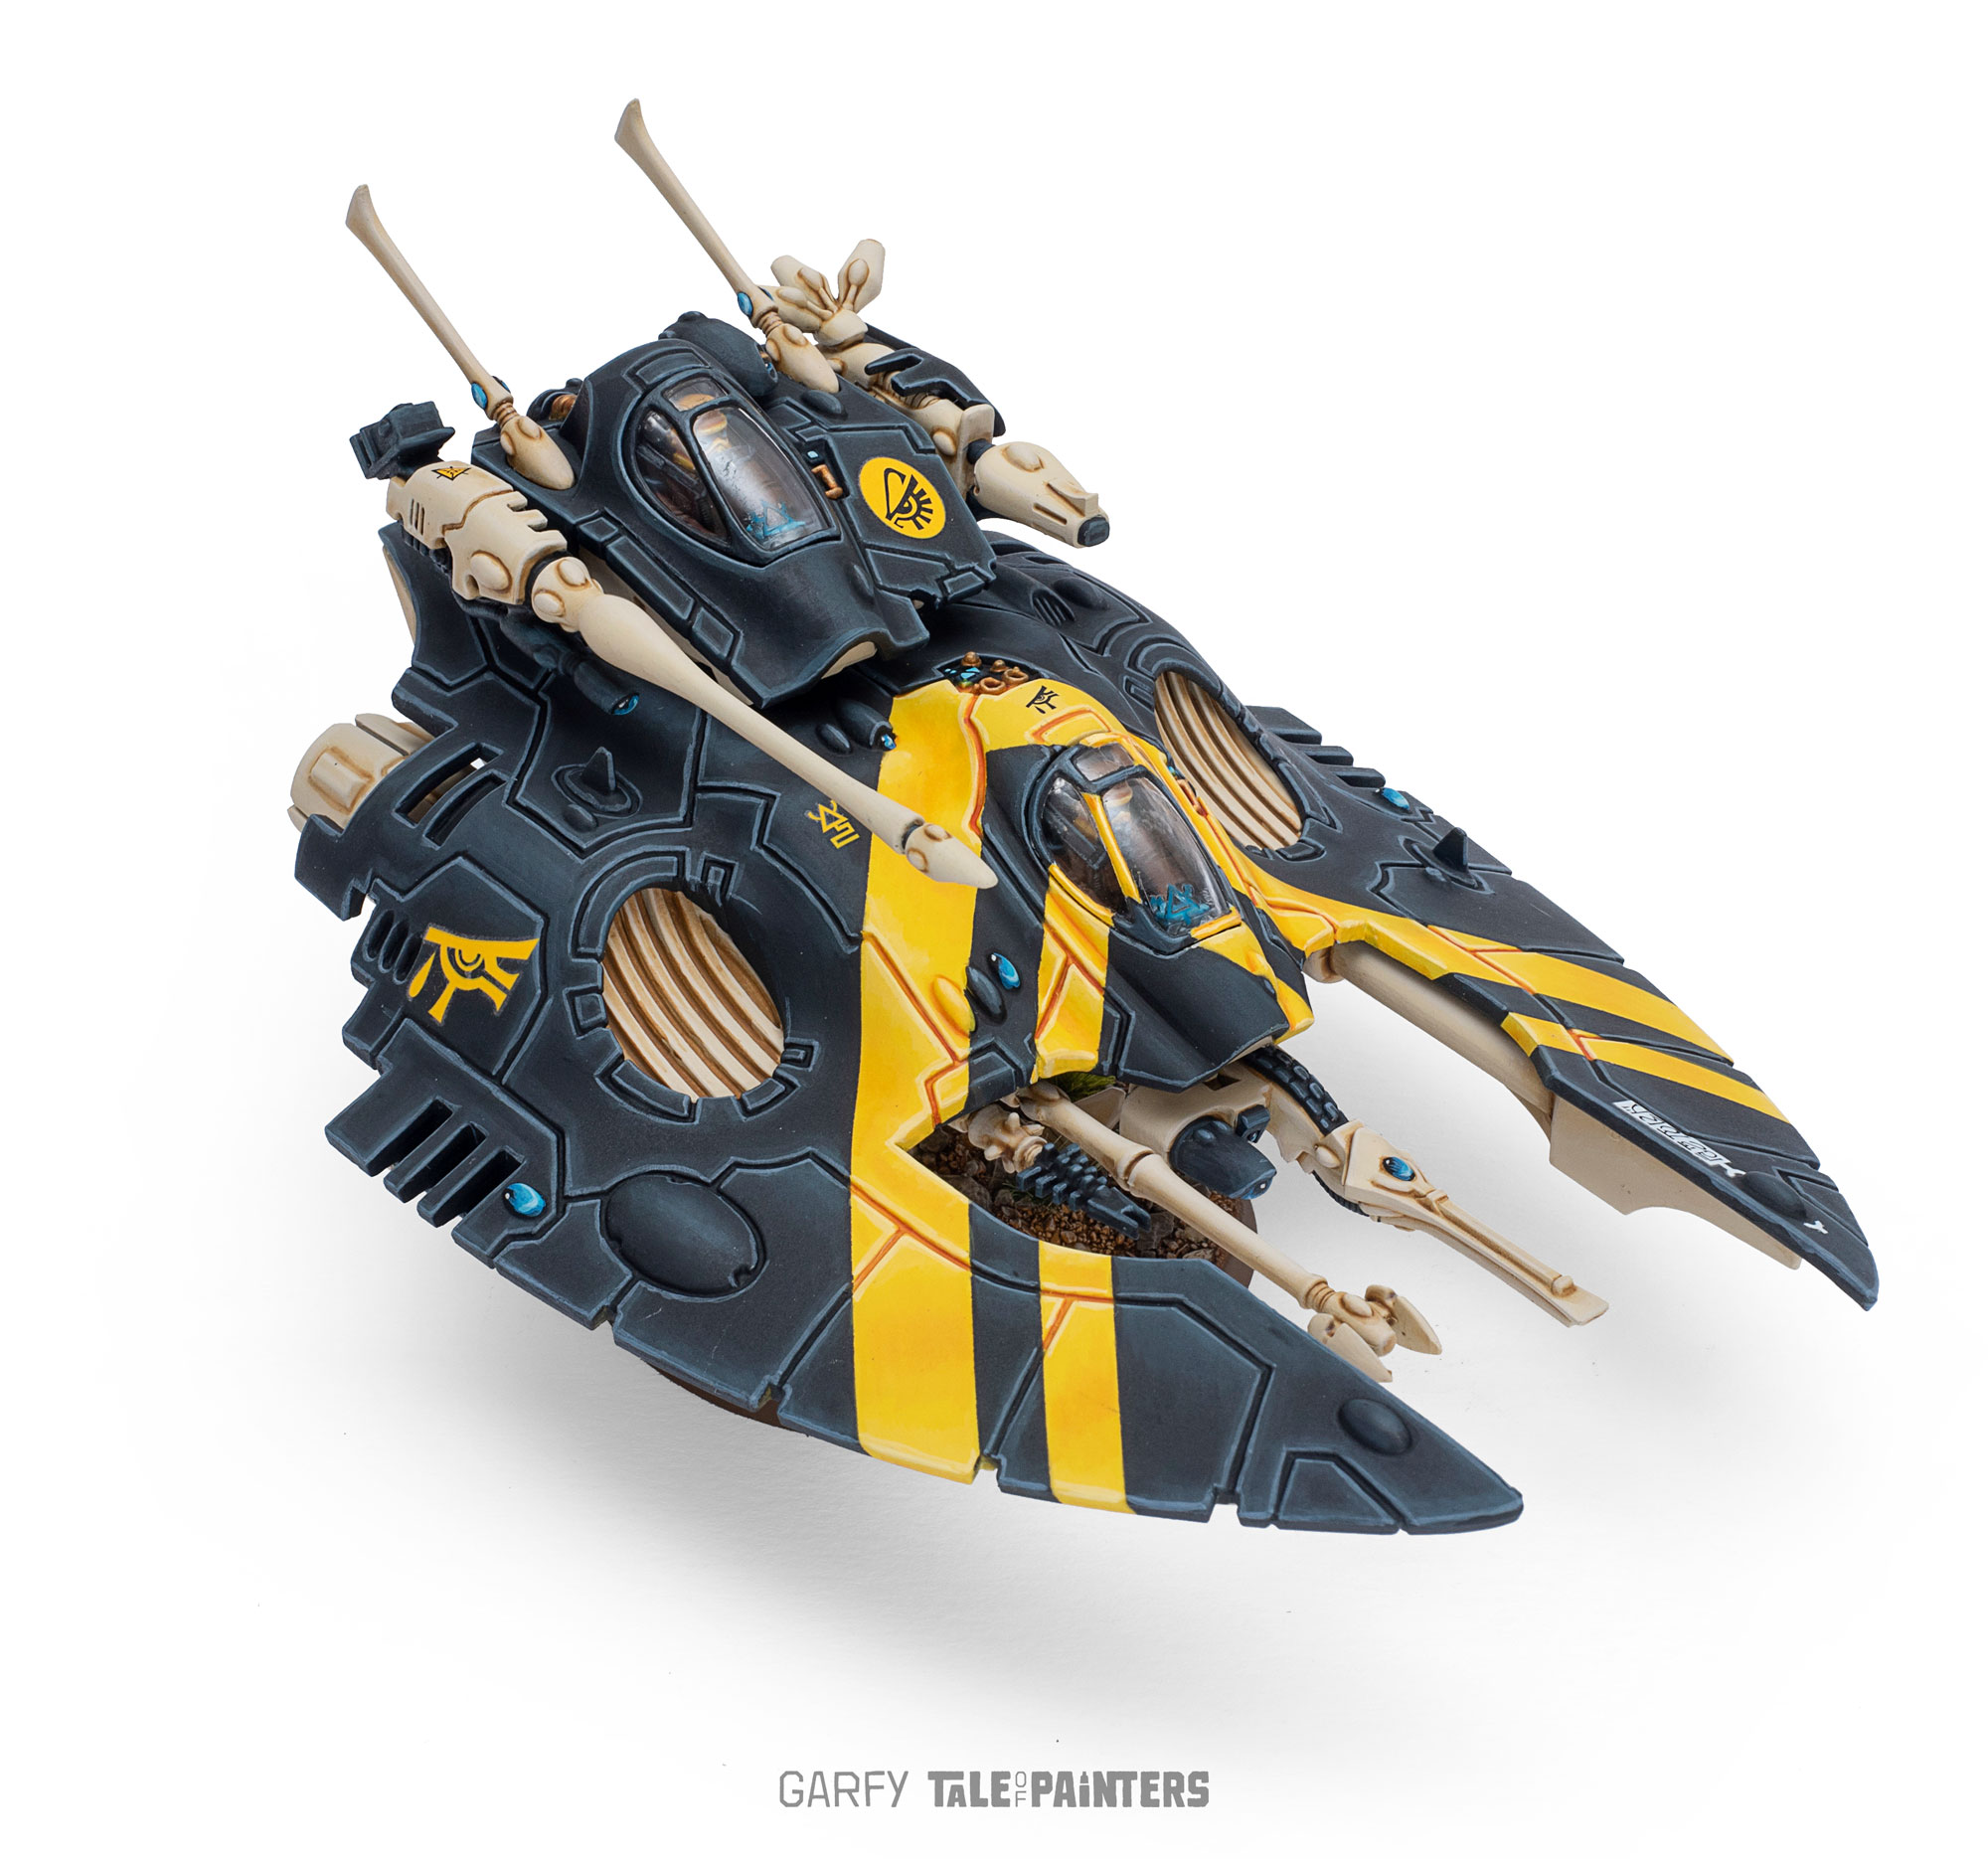
The first thing I decided to do was paint a Wave Serpent at the same time as my Falcon. This would mean I could work on one while the paint was drying on the other. I had the colours for bone, black and yellow sorted from when I painted my Fire Dragon and Swooping Hawk projects. What I needed to work out was what colours are going where. I did some research and looked at Stahly’s Wave Serpent and Darren Latham’s Falcon which gave me some huge inspiration and I used a few ideas and tweaked them, for instance I like the fact that Stahly hasn’t used any metal paints. It makes it feel more alien and Daz’s use of yellow on the black is such a pleasing nod to the 90s that I knew I wanted to do the same.

I wanted to emulate the huge chevrons on the hull of the Saim Hann Falcon that feature prominently on the box art. I decided to not glue the hulls to the chassis (they’re just resting on top in the above picture). I didn’t want to paint the chevrons by hand over the top of a black undercoat so I had to plan ahead. I purchased two different widths of Tamiya Masking Tape. I undercoated the hulls with Wraithbone spray and then airbrushed the hulls with Flash Gitz Yellow. Once dry I gave it a quick blast with matt varnish and then carefully added the lines of masking tape to the hull, making sure I pressed the tape into every recess with a finger nail to help combat paint bleeding. I then airbrushed the hulls with Corvus Black. Once completely dry I peeled the tape off to reveal the stunning yellow stripes.

Painting the pilots wasn’t the only thing that added time to the project, I also decided to do away with the clear flying stand bases and replace them for 60mm Citadel bases. Like a Druchuri warrior I raided all my bitz boxes and snatched up any Aedari looking terrain pieces. I was looking for anything tall that I could drill and insert a metal rod into. That would allow me to glue the grav tanks’ chassis to the metal rod instead of using the clear plastic stand.
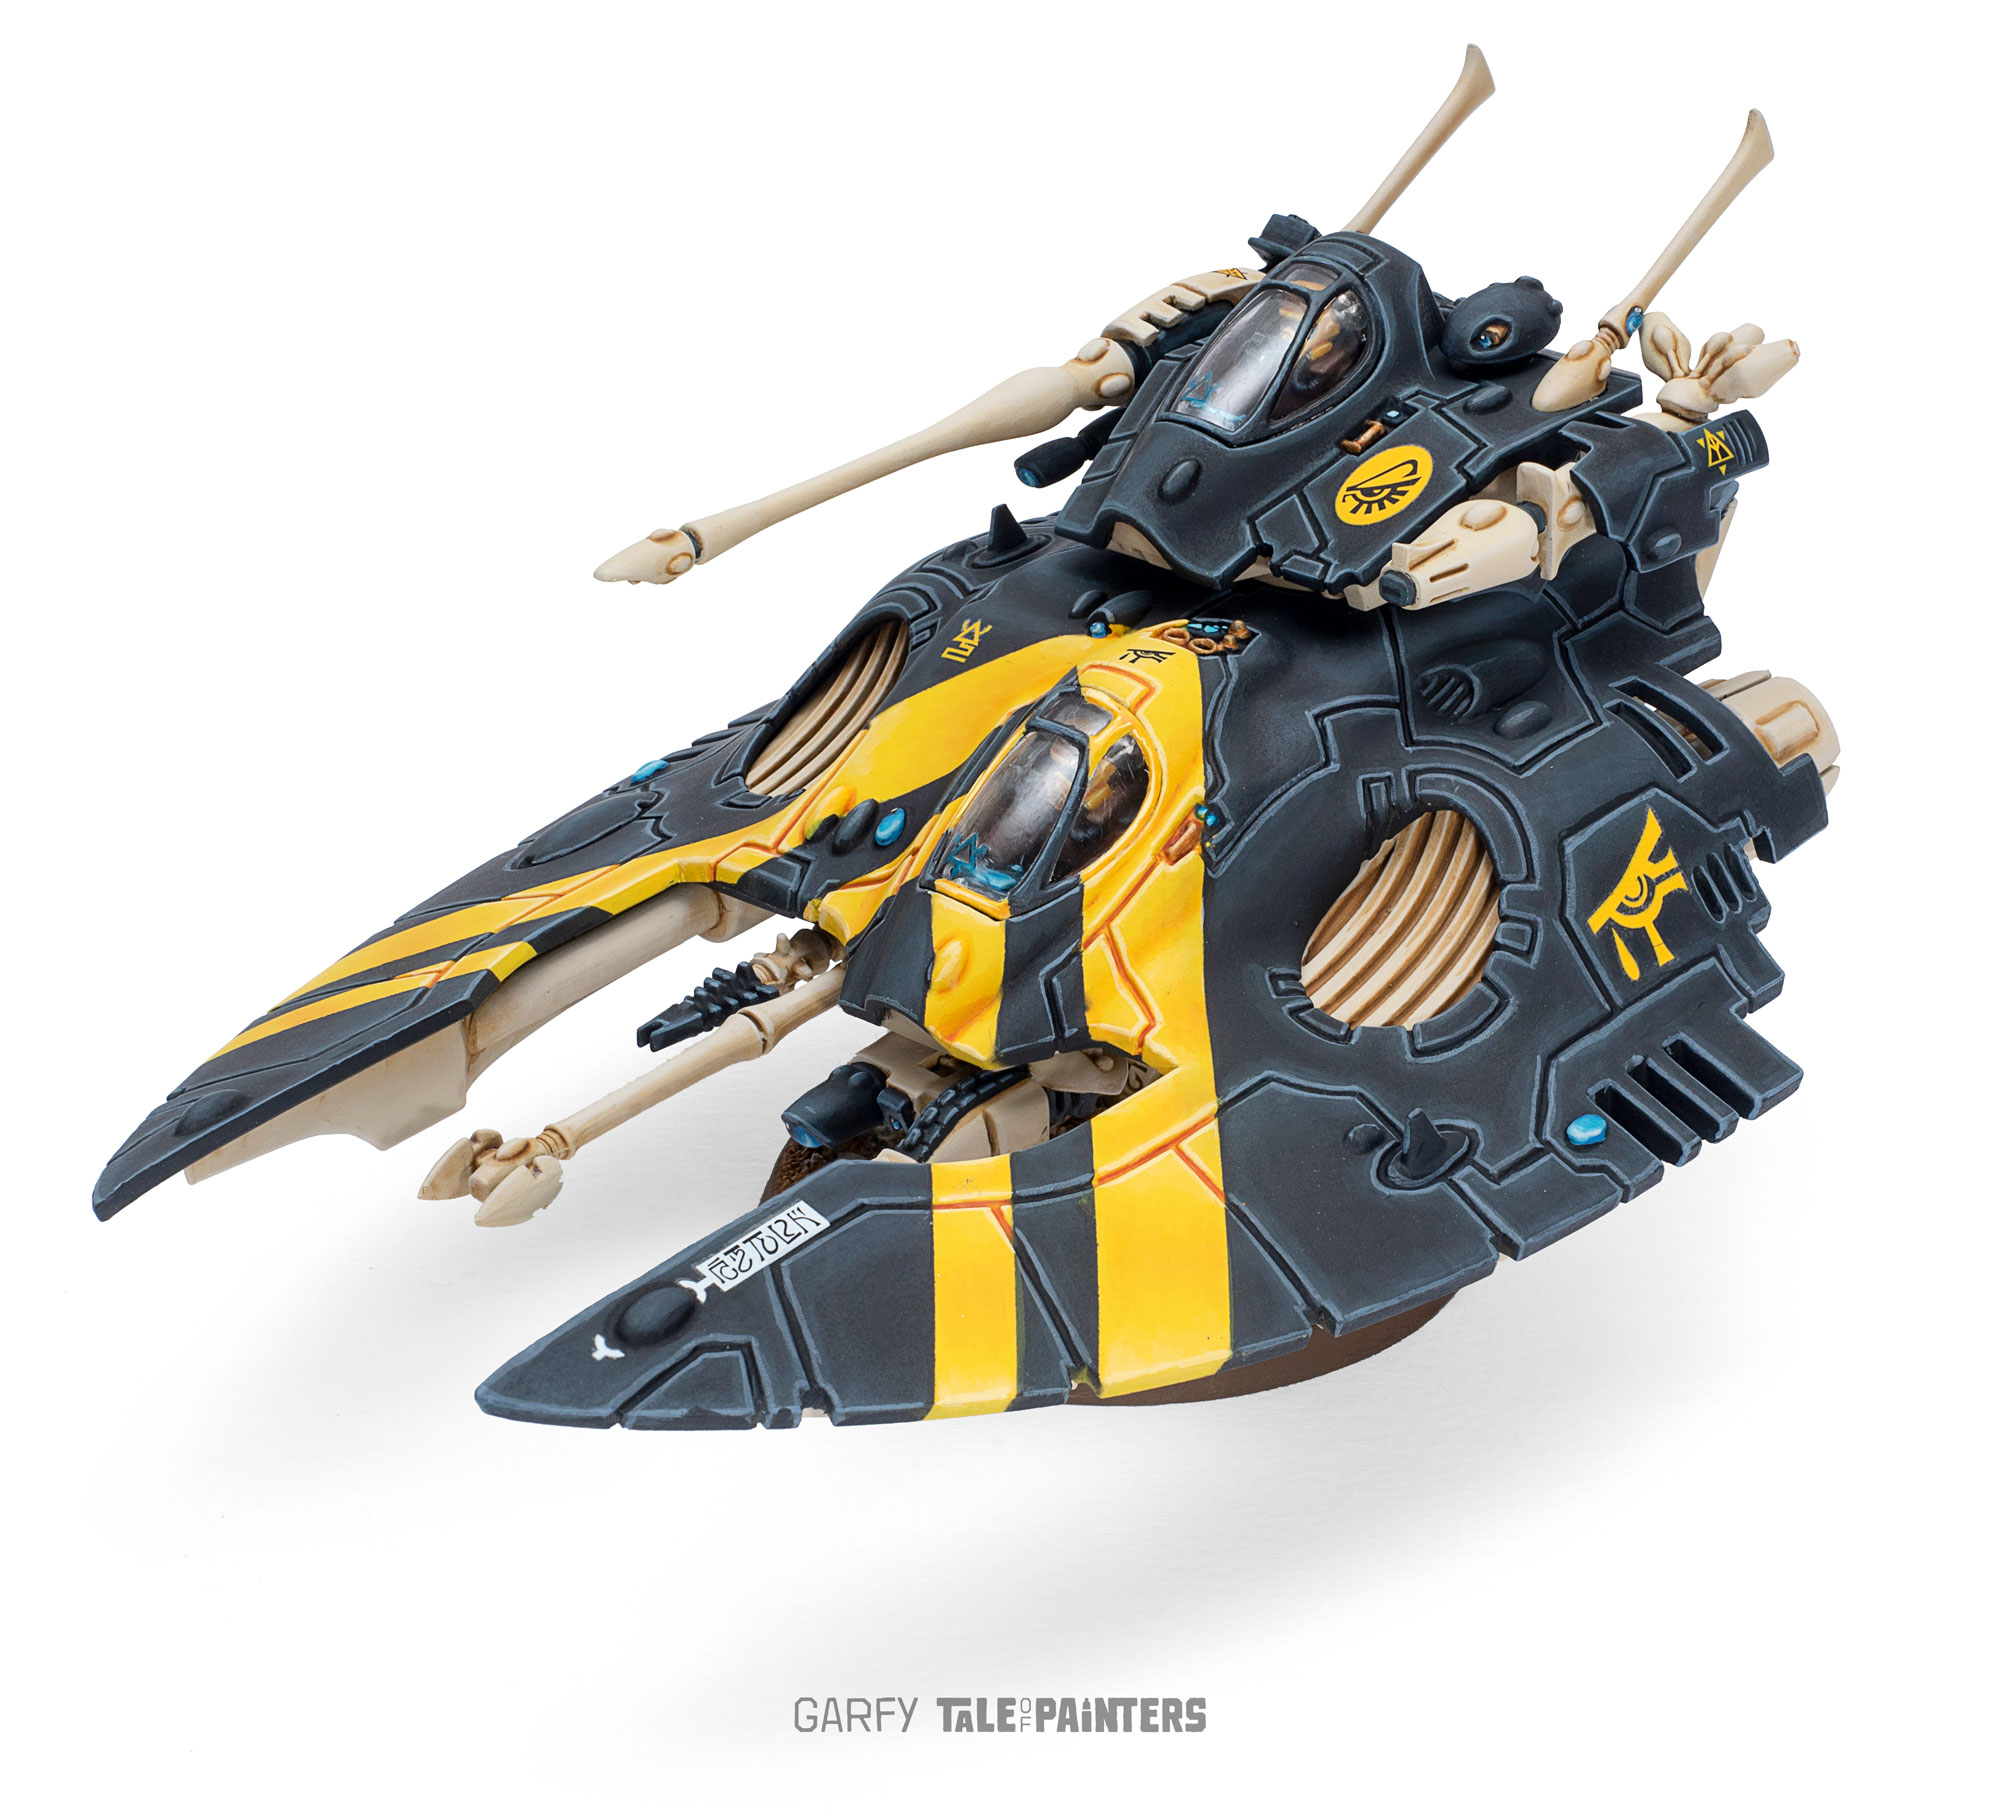
I use Winsor and Newton Matt Varnish a lot, I don’t like stray reflections or satin finishes when I photograph my models. The problem is you can’t spray clear plastic parts with varnish because it makes them go cloudy. I couldn’t fit the canopies to the build until everything was painted and varnished. The frames on the canopies needed to be painted too and they needed to match the chevron patterns. This was pretty tricky, I started by using a model file to lightly rough up the canopy frames I was going to paint. This would give the paint something to key into. if you don’t do this step, the paint just repels on the clear glossy plastic. When it came to the final assembly and varnishing, I ended up just masking off the canopies to protect them.
How to Paint Aeldari Vehicles

As I mentioned previously, I applied the base coats with my airbrush. I‘m actually not a fan of the airbrush painted look, it’s cool if you like it but I prefer the control that comes with doing it by brush. I predominately use the airbrush just as a time saving efficiency to get those base coats on quickly and smoothly. I glaze highlight the armour panels by applying lots of translucent layers of heavily thinned paint by hand. With practice, this will create smooth blends. You could use an airbrush for this. Once again, this project isn’t about saving time, it’s about doing a decent job I’m proud of in the most efficient way possible.

How long did it take to paint two Aeldari Vehicles
I should have really kept a time sheet to tell you the exact number of minutes, but I spend a few hours each day painting if I can, sometimes it’s less. I managed to finish two Aeldari tanks in 13 days from assembling to varnishing. Time is relative to the individual. Just under two weeks is fast for me.
I hope this post has been insightful, I love planning a project and executing it in an efficient way without sacrificing quality (too much). I’m unable to start painting a model without knowing what I’m doing, if it goes wrong it’s a huge waste of time for me. HoweverI do want to say, I’ve never claimed how I paint is the “correct” way. It’s my way. Art is an expression of one’s self. How you to choose to express yourself is the correct way to paint models.
Batch painting a Falcon and a Wave Serpent has doubled the number of units in my Aeldari force. Fire Dragons, Swooping Hawks, Falcon and a Wave Serpent. Not sure what I’ll paint next, maybe something to put in the Wave Serpent. Check back next week when I’ll share the finished Wave Serpent.

2 Comments
Leave a Reply
Tale of Painters is the unofficial Warhammer hobby magazine run by hobbyists like you. Support our work by using the affiliate links from our 🇺🇸 / 🇨🇦 partner stores for your next orders so we can continue to bring you fantastic FREE content every day:


Or support us directly:


Really looks stunning. I’ve been eagerly reading all your Eldar articles for this army.
Quick question: when you say broad highlight with dark reaper, is that airbrushed or brush painted? Also, did you use tape or liquid mask for the canopies and would you recommend any particular glue for the canopies to keep them from looking frosted or fogging up?
Anyway, love the work, keep it up. Im stealing… er.. being inspired by your ideas
Hi Evan, thanks for the message. The broad highlight is painted on. It’s actually thinned paint and painted on several times building up the opacity. Basically glazing. It makes for softer transitions. It’s not needed though, you can just paint on the dark reaper straight away and save yourself a load of time if you don’t mind a harsher transition.
I used tape for the canopies. Tamiya masking tape. Add the tape, then use a finger nail to push it down tight into the canopy frame, then use a scalpel to trim the excess off.
Gluing canopies should only be done with a wood glue, or a PVA glue. Don’t use poly cement or super glue.