
Hey there! You might have already spotted my Iron Warriors Saturnine Dreadnought on the Warhammer Community website. Well, now I’m thrilled to share the behind-the-scenes story of how and why I got the chance to paint it for Games Workshop. I’ve included some stunning photographs, and at the end of this article, I’ll be sharing my painting guide for the first time. So, take a look and let me know what you think!

Model was kindly supplied to me by Games Workshop. My thoughts and opinions are my own.
How do you get to paint for Warhammer Community?
Games workshop recently got in touch with me about painting something from the Saturnine Horus Heresy boxset. I had my heart set on starting an Iron Warriors Horus Heresy army, so I quickly replied with my choice of Saturnine Dreadnought from the Iron Warriors Legion. They agreed to my first choice. It took a whopping 9 days to arrive! If I knew it was going to take that long, I wouldn’t have agreed to paint it to such a short deadline. And guess what? They only sent me the Dreadnought sprues, that meant no instructions or decals! I must admit, I was a bit frustrated with the hand I’d been dealt, but hey, it’s all part of the fun!
Why the traitorous Iron Warriors though?
I’ve had this idea for a Horus Heresy project for a while. It all started back in the 90s when I had a Blood Angel army in both 40k and Epic scale. If you’ve been following my Legion Imperialis series on Tale of Painters, you’ll know that painted a large collection of Epic Scale Iron Warriors. I’ve always loved the concept of having a detachment in Legions Imperialis’ smaller scale that’s an exact replica of an 28mm scale.
Right now, these plans are a bit in shambles, but I’m hoping to pick them up again soon. Unfortunately, for now, my Horus Heresy scale Iron Warriors will only be represented by the Saturnine Dreadnought. But, I’m not giving up! I’ll keep working on it and hopefully, one day, I’ll be able start my 28mm scale Iron Warriors army properly.

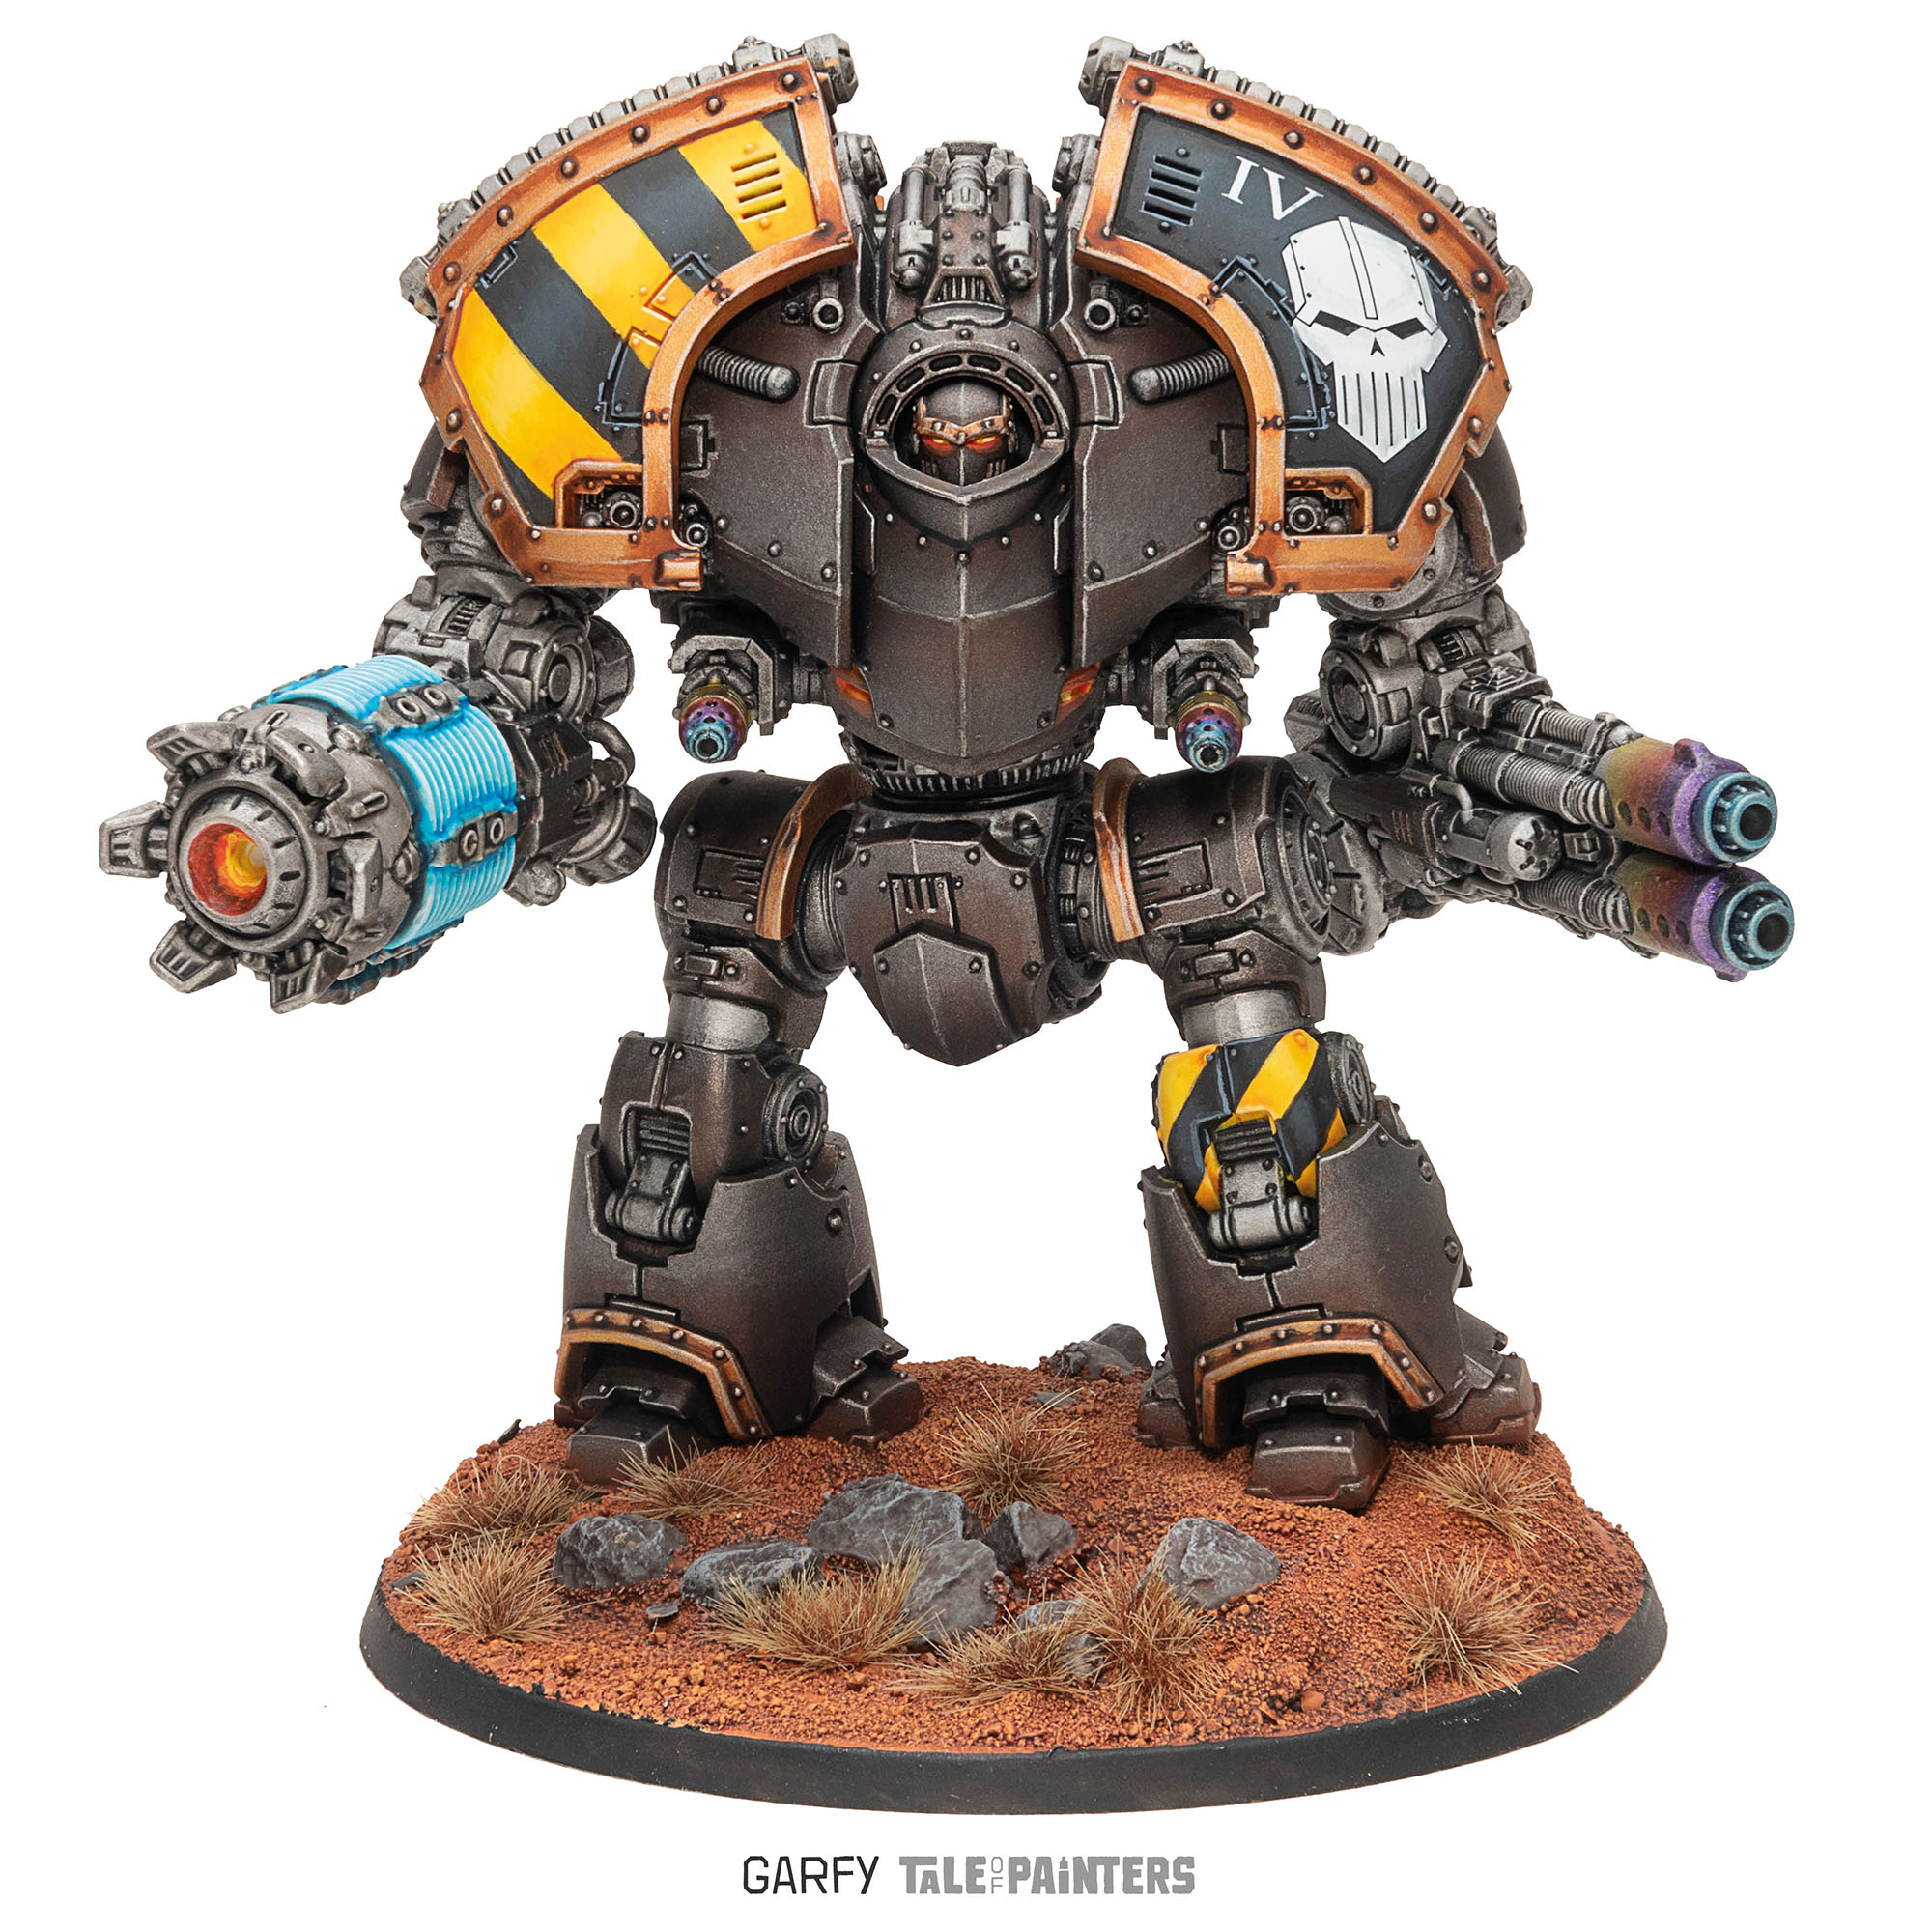
The Test Mini
When I was looking into Iron Warriors, I noticed that most of them blend into a shiny blob without much definition. The grungy, dirty silver looks too similar to the pale gold trim, which blends into the dirty yellow. I didn’t want that for my armour, so I decided to push the colours apart. The armour would be a really dark brown metal, the mechanical parts would be a bright silver, the yellow would be bright and glorious like it should be painted, and the gold trims would be a more coppery orange.

With a plan in place, I tackled a test mini and it made me realise a few things:
- Too many repeating lines in the hazard stripes looks bad. Less is more.
- Glazing Iron Warriors paint over Warplock Bronze is hard to get smooth transitions
- My mechanical parts/sword blades, needs to be shinier.
How to Paint Iron Warriors
Taking my learnings from the test mini, I was ready to paint the Saturnine Dreadnought. When assembling the model I used the kits inbuilt recesses at the joints to glue small 4mm x 1mm neodymium magnets. This allowed me to disassemble the model and paint it using the sub-assembly technique. A bonus side effect was I could change the pose for photography purposes.

Large, imposing, centre pieces benefit from at least a little more effort on their bases. I used milliputt modelling clay to raise one foot higher than the other to make it look more dynamic. Then I pushed the model down into the clay slightly so the weight of this thing looks like it’s sunk into the ground slightly. The choice of colour for the base was easy, I just matched it to my Legions Imperialis Iron Warriors. It’s also a nice contrast to the armour colour but compliments the copper and yellow parts of the model.
As I mentioned earlier in the article, I didn’t receive any waterslide transfers with the sprues, but luckily I had purchased the MKIII command squad for my test mini and the transfer sheet included in that set has a huge Iron Warrior Legion icon designed for banners. I was pretty lucky it just about fit on the pauldron.
How long did it take to paint?
So, I’ve been working on this article for over three weeks now, and it’s been a real rollercoaster ride. It all started with a test mini, then I painted the Dreadnought, took some photos, made a recipe card, and finally, I wrote this blog post. The Saturnine Dreadnought himself took up most of the time, about two weeks. I could have painted it faster, but I was feeling a bit frustrated and had to force myself to sit down and work on it. But hey, I’m glad I did! I’m really happy with the final result.
What do you think about my new Dreadnought? What would you have done differently?

2 Comments
Leave a Reply
Tale of Painters is the unofficial Warhammer hobby magazine run by hobbyists like you. Support our work by using the affiliate links from our 🇺🇸 / 🇨🇦 partner stores for your next orders so we can continue to bring you fantastic FREE content every day:


Or support us directly:


Hey Garfy, I’ve always loved your take on the scheme since I saw the model over on WarCom! Awesome work! May I ask if the recipe for the eye ornses is the same as for your T’au Sept Firewarrior? Thanks a lot, and keep slaying Grey plastic (and happy holidays!)
*eye lenses