
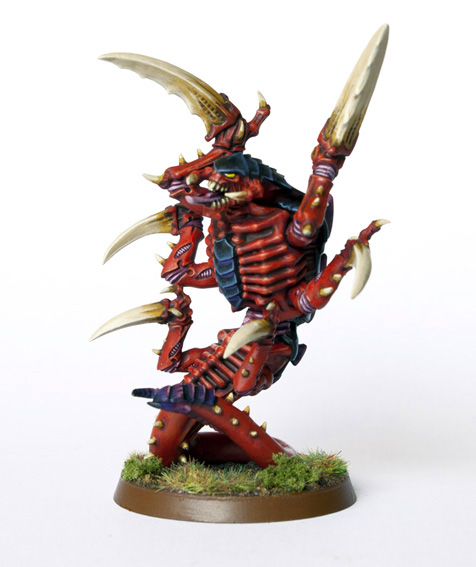
I’m pleased to present to you a comprehensive guide to painting Tyranids the Garfy way with the new Citadel Paints, including Bases, Layers, Glazes, Shades, Textures and Lahmian Medium all of which I will cover in this detailed tutorial.
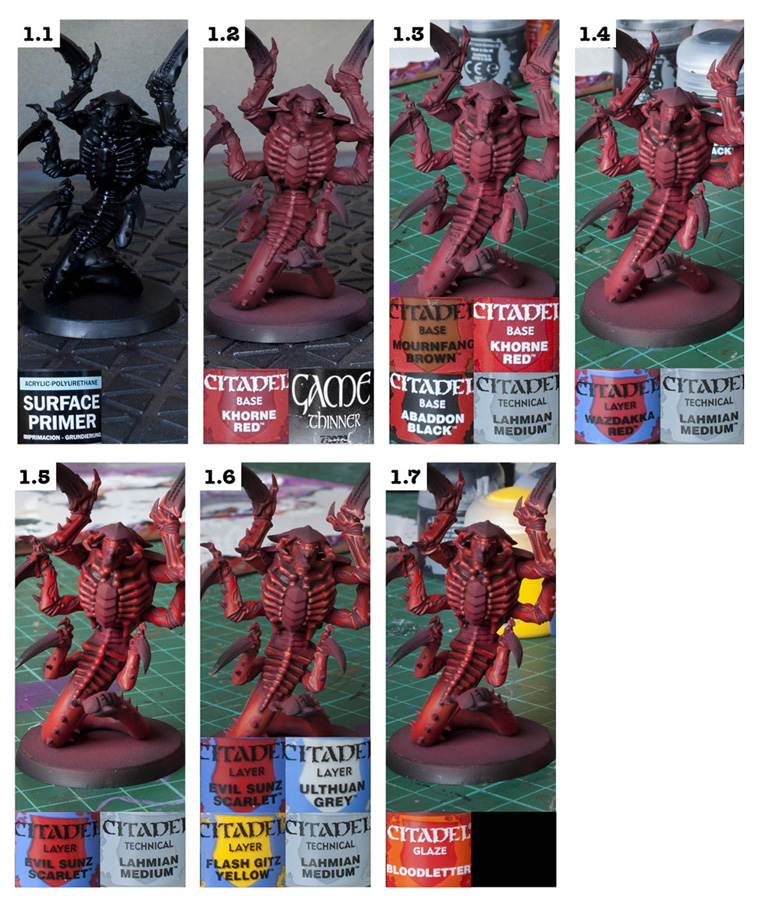
Stage 1 – Skin
Firstly, I just wanted to say I don’t paint straight from the pot. I prefer to use an old white tile and I always add water to my paints, even when I’m using Lahmian Medium (Glaze Medium).
Step 1.1
I start with a Black Undercoat. I use Vallejo Surface Primer through my airbrush. I have a separate review of this product you can see here
Step 1.2
I then Airbrush a base coat of Khorne Red onto the model. I use Vallejo thinner. The old GW paints were notorious for clogging airbrushes (0.3mm nozzle) but these new paints go through a treat. Khorne Red is a Base paint, so this will have a higher concentration of pigment, so I was worried about clogging, but it didn’t clog once. I’m really impressed by this, and it must mean these new paints use a finely ground pigment.
Step 1.3
I then shade the model with a mix of Khorne Red, Mournfang Brown and a touch of Abaddon Black and a lot of Lahmian Medium to turn it into a glaze/wash. Lahmian Medium appears to be more transparent in appearance then Vallejo Glaze Medium. It performs identically though, and I can’t tell a difference, in fact I’d say the GW one aids blending better then the Vallejo one. I then run this colour into all the recesses. I prefer using paints for washes, they have a very different surface tension.
Step 1.4
I then highlight with Wazdakka Red with some Lahmian Medium added. This make the paint silky smooth and it flows off the brush lovely. No drag, no bristle marks. Blends lovely on top of the previous layer too.
Step 1.5
I repeat step 1.4 with Evil Sunz Scarlett. I wouldn’t describe this paint as scarlett. It’s more like the old Blood Red despite GW claiming it’s the replacement colour for Scab Red.
Step 1.6
I then add some tiny highlights on the raised areas using a mix of red, yellow, white and Lahmian Medium. I would do better with Fire Dragon Bright + some Scar White, but hadn’t purchased any yet.
Step 1.7
I tone done the bright highlights using the Bloodletter Glaze. This doesn’t feel like a Shade (wash). The washes shade recesses, this glaze seems to colourise all areas including raised areas with a strong vibrant tone. It’s really good for changing the colour of something, in this instance toning down the highlights.
Stage 2 – Carapace
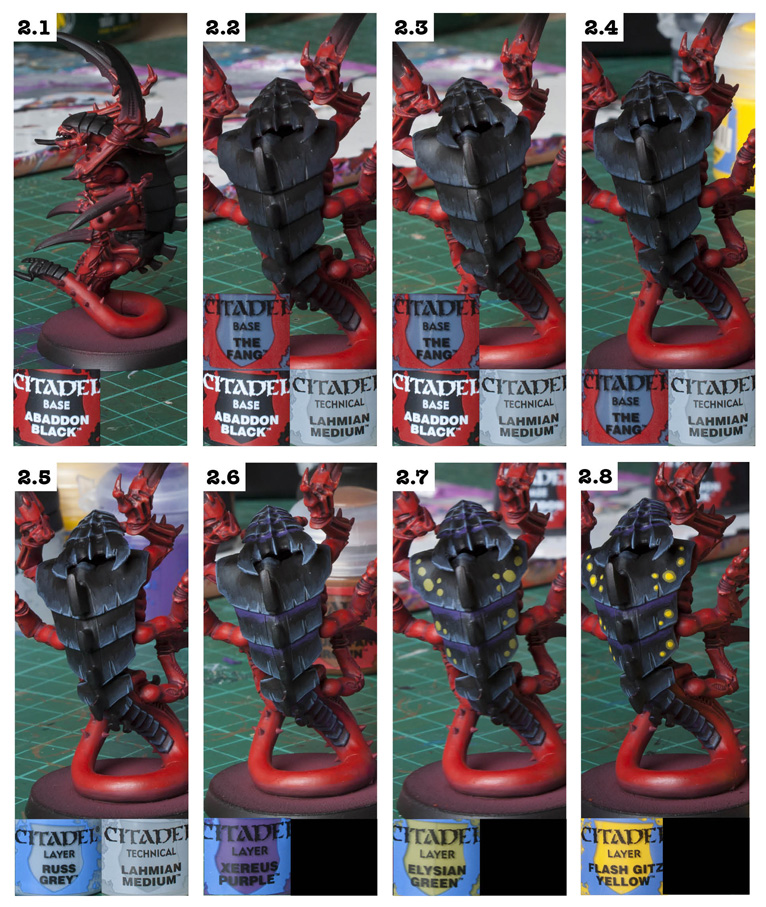
Step 2.1
I tidy up the carapace with Abaddon Black.
Step 2.2
Mixing a touch of The Fang into Abaddon Black I highlight the edges of the carapace with a feathered layer. Once again I use plenty of Lahmian Medium to aid blending.
Step 2.3
I repeat step 2.2, adding a little more of The Fang colour.
Step 2.4
At this stage I’m just painting on The Fang and Lahmian medium on the edges.
Step 2.5
Final edge highlight of Russ Grey with a touch of Lahmian to help the flow of the paint. Having a fluid smooth paint helps with fine, fiddly work. If your paint is thick then you tend to have to drag the brush, and that leads to mistakes.
Step 2.6
I paint some Xereus Purple into the recesses of the carapace, just to help break up all that black and make it appear a little more alien.
Step 2.7
Using Elysian Green I add the spotting to the carapace. This is a solid colour that goes on with one blob.
Step 2.8
Flash Gitz Yellow has a good concentration of pigment and it covers the green in a single thick coat. Because it’s a circle, I don’t mind blobbing it on. At this point it’s a good idea to paint the eyes. I forgot to and had to do it at the end.
Stage 3 – Purple and Pink bits
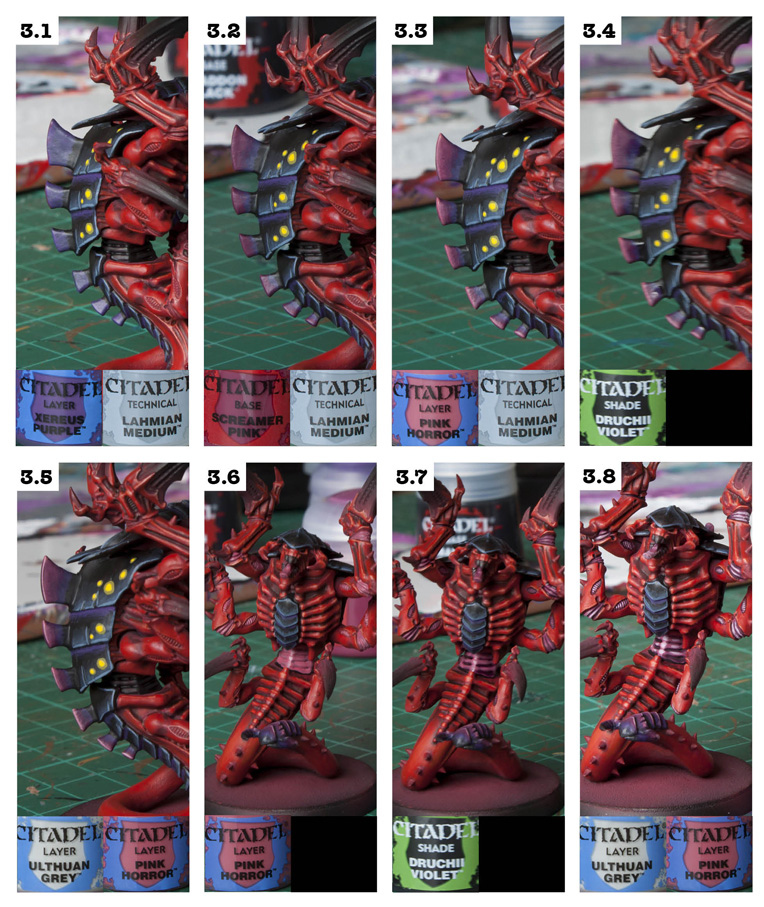
Step 3.1
Xereus Purple is used as the foundation of the blend on the back spines.
Step 3.2
Screamer Pink is the new Warlock Purple and I’m not convinced by it. It’s the only paint I don’t like the colour of. It’s a darker tone and is less vibrant then the last paint, this is probably because it’s a Layer paint. Using Lahmian Medium I feather blend the edges making sure I leave the Xereus Purple showing through.
Step 3.3
I then repeat the above stage but with Pink Horror and making sure I leave some Screamer Pink showing. Once again I feel this paint is a bit too dull and dark for this stage.
Step 3.4
Druchii Violet is a one of the new shade paints replacing the old Citadel washes, but I found this paint to behave exactly the same as Leviathan Purple wash. I used Druchii Violet to blend the layers together.
Step 3.5
Final edge highlight of a 50:50 mix of Pink Horror and Ulthuan Grey (any white shade will do, this is the only one I had)
Step 3.6
Using Pink Horror, I paint all the soft squidgy parts between the red skin. This paint goes on in 2-3 coats.
Step 3.7
I then heavily wash these areas with Druchii Violet. This shade dries matt like the old Citadel Washes and still adds good shading to the deepest recesses.
Step 3.8
50:50 mix of Pink Horror and Ulthuan Grey is used to carefully highlight the pink bits. This can be delicate work, especially on the arms.
Stage 4 – Bone Claws and Basing
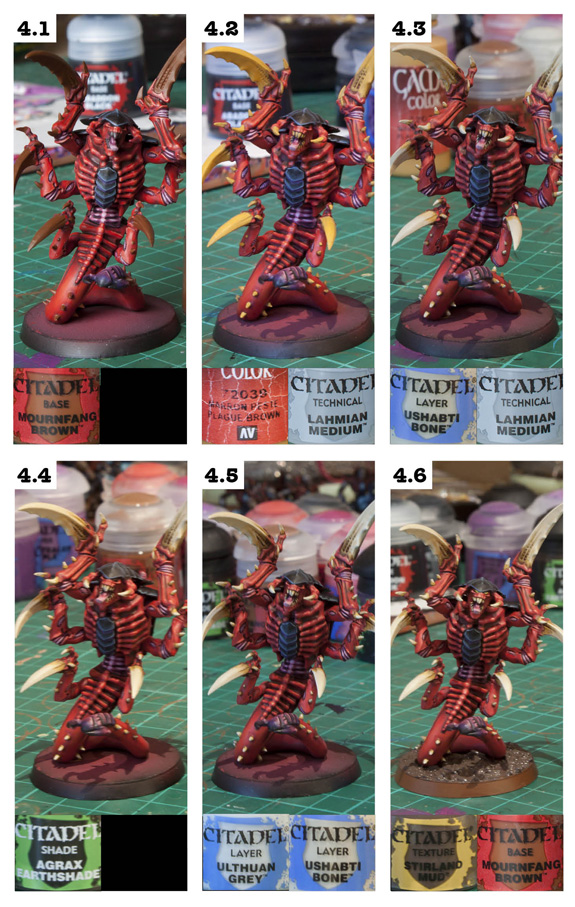
Step 4.1
I paint the claws using the Base colour Mournfang Brown. It’s a heavy thick paint, but is still smooth and covers evenly, even though I didn’t use Lahmian Medium.
Step 4.2
A Vallejo paint has snuck into the review! Sadly it’s one of the colours I forget to pick up… I guess I was too excited. I used plague brown as an intermediate colour between Mounfang Brown and Ushabti Bone. It yellows the claws a little and makes them look a little more aged I think. In future I will use Balor Brown and then Zamesi Desert.
Step 4.3
Now I paint on pure Ushabti Bone and some Lahmian Medium is used to blend the claws up to pure bone. This medium really helps at this stage. I found the bone colour layer smoother then the Vallejo equivalent and it’s less patchy when painted on. In just 3 coats it’s a solid colour with soft edges layered on top of the previous layers.
Step 4.4
I use Agrax Earthshade to shade some of the recesses on the claws. I did a few light coats of this instead of flooding it. This is a better way to blend with washes.
Step 4.5
Final edge highlight with a 50:50 mix of Ushabti Bone and Ulthuan Grey (any light white colours is fine)
Step 4.6
I painted the base with Mournfang brown, and once that had dried I painted the top of the base with one of the new texture paints – Stirland Mud. People say it’s a new faster way to base your models, but I disagree. It takes forever to dry. It’s a nice effect for lumpy mud though. I quite like it, it looks more realistic then perfectly flat sand on a base.
Final thoughts…
I recently spent a month painting a Tyranid Hierophant (seen here), and I felt like I never wanted to paint another Tyranid for a very long time. Then I heard about the new range of paints from Games Workshop and I genuinely got excited about the prospect of trying out some new paints and refining my paint scheme even further. I’m now anxious to paint more Tyranids.
These are great paints, and if I’m honested. I prefer the feel of them to my beloved Vallejo paints. They’re really smooth and I have had no separation problems like I have with Vallejo and no more blocked nozzles, or squirting out too much paint and wasting it, or a crusty build up around the rim (stop sniggering). The flip tops are cool now they stay open with their little stopper hinge thingy.
Do you like our tutorials and reviews? Here is what you can do to support us: Disable your Ad Blocker or place your next Wayland Games order by clicking here or on the banner on the right. Thank you very much, we appreciate any help to keep us going!

11 Comments
Leave a Reply
Tale of Painters is the unofficial Warhammer hobby magazine run by hobbyists like you. Support our work by using the affiliate links from our partner stores for your next orders so we can continue to bring you fantastic FREE content every day:


![]()
![]()
Or support us directly:


THE O.G!!! love this! Hive Fleet Dendrobates for the alien win!!!
Seems like the Genestealers and Broodlord you painted up for Space Hulk (http://taleofpainters.blogspot.com/2012/10/showcase-space-hulk-broodlord-and.html) seem to be of a lighter color and have a little more pink in them than the rest of your Tyranids. Are these representative of your army? I'm asking because I really like the darker version. Could you compare the two different Genestealers, if there are two types.
Thanks,
StevePhy
Another great article. Find myself visiting this site most days now.
Pleased to hear the new paints airbrush well as I've a boatload on order and I've just started messing about with the old airbrush.
If I may enquire, what ratio is your paint:thinner mix and are you using water or a medium?
ps (no) thanks to you I ended up getting the Vallejo primer 😉
Splendid tutorial, I've been waiting for one for the new paints. It all sounds wondrous, GW really are playing a blinder these days.
That format is one of the best tutorials I have seen.
I have been promising a Grey knight tutorial for a while now… I'll see if I can get the paints I need at the weekend and work on the tutorial then. No promises, but we'll see what I can do. If I do it, it'll be in the same layout as above? Is that ok with you guys?
That is awesome. How about a Grey Knight Tutorial witht he new paints?
This is seriously beautiful work, and possibly the most useful article on step-by-step painting I've see online!
Great stuff, sir.
I've just realised that model has a facehugger on it's chest! WHAAAAAAATTTTT! =O) hehe
Anyway, that aside. Great write up and very easy to follow guide. Great work once again!
Indeed great write up Garfy! Good to hear that this new range is better than the last in many ways. Also interesting to read about the Airbrush flow ability. Always had problems with the foundation ranges myself also, so will be nice to get ahold of some of these and give them a go. Especially the reds..
Cheers
Great write-up and fantastic tutorial 🙂 Finally glad to see a very positive review of the paints, I absolutely love them to bits so far, it's provided a new learning curve for us all to master 🙂