To celebrate the release of the Sisters of Battle Codex for the 10th edition of Warhammer 40.000, I’ve created an extra detailed tutorial for The Order of the Golden Light. This is perfect for all kinds of models in golden armour, such as Stormcast Eternals or Adeptus Custodes (regardless of gender). In this tutorial, I also explain how to paint details like leather, cream-coloured robes, and purity seals, which are universally useful.
The model shown is Sister Tariana Palos, a limited edition model from the Commemorative Series and unfortunately no longer available. However, the colour scheme can be applied to all models in the Adepta Sororitas range.
This tutorial assumes that you are familiar with the fundamental techniques of painting Warhammer miniatures. I will guide you step-by-step through the paints and techniques I utilized. Since my paint collection is quite varied, I will offer suitable alternatives from the current Citadel paint range [in brackets] whenever I use a paint that is not from Games Workshop or is out of production. However, if your goal is to replicate the exact outcome displayed, I suggest expanding your paint collection.
You’ll find a list of all the paints used in this tutorial at the end of the post.
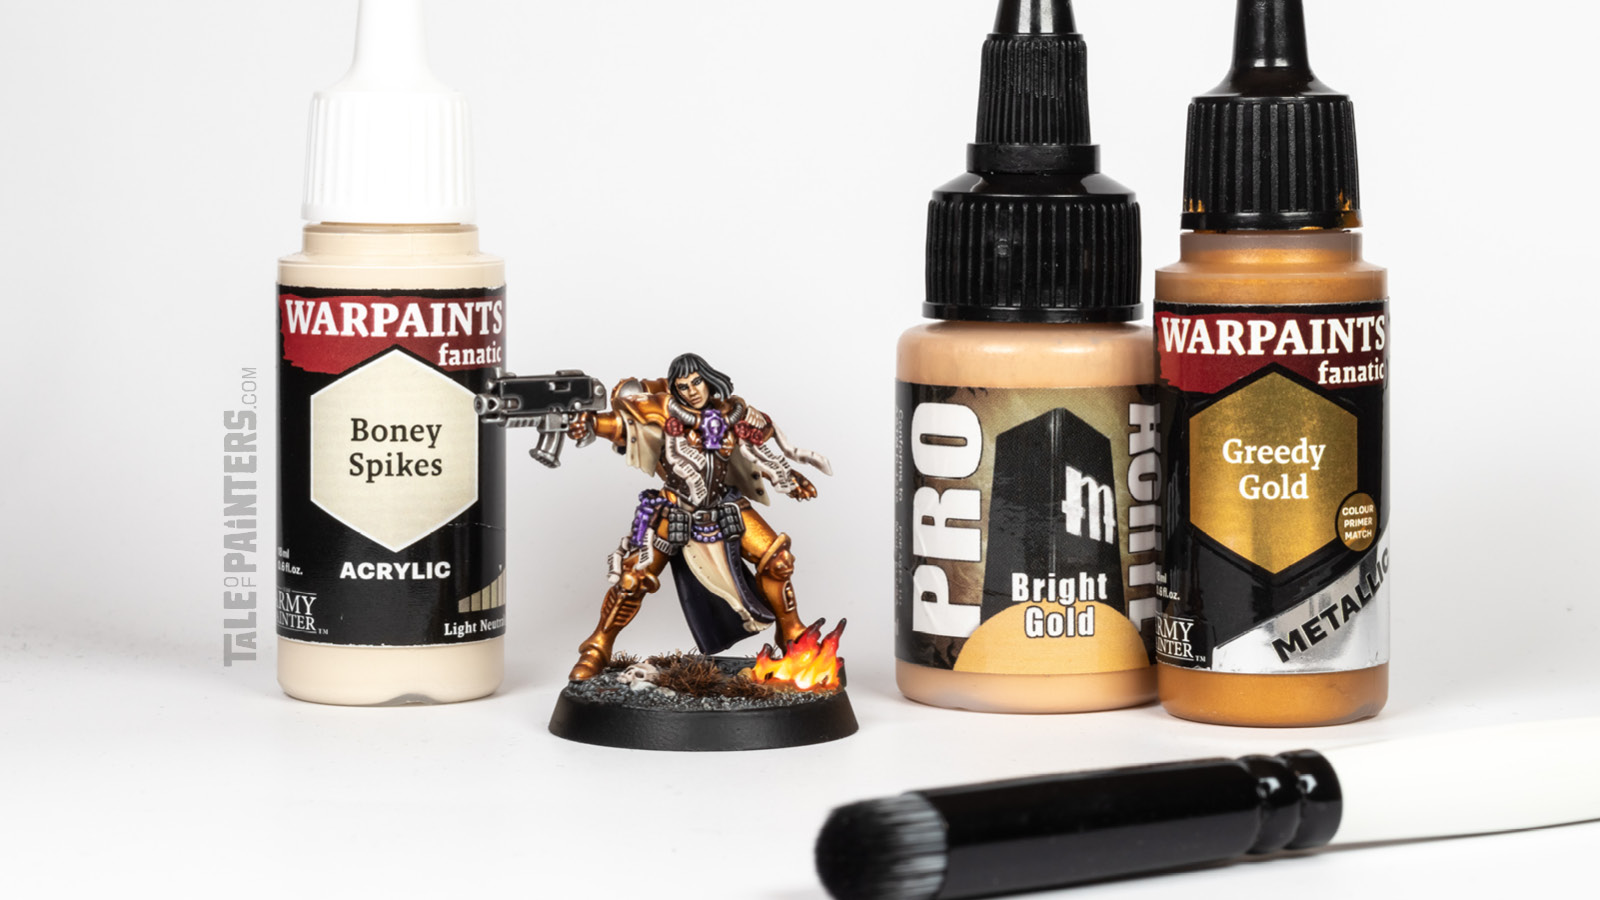

How to paint Sister Tariana Palos
Base & golden armour
While painting this model, I kept the base, body, and head separate.
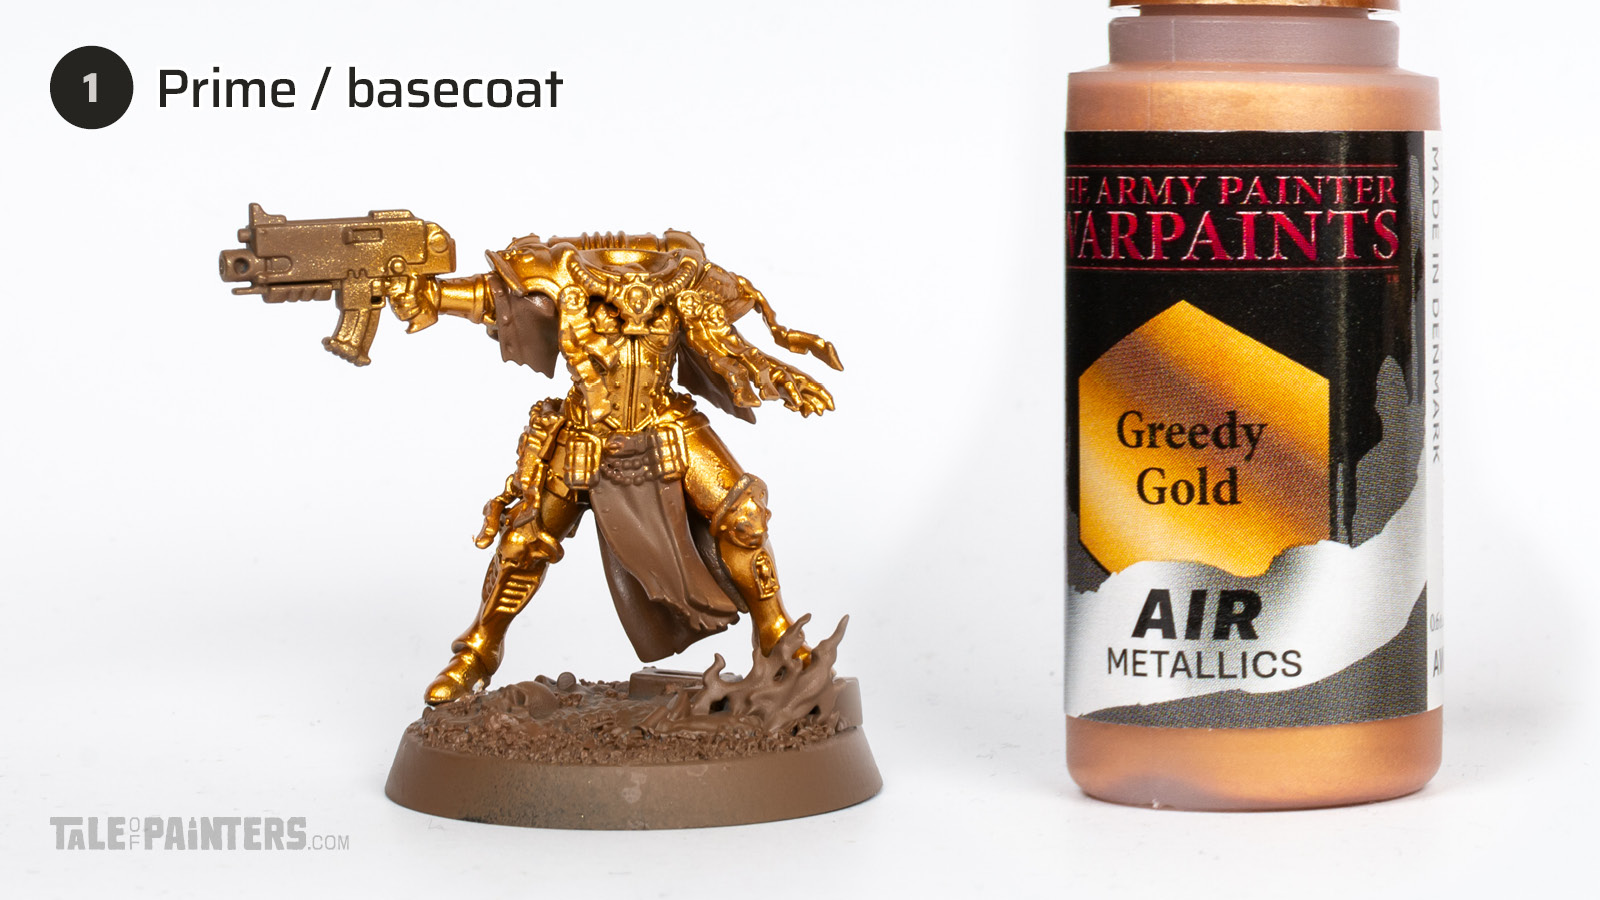

Prime the model (sans the head) with The Army Painter Colour Primer Leather Brown. Then, spray the armour with Warpaints Air Greedy Gold [or apply a couple of thin layers of Warpaints Fanatic Greedy Gold or Retributor Armour with a brush].
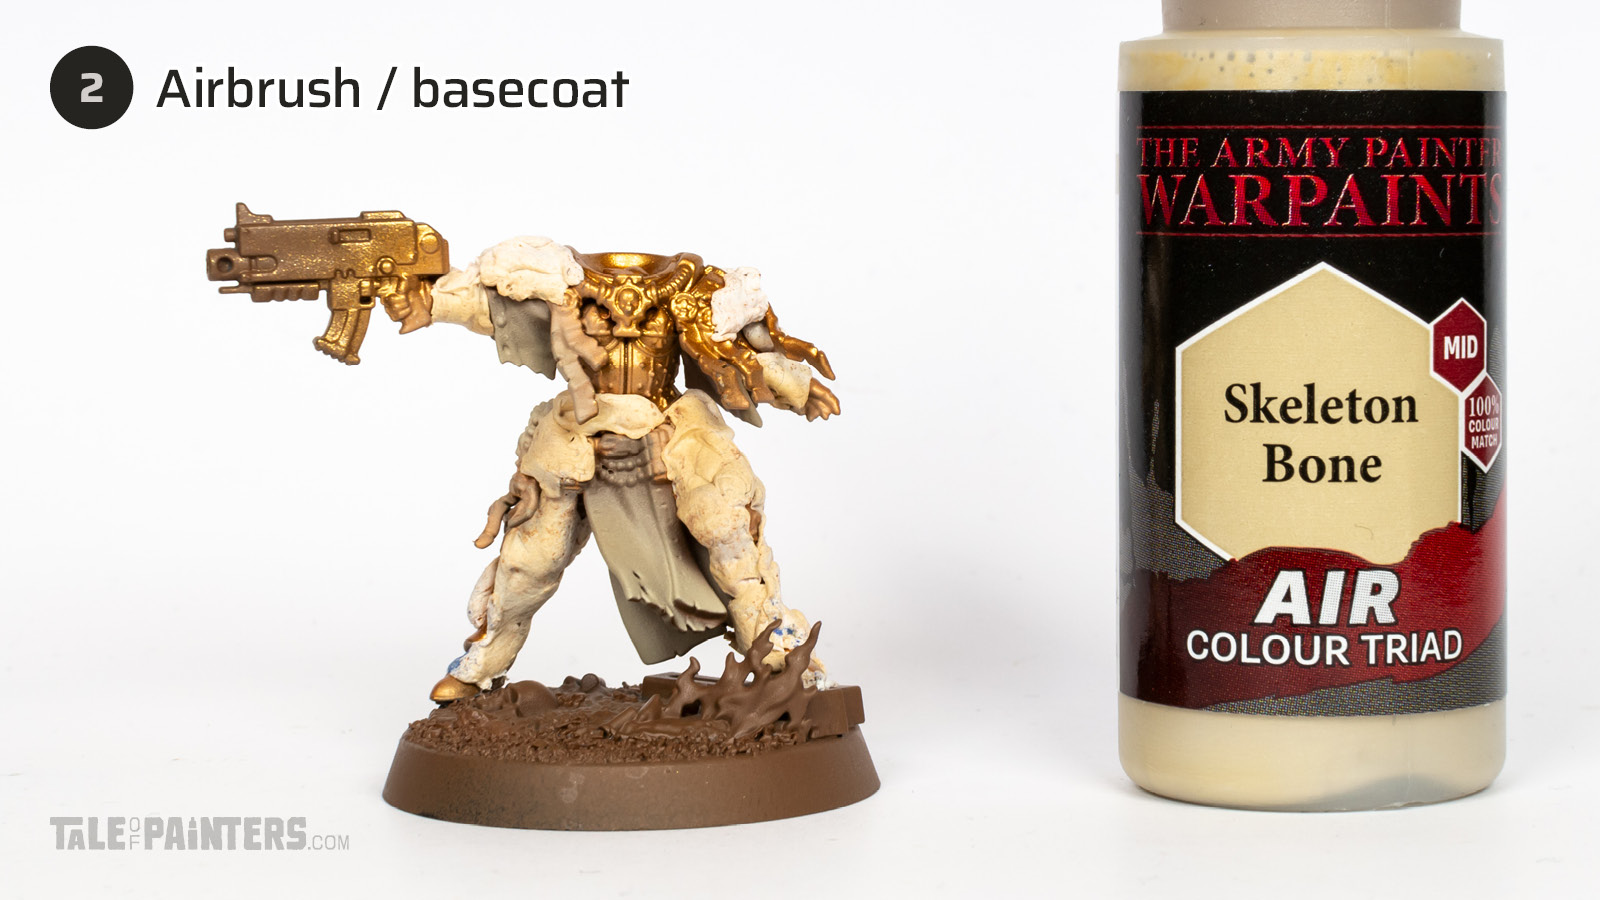

Spray the robes with Warpaints Air Skeleton Bone. This is optional but makes basecoating the robes a bit easier later on.
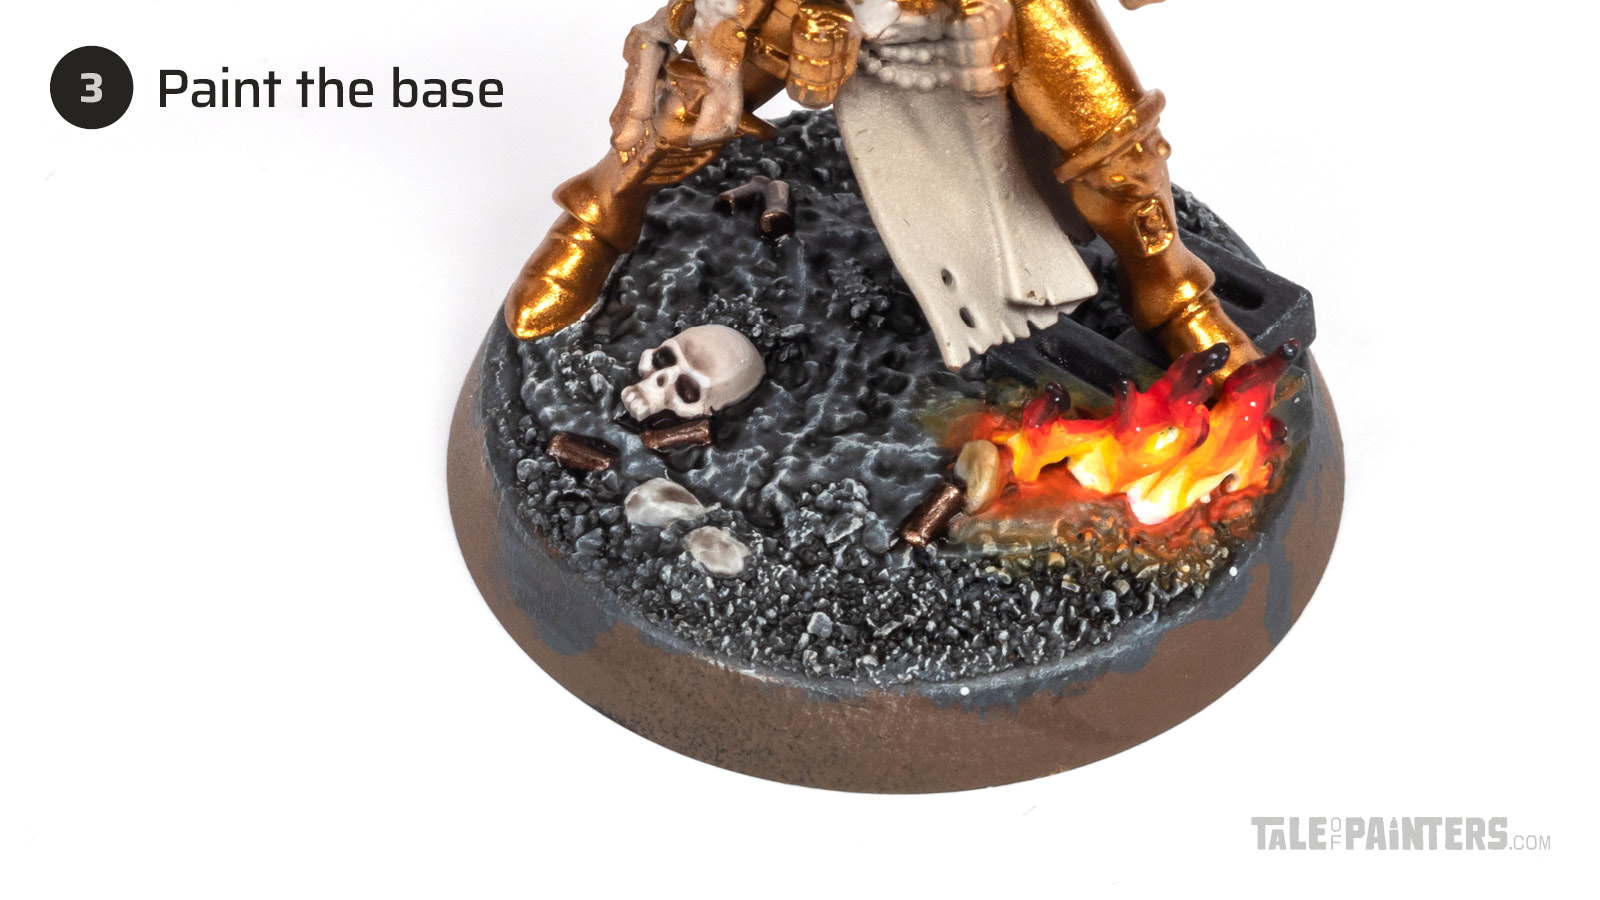

Basecoat the texture of the base with Mechanicus Standard Grey, then drybrush with Corax White. Mix Warpaints Fanatic Strong Tone Wash [or Agrax Earthshade] and Dark Tone Wash [or Nuln Oil] 1:1 and thin this mix with a little bit of medium. Wash the texture of the base.
Patreon bonus content: An expanded version of this tutorial that explains how to paint the scenic base and the flames can be found here.
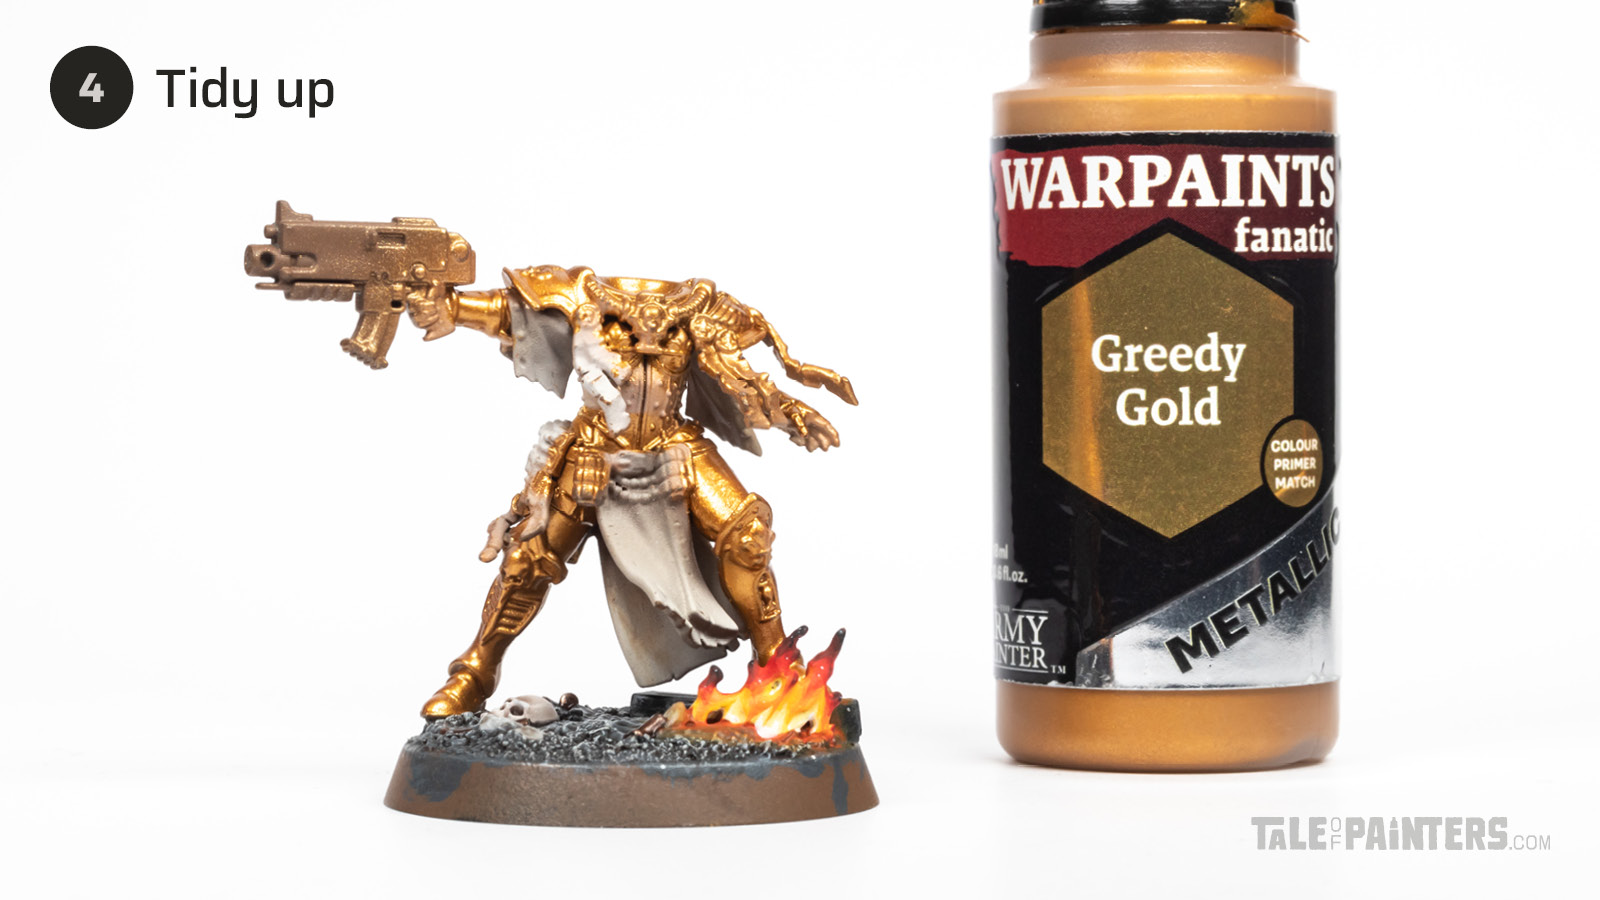

Paint any parts of the armour the airbrush didn’t catch with Warpaints Fanatic Greedy Gold [or Retributor Armour].
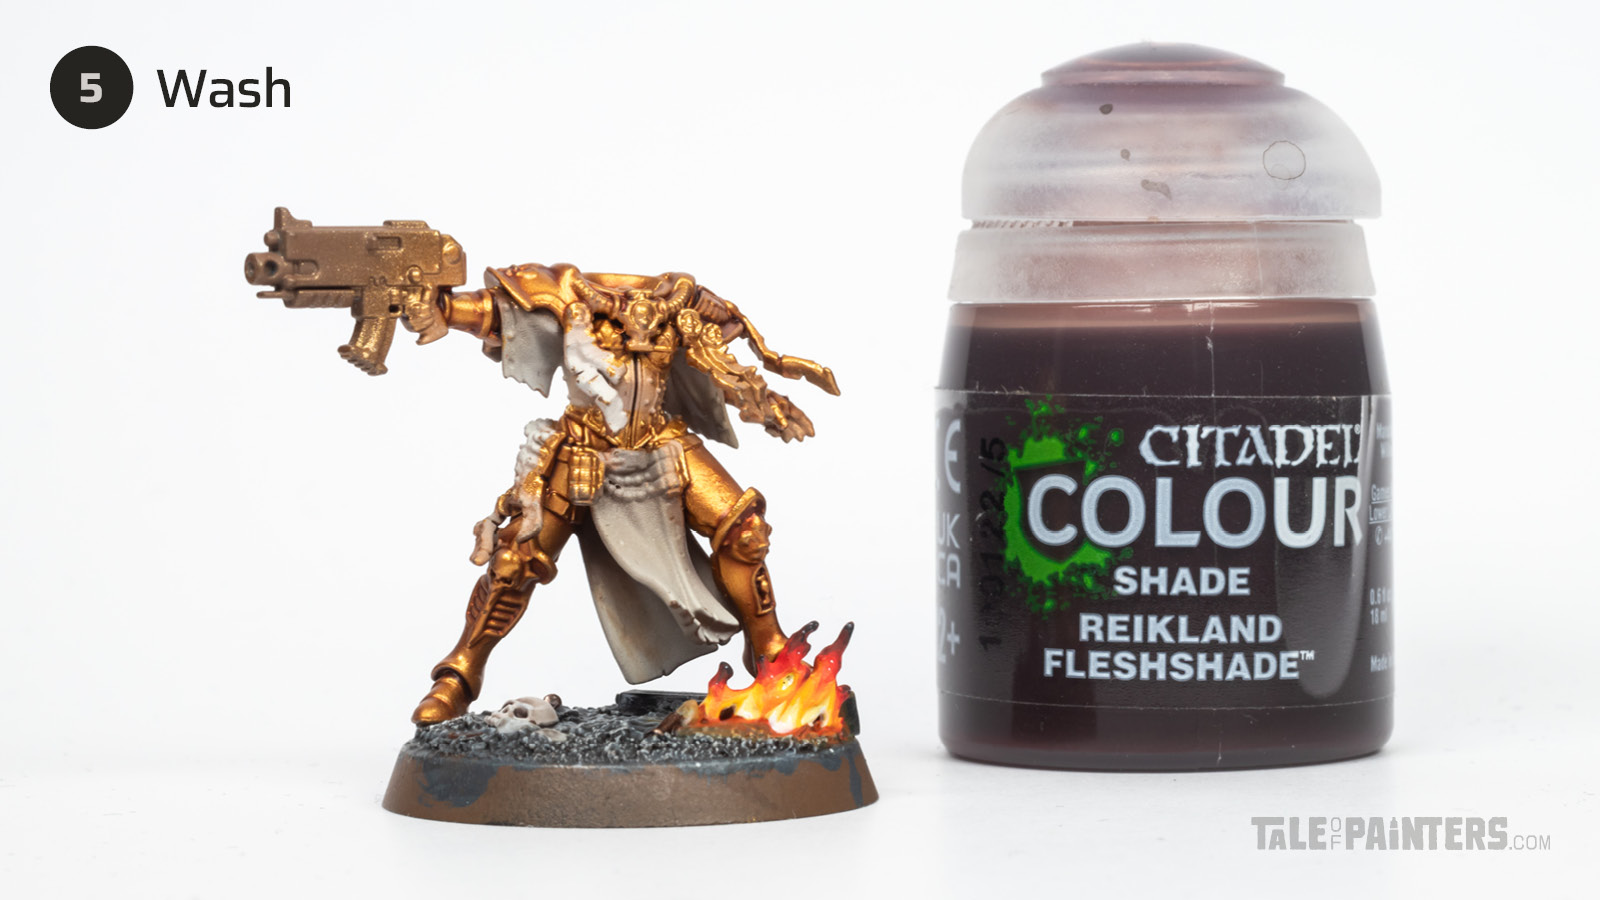

Wash the armour with Reikland Fleshshade. Make sure to soak up any excess with a clean brush, I recommend keeping the model in a vertical position while drying so that gravity doesn’t pull the wash towards the feet.
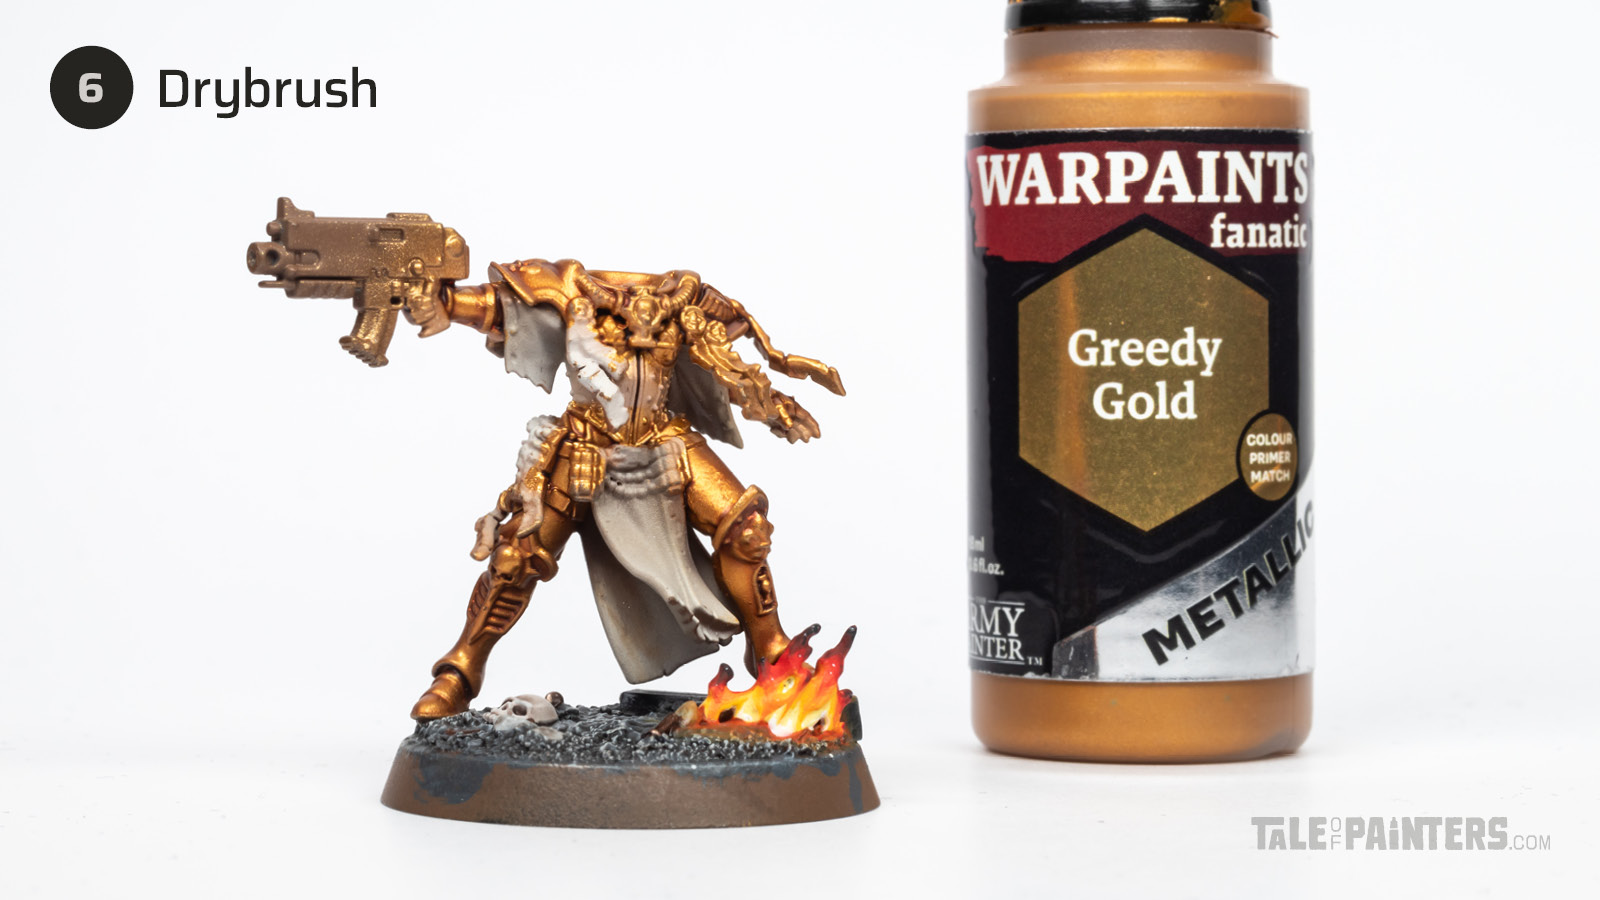

Drybrush the armour with Fanatic Greedy Gold [or Retributor Armour].
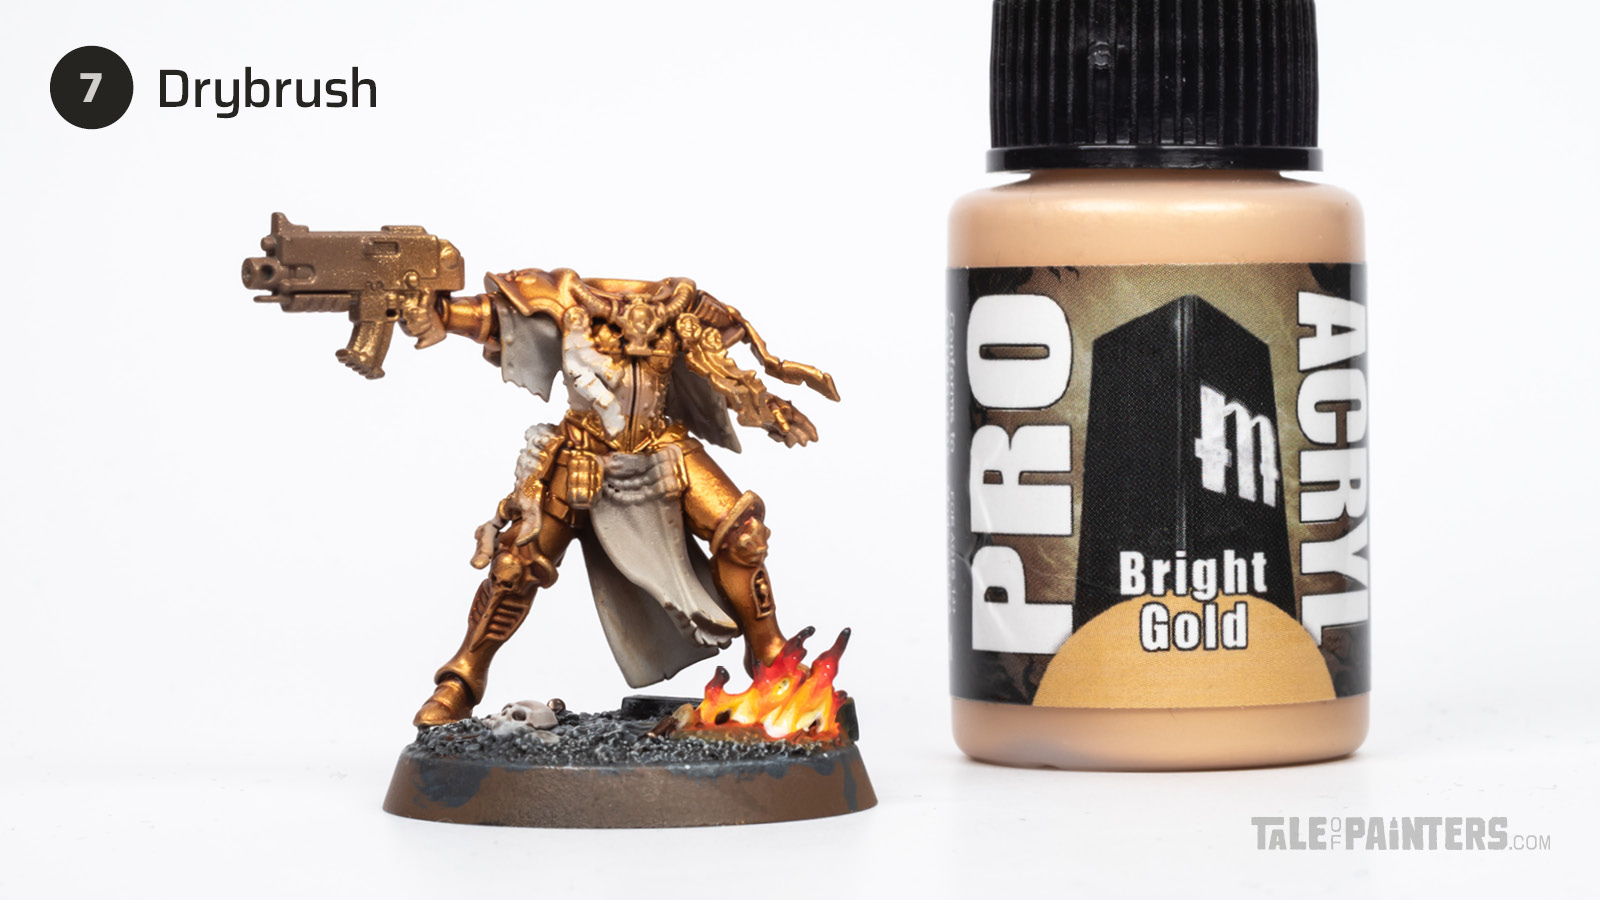

Gently drybrush the armour with Pro Acryl Bright Gold [or Liberator Gold].
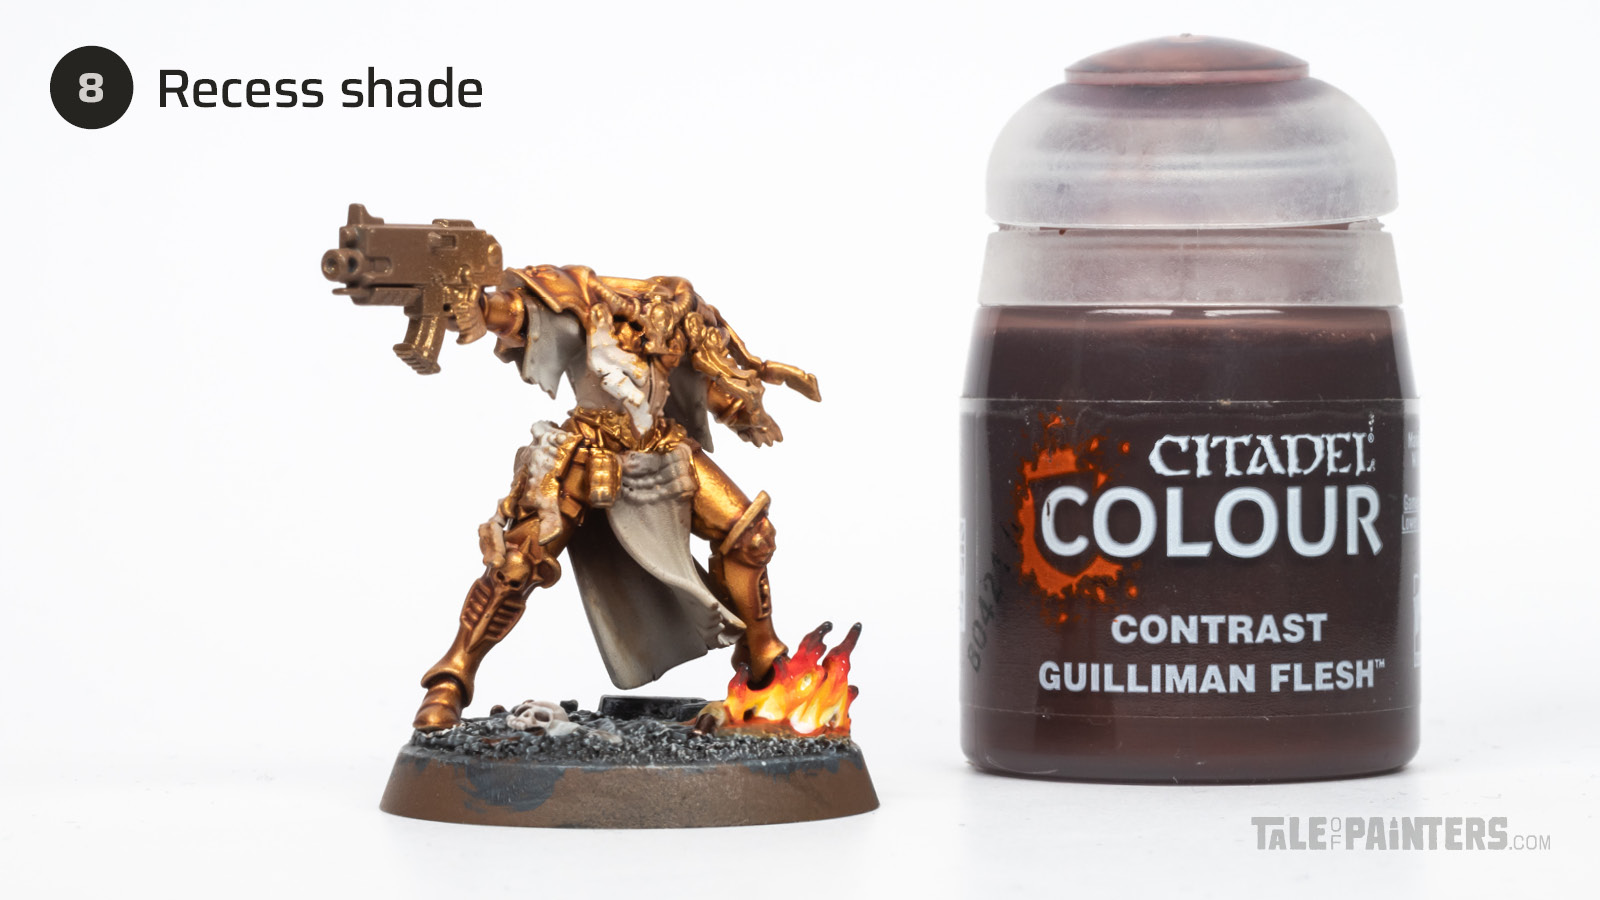

Apply Guilliman Flesh into any recesses you want to darken further, and to add definition where the armour meets other parts of the model.
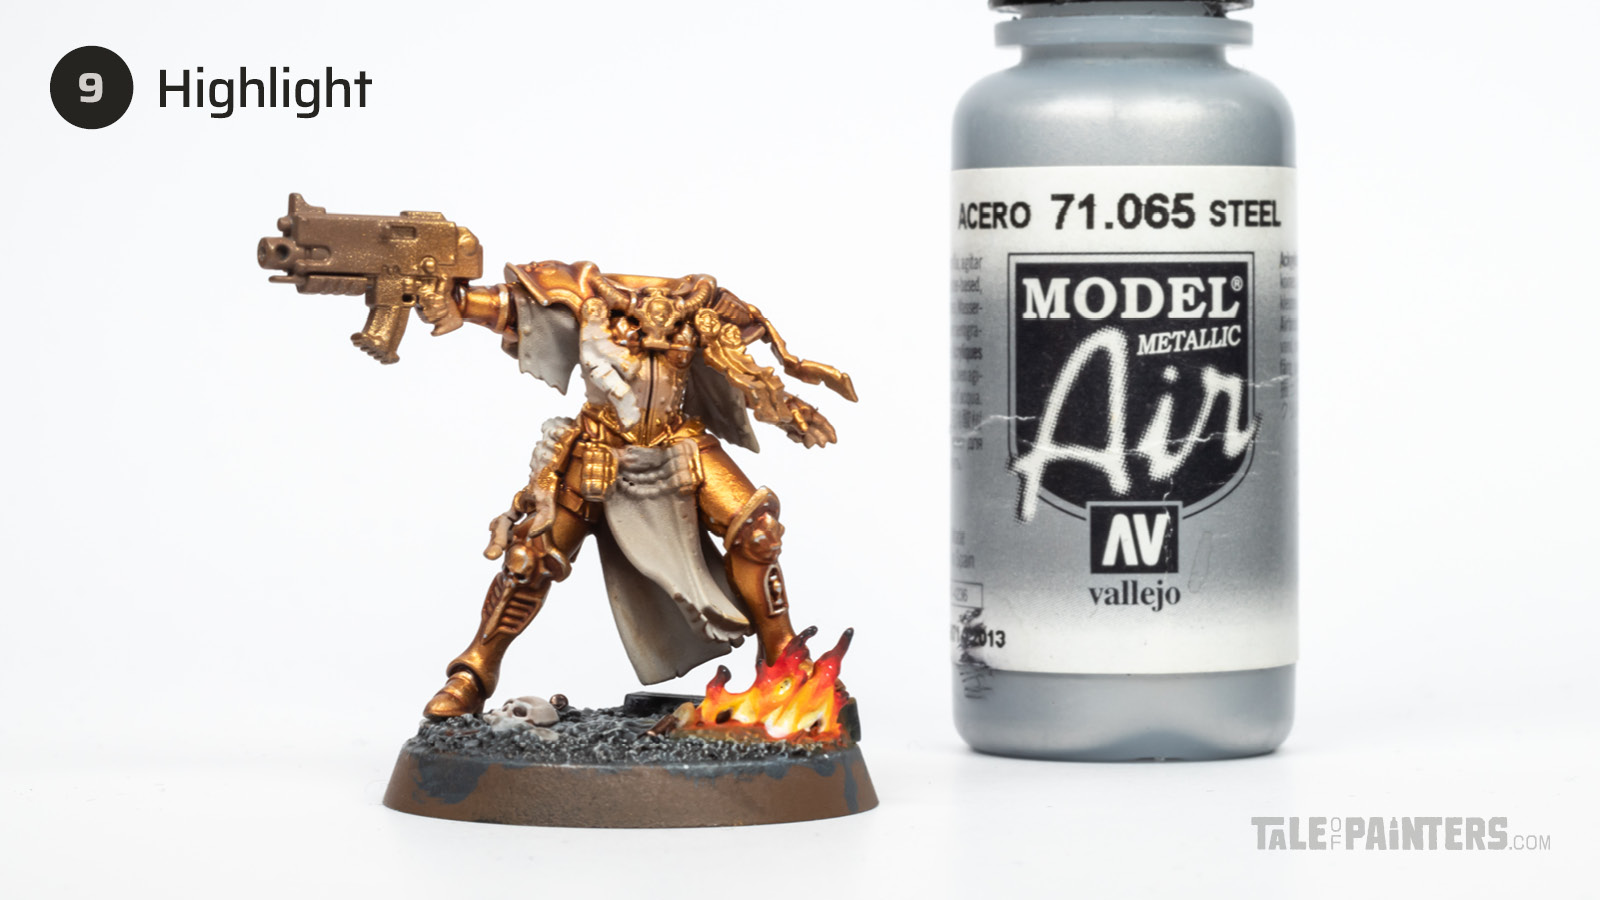

Highlight the gold with Vallejo Model Air Steel. I kept this highlight sparingly, mainly just dots to sharp corners.
Painting the robes
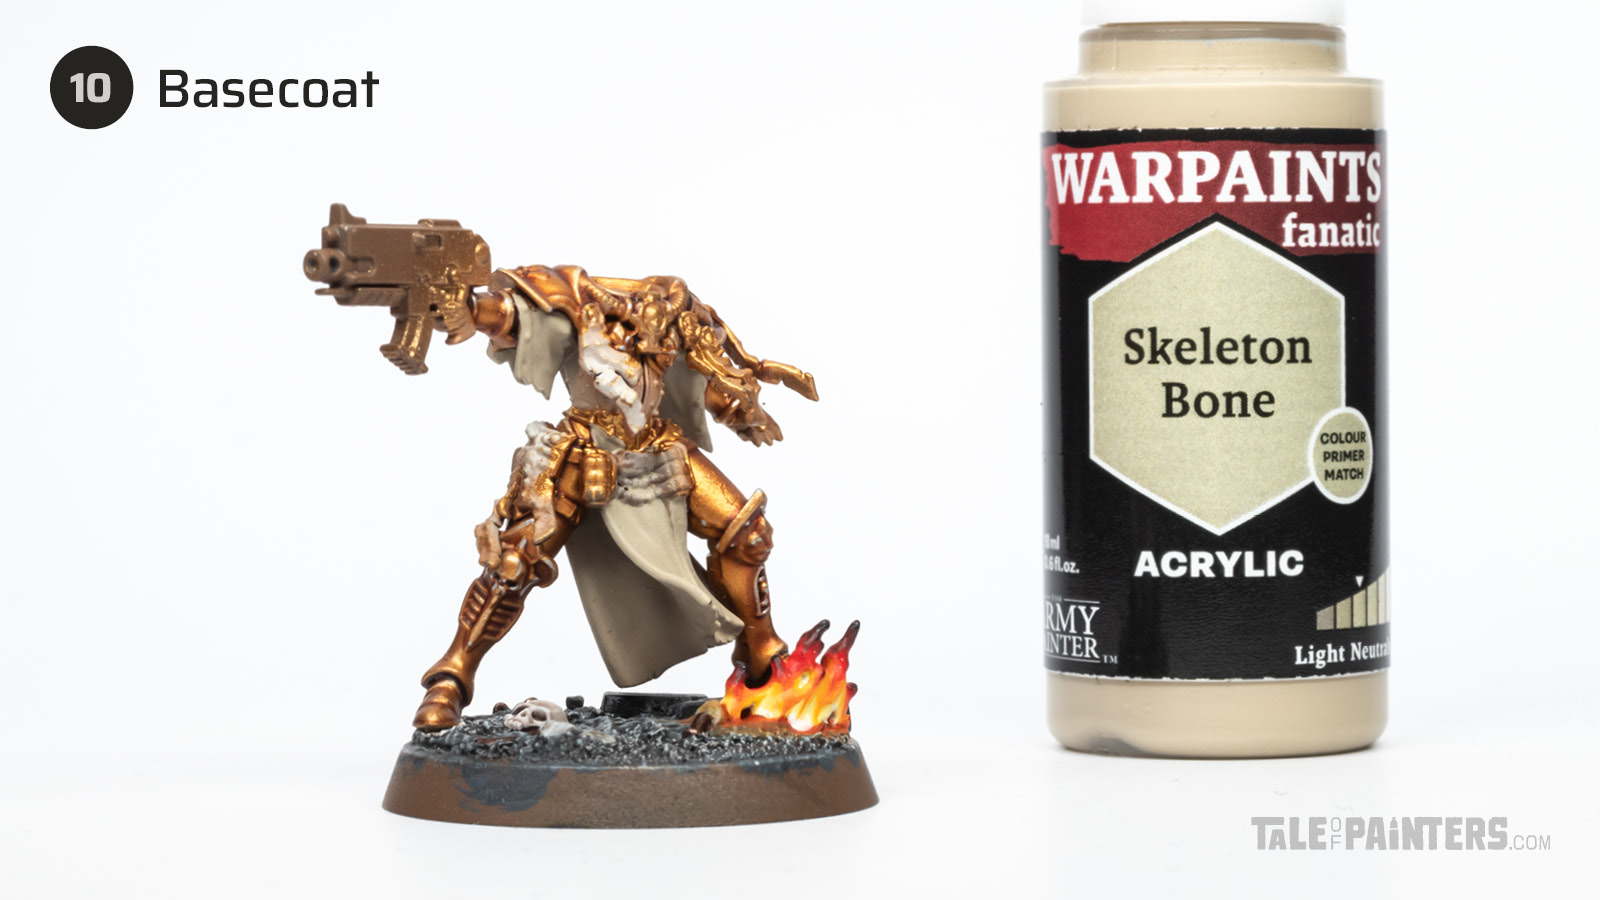

Basecoat the robes with Warpaints Fanatic Skeleton Bone [or Ushabti Bone].
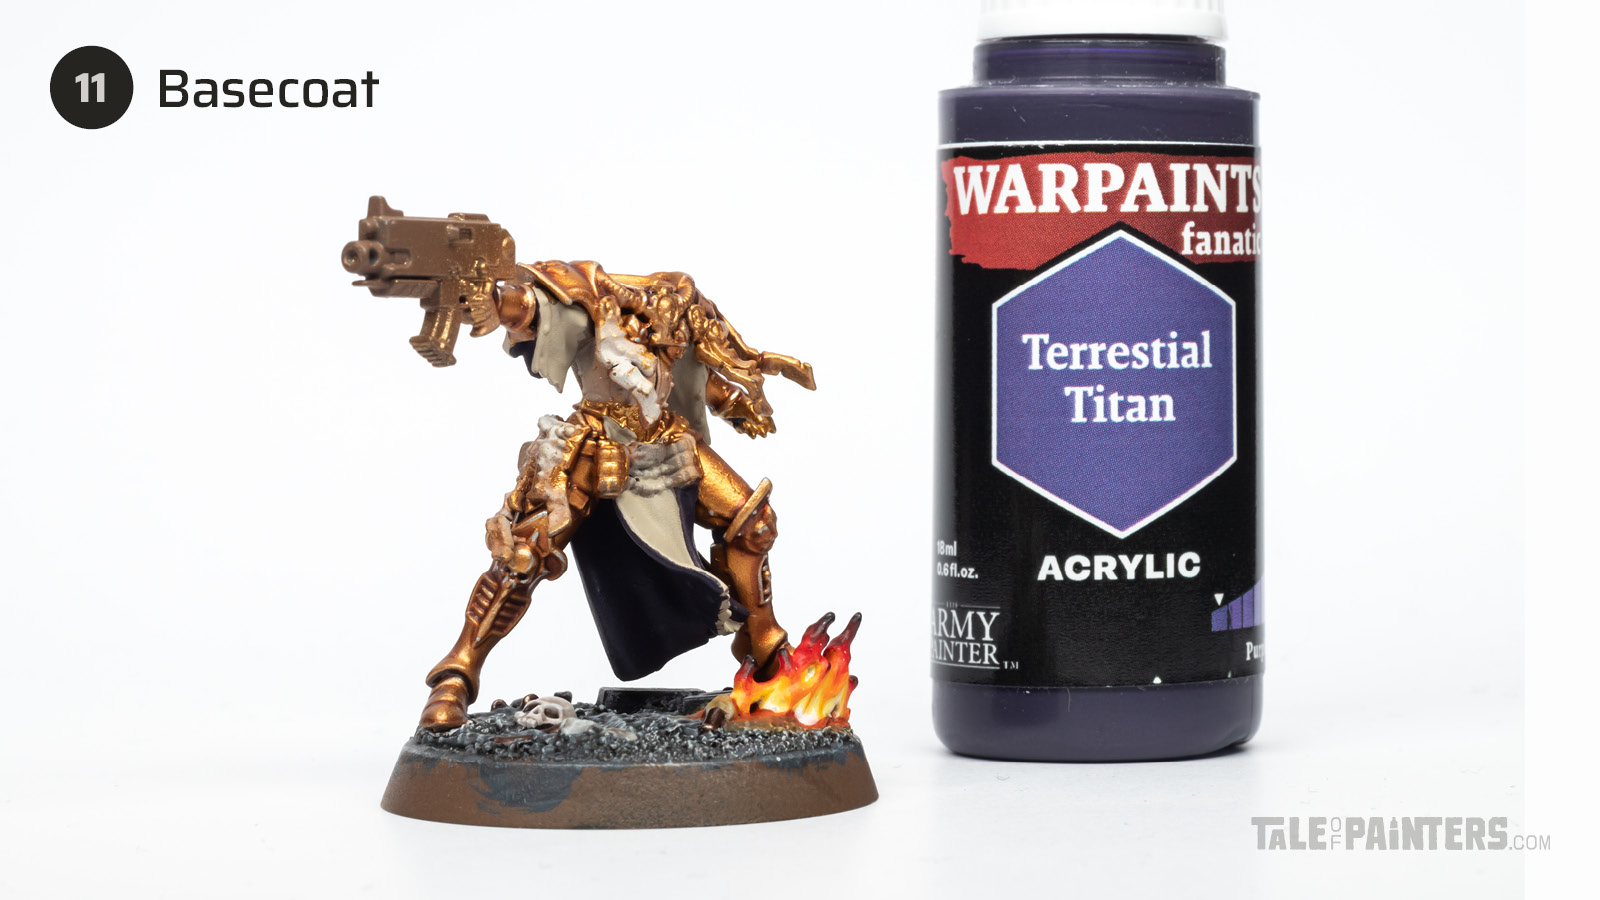

Paint the inner side with Warpaints Fanatic Terrestrial Titan [or Naggaroth Night].
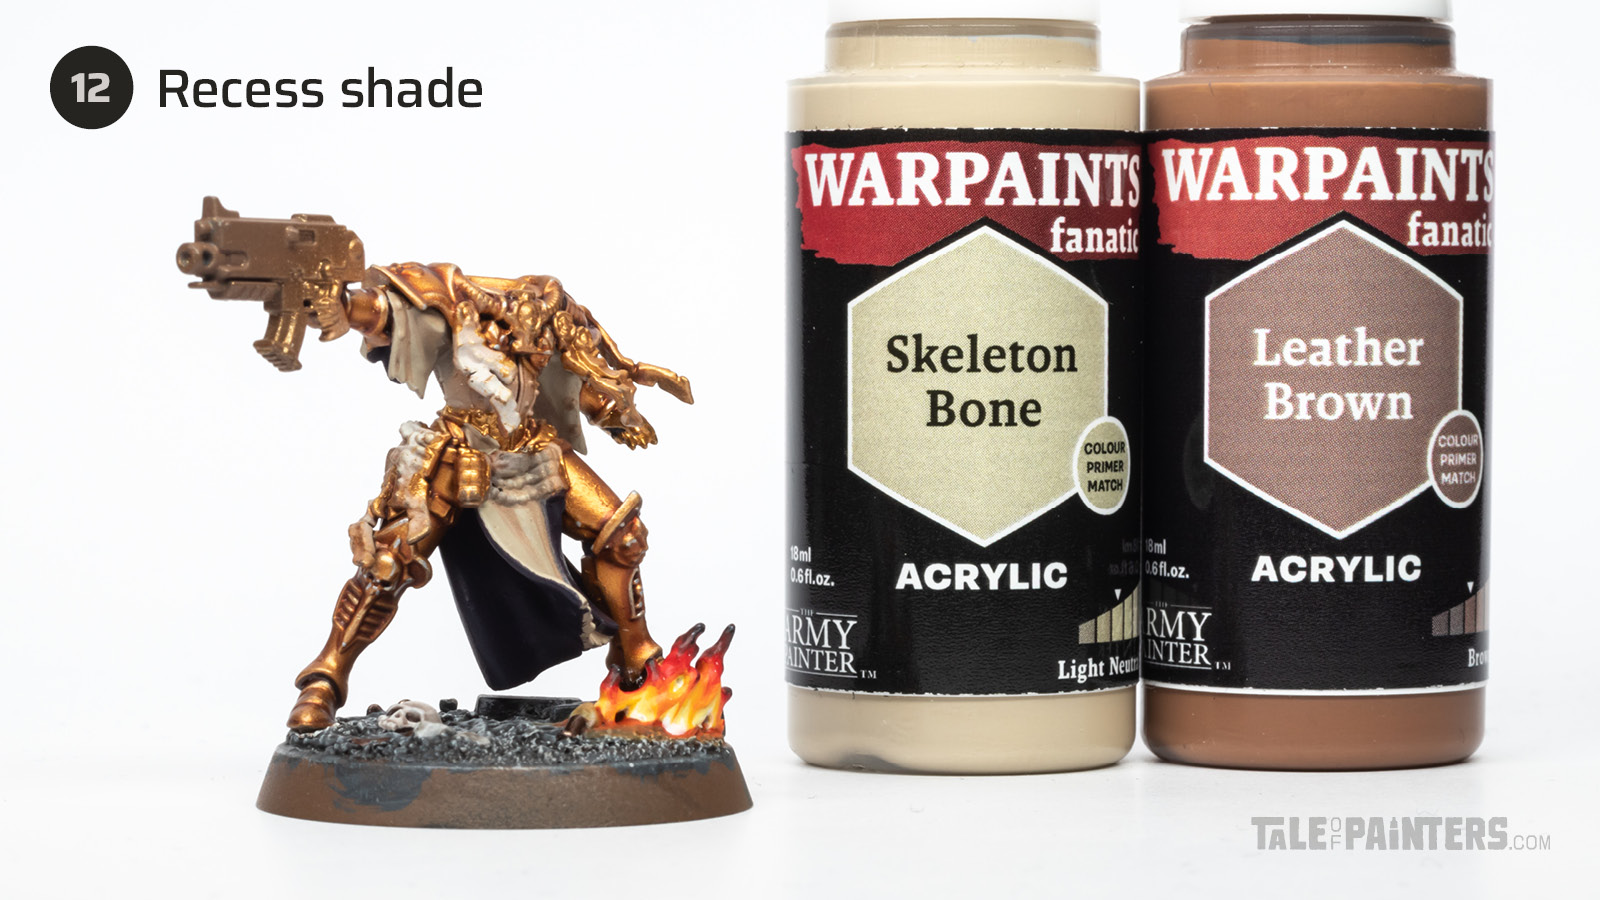

Mix Fanatic Skeleton Bone [or Ushabti Bone] with Fanatic Leather Brown [or Steel Legion Drab] about 2:1, add a little bit of water, and use this mix to shade the foldes of the robe.
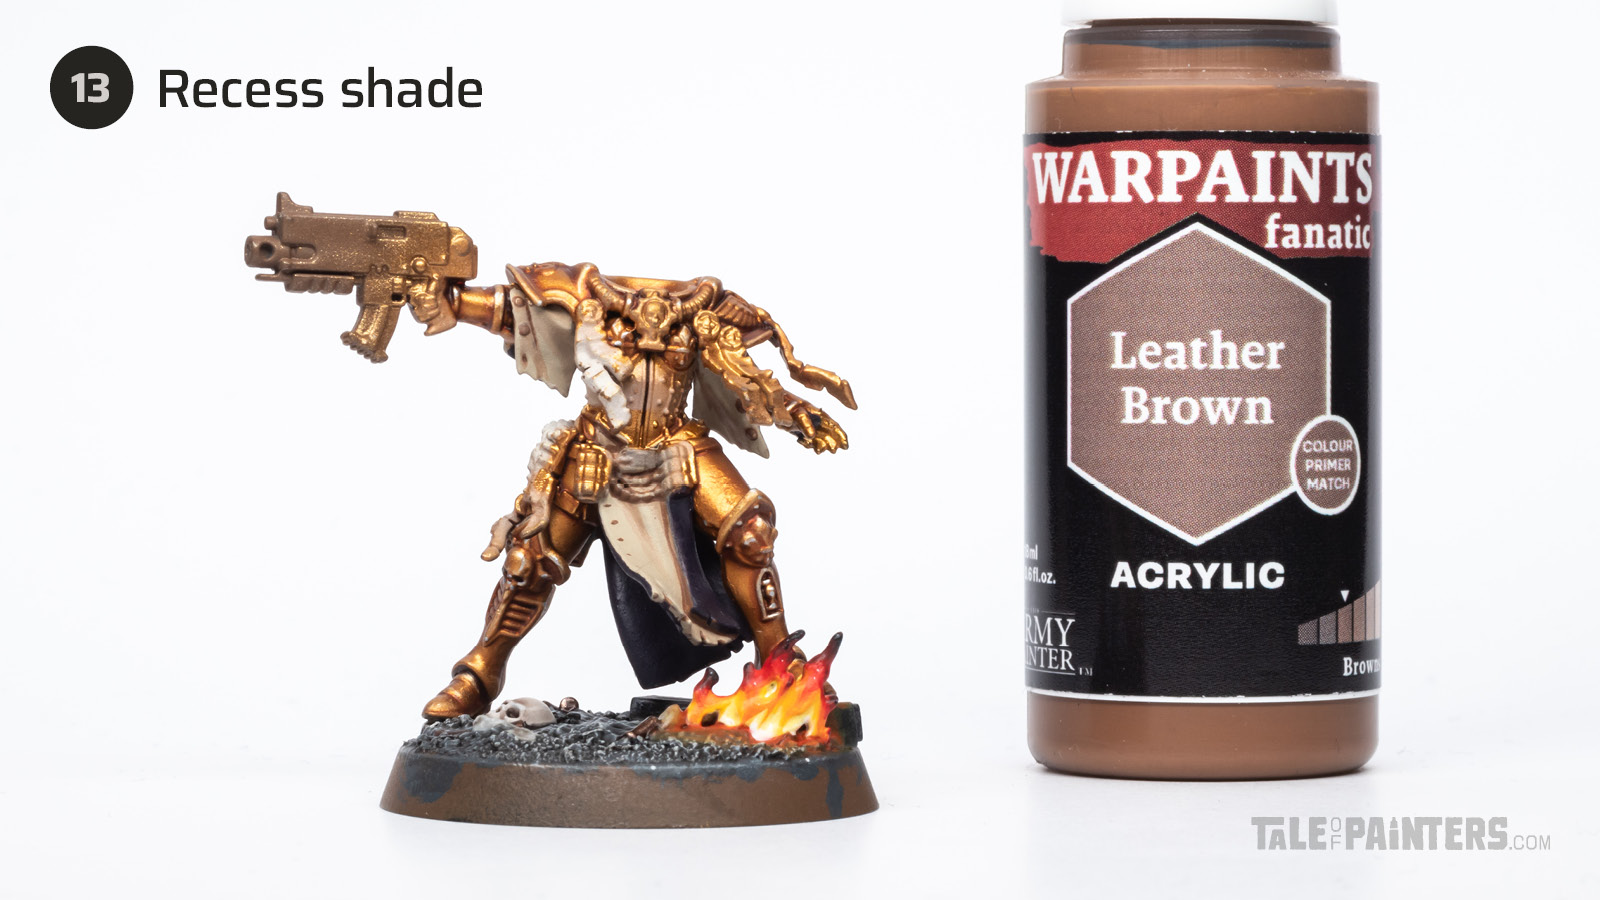

Add more depth to the robe by shading the foldes with Warpaints Fanatic Leather Brown [or Steel Legion Drab].
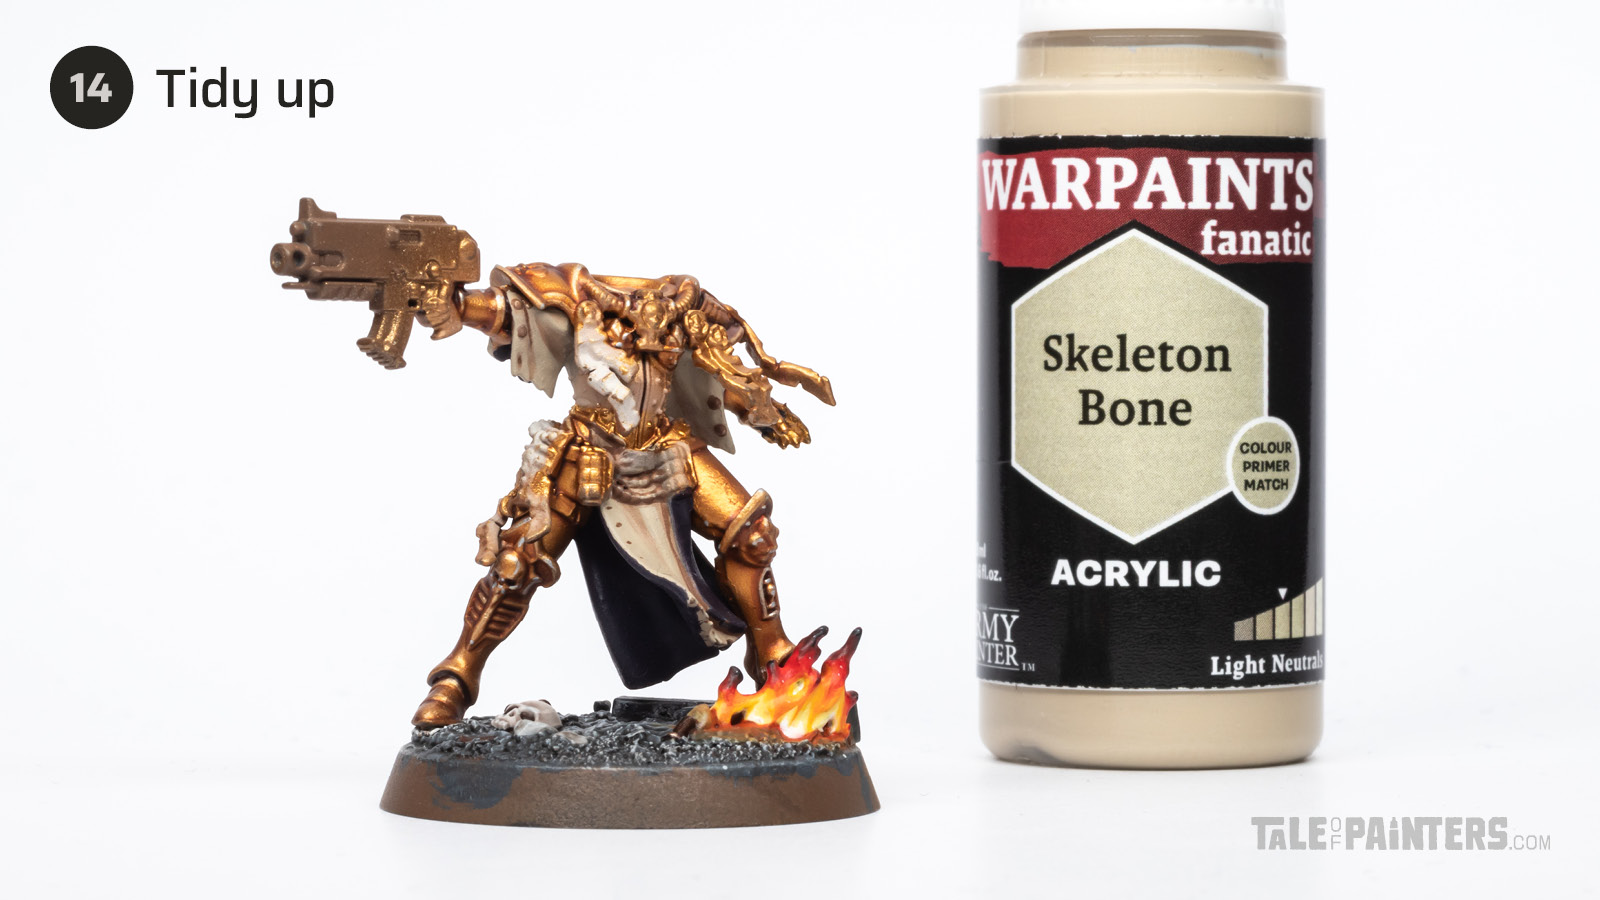

Apply thinned Fanatic Skeleton Bone [or Ushabti Bone] to smoothen the transitions.
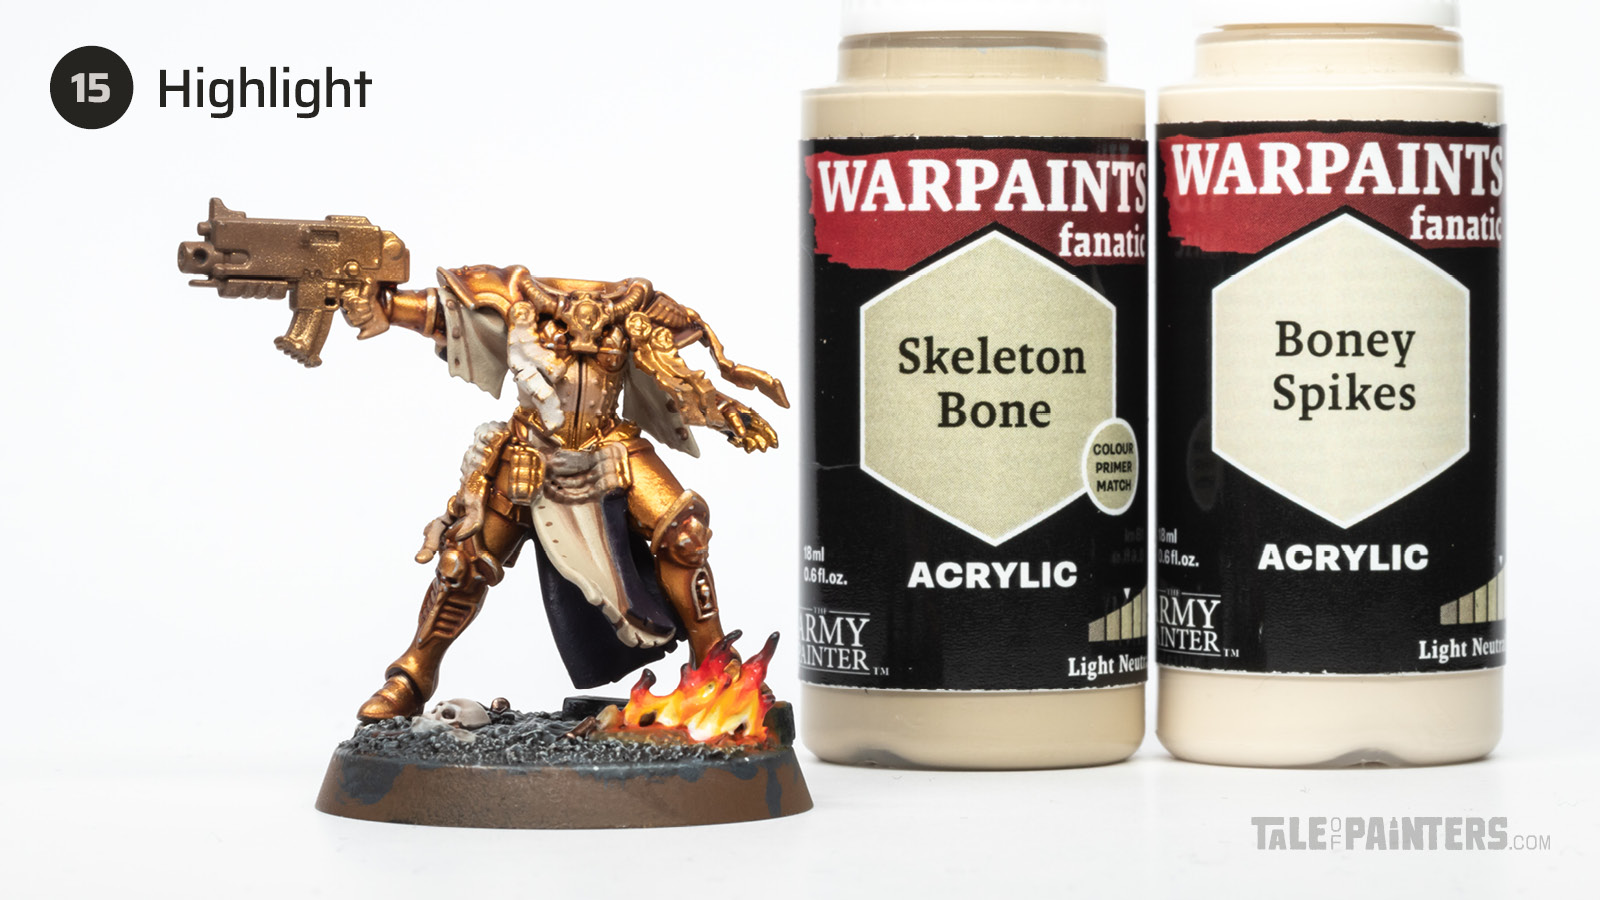

Highlight the edges of the robe and sharpest creases with a 1:1 mix of Fanatic Skeleton Bone [or Ushabti Bone] and Fanatic Boney Spikes [or Screaming Skull].
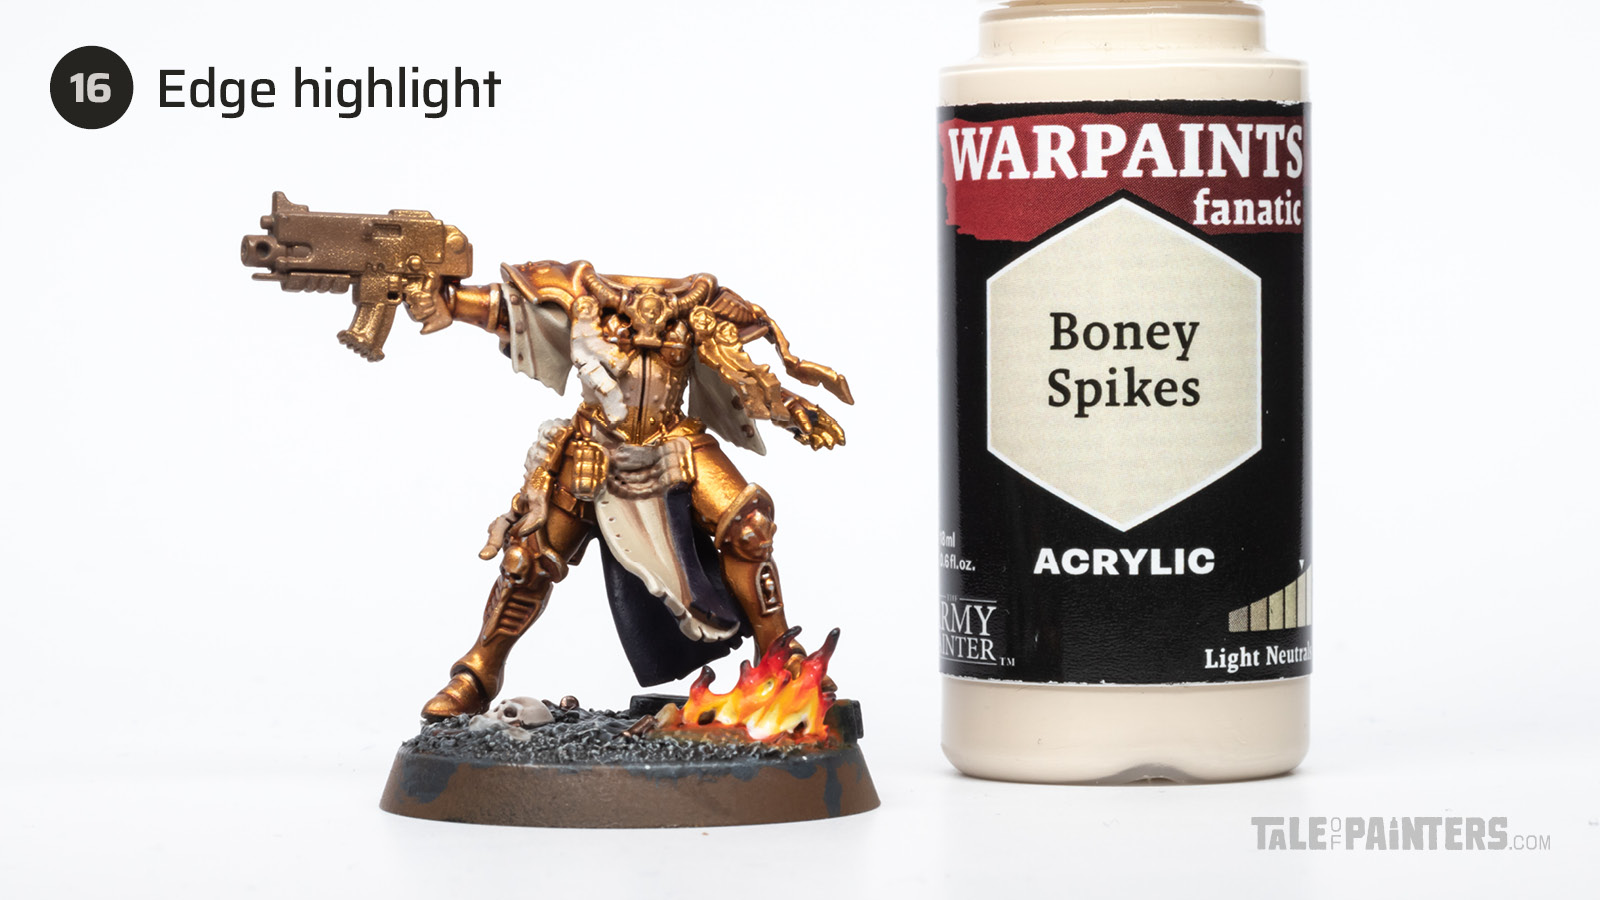

Apply an even thinner highlight of Fanatic Boney Spikes [or Screaming Skull].
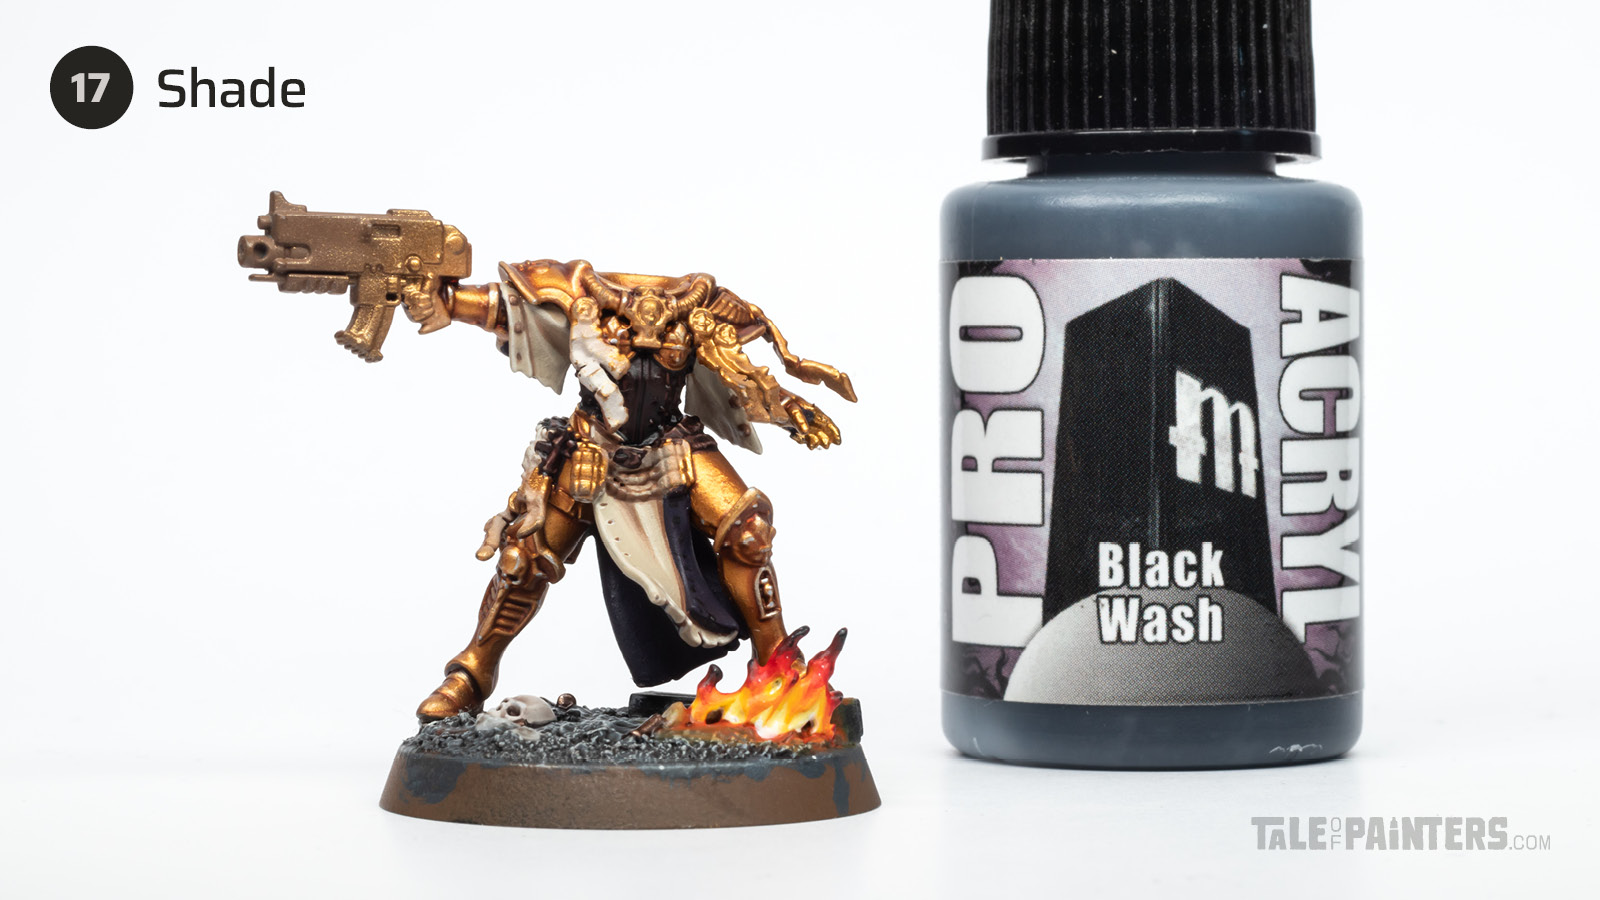

Use Pro Acryl Black Wash [or Nuln Oil or thinned Abaddon Black] to shade the inner of the robes.
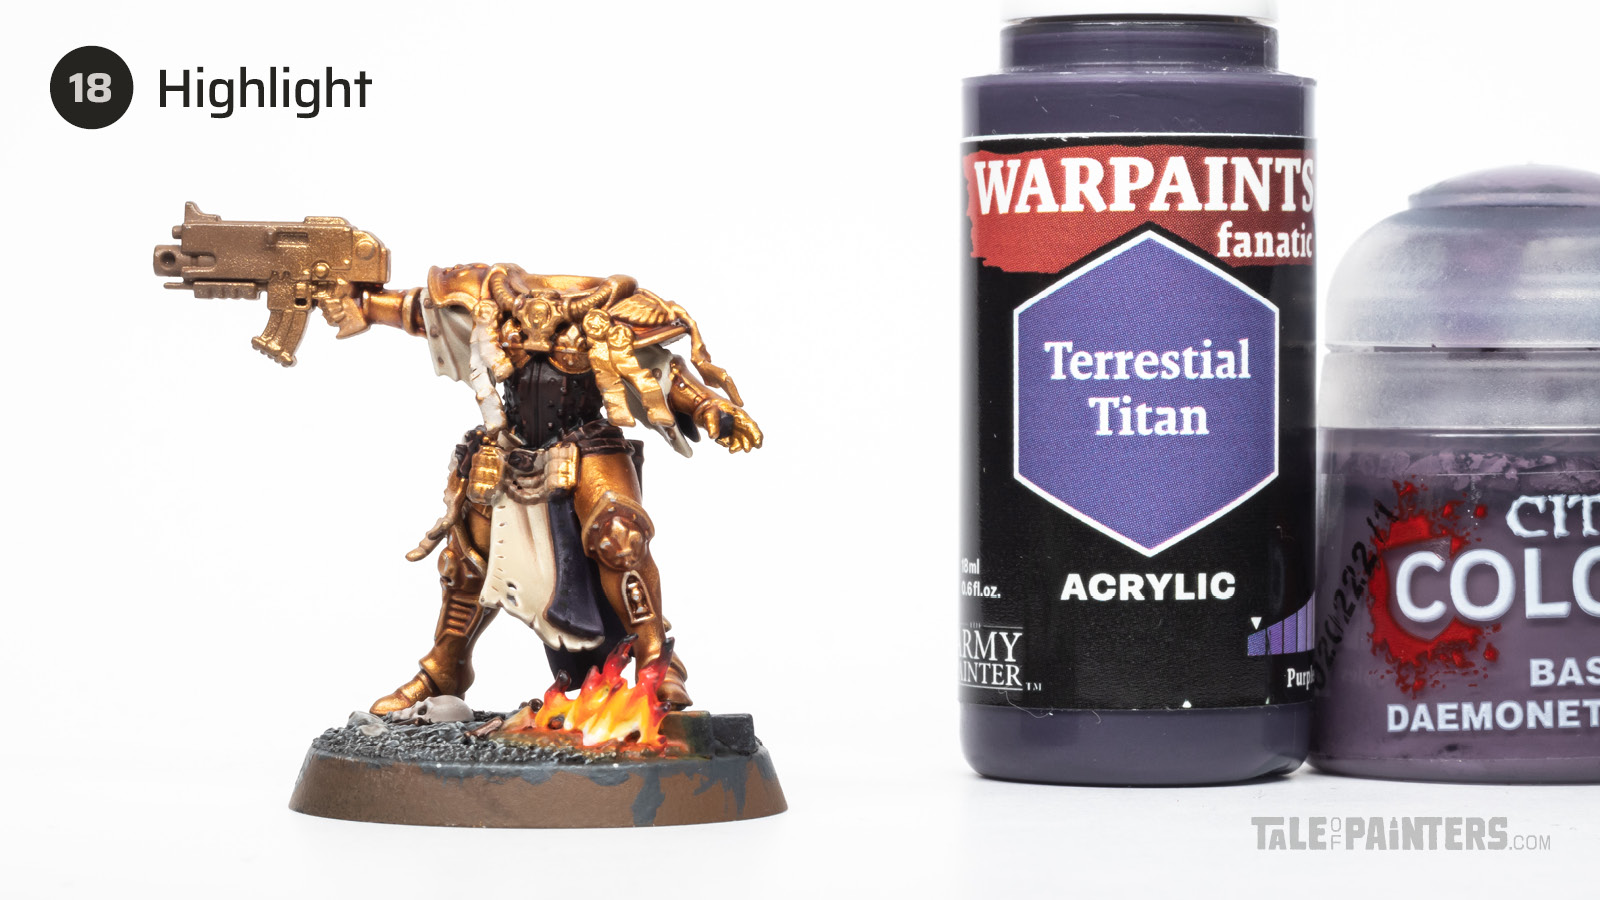

Highlight the purple areas of the robes with a 1:1 mix of Fanatic Terrestrial Titan [or Naggaroth Night] and
Daemonette Hide.
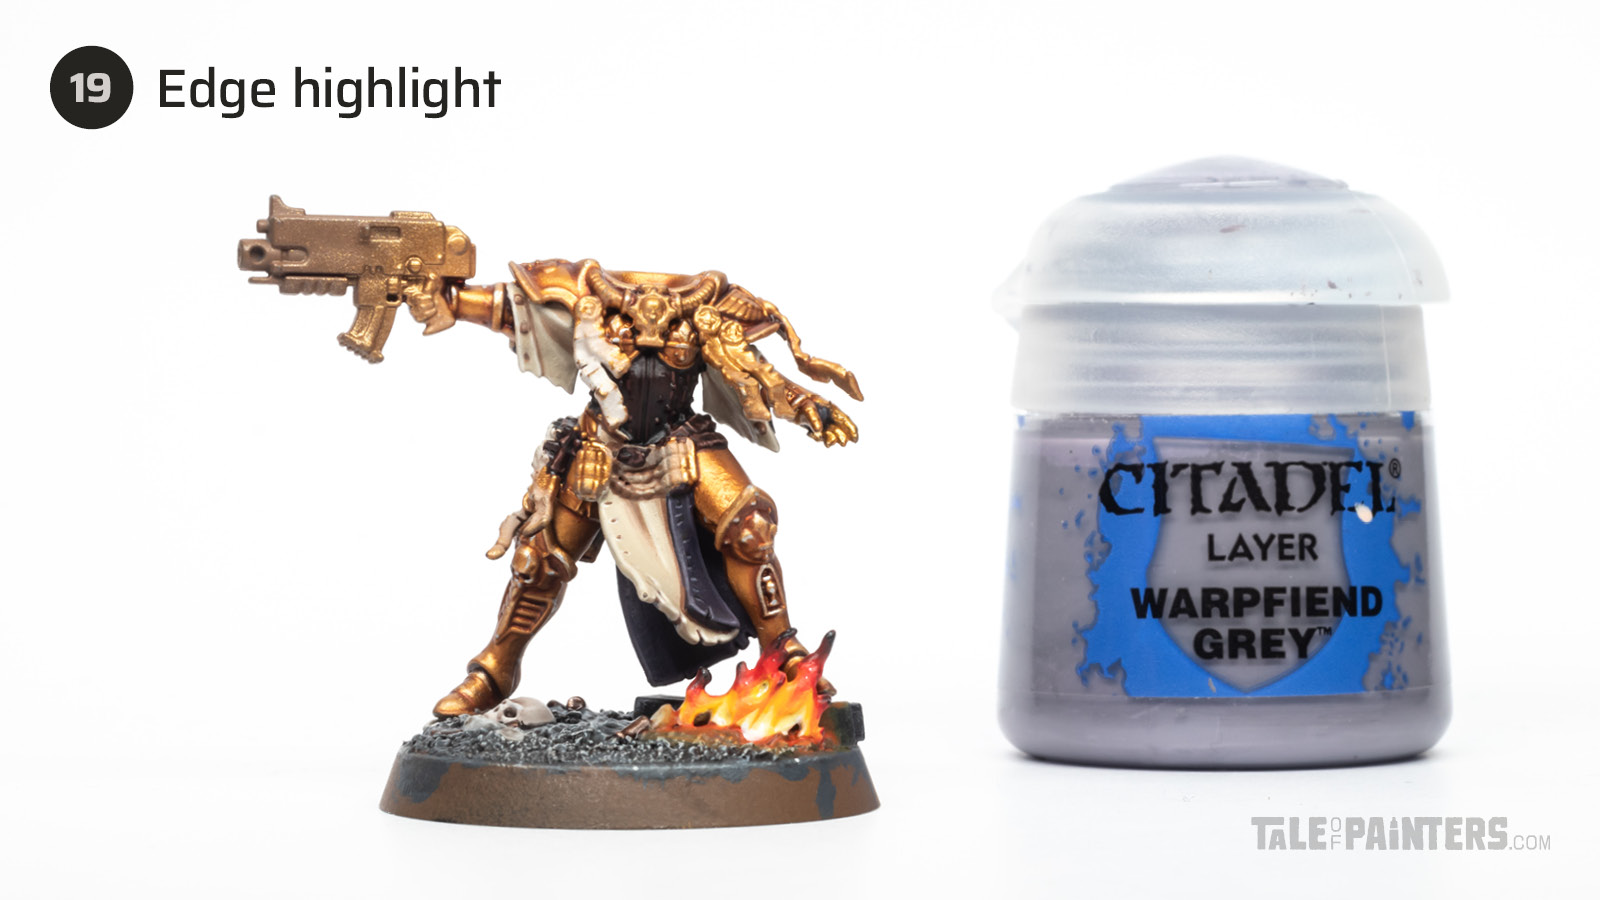

Add an even finer highlight of Warpfiend Grey to the edges and sharpest creases.
Brown leather
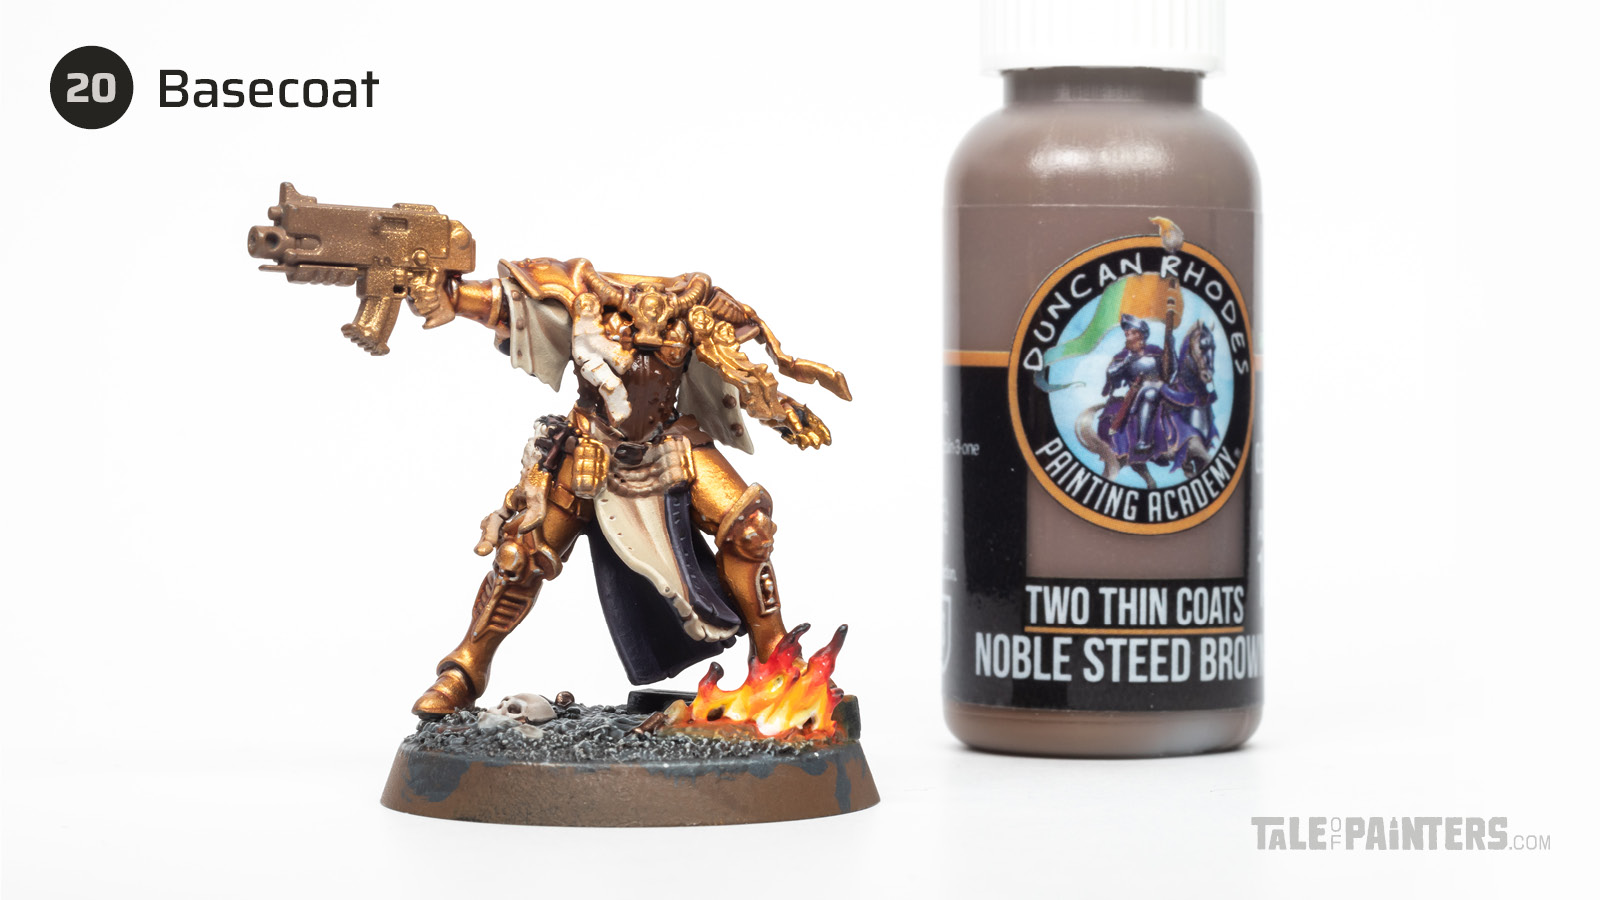

Basecoat the corset and belts with Two Thin Coats Noble Steed Brown [or Mournfang Brown].
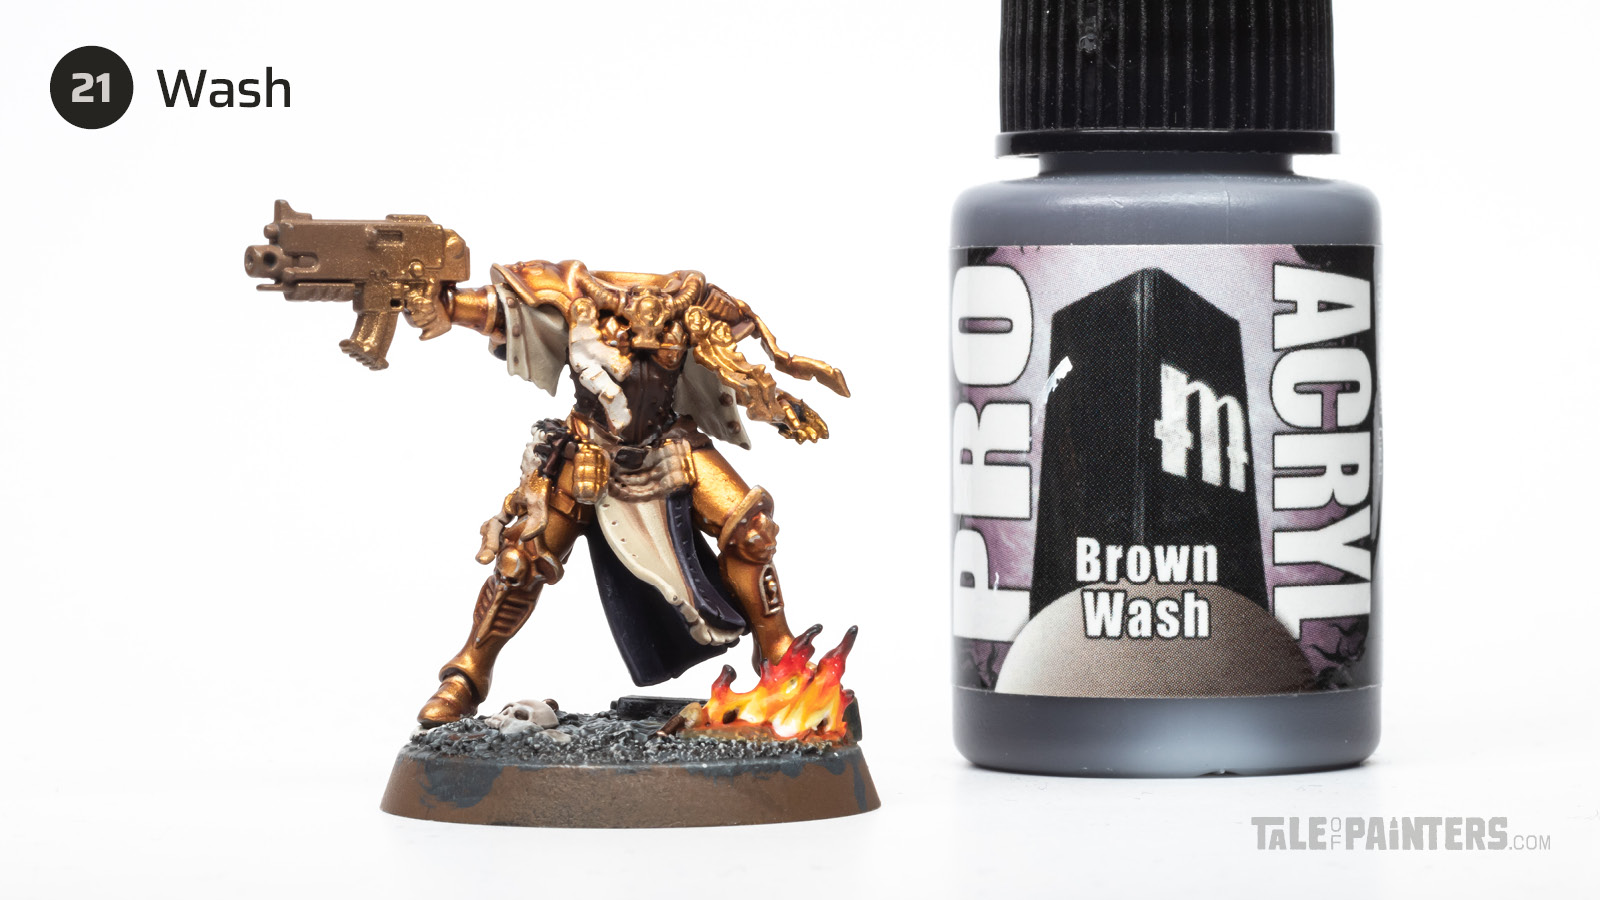

Wash the leather with Pro Acryl Brown Wash [or Agrax Earthshade].
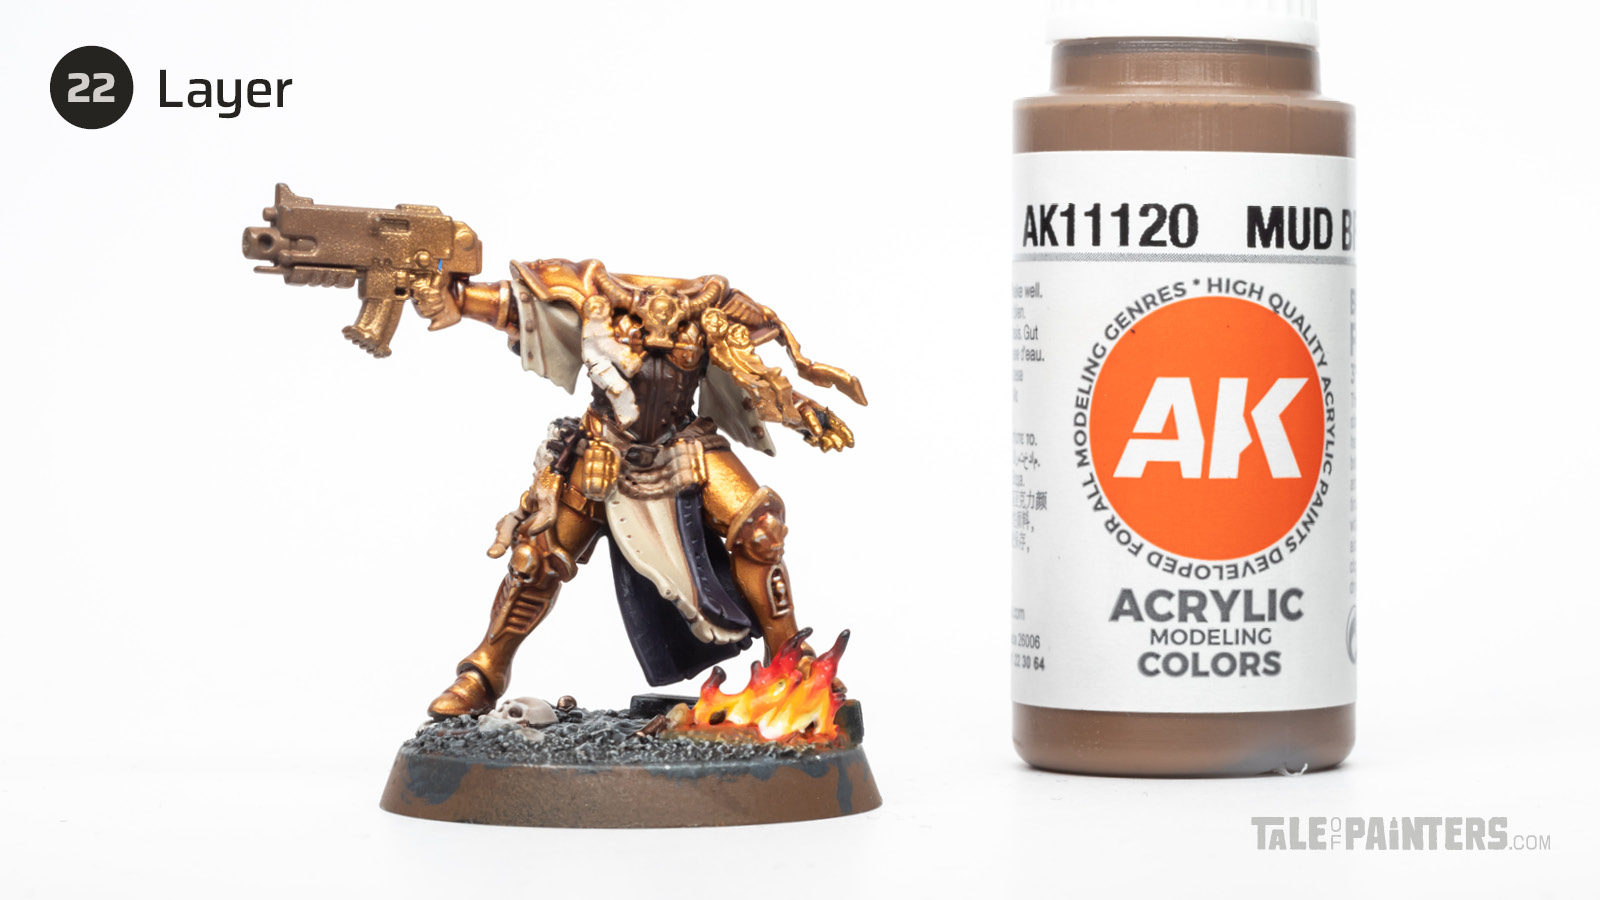

Highlight the leather with AK 3rd Gen Mud Brown [or mix Kislev Flesh into Mournfang Brown].
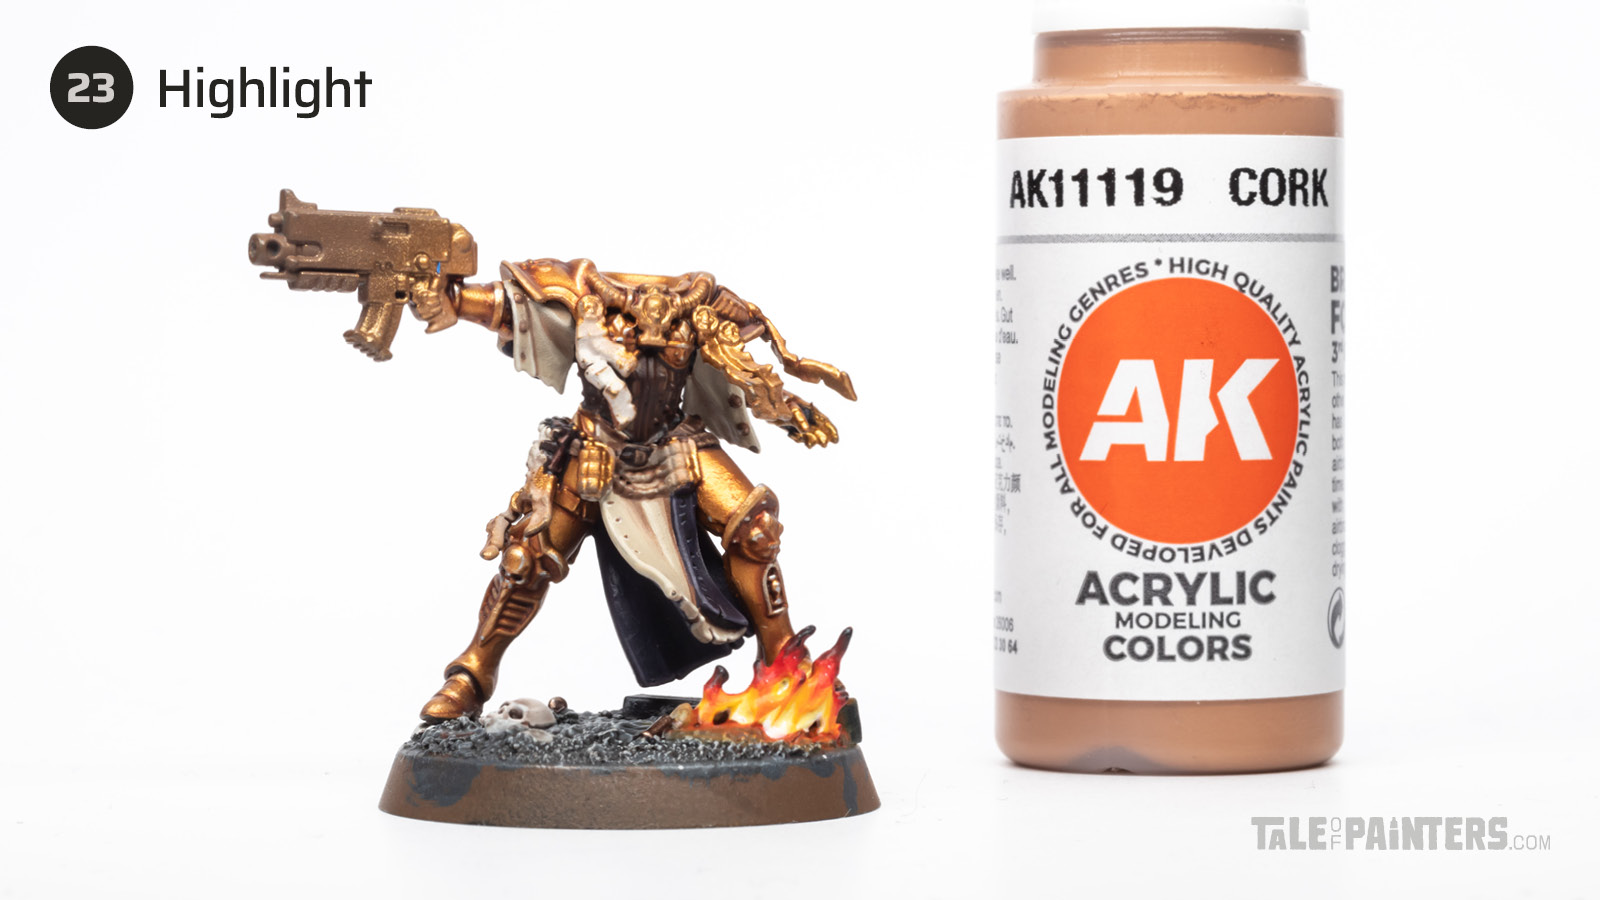

Apply an even finer highlight of Ak 3rd Gen Cork [or mix more Kislev Flesh into Mournfang Brown].
Polished steel tutorial
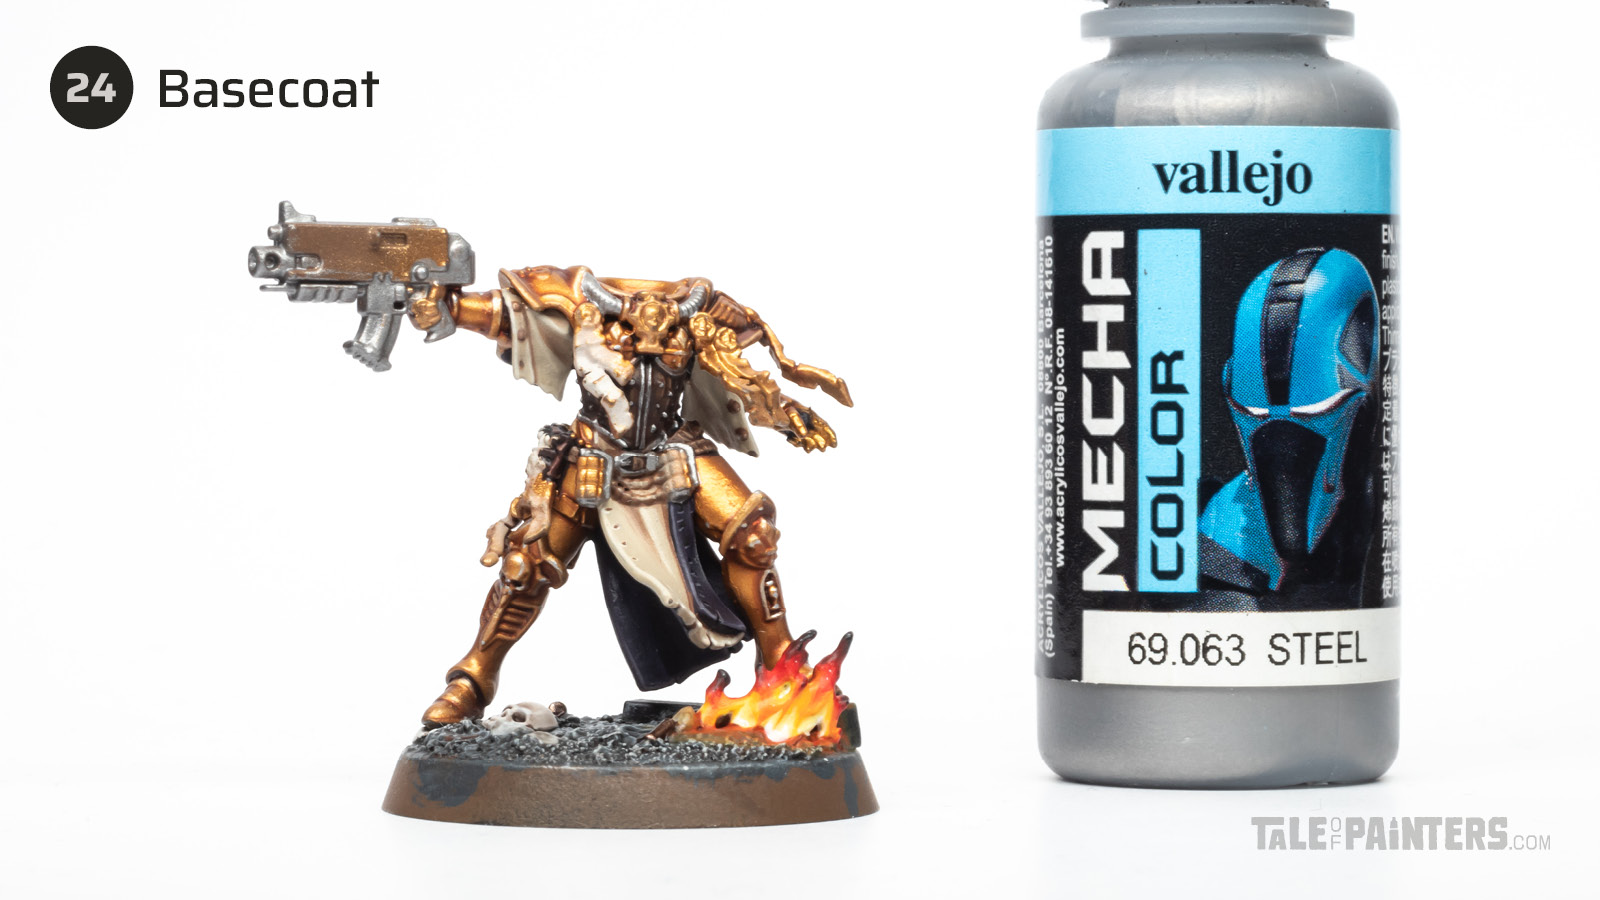

Basecoat the steel with Vallejo Mecha Color Steel [or Iron Hands Steel or Ironbreaker].
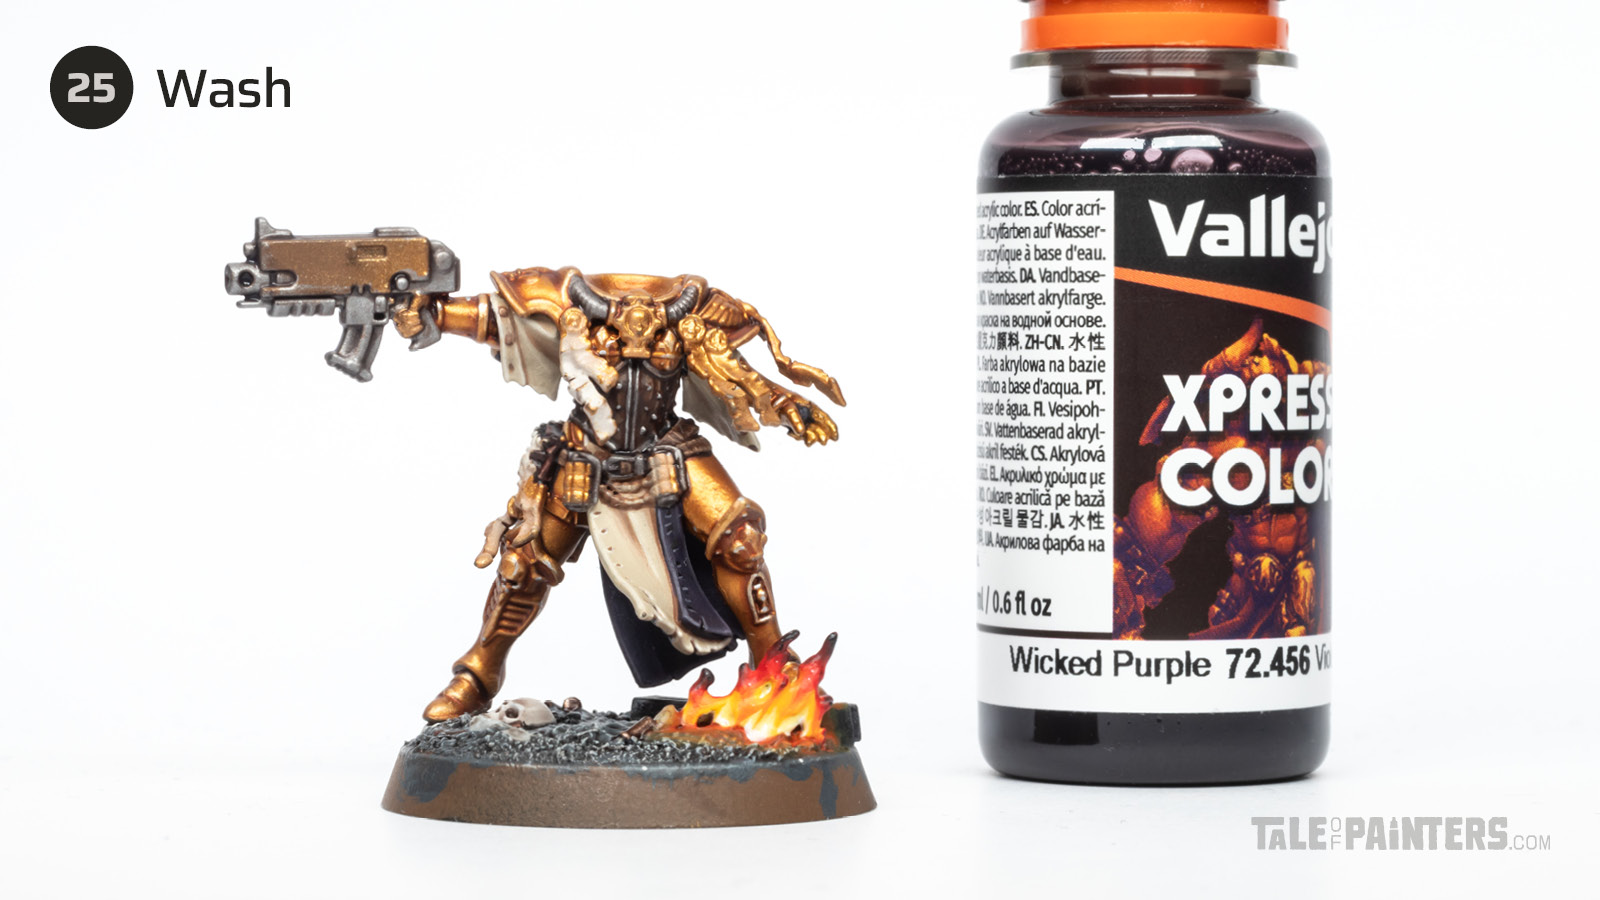

Apply Vallejo Xpress Color Wicked Purple all-over as a wash [or mix Nuln Oil with a little bit of Shyish Purple].
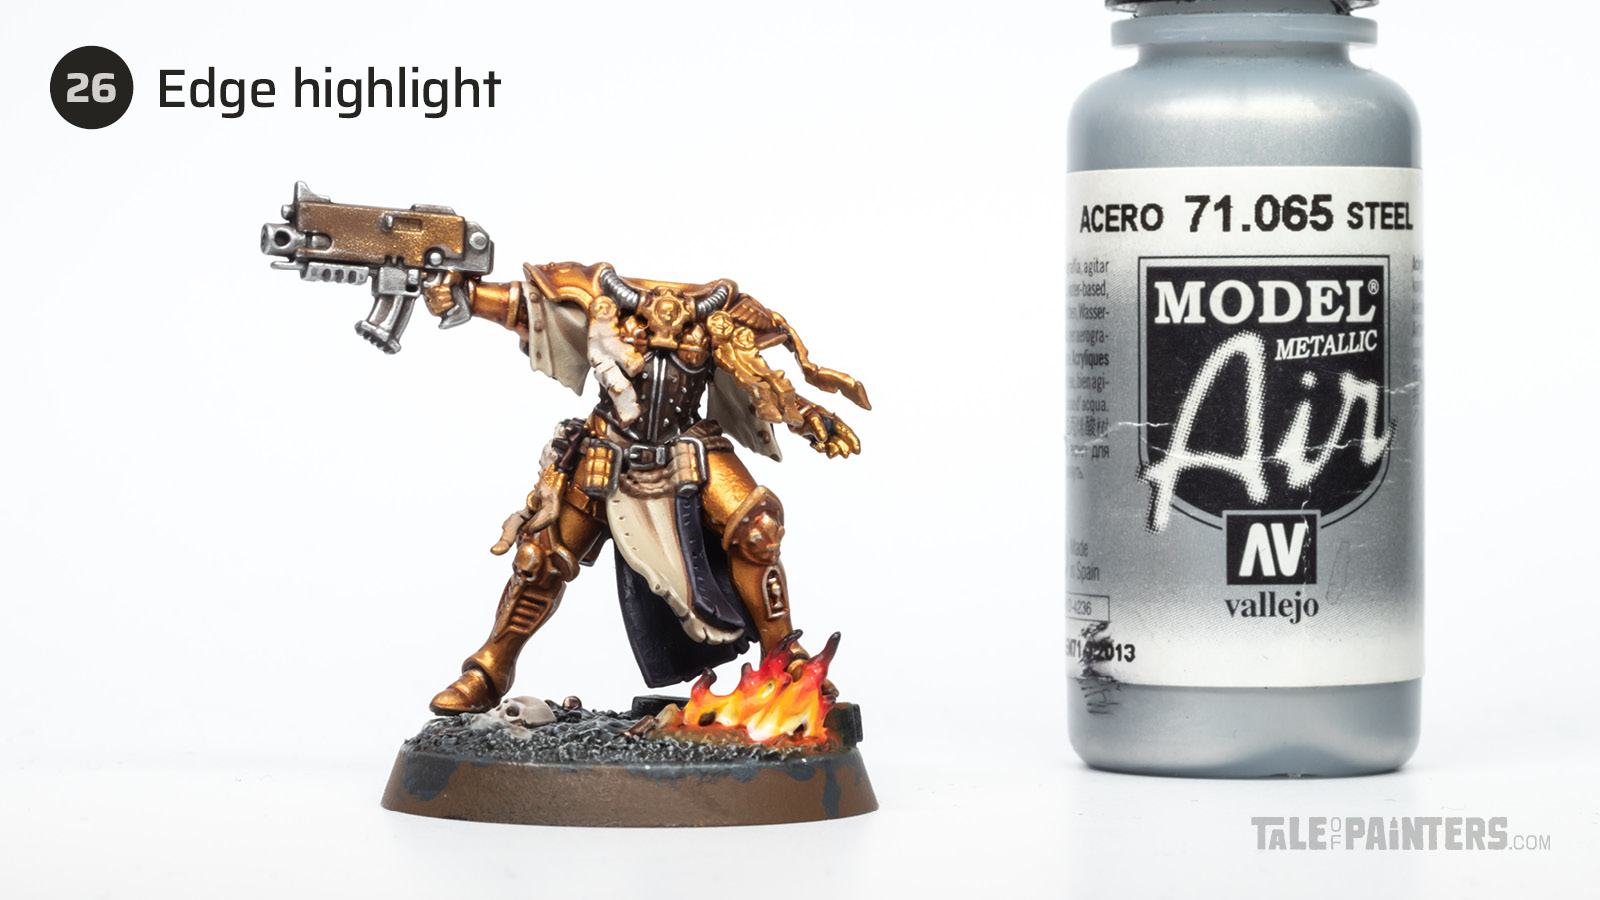

Edge highlight the steel with Vallejo Model Air Steel [or Stormhost Silver or Runefang Steel].
Black details
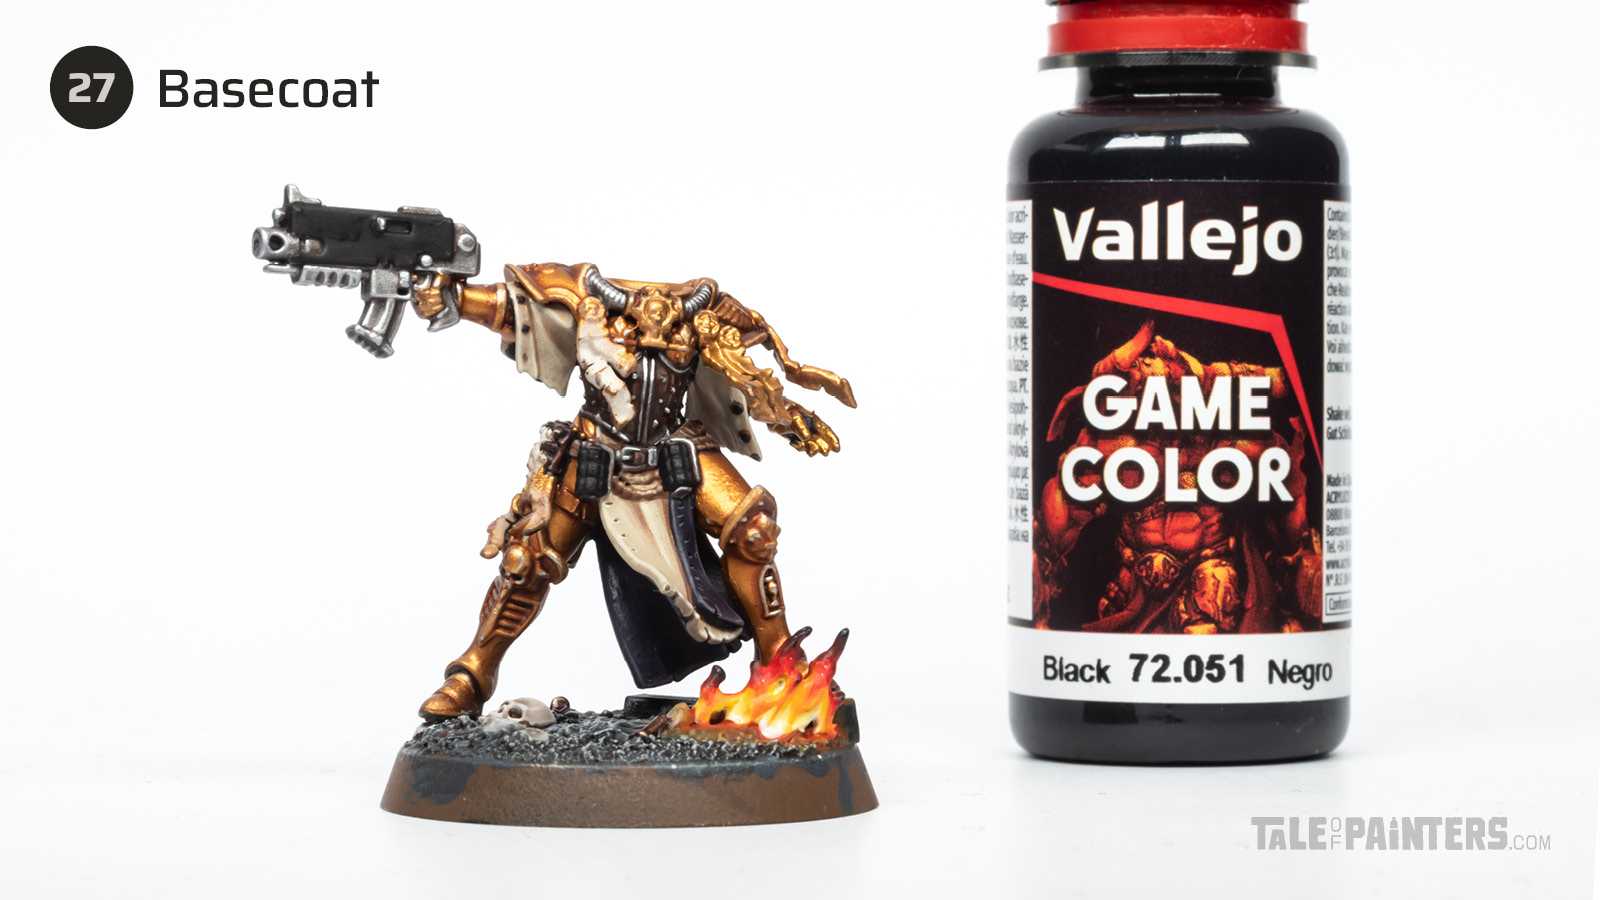

Basecoat the black details such as the gun and grenade casings and buttons on the robes with Vallejo Game Color Black [or Abaddon Black].
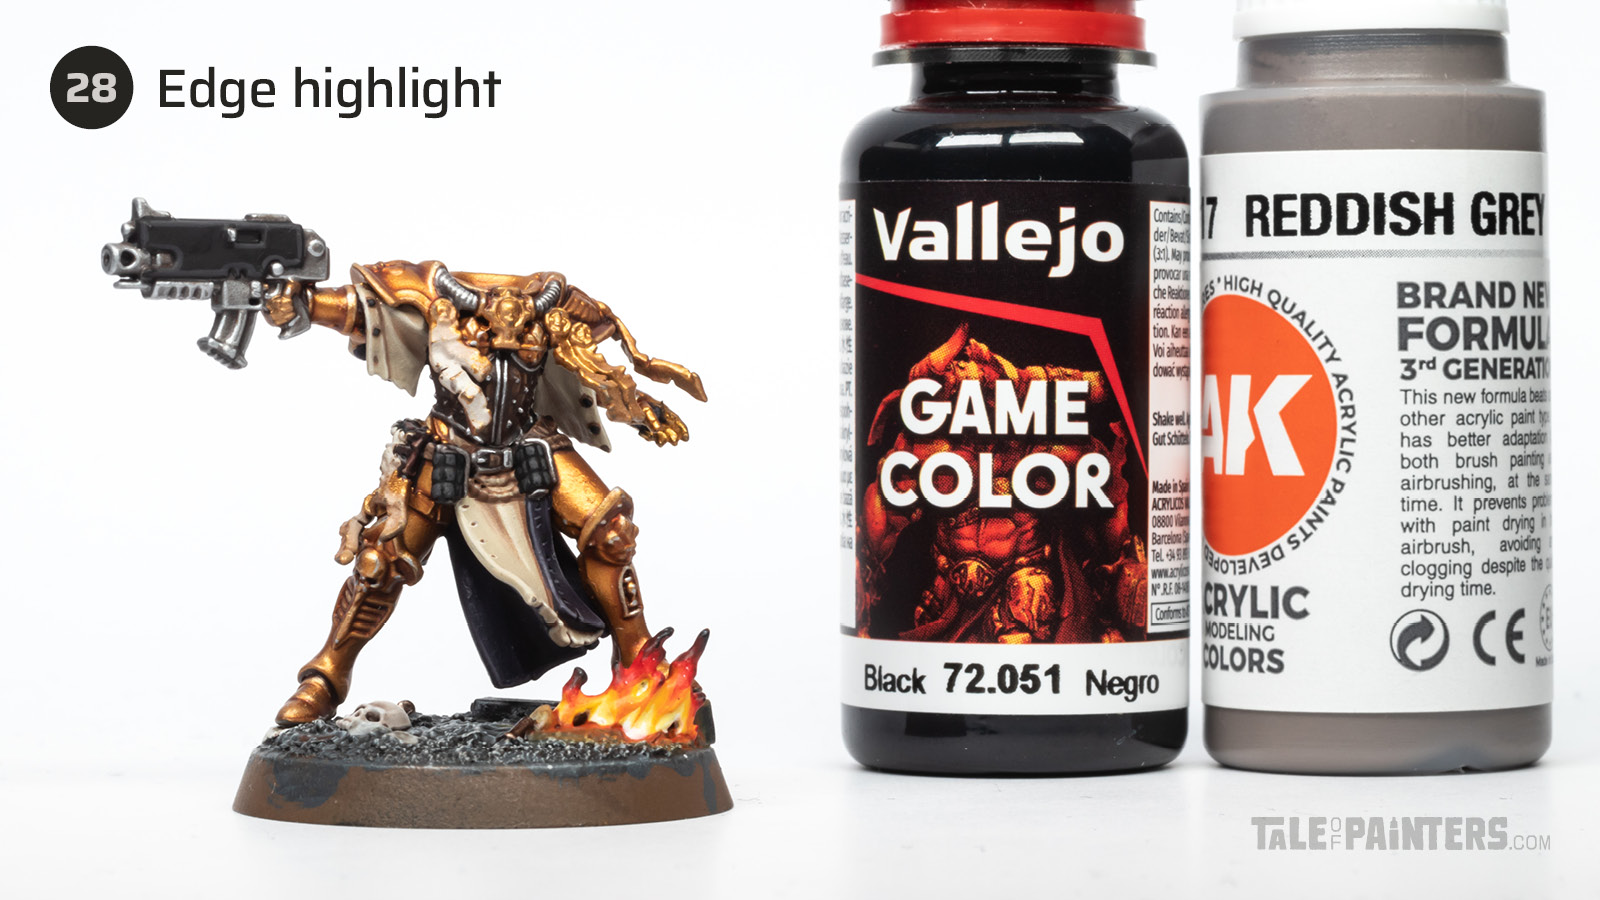

Mix Game Color Black about 2:3 with AK 3rd Gen Reddish Grey [or just use Skavenblight Dinge] and edge highlight the black.
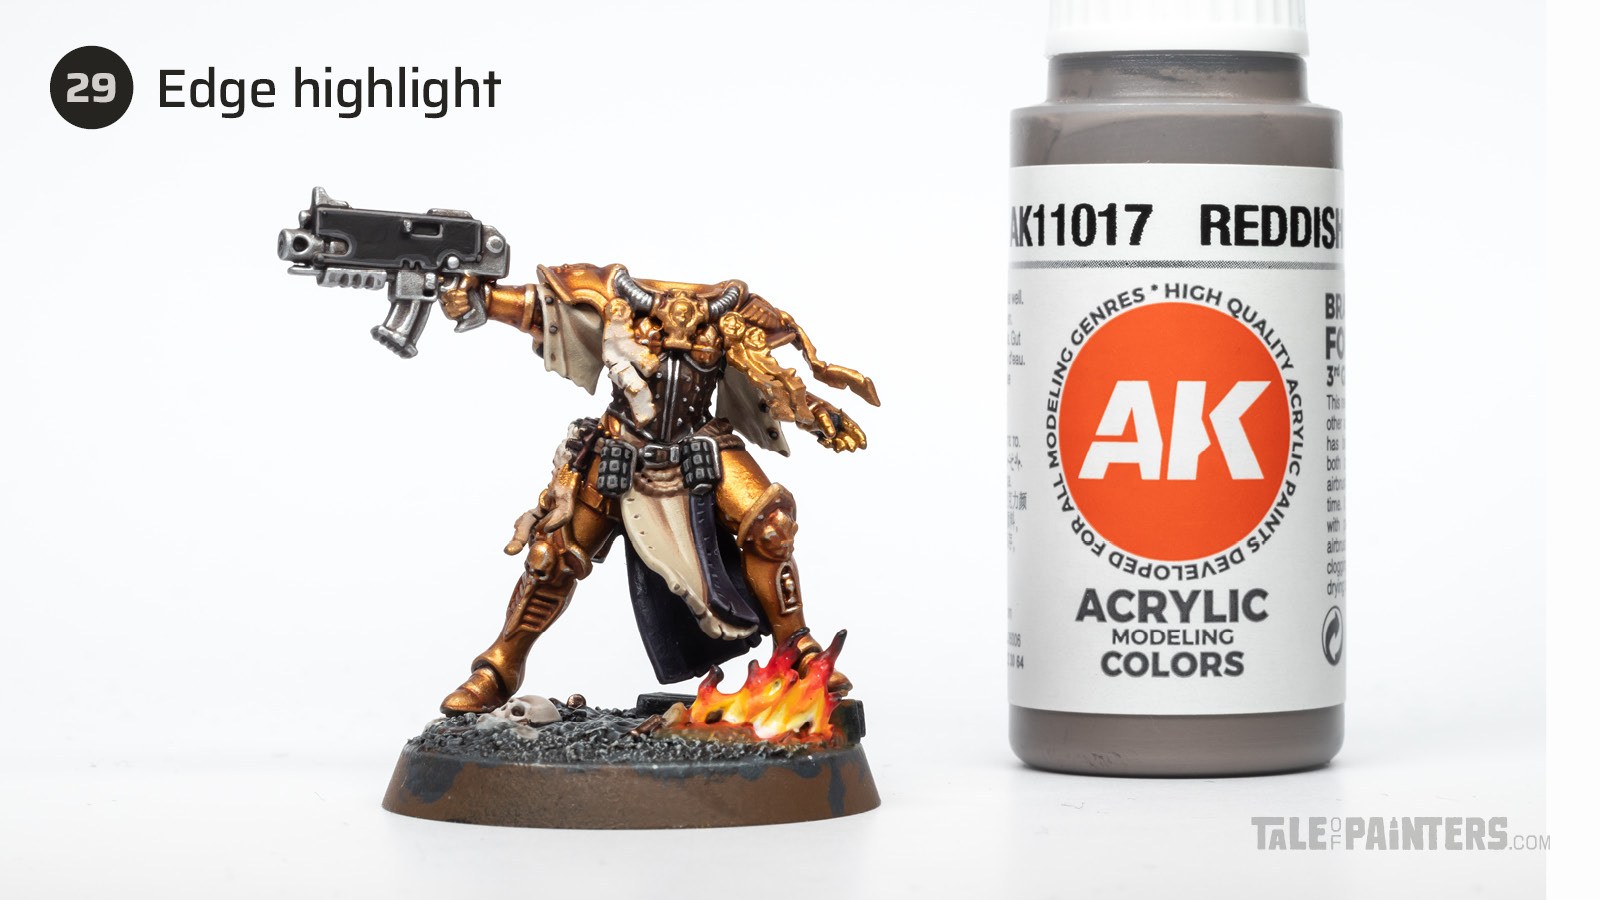

Apply an even finer highlight of pure AK 3rd Gen Reddish Grey [or use Stormvermin Fur].
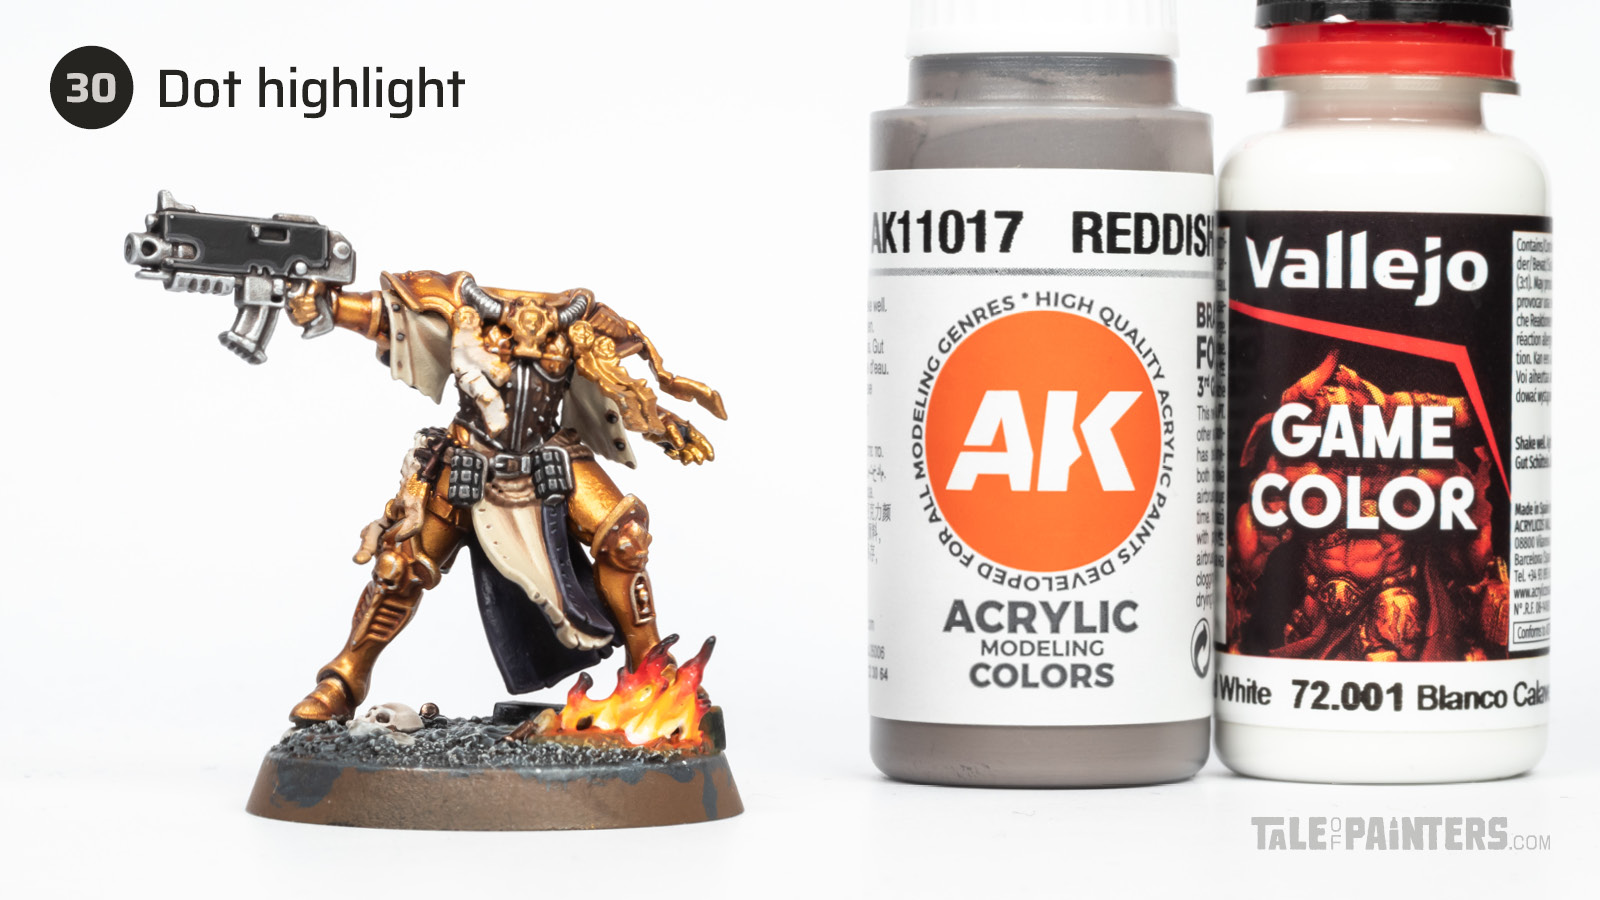

Mix AK 3rd Gen Reddish Grey [or Stormvermin Fur] about 1:1 with Vallejo Game Color White [or White Scar] and apply dots to the rivets and corners of the gun casing and grenades.
How to paint purity seals
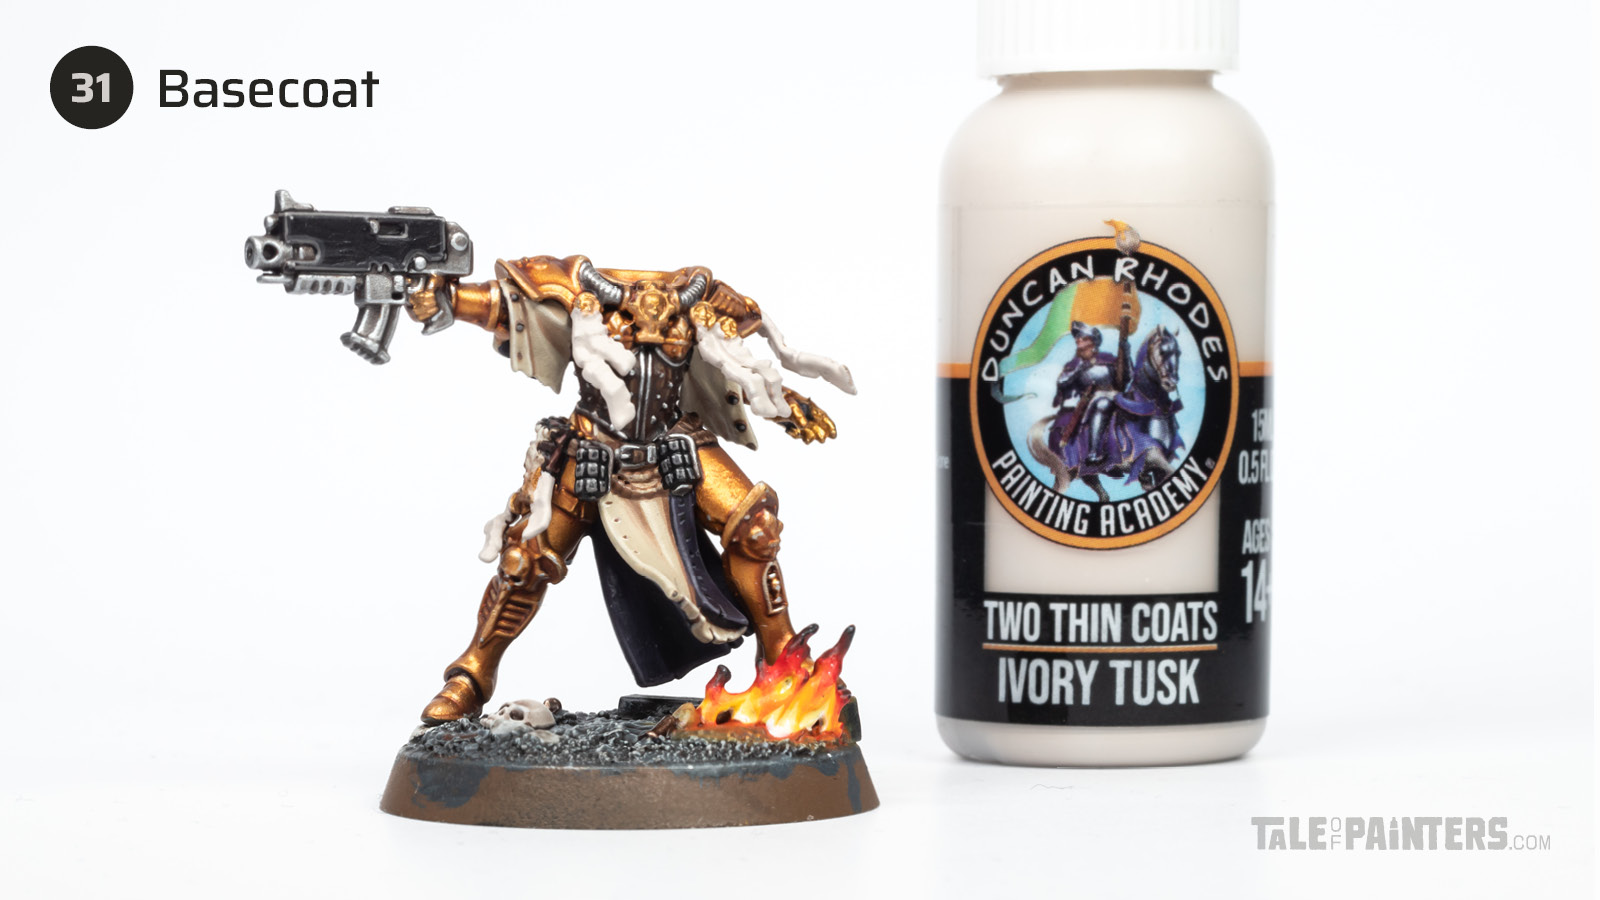

Basecoat the purity seals with Two Thin Coats Ivory Tusk [or a 1:1 mix of Pallid Wych Flesh and Rakarth Flesh].
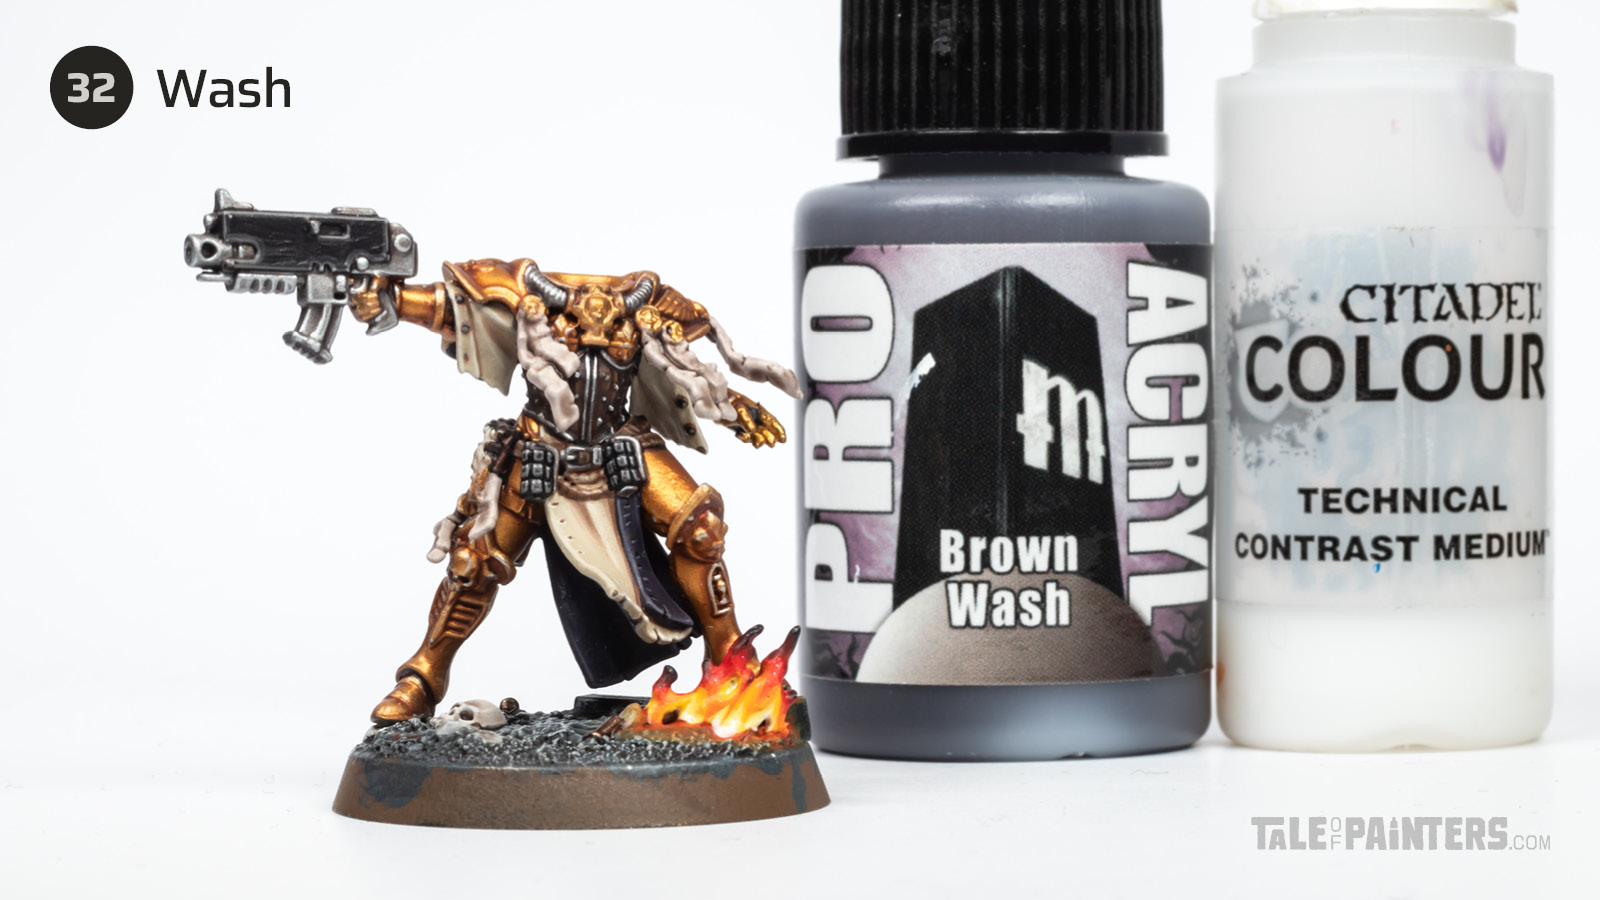

Wash the parchment with a 1:1 mix of Pro Acryl Brown Wash [or Agrax Earthshade] and Contrast Medium.
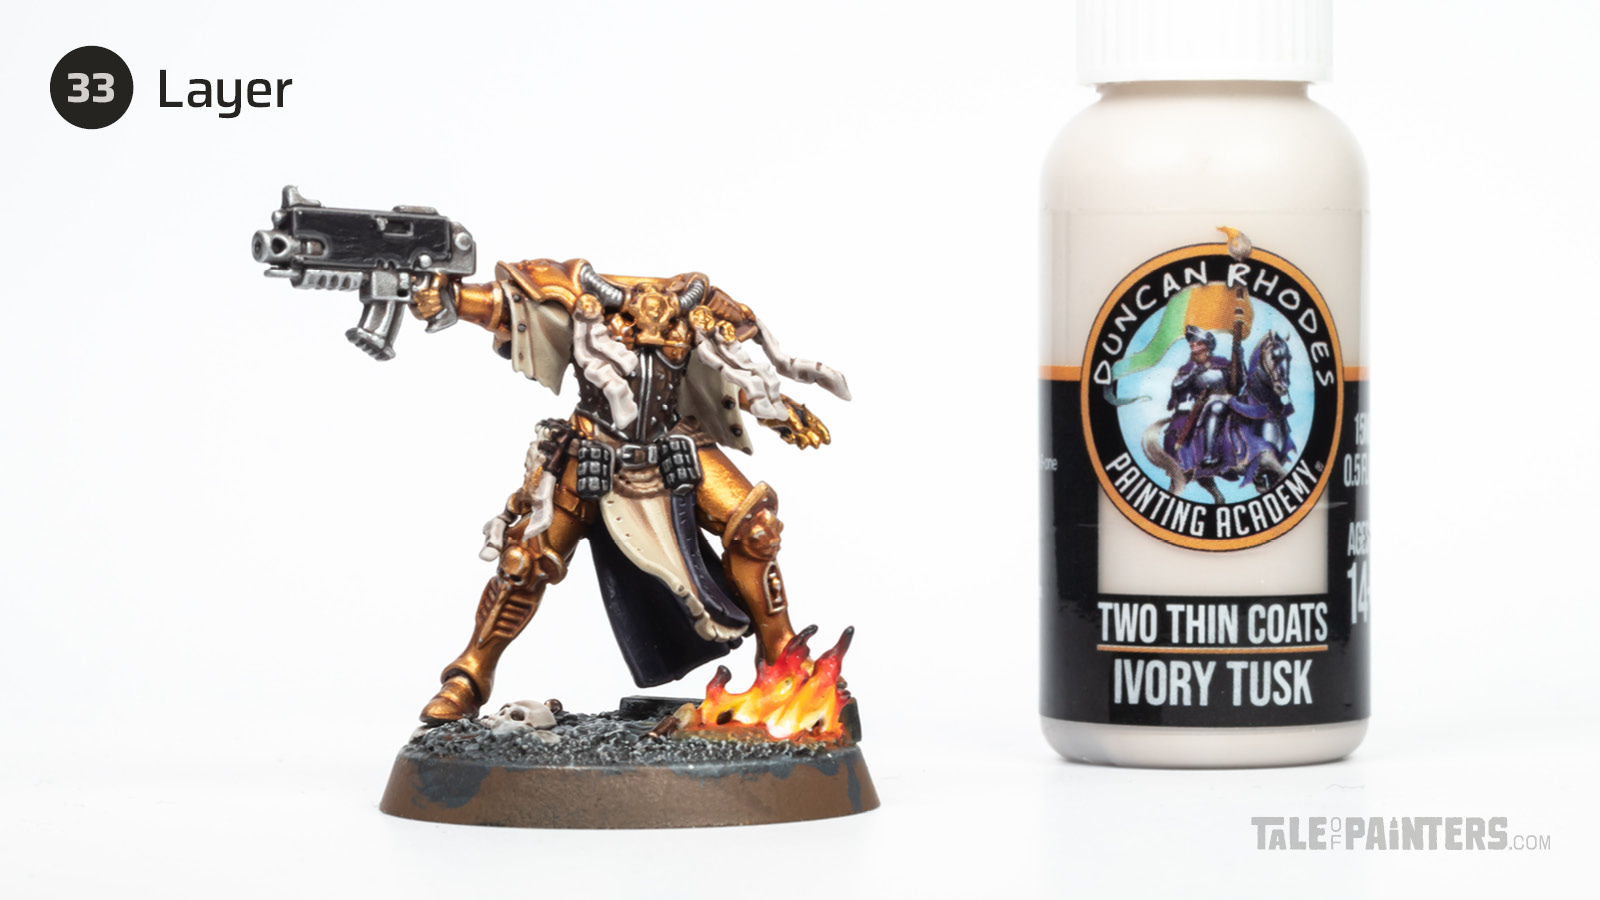

Layer with Two Thin Coats Ivory Tusk [or a 1:1 mix of Pallid Wych Flesh and Rakarth Flesh], omitting the recesses.
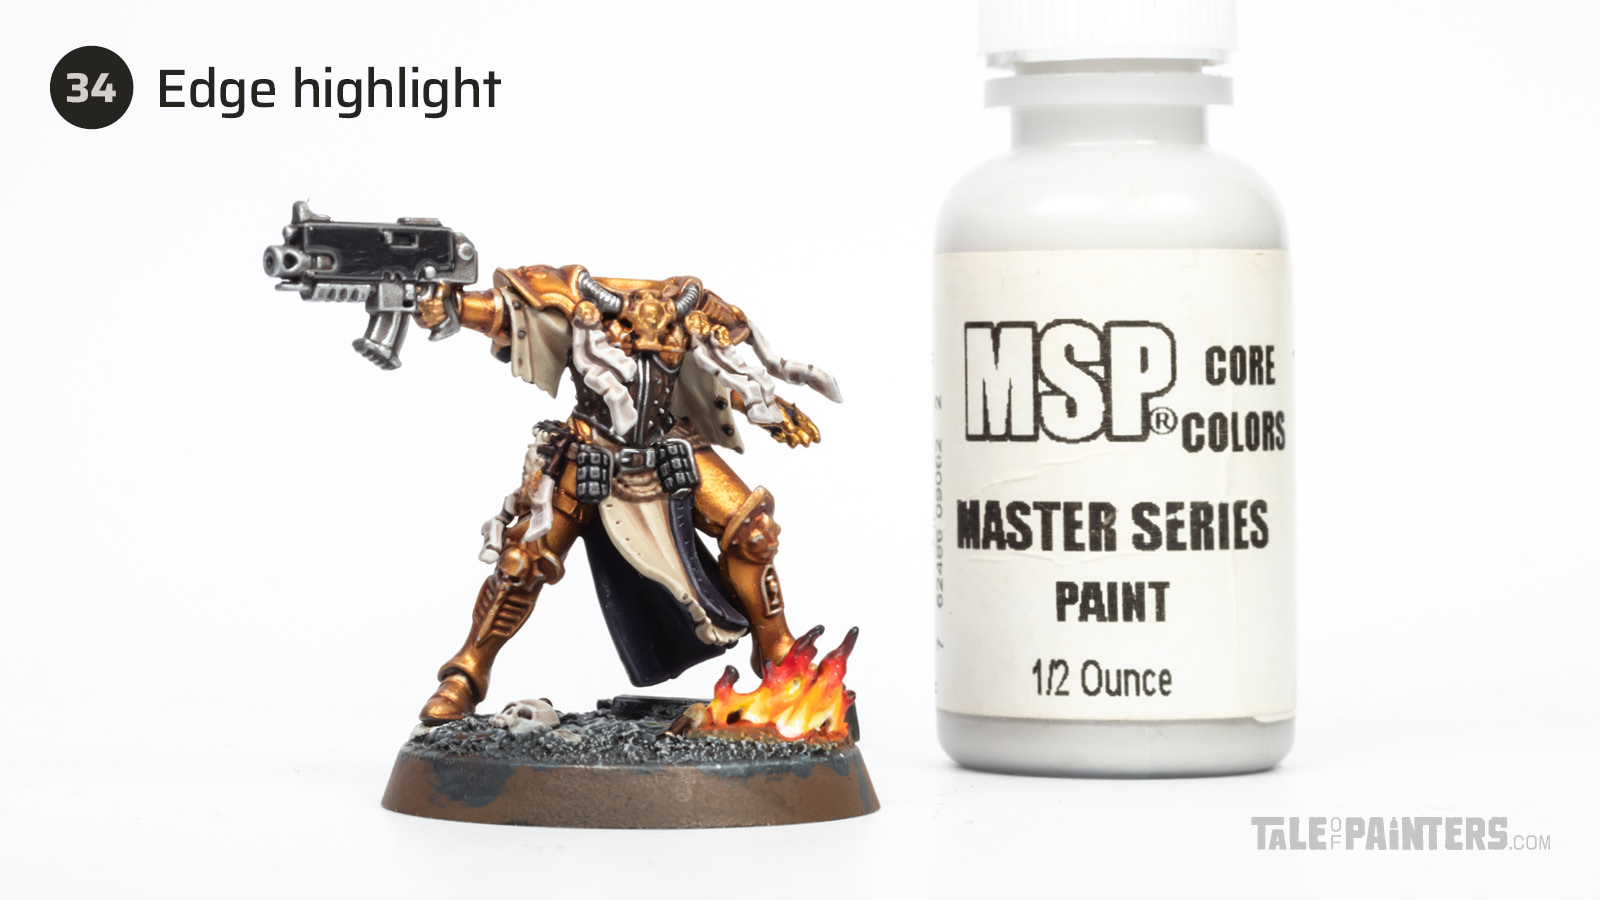

Highlight the parchment with Reaper Master Series Leather White [or Pallid Wych Flesh].
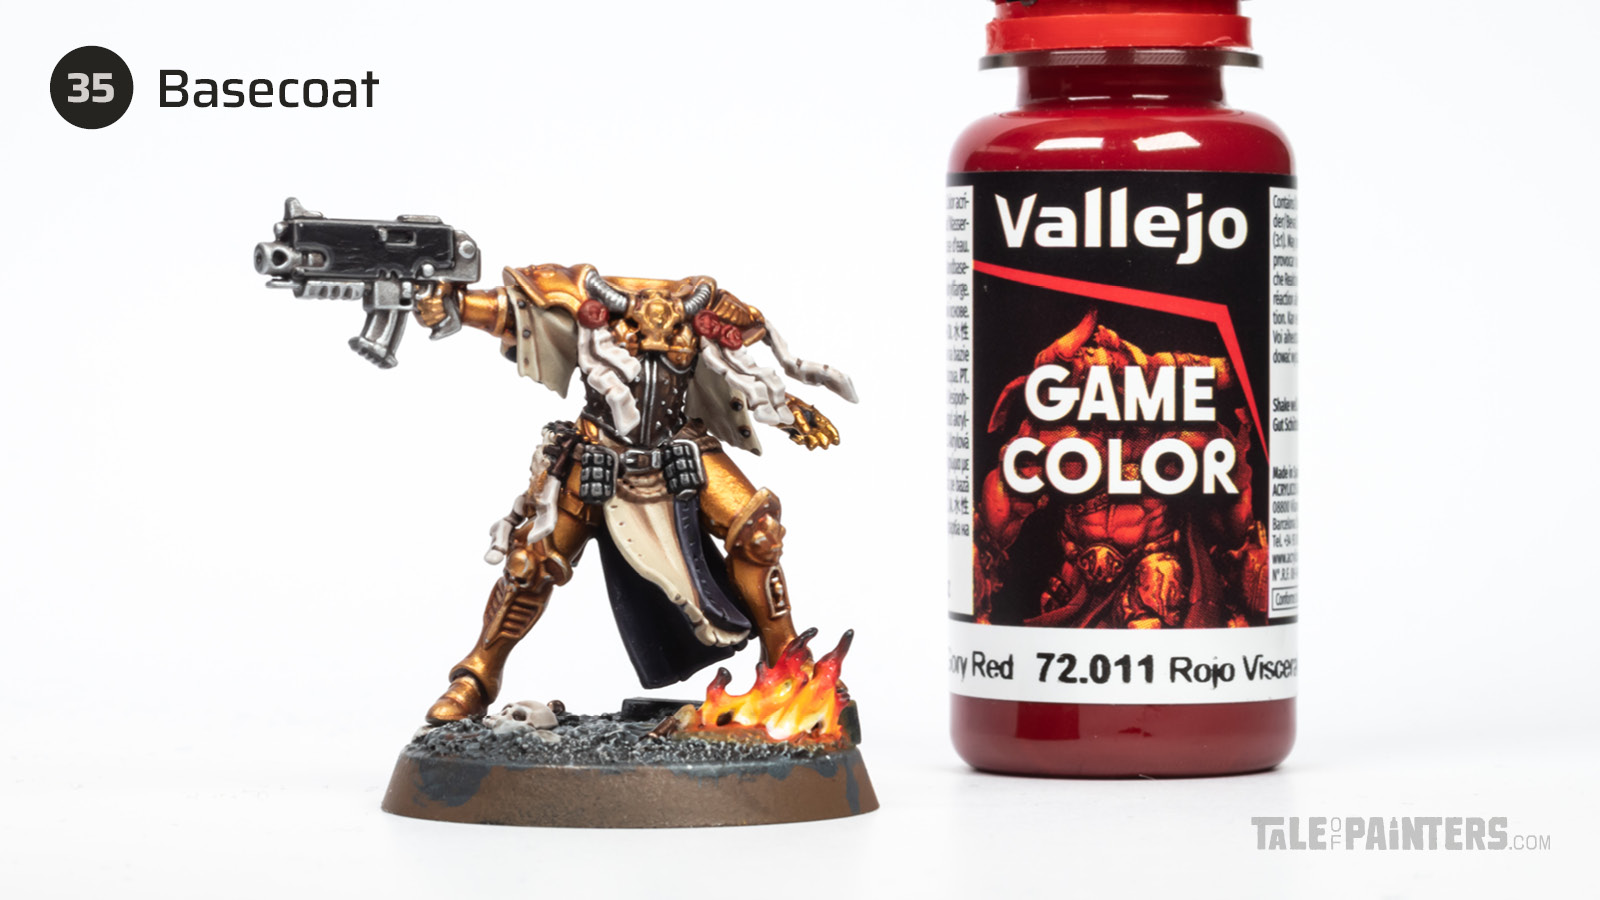

Basecoat the wax seals with Vallejo Game Color Gory Red [or Word Bearers Red].
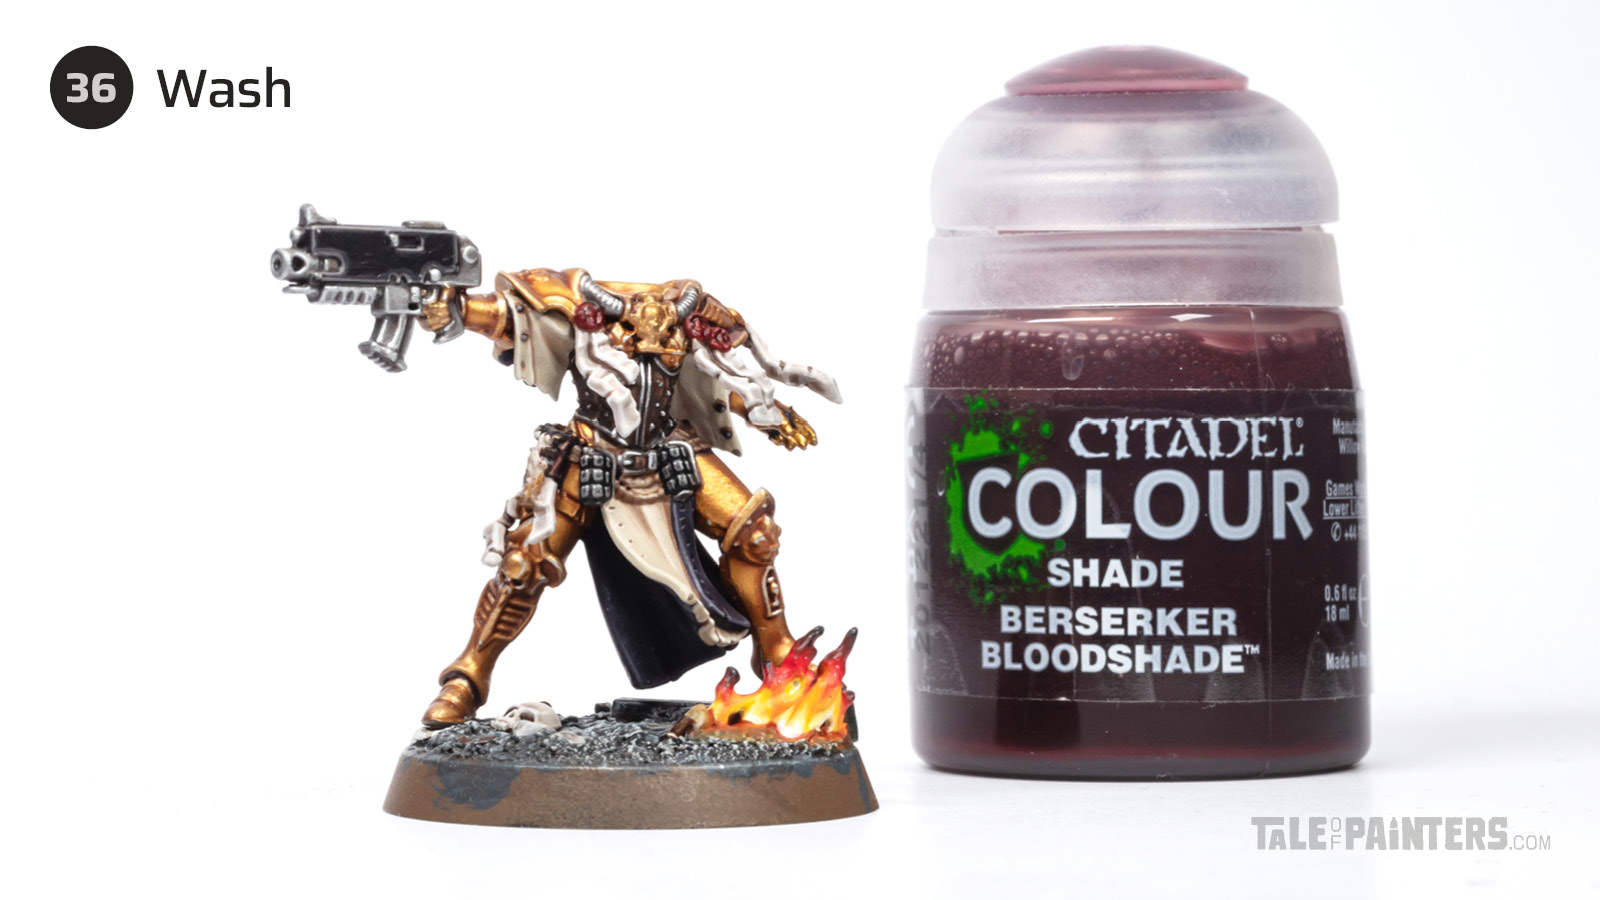

Wash the seals with Berserker Bloodshade.
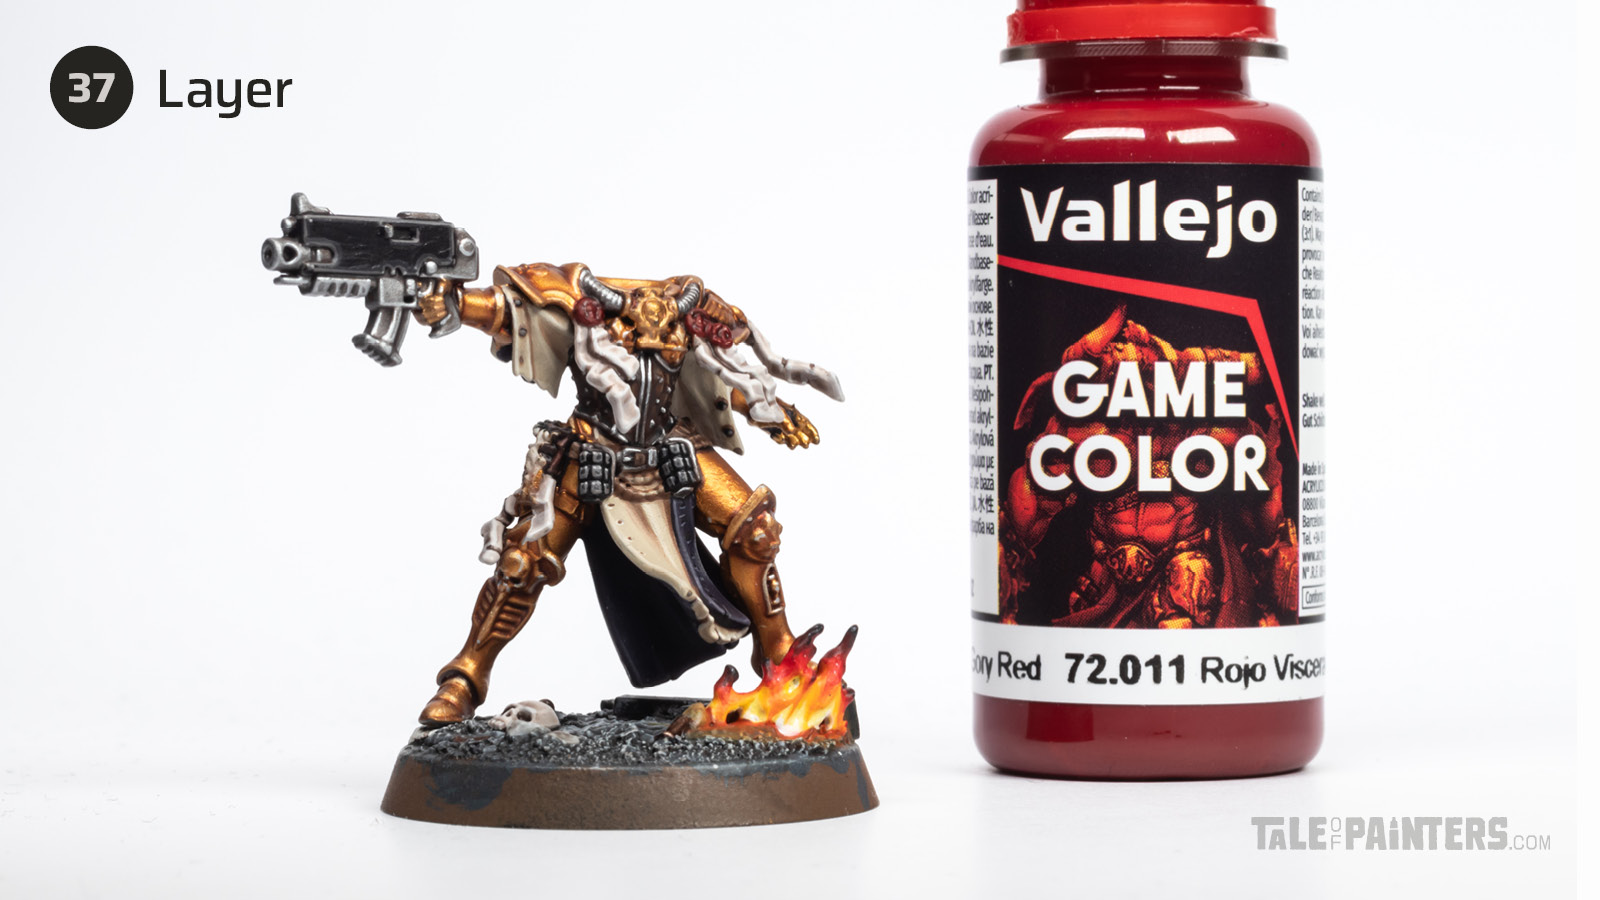

Layer with Game Color Gory Red [or Word Bearers Red], while leaving the recesses dark.
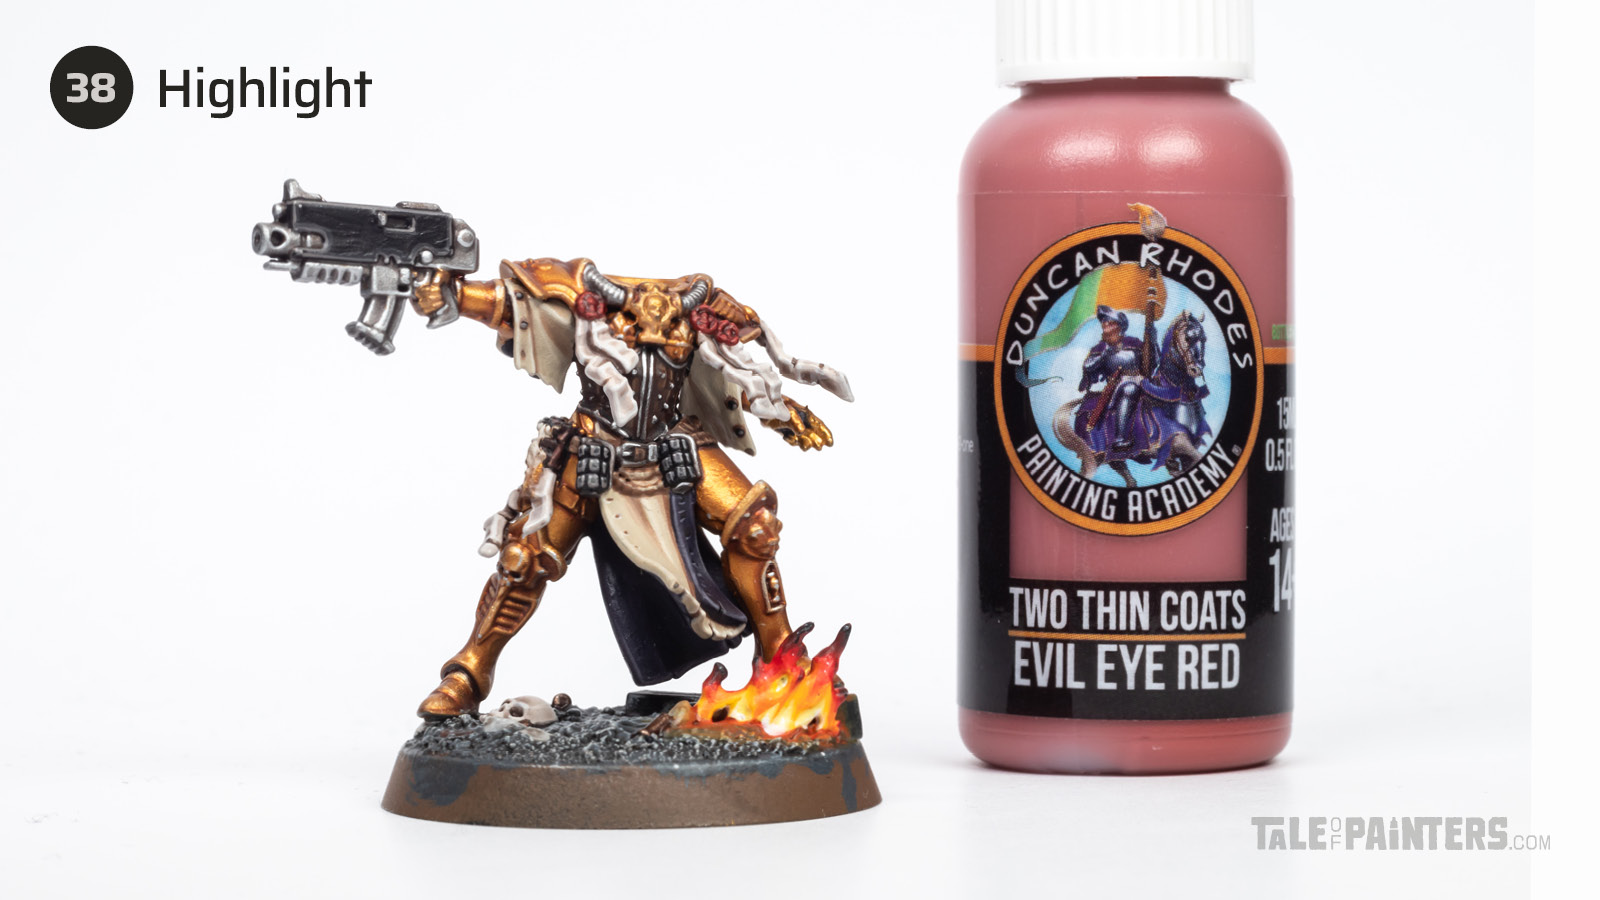

Highlight the red wax with Two Thin Coats Evil Eye Red [or mix Word Bearers Red with Ratskin Flesh].
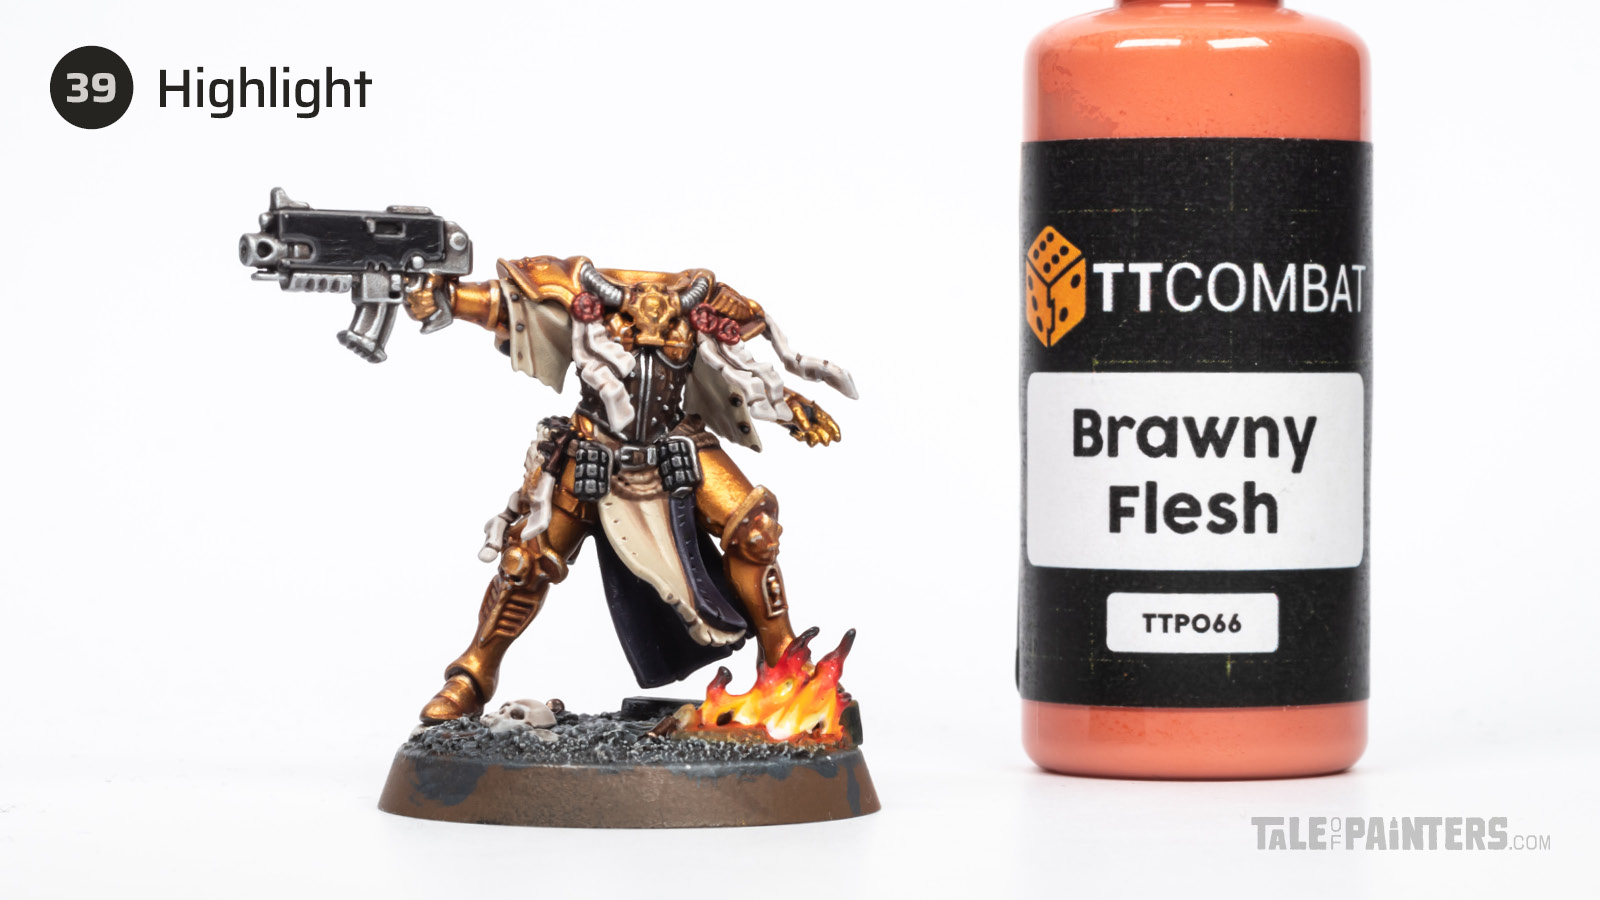

Add a final highlight of TT Combat Brawny Flesh [or Ratskin Flesh].
Icons and additional details
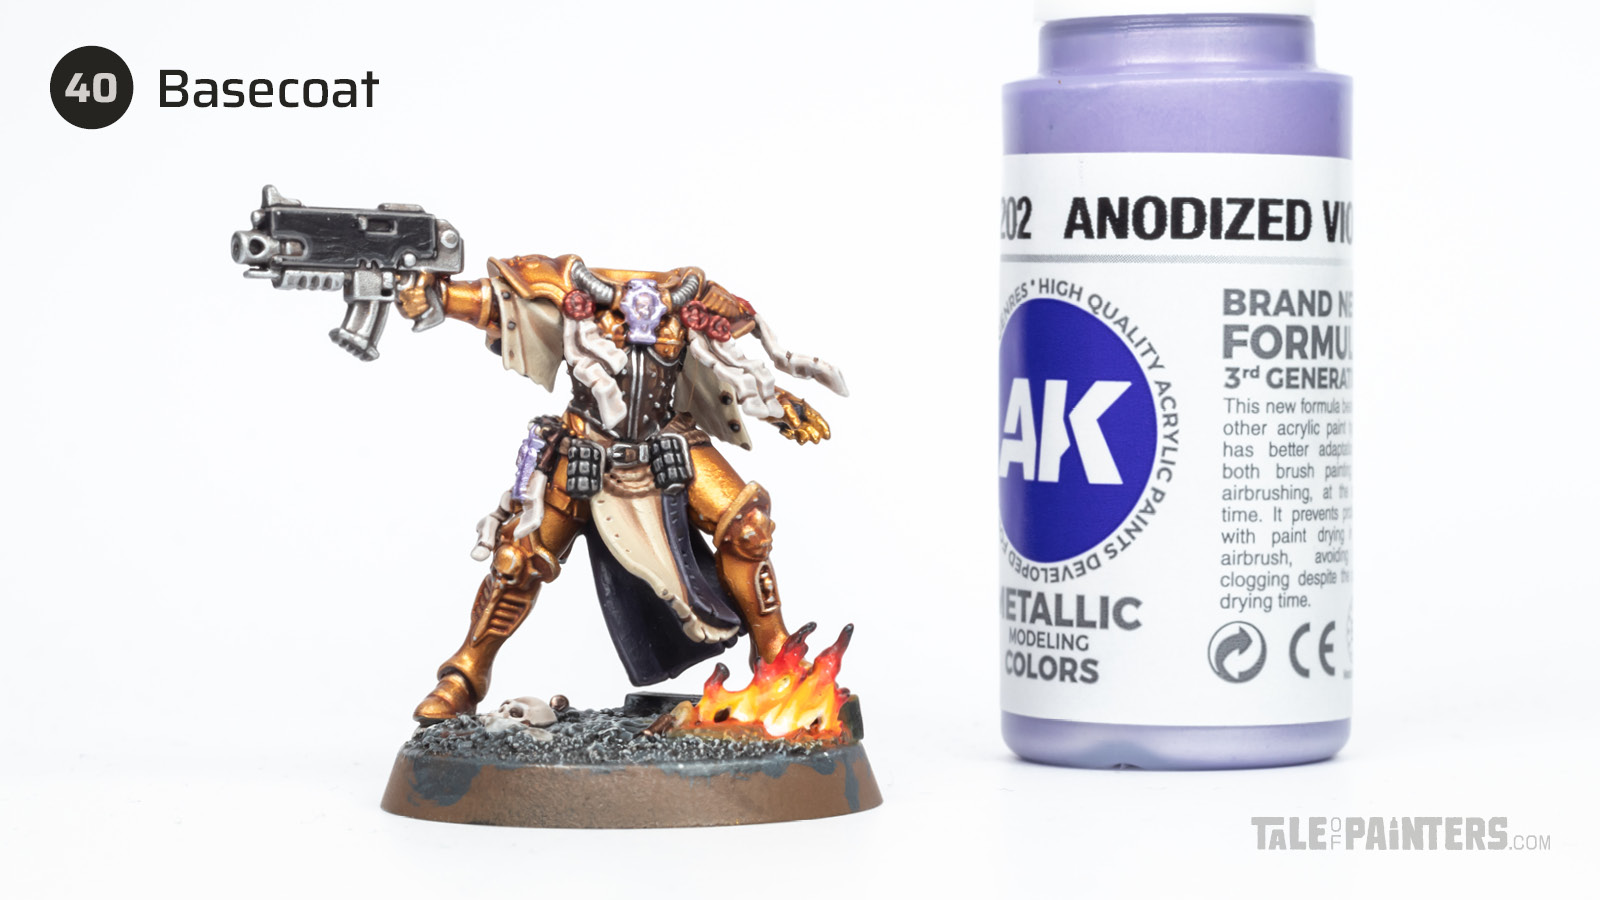

Basecoat the Inquisitorial icons with AK 3rd Gen Anodized Violet [or just use Iron Hands Steel or Ironbreaker].
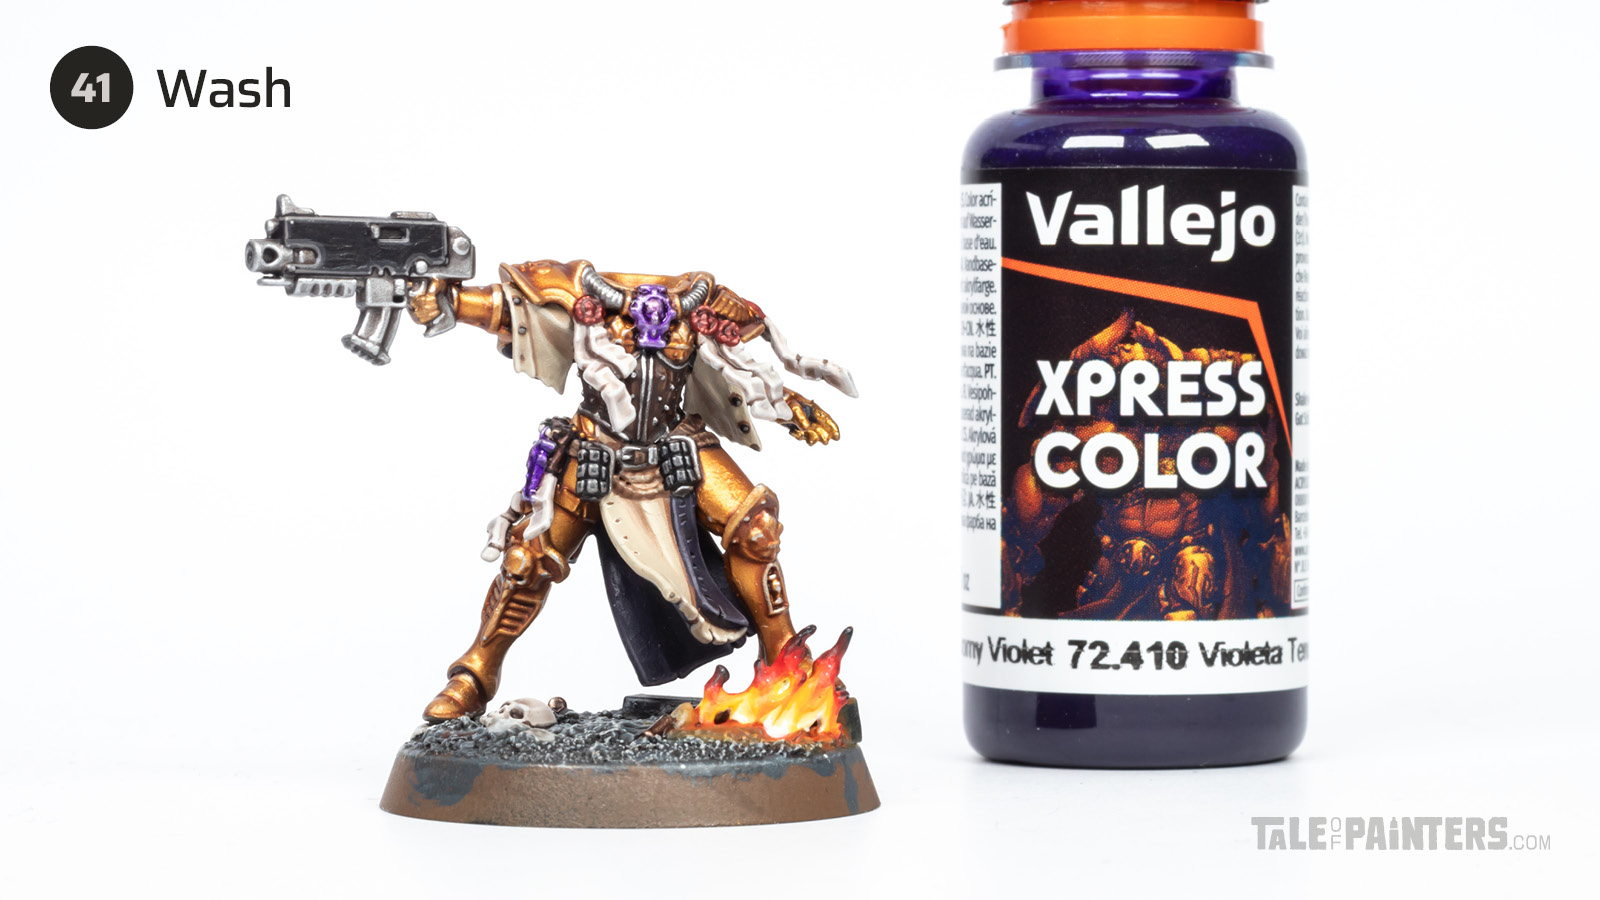

Apply a coat of Vallejo Xpress Color Gloomy Violet [or Luxion Purple].
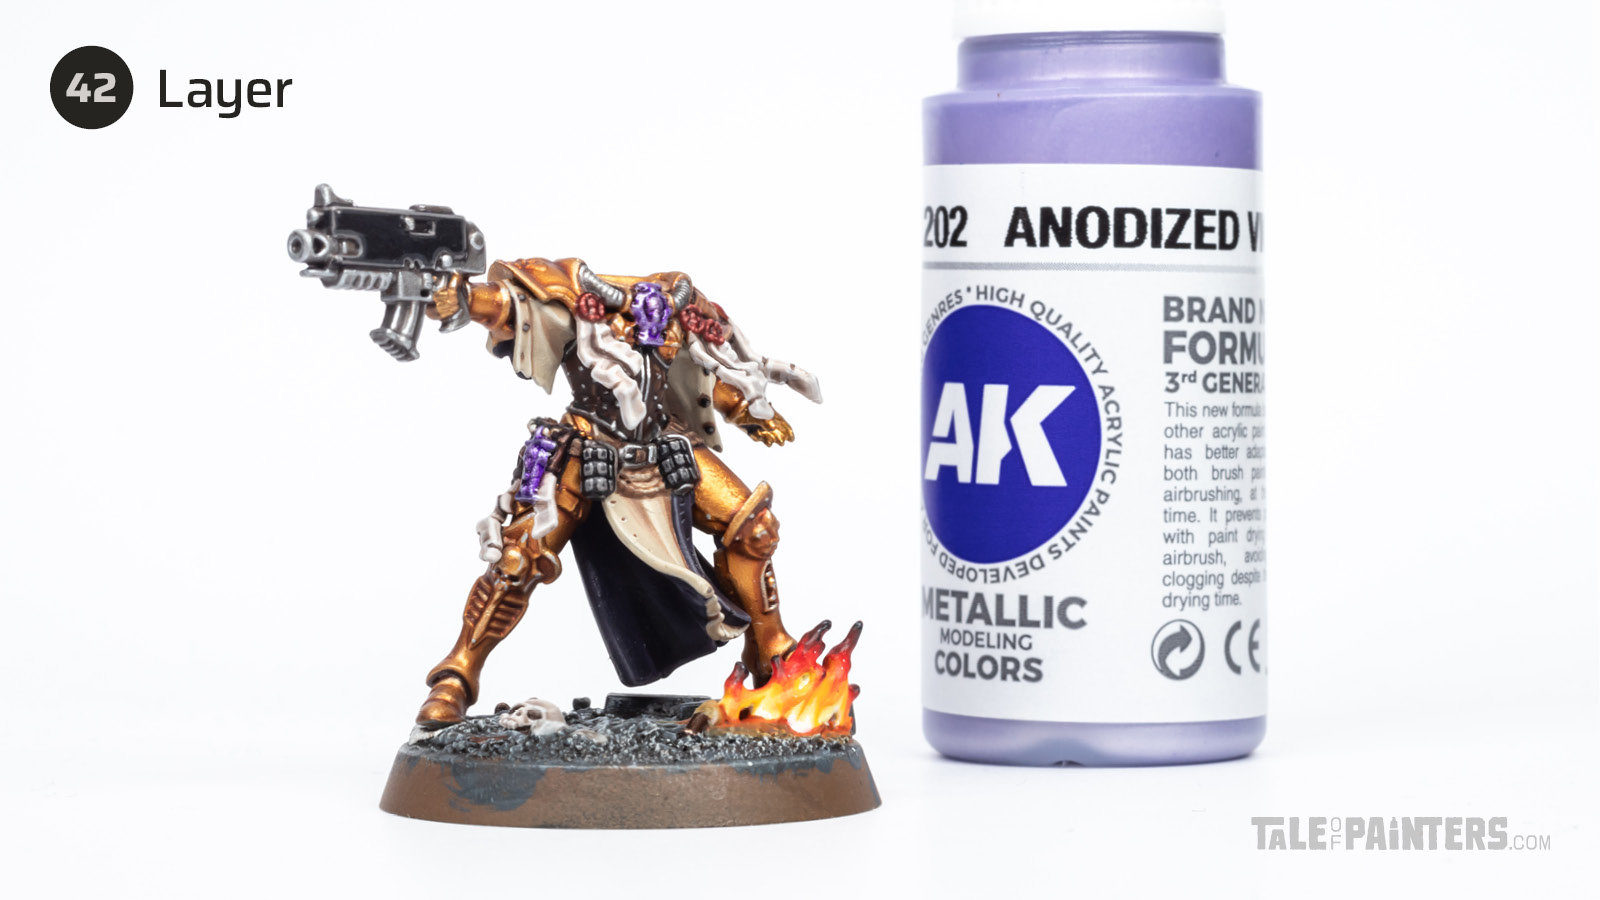

Highlight the icons with AK 3rd Gen Anodized Violet [or just use Iron Hands Steel or Ironbreaker, and then apply a glaze of Luxion Purple thinned with Contrast Medium].
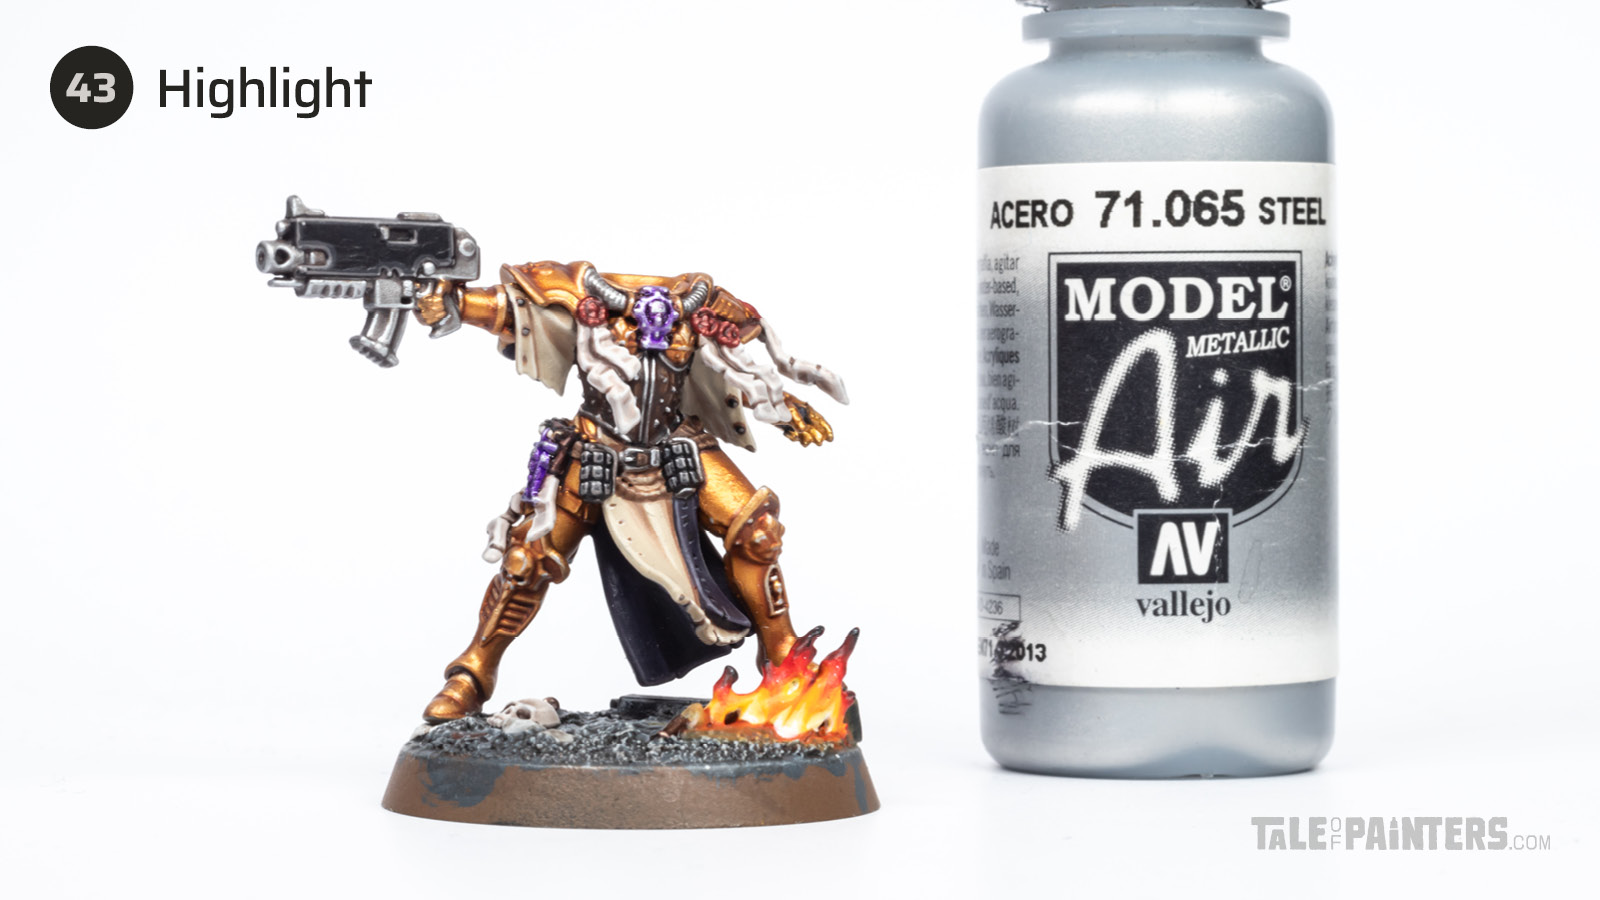

Add a final thin highlight of Vallejo Model Air Steel [or Stormhost Silver or Runefang Steel].
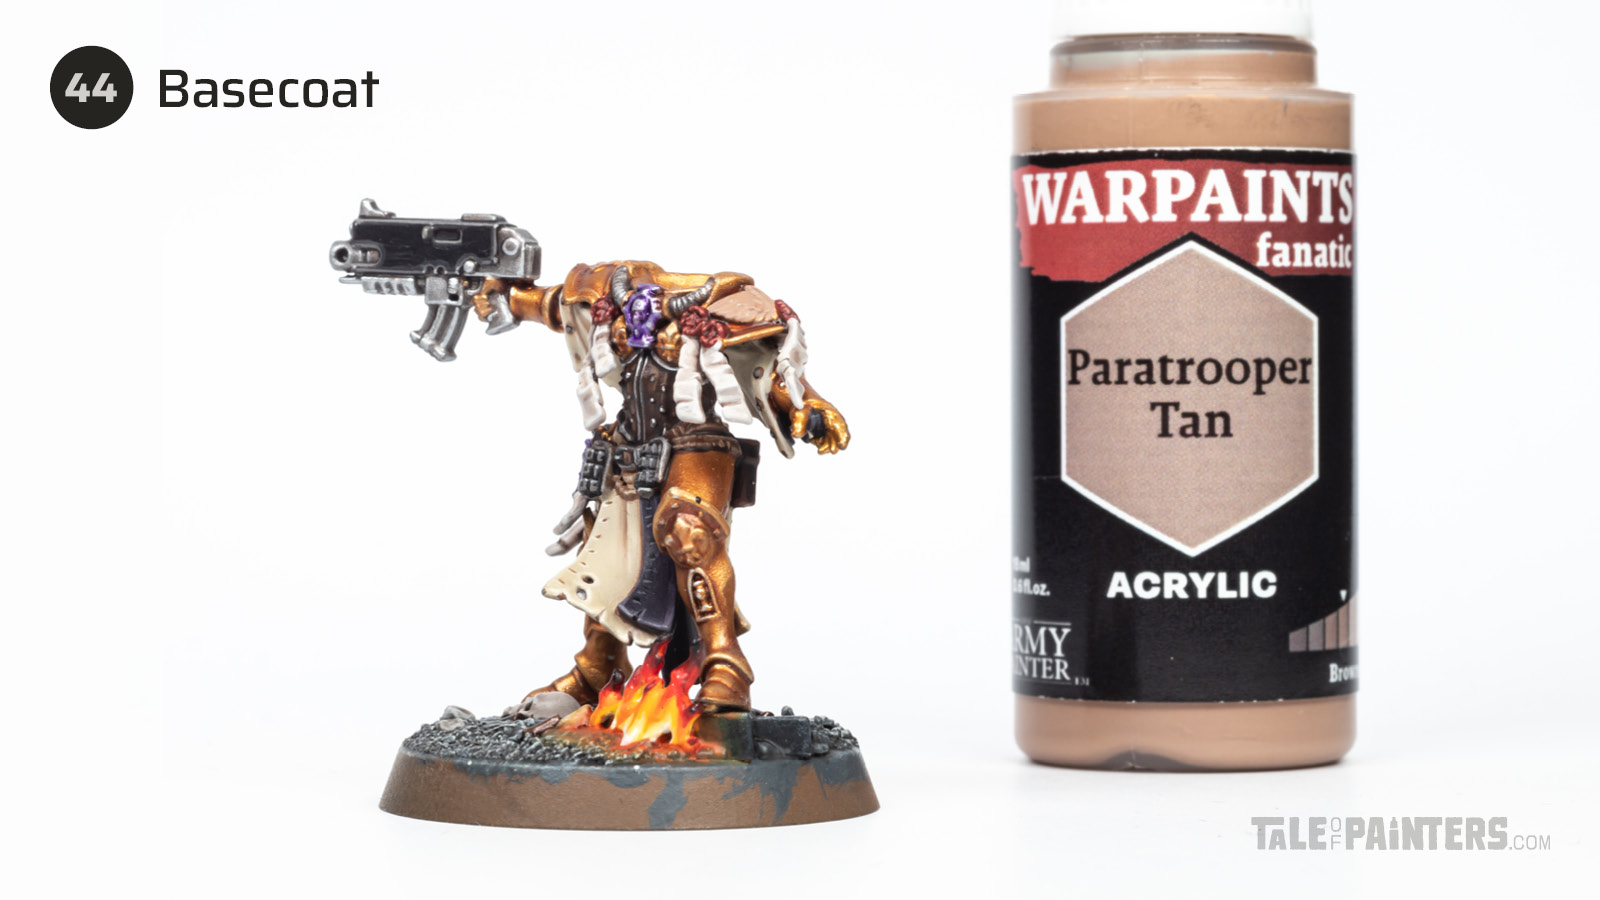

Basecoat the icons on the shoulder pads with Warpaints Fanatic Paratrooper Tan [or Steel Legion Drab].
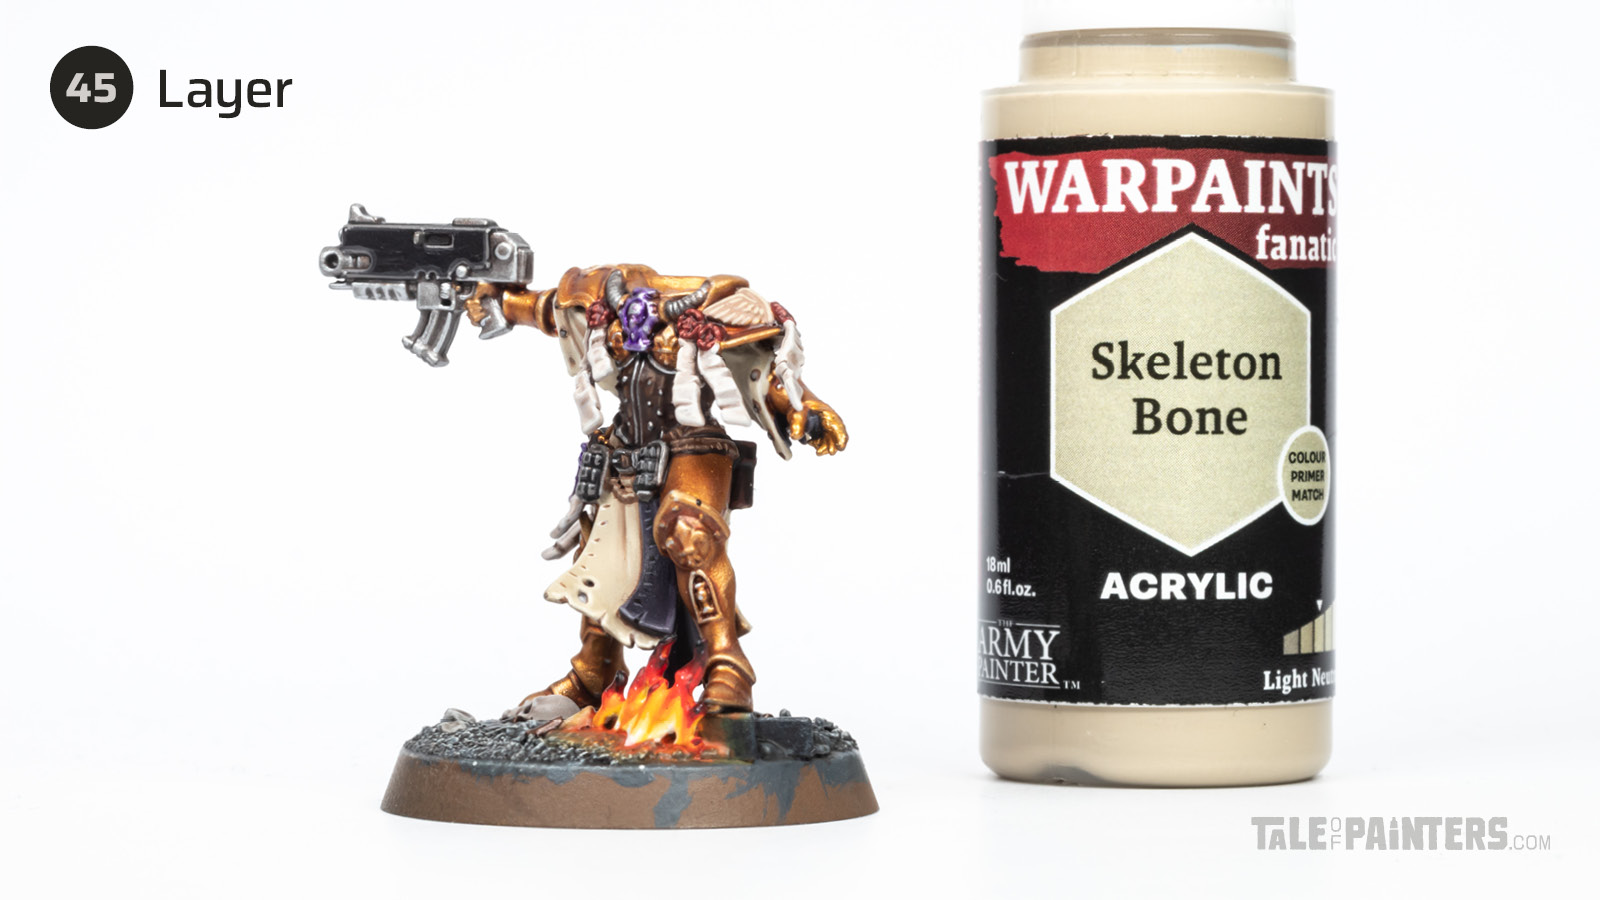

Layer with Fanatic Skeleton Bone [or Ushabti Bone] while omitting the recesses.
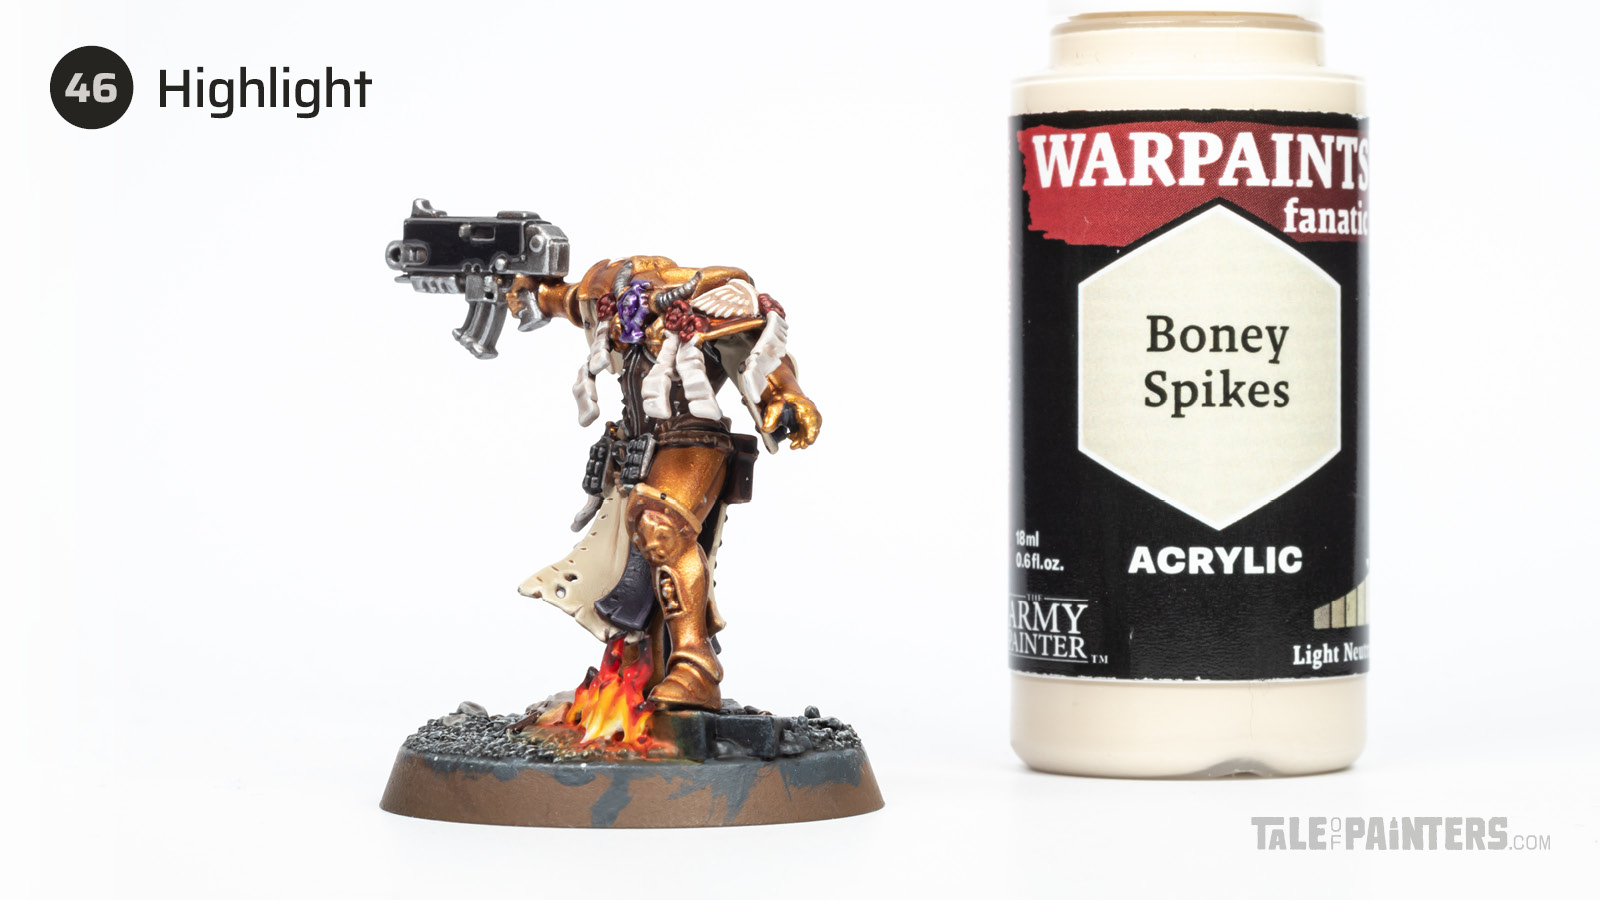

Highlight with Fanatic Boney Spikes [or Screaming Skull].
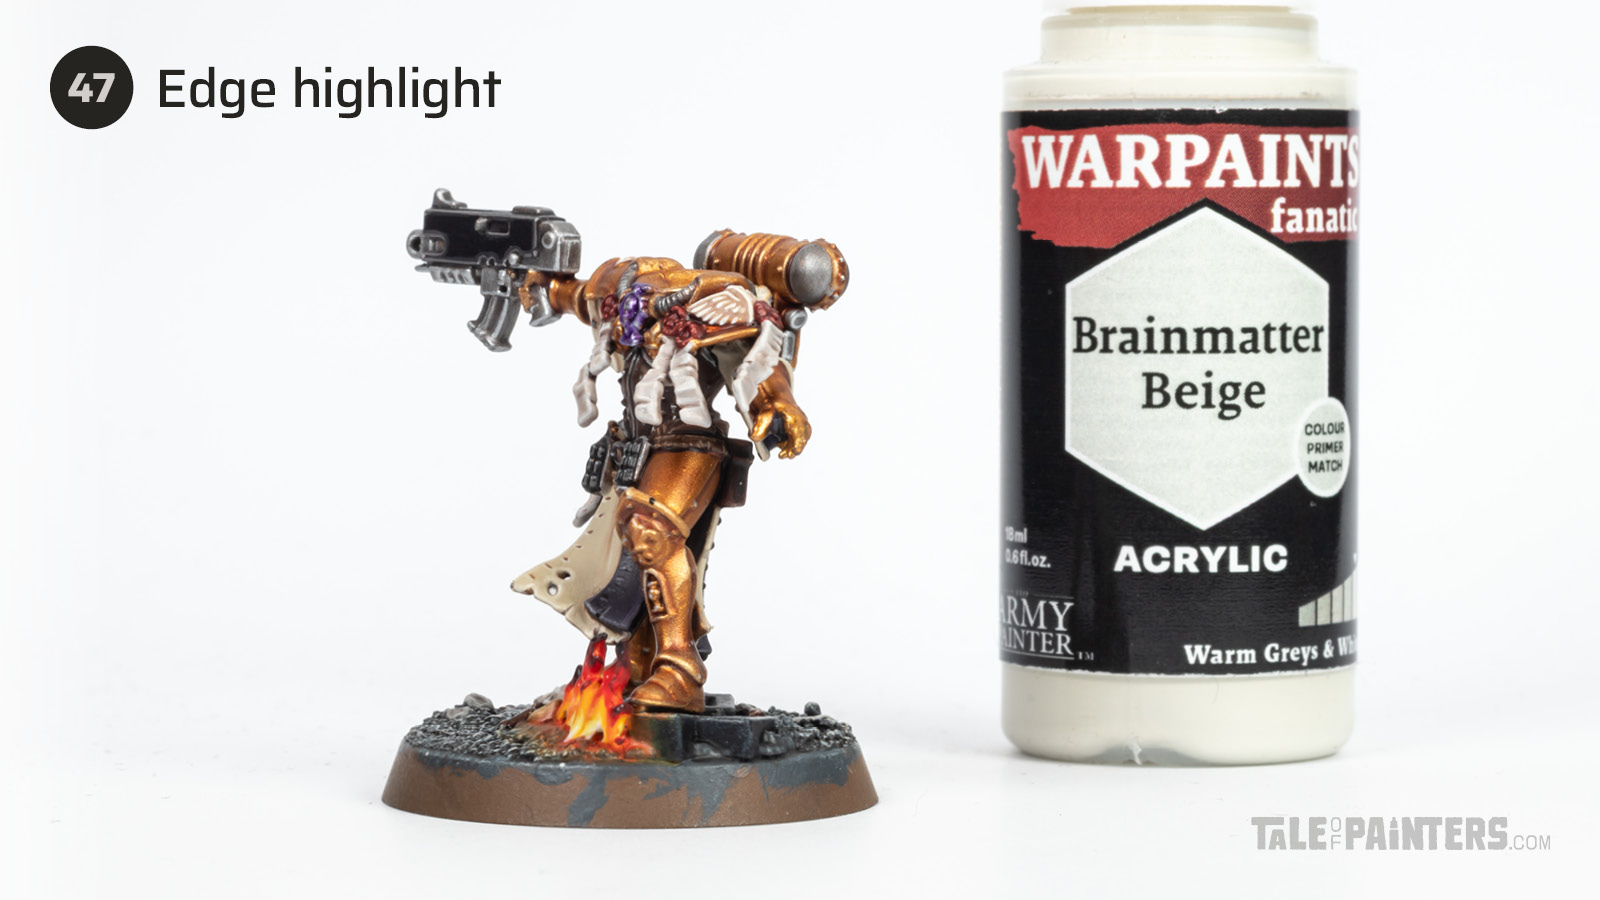

Add an even finer highlight of Fanatic Brainmatter Beige [or mix Screaming Skull with White Scar].
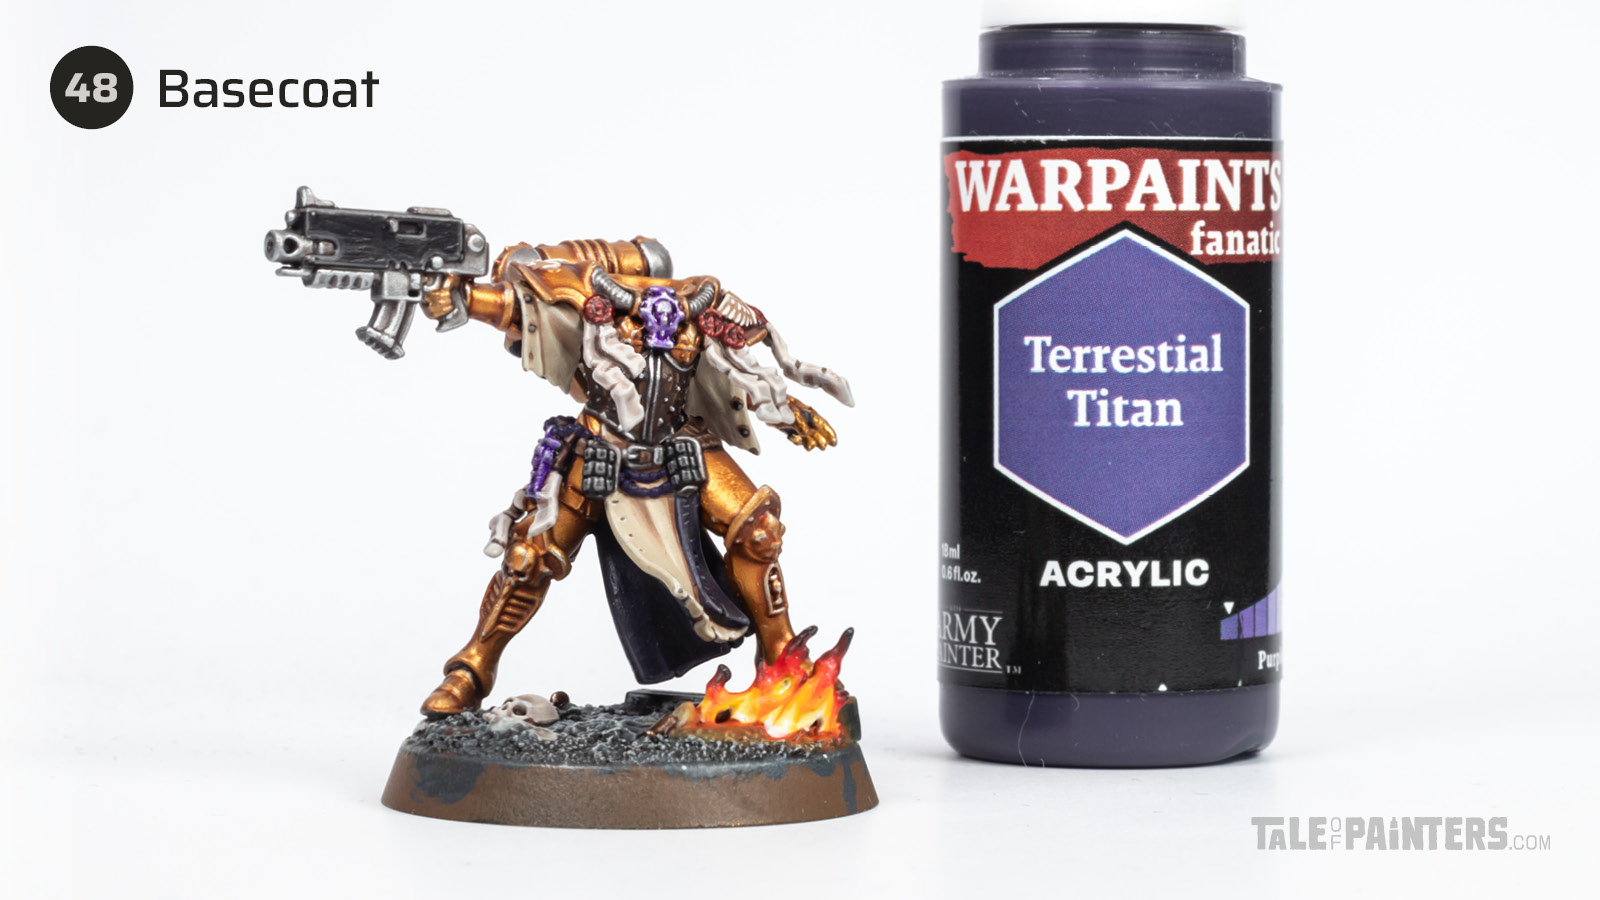

Basecoat the rosary beads with Warpaints Fanatic Terrestrial Titan [or Naggaroth Night]
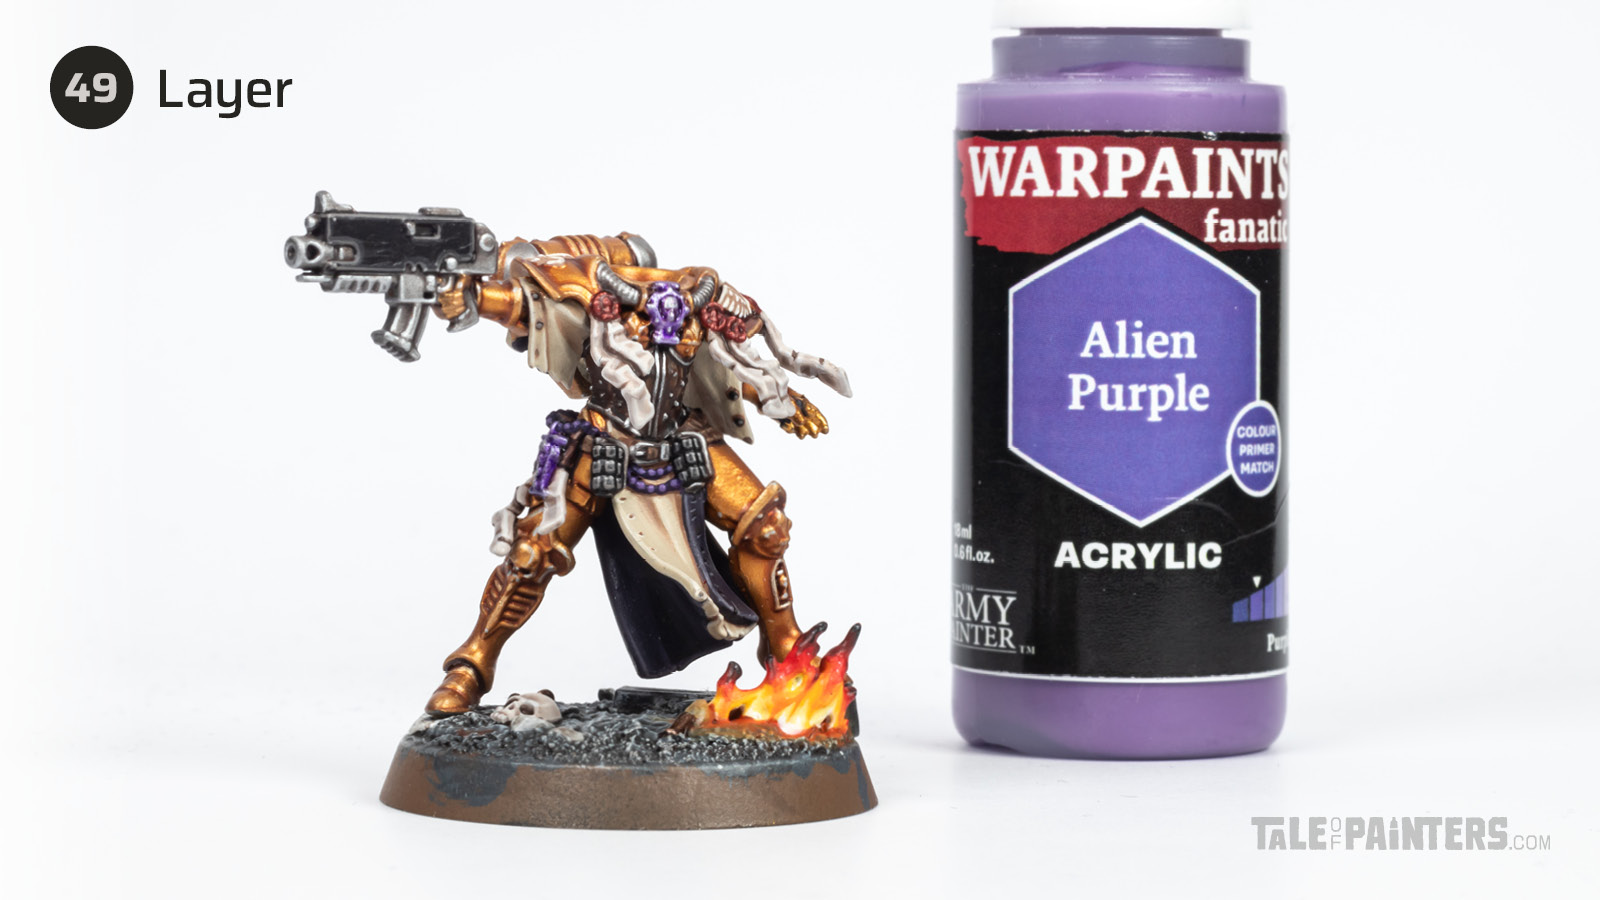

Layer the beads with Fanatic Alien Purple [or Genestealer Purple].
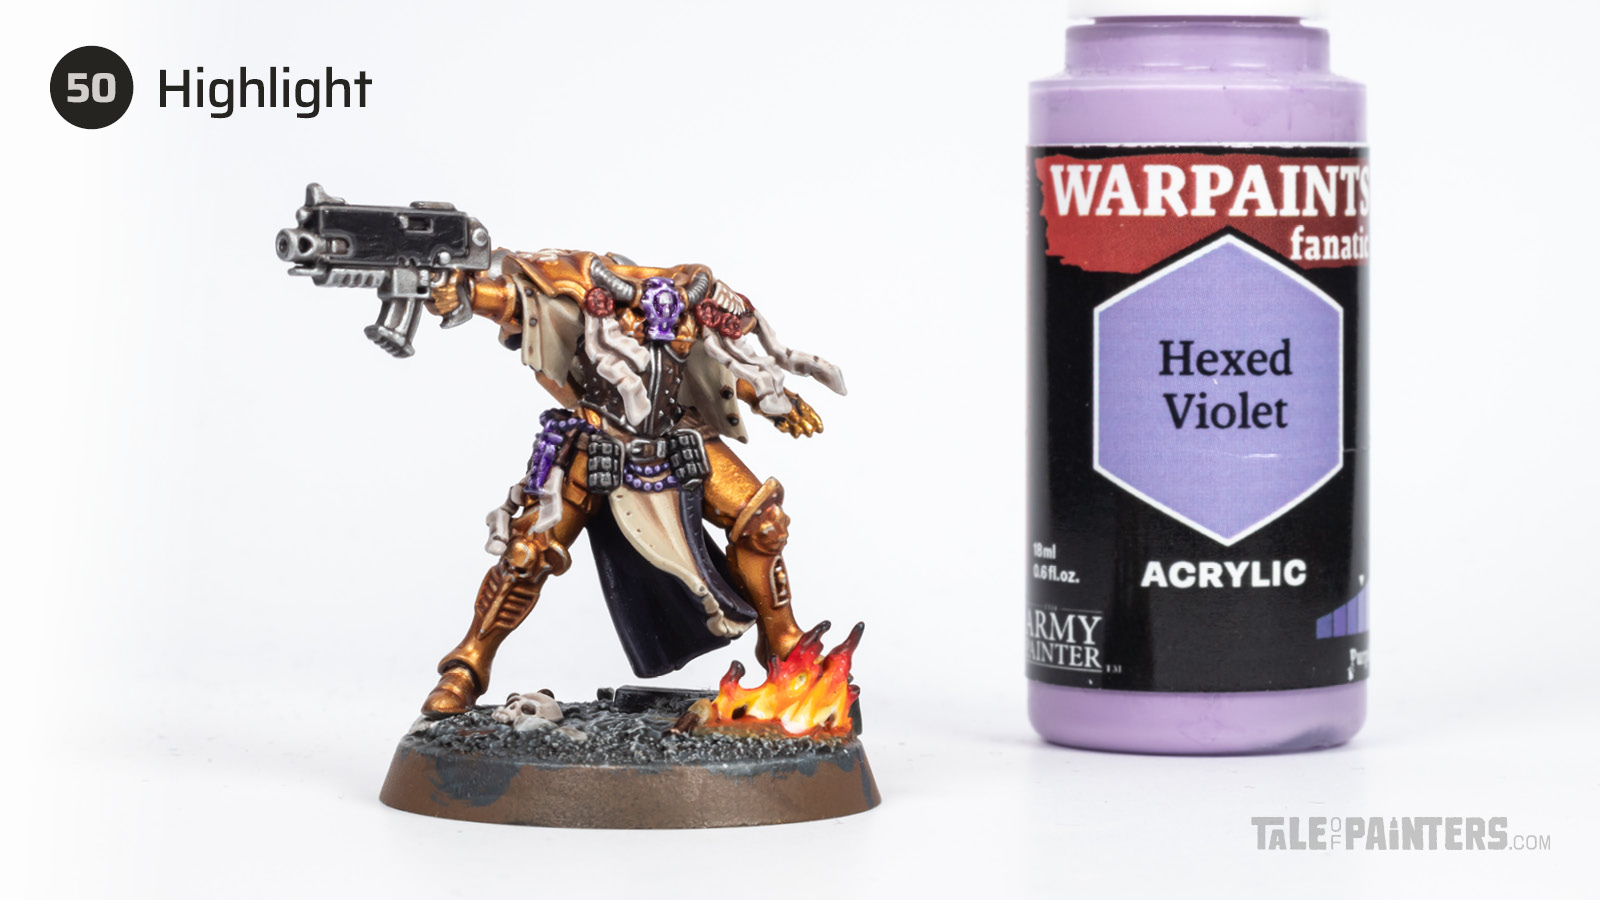

Highlight with Warpaints Fanatic Hexed Violet [or Dechala Lilac].
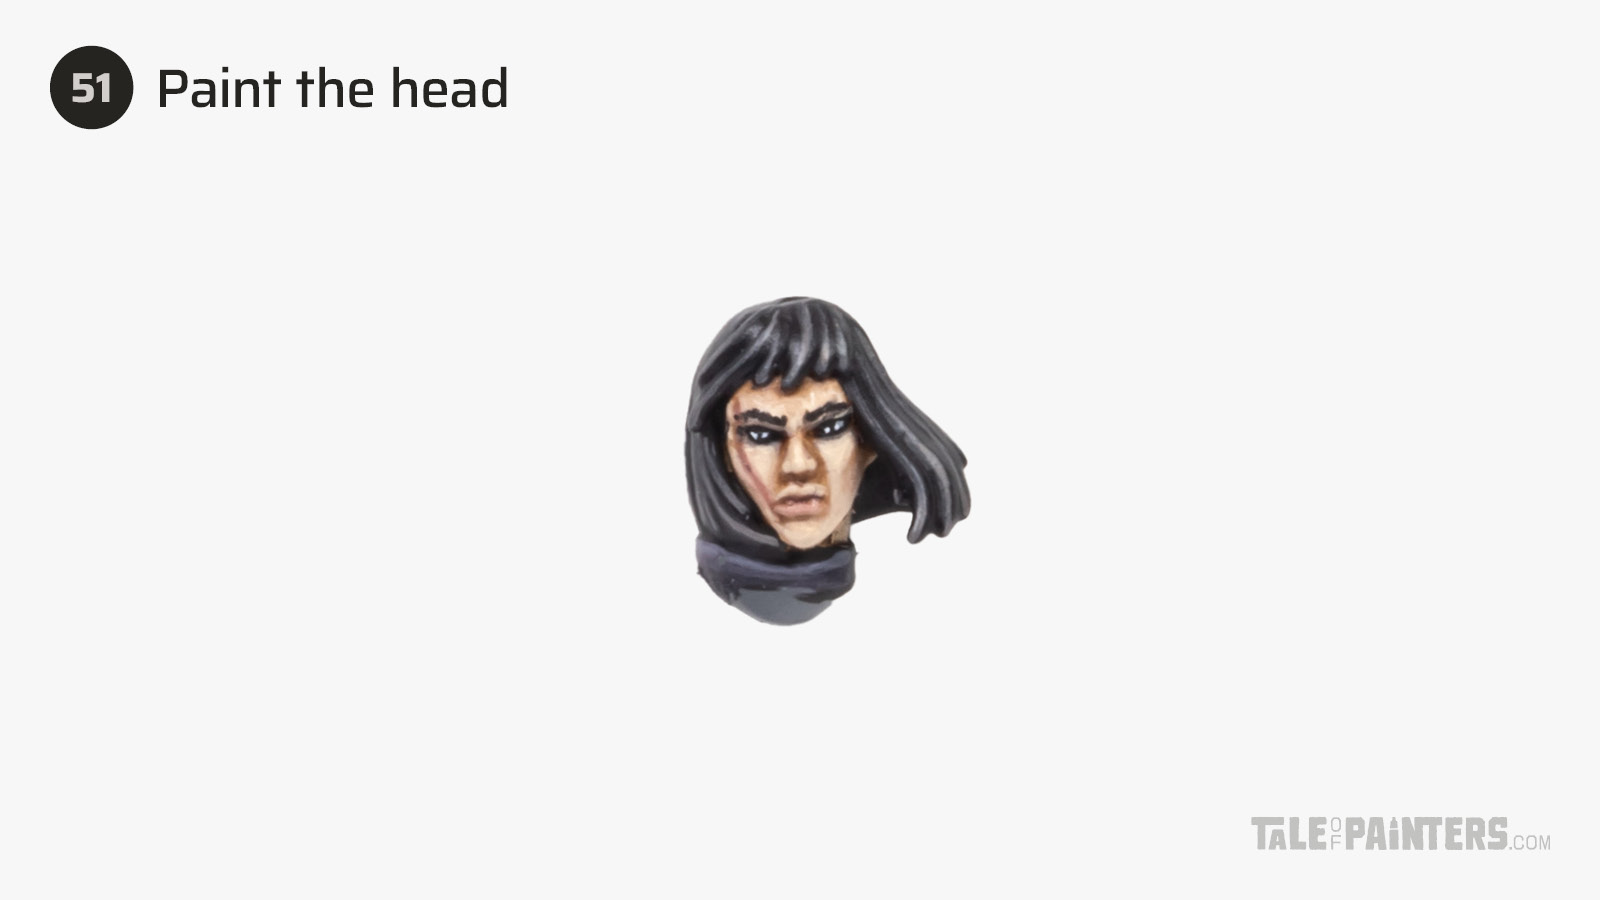

To learn how I painted Sister Tariana Palos’ head check out this tutorial. I painted the head a while ago with The Army Painter’s Skintones set, which is out of production by now.
Patreon bonus content: In the expanded version of this tutorial on my Patreon, I updated the process to match The Army Painter’s current generation of Fanatic paints.
Finishing touches
At this point, I prepared the model for the final assembly. I checked the model for any mistakes I missed and corrected them, and glued the model together.
With the head attached, paint the trim of the base with Vallejo Game Color Black [or Abaddon Black] and add thin lines of black script to the purity seals. Glaze the left foot of the model with several thin coats of Fuegan Orange to represent the flames reflecting in the armour. Finally, varnish the model with a coat of Mr Hobby Premium Topcoat Flat or your favourite matt varnish (you can find a list of my matt varnish recommendations here).
Sister Tariana Palos painted by Stahly
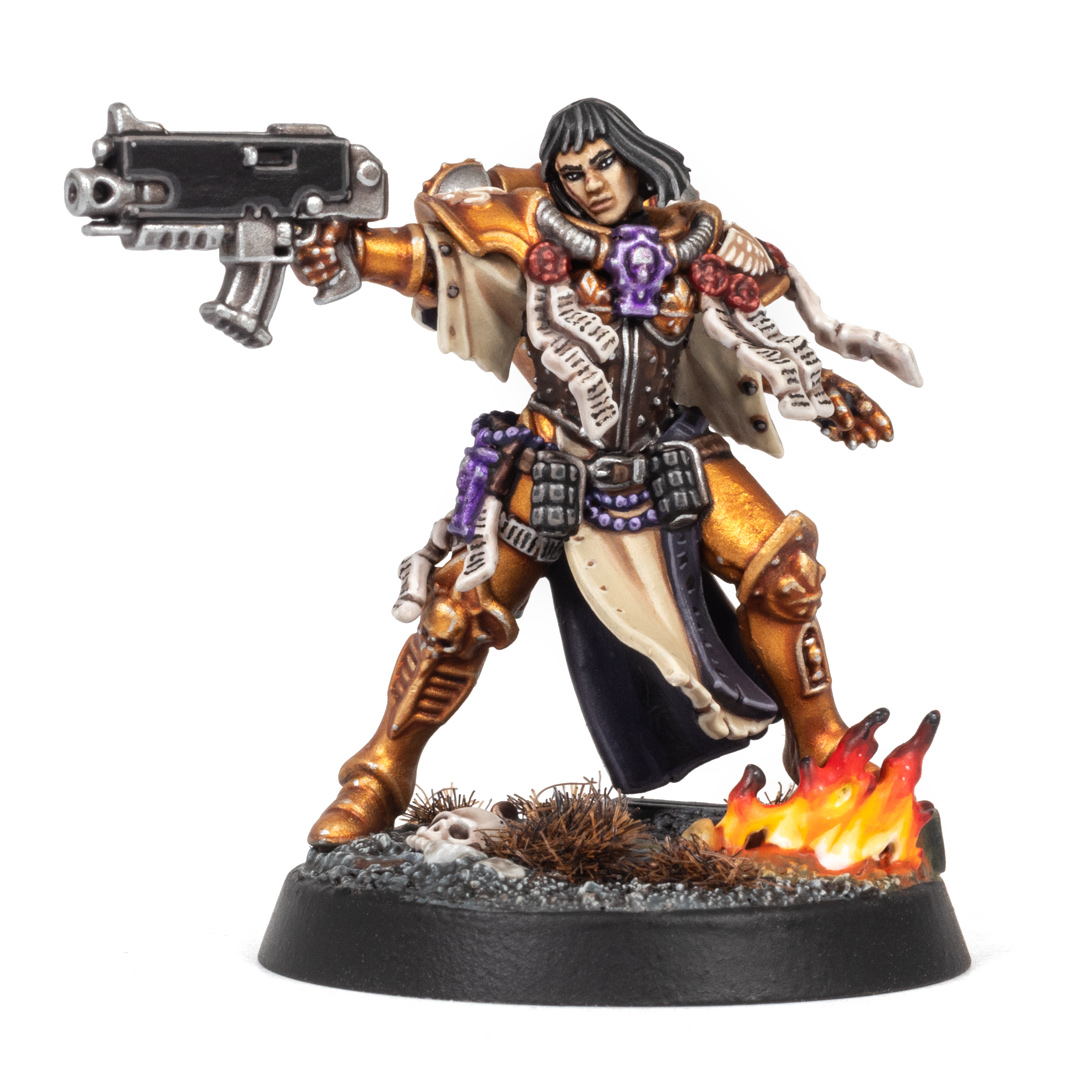

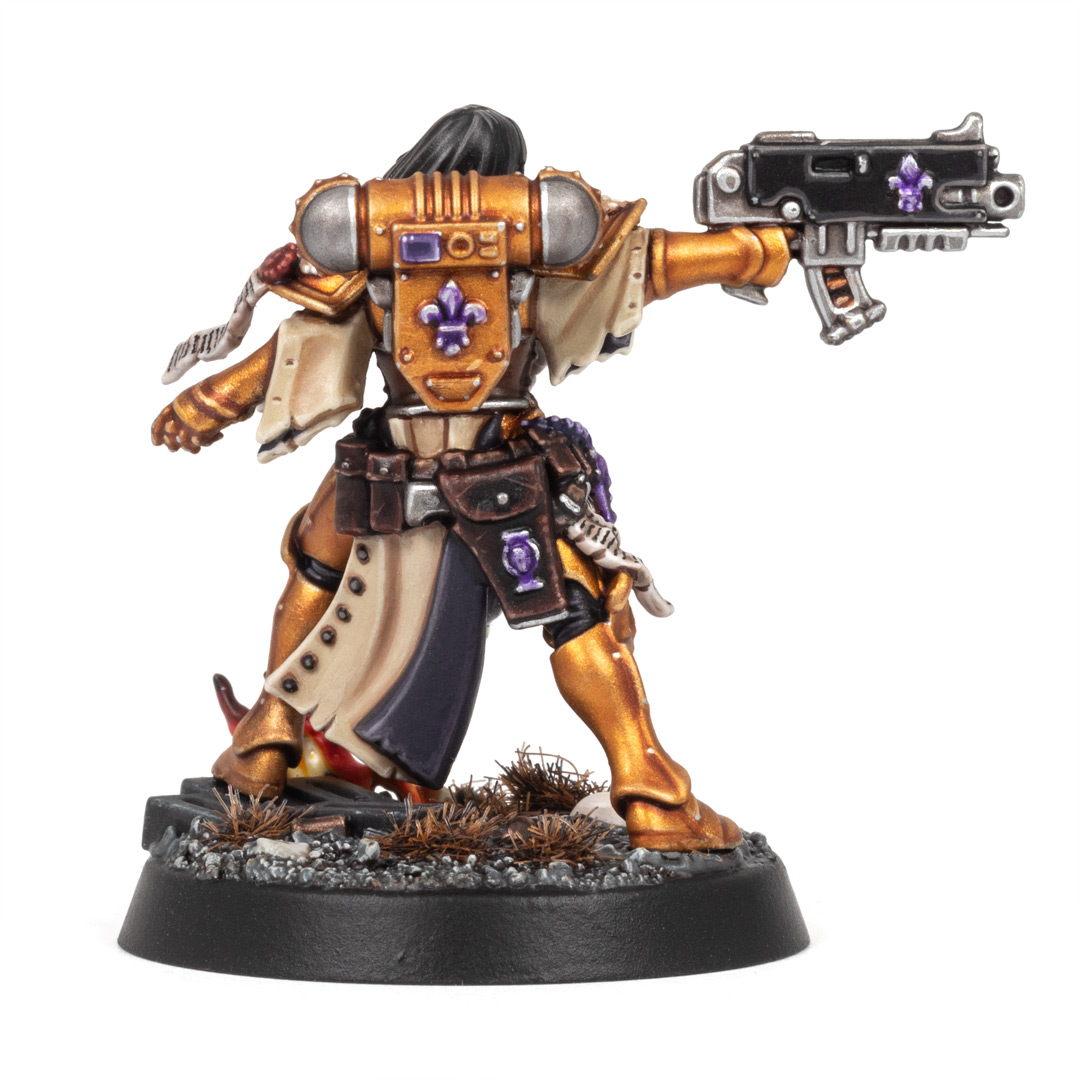

And here you can see my finalised version of Sister Tariana Palos, painted in the colours of The Order of the Golden Light. If you compare the model to the ‘Eavy Metal Showcase in the Sisters of Battle Codex, you’ll notice I’ve taken some creative liberties. For example, to contrast with the warm golden armour, I’ve used more violet, such as on the inner sides of the robes, the icons, and even shaded the steel with a dark purple. Overall, the painting time was about 9 hours, but since regular Sisters of Battle models are a bit less detailed, the time can be reduced with batch painting.
If you’d like to download this tutorial, please consider supporting me on Patreon. The PDF includes extra high-res images, as well as some additional guides:


You can get the expanded step-by-step tutorial for my Sisters of Battle here in my Patreon shop (or by becoming an Autarch tier member). This expanded version also covers the flames on the base, a darker leather tone, as well as an updated tutorial for the face.
Paints you will need for this tutorial:
AK 3rd Gen
- AK Anodized Violet [or Iron Hands Steel]
- AK Cork [or Mournfang Brown / Kislev Flesh mix]
- AK Mud Brown [or Mournfang Brown / Kislev Flesh mix]
- AK Reddish Grey [or Stormvermin Fur]
Citadel (Games Workshop)
- Berserker Bloodshade (Shade)
- Castallax Bronze
- Corax White
- Contrast Medium
- Daemonette Hide
- Grey Seer
- Guilliman Flesh (Contrast)
- Mechanicus Standard Grey
- Reikland Fleshshade (Shade)
- Targor Rageshade (Shade)
- Warpfiend Grey
Two Thin Coats
- TTC Battle Axe Brass [or Retributor Armour]
- TTC Berserker Red [or Gal Vorbak Red]
- TTC Demon Red [or Evil Sunz Scarlet]
- TTC Evil Eye Red [or Word Bearers Red / Ratskin Flesh mix]
- TTC Ivory Tusk [or Rakarth Flesh / Pallid Wych Flesh mix]
- TTC Noble Steed Brown [or Mournfang Brown]
- TTC Yellow Flame [or Flash Gitz Yellow]
- WPF Alien Purple [or Genestealer Purple]
- WPF Boney Spikes [or Screaming Skull]
- WPF Brainmatter Beige [or Screaming Skull / White Scar mix]
- WPF Dark Tone Wash [or Nuln Oil]
- WPF Greedy Gold [or Retributor Armour]
- WPF Hexed Violet [or Dechala Lilac]
- WPF Leather Brown [or Steel Legion Drab]
- WPF Paratrooper Tan [or Gorthor Brown]
- WPF Skeleton Bone [or Ushabti Bone]
- WPF Strong Tone Wash [or Agrax Earthshade]
- WPF Terrestrial Titan [or Naggaroth Night]
- VGC Black [or Abaddon Black]
- VGC Dead White [or White Scar]
- VGC Gory Red [or Word Bearers Red]
- VGC Toxic Yellow [or Dorn Yellow]
- VGC White Ink [or White Scar]
Other
- Formula P3 Inferno Orange [or Troll Slayer Orange]
- Mr Hobby Premium Topcoat Flat
- Reaper Master Series Leather White [or Pallid Wych Flesh]
- Scale75 Dispel Magic Acrylic Medium [or Lahmian Medium]
- The Army Painter Leather Brown Colour Primer
- TT Combat Brawny Flesh [or Ratskin Fl.]
- Vallejo Hobby Spray Skeleton Bone
- Vallejo Mecha Color Steel [or Iron Hands Steel or Ironbreaker]
- Vallejo Model Air Steel [or Stormhost Silver or Runefang Silver]
- Vallejo Model Color German Grey [or Eshin Grey]
- Vallejo Xpress Color Gloomy Violet [or Luxion Purple]
- Vallejo Xpress Color Wicked Purple [or Nuln Oil / Shyish Purple mix]
- Warpaints Air Greedy Gold [or Retributor Armour]
Has my tutorial inspired you to start a Sisters of Battle army? Then feel free to use our affiliate link to expand your collection:
You can find the latest GW releases at our 🇬🇧/🇪🇺 partner stores Wayland Games, Element Games, and Firestorm Games, at 🇩🇪 Taschengelddieb and PK-Pro, and at 🇺🇸 Noble Knight Games with a welcome discount of up to 20% over RRP. Using our links helps to support Tale of Painters at no additional cost to you, so thank you very much for using them!
Hope you enjoyed this tutorial. If so, leave a comment or reaction below, and if you got any questions, leave them here so I can answer them for you.


