
As promised, here is part two in my “how to paint Dark Eldar” series. Last time I showed you how to paint a Kabalite Warrior, this time I focus on replicating the glow effect that I add to all my helmet wearing Dark Eldar. This is a useful technique that you can use on a variety of models, for example Grey Knights, Chaos Space Marines, Necrons – the possibilities are endless.

First you need to choose your set of colours. For my technique I chose five paints from a very dark cool green to pure white: VGC Scurvy Green, Jade Green, Foul Green, Reaper Master Series Mint Green (you can also use a mix of Foul Green and white if your can’t locate Reaper paints in your country) and Army Painter Matt White. If you prefer Citadel paints, I recommend Kabalite Green, Sybarite Green, a mix of Sybarite Green and Gauss Blaster Green, pure Gauss Blaster Green and White Scar (in this order).
Of course, feel free to change your palette, for example to blue similar to the Grey Knight studio army: Kantor Blue, Caledor Sky, Teclis Blue, a mix of Teclis Blue and white, White Scar.

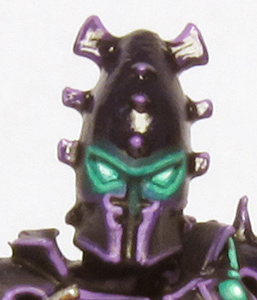
So here we have the model, I painted the armour and the helmet as described in this tutorial.
Then I took my second lightest colour – RMS Mint Green – and painted the eye sockets with it. You don’t need to be that tidy at this stage.

Next I carefully painted around the eyes with my mid colour Foul Green.

With my darkest colour Scurvy Green I painted an even thinner line around the eyes, carefully leaving a little bit of my mid tone Foul Green. I also started to build up the glow around the eyes. As the armour of my Kabalite Warriors is almost black, I was able to head straight for my darkest colour. If your base colour is lighter, I recommend mixing your second darkest colour into your base colour and use this mix to build up the glow.

To build up the glow, I highlighted the edges around the eyes with my second darkest colour, Jade Green.

With my mid tone Foul Green I finished the glow effect by highlighting only the areas that are close to the center of the eyes (a bit hard to see on the picture, I’m afraid)

Finally I added dots of Army Painter Matt White to the center of the eye to make them really glow. The light source should always be the brightest spot on your model. Make sure to apply only a single coat of thinned (!) white so you just light up the Mint Green a little bit and don’t end up with thick white blobs.

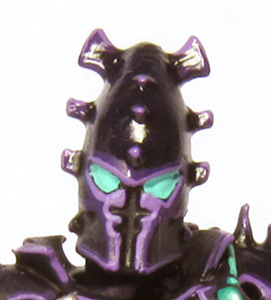
So far I’ve presented you very zoomed in close ups, above I included a more real life sized picture of the whole model so you can get a better impression of what the effect looks like on an arm length.
How do you like this tutorial? Was it useful to you? Let me know in the comments!
Do you like our tutorials and reviews? Here is what you can do to support us: Check out the websites of our sponsors, place your next orders at Wayland Games by clicking here or on the banner on the right. Thank you very much, we appreciate any help to keep us going!
10 Comments
Leave a Reply
Tale of Painters is the unofficial Warhammer hobby magazine run by hobbyists like you. Support our work by using the affiliate links from our 🇺🇸 / 🇨🇦 partner stores for your next orders so we can continue to bring you fantastic FREE content every day:


Or support us directly:


Gorgeous looking eyes. Question: If someone wanted to make yellow eyes using this process, what colours would you suggest?
Appreciate the work and tutorial. I am …calling myself a pedestrian painter is an insult to a three year old doing finger paints…and want to make a decent looking army. I think this gives me an idea to expand it to all armor without having to do stuff you real painters find trivial like drybrushing, blending, washing, etc… thanks again
thank you , rly good tutorial!!
Great stuff…very inspiring.
Great tutorial, thanks!
Great effect, really fitting the dark eldar aesthetics.
If I may have a request, could you give us some feedback on our latest project? You can find it over on the Miniworks here: http://drazhar-urien-rakarth.blogspot.com/2013/03/agnieszka-paints-hobbit-efgt-bombur.html
Do you guys have any wet blending videos? If anyone knows please reply. Thankyou
great thanks !
Love the zoomed-in photo walk-throughs! They present such a great idea of what to expect as I paint vs. once it is complete.
Nice tute! Thanks for posting the great content