
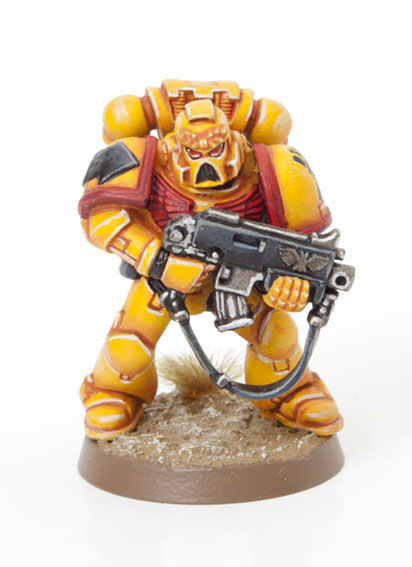
This is a tutorial explaining how to paint Imperial Fist Space Marines using the latest Games Workshop paints. The model above was painted in 16 steps. I break each step down with a high resolution picture and detailed instructions. Read the full tutorial after the jump.
I’ve designed this tutorial so established painters find it interesting but also so new comers to the hobby can learn some basic and advanced techniques. I will use terms such as glazing and washing, don’t worry if you don’t know what these mean because I will elaborate and explain during that step.
Paints you will need for this tutorial:
White Undercoat spray
Averland Sunset (Base)
Yriel Yellow (layer)
Wild Rider Red (layer)
Skrag Brown (layer)
Ceramite White (Base)
Khorne Red (Base)
Evil Sunz Scarlett (layer)
Abaddon Black (base)
Eshin Grey (layer)
Dawnstone (layer)
Leadbelcher (base)
Agrax Earthshade (shade)
Runefang Steel (layer)
Fire Dragon Bright (layer)
Armageddon Dust (texture)
In case you need to expand your paint collection, head over to Wayland Games or Slave to Painting, which both stock a huge selection of paints at competitive prices.

1. Undercoat the model white. I used Skull White spray from GW. Use a primer as it’s harder wearing.
2. Using a large brush basecoat the model with Averland Sunset. Add some water and mix on a palette (old white tiles make great palettes).
3. Highlight the armour with Yriel Yellow. These are area highlights so cover most of the armour leaving some of the Averland Sunset showing through to represent shadow/shade.
4. Make a glaze by mixing Wild Rider Red with a lot of Lahmian Medium. 3 parts medium for every 1 part paint is a good rule of thumb for glazes. Use the glaze to shade the lower areas of the armour parts.

5. Use Skrag Brown and a fine detail brush to line all the gaps in the armour.
6. Use a fine detail brush and Ceramite White to add edge highlights to the upper edges of the armour. Mixing a touch of water will aid flow from the bristles.
7. Paint the chest eagle and shoulder trim with Khorne Red.
8. Pick out the individual feathers and edges of the trim using a fine detail brush and Evil Sunz Scarlett.

9. Black in all the detail using Abaddon Black. If you’re feeling brave then freehand paint the chapter symbol on his left shoulder pad or just apply a transfer at the end of the tutorial.
10. Highlight the upper areas of the black details using Eshin Grey.
11. Edge highlight the black details using a fine detail brush and Dawnstone.
12. Paint all the metallic areas with Leadbelcher.

13. Wash over the metal areas with Agrax Earthshade.
14. Edge highlight the metal areas using Runefang Steel
15. For the eye lenses, paint two thirds of the lens with red which should start in the corner nearest the nose. Then paint a line of Fire Dragon Orange along the bottom of the lens. Finally dot the black corner with Ceramite White and run an even thinner line of white under the Fire Dragon Orange line.
16. Finally, base the model in a way which fits in with your own army or gaming table. I’ve used Steel Legion Drab for the rim, Armageddon Dust for the base top and then drybrushed with Screaming Skull. Drybrushing is a way of picking out raised detail quickly usually with a lighter colour. To dry brush you need load up your brush with paint and then wipe it off the bristles on a tissue until virtually no paint remains on the brush. Then rapidly and repeatedly drag the side of the brush back and forth over the area to be painted.
Keep checking back regularly as I have White Scars and Iron Hands tutorials still to post.
Do you like our tutorials and reviews? Here is what you can do to support us: Check out the websites of our sponsors, place your next orders at Wayland Games by clicking here or on the banner on the right. Thank you very much, we appreciate any help to keep us going!

9 Comments
Leave a Reply
Tale of Painters is the unofficial Warhammer hobby magazine run by hobbyists like you. Support our work by using the affiliate links from our 🇺🇸 / 🇨🇦 partner stores for your next orders so we can continue to bring you fantastic FREE content every day:


Or support us directly:


way too red for muh taste
Lovely painting
Very nice, always love your tutorials. Had't considered shading yellow with sgrag brown, I'll have to give that a shot.
Do you find it frustrating how gunked up the new citadel pots tend to get? I find it happens really fast, even with careful handling and cleaning.
It's a little frustrating but I hadn't given it a second thought until you mentioned it. My vallejo pots would gunk up too, I guess it comes with the territory.
This comment has been removed by the author.
Another very helpful tutorial. Looking forward to the iron hands one.
Nice tut. Interesting color palette.
Brilliant. I absolutely love your tutorials. So handy! This isn't, by any chance, in line with the general Space Marine release? More chapter tutorials would be so great!
Over the next week or so expect to see White Scars, Iron Hands and Ultramarines (4th company). Keep checking back daily.