
I’m going to unbox a new Imperial Knight. I was lucky to pick up couple of boxes , as I heard there was a shortage.
The model will be coming with its own codex next week and there are many different colour schemes available. It was quite a surprise to me that this model is not part of space marine codex and apparently I’ve heard that all the other 40k armies can ally with this model, including Tyranids. Not sure if it’s true, but we will find out next week.

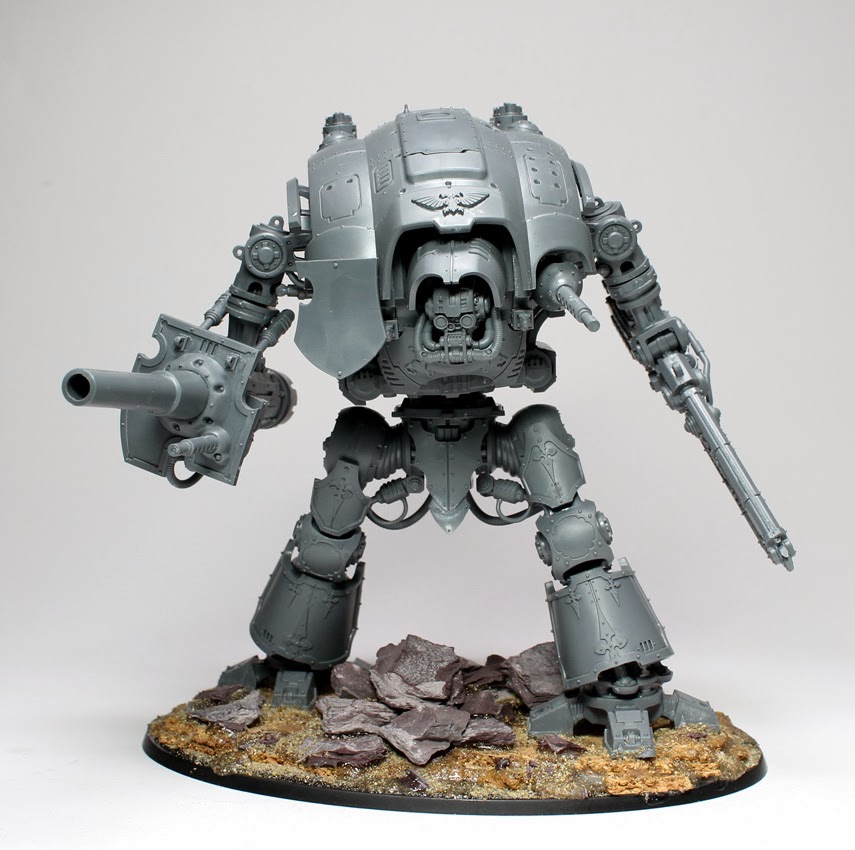
There are 3 spurs of parts for the model, so it is fairly complex figure. There is also a completely new base size, which is quite a bit bigger than an oval base.

You can make 2 different models: Knight Paladin and Knight Errant. It doesn’t seem to be much of a difference in construction; it’s just a matter of a different weapon.
There is a new feature in the instructions. At the end there is an image of the transfer sheet with clear annotations explaining which transfer is for which faction and where to place them. Overleaf there is also front view and shoulder pad view of the model showing which faction goes with which transfer. It’s quite handy.

I do have some negative points though. First of all it is quite disappointing that the codex comes a week after the model. Although stats and some colour schemes are available in the magazine, I would like to know more about the rules and relation to different factions before committing to the colour scheme.
Another thing is that not all the colour schemes featuring on the box and the magazines can be made using the included transfer sheet. GW sells a separate transfer sheet for £12. If I was to use the White Dwaft magazine images as a painting reference, it seems that the transfers from the box would only allow you to paint he red and blue colour schemes..
And as well as quite an expensive addition to an already expensive model, a few of the transfers on the sheet don’t correspond in colour to the painted models in the magazine. They seem black or white on the painted models but are golden or silver on the “for sale” image on their website.

Putting it together did take around 3 hours. It was quite tiring but I did get there after all! (Almost, as it’s still missing a few bits and pieces.) I’m sure a lot of you would consider magnetizing the weapons. The end of the gun can be magnetized; but it means that one of the side features have to be taken off, as it interferes with one of the guns. And also the other side feature has to stay the same for both of the guns, I’m not sure if it’s possible to magnetize it too. It would be a fiddly job. In my view, since the model itself doesn’t change, I would just choose the gun that looks the coolest and stick to that : )
A good feature while making the model is that you can leave arm, neck and gun joints unglued, which allows a perfect positioning at the end of the assembly.
Overall a cool looking model : )
Check out Garfy’s size comparison post here.
Do you like our tutorials and reviews? Here is what you can do to support us: Check out the websites of our sponsors, place your next orders at Wayland Games by clicking here or on the banner on the right. Thank you very much, we appreciate any help to keep us going.
20 Comments
Leave a Reply
Tale of Painters is the unofficial Warhammer hobby magazine run by hobbyists like you. Support our work by using the affiliate links from our 🇺🇸 / 🇨🇦 partner stores for your next orders so we can continue to bring you fantastic FREE content every day:


Or support us directly:


I magnatized my weapons was a but fiddle to male the ammo hoppers interchangeable but not a a major headache. I did all the ammo parts while the main body of the gun was in two halves then did the barrels after I glued that part together. Will post some pics on my Instagram for anyone who's interested its @inkhammer.
Good articule, but you get transfers for three imperial houses, two Admech houses and two free blades. Thats seven unique knights. Also the free blade motifs could easily use different colour schemes. This isn't a bad selection. The main problem I have its there is not all the paint schemes for all of these transfers are on box art or in white dwarf.
My main gripe on this kit is when the shoulders are attached it will remove the possibility to remove the weapon arms….
Not one of my favourite reviews that you have written.
Very little focus on what you actually get in the box and the quality of the model.
Rather you have focused on that the codex is out next week and not at the same time, and that you think the transfer sheet is expensive.
Would have been nicer to see a more indepth review of the kit itself. The construction stages and if you thought that the instructions allowed for an easy kit build. Rather than just an opportunity for you moan on the price of the model, and transfers.
I wouldn't call it a moan as I think I was rather positive about the model in the review. I would put the Imperial Knight as one of my favorite models that has come out from GW 🙂
I just wish you had spent more time reviewing the model and the parts and the construction of the model.
If it is one of your favourite models then why not mention that?
Because I did not 🙂 x
I've seen the model in person and it does look spectacular – Spikey Bits did a video demonstrating the motion of the fully built model…nice piston action at the arm joints, basically the thing can be made almost fully articulated (save the legs). I also like that the arms, shoulder pads AND the top armor plate are all easily removed (even after construction) so painting is easier as is transportation.
Not impressed by the model for the price, really. It isn't worth it.
There appears to be a shocking lack of poseability for the legs in particular. For such an expensive kit, posing would be the least of my expectations. Yes no point in hundreds of parts if there is only one way you have to build those parts, just like the legs on the dreadknights.
Yes, it's big, yes it looks reasonably impressive… But no, I'm not convinced by the value for money… There are a lot of things you should expect within the sale price which aren't there. Once you look at the fact that they are demanding a codex out of you as well, the £110 min spend just seems like a money grab.
You really need to see the leg sections and the amount of detail that they have put on the pistons etc, I have looked to see how easy it would be to cut and pose the legs, but then I think it will lose that Imperial looming stance that it currently has.
The posing on the Tau and Eldar kits works for me as the fluid nature of how they grace battlefield lends itself to that kind of posing.
Will you be doing a painting tutorial on it that would be very helpful?
The only thing that upsets me the most is that the whole lower section of the body can't be moved in any way possible without heavy conversion.
Why can't they make it like Riptide? (/sadface)
Because then they'd have to make an extra sprue, and at $140 a model they simply couldn't afford to do that.
PS – I'm a bit surprised by the lack of weapon options for this large, pricey kit. I remember the old Titans (which these seem to be modeled after) – think they had quite a few weapons.
Please take this as playful ribbing, but it's funny you mention the color scheme thing – seems like you have your color scheme kinda figured out these days? 😀
Im planning on doing one in the blue color scheme like the box art. But kind of at a loss how to paint the second model. Any ideas?
I really like the purple color scheme in the most recent White Dwarf. Maybe something kinda outrageous like that
I wasn't going to get this model but after seeing this and the video review on Spikey Bits, I'm afraid I must.
Kinda neat to see the model in progress. Also weird to see a TEN model (the riptide) in an unmodified photo. More like that please! The size comparison really helps. I thought it would much larger than a riptide – turns out its only a bit bigger.
Thanks for the review!
It is a nice model. I'm quite impressed by it.
Brilliant review mate. Thanks for taking the time to make it.