
Some days ago, Rev shared his hobby setup, so here I am with an idea maybe suitable for your own workspace? Last weekend I did a little IKEA hack to “tame” my ever growing collection of paints. With the help of plastic profiles I bought at a local building centre, I turned my IKEA drawer unit into a neatly organised paint storage. Find out more in this tutorial.

Underneath my desk I got this “Helmer” drawer unit from ikea. It’s made from hard-wearing metal, has castors, fits right under a regular (IKEA) desk and is affordable, which makes it a solid contender for any hobby area. It comes in silver, white or red (sadly not in black).
This is what my drawers looked like before. I had two drawers full of paints, and while they were roughly sorted into, finding a certain paint pot was sometimes difficult.

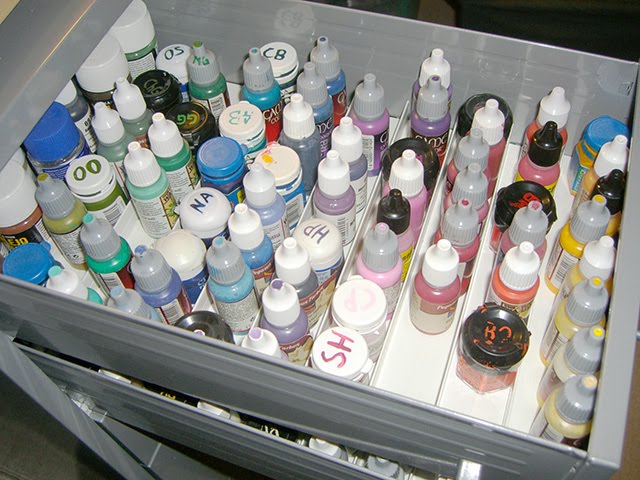
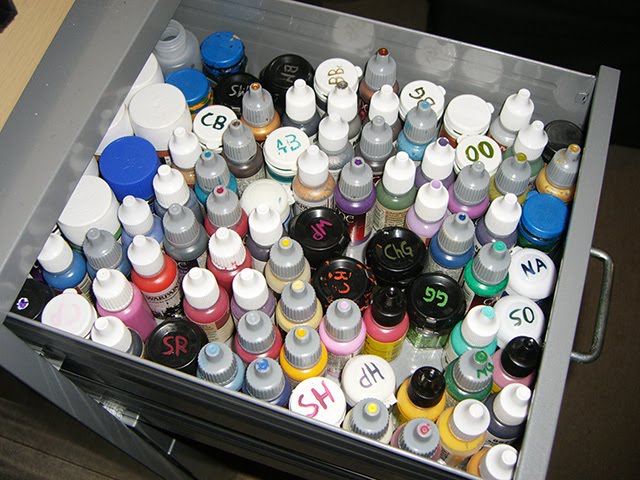
After some planning, I headed to a local building centre and after a while I found something suitable: plastic profiles, made from the same material as regular plasticard. These were available in different sizes and shapes, I got those L-shaped ones which are 35 mm wide, 20 mm high, 1 m long, with a thickness of 1,5 mm. 35 mm width is perfect for GW pots. Of course, those slimmer and longer dropper bottles will have more play, so make sure the height is at least 20 mm or else the bottles will fall over too easily when you open the drawer.


As the profiles were made of regular plasticard material, it was pretty easy cutting them to size with regular hobby tools. For the drawers of my Helmer unit I cut the profiles in 23 cm long pieces. To do this, I sawed the shorter 20 mm long side (marked red) with my Gale Force 9 bone saw down to the bottom. Then I used a ruler and a hobby knife to slit the base of the profile (marked blue). Once slit, you can break off your piece easily. Finally I used a hobby knife and a hobby file to neaten up the edges.


Once the pieces are ready, I attached two stripes of double-faced adhesive tape and put in the profiles. I managed to fit 9 rows in a single drawer with a bit more space in the back for wider pots and tools. Of course the paints take up more space now so I needed a third drawer, but my over 200 paint pots are well organised and there is still room for more.
What do you think of this “Ikea hack”? Of course you could adapt this tutorial for other drawers… or do you’ve got other useful workspace ideas to share?
Do you like our tutorials and reviews? Here is what you can do to support us: Disable your Ad Blocker or place your next Wayland Games order by clicking here or on the banner on the right. Thank you very much, we appreciate any help to keep us going!
5 Comments
Leave a Reply
Tale of Painters is the unofficial Warhammer hobby magazine run by hobbyists like you. Support our work by using the affiliate links from our 🇺🇸 / 🇨🇦 partner stores for your next orders so we can continue to bring you fantastic FREE content every day:


Or support us directly:


Stahly…just came across this and it's brilliant. Can you clarify what plastic profiles are for us in the States? Is there a different name?
Sorry mate, I can't say what they are called in the US. You best bet is to look around in DIY stores until you find something suitable.
Stahly, this is a very cool hack. Thanks of the behind the scenes insight to your hobby. I love it. Just need to see Sigur's now and we have a full set 😉
Hi Dave, the vibrating treadmill of doom sounds a nightmare. You should get some Anti-slip mats for your desk. It might stop them trying to do aerial assaults onto the carpet.
As for storing miniatures and sprues. I have 3 standard size gaming cases and one massive case (the size of 4 standard GW cases). So I can store painted models in those. I prefer to have my models out on display though so I use iKea bookshelves and a shelf above my desk. I'm really lucky to have dedicated space for the hobby
http://taleofpainters.blogspot.com/2011/11/where-magic-happens-garfys-man-cave.html
I really like Rev's solution http://taleofpainters.blogspot.com/2012/02/chat-airbrush-hobby-setup.html
But it does leave the question of where does Rev keep the painted models?
Neat idea on a paint storage solution. Do you feel that the drawers work better than the tired paint rack?
I find that I do not necessarily have trouble storing supplies and paints, but painted models. Ordinarily I would just store unpainted models/ sprues in a box in the closet.
Right now I share the painting room with my wife's treadmill. As she is very active I have found that the vibrations from aforementioned treadmill cause my models to vibrate off my desk. Just last night I lost 3 drop pods, 5 terminators, and several other models to the warp quake.
How you you guys store such a large number of painted models? I figure that between you, Gareth, and the rest of the gang, that you had some possible ideas.
Thanks very much,
Dave
Far too organised for me! lol!