
So you’ve picked up Dark Vengeance and are about to ake the side of the Dark Angel, but aren’t sure how to paint all those beautiful models you’ve found in the box? Behold. In this tutorial we’re going to explore how to paint a beautiful Dark Angel with easy and time-effective techniques. You don’t need to call a Interrogator-Chaplain to find out more, just click “More after the jump”.
Painting an army of Dark Angels is a challenging task, yet a diversified one. The army consists of three fractions that all have their individual trademark colour – dark green for your regular Marines, bone for the Deathwing and black for the Ravenwing. You want to put a cohesive looking army on the table, not three. Also take care that your secretive and gothic Dark Angels don’t become “christmas marines” due to their green, red and cream paint scheme. You can see this on the ‘Eavy Metal painted Dark Angels models. While the paintjobs are perfectly executed, the paint scheme is pretty garish and bright and doesn’t fit the Dark Angels’ theme in my opinion. Thus I’m going to use more muted shades in this tutorial (especially for the cloak) without creating a dull model. It’s all about the contrast.
Before we start: This model was painted with my ecclectic collection of paints, but most of this paint scheme can be recreated with the new Citadel paint range actually. You will find paint alternatives in [brackets] whenever possible. Of course, the best result can be acchieved if you follow this tutorial as close as possible. Thus, if you want to expand your paint collection but your local game store doesn’t carry all of the brands I use, I recommend checking out Wayland Games. They’ve got them all – Vallejo Game Colour, Formula P3 from Privateer Press and Warpaints from The Army Painter – and at a discount.
Tutorial

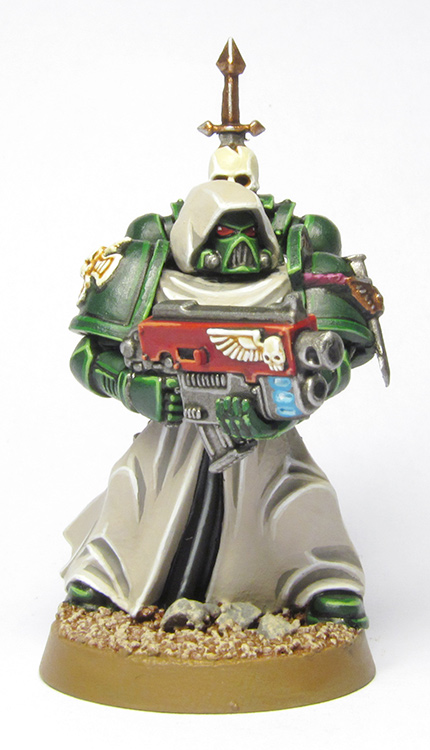
1. Assemble your model, glue some sand on the base and prime. For priming, there are two options. Either you use your favourite black primer, or you can use “Angel Green” color primer from The Army Painter. Angel Green is a colour that is very similar to the old Dark Angels Green or the new Caliban Green. Using Angel Green will save you a lot of time, as you can do priming and basecoating in a single step, especially helpful when painting vehicles. Just two things to remember when using Army Painter primers: First, Shake them thoroughly, get a bit closer with your can than you would with Citadel primers and use long, sweeping moves while keeping the trigger pressed instead of applying short bursts. Second, be sure to pick up the matching Angels Green paint from Army Painter’s Warpaints range so you can fix those areas the primer didn’t cover.
As I didn’t have a can of Angels Green laying around, I just used regular black primer from Games Workshop. For the base I chose a medium brown theme that would go well with both the dark green armour of the regular Dark Angels as well as the bone armour of the Deathwing. So I basecoated the base with Mournfang Brown and drybrushed the sand heavily with P3 Beast Hide [Baneblade Brown]. I proceeded painting the rocks with P3 Bastion Grey [Stormvermin Fur] and drybrushing them with Fortress Grey [Administratum Grey]. Finally I gave everything including the rocks a light drybrush with Terminatus Stone.

2a. With the messy parts done, I started painting the robe. I used Dheneb Stone for the basecoat [Rakarth Flesh], then built up the shadows by painting two thinned coats of Stormvermin Fur directly into the recesses. As you can see above, it doesn’t matter if you are a bit messy at this point.
2b. Now I tidied up the robe with Dheneb Stone, leaving Stormvermin Fur in the recesses. Next I highlighted with Pallid Wych Flesh, followed by a very sharp highlight of Ceramite White [Skull White or whatever white you’ve got].

3a. Now it’s time for the armour. I basecoated with Caliban Green [you can use Dark Angels Green even though it’s a more “vivid” dark green than Caliban Green]. Of course, if you primed with Army Painter’s Angel Green, you can skip this step. Then I blacklined the armour by painting Vallejo Game Colour Black Ink directly into the recesses – thinned Abaddon Black works fine as well. At this stage I also painted the joints of the armour as well as the grills of the helmet and backpack with Boltgun Metal [Warpaints Gun Metal or Leadbelcher] and gave them a wash of Badab Black [Warpaints Dark Tone Ink, the new shades from GW just aren’t as good IMO]. I’ve also did the eye lenses at this point because it’s easier to correct flaws now than later. I painted the eyes with Mephiston Red and highlighted them with Wild Rider Red, followed by a small white dot in the corner. Clean up any messy areas with Caliban Green/Angel Green so that only thin sharp lines of black are left.
3b. Then I applied a first edge highlight with VGC Mutation Green [Warboss Green works fine as well]. Click on the pictures to find out where to place the highlights.
3c. Finally I applied a very sharp extreme highlight with Skarsnik Green only to the uppersides of the most pronounced armour features.

4. Now we spend time on the details. I basecoated the bone areas with Bleached Bone [Ushabti Bone or Warpaints Skeleton Bone], such as random decorations on the armour or the chest eagle (the chest eagle of my model is hidden by the cloak, but on models with a visible chest eagle, paint it bone). I washed VGC Brown Ink directly into the recesses, then cleaned up with Bleached Bone. I highlighted the bone with Screaming Skull and finally Ceramite White.
Next I painted the underskirt with Abbadon Black [Chaos Black] and highlighted with Eshin Grey and Codex Grey [Dawnstone].

5. Basecoat the weapon (and the tactical emblems if the model has any) with Khorne Red [Scab Red] while leaving the black primer around the rivets and in the recesses. Highlight the edges with Mephiston Red and finally with P3 Khardic Flesh for the most prominent features [you can also use Squig Orange].
Next I basecoated the drawstrings (and the wax of the purity seals if the models had any) with Screamer Pink and washed it with Badab Black. Adding a bit of purple gives your Dark Angels a little more secretive touch. Finally I layered with Screamer Pink and highlighted with a mix of Screamer Pink and Fortress Grey [Administratum Grey]. You can also paint the cape of your Company Master in purple, but here I’d recommend mixing black into your Screamer Pink for shading, instead of using a wash, as this creates better results on flat areas.


6. For the ornaments and embellishments I chose to go with an an antique brass look instead of the gold they used on the studio models. I basecoated with VGC Brassy Brass [Balthasar Gold, but Brassy Brass covers just so much better] and gave it a heavy wash with Devlan Mud [Warpaints Strong Tone Ink]. Finally I highlighted with Sycorax Bronze and Mithril Silver [Runefang Steel or Warpaints Shining Silver]. For the censer I also added some streaks of VGC Brown Ink and VGC Black Ink to represent the deposits of fume.
Paint the metal with Boltgun Metal [Warpaints Gun Metal or Leadbelcher] and wash it with Warpaints Dark Tone Ink [Badab Black]. Highlight with Chainmail [Warpaints Plate Mail Metal or Ironbreaker]. In this step also highlight the metal areas you painted in step 3a. In the nozzles of the plasma thrower I painted Ceramite White, then a mix of Ice Blue [Lothern Blue] and Ceramite White while leaving white in the middle, and pure Ice Blue around the edges for a slight glow effect. I also added black dots to the barrel.
Finally I painted the edge of the base with Steel Legion Drab [Graveyard Earth]. You’re done!
How do you like the finished model? It took me a bit of over four hours to paint, however on your regular non-robed Marines you should be faster, especially when using Angel Green primer. And the result is well worth the time spent I’d say!
Stay tuned for part two of this tutorial, aimed for later this week, when I explore how to paint the Ravening and Deathwing parts of your copy of Dark Vengeance!
Do you like our tutorials and reviews? Here is what you can do to support us: Check out the websites of our sponsors, place your next orders at Wayland Games by clicking here or on the banners on the right, or at Total Wargamer by clicking here or at the banners on the right. Thank you very much, we appreciate any help to keep us going!
34 Comments
Leave a Reply
Tale of Painters is the unofficial Warhammer hobby magazine run by hobbyists like you. Support our work by using the affiliate links from our 🇺🇸 / 🇨🇦 partner stores for your next orders so we can continue to bring you fantastic FREE content every day:


Or support us directly:


Thanks for the advice, Stahly!
Yes, the Coat d'arms paint is the good ol' GW paints of the 90's, and the bottles themselves remind me of the early days. And indeed, Citadel has many different colours and I do not mix as much as well.
I got myself Chaos Black spray and will use that. Thanks once again and keep up the good work with the gang with this site.
P.S. Gonna take out and rework on my Necromunda Escher gang after looking at your amazing work on them.
I really like your tutorials and work, Stahly. Thanks for this wonderful site!
I am a returning hobbyist after a lapse, and I feel that Citadel Paints feel alittle different nowadays. It's thicker and more clumpy when compared to the hexagon bottles of the 90's, and even the screw on tops. I know the manufacturer is different since early 2012, and that you use a mix of paints and brands, but what are your comments and thoughts about the Citadel paints after more than a year of using them since their release, Stahly?
Also, you primed this Dark Angel with a regular Games Workshop black primer, which one did you use? Was it Imperial Primer or the Citadel Undercoat Chaos Black spray? I am having problems with Imperial Primer being clumpy and 'thick', and it fails the scratch test badly, easily chipping off the paint with my fingernail even after more than 72 hours! This was not the case with the old Chaos Black (which I used to undercoat during my early days). I guess I am spoilt hehe.
Thanks Ken!
If you look for paints that are more similar to the old hexagon Citadel paints I suggest looking into P3 Paints from Privateer Press or Coat'd'Arms, which are made by the same manufacturer as the old Citadel paints. Coat'd'Arms even sells some of the old colours by a different name.
The new Citadel paints are ok. I enjoy the base paints, as they have a decent coverage but still maintain a good viscosity. I also like the dry paints for drybrushing. The layer paints are so-so, they offer a lot of different colours so I bought some to expand my paint collection as I don't like mixing paints, but I find their coverage is only mediocre and Vallejo Game Colour and P3 are often better in this regard. I don't like the silvers and shades, and I use Army Painter silvers and inks, which are made by the same manufacturer as the old Citadel silvers and washes.
I recommend priming with a spray primer or airbrush. Priming with a brush takes a lot of time and isn't as even as using a spray. Chaos Black Primer is ok, it goes on thin and matte, but often turns greyish in my experience. Army Painter Matte Black primer goes on thicker but has a deep, satin black finish.
nice!!! ty
Really good tutorial for us beginners. Are you planning on continuing the boxed set as promised? Would love to get some pointers on the Deathwing Squad (or even better, the Deathwing Knights)
Thank you for this very beginner friendly tutorial! My first Dark Angels didn't turn out too bad: http://streamflyer.tumblr.com/
But I'm struggling with the very thin lines, especially on the shoulder plates. I watered down my paints and used an ArmyPainter "insane detail" brush, but still. Any hints?
power-armoured dark angels don't have cruxs. great tutorial though!
nice any chance of a tutorial on how to pain the chaos space marines
Helbrute – http://taleofpainters.blogspot.co.uk/2012/09/tutorial-how-to-paint-chaos-helbrute.html
Chosen – http://taleofpainters.blogspot.co.uk/2012/12/tutorial-how-to-paint-dark-vengeance.html
Hope this helps.
Is that model in the dark vengeance box? I cant seem to find it in the DV box on the GW website…
It isn't in the Dark Vengeance box. It's from the Plastic Dark Angels Veteran sprue.
Thanks
Awesome tutorial. Not a single stepped miss, and paint alternatives for the win.
Thanks for this great tutorial. I'm going to use it (paint for paint) on my Dark Angels army. You'll be able to see how it goes in my rather less proficient hands here:
http://pw2gaming.blogspot.co.uk/2013/02/dark-angels-green-wing-part-one.html
Very cool – will follow this closely!
i was wondering if Citadel Shade: Biel-tan Green would be a good choice instead of a watered down black?
Try it out, but Caliban Green is already very dark so a dark green wash will hardly create any visible shading. You could also try Nuln Oil, but it will dull the green. You would need a layer or drybrush of Caliban Green to restore the green after the wash.
The robe colour combination you used here is dead nice, I've recently started a bunch of Dark Angels models to make a start on after I've finished the Grey Knights I have waiting to go. I really like how you've stayed away from mixing the highlights, as a painter of nearly 20 years I can say this is a welcome change.
Great tutorial. I can see that you recomend VGC brown ink. As I already have agrax earth shade and seraphim serpia which of the two would you say was the closest approximation
I recommend go out and buy Brown Ink nevertheless. The Citadel shades are meant to be applied liberally and to run into the recesses, thus there is less pigment and more thinning agent in them. Inks are more for a controlled application and contain much more pigment. You'd probably need to wash Agrax Earthshade two or three times into the recesses to get a similar effect like with Brown Ink – not worth the hassle for saving 2,50 Euro.
Brilliant! I've just bought the limited edition boxed set and was wondering how to paint dark angels! I'm a real fan of the way you painted the robes by painting the recesses, so simple and really effective.
Thanks!
Yeas finally. For years I have searched for a tutorial about painting DA that didn't involve mixing paint but still gets results. Your tutorial fits the spot perfectly. Thanks a lot Stahly, now I can finally work on my DA again.
Great tutorial, im going to be using it in combination with the GW ibook painting guide.
Thanks guys! If someone uses this tutorial for his own Dark Angels I would love to see pictures posted here or on our Facebook page! 🙂
great and very useful tutorial!
Awesome tutorial Stahly. Thanks for taking the time out to write it, very much appreciated! Cannot wait for the Deathwing and Ravenwing section! 😀
Looks fantastic. I suck at those deliberate highlights though… but at least i can admire these.
This is the tutorial I've been looking for all weekend, Should have known you guys would deliver the goods. Your on my christmas list lol.
Very nice. I can't wait to start my Dark Vengeance set. I might do them in pre-heresy colors or as Angels of redemption. Chaos will be night lords or maybe word bearers (pre-heresy too maybe)…so excited i'm not sure what to do! Time for some test models….
I really like the way you painted this.. amazing work indeed. Not sure if I would want to spend 4 hrs per model but you cannot ignore the results indeed!
Love the recipe breakdown ( and alternative colors ) to help reference the result. Thanks for that!
4 hours isn't that bad especially if you are 'batch painting' as there is more than enough to keep you busy till the paint on the first miniature dries you will eventually look up and wonder where the night has gone, but be stunned by your new collection of awesome minatures
very nice, been looking for a good tutorial on painting robes. thanks
great rly great
Lovely.