
Hello again. I’ve made some progress on the Dark Angels Standard Bearer. For the remainder of this particular project I’ll be sharing WIP reports with you but a few folks have asked me about my method of painting Dark Angels armour. So here’s another little tutorial. Again, I have used Vallejo Game Colour but I will point you in the direction of the closest possible GW equivalents as we go along.

The basecoat on the armour is Vallejo Heavy Green. It’s a really nice colour for coverage but a little thick so I thin it a little with water and acrylic medium. The nearest GW paint would be Loren Forest.

The shading is pretty straightforward. It’s literally just a wash of Vallejo Black/Green Ink. Slightly thinned. If you’re using GW paints then a mixed wash Biel-Tan Green and Nuln Oil will work nicely.

The next step here is to bring the Heavy Green back in to play. Working the colour onto the raised surfaces of the armour leaving the recesses dark. Be sure to thin your paint here to reduce build up and paint-dragging.
Next up I add a highlight comprised of a mix of the Heavy Green and Goblin Green (GW: Warboss Green) to the upper facing areas of each plate. Carefully apply this slightly thinned and blend downwards. I’ve not taken a photo of this stage as the effects aren’t astoundingly evident in a unless you’re looking at the miniature in the flesh (or the metal in this case).

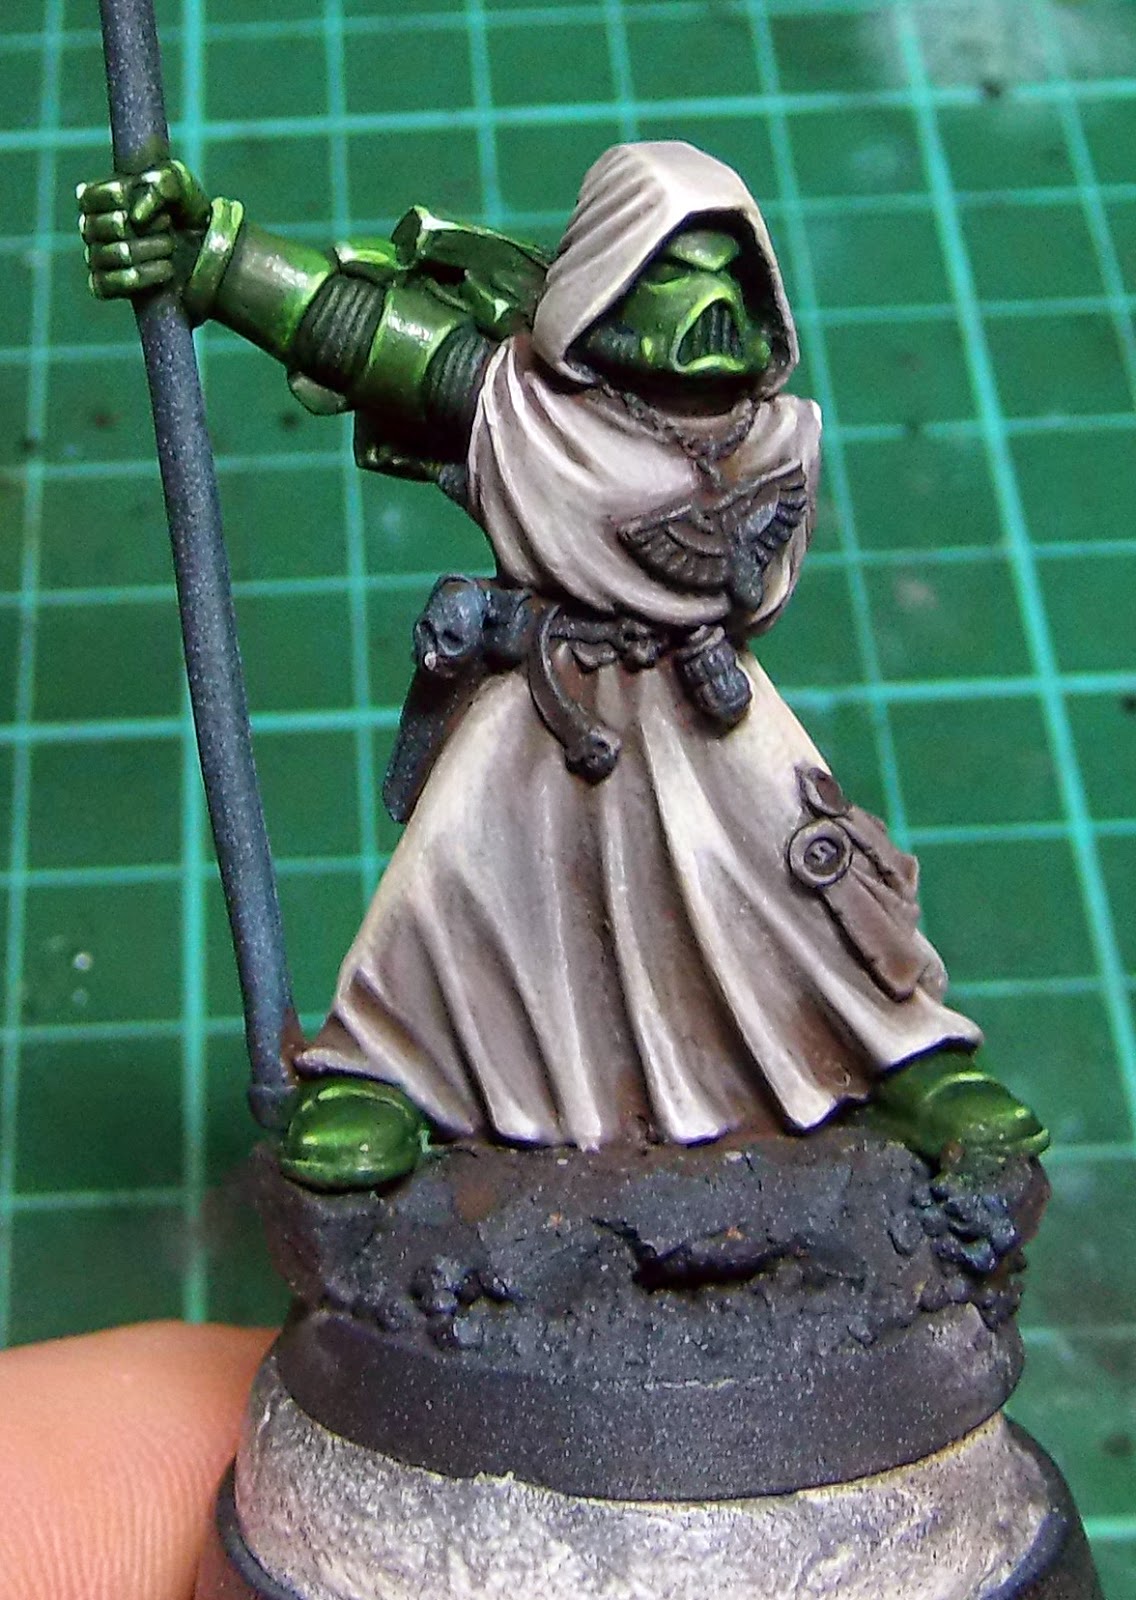
Now this is where things head in a slightly different direction to the norm. Start highlighting the armour edges with a thinned mix of Goblin Green and Scorpion Green (GW: Moot Green). Concentrate on the edges that are more pronounced or upward facing. At this point You’ll no doubt notice that things are starting t look a bit day-glo. Worry not for it’ll all come together at the end.

Next is a slightly thinned highlight with just the Scorpion Green. Again concentrate on more of the pronounced and upper facing edges but more subtly.
The final stage is to add a last highlight to the very uppermost edges and pronounced ridges etc. THis is another thinned mix or the Scorpion Green and White. Afterwards, if you feel the model needs it, you can add a tiny dot of pure white to the sharper corners of the plates. But this is down to personal preference and how shiny and sparkly you want the armour to look.
A final little trick is to very gently add a thinned line of Black/Green Ink mixed with a little dark brown into the deepest recesses of the armour plates. This really is an option only but it does lend a more natural looking shade to the armour and can help equalise the whole look of the model if you feel the armour is a little bright.
Do you like our tutorials and reviews? Here is what you can do to support us: Check out the websites of our sponsors, place your next orders at Wayland Games by clicking here or on the banner on the right. Thank you very much, we appreciate any help to keep us going.
3 Comments
Leave a Reply
Tale of Painters is the unofficial Warhammer hobby magazine run by hobbyists like you. Support our work by using the affiliate links from our 🇺🇸 / 🇨🇦 partner stores for your next orders so we can continue to bring you fantastic FREE content every day:


Or support us directly:


Looks good and slightly different from the other tutorials out there- I like the look. I am currently painting up a larger force of The Brothers Lion and have been soaking up as many tutorials as possible. I'm currently experimenting with the colours on a Deathwing Terminator squad- using alternatives to the norm. Thanks for the lesson- great work 🙂
Those tiny whites at the end make the model, really. It worked so well with the reflection from the arm (probably because of the lighting above), so it may be a good idea to apply that on the length of the arm and elbow pad as well.
Great tutorial and a nice refresher from the three color up edge highlights!
Nice stuff, almost NMM in it's application, with the reflective quality.