
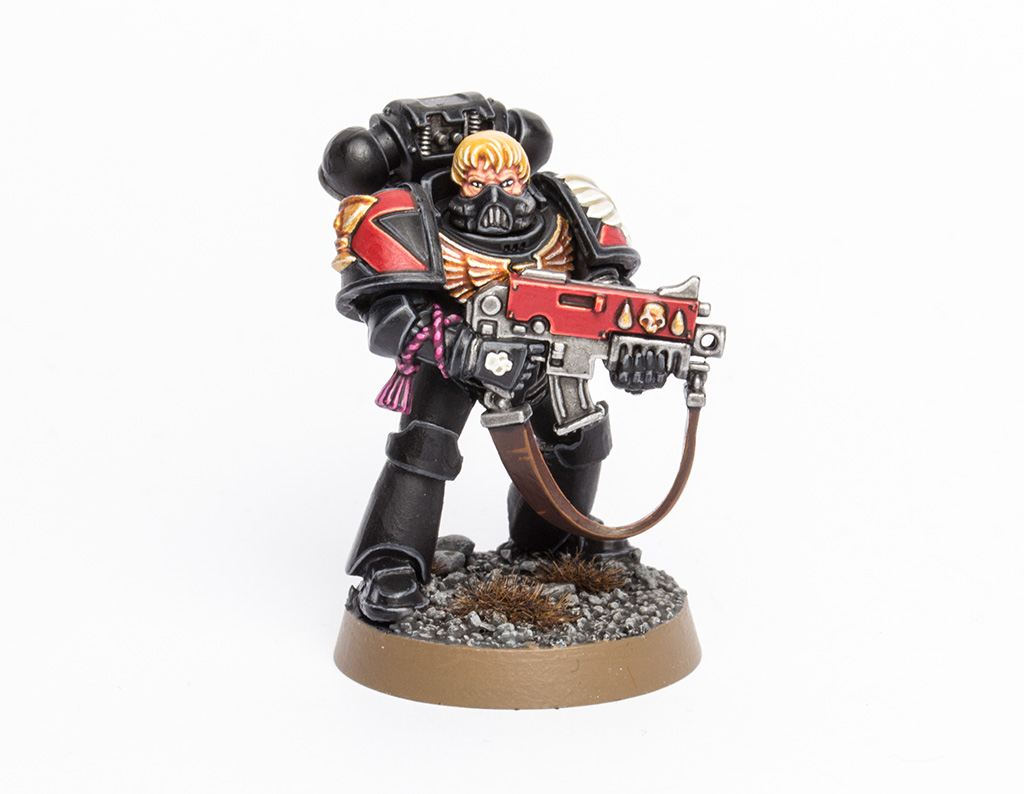
In this extensive step-by-step tutorial I’m gonna explain how I painted the Death Company Blood Angel above, including useful techniques for painting black armour, red armour, gems, eyes, flesh and blonde hair.
This tutorial assumes you have a good understanding of how to paint. It involves paints from a lot of different brands, as well as mixing paints. Underneath each picture are the corresponding instructions. Each step shows the paint(s) I used during that step. If I use a non-GW or an OOP paint, I’ll try my best to give you suitable alternatives [in brackets].
Paints I used for this tutorial:
- Vallejo Surface Primer Black
- Vallejo Surface Primer Grey
- Games Workshop Mephiston Red
- GW Mechanicus Standard Grey
- GW Longbeard Grey
- GW Wild Rider Red
- GW Bronzed Flesh (OOP)
- GW Boltgun Metal (OOP)
- GW Bloodletter
- GW Abaddon Black
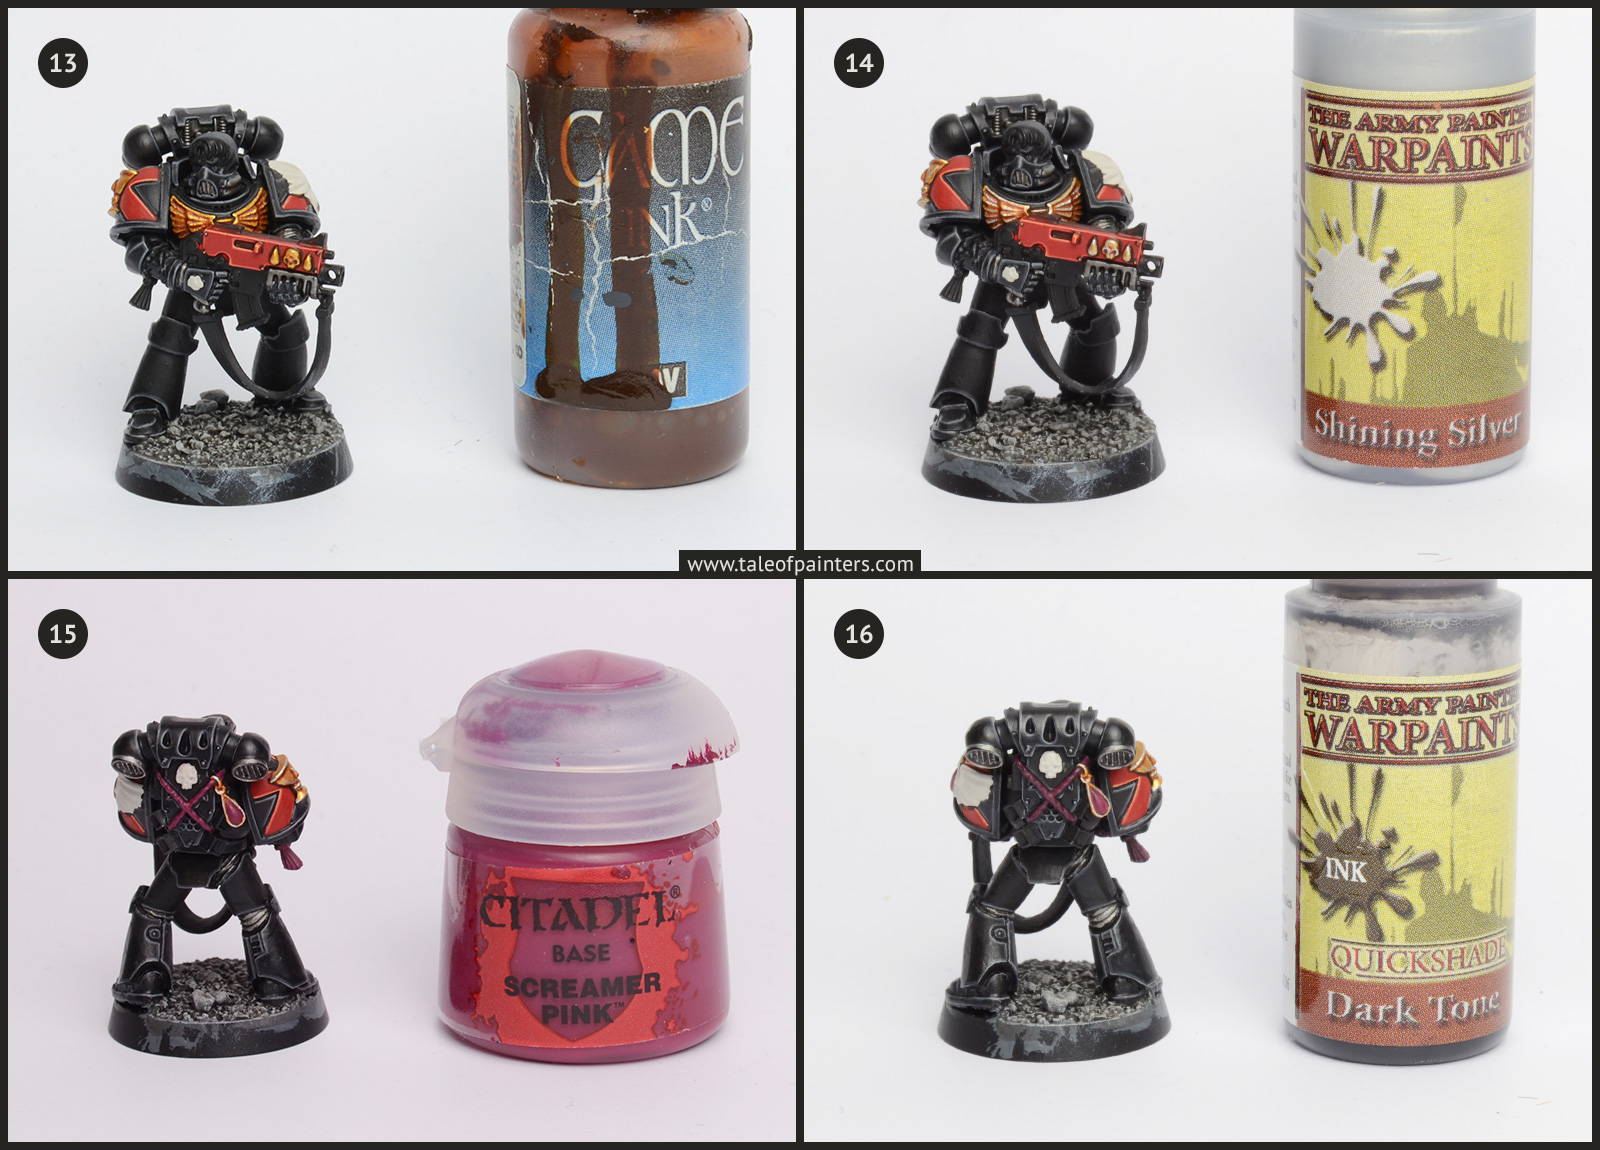
- GW Eshin Grey
- GW Codex Grey (OOP)
- GW Steel Legion Drab
- GW Screamer Pink
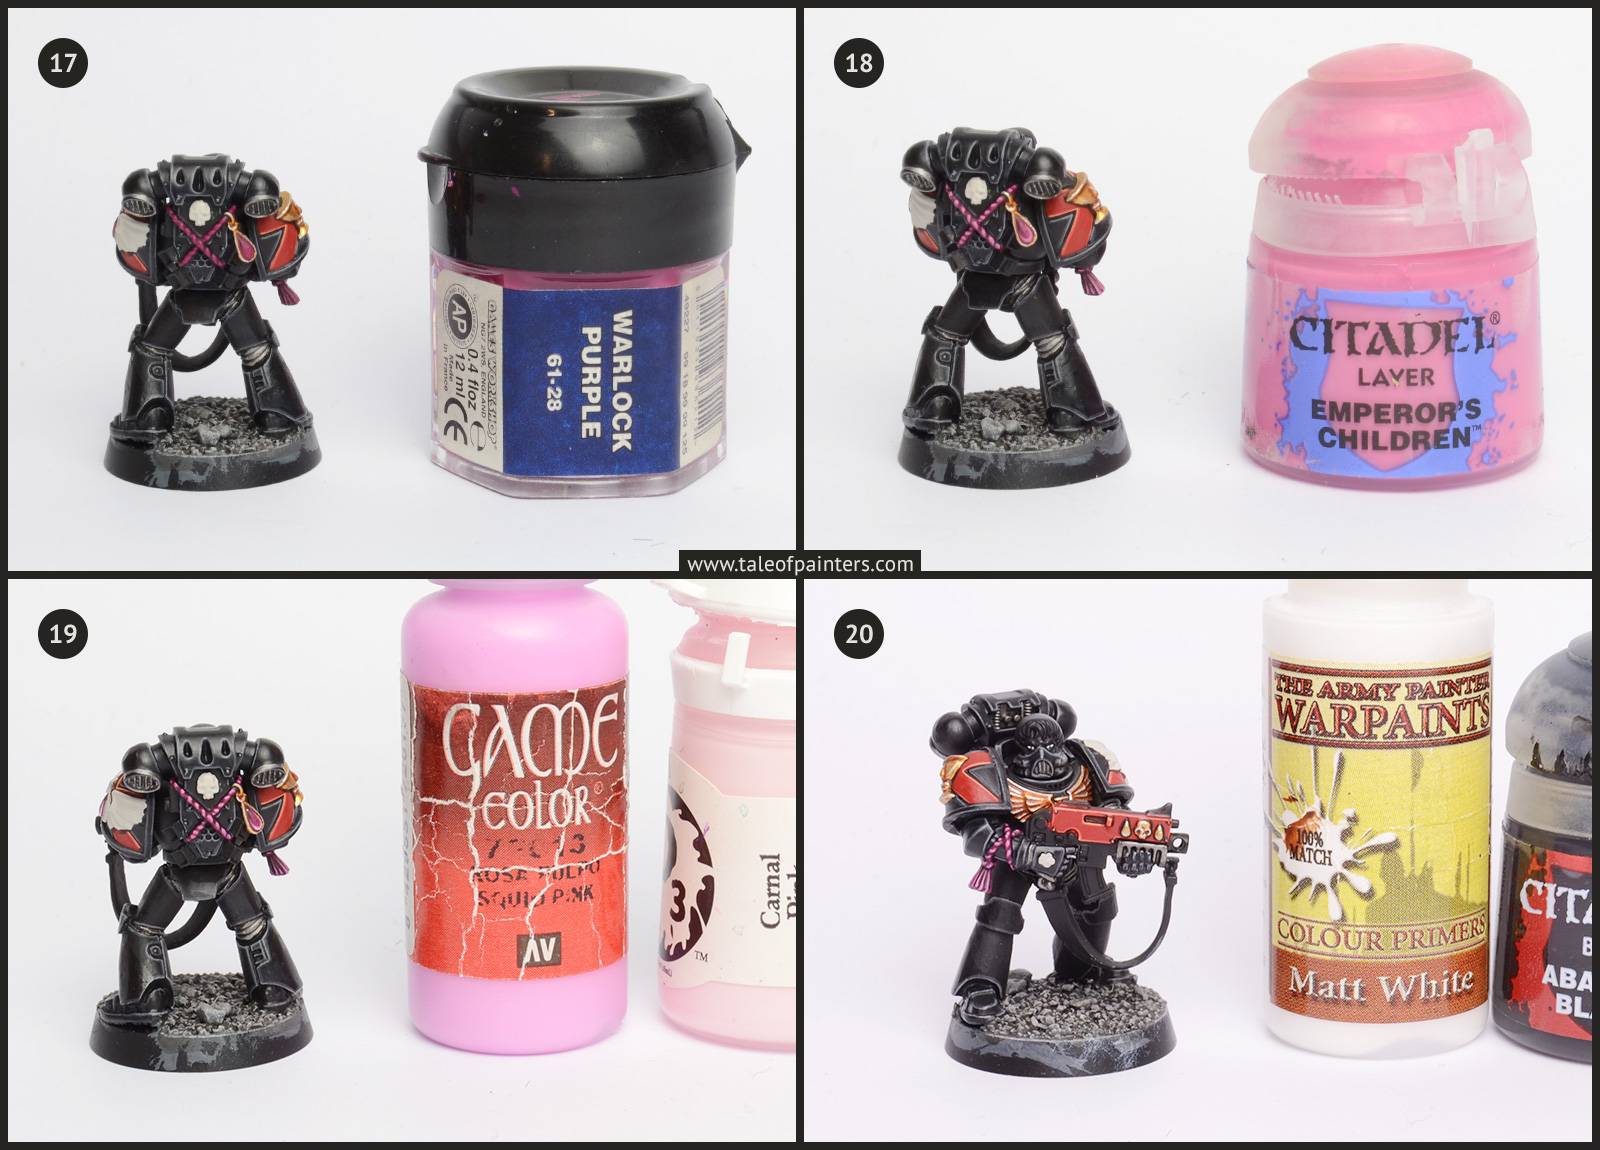
- GW Warlock Purple (OOP)
- GW Emperors Children
- GW Tanned Flesh (OOP)
- GW Dwarf Flesh (OOP)
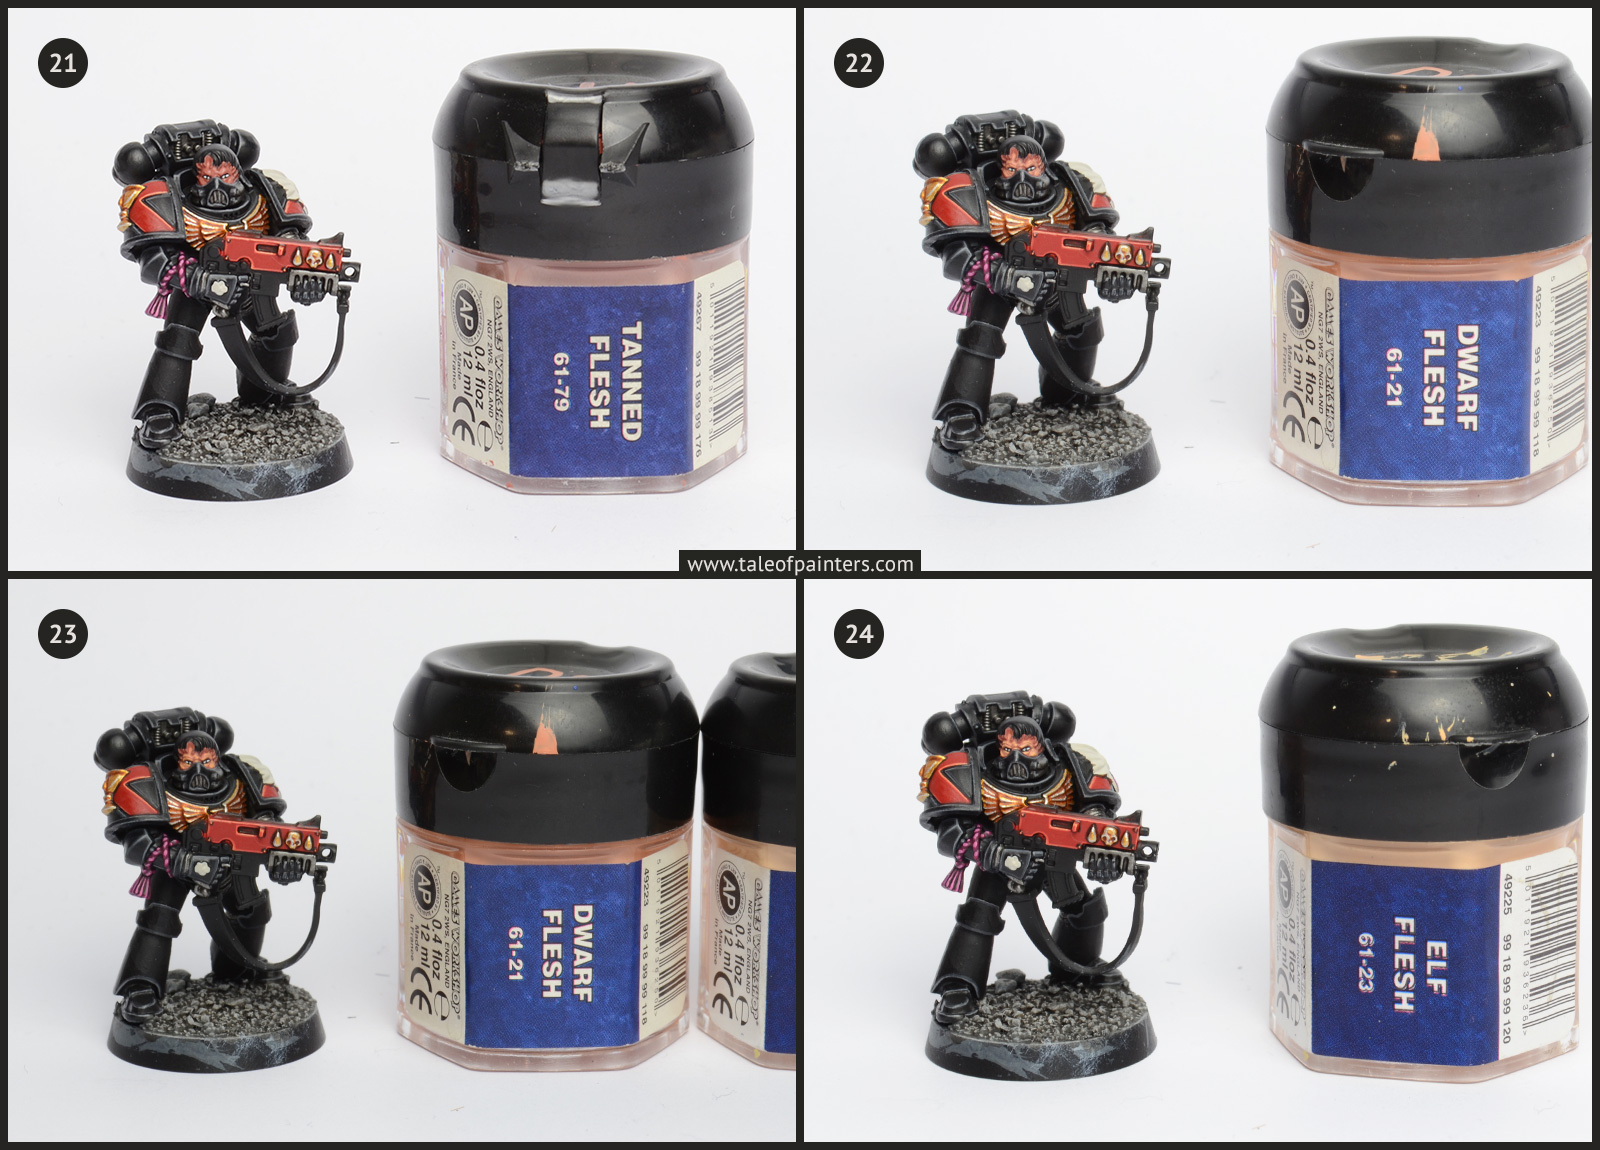
- GW Elf Flesh (OOP)
- GW Averland Sunset
- GW Scorched Brown (OOP)
- GW Bestial Brown (OOP)
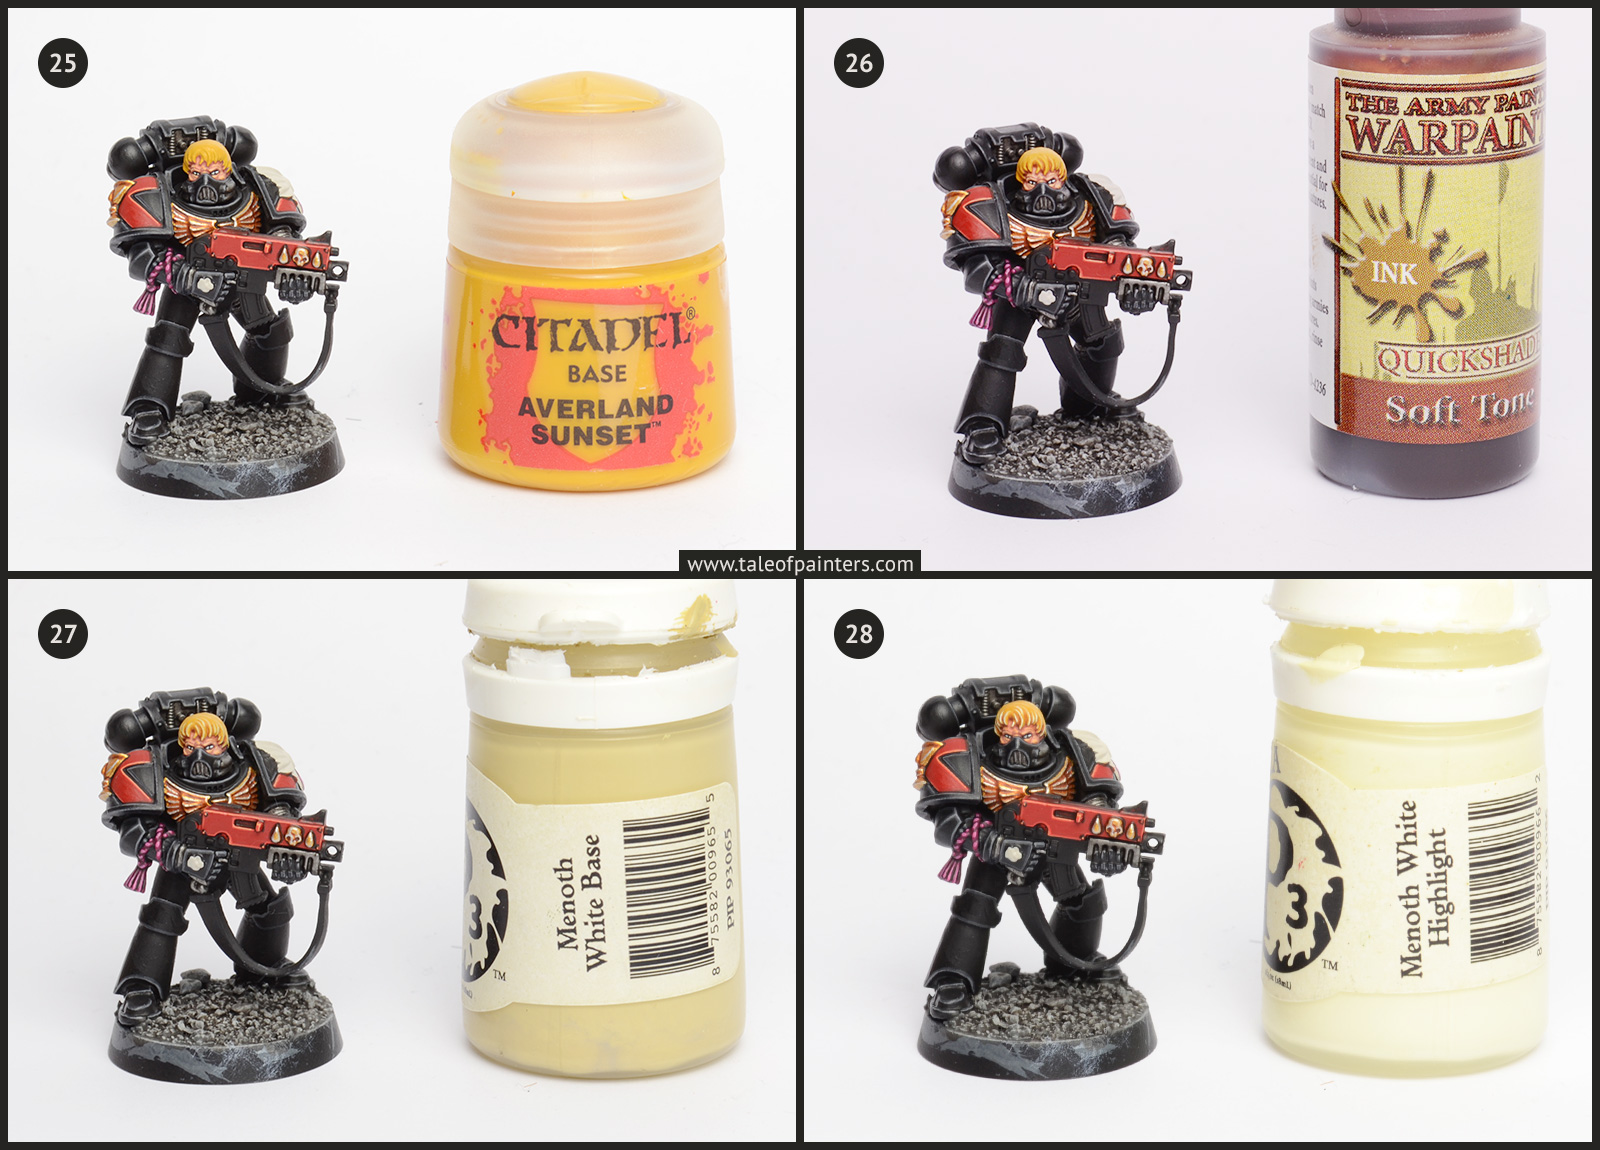
- VGC Brown Ink
- VGC Squid Pink
- VGC Glorious Gold
- The Army Painter Warpaints Strong Tone Ink
- Warpaints Dark Tone Ink
- Warpaints Plate Mail Metal
- Warpaints Shining Silver
- Warpaints Matt White
- Privateer Press Formula P3 Carnal Pink
- P3 Menoth White Base
- P3 Menoth White Highlight
- P3 Hammerfall Khaki
- Reaper Master Series Polished Bone
How to paint Blood Angels Death Company
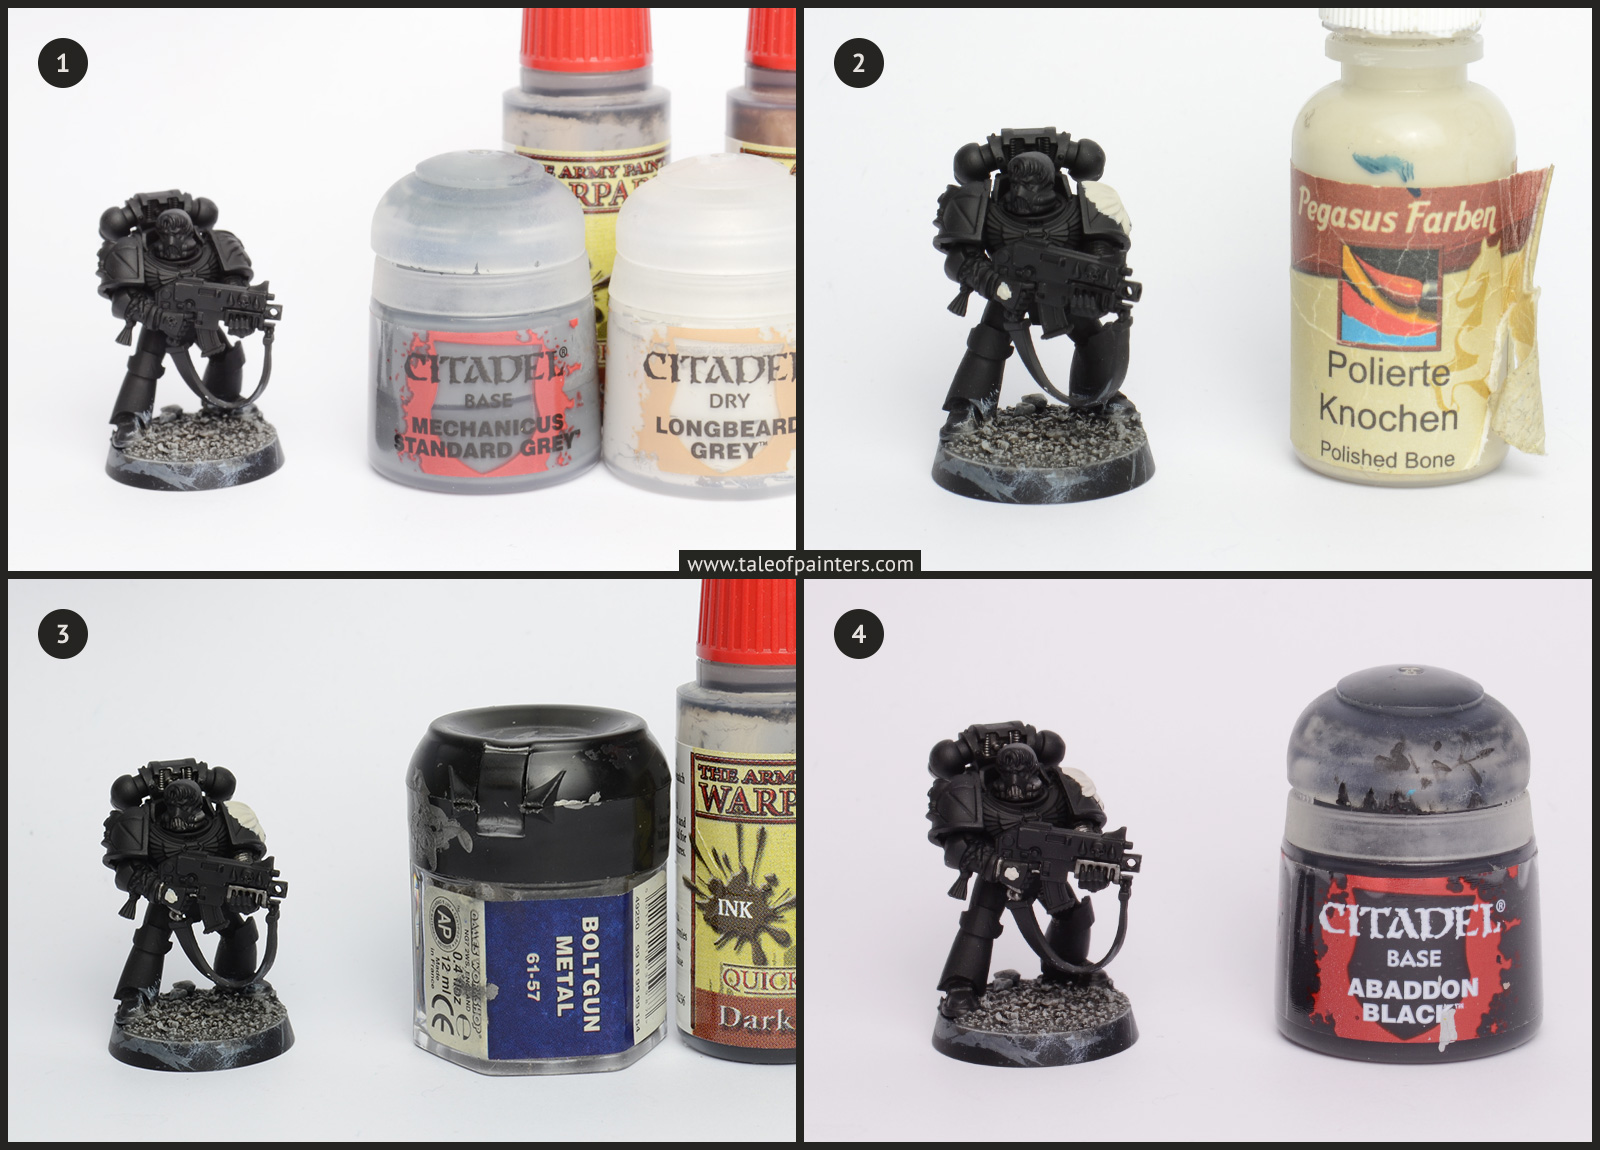
1. I’ve primed the model with black primer (Vallejo Surface Primer black via my airbrush, but canned spray primer works as well). The sand texture of the base was basecoated with Mechanicus Standard Grey, then heavily drybrushed with Longbeard Grey. Finally I’ve applied a generous wash of a 1:1 Warpaints Dark and Strong Tone Ink [Nuln Oil and Agrax Earthshade].
2. Once the wash has dried, I’ve basecoated with white emblems with Reaper Master Series Polished Bone (don’t wonder, it’s relabeled by German brand Pegasus) [Pallid Wych Flesh works perfectly as a replacement]. I do this now, because at this stage you can yet be rather messy and it will take a couple of coats for a decent coverage .
3. I’ve also painted all the metallic areas, that would be hard to reach later, with Boltgun Metal [Leadbelcher] and washed them with Warpaints Dark Tone Ink [Nuln Oil].
4. Finally I’ve cleaned up the black armour with Abaddon Black.
5. With a fine brush, I’ve applied an edge highlight of Eshin Grey to the black armour.
6. An even finer highlight of old Codex Grey [Dawnstone] was applied to the most pronounced edges.
7. I’ve basecoated the red armour panels with Mephiston Red.
8. Then I washed Warpaints Strong Tone Ink [Agrax Earthshade] in the recesses. Two coats might be needed for a deep shading. Then I cleaned up the red areas with Mephiston Red.
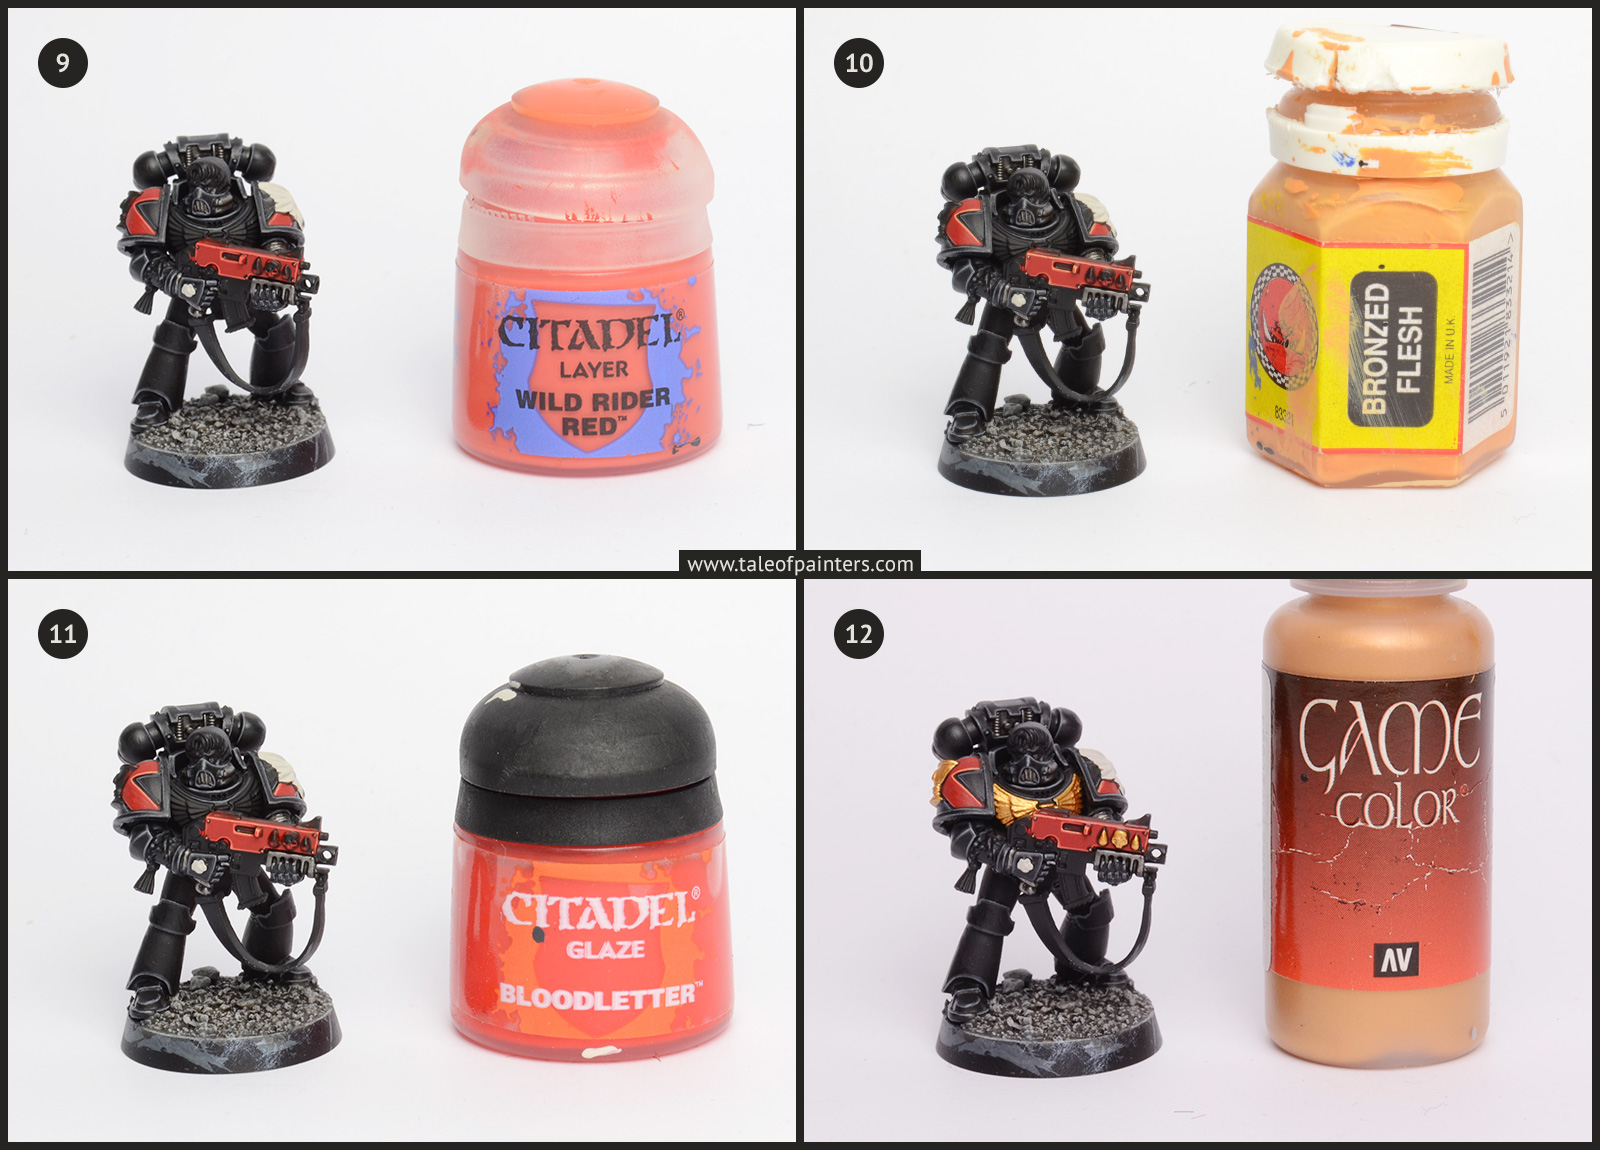
9. I’ve highlighted the red panels with Wild Rider Red.
10. An extremely thin highlight of this very old Bronzed Flesh paint was applied then [Ungor Flesh should work as replacement, or get VGC Bronze Fleshtone]. Keep it very thin, else it will overpower the red.
11. Finally, I’ve glazed the red panels with a thin coat of Bloodletter to tone down the highlights.
12. Now I’ve basecoated the golden emblems with Vallejo Game Colour Glorious Gold [Gehenna’s Gold, though the coverage of the Vallejo paint is much better].
13. I’ve washed the recesses of the gold with VGC Brown Ink [a mix of Agrax Earthshade and Reikland Fleshshade might work, though the Brown Ink has much stronger pigments]. Then I’ve cleaned up by layering VGC Glorious Gold.
14. I’ve finished the gold by highlighting with Warpaints Shining Silver [Runefang Silver].
15. In this step, I’ve basecoated the gems and ropes with Screamer Pink.
16. Now I’ve washed the ropes with Warpaints Dark Tone Ink [Nuln Oil]. For the gems, I’ve mixed a little bit of black into Screamer Pink and applied the mix in the upper left corners.
17. Then I’ve layered old Warlock Purple on the ropes, while highlighting the lower right corners of the gems with this paint as well [mix Screamer Pink with Emperor’s Children or get VGC Warlord Purple].
18. Now I’ve highlighted with ropes and the gems with Emperor’s Children.
19. Finally I’ve added highlights of VGC Squid Pink and Formula P3 Carnal Pink [mix Emperor’s Children with successive amounts of white], while concentrating more and more to the lower right corner with each step. I also added a small dot of Carnal Pink to the upper left corner.
20. Now I started working on the face. I’ve applied two dots of Warpaints Matt White [White Scar] to the corners of the eyea, then cleaned up the eye sockets with Abaddon Black. You can also paint the eyes white and then add a black line for the pupil if you prefer. I like to paint the eyes first, as this allows me to try as many times until I’m happy, without ruining the paint job of the flesh.
21. I’ve basecoated the flesh with old Tanned Flesh [mix Ratskin Flesh with Tuskgor Fur or get VGC Tan]. I’ve left a thin line of black around the eyes for more definition.
22. Now I’ve layered old Dwarf Flesh [Bestigor Flesh, though it might be slightly lighter] while leaving the Tanned Flesh showing in the recesses. Take care to apply multiple thin coats for a smooth result.
23. A first highlight was applied by mixing Dwarf Flesh with old Elf Flesh [Ungor Flesh].
24. Finally I’ve highlighted with pure Elf Flesh [Ungor Flesh]. By the way, check out this old tutorial of mine to learn more about painting faces, too.
25. I’ve basecoated the blonde hair with Averland Sunset.
26. Warpaints Soft Tone Ink [Seraphim Sepia] was washed into the recesses. Then I’ve cleaned up the hair with Averland Sunset again.
27. The first highlight for the hair was P3 Menoth White Base [Ushabti Bone].
28. A final highlight of P3 Menoth White Highlight was applied [mix Screaming Skull with white or get VGC Off White).
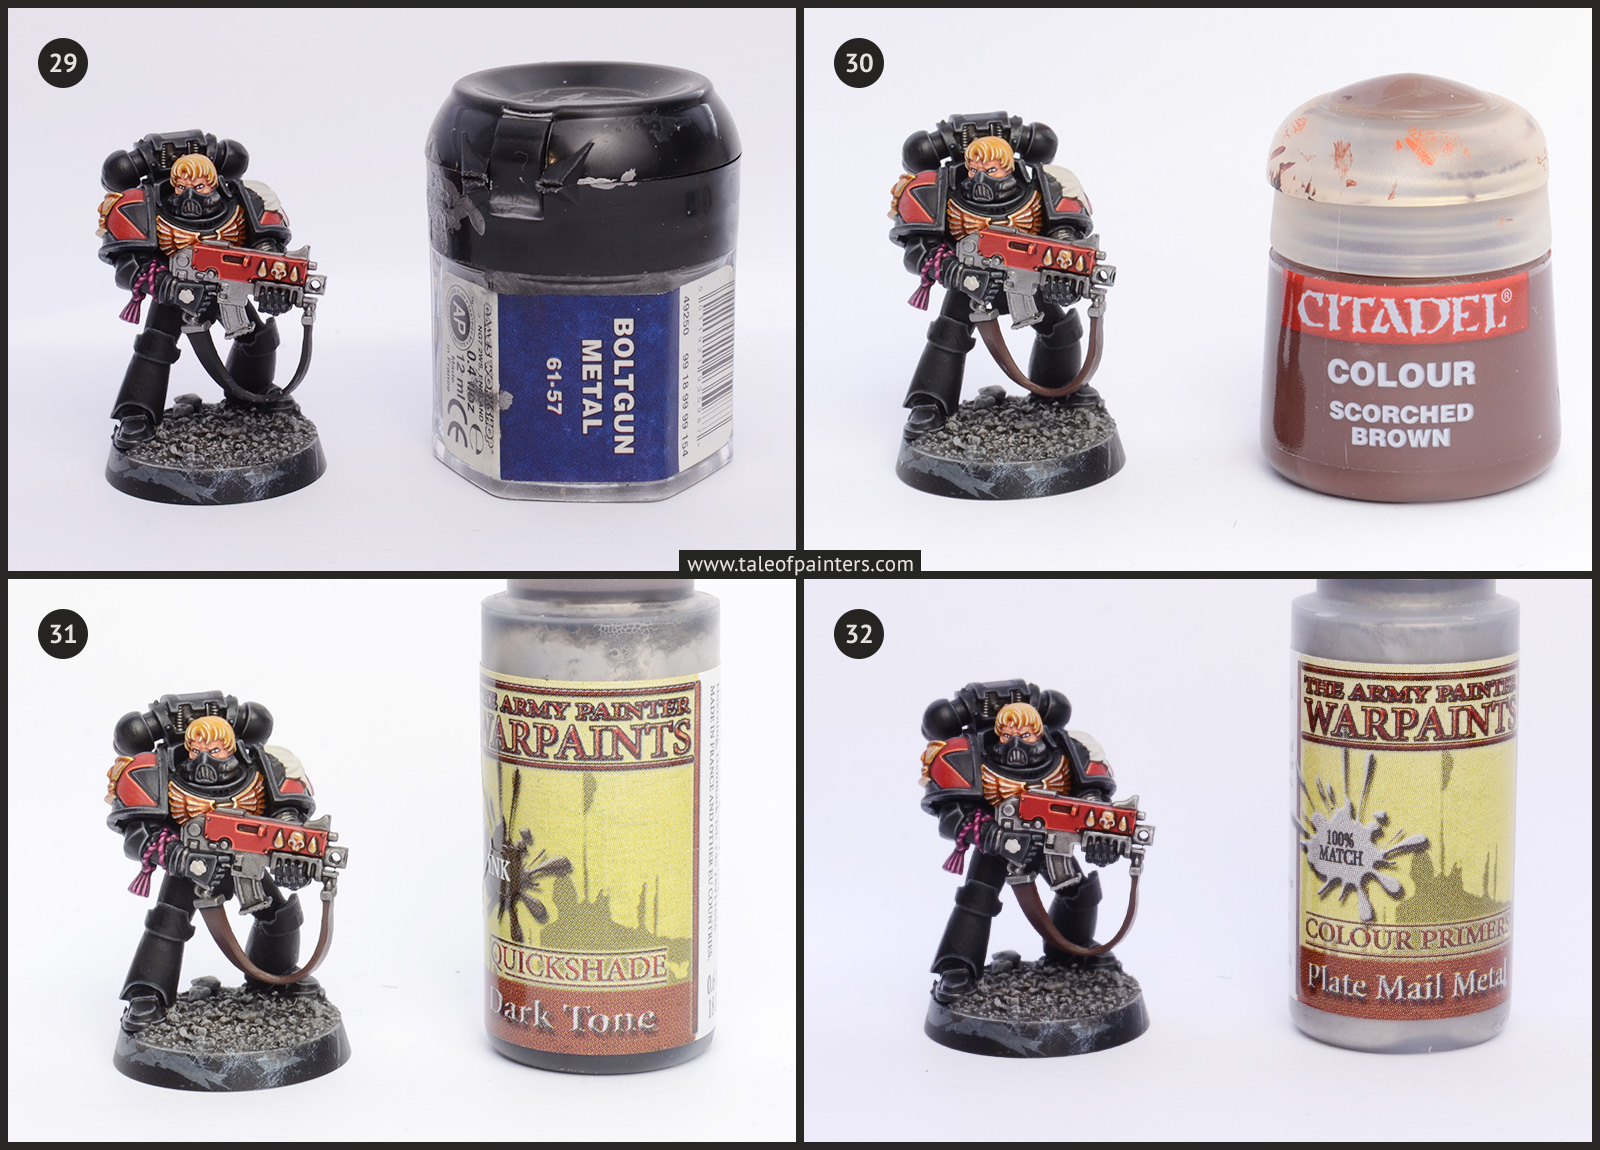
29. All metallic areas not yet painted were basecoated with Boltgun Metal [Leadbelcher].
30. The leather strap was painted with old Scorched Brown [Rhinox Hide].
31. I’ve washed the metallic areas with Warpaints Dark Tone Ink [Nuln Oil]. I’ve also applied some wash where the leather meets the metal.
32. Now I’ve highlighted the metal areas with Warpaints Plate Mail Metal [Ironbreaker]. Don’t forget to highlight the metallics from step 3 as well.
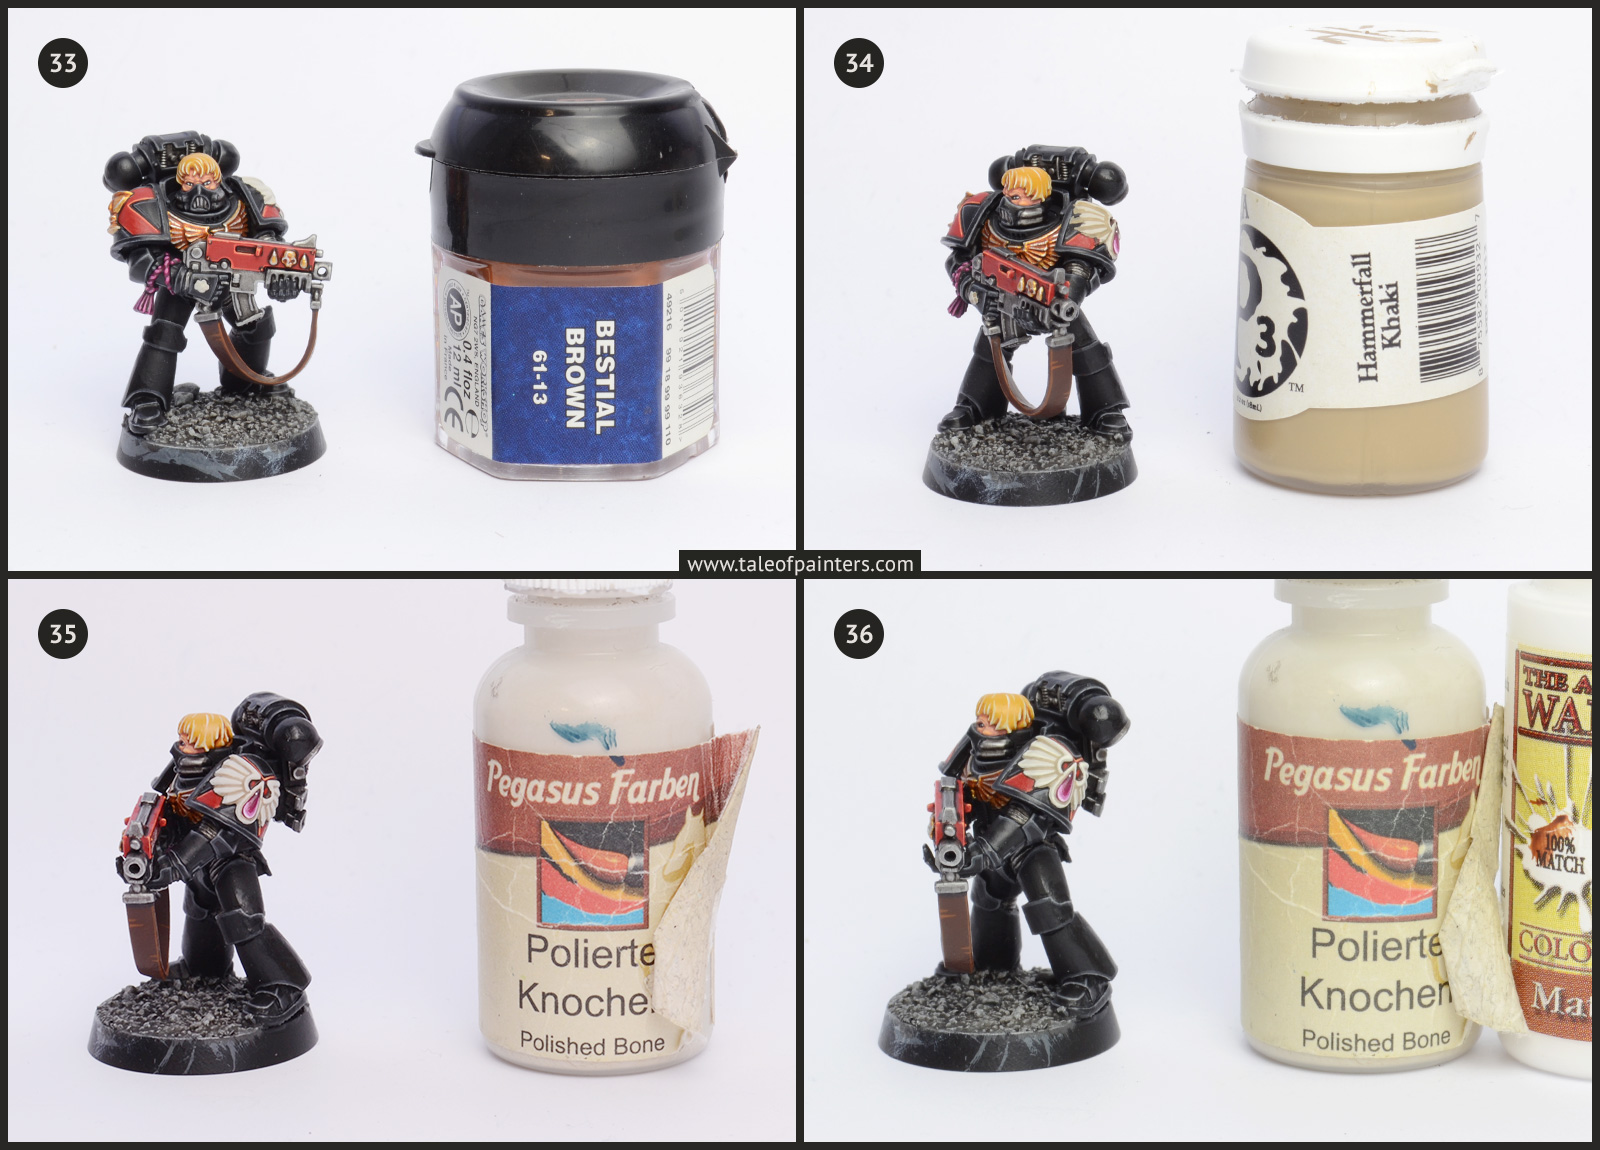
33. The leather was highlighted with old Bestial Brown [Mournfang Brown works as well, though it’s a bit darker].
34. Now over to the white emblems. I’ve applied P3 Hammerfall Khaki [Karak Stone] in the recesses.
35. Then I’ve cleaned up the white areas by layering RMS Polished Bone [Pallid Wych Flesh].
36. A mix of Polished Bone and Warpaints Matt White [White Scar] was applied as a highlight. I skipped this step for smaller emblems.
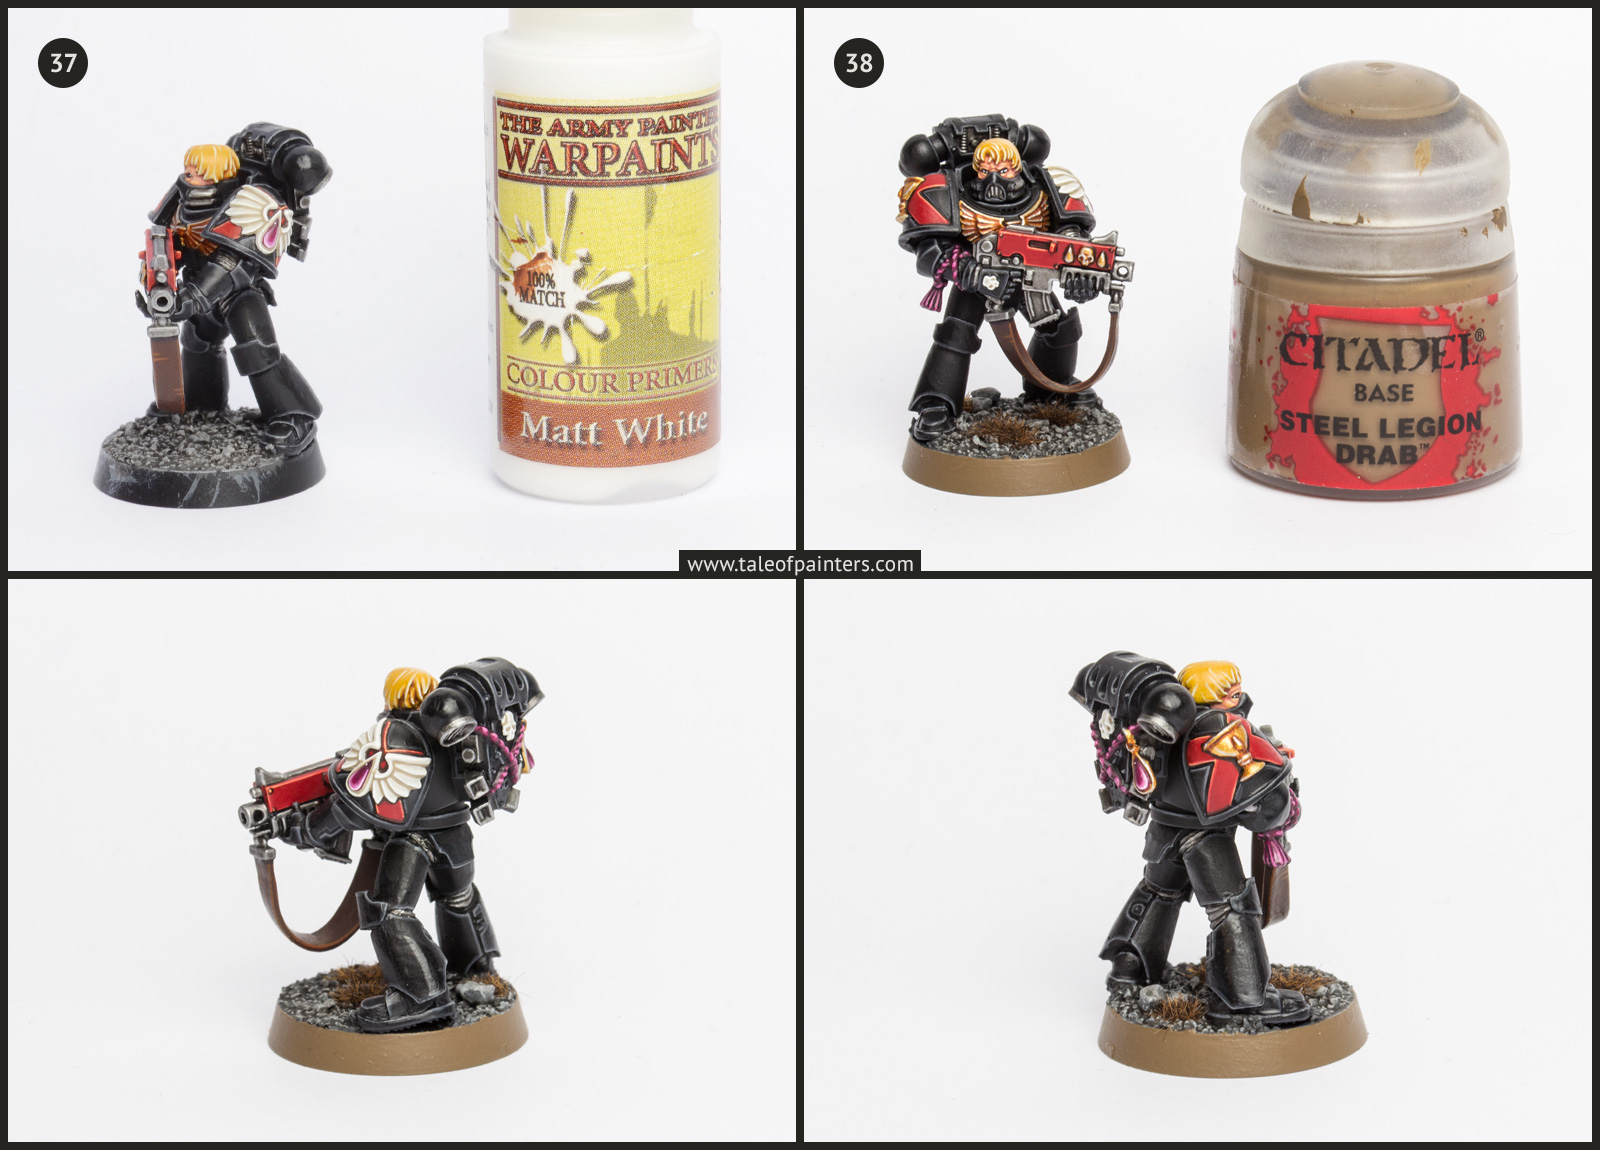
37. A final highlight of pure Matt White was applied to the emblems.
38. The trim of the base was painted with Steel Legion Drab. Finally I’ve added some small patches of my custom blend of light brown, dark brown and black static grass, which I’ve picked up separately from various ebay sellers.
Hope you like the result 🙂 Please tell me in the comments.
Note that this is a complimentary tutorial for the regular Blood Angels tutorial I posted some time ago. Both tutorials share the same techniques and paint recipes. Also check out Garfy’s Black Legion and Iron Hands tutorials for another spin at painting black armour.
8 Comments
Leave a Reply
Tale of Painters is the unofficial Warhammer hobby magazine run by hobbyists like you. Support our work by using the affiliate links from our 🇺🇸 / 🇨🇦 partner stores for your next orders so we can continue to bring you fantastic FREE content every day:


Or support us directly:


Very nice tutorial, thanks for taking the time to make it. Also, I *love* your gem technique. I've neve seen a blood drop painted with a thin edge-type highlight quite like that before. I'll have to try that out.
Congratulations again man and thankyou for the tutorial. Well made as always!
I see that you use various types of acrylics, never heard of Pegasus Farben…
They are just relabeled Reaper Master Series paints.
Brilliant, thank you.
You make it look too easy! Brilliant as always, this whole blog is superb keep it coming ?
SUPERB…..
This is one of the best step-by-step tutorials I have seen on the Net – Thank you.
Tony
That is a great set of pictures, I especially like the addition of the paint next to each step, not only a great reminder as you go, but very visual for us readers. That is an impressively old pot of Bronzed Flesh, at it still has usable paint?
Great work as always Stahly
nice tutorial, the end result is fantastic. I'm not sure how you guys do it but they never look "painted", just extremely realistic and lifelike. when I paint it just looks like a toy soldier with paint on it! great stuff and great blog