

I’m pleased to present to you, a full photo tutorial for Space Wolves. This Blood Claw was painted in 32 steps and every single step is detailed after the jump.
I’ve designed this tutorial so established painters find it interesting but also so new comers to the hobby can learn some basic and advanced techniques. I will use terms such as glazing and washing, don’t worry if you don’t know what these mean because I will elaborate and explain during that step.
Paints you will need for this tutorial:
White Undercoat
Fenrisian Grey (layer)
Russ Grey (layer)
The Fang (base)
White Scar (layer)
Cadian Fleshtone (layer)
Bugman’s Glow (base)
Kislev Flesh (layer)
Doombull Brown (layer)
Screaming Skull (layer)
Abaddon Black (base)
Skragg Brown (layer)
Jokaero Orange (base)
Yriel Yellow (layer)
Flash Gitz Yellow (layer)
Khorne Red (base)
Wazdakka Red (layer)
Wild Rider Red (layer)
Warplock Bronze (base)
Leadbelcher (base)
Nuln Oil (shade)
Rhinox Hide (base)
Mournfang Brown (base)
Zandri Dust (base)
Dawnstone (layer)
Administratum Grey (layer)
In case you need to expand your paint collection, head over to Wayland Games or Slave to Painting, which both stock a huge selection of paints at competitive prices.
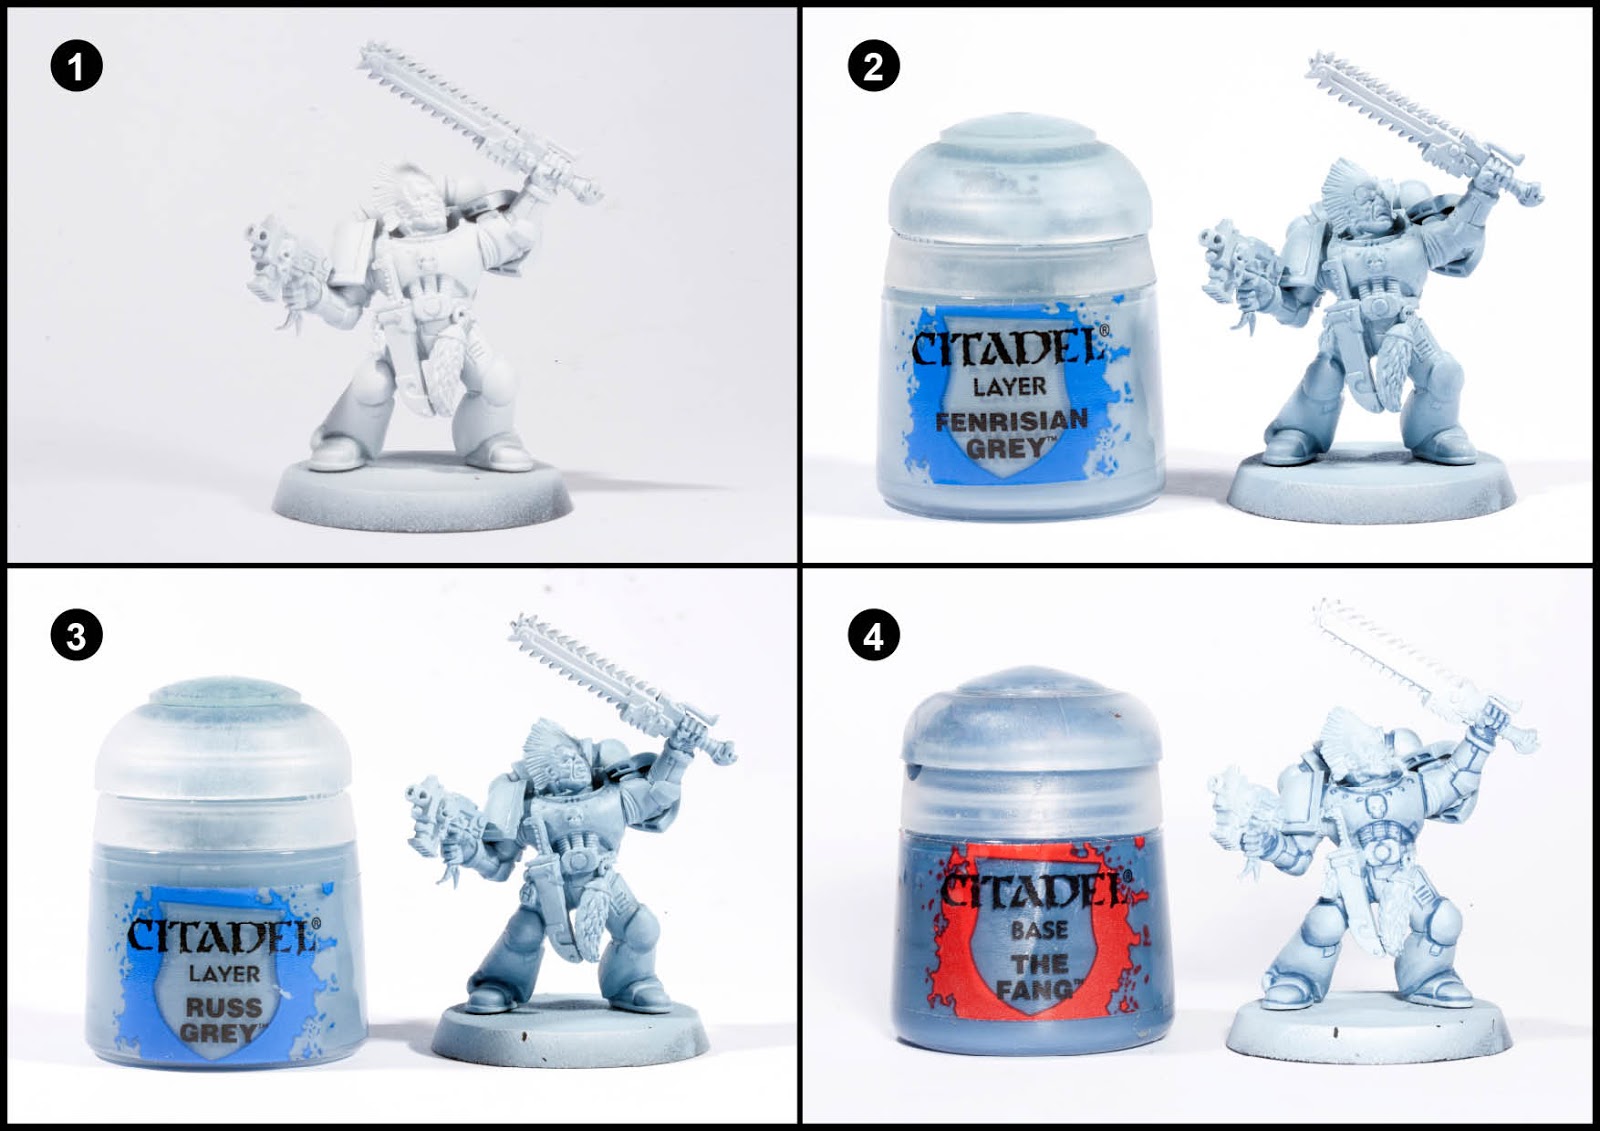
1. Undercoat the model white. I find aerosol sprays a bit “chalky”, so I use Vallejo Surface Primer which is very smooth.
2. Basecoat the model with Fenrisian Grey. I used my airbrush to speed this up.
3. Create a glaze mix of Russ Grey and Lahmian Medium (roughly 50:50) and paint a very thin layer on the lower half areas of all the armour pieces. Once dry, repeat this another couple of times to increase the instensity of the blending. It should produce seemless soft blends.
4. Add some water to The Fang and using a detail brush with a good point line all the gaps in the armour to add definition.

5. Using White Scar, edge highlight all the highest edges of the armour. The thinner you’re able to paint these lines the better. I find watering the paint down a small amount helps the paint flow from the bristles more easily enabling you to get thinner lines. Don’t be afraid to touch up any thick lines with a little Fenrisian Grey.
6. Paint the whole face with Cadian Fleshtone. Don’t forget the ears.
7. Create a glaze mix of Bugman’s Glow and Lahmian Medium (roughly 50:50) and using a fine detail brush careful run the mix into the crease of the face to shade it. Don’t use it like an all over wash.
8. Use Kislev Flesh to highlight the raised areas of the face. A little Lahmian medium and several coats will produce softer blends.

9. Use watered down Doombull to add some subtle shading to the face creases. Less is more, don’t over do it.
10. Highlight the raised areas of the face with Screaming Skull.
11. Paint the eyes, mouth, weapon handles and armour joint ribbing with Abaddon Black.
12. Add two dots of White Scar to each eye and paint the teeth. A touch of water mixed into the paint will help the flow and increase accuracy.

13. Paint the hair all over with Skrag Brown.
14. Create a glaze mix of Doombull Brown and Lahmian Medium (roughly 50:50) and paint it into the lines of the hair. Once dry, repeat to increase the intensity.
15. Carefully paint thin lines of Jakaero Orange on to the raised lines of the hair.
16. Paint the shoulder pads with Yriel Yellow. This might take three coats. Keep the layers thin so they don;t go lumpy.

17. Use Flash Gitz Yellow to highlight the upper two thirds of the shoulder pad.
18. Use Skrag Brown to line the edges of the pad.
19. Basecoat the weapon casings and scabbards with Khorne Red. Don’t forget to paint pack markings on the shoulder pad (like I did in the above photo).
20. Highlight the edges of the red with Wazdakka Red use a medium thick line.

21. Paint a thin edge highlight of Wild Rider Red on the previous layer.
22. Paint all the areas deemed to be metal and gold with Warplock Bronze.
23. Highlight just the metal areas with Leadbelcher, make sure you leave Warplock showing through as shading in the creases.
24. Wash over all the metal areas with Nuln Oil.

25. Paint thin edge highlights of Ironbreaker on all the metal areas.
26. Paint the gold areas with Hashut Copper.
27. Paint any tooth, skulls and wolf pelts/tails with Rhinox Hide.
28. Highlight the previous stage with Moungfang Brown. Make sure you leave the Rhinox Hide layer showing through the gaps in the fur and the eye sockets of the skulls.

29. Further highlight the previous layer with Zandri Dust. Only highlight 50% of the wolf tail so you get that nice blend in the fur.
30. Give the skull, wolfpelt/tail and wolf teeth a final highlight of Screaming Skull.
31. Edge highlight the weapon handles and armour joint ribbing with Dawnstone.
32. One final highlight of Administratum Grey for the weapon handles and armour joint ribbing.
Finally, base the model in a way which fits in with your own army or gaming table. I’ve used Steel Legion Drab for the rim, Armageddon Dust for the base top and then drybrushed with Screaming Skull. Drybrushing is a way of picking out raised detail quickly usually with a lighter colour. To dry brush you need load up your brush with paint and then wipe it off the bristles on a tissue until virtually no paint remains on the brush. Then rapidly and repeatedly drag the side of the brush back and forth over the area to be painted.


You can view other Space Marine tutorials using these quick links. Imperial Fist, White Scars, Iron Hands, Salamanders, Sons of Horus and Minotaurs
Do you like our tutorials and reviews? Here is what you can do to support us: Check out the websites of our sponsors, place your next orders at Wayland Games by clicking here or on the banner on the right. Thank you very much, we appreciate any help to keep us going!

17 Comments
Leave a Reply
Tale of Painters is the unofficial Warhammer hobby magazine run by hobbyists like you. Support our work by using the affiliate links from our partner stores for your next orders so we can continue to bring you fantastic FREE content every day:


![]()
![]()
Or support us directly:


Thankyou!
I will try this (once I have assembled the paints) and think this is an excellent breakdown for a complete job in easy to follow clear steps.
AB
Garfy, just told me an important piece of information concerning this miniature. There is what looks like a gap in the paint process in photo's 3-4. Don't panic, Garfy hasn't added any new colours between photographs; indeed, there is nothing inbetween 3-4. What there is; however, is slight change of lighting and camera angle. Garfy is experimenting with a new set up. Thus, carry on as usual campers and follow those instructions. Lol, yes he does look rather concerned about something on his chainsword.
He looks very shocked about something on his chainsword…
Excellent! I have greatly missed your tutorials. (The frequency kind of dropped off in 2015). 😉 I love they way they are written, and I hope this is a sign for more to come in 2016 😉
I will be trying this one for sure. Thanks!
Lovely paint job but too blue for me. I go traditional grey scheme for armour plate. As I say though some lovely brushwork there.
Traditional grey? The only traditional grey space wolves I can think of are the 13th company that were released when GW did the eye of terror campaign. Traditionally space wolves are bluey grey. Mine is based in second edition schemes.
Garfy, is bang on! The Bluey Grey scheme actually came out in the Rogue Trader days. It debuted with a SW terminator in 1989. Yeah, the Space Wolves earlier schemes appear to be old fashioned grey, but there was always a hint of blue there. Indeed, indications were the scheme was evolving the blue way slowly with the increased lighter shades on the models. It's no surprise their look evolved as GW/Citadel at the time produced more varied and better paints. However, the above is the paint scheme which sent the SW's into the stratosphere. The problem for this paint job though was speed and practicality, it wasn't a fast process like it was for other chapters. As we can see here, it looks simple at first glance, but to get it right (like Garfy has) you actually needed to be a decent, experienced painter. Of all the revamped Marine Chapters in 2nd Ed, it was by far the most difficult to paint for newbs and intermediates. The initial reaction I saw from SW fans, or Marine players was generally positive about the paint design until some folks tried to recreate it. GW have a lot to answer for in this regard. Their guides for painting Space Wolves were notoriously shoddy. Hence, a lot of people I know started painting SW's with darker colours. It makes sense really, if you are paid to create someones army you don't want to piddle about second guessing a colour scheme.
Its about bloody time. Looks lovely.
Great to see a tutorial from you Garfy, your tutorials helped me loads when learning to paint. I love the way you set everything out and explain it all step by step. I really appreciate the effort gone into it too, thank you! The painting is great too 🙂
Classic light blue/grey wolves! LOVE IT!
Garfy amaze me every time with his effort and patience…this is a great work! Far better than any of those WD paint splatter even for a noob.
This is wonderful and a big thank you for this classic Space Wolves break down. Without a doubt the above was and still is one of the toughest Marine paint schemes to recreate from the glory days of 2nd Ed. Getting this look bang on is the mark of a top class painter. Thus, thank you ever so much. I can see why so many people including me came croppers with this. There is so much going on with this oh so subtle, but deadly beastie. Personally, this scheme is still my fave SW one. It really shows up how inadequate GW's SW painting guides were.
A little too powder blue for my personal taste, but certainly well painted!
Can you post equivalent colors for those GW named colors? Their prices are too high, and the color names really don't tell you what to use.
No I can't, sorry. I'm not familiar with other manufacturers paints. You'll have to research it yourself. If you find it out, feel free to post it in the comments so others might find it of benefit.
there's a great conversion chart on dakka dakka. Google it and it should come up in the first few hits.
I second what Tripwire said, they're no better conversion chart for wargames paints than the Dakka Dakka one.