
How to paint Ultramarines Tutorial
Hey there! People often ask me in the comments how I painted my Ultramarines army. But until now I never got around doing a proper painting tutorial. Look no further! In this post I share with you all the paints and techniques I used on my Marines. It’s also of great use for other chapters like Space Wolves or Blood Angels – just exchange the colours for the appropiate ones.

1. Assemble and prepare the model by removing any flash and glueing sand on the base. Notice that I haven’t attached the shield arm for the ease of painting. Prime the model with your favourite black spray primer. I used GW Chaos Black but the last cans I had inclined to fog on the model. The Army Painter Matt Black primer works great as well. Now let’s do the messy business first: Paint the texture of the base with Codex Grey, then overbrush with Fortress Grey and finally drybrush with VGC Ghost Grey. Then apply Badab Black to the one half and Devlan Mud to the other half of the base in an irregular pattern. To create a smooth transition, blend both washes together where they join. When the wash is dry, gently drybrush the base with Fortress Grey to tie everything together. Takes a bit of time, but as I add no static grass or additional details to the base I wanted to bring out the texture really well.
2. Basecoat the armour with Mordian Blue. I think Mordian Blue is a great colour for Ultramarines, nor too light nor too dark, and it’s rather flat which works well with the rich golds we’ll add later. If you like the more traditional Ultramarines Blue way, check out this great tutorial by Garfy.
Once everything is blue, paint the armour joints with Boltgun metal. Now create the shadows by painting VGC Black Ink (thinned Chaos Black works fine as well) directly in the recesses. Wash the armour joints with Badab Black, then take out your Mordian Blue and tidy up the armour until it looks like on the picture above.


3. Now apply a sharp and thin highlight to every edge with Ultramarines blue. You’ll want excellent brush control for this, so you need a brush that keeps a perfect tip. I used a Winsor & Newton Series 7 size 0 for this. Once you’re done, get out VGC Steel Grey to highlight the most prominent edges with an even sharper and thinner highlight. I used a W&N Series 7 M size 0 – the M brushes have shorter tips that hold less paint but increase brush control. The extreme highlight makes the armour really pop, it’s astonishing how much depth it adds to the model.

4. Basecoat all the golds with VGC Shining Gold. The Vallejo Game Color Golds have a much better coverage than their GW counterparts, however they incline to be a bit thick. Thin them down with water or VGC Glaze Medium to make them really smooth (thanks to Garfy for this advice). Then wash VGC Brown Ink in the recesses. Clean up with Shining Gold again and apply a thin highlight of Mithril Silver.
Basecoat the tabbard and the purity seals with Khemri Brown. Layer VGC Khaki on the tabbard and apply highlights with thinned Dheneb Stone and P3 Morrow White (or Skull White). Layer the seals with Bleached Bone and highlight with Morrow White, too.

5. Next are the white areas (like the skull insignia on the right wrist or the storm shield – not shown on the picture above). Basecoat them with Codex Grey, then layer VGC Ghost Grey. You will need about 5 thinned coats for an even coverage – sadly there is no way to speed this up so be patient. Finally highlight with P3 Morrow White.
Basecoat the leather with Scorched Brown, wash with Badab Black and let it dry. Layer with Scorched Brown again and highlight with Bestial Brown.
The face was painted as described in this tutorial: How to paint faces the Stahly way.
6. Paint the metal with Boltgun Metal, wash with Badab Black and highlight with Chainmail.
Paint the wax on the purity seals, the gems and cables with Mechrite Red. Wash with Badab Black and layer Mechrite Red again. Highlight with Blood Red. Give the gems another highlight with Blazing Orange. Paint the lenses with Blood Red and highlight with Blazing Orange, too. Apply a small white dot to the upper left on both the gems and the lenses.
Next I added some freehands for the Ultramarines logo and some random script here and there with multiple layers of thinned P3 Morrow White. I corrected any mistakes with Mordian Blue. I also added script to the purity seals with thinned Chaos Black.
Finally I undercoated the rim of the base with Khemri Brown and painted over multiple thinned layers of Graveyard Earth.
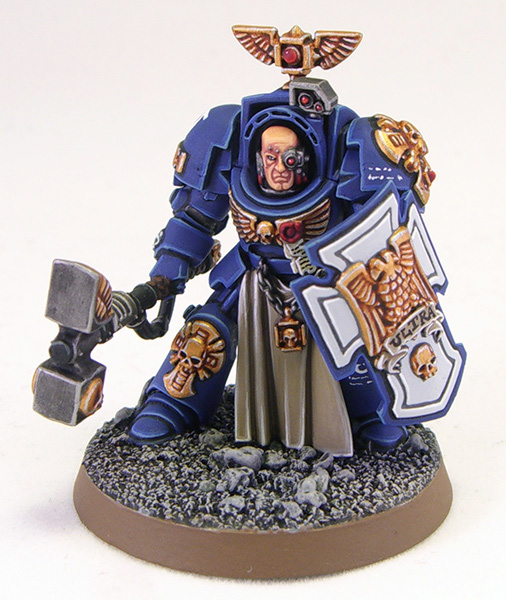
And here we have the finished model after attaching the shield and varnishing:


Do you like our tutorials and reviews? Here is what you can do to support us: Disable your Ad Blocker or place your next Wayland Games order by clicking here or on the banner on the right. Thank you very much, we appreciate any help to keep us going!
17 Comments
Leave a Reply
Tale of Painters is the unofficial Warhammer hobby magazine run by hobbyists like you. Support our work by using the affiliate links from our 🇺🇸 / 🇨🇦 partner stores for your next orders so we can continue to bring you fantastic FREE content every day:


Or support us directly:


hey, how much was all the paint? im thinking of getting into warhammers and just starting off assembling and paint some space marines
One more quick question. What kind of varnish do you use? As a novice, I'm a little concerned about doing it wrong. I read somewhere, that a brush on varnish is better for beginners than the spray on stuff. Any thoughts?
Nice. Quick question about the gold parts. GW always recommends basing with on of their gold foundations, but if I already did a foundation of blue, then I can just do a layer of gold and then a nice wash, right? many folks seem to base with a gold, wash with a brown, then do one layer of gold highlights and then a fine highlight of gold or silver, afterwards…
What would the GW version of steel grey be
Fenrisian Grey should be close.
Would you recommend using the Vallejo equivalent of Mordian Blue to achieve the same effect if not what what you recommend? since the new way of painting blue with a glaze produces a result that is not satisfactory to my tastes.
Thank you.
No, the Vallejo Heavy Blue is quite different in hue. I'd rather recommend to use Macragge Blue and mix in a little bit of Kantor Blue to darken it, as Macragge Blue is a bit lighter than Mordian Blue.
So would you say:
•Macragge Blue + hint of Kantor Blue
•black ink
•ultrmarine blue vallejo
•steel grey vallejo
Thanks for the reply 🙂
Almost, I'd swap VGC Ultramarine Blue for Calgar Blue, as it's closer to old Ultramarines Blue. Vallejo's Ultramarine Blue's hue is slightly more azure and doesn't suit your basecoat of Macragge Blue/Kantor Blue as well.
Awesome tutorial! Looking forward to getting stuck into some painting !
Very nice tutorial! Can post blood angels painting tutorial?
Hey! I loved your tutorial. Can you tell me what mini is that? I love the shield
Thanks a lot for the Tutorial! Some really cool tips here! I'm looking forward to giving your tips a go, good stuff!
Really nice! I'll be following along now 🙂
Excellent tutorial!
I great read. Very informative guide. I like your methodical way of working.
Very nice, thanks for taking the time to post this.