
In this step-by-step tutorial, I’ll show you how to paint grimdark-style Imperial Fists Legionaries for the Horus Heresy using fast and effective techniques like zenithal basecoats, drybrushing, and oil washes. The goal is a gritty, battle-worn look that captures the brutal siege warfare the VII Legion is known for – all without spending dozens of hours on a single model.
This tutorial assumes that you are familiar with the fundamental techniques of painting Warhammer miniatures. I will guide you step-by-step through the paints and techniques I utilized. Since my paint collection is quite varied, I will offer suitable alternatives from the current Citadel paint range [in brackets] whenever I use a paint that is not from Games Workshop or is out of production. However, if your goal is to replicate the exact outcome displayed, I suggest expanding your paint collection.
You’ll find a list of all the paints used in this tutorial at the end of the post.

How to paint Horus Heresy era Imperial Fists
Imperial Fists yellow armour

For priming, any brown or medium grey primer is fine. I used Grey Seer spray. Once primed, spray your Legionary with The Army Painter Warpaints Air Husk Brown, taking care to basecoat every nook and cranny.

Next, spray your model with Warpaints Air Daemonic Yellow from above at a low angle for a zenithal highlight. This will be the armour’s main colour.

Finally, add another zenithal highlight with your airbrush, this time at a high angle with Warpaints Air Imp Yellow. This will add some volume to your model and add a beautifully hue of slightly faded yellow.

The next step is to protect the paint job from the enamel washes we’re gonna use to shade the model later, so seal the model with a coat of gloss varnish. I used AK Interactive Semi-Gloss Varnish Spray, but any gloss varnish is fine, e.g. Vallejo Polyurethane Gloss Varnish.

For the recess shade, we’re gonna use an oil paint, Dark Rust from Abteilung 502. Add some AK Interactive Odorless Thinner (any white spirit will do) and mix the paint thorougly until you get a wash-like consistency. Because of the low surface tension and the smooth gloss coat, the wash will run into the recesses almost by itself.

The best thing about enamel and oil washes is that you can remove them easily even after they’ve dried. Soak a cotton swab with Odorless Thinner or white spirit and carefully remove any excess wash, cleaning up the model. The gloss coat will protect the paint job underneath.

Carefully drybrush the model with Warpaints Air Imp Yellow, concentrating on the edges of the armour. As the Warpaints Air paint comes pre-thinned, leave it on your palette for a moment until the paint has thickened a little. When you’re ready, dab a little piece of blister sponge into the paint, remove any excess, and press it on areas where natural wear and tear would occur, to create random chips and marks.

Repeat the sponge weathering process with Doombull Brown. Concentrate on the areas you hit with Warpaints Air Imp Yellow, but be even more selective so some of the light green paint can still show through.
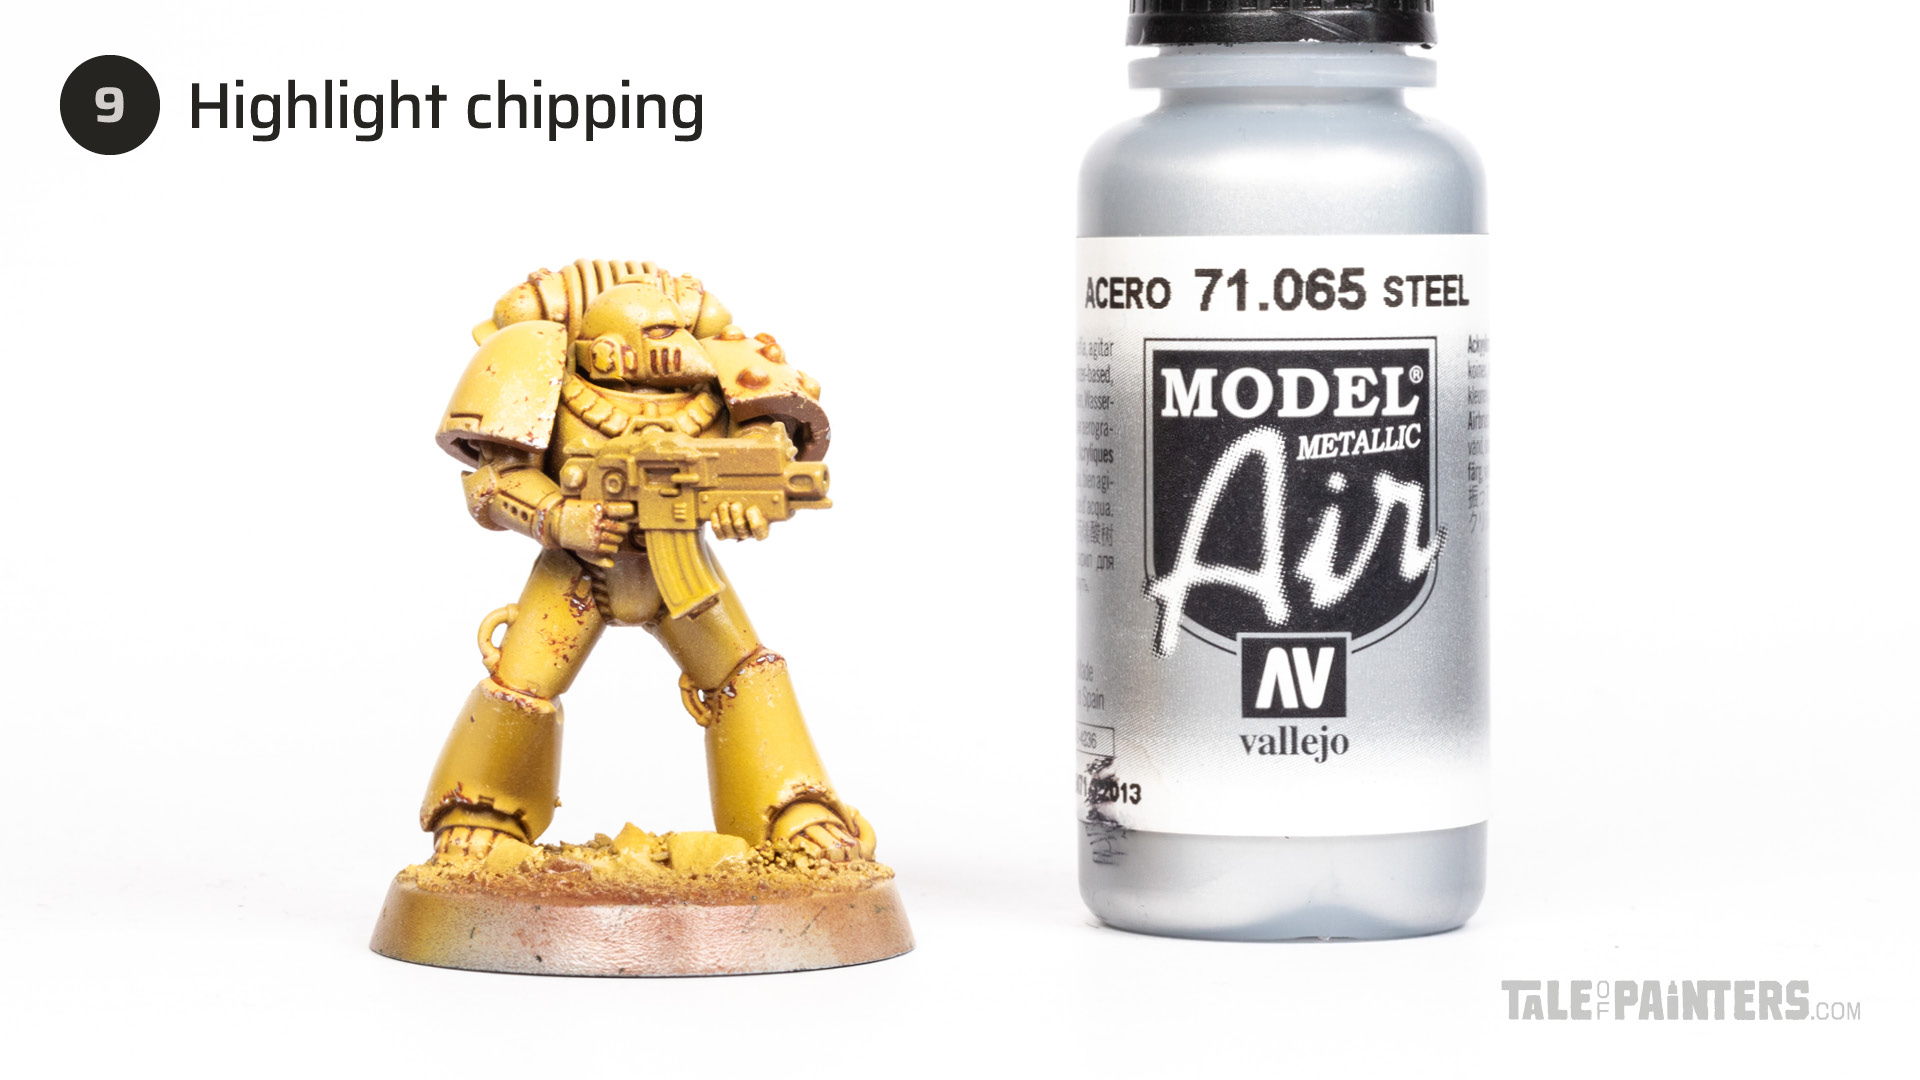
With the tip of a small brush, pick out a few of the larger chips with Vallejo Model Air Steel [or Stormhost Silver].

Armour and weapon details

Next, basecoat the rubber undersuit with a few thin coats of Mechanicus Standard Grey.
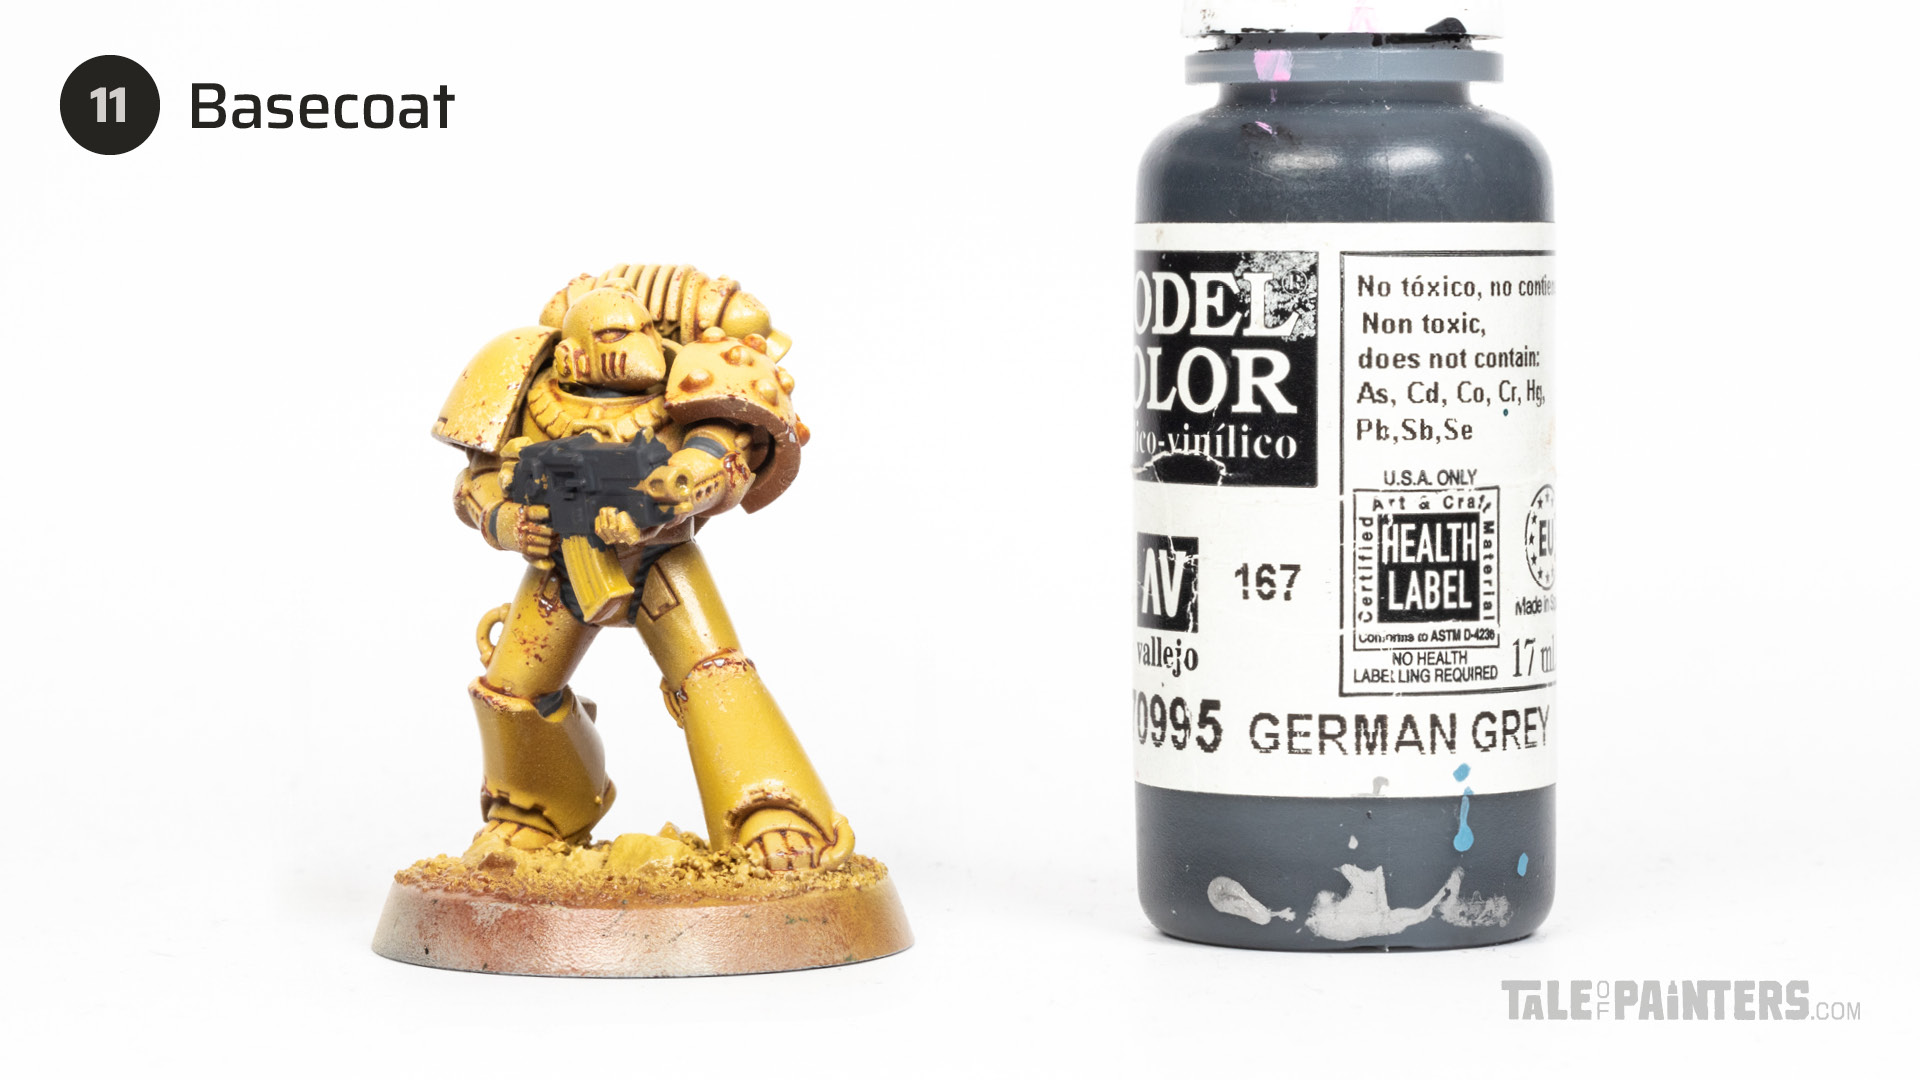
Then, basecoat the casing of the bolter with Vallejo Model Color German Grey [or Corvus Black].

Proceed with painting all steel areas with Vallejo Mecha Color Dark Steel [or Leadbelcher].

Thin Basilicanum Grey with Dispel Magic Acrylic Medium from Scale 75 [or Lahmian Medium] about 2:1 and apply it all over the undersuit, bolter, and steel areas.

Once dry, carefully drybrush the bolter casing with Mechanicus Standard Grey and pick out a few edges with quick, chipped highlights. You really don’t have to be very neat here as we’re going for a used and beaten look.

This is an optional step, but to add some more contrast to the bolter, apply a few small dots of Grey Seer to the sharpest corners and rivets.
Painting the lenses

Now onto the lenses. Carefully paint the eye sockets with Screamer Pink.

Then, use a thin brush and run Gore-grunta Fur around the lenses to add some definition. If you applied too much, tidy up with Screamer Pink afterwards.

Next, highlight the lower half of the lenses with Vallejo Game Color Warlord Purple [or a mix of Screamer Pink and Emperor’s Children].
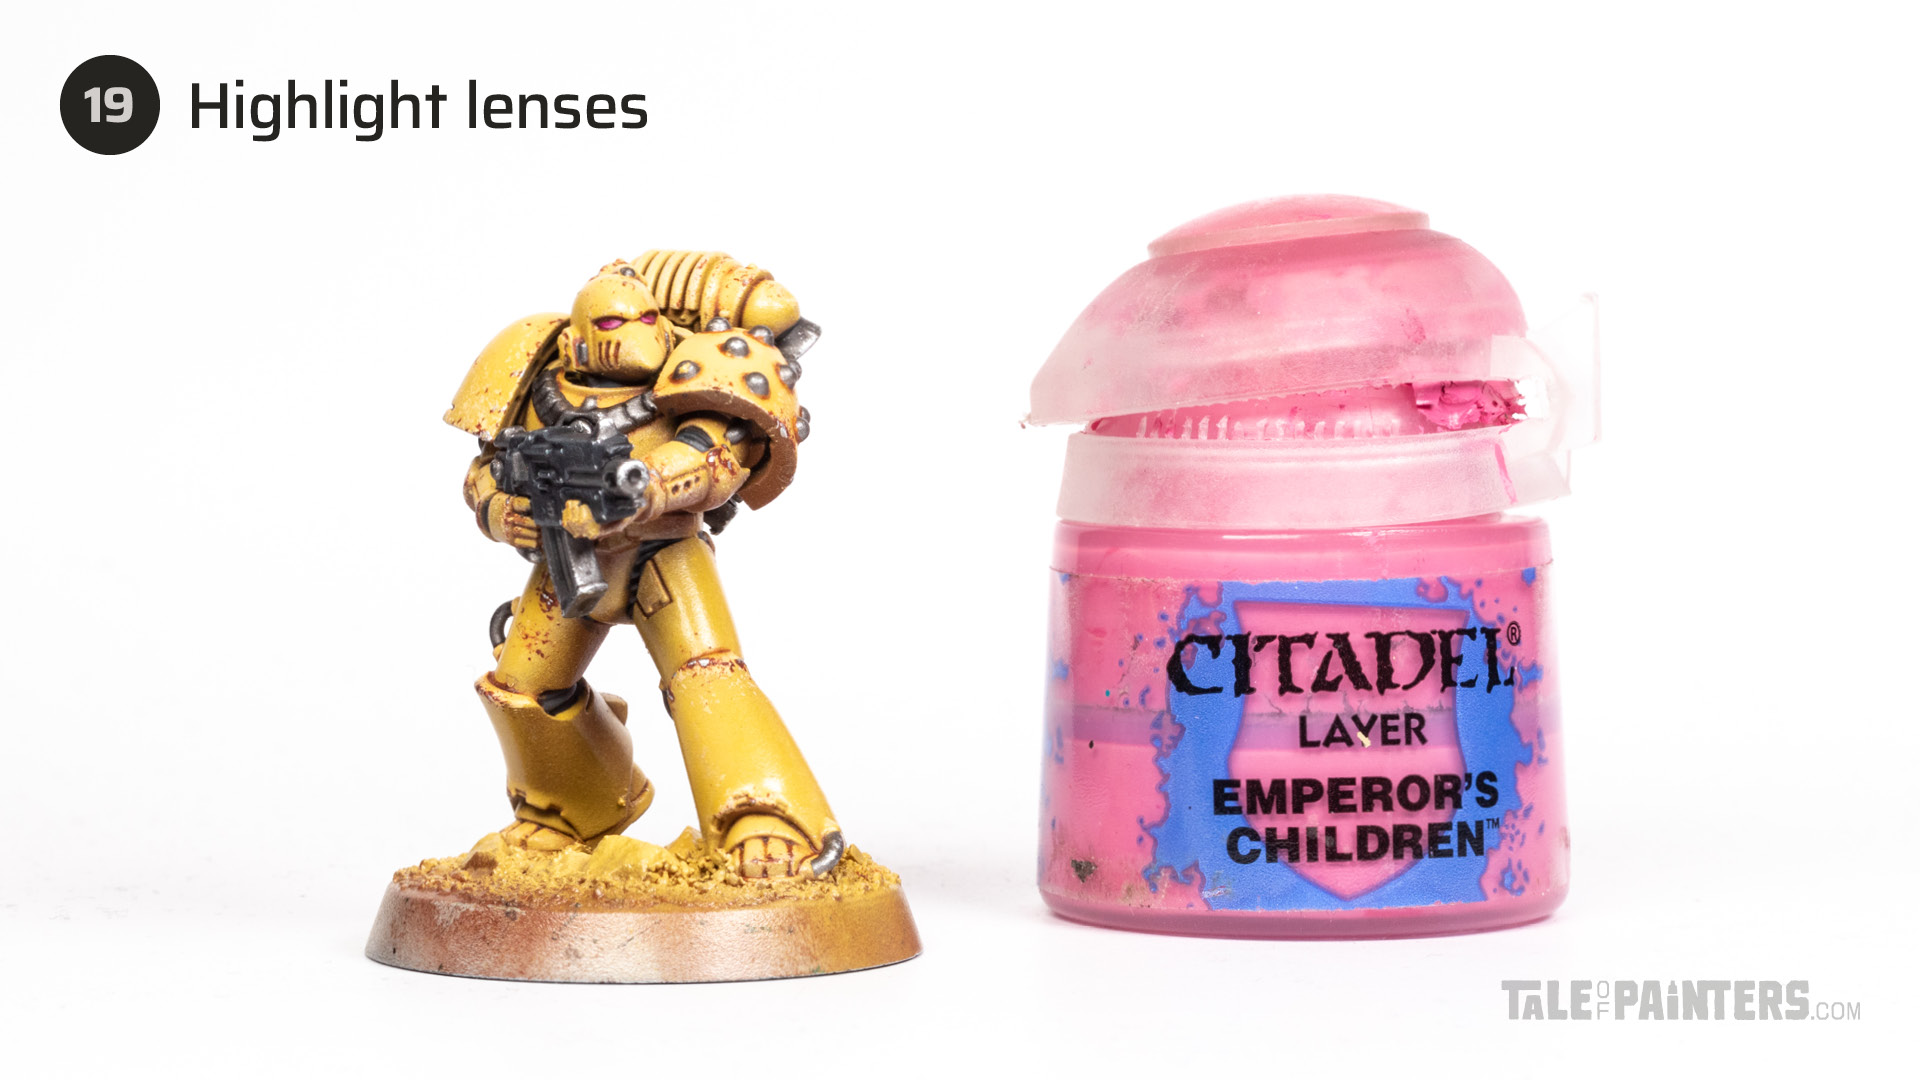
You can skip this step, but I wanted to spend some more effort on the lenses as the rest of the model is painted rather quick and dirty. Apply a very small highlight of Emperor’s Children to the front of the lenses only.

Finally, add a small dot of Vallejo Model Color White [or White Scar] to the corners of each lens.
Final touches and base

As the head is one of the main focal points of a model, I neatened up the drybrushed highlights of the helmet with a quick edge highlight of Warpaints Air Imp Yellow. You don’t need to be overly neat here as we want to go for an irregular, chipped look.

Next, we apply transfers. For this, seal the areas you want to add a decal to with gloss varnish, for example, Warpaints Gloss Varnish [or ‘Ardcoat]. Once dry, let the decal soak in water until it comes off, and put it into place. Once dry, apply multiple coats of Microsol from Microscale until the decal has fully adhered to the sur-
face and visible edges have disappeared.
If you like, you can also add some weathering to the transfers. You could add some scratches and dents with your hobby knife while it is still on the decal sheet, or add some sponge weathering with the armour’s main colour later.

Basecoat the texture of the base with Warpaints Ash Grey, which is the same colour as Dungeon Highlight from The Army Painter’s Gamemaster range [or use Greyseer], and pick out the rocks with Corax White.

Now we want to use dry pigments for a realistic dusty effect. Use an old brush and work Vallejo Pigments Dark Slate Grey into the texture of the base, and also smear a little bit around the feet of the model.

Next, work a little bit of Vallejo Pigments Light Slate Grey into the recesses of the feet.

Finally, add a spot or two of Vallejo Pigments Burnt Umber and blend them into dark grey pigments to add some more variation to the base texture.

Paint the trim of the base with Warpaints Matt Black [or Abaddon Black].
At this point, I checked the model for any mistakes I missed and corrected them. Finally, I varnished the model with my custom mix of ultra matt and matt varnish, if you don’t have an airbrush I can recommend Mr Topcoat Premium Flat (you can find a list of more of my matt varnish recommendations here).
Imperial Fists Legionary in MkVI armour painted by Stahly
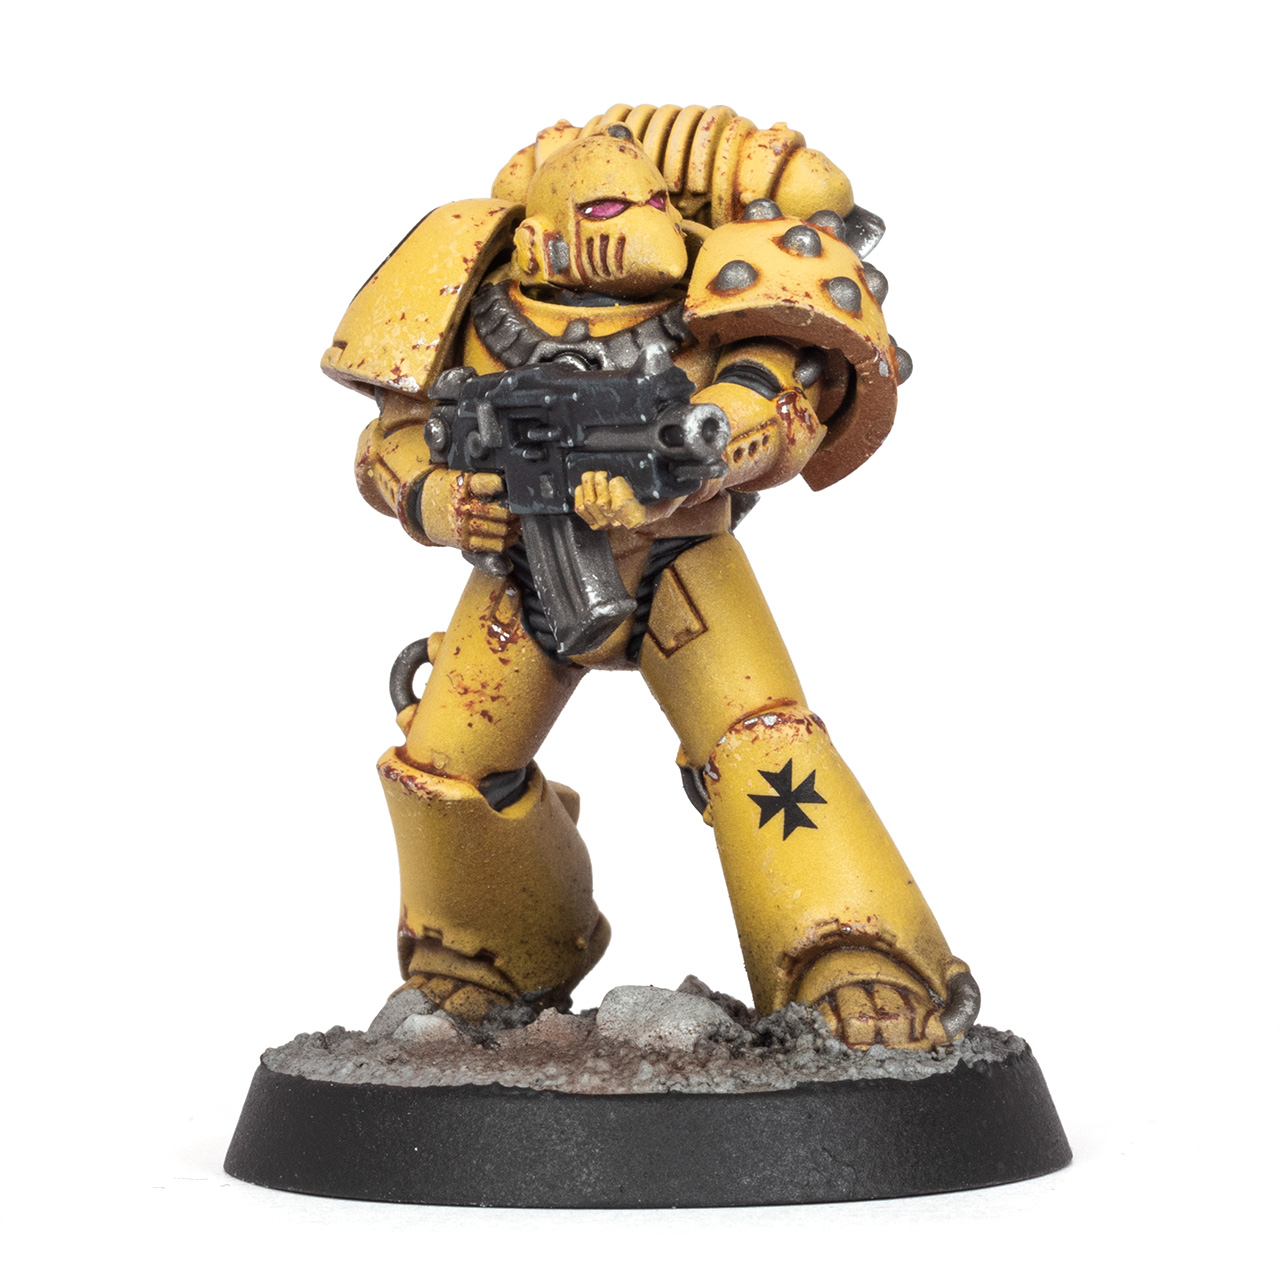

Congratulations, your Imperial Fist Legionary is ready to man the walls of Terra. Painting this model took about an hour (not counting drying time), and the method lends very well to batch-painting. You’ll find more pictures and my thoughts behind the colour scheme in this post.
Paints you will need for this tutorial:
Citadel (Games Workshop)
- Basilicanum Grey (Contrast)
- Corax White (Base)
- Doombull Brown
- Emperor’s Children
- Gore-grunta Fur (Contrast)
- Grey Seer (Base & Spray)
- Mechanicus Standard Grey
- Screamer Pink
Vallejo
- VGC Charcoal [or Eshin Grey]
- VGC Warlord Purple [or Screamer Pink/Emperor’s Children mix]
- VMA Steel [or Stormhost Silver]
- VMeC Dark Steel [or Leadbelcher]
- VMC Black [or Abaddon Black]
- VMC White [or White Scar]
The Army Painter Warpaints Fanatic
- Ash Grey [or Greyseer]
- Matt Black [or Abaddon Black]
The Army Painter Warpaints Air
Other
- AK Interactive Semi-Gloss Spray Varnish
- AK Interactive Odorless Thinner [or white spirit]
- Abteilung 502 Dark Rust Oil paint
- Mr Hobby Premium Topcoat Flat
- Scale75 Dispel Magic Acrylic Medium [or Lahmian Medium]
- Microscale Microsol
- Vallejo Pigments Dark Slate Grey
- Vallejo Pigments Light Slate Grey
- Vallejo Pigments Burnt Umber
Has my tutorial inspired you to protect the Imperial Truth? Then feel free to use our affiliate link to expand your collection:
You can find the latest GW releases at our 🇬🇧/🇪🇺 partner stores Wayland Games, Element Games, and Firestorm Games, at 🇩🇪 Taschengelddieb and PK-Pro, and at 🇺🇸 Noble Knight Games with a welcome discount of up to 20% over RRP. Using our links helps to support Tale of Painters at no additional cost to you, so thank you very much for using them!
Hope you enjoyed this tutorial. If so, leave a comment or reaction below, and if you got any questions, leave them here so I can answer them for you.
Tale of Painters is the unofficial Warhammer hobby magazine run by hobbyists like you. Support our work by using the affiliate links from our 🇺🇸 / 🇨🇦 partner stores for your next orders so we can continue to bring you fantastic FREE content every day:


Or support us directly:


