
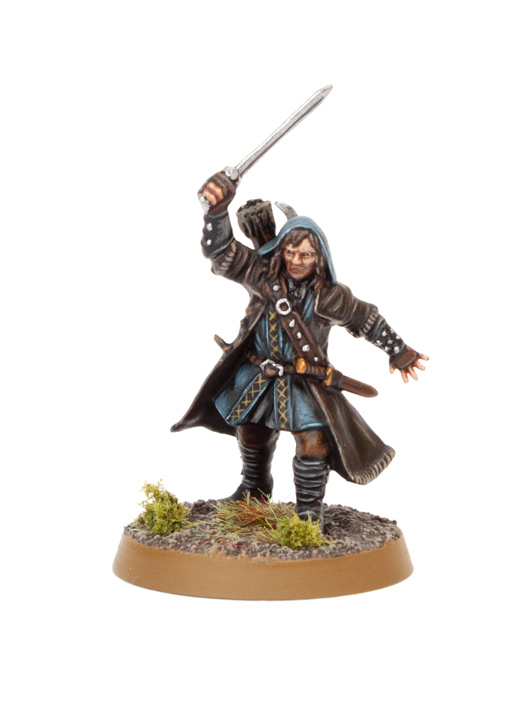
Hobbit tutorial number 10! I’ve hit double figures with this project. I shudder to think of the number of hours I’ve put into this, so I’m going to try to not think about it. Instead I’m going bask in the glory that is Kili. I really like this model. He doesn’t look like a typical Dwarf, he looks more like a Ranger, even a little Aragorn-esque. Read on to discover how I painted this model, you’re going to love the trick I use for realistic stubble.
This tutorial assumes you have a basic understanding of how to paint. For the beginners, I will explain the techniques as I go along. Each picture below shows four chronological steps. Underneath each picture are the corresponding instructions. Each step shows the paint I used during that step. It’s good to have reference material close to hand to check colours. I used google images for film stills and Games Workshop’s 360º pictures on their website were a great help.
Paints you will need for this tutorial:
Black Undercoat (technical)
Cadian Fleshtone (layer)
Bloodletter (glaze)
Rhinox Hide (base)
Kislev Flesh (layer)
Mournfang Brown (base)
Baneblade Brown (layer)
Nuln Oil (shade)
Gorthor Brown (layer)
Karak Stone (layer)
Doombull Brown (layer)
Incubi Darkness (layer)
Thunderhawk blue (layer)
Fenrisian Grey (layer)
Balor Brown (layer)
Stormvermin Fur (layer)
Dawnstone (layer)
Runefang Steel (layer)
Gehenna’s Gold (layer)
XV-88 (base)
Stirland Mud (texture)
In case you need to expand your paint collection, head over to Wayland Games or Slave to Painting, which both stock a huge selection of paints at competitive prices.
Undercoat the model. The details are small, so I hand undercoated the model (rather then use a spray) with Imperial Primer.

1. I painted the face and fingers with Cadian Fleshtone.
2. I changed the hue of the skin using Bloodletter glaze. Dwarves are a little more red in complexion then humans.
3. Paint Rhinox Hide on the hair, the overcoat, the trousers, the fingerless gloves and the arrow quiver. Then I watered down Rhinox Hide heavily and then shaded around the eyes, nose, inbetween the fingers and around the face.
4. I highlight the face with Kislev Flesh. Also if you’re feeling brave, this is the opportunity to paint the eyes with a thin black line and two white dots.

5. Paint Mournfang Brown on to the arrow shafts and trousers and then highlight the hair.
6. Paint the trim of the of the overcoat with short thin lines of Baneblade Brown. Highlight the hair with a few specks of Baneblade Brown. Then paint the arrow feathers with Baneblade Brown.
7. Now for one of my favourite tips. For painting stubble just paint Nuln Oil over the cheeks and chin. It’s that simple.
8. Highlight the overcoat with Gorthor Brown.

9. Highlight the overcoat with some nice, thin lines of Karak Stone.
10. Wash the entire coat with Nuln Oil.
11. Paint the quiver, quiver’s strap, knife scabbard and knife handle with Doombull Brown.
12. Highlight the previous stage using Gorthor Brown.

13. The tunic and hood should be painted with Incubi Darkness. Leave the inset trim black ready for painting the pattern in stage 16.
14. Highlight the tunic and hood with Thunderhawk Blue.
15. Paint some fine highlights of Fenrisian Grey on the tunic and hood.
16. The trim of the tunic which you left black in stage 13 now needs a series of crosses painted along it. Use watered down Balor Brown so it flows from the brush bristles freely to paint thin diagonal lines.

17. Highlight the wrist guard, boots and bootstraps with Stormvermin Fur.
18. Highlight the previous stage with Dawnstone.
19. Paint the buckles on the belt and straps with Runefang Steel. Then paint the studs on the wrist guards with Runefang Steel. Finally paint the sword blade with Runefang Steel.
20. Paint the end of the knife’s pommel and guard with Gehenna’s Gold.
Finally base the model in a way which fits in with your collection. I used Stirland Mud texture paint highlighted with Karak Stone and the base edge was painted with XV-88. Static grass and scrub were glued on in small clumps.


For more Hobbit tutorials check out my Bilbo, Gandalf, Thorin, Gloin, Bombur, Ori, Dwalin, Balin and Goblin tutorials. If you found this tutorial useful, let me know in the comments.
Do you like our tutorials and reviews? Here is what you can do to support us: Check out the websites of our sponsors, place your next orders at Wayland Games by clicking here or on the banner on the right. Thank you very much, we appreciate any help to keep us going!

your a legend. thankyou.
Thank you so much. Your tutorials have been such a huge help.
I noticed that you didn't paint his stubble, to paint that you can take the previous skin colour (Kislev Flesh) and mix it with Rhinox Hide (since his hair colour is brown). Mix it 1:1 and then you pretty much stripple the paint on (it's preferred that the paint is thinned out). Other than that, great paint job! d(^.^)b
Gracias, muchas graciaa!!!. Tus trabajos son espectaculares y de gran ayada a las personas que queremos seguir creciendo como pintores. GRACIAS POR REGALARNOS TU TIEMPO. Saludos desde España.
Thank you very, very much!
These tutorials are fantastic. The first dwarf I painted without these tutorials and I screwed up his face trying to make it a little bit redish. Your way works perfectly, the dwarves I am painting with them are looking great!
I am looking forward to the Radagast Tutorial…
Your tutorials are fantastic, thank you very much.
Thank you. I have another tutorial that goes live tomorrow.
I'm hoping to add a Radaghast tutorial.
Will you be doing Radagast tutorial?
Great work ! I can' t wait for the next tutorial. Thanks.
I can't stop thinking about Aragorn when I see Kili xD
Thanks again, Garfy.
absolutely fantastic again, really appreciated as always! Started to check this site daily now as some great stuff and these tutorials are just what I wanted to push myself when painting my figs 🙂
These step-by-step tutorials are just great! They obviously take you a long time to put together, but their value and longevity certainly make it worth it. Keep up the great work!
Cheers
Dave
This is turning up to be the best hobbit related site. Thanks!
Ha! How I didn't think to use Nuln Oil for the stubble I don't know.
Anyway, thanks for another excellent tutorial, I have been following every step.
Cheers