
Today I present you my take on painting the iconic blue-grey armour of the Vika Fenryka, the Space Wolves, in an easy to follow step-by-step tutorial, painted with the budget-friendly Warpaints range from The Army Painter we reviewed recently. Check out the detailed instructions after the jump.
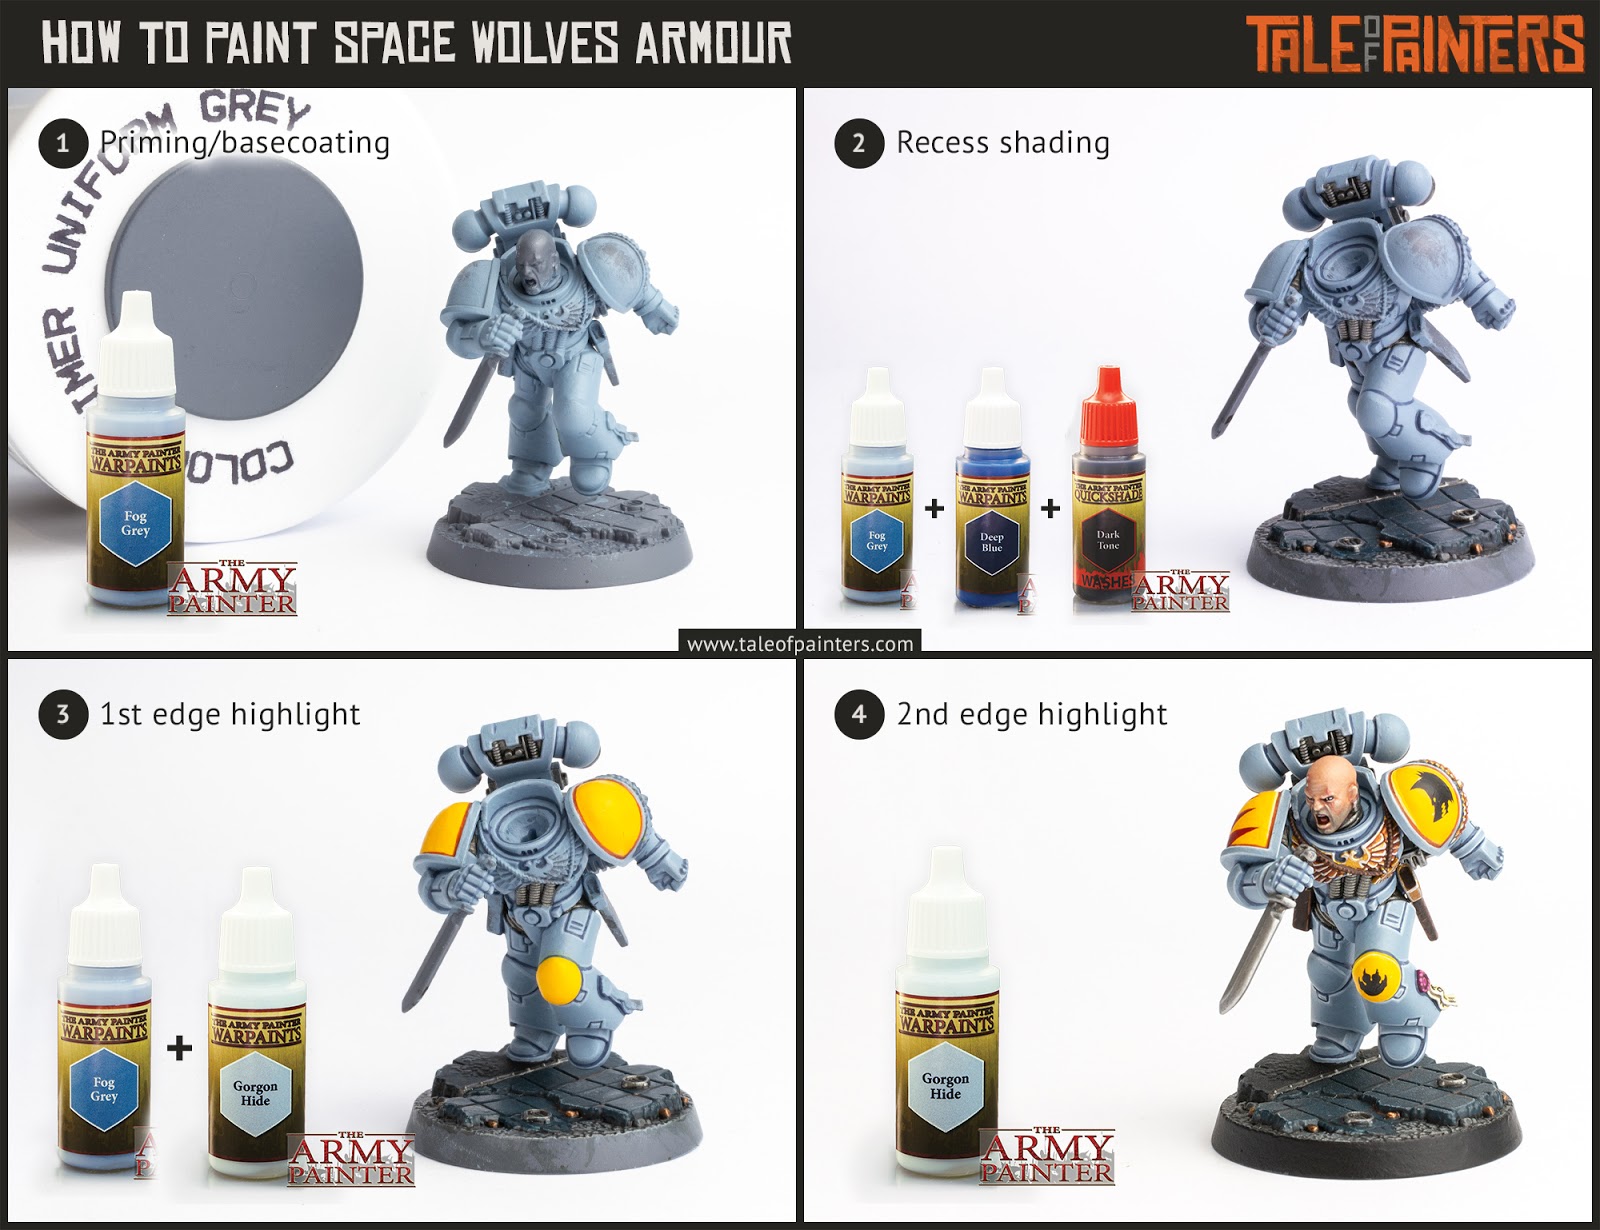
1. The model was primed with Uniform Grey Colour Primer from The Army Painter. In fact, The Army Painter also do a blue grey primer appropiately called Wolf Grey, which would be even better, but I didn’t have it so I stuck with Uniform Grey. When using Colour Primers, make sure to shake them at least a minute, then use long sweeps instead of short burst, at a distance of about 10 to 20 cm. Once the primer was dry, I applied several thin layers of Warpaints Fog Grey as I wanted to go for a light “baby blue” grey base colour for the armour.
2. I like to paint all the messy, drybrushing-involving parts first so I don’t hit any areas I already painted. Once I did that, I added some definition by shading the armour. For that I created a 1:1 mix of Warpaints Fog Grey and Deep Blue, and also added a little bit of Warpaints Dark Tone Ink. When thinning down paint for controlled shading, I like to add washes instead of water. The medium of the wash will help to improve the flow of the paint. I applied this mix directly into the recesses of the armour, and, once done, any messy areas were then tidied up with Fog Grey.
3. The first highlight was a slightly chunky edge highlight with a 2:1 mix of Warpaints Fog Grey and Gorgon Hide.
4. To complete the armour I added a thin edge highlight of Warpaints Gorgon Hide, concentrating on the uppermost edges.
In case you need to expand your paint collection, head over to Wayland Games or Element Games, which stock a huge selection of paints at competitive prices.

Here we have the finished model. Check out these super high-res pictures that reveal every brush stroke 😉

Here are the paint recipes I used for painting all the other details:
Dark metal:
Basecoat oWarpaints Gun Metal, all over wash with Warpaints Dark Tone Ink (thinned with a little bit of Warpaints Quickshade Mixing Medium), drybrush with Warpaints Shining Silver.
Bright metal:
Basecoat Warpaints Plate Mail Metal, recess wash of Dark Tone Ink, edge highlight with Shining Silver.
Black:
Basecoat of Warpaints Matt Black, chunky edge highlight with Warpaints Necromancer Cloak, thin edge highlight with Warpaints Dungeon Grey.
Gold:
Basecoat of Warpaints Bright Gold, all over wash with Warpaints Flesh Wash, another recess wash of Flesh Wash where needed, highlight with Shining Silver.
Yellow:
Basecoat of Warpaints Daemonic Yellow, then paint Warpaints Phoenix Flames all over. Recess shading with Fur Brown thinned with Light Tone Ink, chuncky highlight with Daemonic Yellow, thin highlight with Warpaints Arid Earth.
Skin:
Basecoat of Warpaints Corpse Pale, all over wash with Warpaints Mid Brown wash, paint eyes with Warpaints Matt White, a dot of Warpaints Matt Black for the pupils, line eyes with Matt Back, a layer with Corpse Pale for the skin, highlight with a mix of Corpse Pale and Brainmatter Beige, two more highlights by adding successive amounts of Brainmatter Beige. Beard shadow was several glazes of thinned of heavily thinned Warpaints Hardened Carapace, then rehighlight with a mix of Hardened Carapace and Corpse Pale.
How do you like my take on painting Space Wolves? Tell me in the comments below. Also check out Garfy’s take on painting the Vika Fenryka.
Do you like our tutorials and reviews? Here is what you can do to support us: Check out the websites of our sponsors, place your next orders at Wayland Games by clicking here or at Element Games by clicking here. Thank you very much, we appreciate any help to keep us going.
8 Comments
Leave a Reply
Tale of Painters is the unofficial Warhammer hobby magazine run by hobbyists like you. Support our work by using the affiliate links from our 🇺🇸 / 🇨🇦 partner stores for your next orders so we can continue to bring you fantastic FREE content every day:


Or support us directly:


This is awesome! Nice job. If you get time please do a Blood Angels Tutorial with Army Paint, maybe Death Company as well 🙂
Blood Angels is planned, but it will take a couple of months until I get around it.
In the meantime, try this recipe: Dragon Red Colour Primer/basecoat, recess shading with a mix of Chaotic Red with Strong Tone Ink, 1st highlight Pure Red, 2nd highlight Mars Red.
For Death Company Matt Black Primer/basecoat, 1st highlight Necromancer Cloak, 2nd highlight Dungeon Grey.
Awesome, thank you. I will give it a go.
Thanks for the great tutorial! Pretty sure these boys are from Fenris and not Nocturne though.
Cheers for pointing out. Fixed 😉
I would like to see a tutorial about the model's base
The recipes can be found in my Silver Skulls tutorial, down at the buttom: https://taleofpainters.blogspot.com/2019/02/tutorial-how-to-paint-silver-skulls.html
Thank you !!!