

In today’s post I’ll share a step by step photo tutorial guide on how to paint Scions of the Flame. More after the jump!
This tutorial assumes you have a basic understanding of how to paint. For the beginners, I will explain the techniques as I go along. Each picture below shows four chronological steps. Underneath each picture are the corresponding instructions. Each step shows the paint I used during that step.
Paints you will need for this tutorial:
Black Undercoat Spray
Word Bearers Red (Layer)
Evil Sunz Scarlet (Layer)
Corvus Black (Base)
Trollslayer Orange (Layer)
Catachan Flesh (Base)
Wyldwood (Contrast)
Bloodreaver Flesh (Layer)
Knight Questor Flesh (Layer)
Mournfang Brown (Base)
Skrag Brown (Layer)
Mechanicus Standard Grey (Base)
Dawnstone (Layer)
Stormvermin Fur (Layer)
Administratum Grey (layer)
Incubi Darkness (Base)
Akhelian Green (Contrast)
Thunderhawk Blue (Layer)
Celestra Grey (Base)
Brass Scorpion (Layer)
Reikland Fleshshade Gloss (Shade)
Leadbelcher (Base)
Nuln Oil (Shade)
Stormhost Silver (Layer)
Morghast Bone (Base)
Snakebite Leather (Contrast)
Lahmian Medium (Technical)

1. Undercoat the miniature black with a primer.
2. Paint the armour with Word Bearers Red.
3. Mix four parts Lahmian Medium with one part Evil Sunz Scarlett and wash it over the armour.
4. Drybrush the armour with Corvus Black. Wipe almost all of the paint off brush onto a tissue and then quickly brush back and forth over the armour.

5. Thin Trollslayer with a little Lahmian Medium and using a small brush line the shapes of the armour with orange.
6. Paint the skin with Catachan Flesh.
7. Wash over the skin with Wyldwood Contrast Paint.
8. Paint over the skin with Catachan Flesh leaving the previous Wyldwood step showing through in the creases and recesses to represent shading.
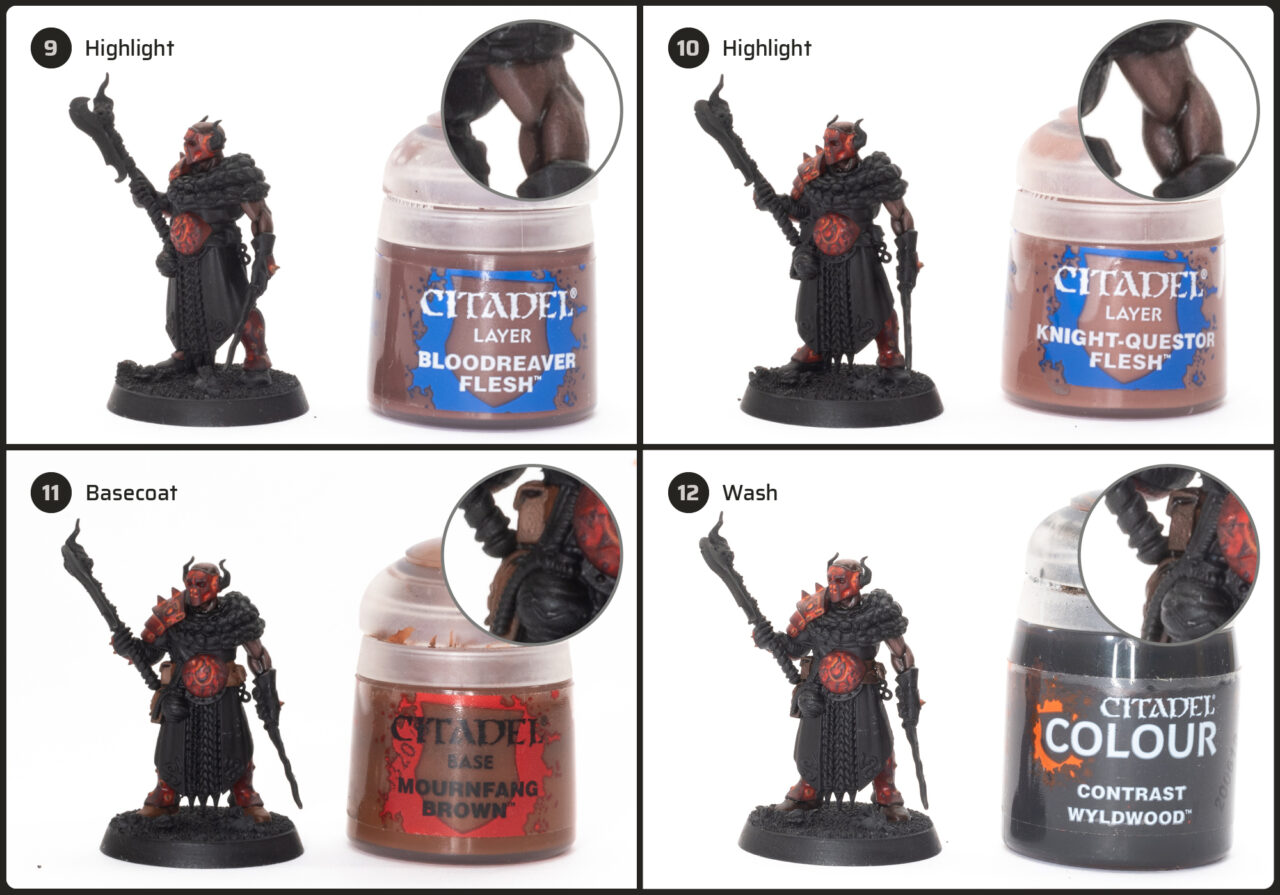
9. Highlight the skin with Bloodreaver Flesh.
10. Add some final thin highlights of Knight-Questor Flesh to the skin.
11. Paint the belt and pouches with Mournfang Brown.
12. Wash the belt and pouches with Contrast Wyldwood.

13. Edge highlight the belt and pouches with Skrag Brown.
14. Highlight the black cloth and rope areas with Mechanicus Standard Grey. Several thin coats to help blend the the grey into the black.
15. Edge highlight the the black cloth and rope with Dawnstone.
16. Base coat the robes with Stormvermin Fur.

17. Highlight the raised areas of the robe with Dawnstone.
18. Edge highlight the robes with Administratum Grey.
19. Base coat the scaley hide all over with Incubi Darkness.
20. Wash the scaley hide with Contrast Akhelian Green.

21. Pick out each individual scale with Thunderhawk Blue.
22. Edge highlight the top edge of each scale with Celestra Grey.
23.Base coat the the weapon shafts, helmet horns, belt trim and belt decoration with Brass Scorpion.
24. Wash the brass areas with Reikland Fleshshade Gloss.

25. Using Leadbelcher paint the weapon blades. You might want to giver this two coats to get a good coverage.
26. Wash the metal, black cloth, black cords and scaly cape with 1 part Nuln Oil and 1 part Lahmian Medium. Once dry, do this again on the weapon to add dark shading reflections to the blade.
27. Edge highlight the metals and brass with Stormhost Silver.
28. Paint the rope on the belt with Morghast Bone.

29. Wash the rope with Contrast Skeleton Horde to shade it.
For the fire, this will be covered in a separate tutorial.
Paint it’s base to match your army. I painted the sand on my base White and then washed it with Agrax Earthshade, then Basilicanum Grey, then drybrushed it with Celestra Grey. The base rim is Steel Legion Drab. Used Gamer’s Grass Tufts to decorate the bases.

Another freaking solid tutorial. Totally love this scheme. Stealing it! 🙂
This doesn’t look like a complete step by step photo tutorial guide on how to paint a Azyrite Ruins in a sandstone colour scheme. I think there’s been a copypasta mistake 🙂