

On the occasion of Death Masque and the new Deathwatch release, I’m pleased to present to you, a full photo tutorial for Chaplain Ortan Cassius in Deathwatch armour. This tutorial is 53 steps and every single step is detailed after the jump.
I’ve designed this tutorial so established painters find it interesting but also so new comers to the hobby can learn some basic and advanced techniques. I will use terms such as glazing and washing, don’t worry if you don’t know what these mean because I will elaborate and explain during that step.
Paints you will need for this tutorial:
Black Undercoat
Eshin Grey (layer)
The Fang (base)
Russ Grey (layer)
Nuln Oil (shade)
Administratum Grey (layer)
Caledor Sky (base)
Macragge Blue (base
Hoeth Blue (layer)
Kantor Blue (base)
Fenrisian Grey (layer)
Guilliman Blue (glaze)
Runefang Steel (layer)
Warplock Bronze (base)
Hashut Copper (layer)
Seraphim Sepia (shade)
Runelord Brass (layer)
Leadbelcher (base)
Iron Breaker (layer)
Khorne Red (base)
Wazdakka Red (layer)
Wild Rider Red (layer)
Screamer Pink (base)
Emperor’s Children (layers)
Druchii Violet (shade)
Ulthuan Grey (layer)
Warpstone Green (layer)
Warboss Green (layer)
Biel-Tan Green (shade)
Nurgling Green (layer)
Karak Stone (layer)
Rakarth Flesh (base)
Dawnstone (layer)
Teclis Blue (layer)
Temple Guard Blue (layer)
Cadian Fleshtone (layer)
Bugman’s Glow (base)
Kislev Flesh (layer)
Doombull Brown (layer)
Screaming Skull (layer)
Abaddon Black (base)
In case you need to expand your paint collection, head over to Wayland Games, which stock a huge selection of paints at competitive prices.

1. Undercoat the model black.
2. Create a glaze by mixing 50:50 Eshin Grey with Lahmian Medium and paint a thin layer on just the upper areas of the armour. Imagine an area highlight where natural sun would catch and light the armour panels. Repeat painting thin layers to increase the intensity of the colour. The multiple thin layers create smoother transitions.
3. Apply the technique listed above but use the fan this time and use it less so it blends into the Eshin Grey layer.
4. Use Russ Grey to paint an edge highlight on the edges where the light would catch and glint.

5. Cover all the black areas with a wash of Nuln Oil to help blend all the area together.
6. Paint the thinnest line possible of Administratum Grey on the edges to represent a glint of light.
7. Paint the blue areas with Caledor Sky.
8. Create a glaze by mixing 50:50 Macragge Blue with Lahmian Medium and paint a thin layer on the lower areas of the blue armour areas.

9. Paint an edge highlight of Hoeth Blue on any raised edges of the blue areas.
10. Paint Kantor Blue to shade the areas that butt up against the blue.
11. One final edge highlight of Fenrisian Grey as thin as possible.
12. Create a 50:50 mix of Guilliman Blue and Runefang Steel and paint the Deathwatch Marine arm completely.
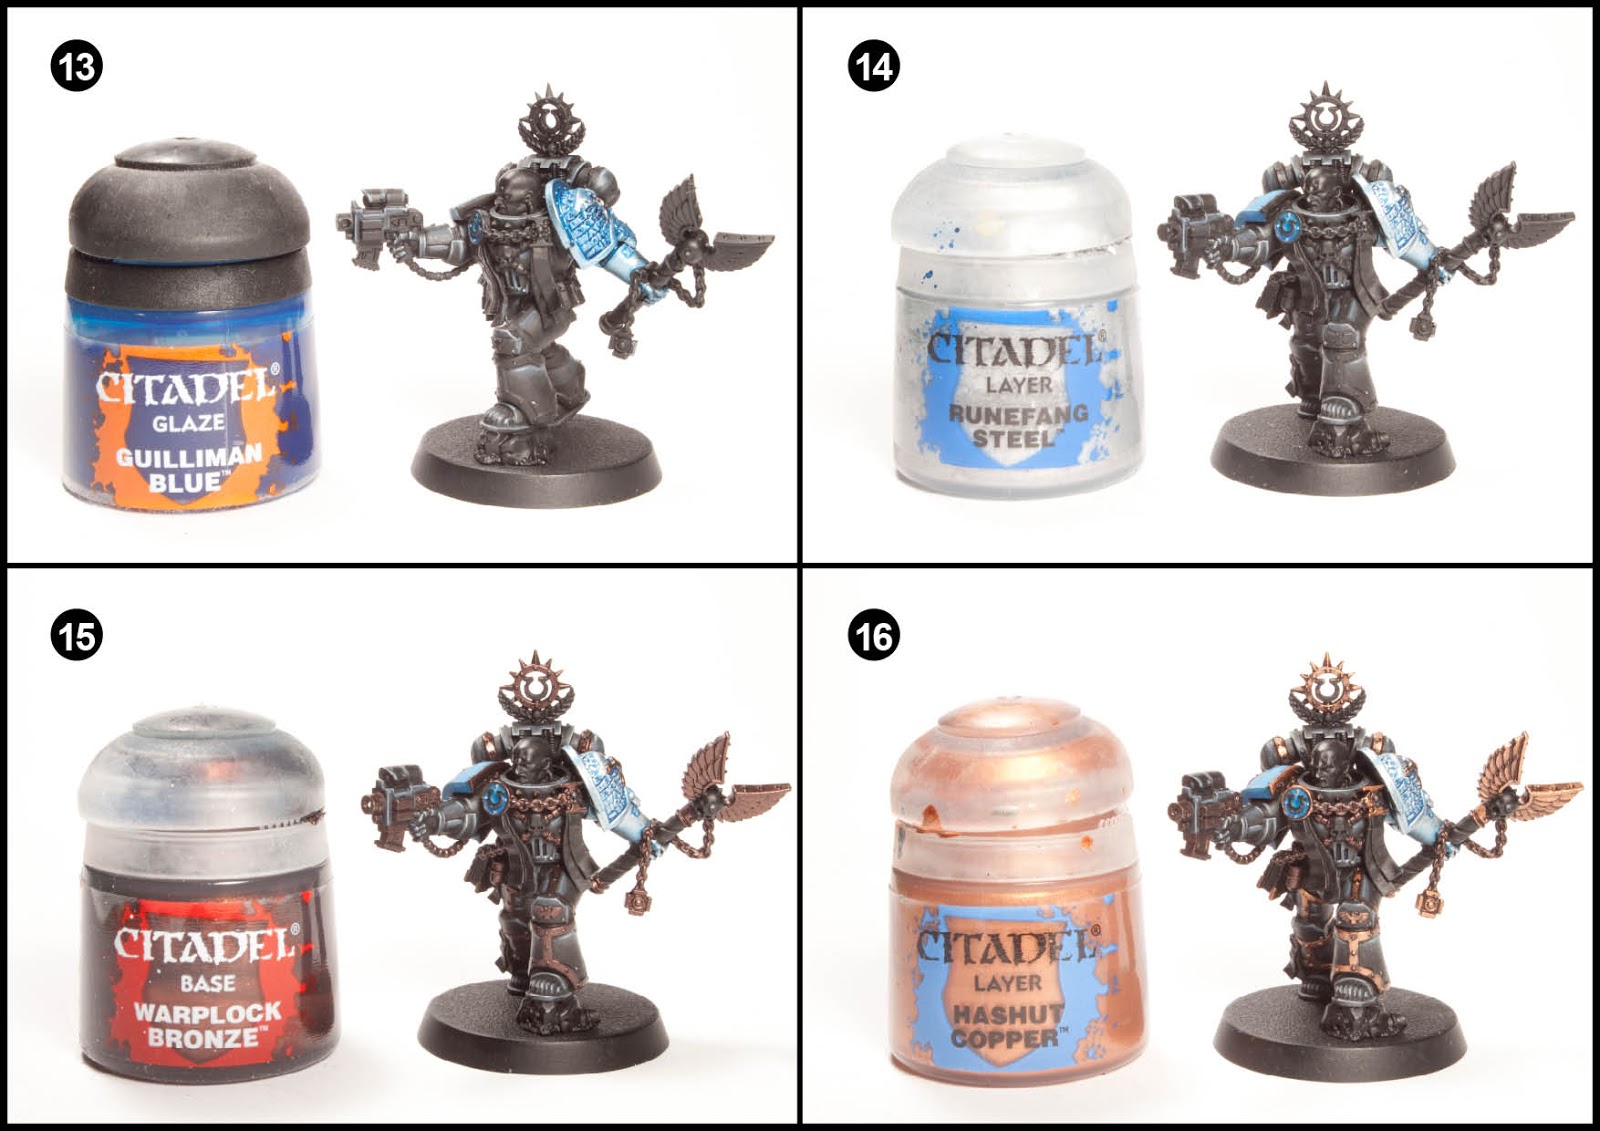
13. Wash over the recessed areas of the arm with Guilliman Blue.
14. Highlight the silver arm with Runefang Steel.
15. Paint any area that will be Gold or Metal (not the Deathwatch arm though) with Warplock Bronze.
16. Pick out the gold areas with Hashhut Copper. Be sure to leave Warplock Bronze showing through as shading.

17. Wash over the gold areas with Seraphim Sepia.
18. Pick out the edges of the gold with Runelord Brass.
19. Paint all the metallic areas such as chains and gun areas with Leadbelcher.
20. Wash over the metal areas with Nuln Oil. Optional tip: If the blue silver arm isn’t to your taste, wash over it as well with Nuln Oil to give it a darker shade.

21. Highlight the previous stage with Ironbreaker. Nice thin edge highlights.
22. Paint the Crozius handle, gun casing, purity seals and book cover with Khorne Red.
23. Highlight the book cover and gun casing with Wazdazza Red.
24. Highlight the book cover and gun casing with thin edge highlights of Wild Rider Red.

25. Create a thin glaze of Wazdakka Red by mixing in 50:50 Lahmian Medium. Use a thin layer to tone down and blend together the previous red layers.
26. Highlight the purity seals and Crozius handle with Screamer Pink
27. Highlight the purity seals and Crozius handle with a very thin edge highlight of Emperor’s Children.
28. Wash over the purity seals and Crozius handle with Druchi Violet.

29. Paint all the Ultramarine U symbols with Celestra Grey.
30. Highlight the Ultramarine U symbols with Ulthuan Grey.
31. Paint the laurel and grenades with Warpstone Glow.
32. Highlight the laurel and grenades with Warboss Green.

33. Wash the laurels and grenades with Biel-Tan Green.
34. Paint a thin edge highlight of Nurgling Green on the grenade edges and laurel leaf edges.
35. Paint the book pages, pouches and parchment with Karak Stone.
36. Highlight the previous step with Rakarth Flesh.

37. Wash the parchment, pouches and book pages with Agrax Earthshade.
38. Edge highlight the parchment, pouches and book pages with Ushabti Bone.
39. Heavily water down some Rhinox Hide and paint some thin lines onto the parchment to represent writing.
40. Paint all the skulls with Zamesi Desert.

41. Highlight the skulls with Ushabti Bone.
42. Water down some XV-88 and run some of the watery mix into the areas that require shading on the skulls.
43. Highlight the ribbing between the armour sections with Dawnstone.
44. Paint any gems/targetters with Teclis Blue.

45. Highlight the gems and targetters with Temple Guard Blue
46. Final bright highlights of Ulthuan Grey are added to the gems and tergetters.
47. Basecoat the skin with Cadian Fleshtone.
48. Create a glaze by mixing 50:50 Bugman’s Glow with Lahmian Medium and use it to shade the face areas.

49. Highlight the raised areas of the face with Kislev Flesh.
50. Water down Doombull Brown and carefully paint thin lines into the creases.
51. Paint thin edge highlights of Screaming Skull on to the raised areas of the face.
52. Paint the mouth and eyes with Abaddon Black.

53. Pick out the teeth and dot the eyes with Ulthuan Grey.
Finally, base the model in a way which fits in with your own army or gaming table. I’ve used Steel Legion Drab for the rim, Armageddon Dust for the base top and then drybrushed with Screaming Skull. Drybrushing is a way of picking out raised detail quickly usually with a lighter colour. To dry brush you need load up your brush with paint and then wipe it off the bristles on a tissue until virtually no paint remains on the brush. Then rapidly and repeatedly drag the side of the brush back and forth over the area to be painted.
You can view other Space Marine tutorials using these quick links. Imperial Fist, White Scars, Iron Hands, Salamanders, Sons of Horus and Minotaurs
Click this link if you’d like a tutorial for painting Genestealers.
Do you like our tutorials and reviews? Here is what you can do to support us: Check out the websites of our sponsors, place your next orders at Wayland Games by clicking here or on the banner on the right. Thank you very much, we appreciate any help to keep us going!

16 Comments
Leave a Reply
Tale of Painters is the unofficial Warhammer hobby magazine run by hobbyists like you. Support our work by using the affiliate links from our partner stores for your next orders so we can continue to bring you fantastic FREE content every day:


![]()
![]()
Or support us directly:


Great post!I am actually getting ready to across this information,i am very happy to this commands.Also great blog here with all of the valuable information you have.Well done,its a great knowledge.
Home Painting Contractor in Chennai
Just finished my fourth model of the box and slowly i'm getting quite happy with my black armor. So very big thank you for your work here; it's very inspiring 🙂
But one big problem for me is still the gold.
I have really bad experiences with metallic gw-colors and so i switched with most of my colors to Vallejo, AP and Revell, but also use the GW-colors i have left, or the few i can't replace properly (Nuln Oil…)
So i transfered your colors like this:
Warplock Bronze (base) = Tin Bitz (older GW-Mixture)
Hashut Copper (layer) = Stays the same
Seraphim Sepia (shade) = Flesh Wash (GW)
Runelord Brass = Brassy Brass (Vallejo GC)
But the outcome lacks the fine contrast of yours. During painting i notized, that it's quite difficult to get a fine highlight with Brassy Brass. I'm not sure if the Brass lacks contrast compared to the earlier steps, or if i should darken down my Flesh Wash more.
I have some mobile-pics here:
https://www.facebook.com/groups/558678807591537/permalink/1101024506690295/
This is great, thanks! I particularly like how the Emperor's Children washed with Druchii Violet looks on the crozius handle. It gives it that real look of coloured leather.
Why do you still link to Slave to Painting when they've been closed since last year?
do you think this would work with Green for the armour shade instead of blue and look decent for dark angels? Gaz.
Personally the lack of hood/robes doesn't make this an ideal candidate for the Dark Angels. Plus it has three moulded Ultramarine Symbols on it. There is an awesome Dark Angel model already in the set.
Hi Garfy,
Thanks for the response mate. I was more talking about your technique for the black armor as a 30k alternative. Love the tutes so far mate. Please keep them up
Excellent tutorial! You make this look very easy.
This is epic. Thanks for all the hard work you put into this! Can't wait to get started
You have the best tutorials! I haven't used any yet (!), but the ease of the steps is very approachable for every skill level. Kudos!
Great work! Thanks for this Tut!
It's a great range and readily available on the high street in GW stores and independents. I like that convenience.
I love that you use all GW paints. That's all I use too. Looks amazing, thanks for this.
When you wash the black with nuln oil
Is it a thinned wash or pure wash applied thin/thick?
Really nice tutorial
Thanks
If you use it straight from the pot, paint it light. if you want to thin with Lahmian Medium then paint on several coats letting each dry before applying the next.
Jesus, Garfy this bloke is fantastic… how many steps, my God, and I am nervous about painting up my Space Wolves after your brilliant tutorial. Pfffffft, what a wuss I am. Oh man, some bloke is going to want to give you a big hug after this.