
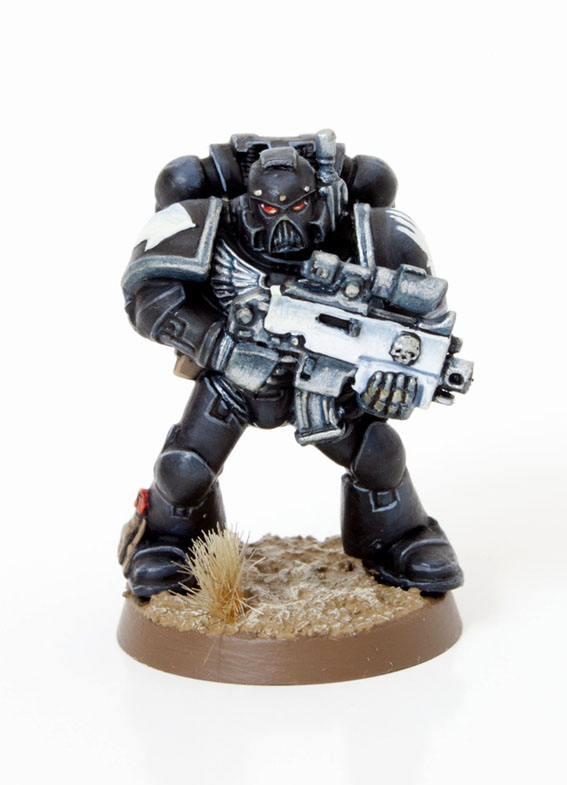
This is a tutorial explaining how to paint Iron Hands Space Marines using the latest Games Workshop paints. The model above was painted in 16 steps. I break each step down with a high resolution picture and detailed instructions. Read the full tutorial after the jump.
I’ve designed this tutorial so established painters find it interesting but also so new comers to the hobby can learn some basic and advanced techniques. I will use terms such as glazing and washing, don’t worry if you don’t know what these mean because I will elaborate and explain during that step.
Paints you will need for this tutorial:
Black Undercoat spray
Eshin Grey (layer)
The Fang (base)
Nuln Oil (shade)
Kantor Blue (base)
Iron Breaker (layer)
Abadon Black (base)
Runefang Steel (layer)
Ceramite White (base)
Fenrisian Grey (layer)
Steel Legion Drab (base)
Zandri Dust (base)
Evil Sunz Scarlett (layer)
Fire Dragon Bright (layer)
In case you need to expand your paint collection, head over to Wayland Games or Slave to Painting, which both stock a huge selection of paints at competitive prices.

1. Undercoat the model with black primer. I use Vallejo primer in my airbrush.
2. Highlight the black armour with Eshin Grey. Mix some Lahmian Medium into the paint to aid blending.The highlights should be generous and cover raised areas instead of edges.
3. Mix The Fang and some Lahmian Medium together and highlight the previous stage further leaving some of the previous colour showing through.
4. Edge highlight the armour using Fenrisian Grey and a fine detail brush.

5. Wash the armour with Nuln Oil. This will help tone down the brightness of the highlights and blend them together.
6. For the base layer of the metals mix 2 parts Ironbreaker with 1 part Kantor Blue, a touch of Lahmian Medium with help smooth this mix out. Then paint the hands, shoulder rims, bionics, bolter parts and chest eagle.
7. Create a dark blue wash by mixing together Abbadon Black, Kantor Blue and a tonne of Lahmian Medium. Use this to wash the chest eagle and bionics so the dark colour gets into all the recesses. For flat areas like the trim and hand carefully paint on the mix in specific areas to create shading. I really like upside down shading for metallics. Just think of spoons.
8. Edge highlight the metals carefully using a fine detail brush and Runefang Steel.

9. Paint the bolter casing and the tactical symbol with Cermite White. This may take a couple of coats.
10. I hand painted the Iron Hands symbol by carefully breaking it down into a series of shapes. It’s effectively an upside down triangle and a series of vertical lines and a horizontal line. Feel free to use a decal instead.
11. Create a glaze of Fenrisian Grey by mixing 3 parts Lahmian Medium to 1 part paint. Then carefully shade specific areas of the white. Be careful not to let the paint pool where you want it to blend. Always work away from the blend so your brush leaves the piece where you want the shading to be darkest.
12. Paint the pouches and purity seal parchment with Steel Legion Drab.
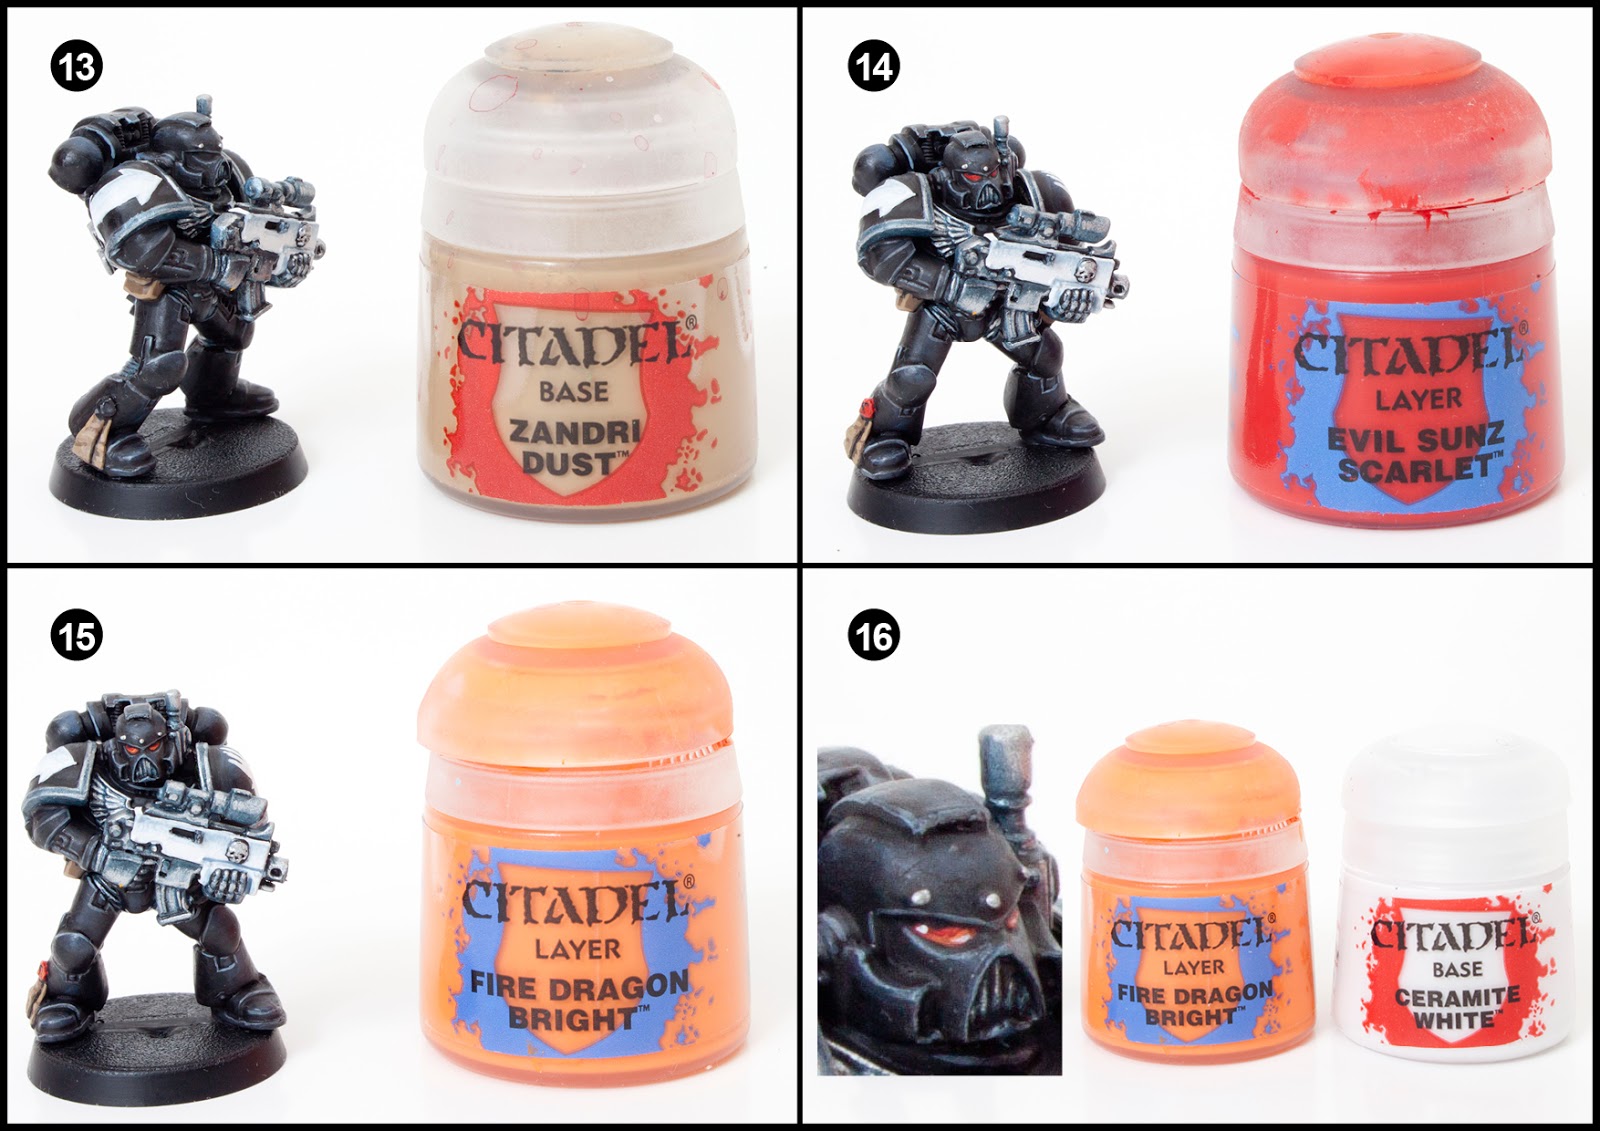
13. Highlight the previous stage with Zandri Dust
14. Paint the purity seal with Evil Sunz Scarlett. For the eye lenses, paint two thirds of the lens with red which should start in the corner nearest the nose.
15. Then paint a line of Fire Dragon Orange along the bottom of the lens.
16. Finally dot the black corner with Ceramite White and run an even thinner line of white under the Fire Dragon Orange line.


Finally, base the model in a way which fits in with your own army or gaming table. I’ve used Steel Legion Drab for the rim, Armageddon Dust for the base top and then drybrushed with Screaming Skull. Drybrushing is a way of picking out raised detail quickly usually with a lighter colour. To dry brush you need load up your brush with paint and then wipe it off the bristles on a tissue until virtually no paint remains on the brush. Then rapidly and repeatedly drag the side of the brush back and forth over the area to be painted.
Keep checking back regularly as I still have an Ultramarine tutorial still to post.
You can view the Imperial Fist tutorial here and the White Scar tutorial here.
Do you like our tutorials and reviews? Here is what you can do to support us: Check out the websites of our sponsors, place your next orders at Wayland Games by clicking here or on the banner on the right. Thank you very much, we appreciate any help to keep us going!

19 Comments
Leave a Reply
Tale of Painters is the unofficial Warhammer hobby magazine run by hobbyists like you. Support our work by using the affiliate links from our partner stores for your next orders so we can continue to bring you fantastic FREE content every day:


![]()
![]()
Or support us directly:


Iron Marines cheats
Hello there Garfy. Thank you for the tutorial; unfortunately I have been unable to duplicate the results. I am not an artist but I love playing the game even though my space marine legion looks fitting for the garbage can.
However my friends and I have started playing a new game called Deathwatch wich is a warhammer 40k themed Dungeons and dragons and I get a lot of grief from my friends about my unit. We only use one that fits on a grid map. They tell me that I have to show up late to the battles because the short bus has to stop at all train tracks. My friends, great people…
I guess it is a long way of asking if I could buy a painted space marine from you. Any legion would do but if I could chose I would pick the Black Templar. I could understand there would be a million reasons not to sell me one, I just thought it wouldn't hurt to ask.
Thank you for your time. My email is
Adam.edner@yahoo.com
Adam.edner@yahoo.com
This article doesn't have the Iron Hands tags, was trying to find one earlier and ended up reading through the tutorials. Great site. 🙂
Sorry about that. Thanks for letting me know. I've added the correct tag now. Thank you.
Great tutorial. I was just wondering if you used an airbrush kit or brushes to paint this? Does this tutorial work as well with brushes as it does using the airbrush?
Awesome tutorials. Please make an Iron Fists one for the win! 🙂
I've never heard of Iron Fists? Do you have a link to a picture?
If you mean Imperial Fists, then I've already done those.
Hello Garfy. The Iron Fists are a relatively unknown chapter but the color scheme is really awesome. If you could make a tutorial sometime, that would be great 🙂
http://warhammer40k.wikia.com/wiki/Iron_Fists
https://dl.dropboxusercontent.com/u/3007354/Iron_Fists.jpg
Hey Garfy, thanks for the tutorial series! I am now a regular follower of your work, and if you could find the time to do a crimson fist amonst your marine tutorials I'd love to see it. Either way I'm a fan for life, keep up the good work!
Interesting way of painting black. It adds a certain 'something' that makes it stand out from the regular 'flat black grey edges' technique.
It's almost ghostly in a way, I'll definitely be experimenting and 're-purposing' this for my Damned legionnaires.
Confirmation of Salamders Tutorial! Garfy is a Hobby Hero.
I've trawled the internet for a good black tutorial for my Iron Hands and tried doing the same highlights as this using greys or P3 coal black and never got it to look right, but you've got it spot on. This has to be my favourite black tutorial, plus it comes with a great way to do metal and shade white. Win win
Great guide! Sometimes Iron Hands look boring, but the hints of blue throughout the model really help bring it to life. 🙂
I like your use of NMM technique with TMM colours! Great high contrast.
Hey guys, really great site I have it as a recommended blog on my own site. Do you do requests? If so could you do a Eldar Crimson Hunter sometime? Keep up the good work!
Hey John, thanks for recommending our blog. Are you apart of our blog roll? Check out this link if you'd like to join it. http://taleofpainters.blogspot.com/2011/10/tale-of-painters-blog-network.html
As for requests, usually the tutorials fall within what projects we're working on. I can't speak for the others but occasionally I'll do a tutorial out of the blue for a scheme tat I'm not even working on like tau or these marine ones.
So, who knows, one day we could have a Crimson Hunter tutorial but not anytime soon. Stahly has a great saim hann tutorial that you might be able to switch some colours in to paint crimson hunters. http://taleofpainters.blogspot.co.uk/2013/06/tutorial-how-to-paint-eldar-of-saim.html
The next set of tutorials will be Ultramarines, Sons of Horus, Minotaurs Space Marines and Salamanders.
Thanks for getting back to me Garfy. Np its a great blog you have here and great resource for us gamers who have a soft spot for painting too 🙂 that link above didn't work. Could you add http://witchbladeblog.blogspot.ie/?m=0 to your blog roll please? Thanks bud.
John