

I love the fact that Tale of Painters has a strong Hobbit following. It’s spurring me on to keep bringing you guys tutorials. The Hobbit tutorials are my favourite to do because I always get an over whelming response. You guys asked for Mirkwood Rangers and I’m happy to oblige. Catch the whole tutorial after the jump.
This tutorial assumes you have a basic understanding of how to paint. For the beginners, I will explain the techniques as I go along. Each picture below shows four chronological steps. Underneath each picture are the corresponding instructions. Each step shows the paint I used during that step. It’s good to have reference material close to hand to check colours. I used google images for film stills and Games Workshop’s 360º pictures on their website were a great help.
Paints you will need for this tutorial:
Black Undercoat
Incubi Darkness (base)
Thunderhawk Blue (layer)
Castellan Green (base)
Caliban Green (base)
Loren Forest (layer)
Rhinox Hide (base)
Doombull Brown (layer)
XV88 (base)
Gorthor Brown (layer)
Steel Legion Drab (base)
Zamesi Desert (layer)
Seraphim Sepia (shade)
Ushabti Bone (layer)
Cadian Fleshtone (layer)
Bugman’s Glow (base)
Pallid Wych Flesh (layer)
Ironbreaker (layer)
Gehenna’s Gold (layer)
Mephiston Red (base)
Abaddon Black (base)
Straken Green (layer)
Stirland Mud (texture)
In case you need to expand your paint collection, head over to Wayland Games or Slave to Painting, which both stock a huge selection of paints at competitive prices.
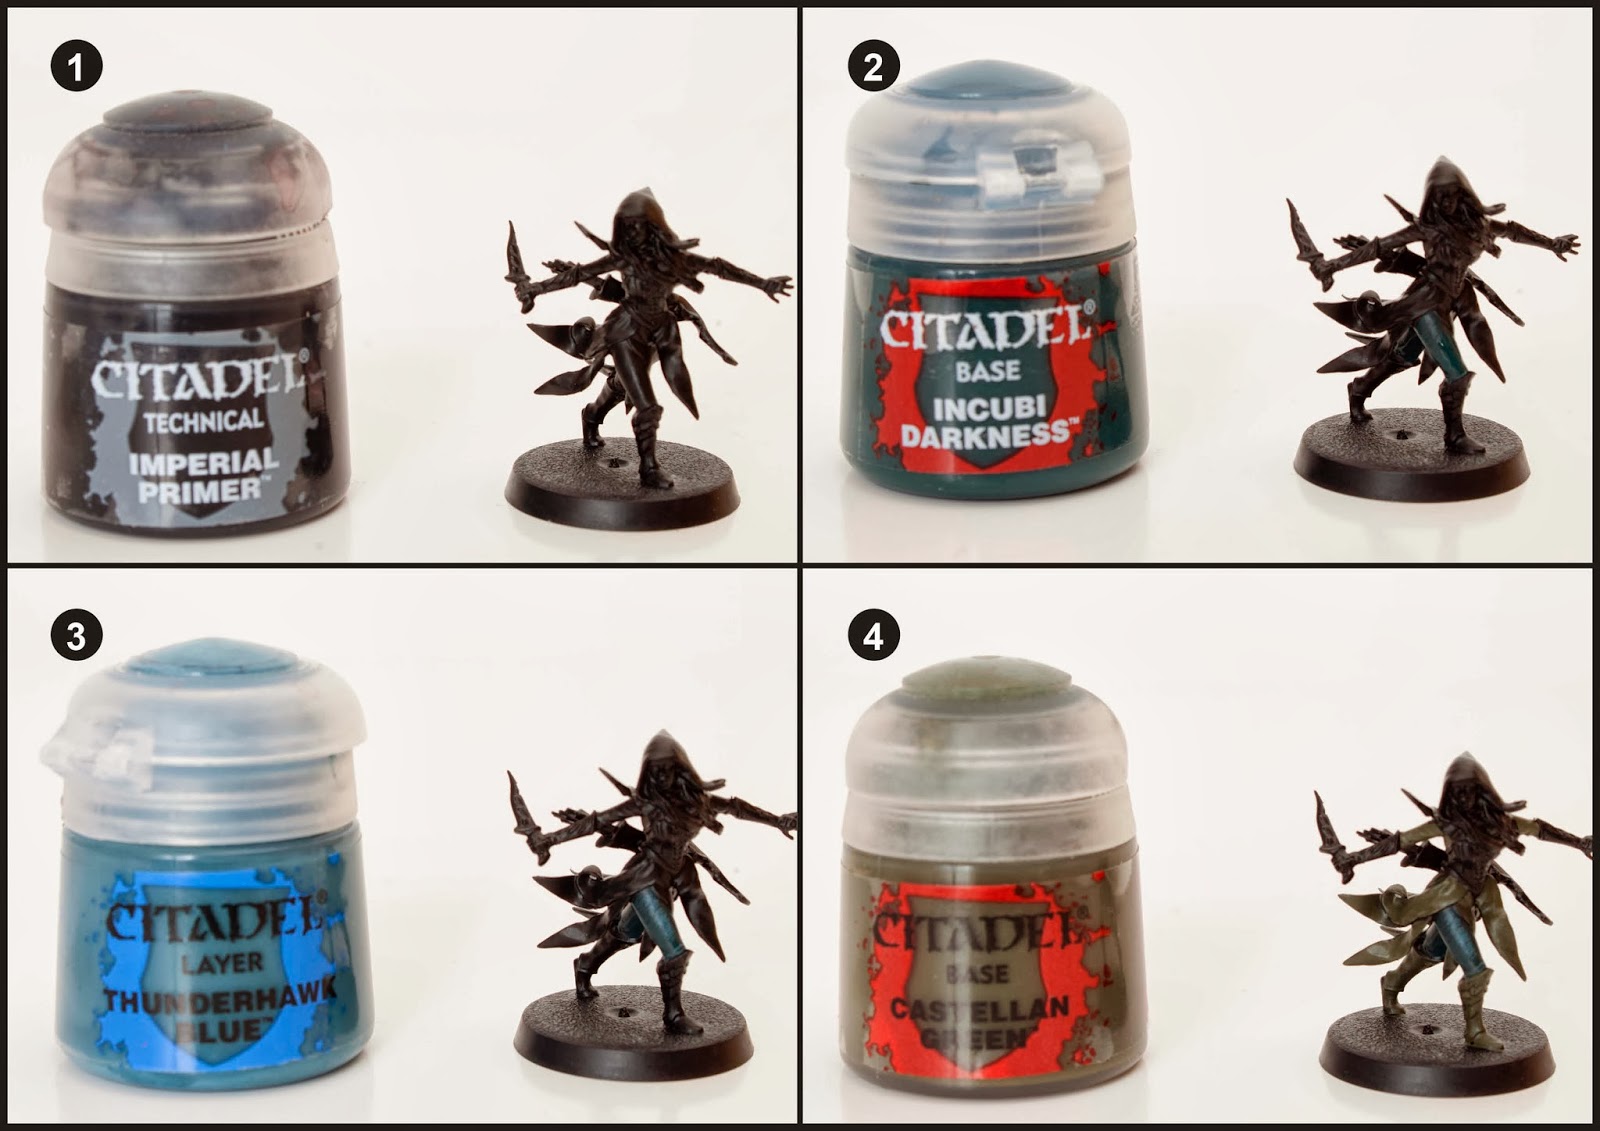
1. Undercoat the model. Because the model is so small with really fine detail I undercoated by hand using Imperial Primer.
2. Paint the leggings with Incubi Darkness. This is a base paint so it goes on with one or two coats.
3. Highlight the length of the leggings with Thunderhawk Blue.
4. The model’s cloth areas are predominately brown and green. You can decide for yourself where to paint which. I recommend changing the areas around so there is a bit of variety in the warband. Once you’ve decided on what areas will be green paint them with Castellan Green.

5. Mix Lahmian Medium (50%) with Caliban Green (50%) and shade the green areas in the recesses. Once dry repeat this step to make the areas darker if required.
6. Highlight the edges of the green with Loren Forest.
7. Paint all the areas you decided to be brown with Rhinox Hide.
8. Highlight the Rhinox Hide areas with Doombull Brown.

9. Highlight the Doombull Brown layer with XV-88.
10. Paint the bow, quiver and arrow shafts with Gorthor Brown.
11. Highlight the bow, quiver and arrow shafts using Steel Legion Drab.
12. For blonde hair paint the hair with Zamesi Desert. Check out some of the Dwarf tutorials for other ways to paint different hair colours.

13. Wash your Elf’s hair with Seraphim Sepia (because their worth it).
14. Highlight the hair with Ushabti Bone.
15. Paint the face and hands with Cadian Fleshtone.
16. Create a wash by mixing Lahmian Medium (50%) with Bugman’s Glow (50%). Use this to shade the skin areas.

17. Highlight the face again using Cadian Fleshtone. Just paint the brow, nose, upper lip, cheekbones, chin and individual fingers.
18. Water down some Pallid Wych Flesh so its nice and thin and sparingly highlight the previous step to get that pale elf skin tone. Click the picture above to get an idea of how sparingly.
19. Paint the dagger and the tips of the bow with Ironbreaker.
20. Paint the lip of the quiver, the handle and guard of the blade with Gehenna’s Gold. This should take three thin coats.

21. Use Mephiston Red to paint the arrow fletchings.
22. At this point I wanted to add more definition to my Elf so I created a black glaze by mixing Lahmian Medium (75%) with Abaddon Black (25%). I then applied this to areas I wanted to darken such the overlapping fabrics, the wooden weapons and the silver blade. Once dry repeat this step to increase the darkness (shading). It’s best to do several thin translucent coats. I did not use this glaze on the skin, hair or gold.
23. Now the greens have some extra shading definition, I now want them to “pop” by adding an extra edge highlight of Straken Green.
Finally base the model in a way which fits in with your collection. I used Stirland Mud texture paint highlighted with Karak Stone and the base edge was painted with XV-88. Static grass and scrub were glued on in small clumps.
Tale of Painters has a whole host of Hobbit tutorials for you to check out.
Do you like our tutorials and reviews? Here is what you can do to support us: Check out the websites of our sponsors, place your next orders at Wayland Games by clicking here or on the banner on the right. Thank you very much, we appreciate any help to keep us going

hi, great tutorial! Please, please, please can you do a tutorial on how to paint Beastmen for warhammer fantasy
best,
Alex
Please, please please make some more of these amazing tutorials. Palace Guards and Thranduil are crying out for your guides. Best painting series on The Hobbit miniatures out there
Great series
Hey man, I have been painting using your guides since you started and I base my buying on your guides. I have Thror here ans Thrain but won't paint them until I see how you do! Haha
Would you paint Tauriel in the same method as above? If so what colours would you use for her hair?
I'm hoping you do a guide for the master of lake town or Bard the Bowman!
Or Beorn or Thranduil
Keep up the fantastic work mate, Huge fan
Nic 🙂
yes Tauriel can be painted with the above guide easily. As for the hair you could easily use one of my dwarf tutorials for the hair colour. Maybe Gloin?
http://taleofpainters.blogspot.co.uk/2012/12/tutorial-how-to-paint-gloin-dwarf-from.html
I'd love to paint more Hobbit, but I have too many other projects to work on at the moment. I think, I feel a bit overwhelmed and not very interested in the hobby at the moment.
Thanks for the great painting guide I've been trying to find the right turquoise colour for the elves legs for ages. Also I have to thank you for giving me the inspiration to paint them as I've been so set on building a Orc army I had lost the motivation to finish my current one.
but thanks to your guide I am rearing to go.
Legolas is too similar to the above tutorial to warrant his own tutorial. Just use the guide above.
I do need a dwarf hero to lead my Grim Hammers. It won't be Thrain the Broken though. Sorry. I was thinking of Thror.
Garfy, you are a true master to make tutorial paint for the Hobbit, I follow you all the time, and I like to see new tutorial.
I will ask you about this; cut you not doe a tutorial of Legolas Greenleaf and/or Thrain the Broken.
I hope you will and I will look forward to see them.
Great Tutorial ! Thank you.
I would like to see a Tutorial fot the new Thranduil Miniature.
Would be great !!
Garfy, you are amazing.
Honestly, this is great, the Mirkwood Rangers are an awesome army and I've left mine unpainted for a while because I was worried about messing up such great models.
I'm still new, but if they turn out worth sharing, I'll send you a pic or two of how they turned out.
I do have a question though, I've always had a bit of trouble with Imperial Primer (non-spray), specifically it always seems to bead up or flake off. Is there a certain technique in painting that would fix that, or was I simply doing something wrong (Not shaking the paint enough, using old paint etc.)
Imperial primer isn't very hard wearing I'm afraid. Vallejo sell a surface primer which which is much harder wearing. I use that sometimes by brush or airbrush.
If you only have Imperial Primer, then give it a good two or three coats. Let each coat dry before applying the next one.
Thanks for your kind words.
And i'm going to use this for my warhammer wood elves theme now. Thanks so much this looks lovely and pretty darn east to follow since I only have about 30 elves to paint. The rest are tree spirits…thats easy stuff haha
Great work with these new elves, any chance we will see some other elves like Rivendell Knights or High Elves?
Maybe. Hunter Orcs and Warg tutorials will be the next two.
Awesome tutorial. Love the Lord of the Rings/Hobbit stuff!
In Russia this models will come only in january. I just can't wait to try painting them using your tutorial! Thanks a lot for all your Hobbit tutorials!
Nikolai, please send me pictures of your finished Rangers. Sorry you have to wait until January, the models are awesome!
This comment has been removed by the author.
This is great! Please keep up all the great work on the Hobbit miniatures 🙂
Great and very helpfull. Thank you so much.
A Tauriel-Tutorial would be great too 🙂
Really love this. I second the call for a Palace Guard tutorial as most people who use Mirkwood rangers will also use Palace Guard.
The Hobbit community is much neglected, thanks for giving it some love.
Another great tutorial can't wait for the next one. Please do the hunter orcs on fell wargs in future, give the forces of evil some love! Excellent work keep it up.
Thanks for this great tutorial, i love watching our your painted models, but u cant imagine how useful and how much i improved with this tutorial. Great result, and easy was to follow your steps with this formats.
Keep your nice work =)
That was quick! The end result looks great.
I've never used one of your tutorials before, but I reckon I will with this one, thanks for posting one! Will the Palace Guards be forthcoming as well?
Brilliant!
Great tutorial, thanks for posting!
Love how you did the skin tone. I've been doing something similar, Bugmans Leviathan -> Bugmans -> Cadian -> Kislev -> Kislev/White Scar, but I'm really looking forward to trying your way, as the results seem to be better (Plus, half the number of steps and better results? Win in my books).
Thanks so much for this, am looking forward to using the guide.