
Hi there, on the occasion of the release of the new Eldar codex I’ve completely reworked and rewritten the painting tutorial I did a couple of years ago when I started my Eldar army. So if your Wraithknights are craving for some paint, clickt after the jump and you will learn how to paint the striking red of the Craftworld Saim-Hann.
Please note that I started painting my Eldar army long before the new Citadel paints range was released. Thus, I used mainly the old Citadel paints along with Vallejo Game Colour and Formula P3 paints from Privateer Press. I tried to give close approximations for the new Citadel paints in [brackets], as well as other good alternatives when a good match can’t be found at GW’s paint range. For example, Army Painter Warpaint Inks are virtually the same as the good old Badab Black and Devlan Mud.
Paints you will need for this tutorial:
Army Painter Pure Red colour primer
Army Painter Pure Red warpaint [Evil Sunz Scarlet]
Scorched Brown [Rhinox Hide]
Macharius Solar Orange [Jokaero Orange]
Blazing Orange [Trollslayer Orange]
VGC Filthy Brown [Tau Light Ochre]
Dheneb Stone [Rakarth Flesh]
Army Painter Strong Tone Ink [Devlan Mud]
P3 Battlefield Brown [Dryad Bark]
P3 Morrow White [White Scar]
P3 Coal Black [Stegadon Scale Skin]
VGC Wolf Grey [Space Wolves Grey]
Warlock Purple [VGC Warlord Purple]
Leviathan Purple [Druchii Violet]
VGC Squid Pink [Emperor’s Children]
VGC Polished Gold [Auric Armour Gold]
Chaos Black [Abaddon Black]
Codex Grey [Dawnstone]
In case you need to expand your paint collection, head over to Wayland Games or Slave to Painting, which both stock a huge selection of paints at competitive prices.
Tutorial:

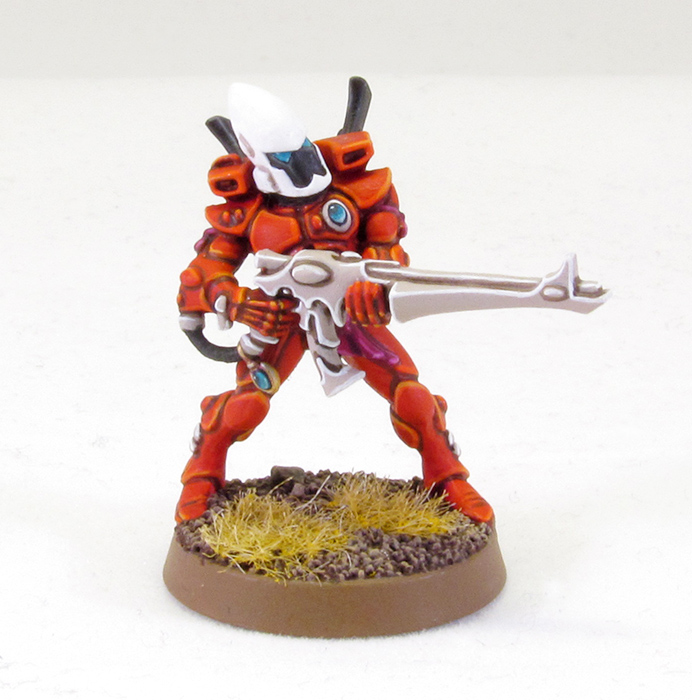
1. After the assembling, I’ve used Army Painter’s Pure Red colour primer to prime the model. Remember to give Army Painter sprays a good shaking before you use them. Also use long, sweeping moves with the trigger pressed down instead of short paint bursts, otherwise the model might become grainy. After the primer was dry, I covered the model with a quick coat of thinned The Army Painter Pure Red Warpaint [Evil Sunz Scarlet/Blood Red], because I found out that when you apply a coat of spray varnish directly over Pure Red colour primer, the primer paint will become foggy. A quick layer of paint to cover the primer is going to prevent that. All in all it’s still quicker than to build up an opaque red over a white primer, but if you don’t have Army Painter primers available feel free to start with a white primer and then paint on as many red coats as needed. With the basecoat ready, I moved over to the base. I’ve basecoated the sand texture with Scorched Brown [Rhinox Hide], then drybrushed with Formula P3 Beast Hide and finally P3 Jack Bone [drybrushing Gorthor Brown and Rakarth Flesh will result in a similar effect].

2. Next, I shaded the body armour by carefully appying VGC Dark Fleshtone [Doombull Brown] directly into the recesses. It’s a good idea to thin the VGC Dark Fleshtone with VGC Brown Ink, as the paint will flow easier from your brush and the ink won’t weaken the opacity of the paint in the way water or acrylic medium does. A handy advice when you need to restore the red basecoat because you went overzealous with the brown shading: Apply a coat of Macharius Solar Orange [Jokaero Orange] over any area you need to touch up before applying your Pure Red Warpaint [Evil Sunz Scarlet/Blood Red]. Because of the good opacity of the orange you will need less paint coats than just using red to cover your flaws. For the highlights, I applied Blazing Orange [Trollslayer Orange] and finally VGC Filthy Brown [Tau Light Ochre]. I’ve tried to keep the Filthy Brown highlights as sharp and thin as possible.

3. I’ve basecoated the wraithbone parts with Dheneb Stone [Rakarth Flesh]. To shade the wraithbone, Army Painter Strong Tone Ink [Devlan Mud], mixed with a little bit of P3 Battlefield Brown [Dryad Bark] to give the wash more “body”, was then painted directly into the recesses. After cleaning up with Dheneb Stone, I highlighted the wraithbone with P3 Morrow White [any pure white will do, e.g. Matt White Warpaint or White Scar].
The gem stones got a basecoat of P3 Coal Black [Stegadon Scale Skin]. For the highlights I went with VGC Falcon Turquoise, P3 Arcane Blue and VGC Wolf Grey. The key to painting gems is to concentrate your highlights to the lower right part and to add a small dot of VGC Wolf Grey to the upper left part – this will be the reflection.
The purple ribbons and pieces of clothing were basecoated with Warlock Purple [Screamer Pink is too dark, I recommend VGC Warlord Purple as a substitute]. For shading, I washed with Leviathan Purple [Druchii Violet], then layered Warlock Purple again. For the highlights, I created a mix of Warlock Purple and VGC Squid Pink [Emperor’s Children would work well, too], and finally highlighted with pure Squid Pink [Fulgrim Pink of the Citadel Edge range].
The gold jewellery was basecoated with VGC Polished Gold [Auric Armour Gold], and then washed with Leviathan Purple [Druchii Violet]. Then I layered with Polished Gold and highlighted with P3 Radiant Platinum.
The black parts such as the fins on the back were painted with Chaos Black [Abaddon Black] and highlighted with Eshin Grey first and Codex Grey [Dawnstone] second.
4. As you might have noticed by now, the model is missing its head. This is because I kept the head separate and primed it white with Army Painter Matt White colour primer. Much easier than painting white over red. To shade the helmet, I applied several coats of thinned Dheneb Stone [Wych Flesh] into the recesses. Then I’ve painted the eyes with VGC Falcon Turqoise and highlighted them with P3 Arcane Blue, finishing the eyes with a small dot of VGC Wolf Grey for the reflection. The black face plate was painted like the other black parts of the model.
Finally I’ve finished the model by painting the trim of the base with Steel Legion Drab, applied yellow static grass and then sealed the miniature with matt varnish.


Of course, Eldar are not only made up of guardians. Eldar are a really colourful army because of their aspect warriors who all bear the trademark colour of their shrine. There are different approaches for painting aspects. The first and probably most popular one is to grant each aspect his own paint scheme, seen on Games Workshop’s studio army. Green Striking Scorpions, orange Fire Dragons, despite the Craftworld they belong to. The second approach is to paint every aspect squad in your Craftworld’s colors, e.g. Dire Avengers in a Ianyden yellow armour. This creates an army with a consistent look, though it’s not very consistent with the background.
In my Saim-Hann army, I went for the middle ground. Each aspect got his own trademark colours, but I made sure to keep the army’s overall palette very limited. For example, instead of giving the Banshee’s armour its own cream shade, I picked up the same bone colour of the shuriken weapons of my Guardians. Fire Dragons got a reddish brown armor that was painted the same way as the Warlocks’ and Farseers’ leather pouches. The dark blue armour of the Dire Avengers appears on the flowing ribbons of my Harlequins, and so on. On top of that, the typical Saim-Hann red can be found on every aspect warrior, for example on the crests of my Dire Avengers or on the hair and loincloths of my Banshees. The result is an army that looks harmonious, even if every squad is painted differently. With some careful planning and colour adjusting, you can make this work for every craftworld.
Last but not least, here are the colour recipes I used in my Eldar army that aren’t covered by the tutorial above:

Eldar flesh: Basecoat Tallarn Flesh [Cadian Fleshtone], layer on Elf Flesh [Ungor Flesh], highlight with VGC Pale Flesh and P3 Menoth White Highlight.
Blonde hair: Basecoat P3 Leather Brown, layer on streaks of Ianyden Darksun [Averland Sunset], highlight with P3 Menoth White Base [Ushabti Bone].


Blue Dire Avenger armour: Basecoat Fenris Grey [The Fang], wash with slightly thinned Asurmen Blue [Drakenhof Nightshade], highlight with Shadow Grey [Russ Grey] and VGC Steel Blue [Fenris Grey].
Brown leather (and Fire Dragon armour): Basecoat with VGC Dark Fleshtone [Doombull Brown], wash with Badab Black [Warpaints Dark Tone Ink], highlight with VGC Dark Fleshtone and Vermin Brown (Skrag Brown).

Silver with reddish tint (e.g. used on power swords): Basecoat Chainmail [Ironbreaker], wash with Baal Red [Carroburg Crimson is notably darker than Baal Red, best alternative is to glaze with thinned VGC Red Ink], layer thinned Chainmail, highlight with Mithril Silver [Runefang Steel].
Do you like our tutorials and reviews? Here is what you can do to support us: Disable your Ad Blocker or place your next Wayland Games order by clicking here or on the banner on the right. Thank you very much, we appreciate any help to keep us going!
7 Comments
Leave a Reply
Tale of Painters is the unofficial Warhammer hobby magazine run by hobbyists like you. Support our work by using the affiliate links from our partner stores for your next orders so we can continue to bring you fantastic FREE content every day:


![]()
![]()
Or support us directly:


I just want to say that in light of the recent WD profile, I have followed this site for years. In particular it was this article that convinced me to really try careful painting, and I got pretty close to the above! This resource is really invaluable and I'm so grateful you continue to make these posts.
There is a great warhammer tv youtube on doing Iyanden yellow with just a wash on white Watch "Corax White model spray." on YouTube
https://youtu.be/iLpkAjDZKU4..
Hey will you be putting up a article for how to paint Iyanden, I find that your painting tutorials are some of the best on the internet and it would be great to be able to follow an Iyanden one.
Nayros
Hi,
wie wärs mit einem Iyanden Tutorial mit einem satten Gelb?
Daran verzweifel ich 🙁
Gruß
Apollux (GW-Fanworld)
Hi Apollux,
for Iyanden I recommend Army Painter's Daemonic Yellow colour primer as a base coat. Then paint a mix of Deathclaw Brown and Seraphim Sepia or Fuegan Orange in the recesses and highlight with Dorn Yellow (or a mix of white and yellow) and highlight with White Scar. Basically, the same steps as painting red armour, just with different colours. Remember, painting yellow is very time-consuming.
An actual tutorial would be much appreciated! Reading a description on how to do it is one thing but seeing it is so much better. There's also NO Iyanden-tutorials on the internet it seems, I've googled and Youtubed all evening and I've found about 2-3 ones that are pretty bad.
Keep up the good work!
Love your tutorials and I will be using this one as a base as I redo my eldar. thank you!