
In part two of this series of exclusive Tale of Painters’ tutorials, I tackle painting the saviours of Mankind, the legendary Blood Angel Terminators. More after the jump.
This tutorial assumes you have a basic understanding of how to paint. For the beginners, I will explain the techniques as I go along. Each picture below shows four chronological steps. Underneath each picture are the corresponding instructions. Each step shows the paint I used during that step.
Paints you will need for this tutorial:
Black Undercoat
Mephiston Red (base)
Rhinox Hide (base)
Evil Sunz Scarlett (layer)
Fire Dragon Bright (layer)
Gehenna’s Gold (layer)
Leadbelcher (base)
Eshin Grey (layer)
Dawnstone (layer)
Administratum Grey (layer)
Karak Stone (base)
Rakarth Flesh (base)
Agrax Earthshade (shade)
Iron Breaker (layer)
Fenrisian Grey (layer)
Pallid Wych Flesh (layer)
Abaddon Black (base)
Genestealer Purple (layer)
Emporer’s Children (layer)
Ceramite White (base)
In case you need to expand your paint collection, head over to Wayland Games or Slave to Painting, which both stock a huge selection of paints at competitive prices.
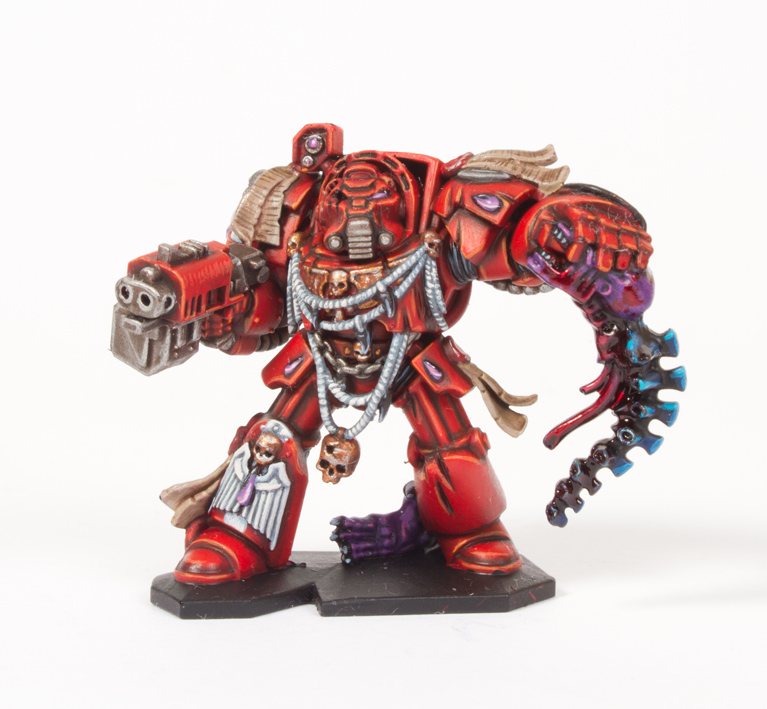
1. Undercoat the model black and then base coat the model with Mephiston Red.
2. Water down Rhinox Hide and carefully apply it to all the creases and lines of the model. in this step you’re adding definition by shading.
3. Paint all the armour pieces with Evil Sunz Scarlett. This will brighten up the armour.
4. Paint thin edge highlights of Fire Dragon Bright on to the red armour.

5. Basecoat all the gold areas with Gehenna’s Gold.
6. Mix quite a lot of water with Rhinox Hide on to a mixing palette and then wash over the gold areas to shade them.
7. Paint the metal areas like the gun muzzle, magazine and mouth respirator pieces with Leadbelcher.
8. Paint the Crux Terminatus on the shoulder with Eshin Grey. Do the same for any other areas you want to heavy this heavy stone look.
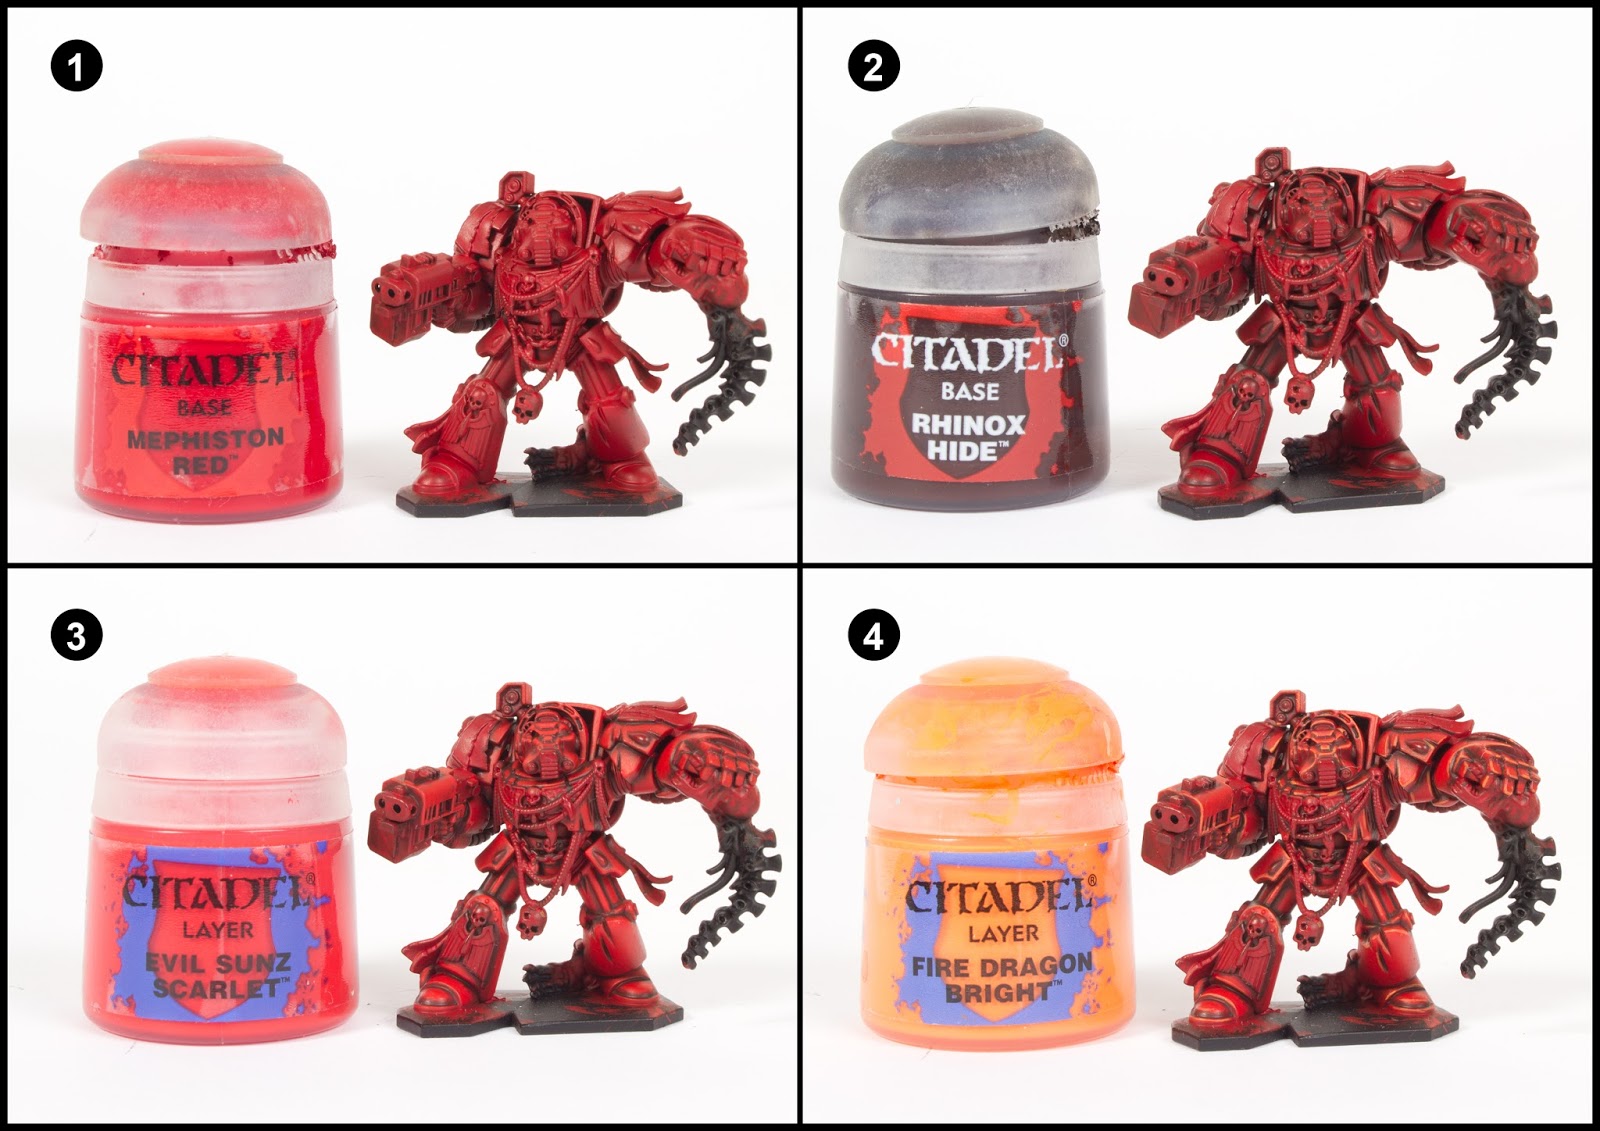
9. Highlight the stone areas with Dawnstone, leave the Eshin Grey showing through in the recesses and shaded areas.
10. Add edge highlights of Administratum Grey to the stone.
11. Paint all the parchment (purity seal paper) with Karak Stone.
12. Highlight the parchment with Rakarth Flesh.

13. Wash over the parchment and metal areas with Agrax Earthshade.
14. Highlight the metal areas with edge highlights of Iron Breaker
15. Paint everywhere that is to be white with Fenrisian Grey. Ropes, Wings etc.
16. Mix a lot of water with Eshin Grey on a mixing palette and then wash over the white areas so the mix runs into the detail and shades them. I also painted the Genestealer teeth on Goriel’s necklace with this colour.

17. Highlight the white areas by carefully picking out the raised areas with pallid Wych Flesh. Add some thin highlights to the Genestealer teeth on the necklace.
18. Use Abaddon Black to paint every single gem, the eyes (eye in the case of brother Goriel here) and the rubber flexible ribbed armour joints in the groin, back of the knees and elbows. I also painted the Genestealer carcass with black. While I had the black paint out I watered it down and added some fine lines to the parchment to represent writing.
19. Paint the lower half of the gems/lights with Genestealer Purple. Click the picture above for a close up.
20. Paint a thin line of Emperor’s Children over the previous Genestealer Purple stage.

21. Use Ceramite White to paint a dot in the top corner of each gem/eye. Then paint a very thin line over the top of the Emperor’s Children line. At this stage I also added some white edge highlights to the wax seal of the purity seals which up to this point were still Mephiston Red.
For the Genestealer carcass, see the previous guide I posted here.
Be sure to return in the next few days for part three of three where I paint a Deathwing Terminator. Deathwing had their own Space Hulk expansion in the 1980s.
Do you like our tutorials and reviews? Here is what you can do to support us: Check out the websites of our sponsors, place your next orders at Wayland Games by clicking here or on the banner on the right. Thank you very much, we appreciate any help to keep us going.

17 Comments
Leave a Reply
Tale of Painters is the unofficial Warhammer hobby magazine run by hobbyists like you. Support our work by using the affiliate links from our partner stores for your next orders so we can continue to bring you fantastic FREE content every day:


![]()
![]()
Or support us directly:


Very cool!
Whats happening at stage 3? Are you covering all the armor with evil sunz or just the bright spots? The evil sunz looks orange on my mini so maybe I didn't thin it enough.
I'm planning on doing my Blood Angels with this tutorial. I've got all of the colors but in Reaper equivalents, so tally-ho!
Great tutorial. I will definitely be using this when I get round to painting my deathstorm box set. Why do use Rhinox hide to wash the armour and gold, rather than using Agrax earthshade? Is it just personal taste?
Great tutorial, great final effect. What about Loin Cloth on other minis. Do you have any suggestions how to paint those?
How do you think this compares to the original White Dwarf tutorial in 2009
Oh, this is fantastic! I picked up Space Hulk, but I've never painted a Blood Angel before. This will be a huge help.
Very nice!
Splendid work as usual Garfy. Can't wait for your rendition of the Deathwing.
Awesome Garfy, thanks for the time and the post. -Randy
This is a very solid tutorial Garfy!
Whit this, you can add passage or customize it (like oil washes)…better than "eavy Metal Seargent Lorenzo" tutorial for me.
This is perfect, and I will definitely be following this. The Paint Splatter guide in WD is way too dumbed down and looks pretty bad, this strikes the perfect balance. Thanks!
How do you get the wash so well-behaved in step 2? At this stage most of my minis look like a toddler has attacked them with paint, and I spend a while doing a clean-up coat of the base colour.
The instruction says "carefully apply it to the creases and lines of the model".
It's not an all over wash. That would be counter productive. As you said, you have to do an additional step to clean up. Just be neat in the first place.
Thanks for the kind words.
I had the same problem until my friend showed me how to "wick" some of the paint from my brush onto a paper towel or napkin as I rotated the brush to twisted the hairs back to a point. Hope that helps!
These tutorials are fantastic. Even if I'm not planning to follow the exact recipe, your photography, clarity, and presentation are really helpful.
Lovely work.. as usual.