
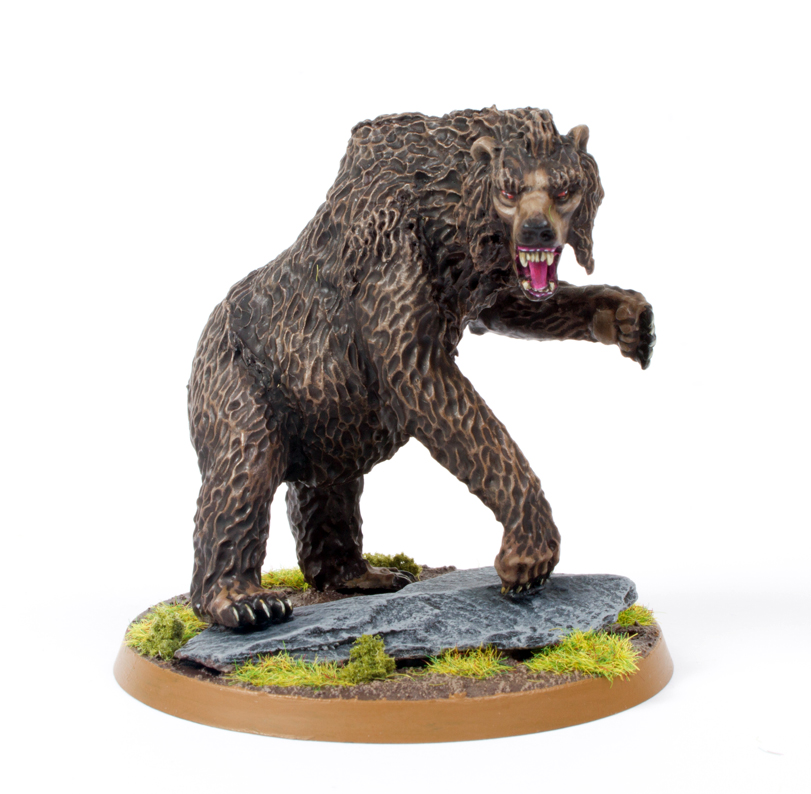
In this detailed tutorial I explain how I painted Beorn in bear form for my Hobbit collection. More after the jump.
This tutorial assumes you have a basic understanding of how to paint. For the beginners, I will explain the techniques as I go along. Each picture below shows four chronological steps. Underneath each picture are the corresponding instructions. Each step shows the paint I used during that step.
Paints you will need for this tutorial:
Black Undercoat
Rhinox Hide (base)
Gorthor Brown (layer)
Steel Legion Drab (base)
Baneblade Brown (layer)
Nuln Oil (shade)
Agrax Earthshade (shade)
Tallarn Sand (layer)
Screaming Skull (layer)
Pink Horror (layer)
Emperor’s Children (layer)
Druchii Violet (shade)
Stirland Mud (texture)
XV88 (base)
In case you need to expand your paint collection, head over to Wayland Games or Slave to Painting, which both stock a huge selection of paints at competitive prices.

1. Undercoat the model black. I use Vallejo Surface Primer. I actually had an issue with the paint repelling. I scrubbed the resin and it’ still didn’t help So I varnished the model with ‘ardcoat which worked.
2. Basecoat the whole model with Rhinox Hide.
3. Using a large flat brush, apply some Gorthor Brown to the bristles and then wipe the brush repeatedly on a tissue so the brush is dry. Then lightly brush Gorthor Brown over the raised edges of the fur. This is called dry brushing. Paint the face with Gorthor Brown.
4. Drybrush Steel Legion Drab on the raised areas of the body. Highlight the face with Steel Legion drab.

5. Sparingly, only dry brush the upper raised areas of the fur with Baneblade brown. Leave previous layers showing through in the areas that would be shadows. This will help create definition and shape. Highlight the face with a couple of edge highlights of Baneblade Brown.
6. Only use Nuln Oil to shade the heavily shadowed areas. So creases in fur, around the limbs etc.
7. Give the whole model an all over wash of Agrax Earthshade to tone the highlights down and shade the recesses of the fur.
8. Paint the teeth and claws with Tallarn Sand. I wanted black claws so I just edge highlighted the top of each claw.

9. Highlight the teeth and claws further by using Screaming Skull.
10. Paint the tongue, gums and inside of the mouth with Pink Horror.
11. Highlight the tongue, gums and inside of the mouth with Emperor’s Children.
12. Wash the tongue, gums and inside of the mouth with Druchii Violet.

13. Paint the eyes with Squig Orange. if you’re feeling brave then paint a black pupil with a white dot in the centre.
Finally base the model in a way which fits in with your collection. I used Stirland Mud texture paint highlighted with Karak Stone and the base edge was painted with XV-88. Static grass and scrub were glued on in small clumps.
Tale of Painters has a whole host of Hobbit tutorials for you to check out.
Do you like our tutorials and reviews? Here is what you can do to support us: Check out the websites of our sponsors, place your next orders at Wayland Games by clicking here or on the banner on the right. Thank you very much, we appreciate any help to keep us going.

12 Comments
Leave a Reply
Tale of Painters is the unofficial Warhammer hobby magazine run by hobbyists like you. Support our work by using the affiliate links from our 🇺🇸 / 🇨🇦 partner stores for your next orders so we can continue to bring you fantastic FREE content every day:


Or support us directly:


Hi Garfy!
http://natfka.blogspot.de/2014/11/the-inside-scoop-on-lord-of-rings.html
what do you think of this?
I think it's all hearsay and I don't tend to worry about rumours. I prefer to wait until I know what's going on from a reliable source (such as Games Workshop itself).
Lets say I indulge this rumour for just a moment and add to it another rumour I heard about a very big plastic smaug model. If the licence ends in 2016, that's not a very long time to recoup production costs on a smaug kit.
But anyway, lets wait and see and not worry about it. Lets enjoy the moment.
Nice work yet again. your tutorials are easy to follow and have really helped my skill levels increase!
Cheers mate! Much appreciated!
another great tutorial Garfy , model looks fantastic.
Michael
You should try the Vallejo model colour paints. They're easily my favorite for painting any type of model.
I did. I have a large collection (over 100 bottles). I prefer GW paints now.
You were using the GAME colour paints. Model colour is a different range and better that the former and GW [IMHO]
Quality doesn't factor into my decision.
Y so?
I might answer if you register. It's difficult having a conversion with anonymous person.
Very nice. And I'm sure I'll find this useful for other animals now that I understand your technique. Thanks.