
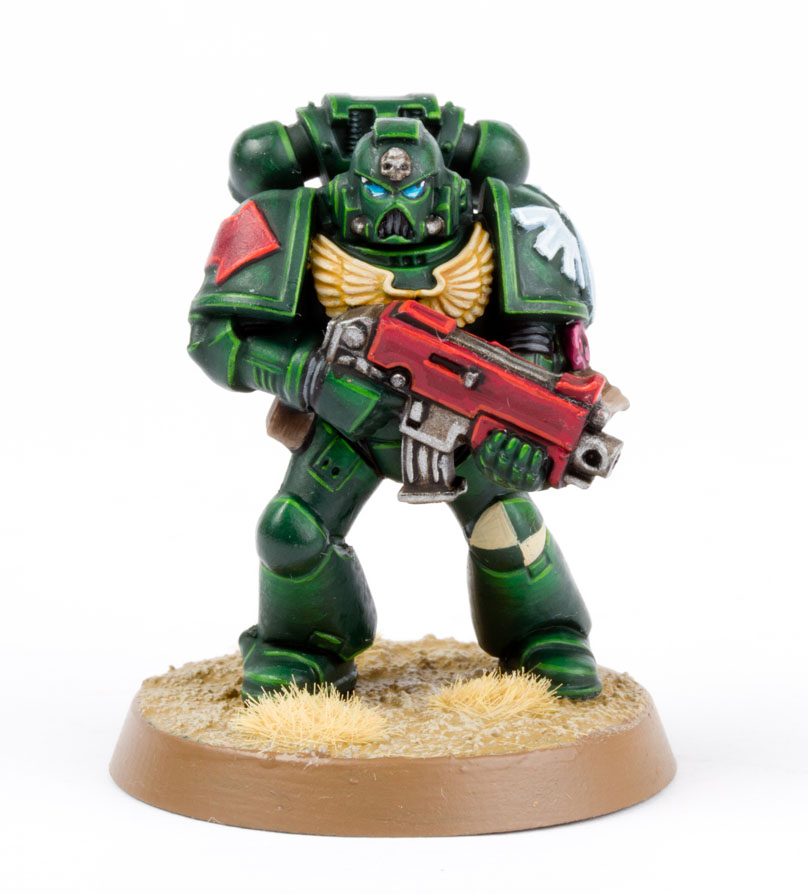
In today’s post I share with your a complete photo tutorial guide to paint the Dark Angel Tactical Marine pictured above Just in time for the rumoured up and coming Dark Angel codex. What are you waiting for, more after the jump!
This tutorial assumes you have a basic understanding of how to paint. For the beginners, I will explain the techniques as I go along. Each picture below shows four chronological steps. Underneath each picture are the corresponding instructions. Each step shows the paint I used during that step.
Paints you will need for this tutorial:
- Black Undercoat
- Caliban Green (base)
- Warpstone Glow (layer)
- Moot Green (layer)
- Beil-Tan Green (shade)
- Abaddon Black (base)
- Leadbelcher (base)
- Agrax Earthshade (shade)
- Iron Breaker (layer)
- Khorne Red (layer)
- Evil Sunz Scarlett (layer)
- Wild Rider Red (layer)
- Fenrisian Grey (layer)
- Ceramite White (base)
- Zamesi Desert (layer)
- Ushabti Bone (layer)
- XV88 (base)
- Baneblade Brown (layer)
- Rakarth Flesh (base)
- Dawnstone (layer)
- Screamer Pink (layer)
- Emperor’s Children (layer)
- Teclis Blue (layer)
- Temple Guard Blue (layer)
- Armageddon Dust (Texture)
If you need to expand your paint collection, check out our 🇬🇧/🇪🇺 partner stores Wayland Games, Element Games, and Firestorm Games, at 🇩🇪 Taschengelddieb and PK-Pro, and at 🇺🇸 Noble Knight Games, which all offer an amazing range of paints and hobby products at a discount. Using our links helps to support Tale of Painters at no additional cost to you, so thank you very much for using them!
Dark Angels painting guide
0. Undercoat the model using a black undercoat. I use Vallejo surface primer with my airbrush.
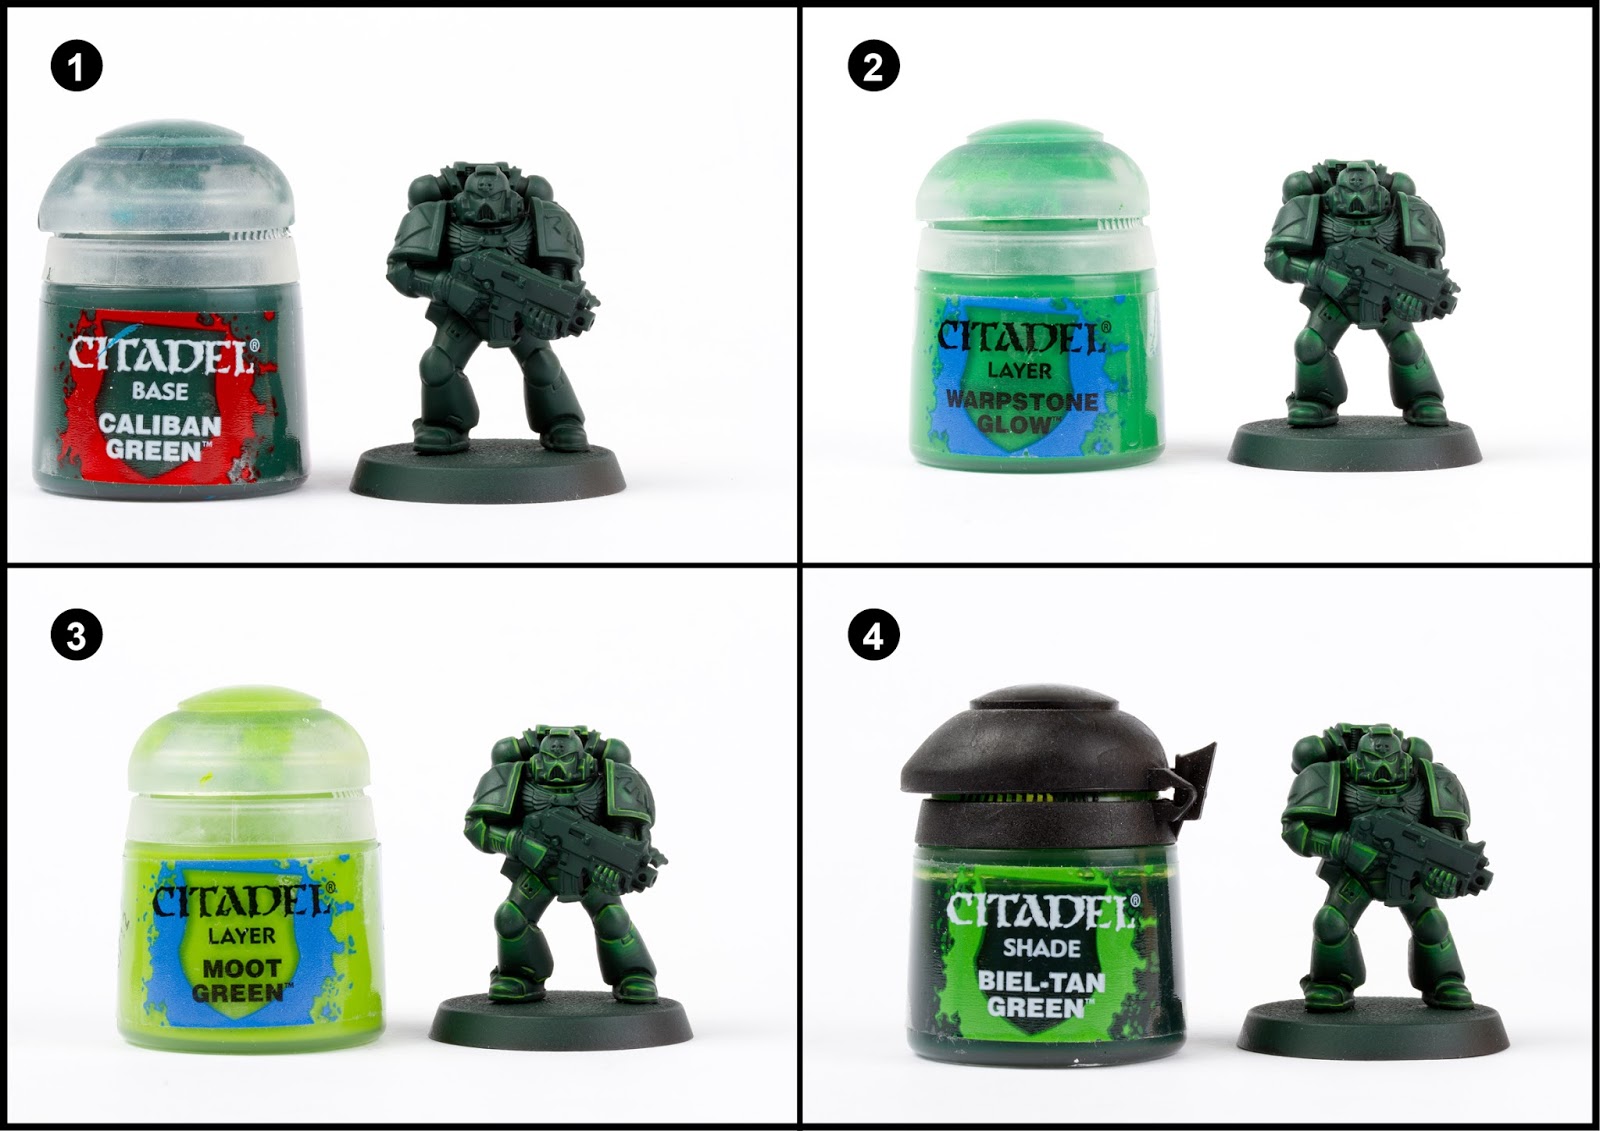
1. Basecoat the model with Caliban Green.
2. Create a mix of Warpstone Glow and Lahmian Medium (50:50) and paint a thin layer (a glaze) over all the rounded areas of the armour that would catch natural light. Once dry, repeat to build the intensity. It’s these thin layers that create such nice soft blends.
3. With a fine detail brush, paint the upper sharp edges of the armour with Moot Green to represent glints of light on the edges.
4. Wash the whole model with Biel-Tan Green to tie together the blending.

5. Paint the rubberised areas between the armour, the bolter and tactical symbol with Abbadon Black.
6. Pick out any metal areas with Leadbelcher.
7. Wash the metallic areas with Agrax Earthshade.
8. Highlight the edges of the metals with Iron Breaker using a fine detail brush.

9. Paint the bolter casing and any other areas such as the tactical arrow with Khorne Red. Look carefully at the pictures above to see where the red goes on the gems (you should leave the top left area of the gem black.
10. Highlight the previous areas with Evil Sunz Scarlett.
11. Edge highlight the red areas with Wild Rider Red and a fine detail brush.
12. Basecoat the Chapter symbol with Fenrisian Grey.
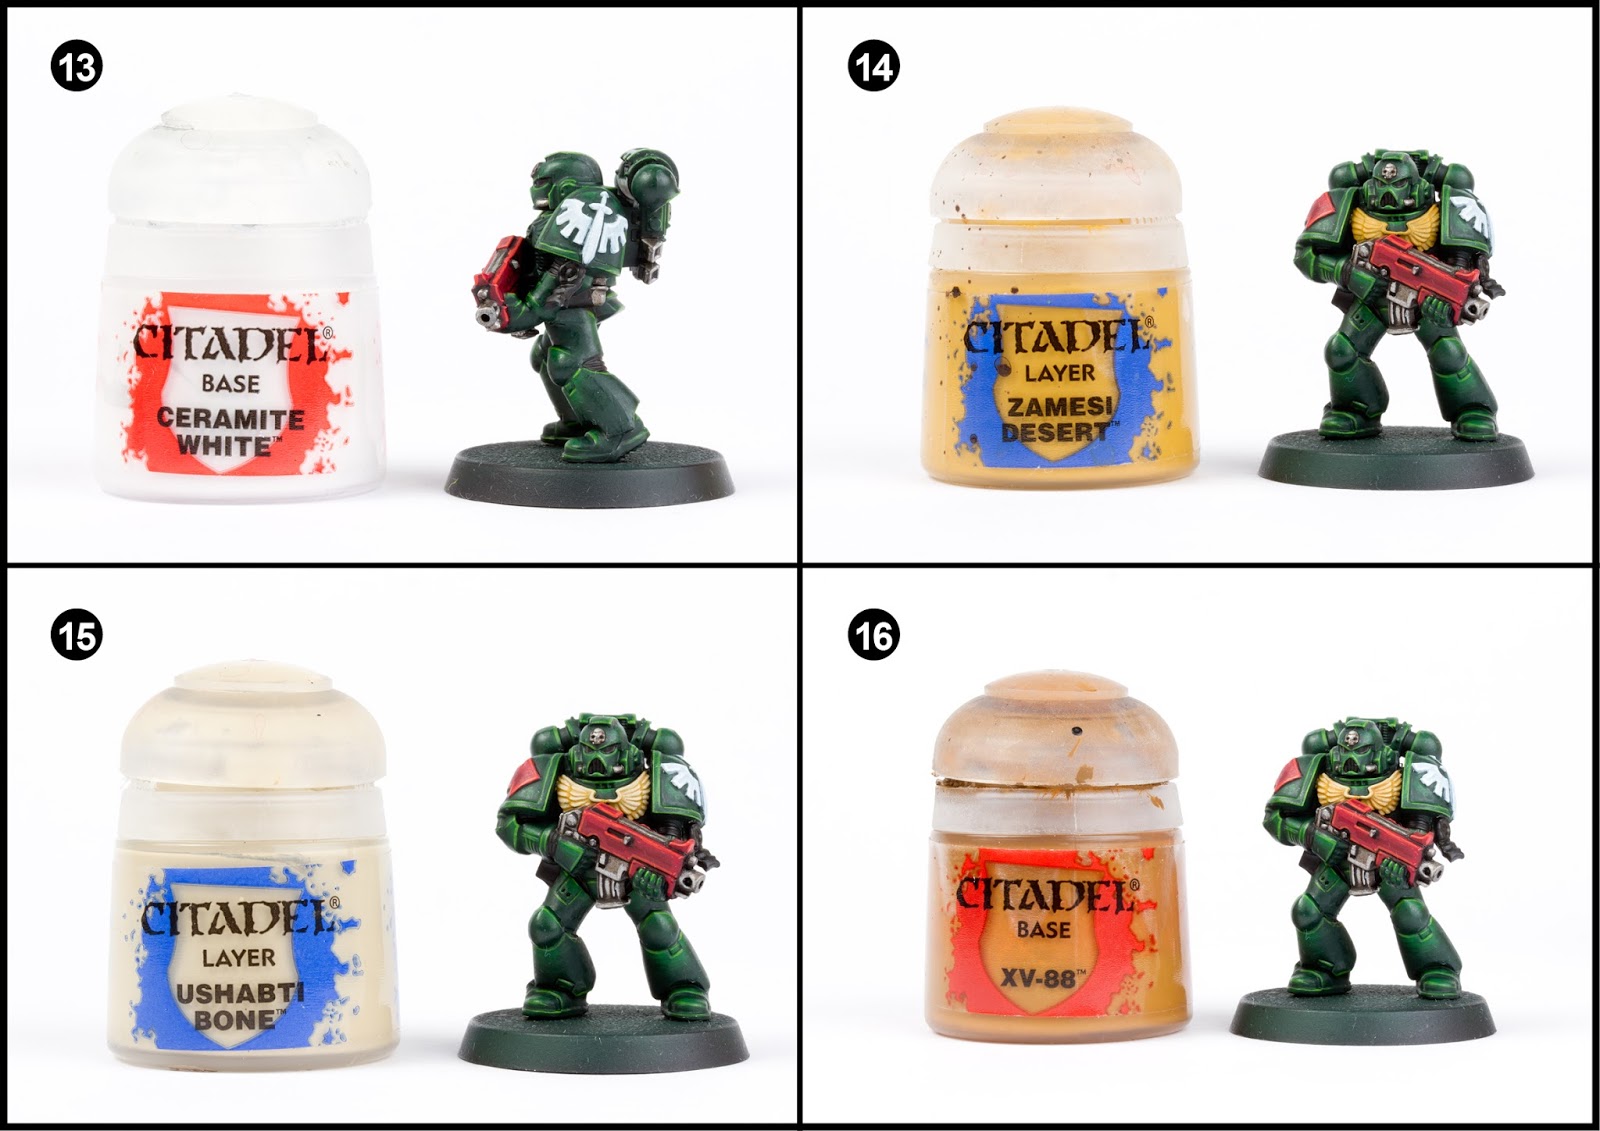
13. Paint the Chapter symbol with Ceramite White. This might take a couple of coats to get a solid coat. Water your paint a touch to make it flow from the brush easier. It makes for a more accurate method.
14. Paint the chest Aquilla with Zamesi Desert.
15. Highlight the chest Aquilla with Ushabti Bone. Make sure you leave some Zamesi Desert showing through for shading.
16. Water down some XV-88 and use it to shade the chest Aquilla. Just paint thin lines.

17. Paint any scrolls or parchments with Baneblade Brown.
18. Highlight the scrolls/parchments with Rakarth Flesh.
19. Run a wash of Agrax Earthshade over the scrolls and parchment areas.
20. Paint thin edge highlight lines of Dawnstone onto the rubberised areas under the armour pieces (elbows, back of knees, groin etc).

21. Paint any wax seals with Screamer Pink. Leave some black showing through as shading.
22. With very thin highlights use Emperor’s Children to highlight the wax seals.
23. The eyes actually require three steps. Firstly paint Teclis Blue into the lens leaving a black area showing in the upper most corner furthest from the nose. Then paint a line of Temple Guard Blue along the bottom of the lens. Finally, paint a thinner white line below the line of Temple Guard Blue and paint a white dot in the middle of the black area you left.
24. Paint the squad marking on the knee with Ushabti Bone.

25/26. Finally, base the model in a way that fits in with your collection. I used Armageddon Dust texture paint highlighted with Screaming Skull and the base edge was painted with Steel Legion Drab.
That all the tutorials I have planned for the moment. I hope to return with more soon. Hope you enjoyed this one.

16 Comments
Leave a Reply
Tale of Painters is the unofficial Warhammer hobby magazine run by hobbyists like you. Support our work by using the affiliate links from our partner stores for your next orders so we can continue to bring you fantastic FREE content every day:


![]()
![]()
Or support us directly:


Thanks so much for this. I have these models from the 2013-era painting set, and am now looking to get these guys done for a Tactical Space Marine Kill Team. This should really help get me rolling as a newbie to 40k!
I’ve been looking for a comprehensive tutorial like this for ages. It’s superb. Thanks for going to so much effort and detail – appreciated. I’ve bookmarked your site for future reference. Thanks Garfy! Stellar work.
Hello, I have been trying to paint minis for a few years now. I am no longer able, due to medical reasons. As much as I would love to, I can't paint nearly as well as you! Can you please email me at ryggrad82@gmail.com? I have an important question for you.
Just wanted to say thanks for taking the time to do this tutorial. Trying to get back into painting mini's after a near 20 year "break"
Having a tutorial like this is not only great for following, but it gives you a final product to aspire to 🙂
I went a bit crazy on eBay/GW/Wayland so I have A LOT of mini's to paint. Needless to say I'll be stalking more or less everything you post in the coming years/months
Will be having another crack at step 2 tonight, my first attempt last night was less than successful…
Thanks Hayward. Have fun with the stalking. You'll see I have more of a presence on Facebook, Youtube and Instagram so feel free to hit me up over on those.
Cool, I'll increase my stalking range to take those platforms in.
Do you mind if I ask, how are you mixing your paint up? For step 2, when I do a 50:50 mix and try to paint it on, it seems a lot brighter and more obvious that it does in your picture.
With me it looks like less of a blend and more like another coat of paint. I'm 101% sure that I'm doing something wrong. Do you have any tips for applying that stage?
Hi Garfy,
When you're mixing medium with paint do you add a bit of water or keep the brush wet or anything?
Thanks,
I don't deliberately, but if I've just cleaned my brush and worked the brush into a point it might still be wet
Love it Garfy as always…will definitely use this scheme for my dark angels in dark venegeance
Also what do you think is better?
Spray Primer or Imperial Primer?
Thanks
Vallejo surface primer through an airbrush is cheapest, most reliable and smoothest.
I love well painted dark angels, and on his new 32mm base this guy just rocks. Not sure about blue eyes, but I know this matches your armies of the imperium, maybe it will go better with the blue osl glow on the plasma weapon dudes (hint hint)
I love you Mr Garfy sir!
Once again very nice tutorial. If i collected Dark Angels i'd never look back after seeing this.
The only thing that i would like to see is a Space Wolves tutorial, please paint a Space Wolf. It's one of the major chapters and there's no tutorial for them. Would really love a Space wolf tutorial from the best tutorial makers on the web imo.
One day dude. I have the Stormclaw box set and I do want to add them to my army of the imperium. Need to finish Dark Vengeance and DeathClaw first (and Execution Force).
"In today's post I share with your a complete photo tutorial guide to paint the Blood Angel's Death Company Marine pictured above."
Might want to change that 😉
Thanks.