
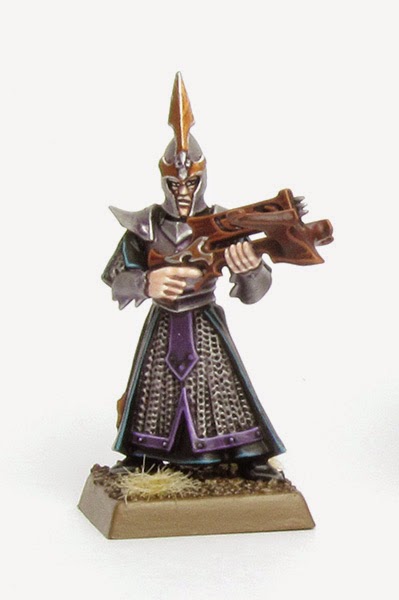
Hey guys, with Age of Sigmar on the roll I thought it would be great to look into painting some Fantasy models. So today, I dug out this tutorial for painting a Dark Elf/Aelf Exile Darkshard I created last year. After the jump you will find all the steps for painting the model above.
This tutorial assumes you have a good understanding of how to paint, as it involves non-GW paints and mixing colours. Underneath each picture are the corresponding instructions. Each step shows the paint(s) I used during that step. If a non-GW paint was used, I try my best to give you suitable alternatives [in brackets].
Paints I used for this tutorial:
Black Primer (Vallejo Surface Primer Black)
Games Workshop XV-88
GW Sycoray Bronze
GW Eshin Grey
GW Codex Grey (OOP, use Dawnstone instead)
Vallejo Game Colour Dark Fleshtone
VGC Pale Flesh
The Army Painter Warpaints Strong Tone Ink
Warpaints Soft Tone Ink
Warpaints Matt White
Privateer Press Formula P3 Trollblood Base
P3 Ryn Flesh
In case you need to expand your paint collection, head over to Wayland Games or Slave to Painting, which both stock a huge selection of paints at competitive prices.
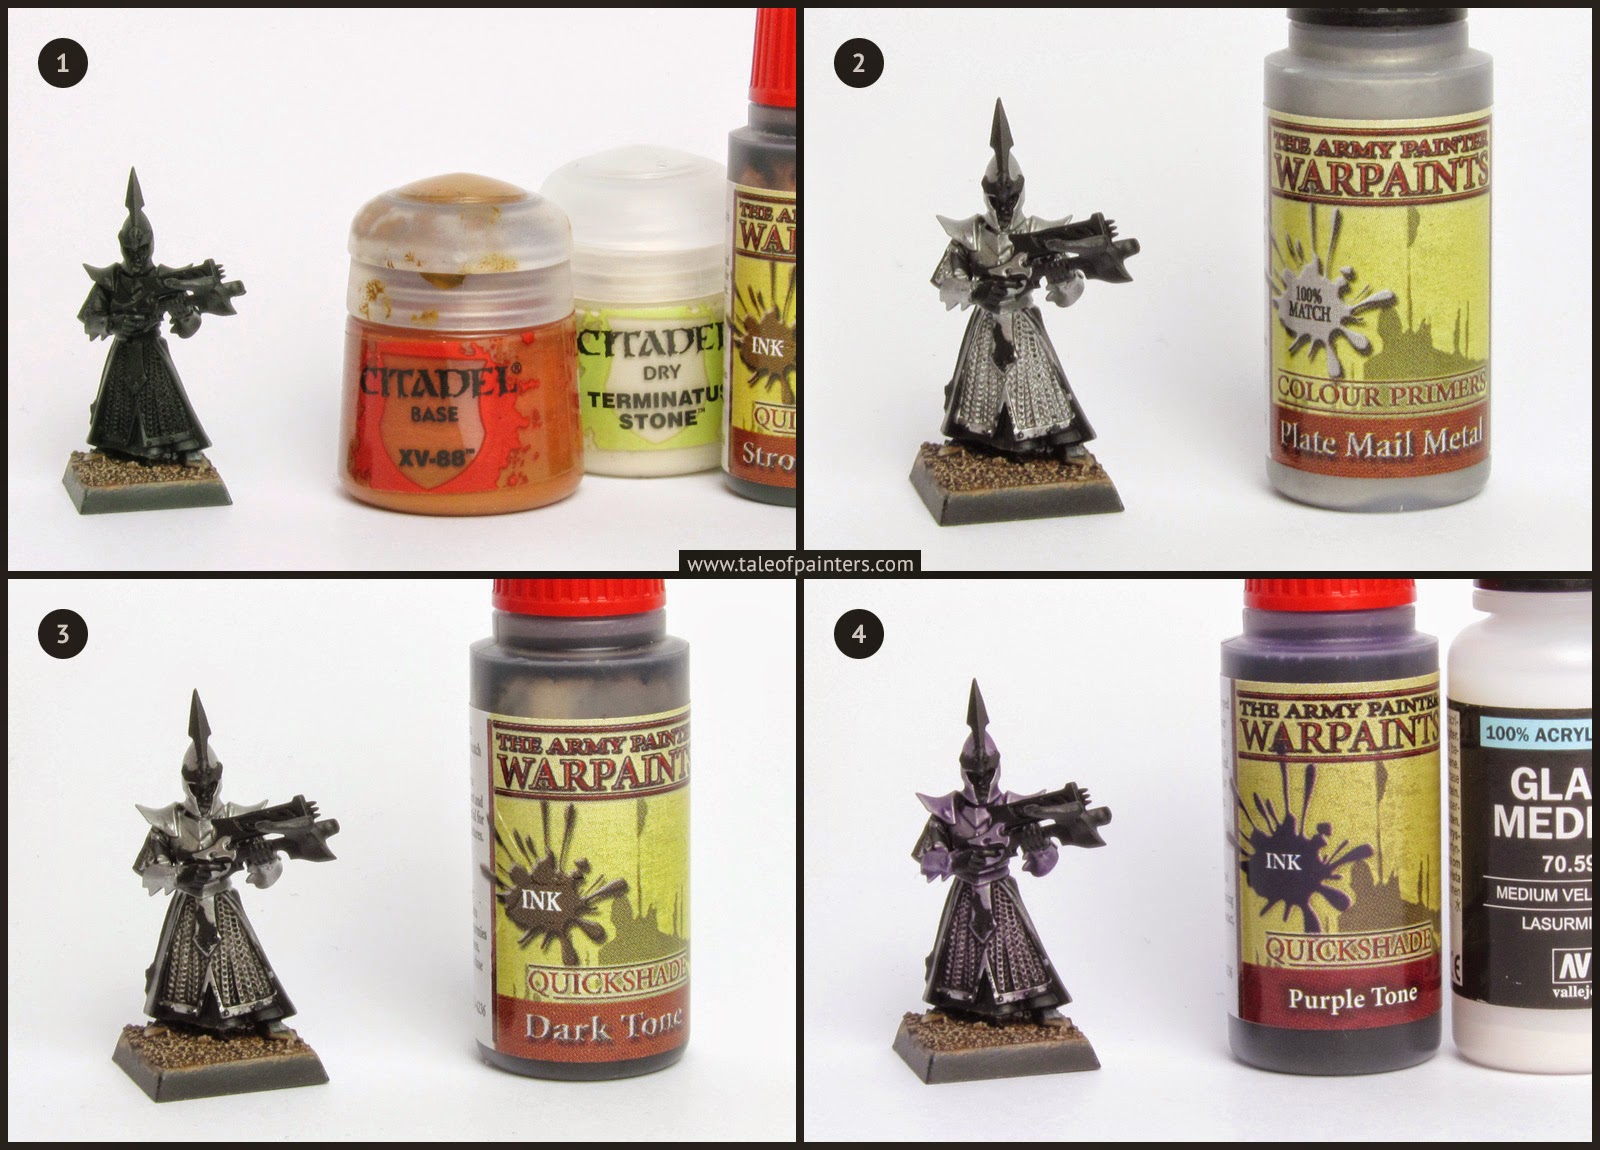
1. The model was primed with black Vallejo Surface Primer, applied with my airbrush. If you don’t own an airbrush, you can use spray primer of course. I recommend Army Painter’s Matt Black primer, as it provides a nice, deep black. Once the primer was dry, I painted the texture of the base with XV-88, drybrushed heavily with Terminatus Stone and applied a generous wash of Army Painter Warpaints Strong Tone Ink [Devlan Mud; Agrax Earthshade works, too, though it is a bit of a lighter brown].
2. I basecoated the armor with Warpaints Plate Mail Metal [Chainmail or Ironbreaker].
3. Now I washed the chain mail with Warpaints Dark Tone Ink [Badab Black or Nuln Oil].
4. I prepared a mix of Warpaints Purple Tone Ink [Leviathan Purple or Druchii Violet] and Vallejo Glaze Medium, about 3:1, and washed the whole armour including the chain mail. The Glaze Medium will make the wash more subtle. Lahmian Medium might work as a substitute if you don’t have access to Vallejo paints.
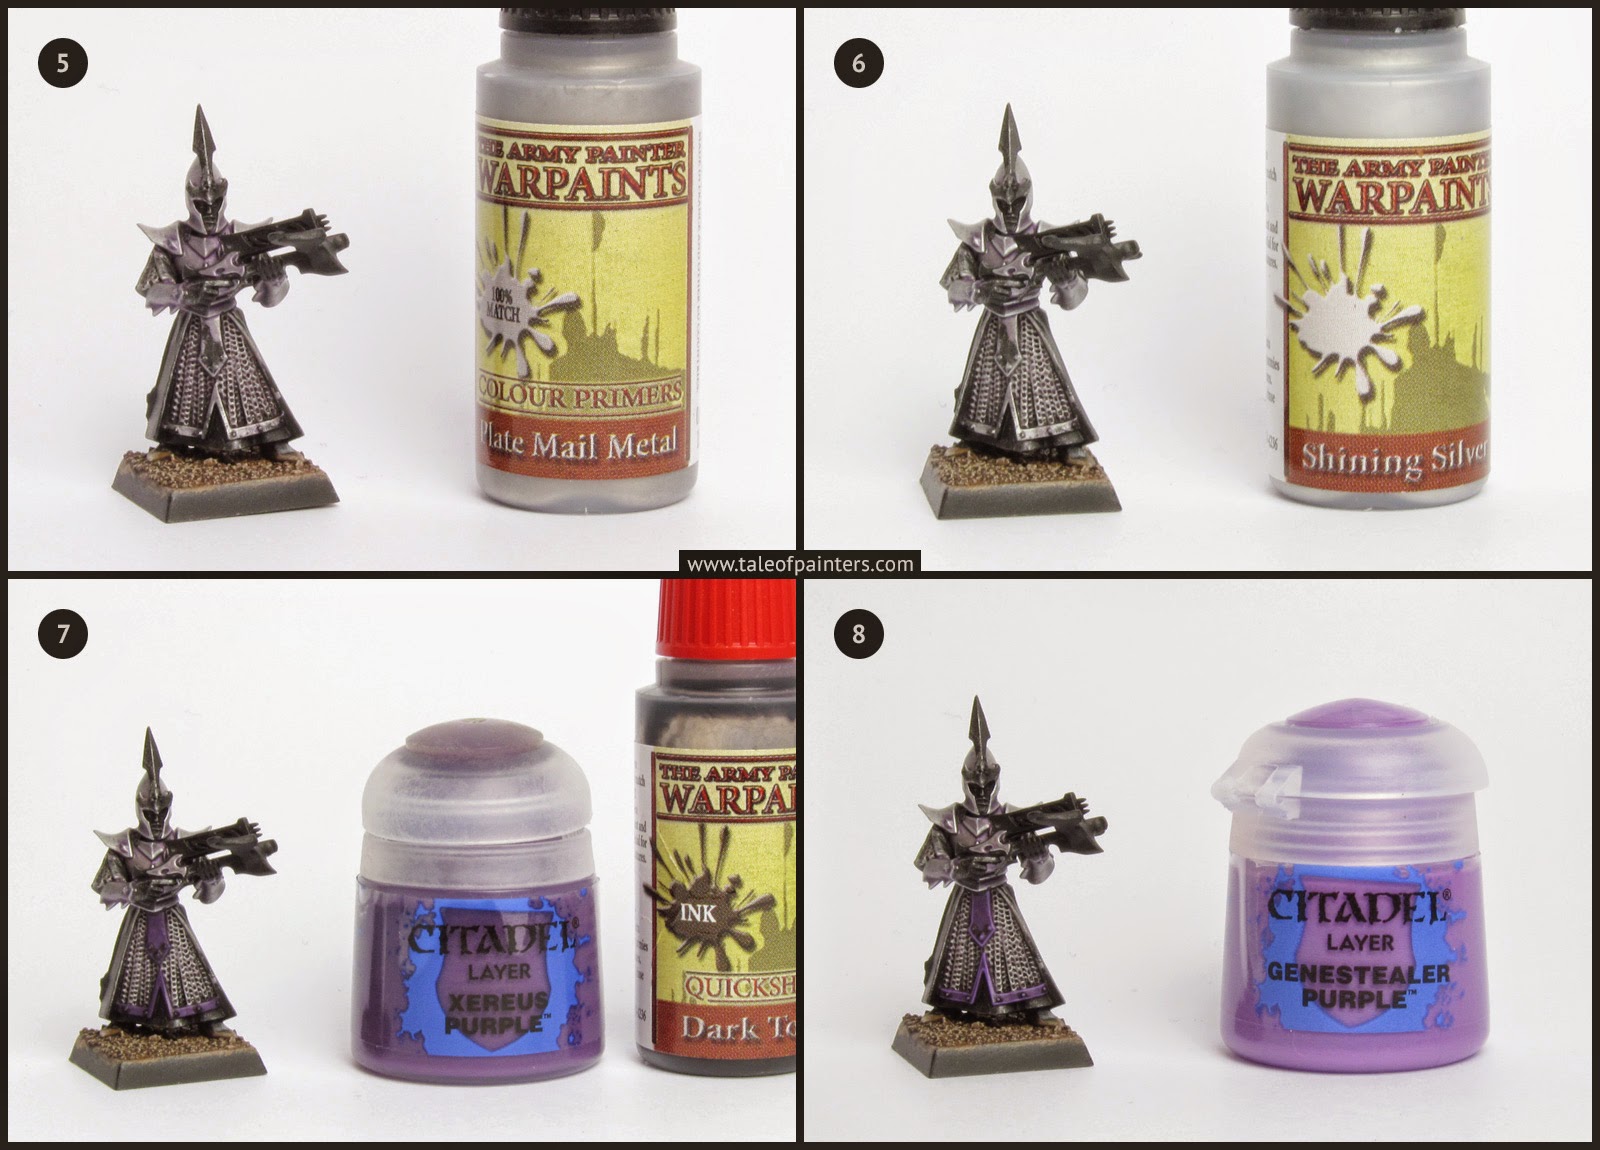
5. Next I drybrushed the metal areas with Plate Mail Metal, this will leave the purple tint only in the recesses. If the purple is still showing through on the raised flat areas after the drybrush, paint a thin coat of Plate Mail Metal over the areas in question.
6. Now I gently drybrushed the chain mail with Warpaints Shining Silver [Mithril Silver or Runefang Steel] and edge highlighted the armor with the same colour.
7. I applied a base coat of Xereus Purple to the trims of the tunic and washed Warpaints Dark Tone Ink into the recesses. This will be the main spot color of the model and can also be used for shields and banners.
8. Next I edge highlighted the purple areas with Genestealer Purple.
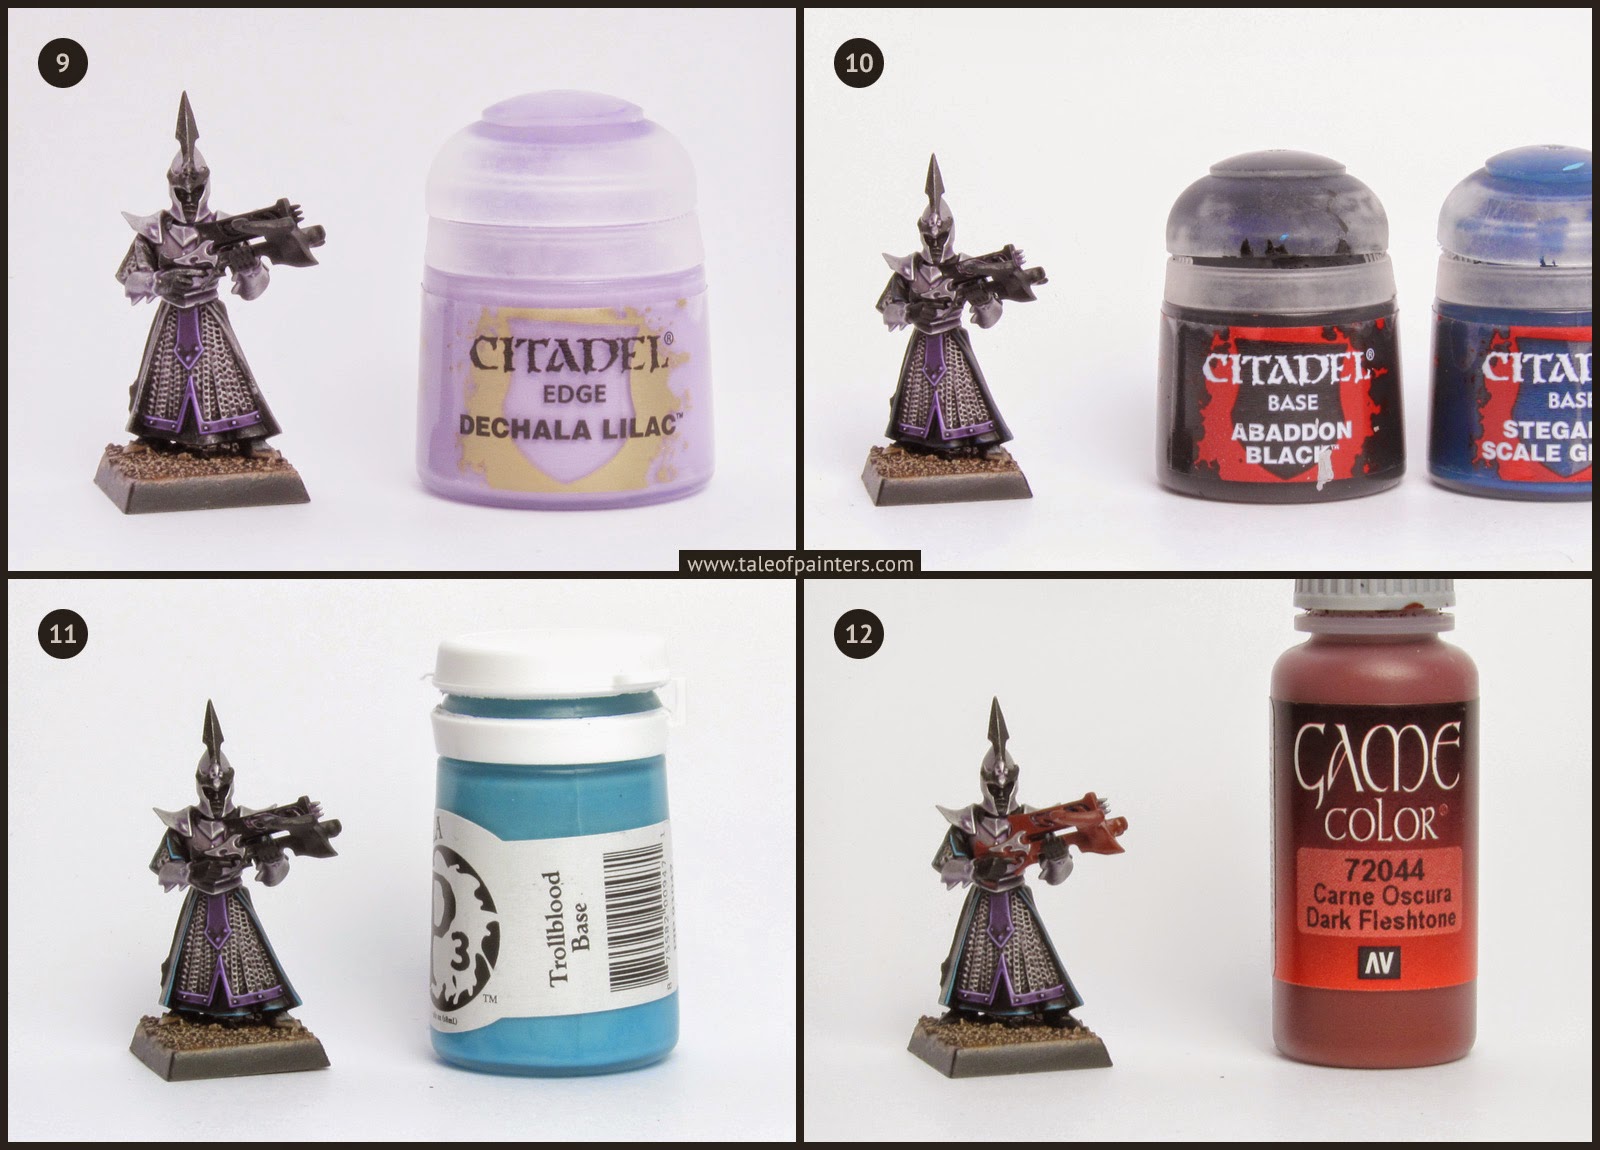
9. Finally I applied a edge highlight of Dechala Lilac to the uppermost purple areas.
10. Now I restored the black primer on the clothing with Abbadon Black and applied a highlight of Stegadon Scale Green.
11. Then I highlighted the garment with Formula P3 Trollblood Base [it’s hard to find a replacement for this color in the Citadel paint system, Thunderhawk Blue is more greyish and Sotek Green is more turquoise].
12. The wooden repeater crossbow was base coated with Vallejo Game Colour Dark Fleshtone [Dark Flesh or Doombull Brown].
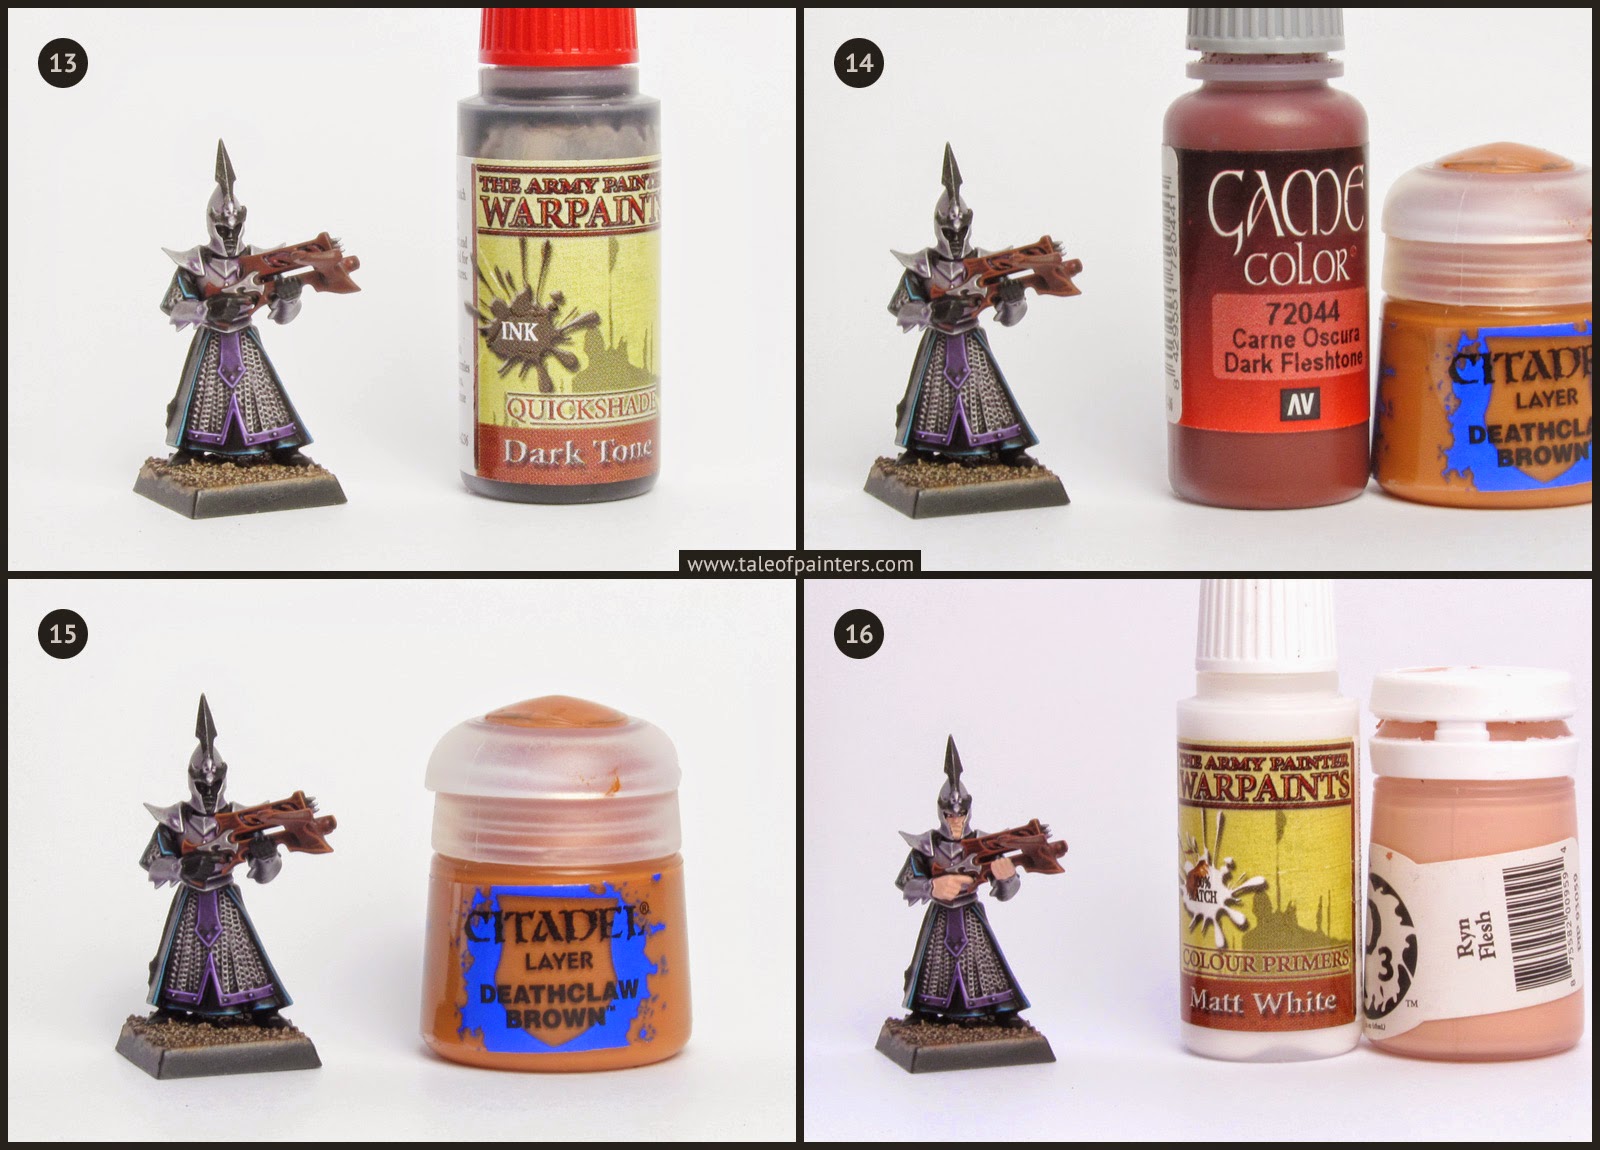
13. I washed the crossbow with Warpaints Dark Tone Ink. If you encounter any stains because the wash has pooled, mix some black into your Dark Fleshtone and even it out.
14. For this step I mixed Dark Fleshtone with Deathclaw Brown for a highlight because I didn’t have Tuskgor Fur. If you got it, you can use this colour instead. Notice how I added some horizontal streaks to suggest wood grain.
15. A final edge highlight of Deathclaw Brown was then added to the uppermost areas of the crossbow.
16. In this step I applied two dots of Warpaints Matt White [any white such as White Skull or White Scar will do] in the corners of the eyes, then applied a base coat of P3 Ryn Flesh [this colour is hard to replace, your best bet might be Ungro Flesh, but it’s much more yellow so the end result won’t be as pale] to the skin, leaving a thin line of black around the eyes. More about my technique for painting eyes and faces can be found here.
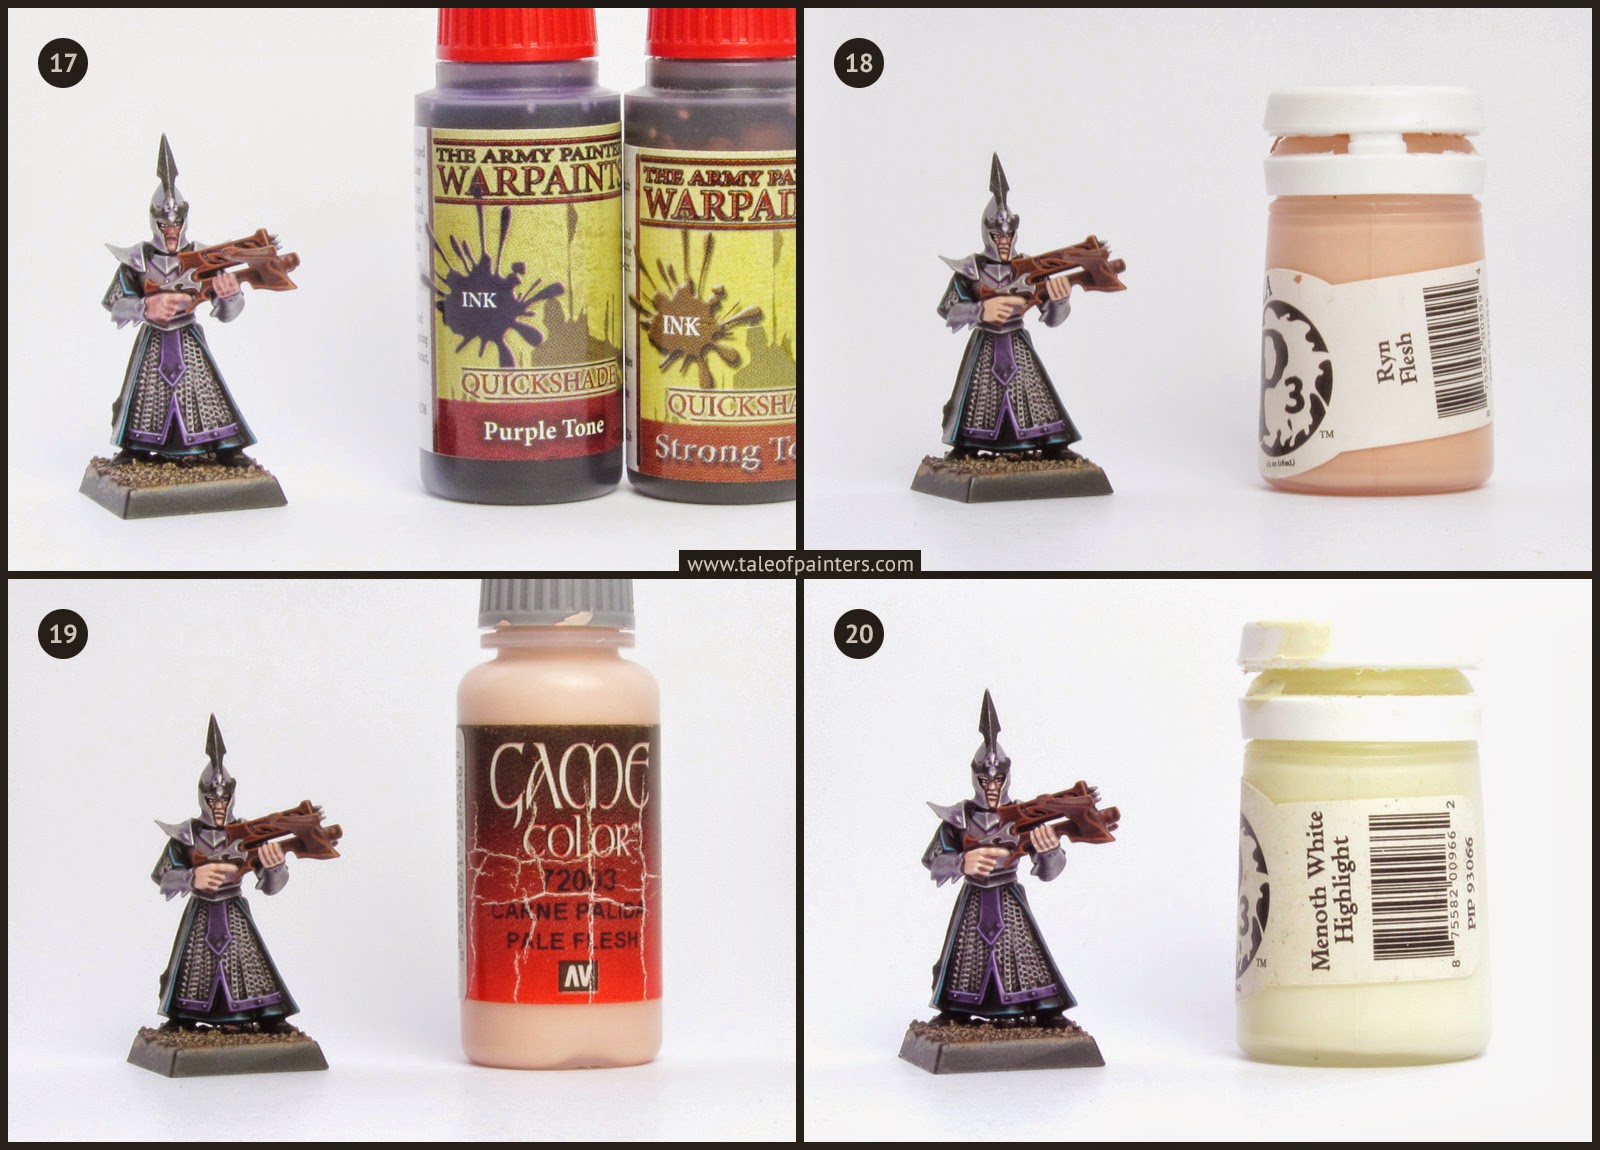
17. I prepared a 1:1 mix of Warpaints Purple Tone Ink and Strong Tone Ink, then washed all the skin areas.
18. Once dry, I layered the skin with Ryn Flesh, leaving the wash only in the recessed areas.
19. Now I applied a highlight of VGC Pale Flesh [again a colour that can hardly be replaced].
20. Finally I highlighted with P3 Menoth White Highlight [yet again a colour hard to replace with Citadel paints, but VGC Off White is pretty much the same].
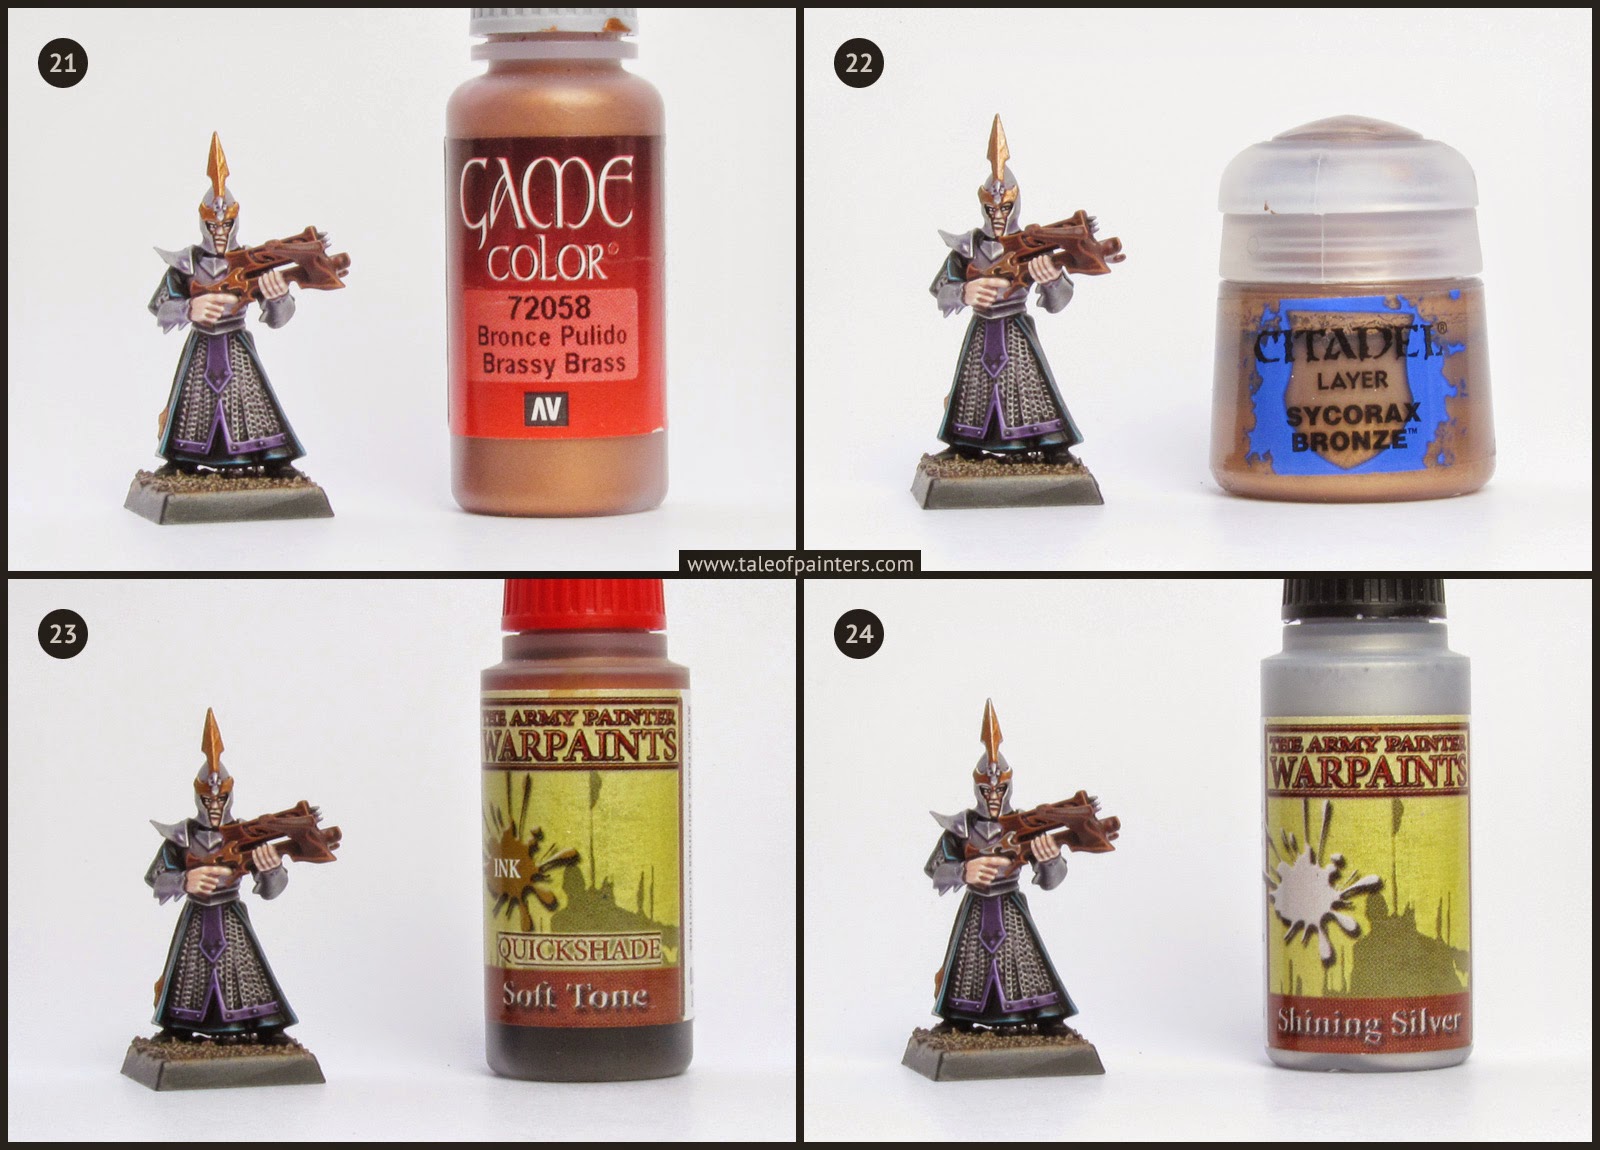
21. The brassy metal was basecoated with VGC Brassy Brass [Balthasar Gold].
22. A quick highlight of Sycorax Bronze was used to lighten up the brass.
23. Then I washed the brassy parts with Warpaints Soft Tone [Gryphonne Sepia or Seraphim Sepia].
24. Finally a thin edge highlight of Warpaints Shining Silver was applied.
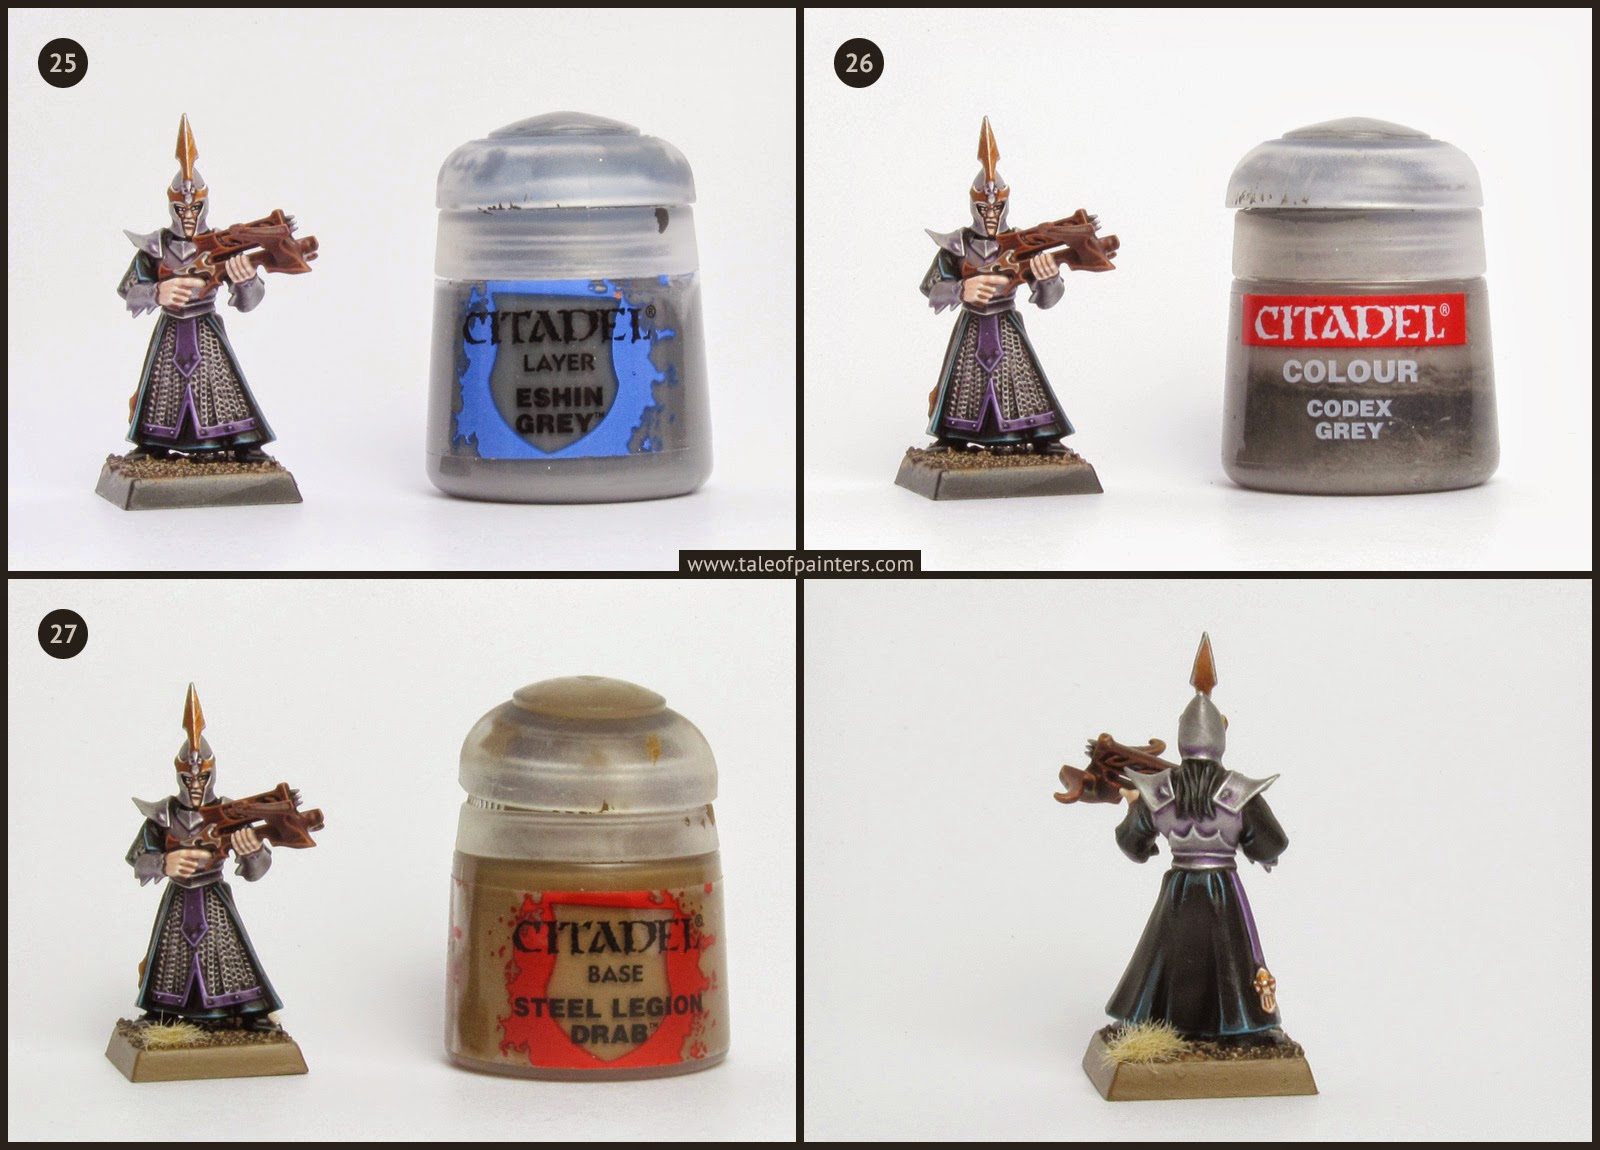
25. The black hair and leather boots were highlighted with Eshin Grey.
26. A second highlight was added with Codex Grey [Dawnstone].
27. Finally I painted the trims of the base with Steel Legion Drab and glued on some static grass (arid static grass from Gale Force 9).
How do you like the paint scheme? I feel it’s suitably dark, with a subtle contrast between the purple spot colour and the turquoise tint of the black. Painting the model above took me between 1.5 and 2 hours. With batch painting you should be able to complete a small unit in a couple of evenings, but feel free to cut some corners if you need to churn out ranks more quickly.
Do you like our tutorials and reviews? Here is what you can do to support us: Check out the websites of our sponsors, place your next orders at Wayland Games by clicking here or on the banner on the right. Thank you very much, we appreciate any help to keep us going.
11 Comments
Leave a Reply
Tale of Painters is the unofficial Warhammer hobby magazine run by hobbyists like you. Support our work by using the affiliate links from our 🇺🇸 / 🇨🇦 partner stores for your next orders so we can continue to bring you fantastic FREE content every day:


Or support us directly:


Beautiful work. Sorely tempted to do some of my own.
That looks superb.
Army Painter silvers are a lot nicer to work with than their Citadel counterparts, don't you think?
Yes, they are exactly the same paints as the old Citadel silvers.
About time you painted some Dark Elves , i've got a whole army sitting here in just black primer ! Top notch as always , got some inspiration now .
It looks fantastic, but I cringe at the idea of painting 200 of them. 🙂
Nice tutorial. Love the detailed steps!
I'd have never guessed that Trollblood Base would render soooo good to highlight black. Thanks a lot for that
Èver thought of moving from Privateer Press's paints to their miniatures?
No, sorry 🙂
How did you take the photographs, I have been having a nightmare getting photos to come out this clear.
Wonderful