

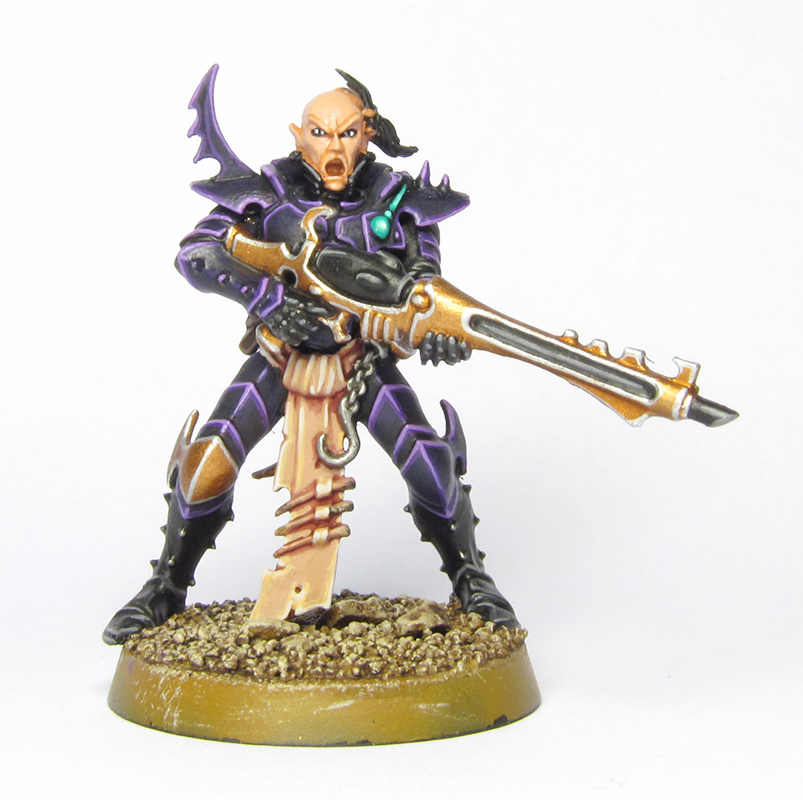
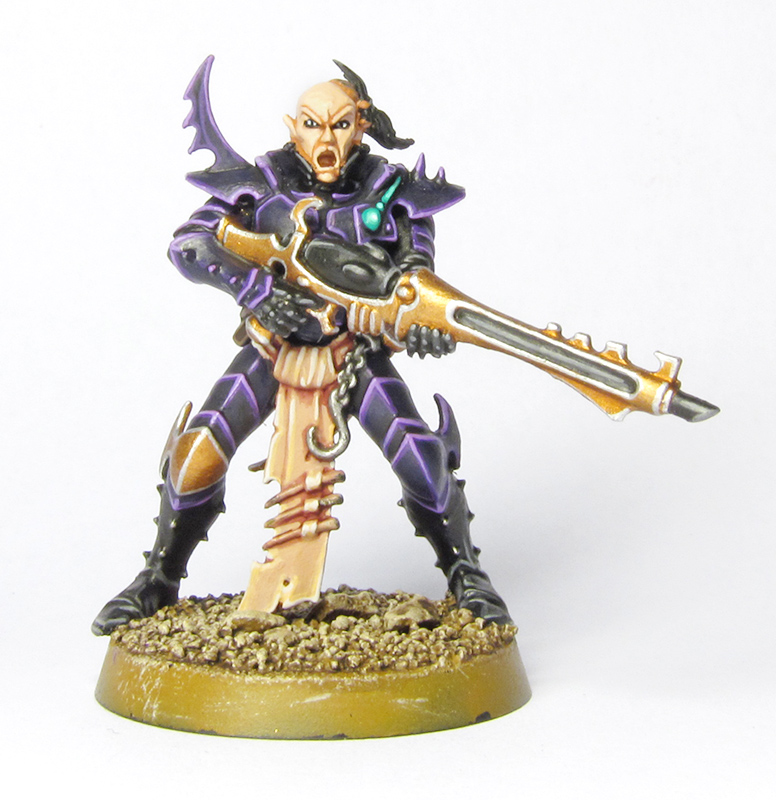
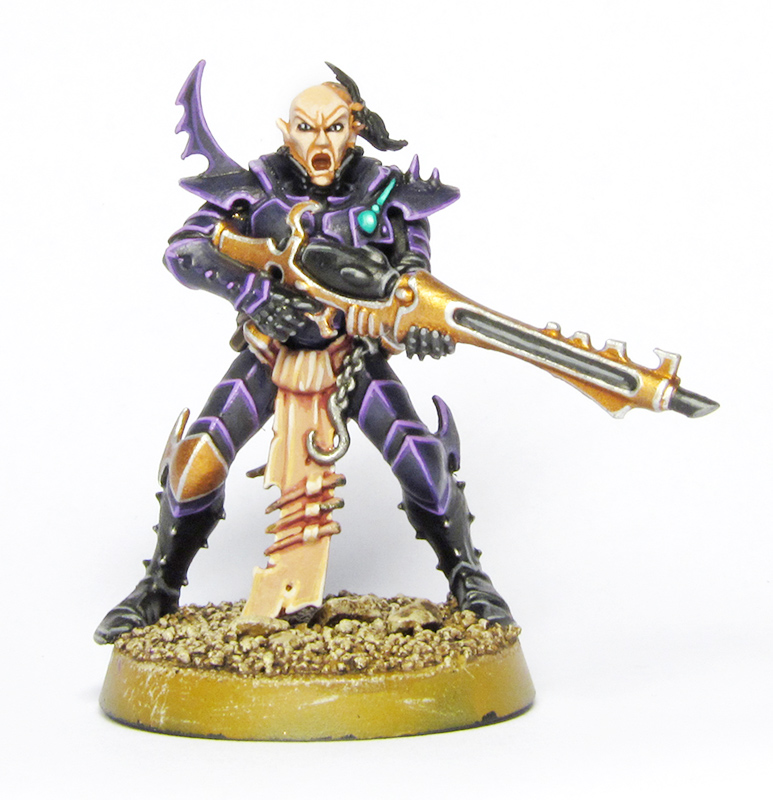
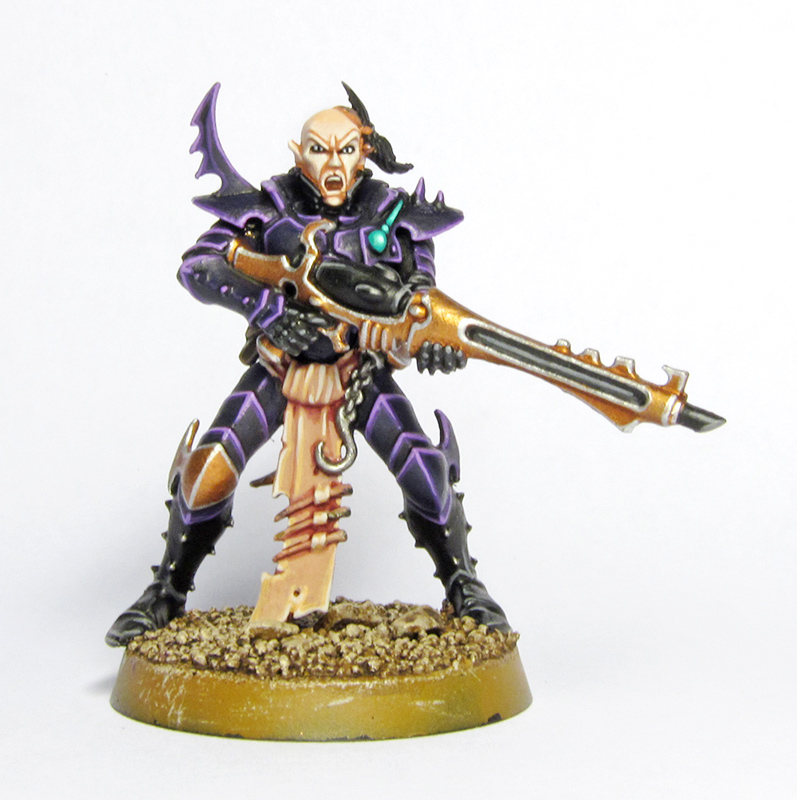
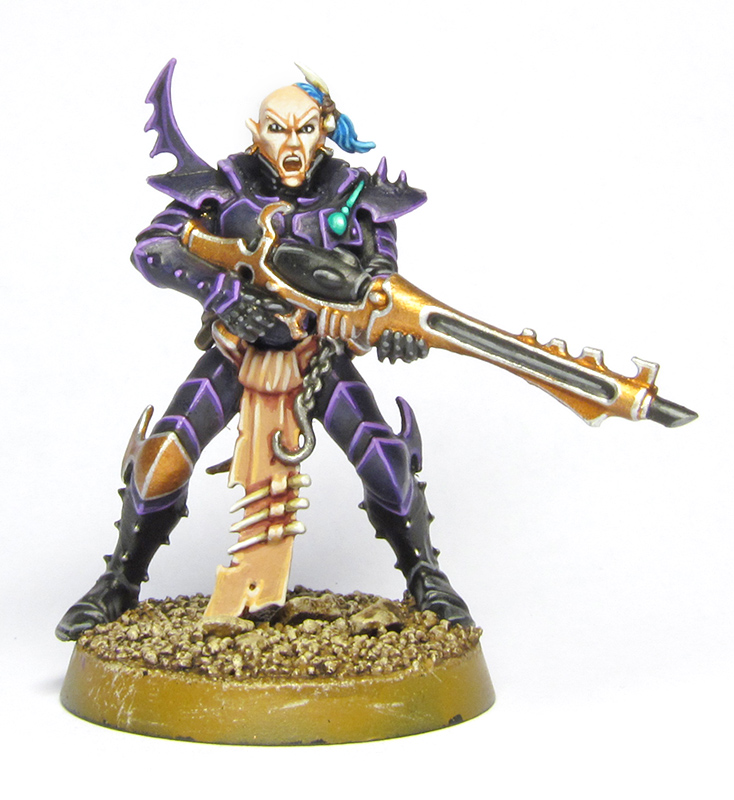
I created this tutorial a while ago. As I use the techniques and paints described here for my Wracks as well, I thought it would be a good idea to bring it back to the front page. In this extensive step by step guide you will learn how to paint Dark Eldar Kabalite Warriors of the Kabal of the Last Hatred. It comprehends easy techniques for painting Kabalite armour, flayed skin and Dark Eldar flesh and a lot more. All presented in super macro photographs where you can see every paint streak. Click more after the jump and find out how I painted the model above.
Paints you will need for this tutorial:
Waywatcher Green
Codex Grey (old)
Tallarn Flesh (old)
Scorched Brown (old)
Asurmen Blue (old)
AP Soft Tone Ink
AP Gun Metal
AP Platemail Metal
AP Matt White
VGC Pale Flesh
P3 Khardic Flesh
P3 Midlund Flesh
P3 Ryn Flesh
AP = The Army Painter Warpaints, VGC = Vallejo Game Color, RMS = Reaper Master Series, P3 = Privateer Press Formula P3, old = old Citadel paint range, otherwise current Citadel paint range. Suitable paint equivalents are put in [brackets] later on.
In case you need to expand your paint collection, head over to Wayland Games or Slave to Painting, which both stock a huge selection of paints at competitive prices.
How to paint Dark Eldar Warriors
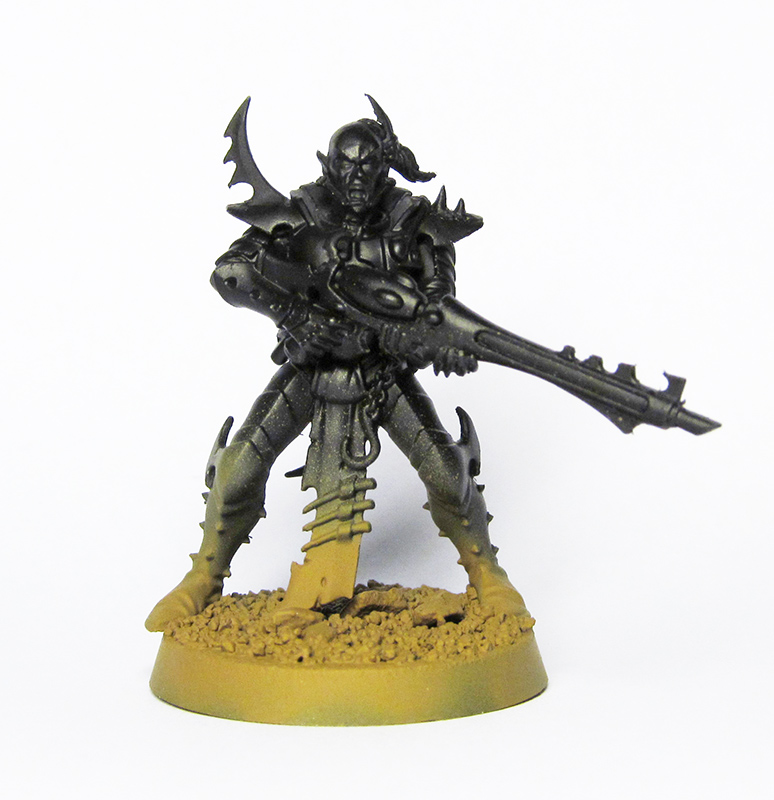
1A. I’ve primed the model with my airbrush by using black Vallejo Surface Primer (check out Garfy’s review here). Then I sprayed the sand texture with XV-88. If you don’t have an airbrush, you can use regular black spray primer and apply XV-88 with a brush of course.
1B. To finish the sand, I’ve drybrushed heavily with Terminatus Stone [Pallid Wych Flesh works as well] and gave it a generous wash of AP Strong Tone Ink [Army Painter inks have the same formula as the old Citadel washes, check out my review here, I’m not a big fan of the new Citadel shades]. I recommend to do this for as many models as possible, as the wash will take a while to dry.
1C. I’ve basecoated the brassy areas with VGC Brassy Brass, then drybrushed with Sycorax Bronze for a little more definition. I prefer to do messy techniques such as drybrushing as early as possible in the painting process, so I don’t have to worry to hit already painted areas later.
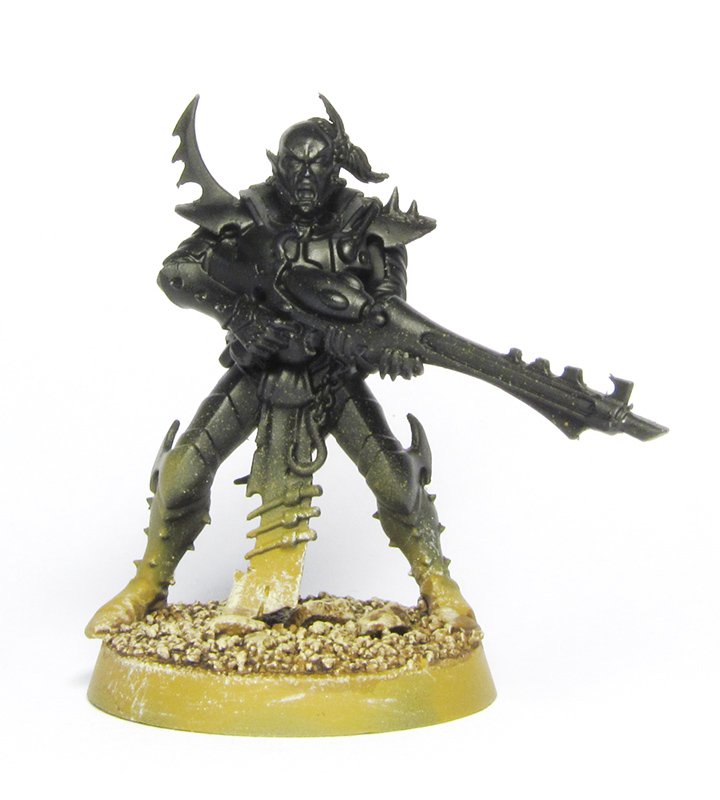
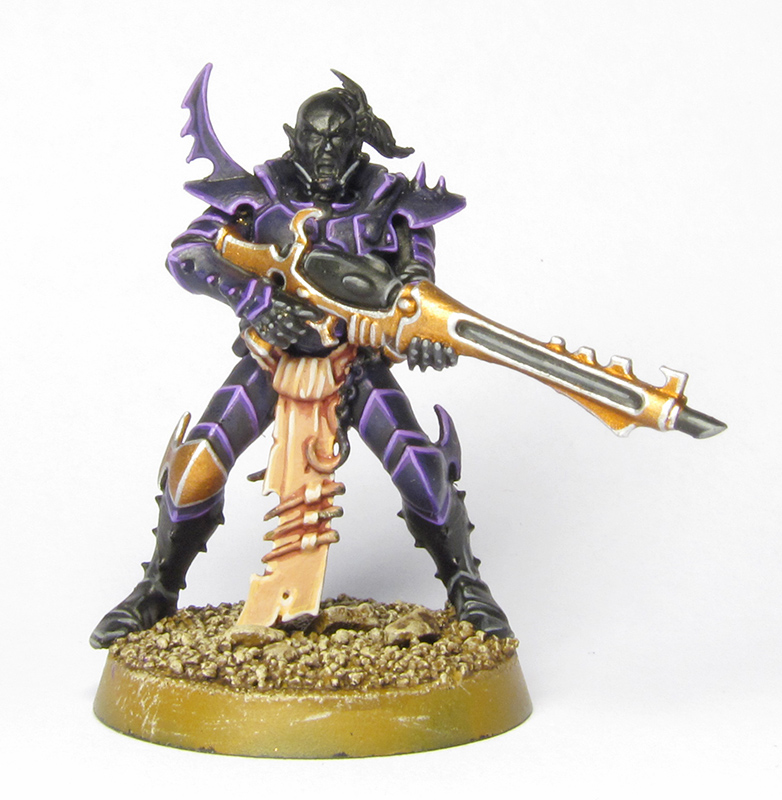
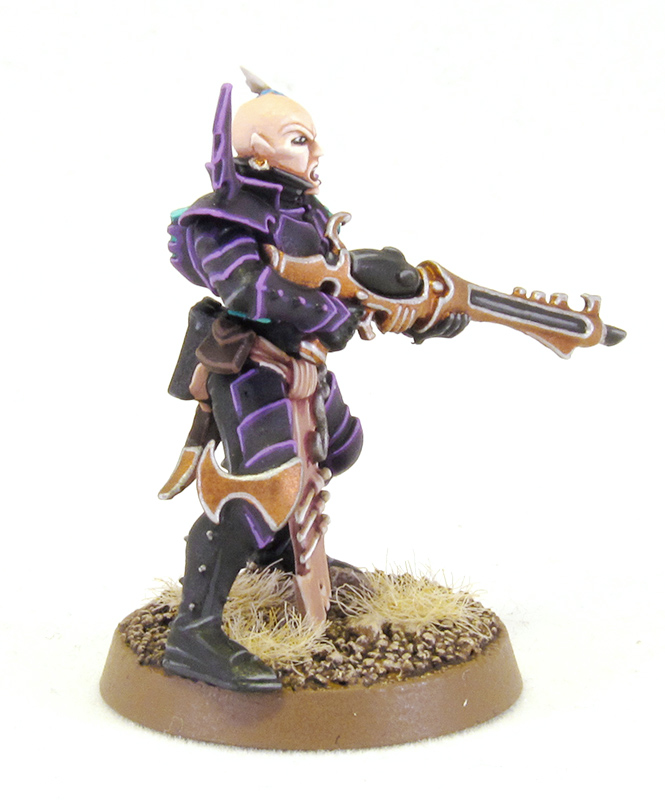
2A. I’ve basecoated the purple armour with Naggaroth Night. Then I gave the whole armour a wash of AP Dark Tone Ink [Badab Black]. As Kabalite armour is very segmented and detailed, applying a wash all over works surprisingly well. You’ll end up with a very dark, almost black purple with a subtle shading.
2B. I’ve applied the first stage of highlighting with VGC Hexed Lichen [I chose VGC Hexed Lichen over Xereus Purple, as it’s slightly more reddish and warm].
2C. For the final highlight, I’ve prepared a mix of P3 Carnal Pink and VGC Hexed Lichen. I don’t remember the ratio I used, but you need to add quite a bit of Carnal Pink as Hexed Lichen has a strong opacity. Just use the picture above for reference. P3 Carnal Pink is a very light pink, almost white. It doesn’t make the mix as dull as pure white would do. Of course you could also add pure white and a little bit of a bright red. Once my mix was ready, I applied a very thin and sharp highlight (for those interested, I use a Winsor & Newton Series 7 M size 00 for this kind of delicate brush work). If you need to cover up any mistakes, mix a little black into Naggaroth Night.
3A. Then I went for the flayed skin. I’ve basecoated with Tallarn Flesh [Cadian Fleshtone of the new paint range is close, but its coverage is so much worse], then I took Carroburg Crimson and added a little water (like 3:1 wash to water) and applied it as a glaze. I’m not a big fan of the new Citadel shades, but they are ok for glazing and Carroburg Crimson has the perfect shade for the job. Check out the picture, this is what the result should look like.
3B. Then I layered Tallarn Flesh and highlighted with Kislev Flesh and finally Pallid Wych Flesh.
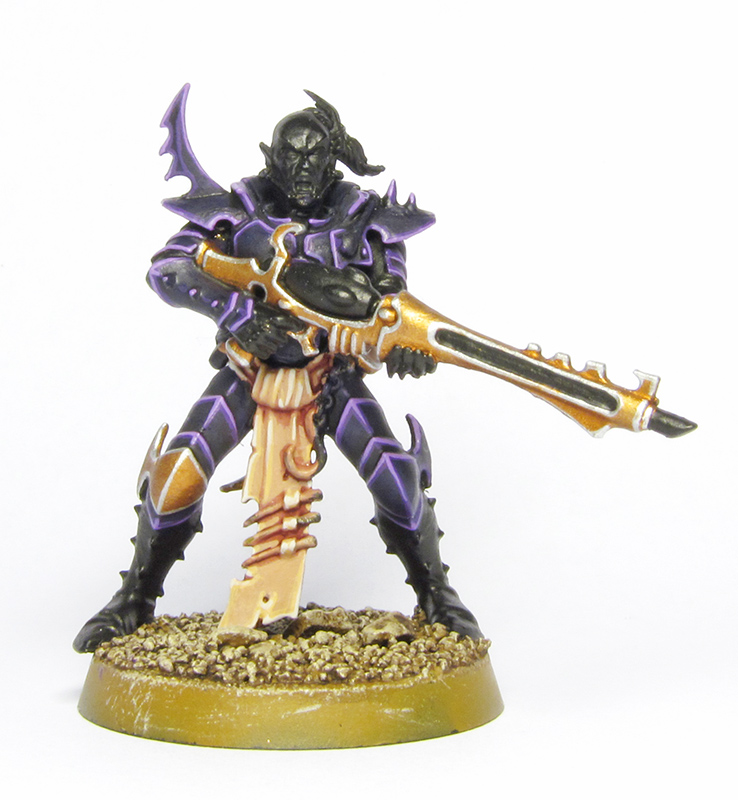
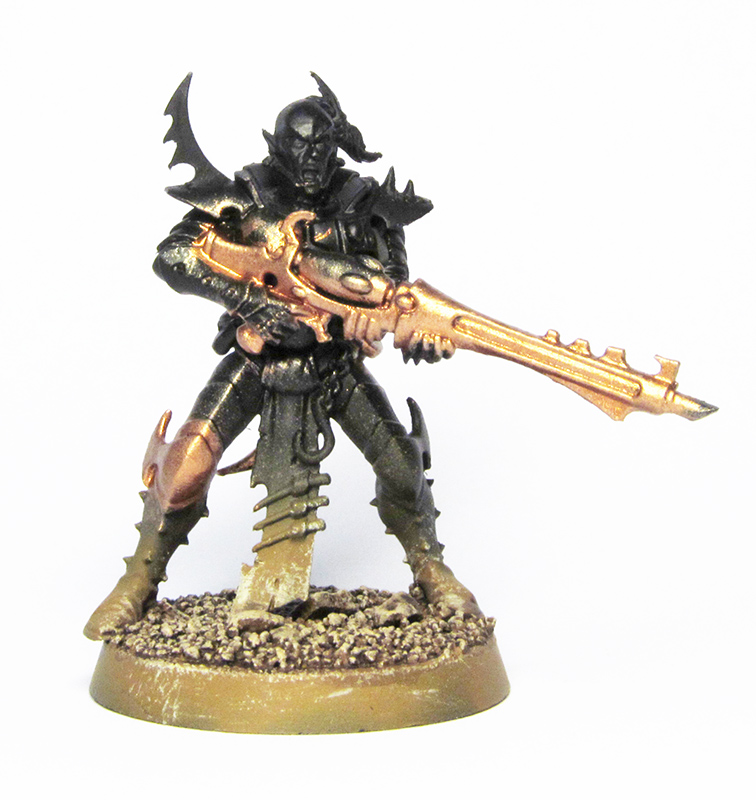
4A. Now I’ve washed the brassy parts with a generous wash of AP Soft Tone Ink [Gryphonne Sepia]. Once dry, I restored the black primer with Abaddon Black [any black will do] on areas such as the leather undersuit, the barrel of the splinter rifle and the spare ammo on the hip. Finally I highlighted the brass with AP Shining Silver [Army Painter’s silvers are the same as the ones from the old Citadel paint range, so Mithril Silver or the new Runefang Steel would be good substitutes].
4B. With the brass completed, I highlighted the black areas with Eshin Grey and then Codex Grey [Dawnstone].
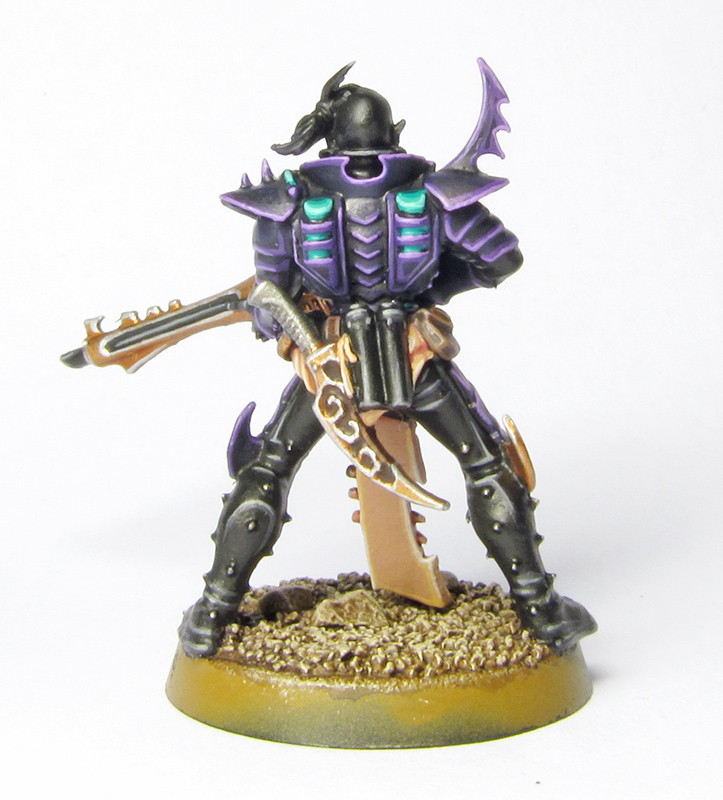
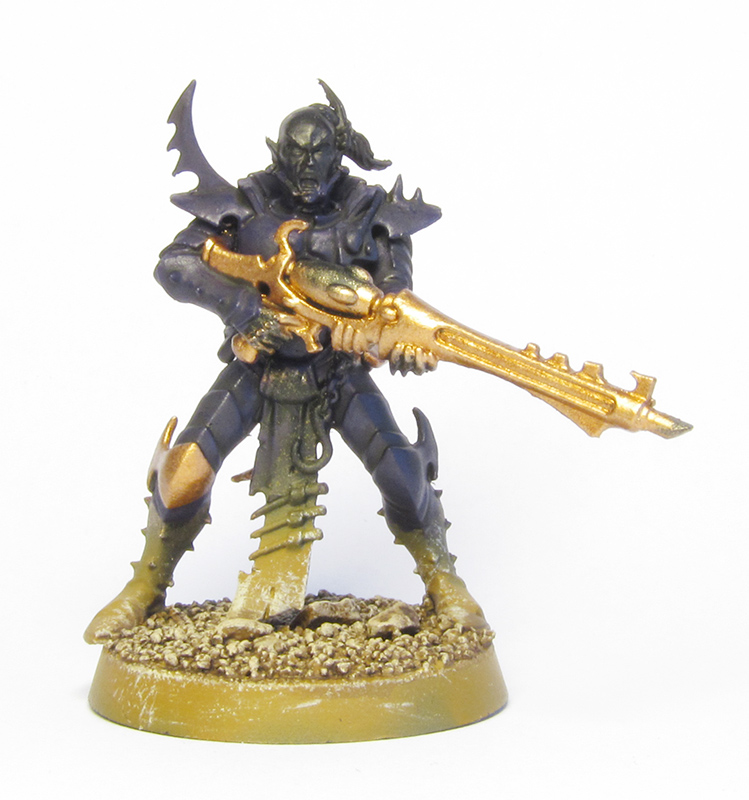
5. I painted the metal chains with AP Gun Metal [Boltgun Metal, Leadbelcher or P3 Pig Iron] and the leather straps and knive holster with Scorched Brown [Rhinox Hide]. Then I washed both areas with AP Dark Tone Ink [Badab Black]. Finally I highlighted the metal with AP Plate Mail Metal [Chainmail or Ironbreaker] and the leather with Gorthor Brown. Next up is the bone, which I painted with P3 Jack Bone. I washed a little bit of AP Strong Tone Ink [Devlan Mud] in the recesses for shading, then highlighted with Pallid Wych Flesh and finally AP Matt White [any white will do]. For the energy cells and power cables, I basecoated with VGC Scurvy Green, then layered VGC Jade Green, after that I highlighted with VGC Foul Green and finally Reaper Master Series Mint Green [if you don’t have it, you can also mix white into Foul Green]. For the gem on the chest I added a small dot of thinned AP Matt White – see the next picture.
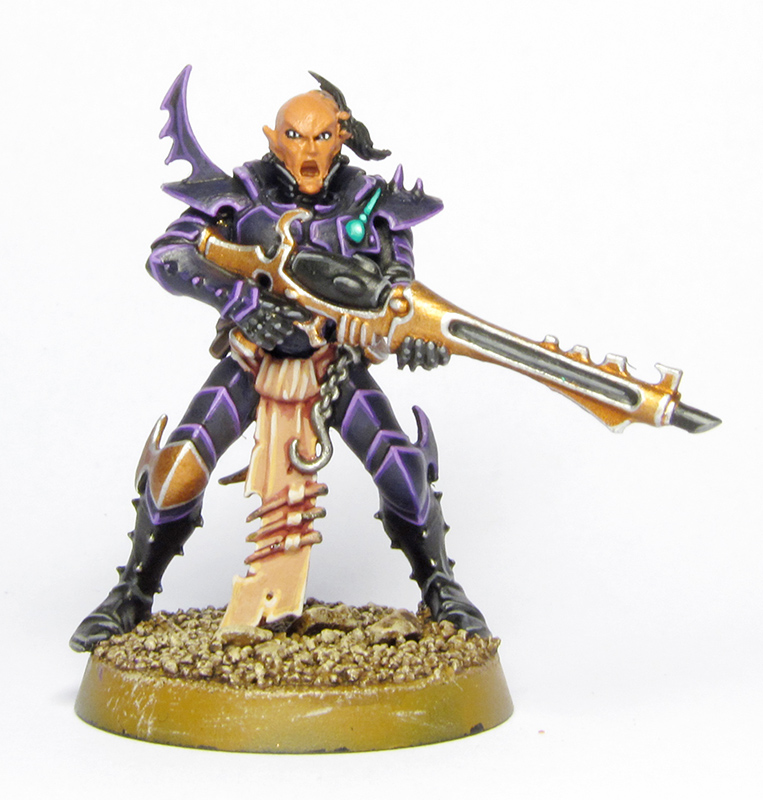
6A. Now it’s time to paint the bare head. First, I’ve painted the eyes as I’ve layed out in this tutorial. Then, I basecoated the flesh with P3 Khardic Flesh, carefully leaving a thin black line around the eyes.
6B. Next I layered P3 Midlund Flesh, leaving Khardic Flesh in the recesses around the eyes, nose and mouth, as well at the hairline and where the neck meets the collar. For female faces, I would only leave Khardic Flesh around the hairline and the collar to make the facial features softer.
6C. The next layer was P3 Ryn Flesh.
6D. Then I highlighted with VGC Pale Flesh.
6E. Finally I highlighted with thinned P3 Menoth White Highlight [VGC Off White] to complete the pale look.
7. The blue hair and ribbons were basecoated with VGC Electric Blue and washed with a 3:1 mix of Asurmen Blue and Waywatcher Green. Then I layered with VGC Electric Blue and highlighted with a mix of Electric Blue and AP Matt White.
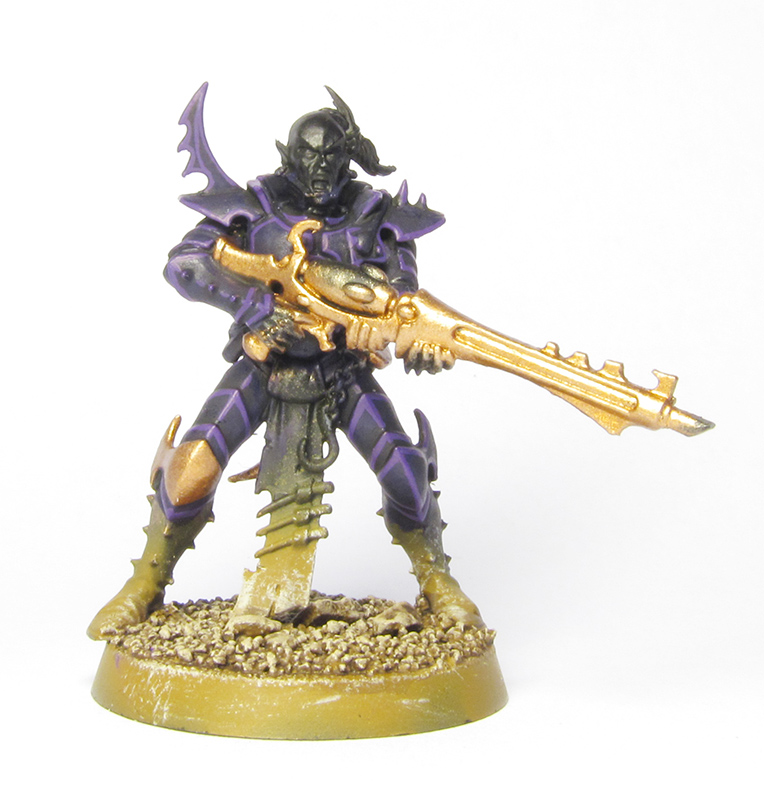
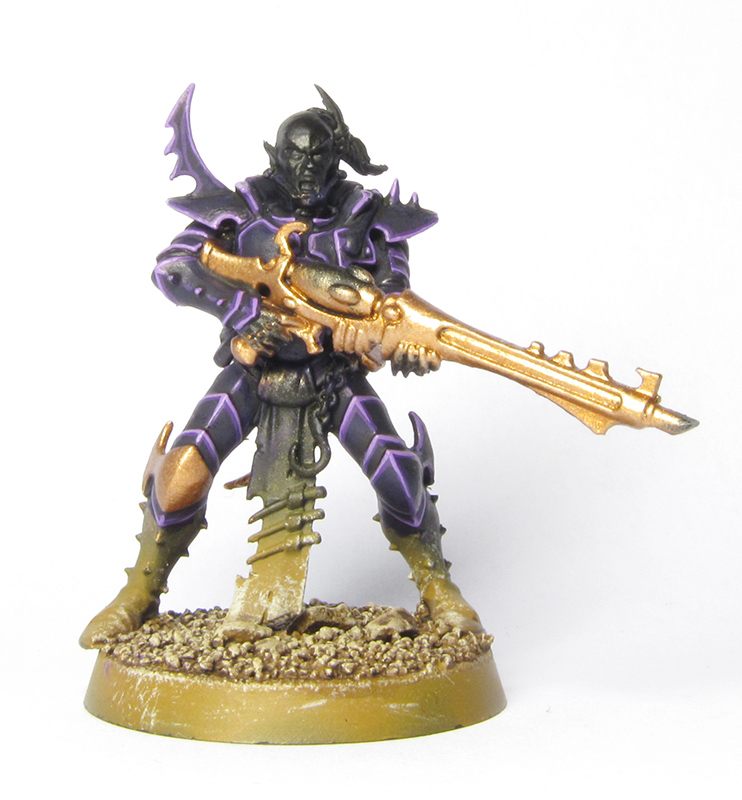
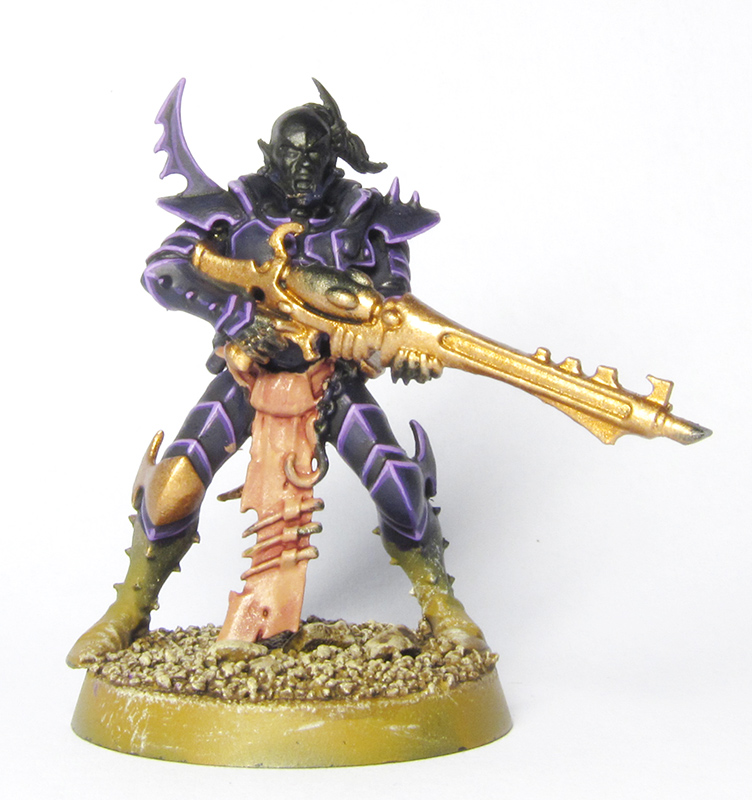
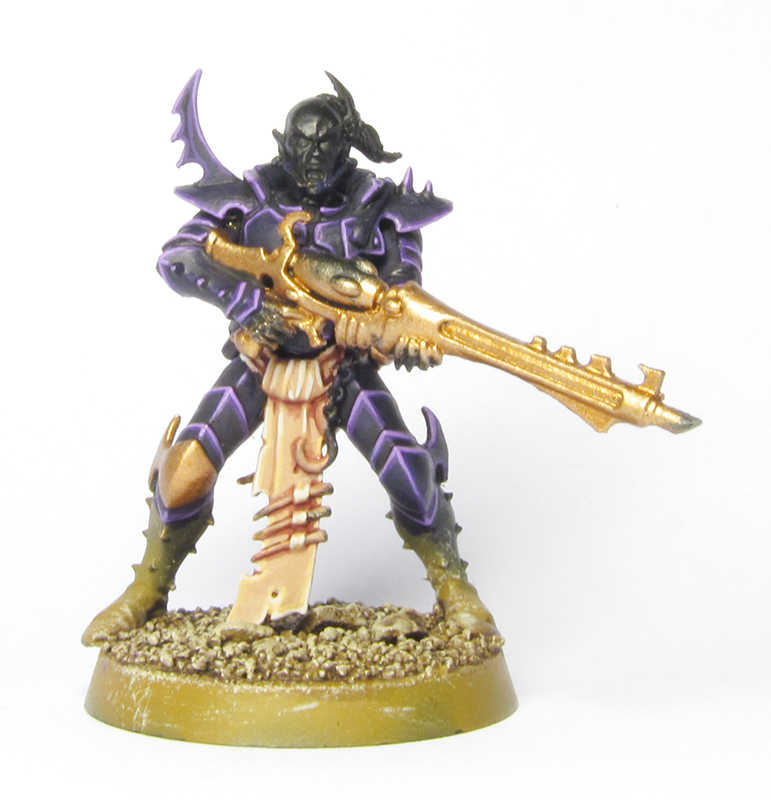
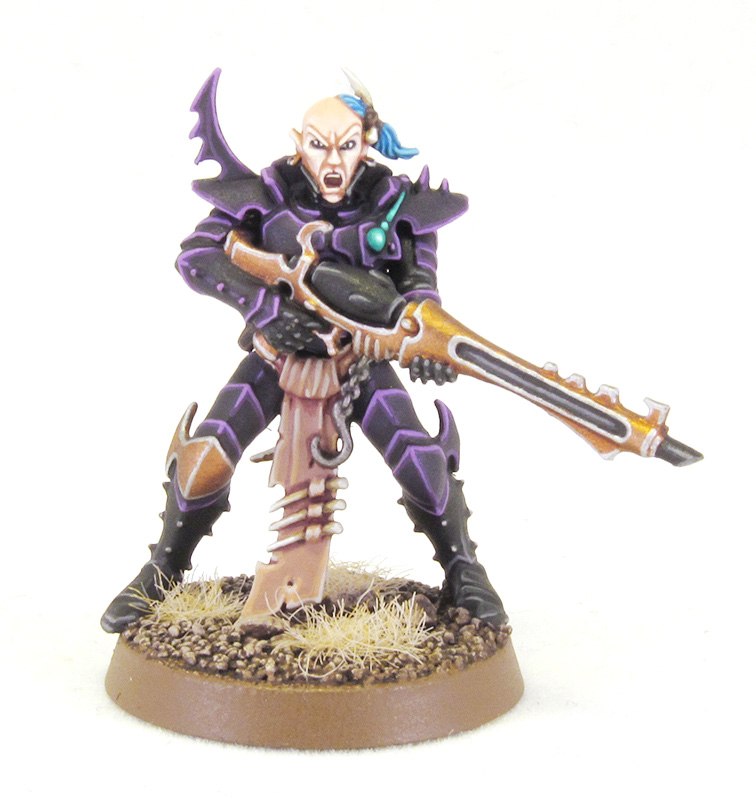
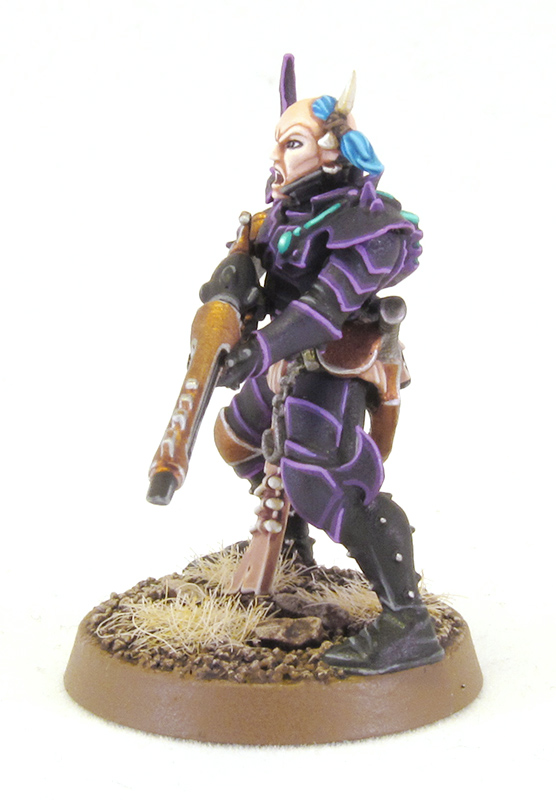
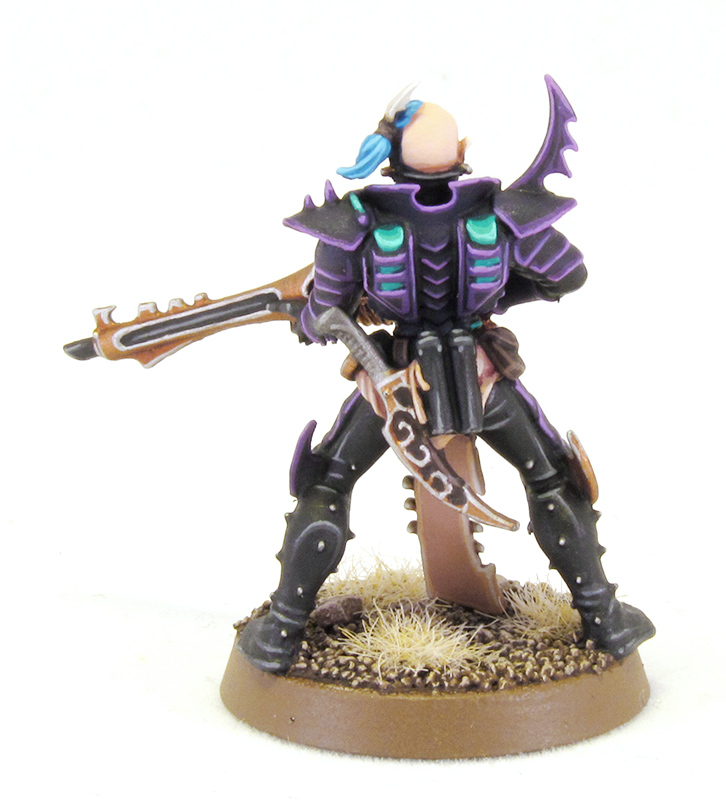
8. To complete the model, I painted the base trim with Steel Legion Drab [Graveyard Earth] and glued patches of bleached static grass (“arid grass” from Gale Force 9) to the base. Finally I hit the model with a coat of matt varnish. Below you can see a couple of shots I took of the finished model in my light box, so the colours should be a bit more true to life than on the pictures above.
And that’s it! Hope you enjoyed the tutorial. If so, leave a comment for me. You might notice that my helmet wearing Kabalite Warriors feature glowing eyes, which isn’t covered in this tutorial. I will explain my technique for glowing eyes in a future post, so stay tuned!
Do you like our tutorials and reviews? Here is what you can do to support us: Check out the websites of our sponsors, place your next orders at Wayland Games by clicking here or on the banner on the right. Thank you very much, we appreciate any help to keep us going!
15 Comments
Leave a Reply
Tale of Painters is the unofficial Warhammer hobby magazine run by hobbyists like you. Support our work by using the affiliate links from our 🇺🇸 / 🇨🇦 partner stores for your next orders so we can continue to bring you fantastic FREE content every day:


Or support us directly:


just wondering what you mean by 'layering' after you shade? is that just painting the shaded area, but leaving the really shaded parts up?
Nice add for someone like me that hasn't been following the site for years. Almost enough to make me want to paint my old 3E DE. But boy that is a lot of paint.
The 3E Warriors are surprisingly fun to paint! I dug my own out a while back and started painting them up to work my way toward the newer DE range: https://imgur.com/a/UQtsL
I though you didn't have an airbrush Stahly…
Hi, I do think this is an excellent website. I stumbledupon it
😉 I may revisit yet again since i have book marked it.
Money and freedom is the greatest way to change, may you
be rich and continue to guide other people.
Here is my web page; Cheap Louis Vuitton Handbags
I've been browsing online more than 2 hours today, yet I never found any interesting article like yours. It's
pretty worth enough for me. In my view, if all
webmasters and bloggers made good content as you did, the web will be much more useful than ever before.
Here is my homepage :: http://www.tedxyse.com
Thanks for the tutorial, seeing your purple color scheme got me pumped about doing some of my models in a similar way. I did some Dire Avengers and was very pleased with the results! I'll have to incorporate more highlights on my blacks and metals, to get that extra depth.
Cool, please share the link when you've painted them 🙂
Okay, finally had a sunny day in Chicago to take some pictures. Let me know what you think, I'm still very much an amateur painter 🙂
Terrific tutorial! I like your photos, what camera do you use?
Actually a rather cheap cam, a Canon Powershot SX150 IS, but it has a nice optical zoom and 14 MP so get quite large macro photographs out of it.
Nice tutorial, thank you. I have use for this, even though I'll probably paint a kabalite / sybarite green scheme.
Love the super-up-close photos! Makes me feel a lot better about having such obvious brush strokes at the 6-inches-from-face view. The tutorial is awesome as well! Thanks for posting this.
Excellent tutorial, and fantastic brushwork! I must get some of the AP washes!
Brilliant tutorial. My only advice would be to number the pictures. Just makes it that little bit clearer.
Well done though mate. I suppose I have to do a Necron one now to keep up! 😀