
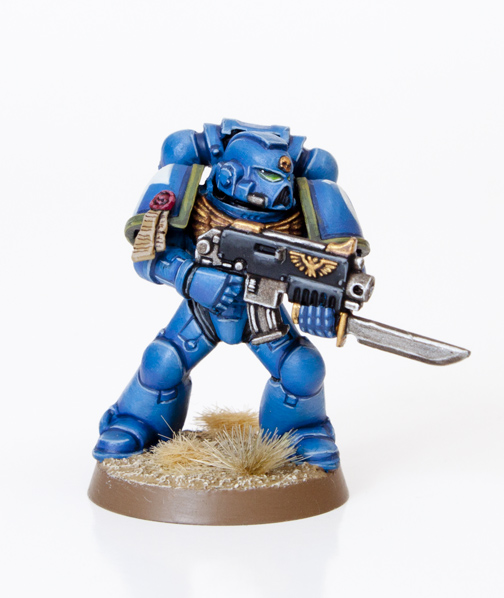
This is a very special tutorial and bit of an exclusive for Tale of Painters. This is the tutorial and the original images that White Dwarf used for their 2013 October issue. Obviously the magazine has to be concise and appeal to all ages, so I thought it would be cool to post this on Tale of Painters in our familiar format for those people who wanted the stages elaborated or for the people that missed it in the magazine. You can still buy the issue in iPad format which I highly recommend.
I’ve designed this tutorial so established painters find it interesting but also so new comers to the hobby can learn some basic and advanced techniques. I will use terms such as glazing and washing, don’t worry if you don’t know what these mean because I will elaborate and explain during that step.
Paints you will need for this tutorial:
Black Undercoat spray
Caledor Sky (base)
Macragge Blue (base)
Hoeth Blue (layer)
Kantor Blue (base)
Fenrisian Grey (layer)
Castellan Green (base)
Loren Forest (layer)
Elysian Green (layer)
Gehenna’s Gold (layer)
Agrax Earthshade (shade)
Auric Aarmour Gold (layer)
Leadbelcher (base)
Runefang Steel (layer)
Eshin Grey (layer)
Dawnstone (layer)
Warpstone Glow (layer)
Moot Green (layer)
White Scar (layer)
Tallarn Sand (layer)
Karak Stone (layer)
Rhinox Hide (base)
Khorne Red (base)
Pink Horror (layer)
Ulthuan Grey (layer)
Armageddon Dust (texture)
In case you need to expand your paint collection, head over to Wayland Games or Slave to Painting, which both stock a huge selection of paints at competitive prices.
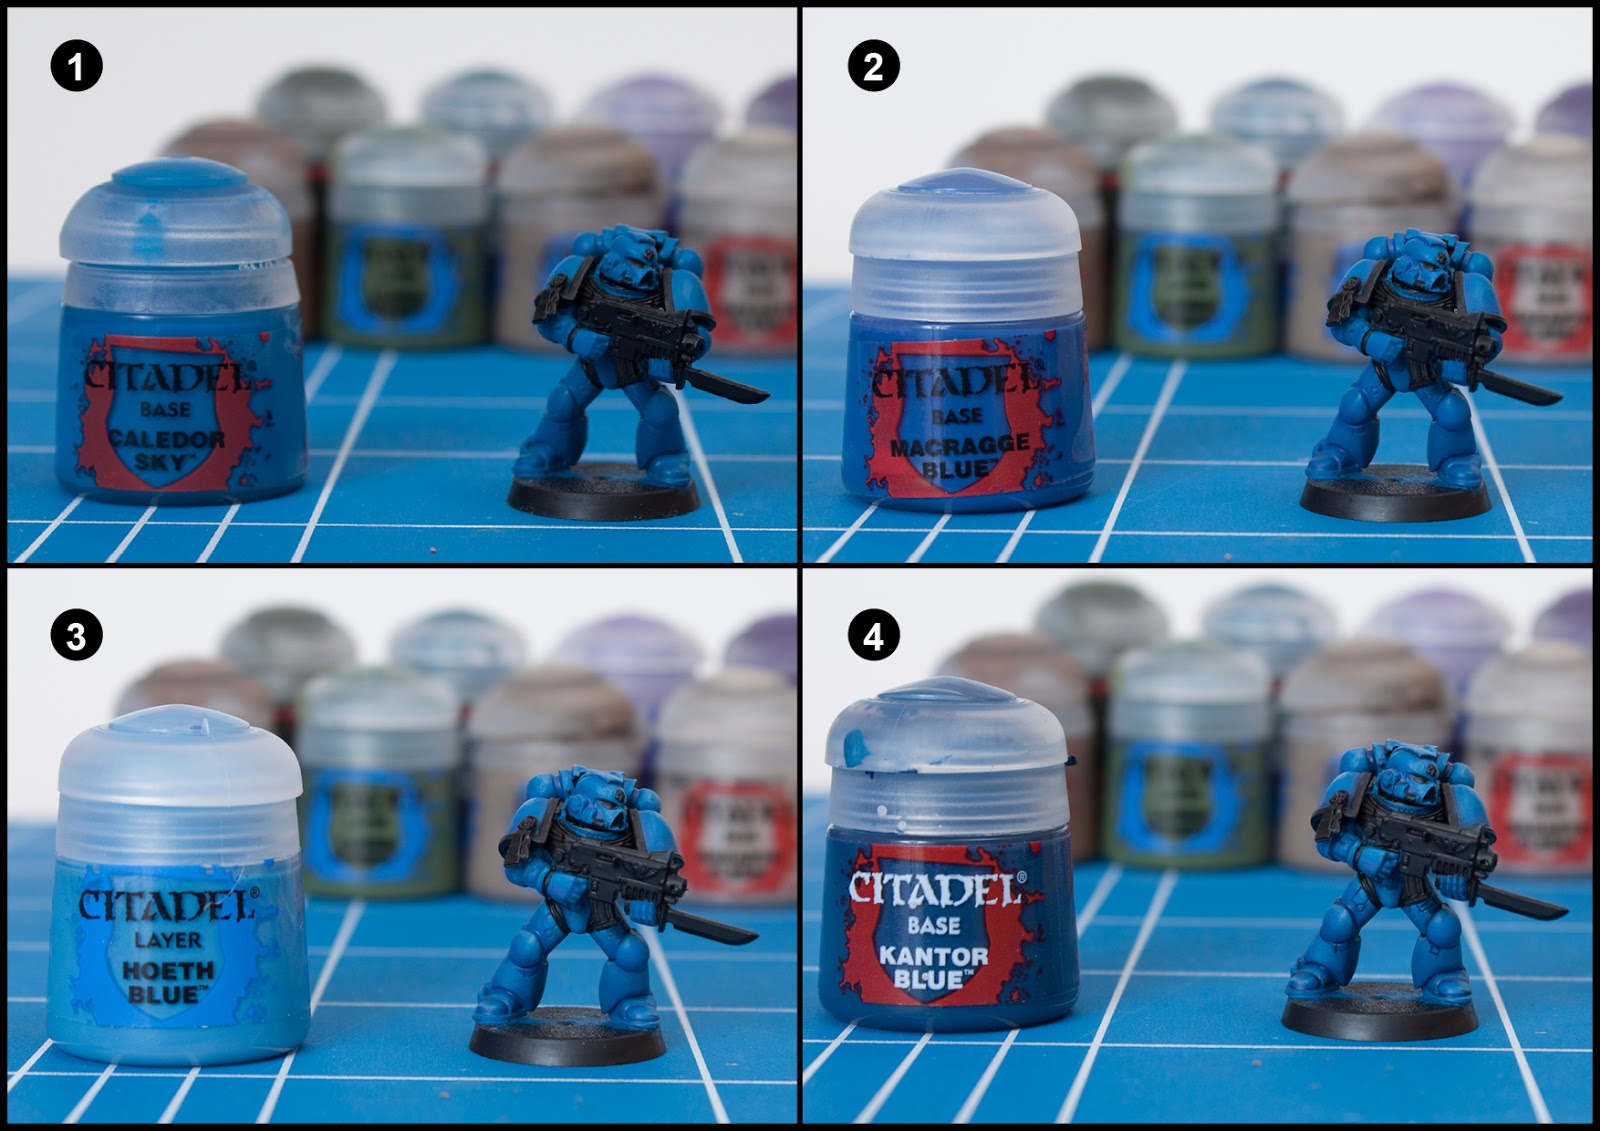
1. Basecoat the model with Caledor Sky.
2. Create a glaze by mixing Lahmian Medium with Macragge Blue (50:50) and shade the lower half of all the armour sections. Repeat this two to three times to build the shading up with this translucent mix.
3. Create a glaze by mixing Lahmian Medium with Hoeth Blue (50:50) and area highlight the upper half of all the armour sections. Repeat this two to three times to build the brightness up with this translucent mix.
4. Add a small amount of water to Kantor Blue on a mixing palette and then paint all the armour joins/gaps.
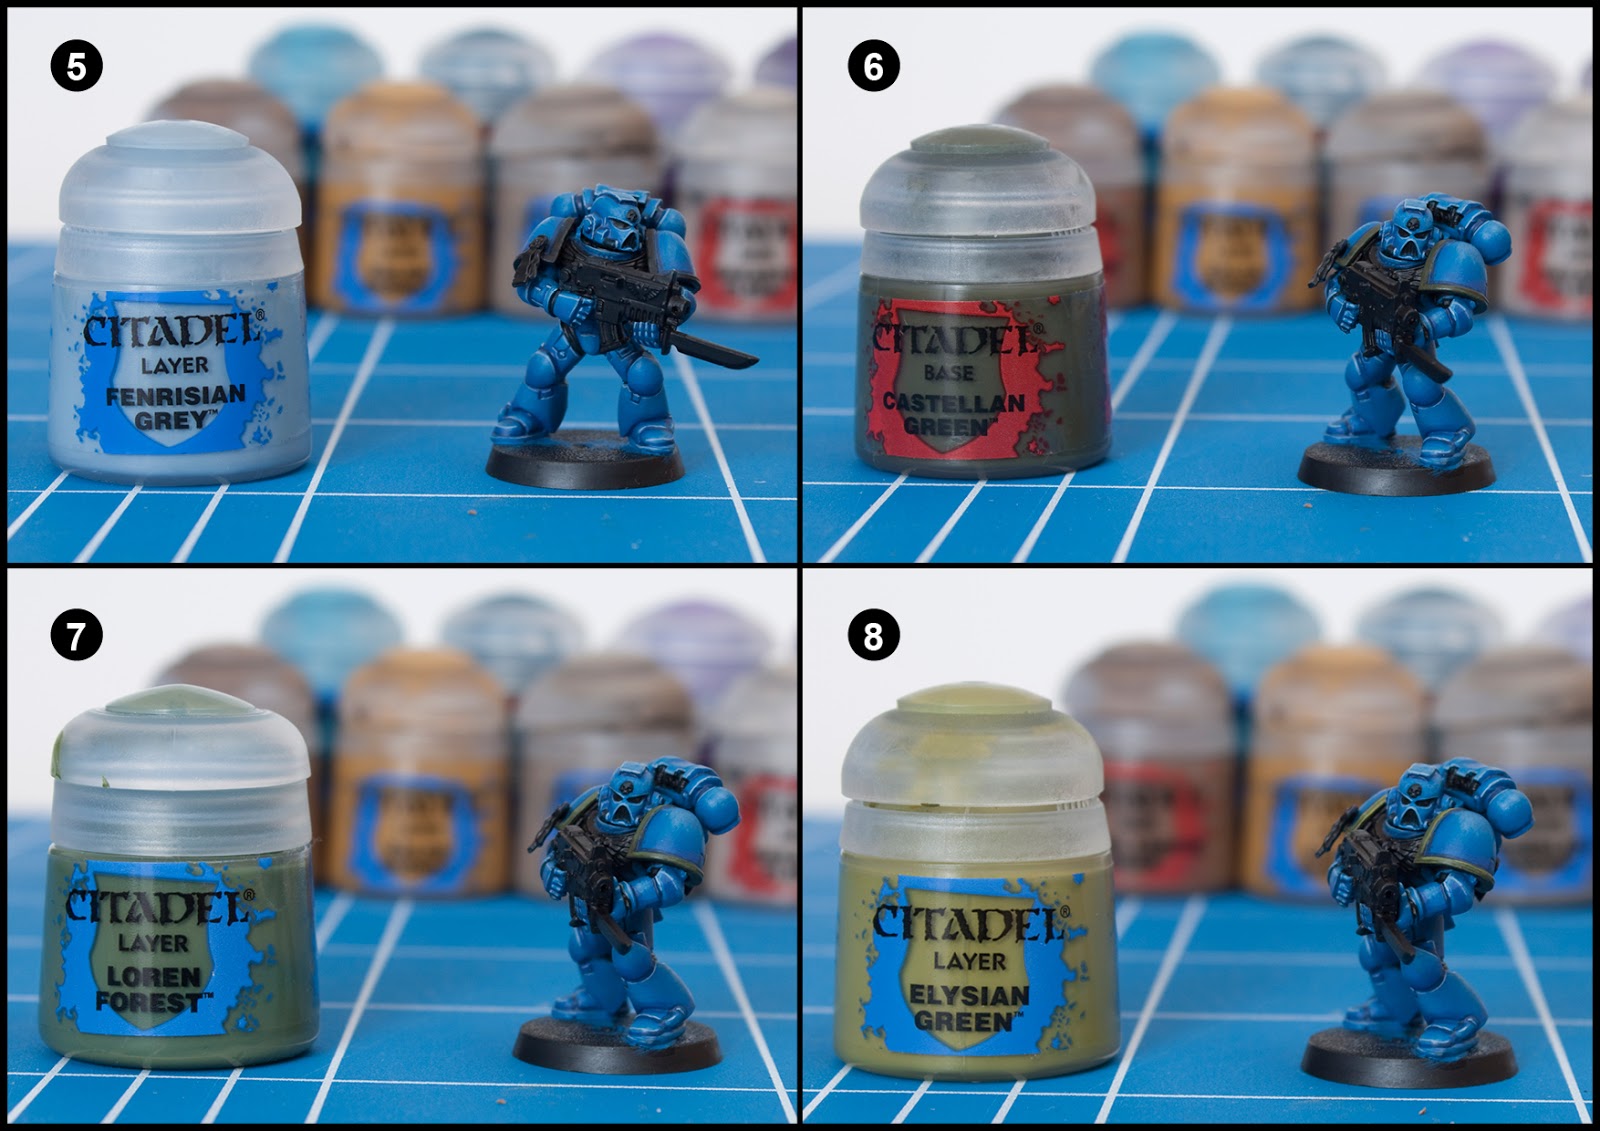
5. Using a fine detail brush, edge highlight the upper edges of the armour with Fenrisian Grey.
6. Paint the armour trim with Castellan Green if you want to paint the 4th company.
7. Highlight the edges of the trim with Loren Forest.
8. One final thin edge highlight of Elysian Green finishes off the trim.

9. Paint the chest Aquilla and parts of the bolter with Gehenna’s Gold. A touch of Lahmian Medium really helps smooth out metallic paints.
10. Wash all the gold areas with Agrax Earthshade to add some darker shading.
11. Highlight the edges of the gold with Auric Armour Gold.
12. Paint the gun metal parts of the bolter with Leadbelcher. Also pick out the tubes on the helmet and the vents on the backpack.

13. Wash these metallic areas with Agrax Earthshade.
14. Edge highlight the previous stage with Runefang steel.
15. Area highlight the upper halves of the bolter casing with Eshin Grey.
16. Area highlight the upper quarter of the bolter casing with Dawnstone. Creating a glaze with Lahmian Medium and painting on a couple of layers is a better way to blend colours.
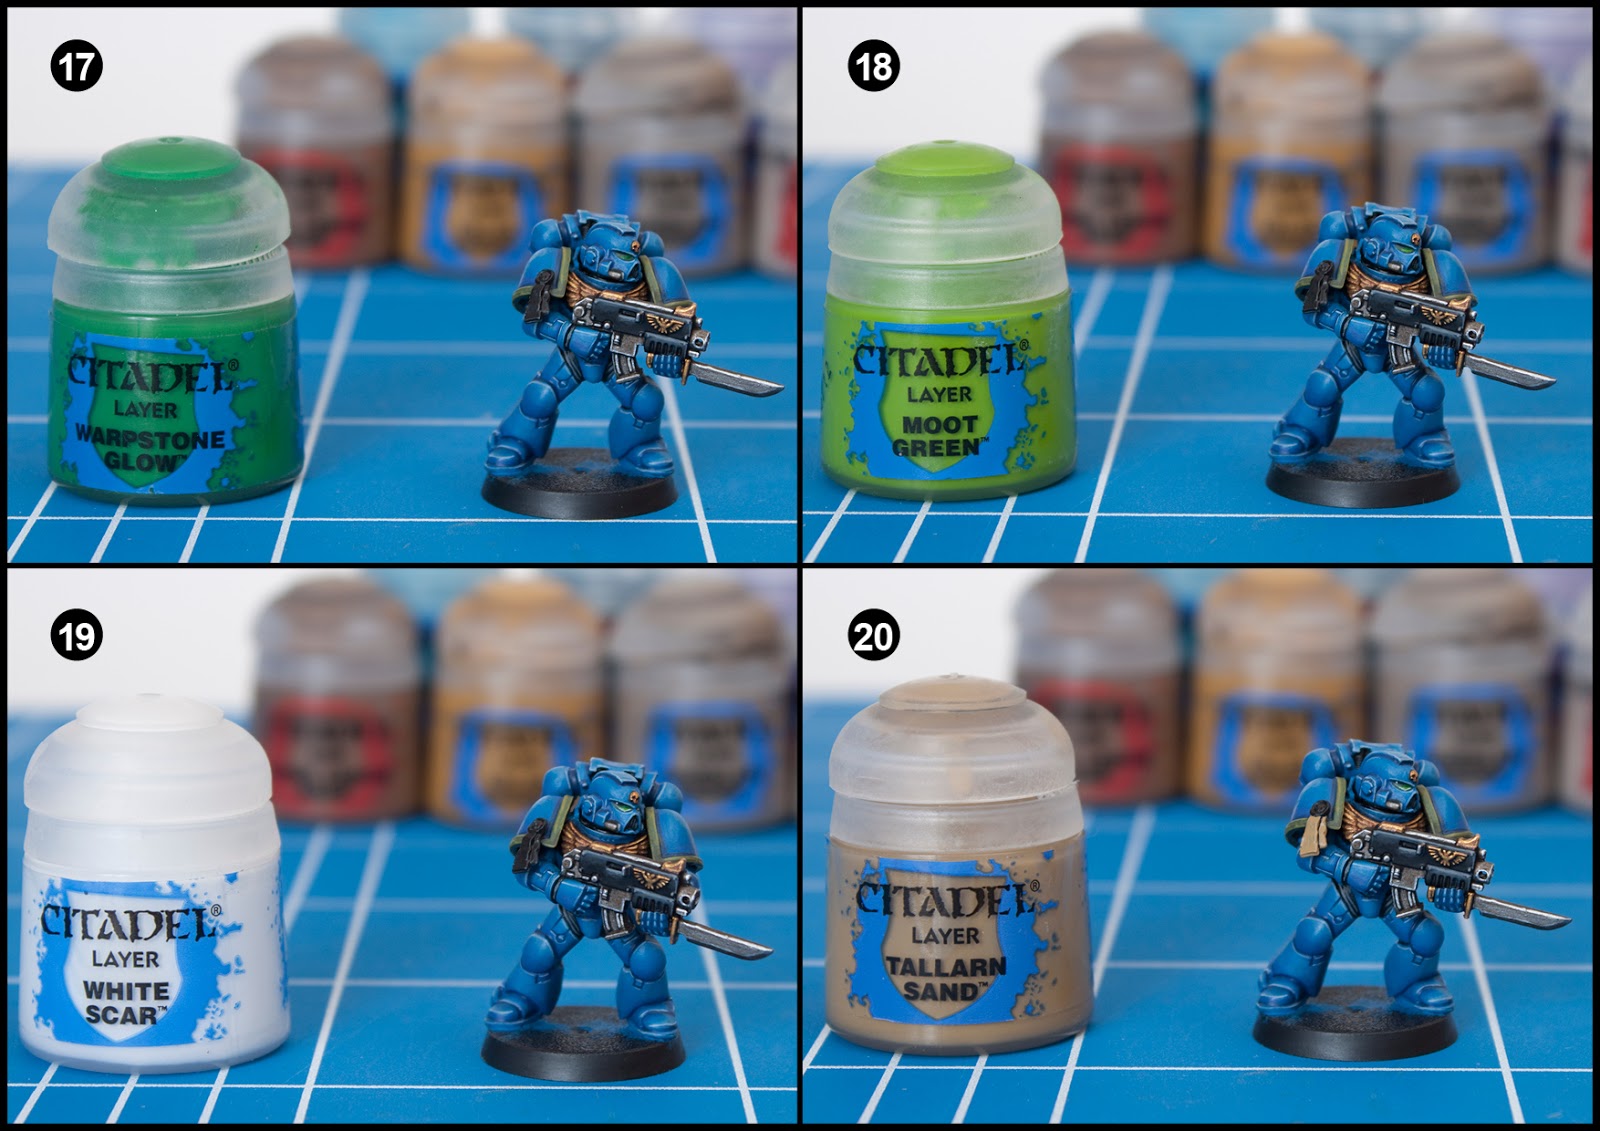
17. Paint the corner of the eye lens with Warpstone Glow leaving a black area in the outer edges.
18. Paint a line of Moot Green along the bottom of the lens.
19. Paint a really thin line of White Scar on the previous step. I find watering my paints down increases fluidity from the bristles and makes me more accurate.
20. Paint the parchment on the purity seal with Tallarn Sand.

21. Highlight the previous step with Karak Stone.
22. Paint some thin lines to represent text on the parchment part of the purity seal. I find Rhinox Hide is better than black for this.
23. Paint the wax seal of the purity seal with Khorne Red.
24. Highlight the wax seal with some small highlights of Pink Horror.

To freehand the icons thin your paints with water, try to paint in as few strokes as possible to minimalise brush marks and paint think multiple layers. It’s time consuming but worth it. Make sure you do this for each of the remaining steps. Skip this section if you plan to use transfers.
25. Using Fenrisian Grey, paint four dots as a guide for the U symbol.
26. Join the dots with curved lines to create a circle and paint a bar across the the top.
27. Fill the shape in by painting a few thin layers of Fenrisian Grey.
28. Paint an inner circle of Caledor Sky within the top half of the Fenrisian Grey shape. This will give you that nice thick bottom U. Then paint a vertical blue line through the bar at the top.

29. Highlight the Icon with Ulthuan Grey to make it a little lighter.
30. Use the image at the top as a guide for the position of the dots for the tactical symbol.
31. Join the dots up to create the outline of the symbol.
32. Fill the outline in with thin, multiple coats of Fenrisian Grey.

33. Highlight the icon with Ulthuan Grey to make it a little brighter.
Finally, base the model in a way which fits in with your own army or gaming table. I’ve used Steel Legion Drab for the rim, Armageddon Dust for the base top and then drybrushed with Screaming Skull. Drybrushing is a way of picking out raised detail quickly usually with a lighter colour. To dry brush you need load up your brush with paint and then wipe it off the bristles on a tissue until virtually no paint remains on the brush. Then rapidly and repeatedly drag the side of the brush back and forth over the area to be painted.
You can view other Space Marine tutorials using these quick links. Imperial Fist, White Scars, Iron Hands, Salamanders, Sons of Horusand Minotaurs
Do you like our tutorials and reviews? Here is what you can do to support us: Check out the websites of our sponsors, place your next orders at Wayland Games by clicking here or on the banner on the right. Thank you very much, we appreciate any help to keep us going!

27 Comments
Leave a Reply
Tale of Painters is the unofficial Warhammer hobby magazine run by hobbyists like you. Support our work by using the affiliate links from our partner stores for your next orders so we can continue to bring you fantastic FREE content every day:


![]()
![]()
Or support us directly:


GW is releasing the USD $100 starter boxes. Can we have tutorials on those please?
This is a super-basic question, somewhat embarrassingly so, but it seemed worth asking here. The photos make it apparent you're painting a based model rather than painting the model and base separately like a lot of other high-end painting tutorials recommend- I've always been leery of this approach because it seems like seating the model's feet properly on a textured surface would be too difficult or prone to error, and as such I've been using texture paints as I slowly learn better painting technique. Anyway, here's the dunce question:
How do you achieve such a perfect application around the model's feet? Is there a tool you'd recommend for this? I've tried both a cheap flat (shader) paintbrush from an art supply store and the "official" GW texture base tool, and while the latter is definitely an improvement, it's still quite easy to accidentally get hard-to-remove grit on the model's feet. What's your method for neatly applying texture paint?
It is steps 15 and 16. It's the only grey paint in the tutorial.
You used Eshin Grey and Dawnstone, which are two grey paints you used in the tutorial (so it's not the only grey paint in the tutorial). That's why I asked which of the two you used for highlighting the black armour joints.
Oh right, and you used Fenrisian Grey also, so there are 3 grey paints in the tutorial.
Thanks in advance,
Nick
Garfy,
can you tell me which colour you used to to highlight the black armour joints ? It isn't mentioned anywhere in the tutorial, but going from step 15 to 16 you can clearly see it has been done.
Thanks.
This is really a masterclass of a tutorial!!
Thankyou!!!
Glad you like it.
Hello,
I find this one of the best tutorials to paint Ultramarines and I iwll be using it myself to paint my new UM army with it.
I do however have one question : at some point (from step 15 to step 16) you notice that the black armour joints have been highlighted with grey. Did you do this with the Eshin Grey or with the Dawnstone ? You can clearly see on the foto that it has been highlighted, but it is never mentioned in the tutorial itself.
Thanks in advance and certainly keep on painting, doing great job and making great tutorials (do a Dark Angels one maybe, very curious about the colour scheme you would use for them).
Nick.
NM my comment about the Dark Angels, just found Stahly's tutorial about them and looks great also !
Thanks.
The tutorial is great. I am going to use this for my new UMs. I just wanted to ask if you would recommend any washes on the armour? I am thinking that painting the rivets and panels with kaledor blue would be difficult.
You can create a wash from any dark blue paint mixed with Lahmian Medium or Vallejo glaze medium.
This comment has been removed by the author.
Thanks. Make sure you send me pics on our Facebook group of your ultramarines painted using this guide and I'll repost for the group
Can you please make such a great tutorial about cadian imperial guard ??
Garfy, this is probably one of the best tutorials on ultramarine's since the release of the new paint line. I gotta give it to you. I haven't seen the ultramarines in the new white dwarf.
What I would love to see is your take on the Dark Angels. I know its probably one of the easiest schemes to do, being straight forward and all, but I'm sure there are a few tips or tricks to get them to come out right and not looking like something out of the Tron movies.
I loved your review of the paint line you did with your wife. Excellent stuff there. So, if you can find the time and break down a tutorial I'd appreciate it. Sincerely, your biggest fan!
I do have the Dark Angels from Dark Vengeance still. It would be awesome to do a Dark Angel tutorial. However Stahly has a really cool tutorial already so my time might be better spent offering a different tutorial.
I have so much on my painting table at the moment I feel like I'm drowning. I just need to keep chipping away at these projects. I need to start painting my trolls from the hobbit so I can document it and make a tutorial. But I'm painting a Helbrute at the moment and after that I need to convert a goblin riding a wolf for a competition, then after that I need to finish building my Doomsday Arc…. arrrgh too much 🙁
Hope I hit the right reply and I'm inline, but anyways! Here goes! Hey its all good man, I over came my problem, its just with greens you have to be extra careful or your stuff can go 1982 TRON on you. I appreciate the reply and yea its two years later and all, but what I did was just went with a muted highlight a lot like in your review as stated above with the Mrs. Just by adding simple 1 to 2 ratios with bleached bone Ala dark angels green. Customer was happy with his two squads. As for myself I'm going ahead and starting my Blood Ravens force. Thinking I can go two ways, generic codex or if I want to dark angel codex since they have similarities. Or from what I'm reading both in 7th edition. I haven't played since the third. Painting over took me, people like what I brought to tables and word of mouth, yadda yadda…
Your a great inspiration man! I dig your photos from time to time in the white dwarf issues. And I lurk, sometimes post in PYGS. Again probably the best painting/hobby group on Facebook.
So I have three sheets of blood raven transfers on order, along with that cool looking commander with the banner bearer, I dig that model. (I don't own a laser jet so I can't print decals and I really want a uniform look on my guys when they're done.) I'll post progression on PYGS, but the off-season for painting is approaching – summer and I don't mix well when I want to paint, but late night… etc…
Alright man sorry for the long reply and again I hope i'm in the right line, take care dude!
As always, a terrific tutorial. I'm an enormous fan of your work here at ToP; when I saw them pop up in WD I thought this guy simply must be Garfy! I always think it's a shame that WD water down their tutorials so much to about 5 steps, when it's so clear that more are involved.
I think I've found the colours and methods to paint up my space marines thank you. With the release of the Farsight supplement have you considered a painting tutorial on the Farsight Enclaves on a Battlesuit or Firewarrior?
I haven't considered it. I have done a T'au scheme which proved popular.
Best looking Ultramarine I've ever seen. Cool, bright, shining blue with that sexy kind of shading. Wow! I'll use this tutorial for my next space marines. Your Hobbit-Tutorials already worked wonders for my dwarfes and goblins. Thank You so very much…
Great tutorial and thanks for posting! Love your style and I've wanted the recipe for your Ultramarines for a while. Going to give this a go with my latest batch of 4th Co Ultramarines – paints ordered 🙂
Garfy,if you had only posted this one day earlier it would have changed my mind from turning to start chaos space marines instead of ultramarines – but alas… Great tutorial and have well done on getting it in the White Dwarf
Great tutorial! My brother has the Ultramarines 4th company and he used brighter greens like Snot Green and Goblin Green at the time. His are also a bit of a darker shade of blue. Other than that, the models look very similar. Do you have a Uriel Ventris model?
You make it look so easy, nonetheless I applaud your shading and freehand skills.
One thing I'd like to know is do you remove the bolter from the model to get to the aquila and the rest of the torso are or are you just pure professional and can get behind it with ease?
Thanks for the kind words. It's always best to paint any model in sub assemblies if it makes it easier to reach those hard to get places. However in this case the bolted was glued in place for the purpose of this tutorial.