
Recently, I painted a Championess of the Infernal Cohort of the Helsmiths of Hashut. For this, I chose the black, gold, and yellow of Muspelzharr. In this step-by-step tutorial, I’ll show you how you can easily replicate this.
This tutorial assumes that you are familiar with the fundamental techniques of painting Warhammer miniatures. I will guide you step-by-step through the paints and techniques I utilized. Since my paint collection is quite varied, I will offer suitable alternatives from the current Citadel paint range [in brackets] whenever I use a paint that is not from Games Workshop or is out of production. However, if your goal is to replicate the exact outcome displayed, I suggest expanding your paint collection.
You’ll find a list of all the paints used in this tutorial at the end of the post.

How to paint Muspelzharr

After assembling the model begin by priming the model(s) the black primer of your choice, I used AK Fine Primer Black.
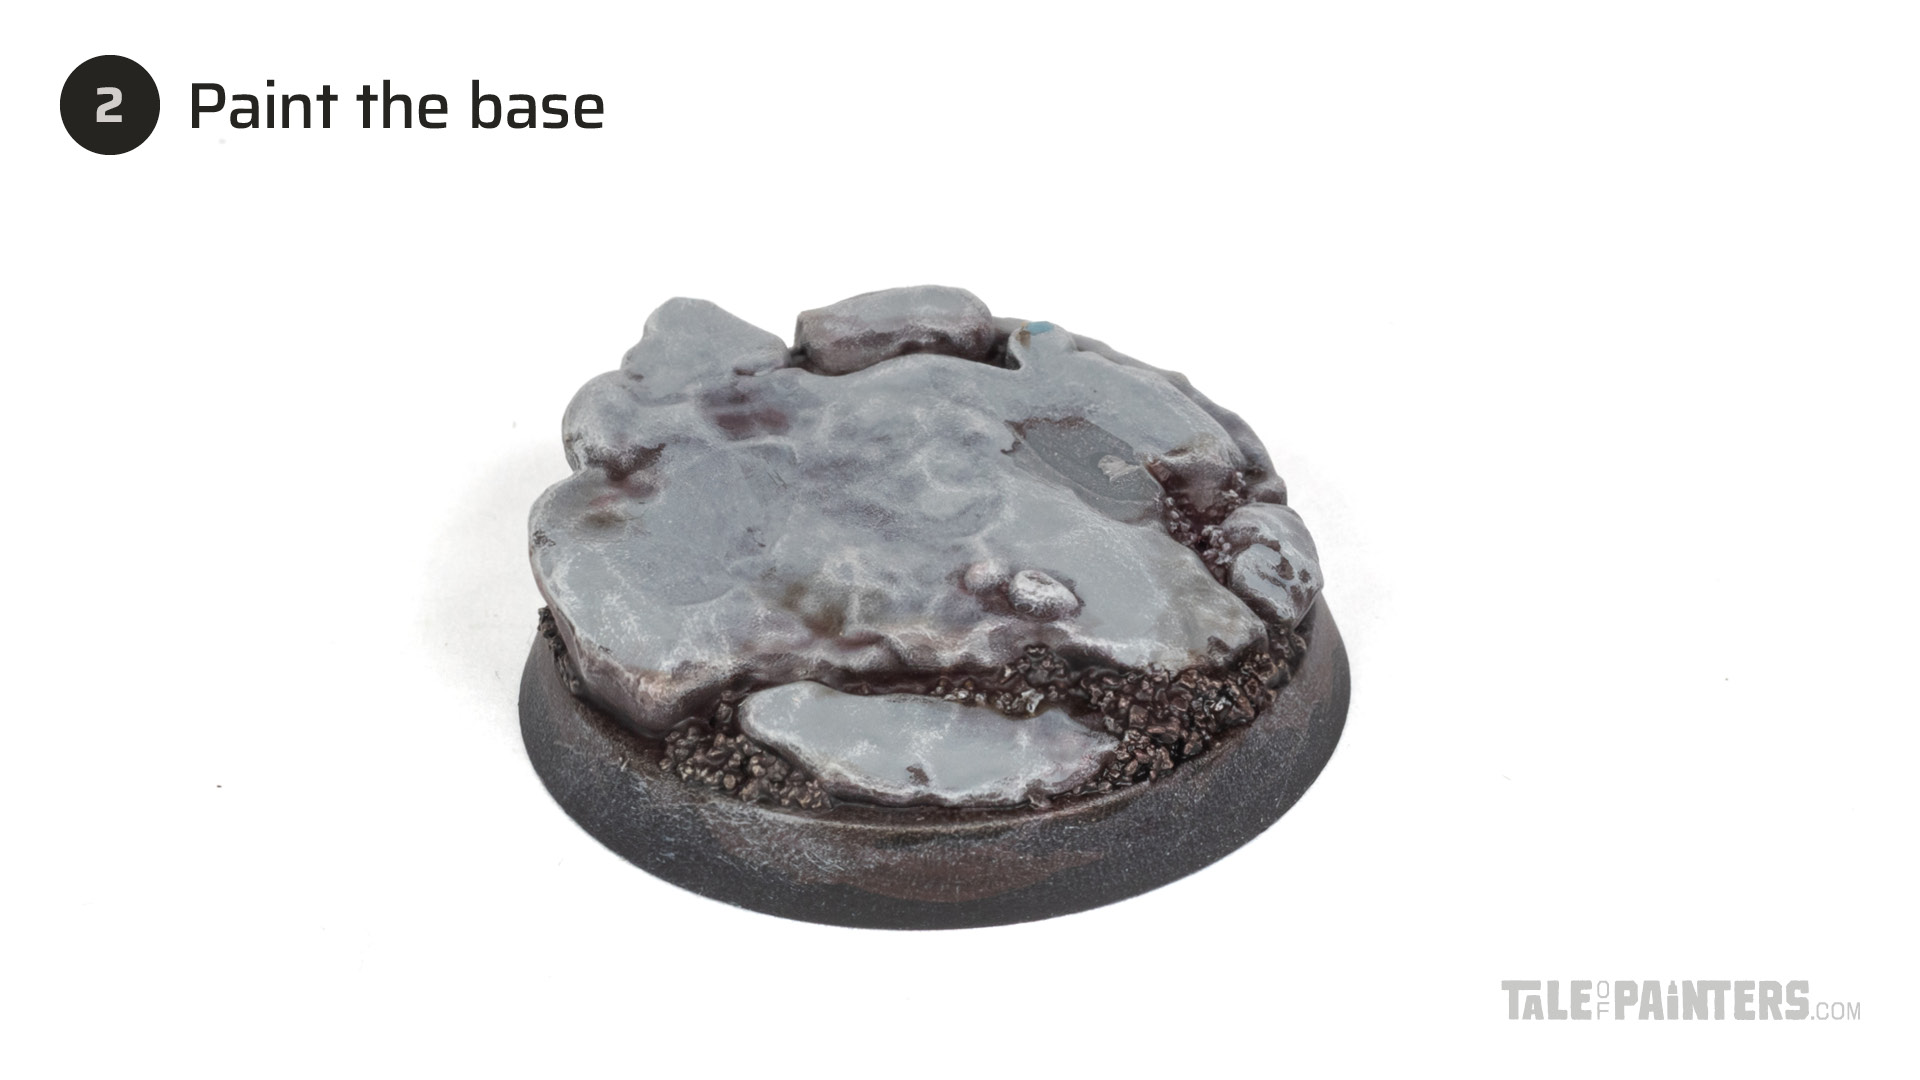
As the Champion(ess) comes on a scenic base, I kept that separate for the ease of painting. I basecoat the rocks and sand with TTC Cuirass Leather [or Rhinox Hide], then heavily drybrushed with Vallejo Game Color Neutral Grey [or Dawnstone], followed by VGC Stonewall Grey [or Grey Seer] and TTC Ivory Tusk [or Pallid Wych] Flesh. Then, I washed the sand with a 1:1 mix of Berserker Bloodshade and Agrax Earthshade, and also feathered the wash into the underside of the rocks to blend them in.
Black armour & steel
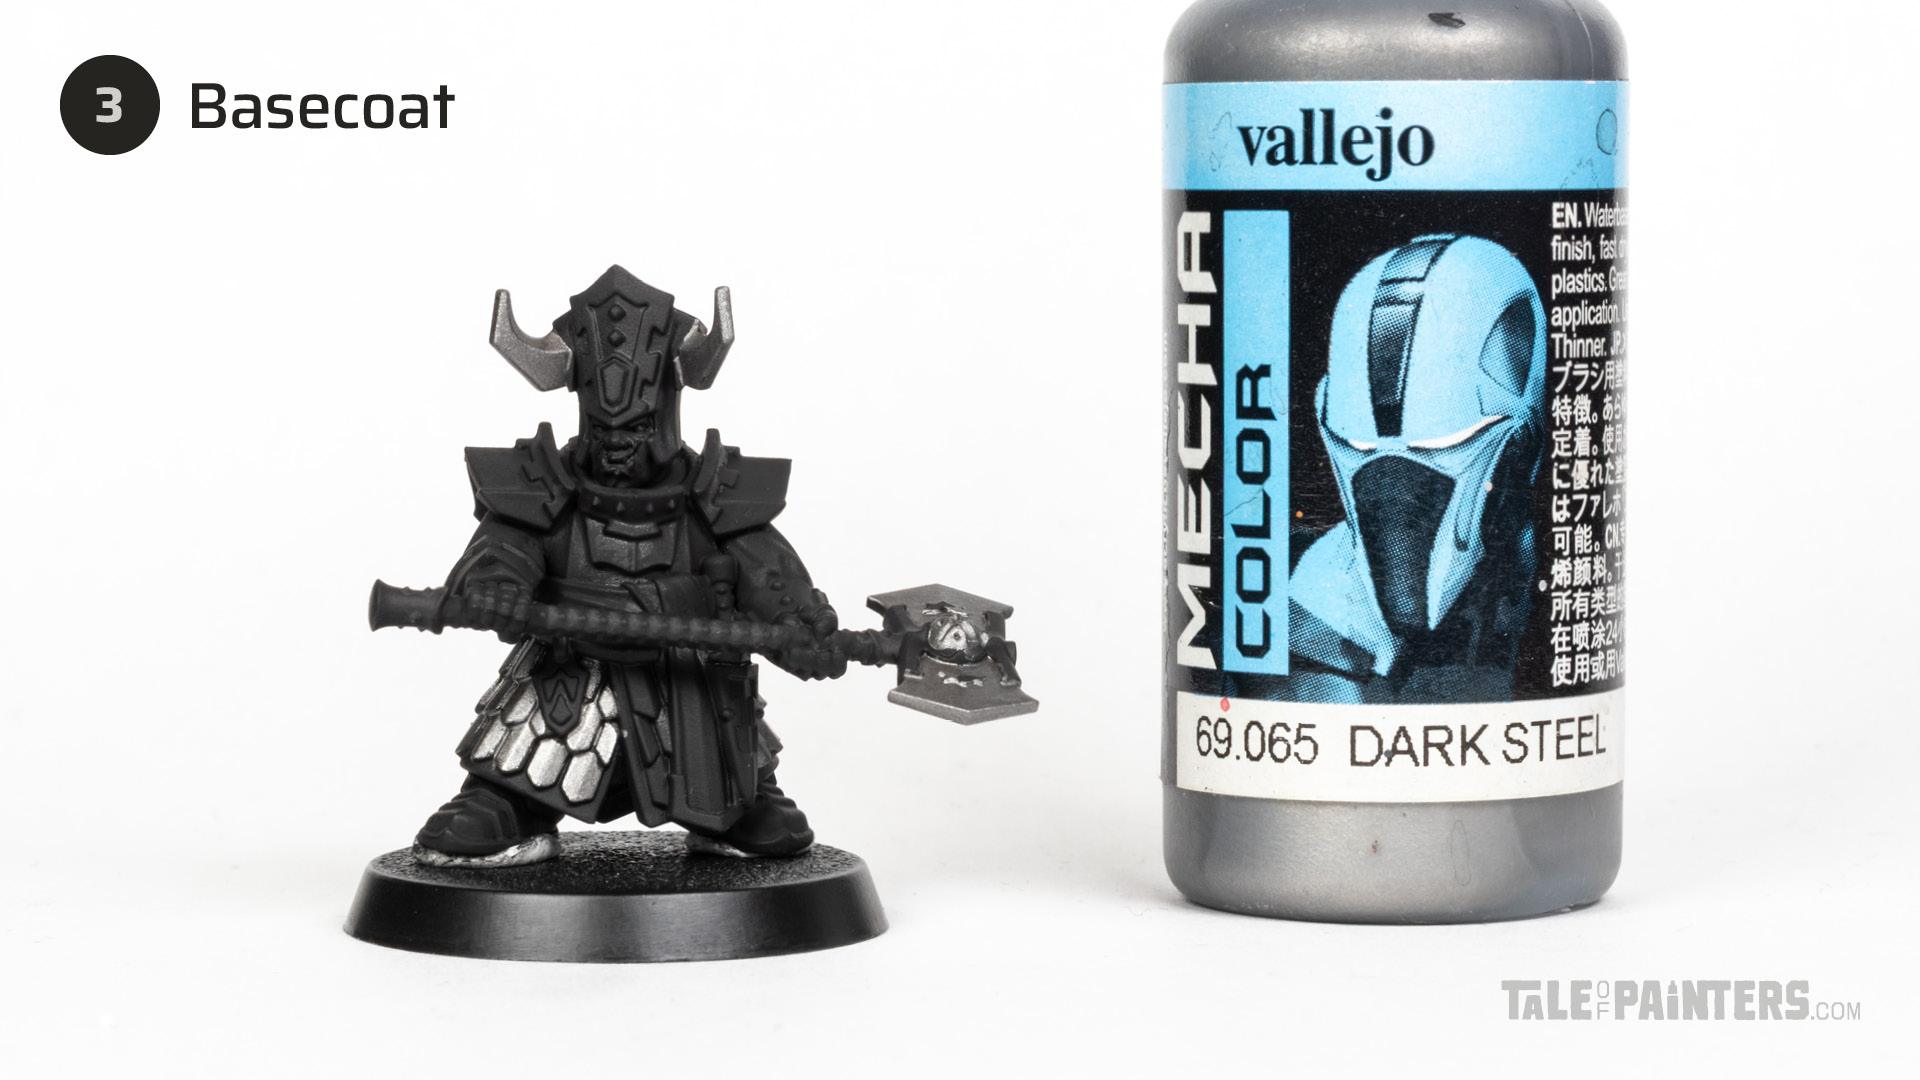
Basecoat the scales on the coat and details such as the horns and axe blade with Valejo Mecha Color Dark Steel [or Leadbelcher].
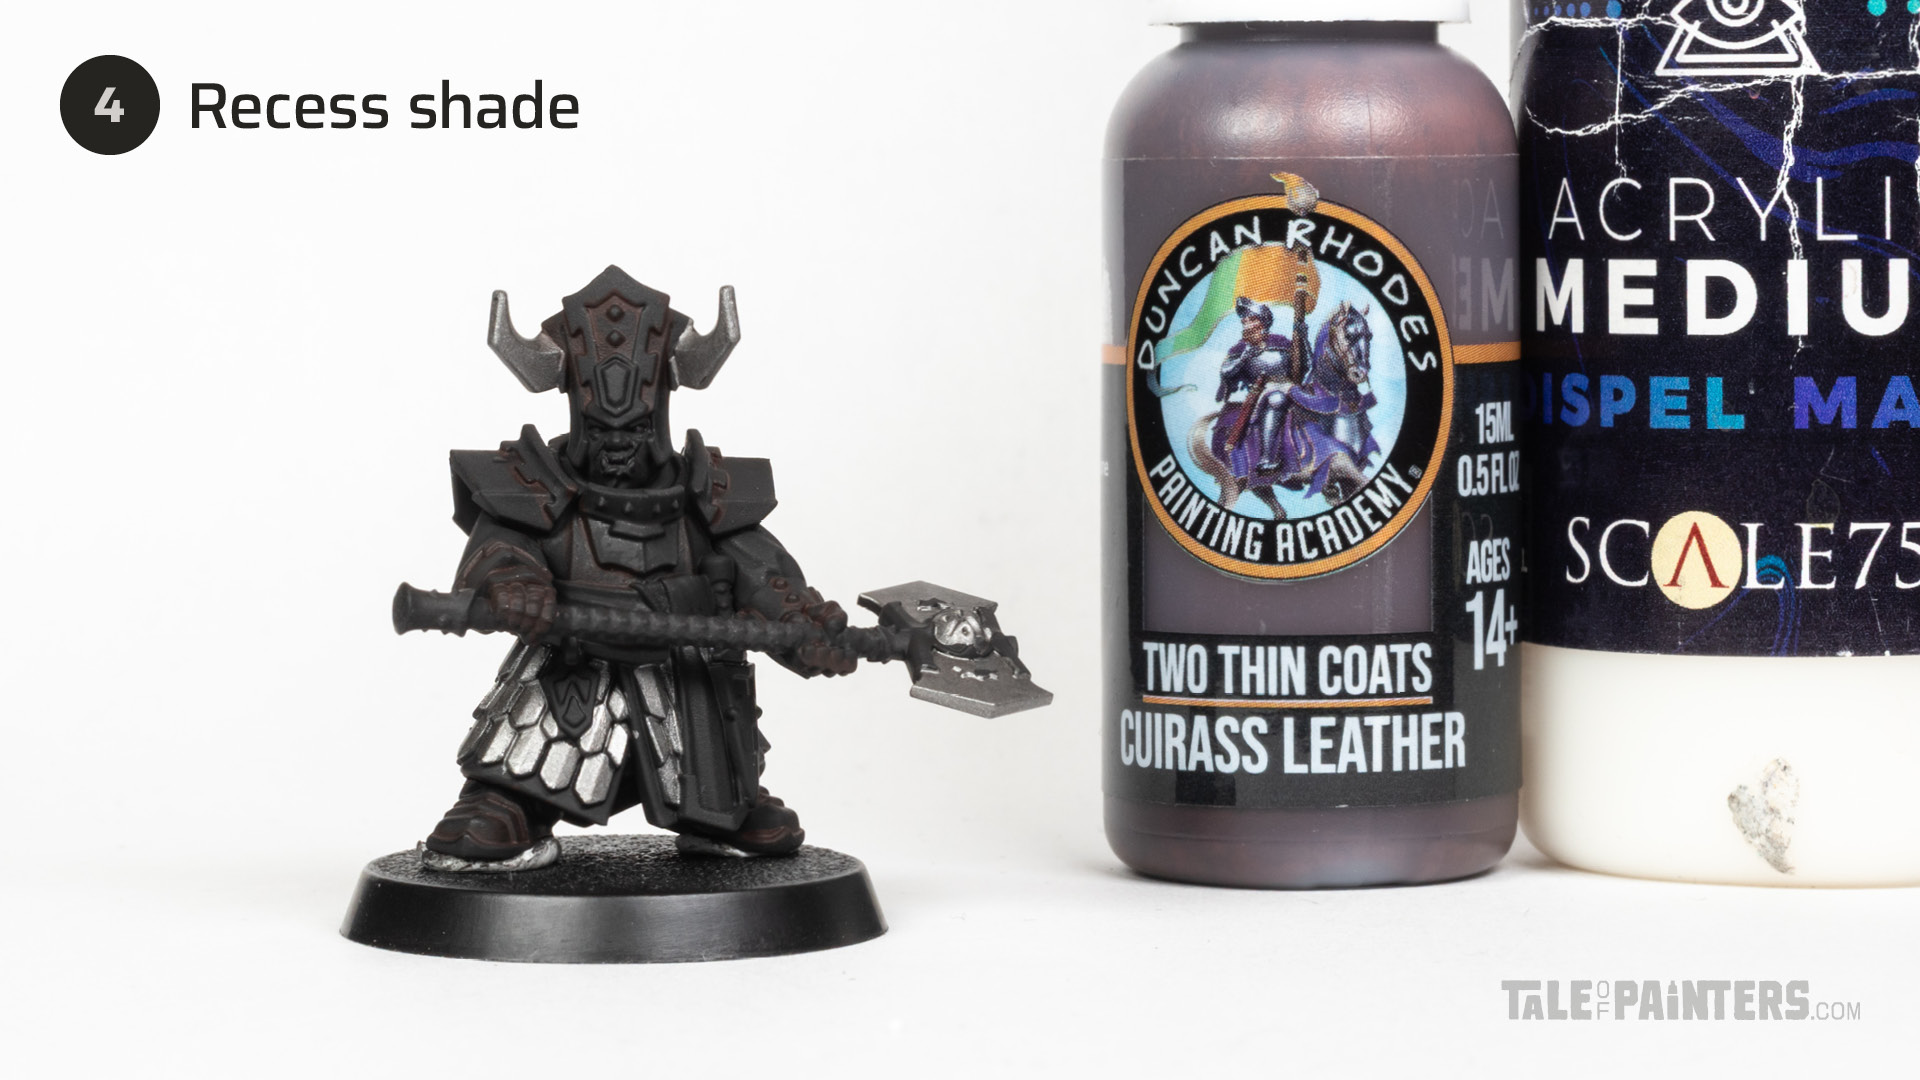
Thin TTC Cuirass Leather [or Rhinox Hide] with Scale75 Dispel Magic medium and paint this mix into the recesses of the black armour.
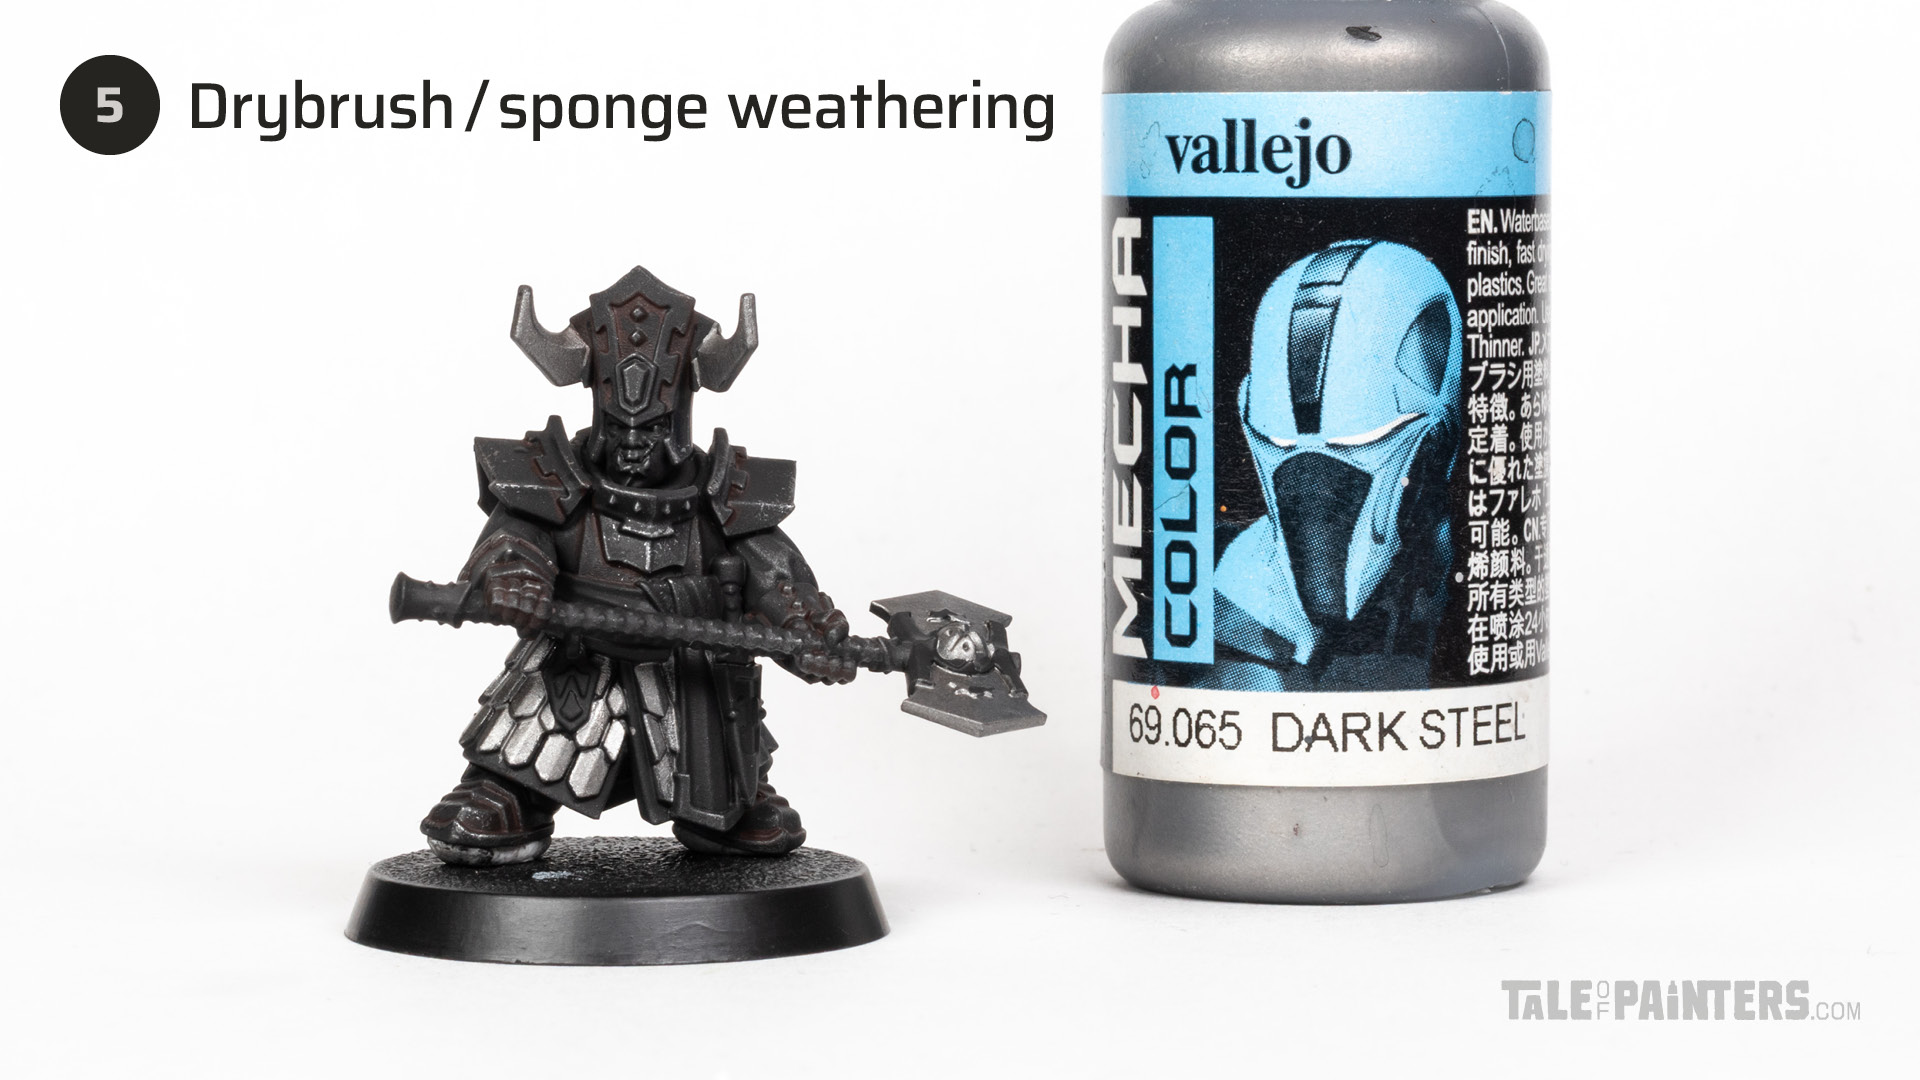
Drybrush the the black armour with VMeC Dark Steel [or Leadbelcher] to add a subtle metallic sheen. Then, dabbing a piece of ripped blister sponge into VMeC Dark Steel, add some chips and weathering to the edges of the armour.
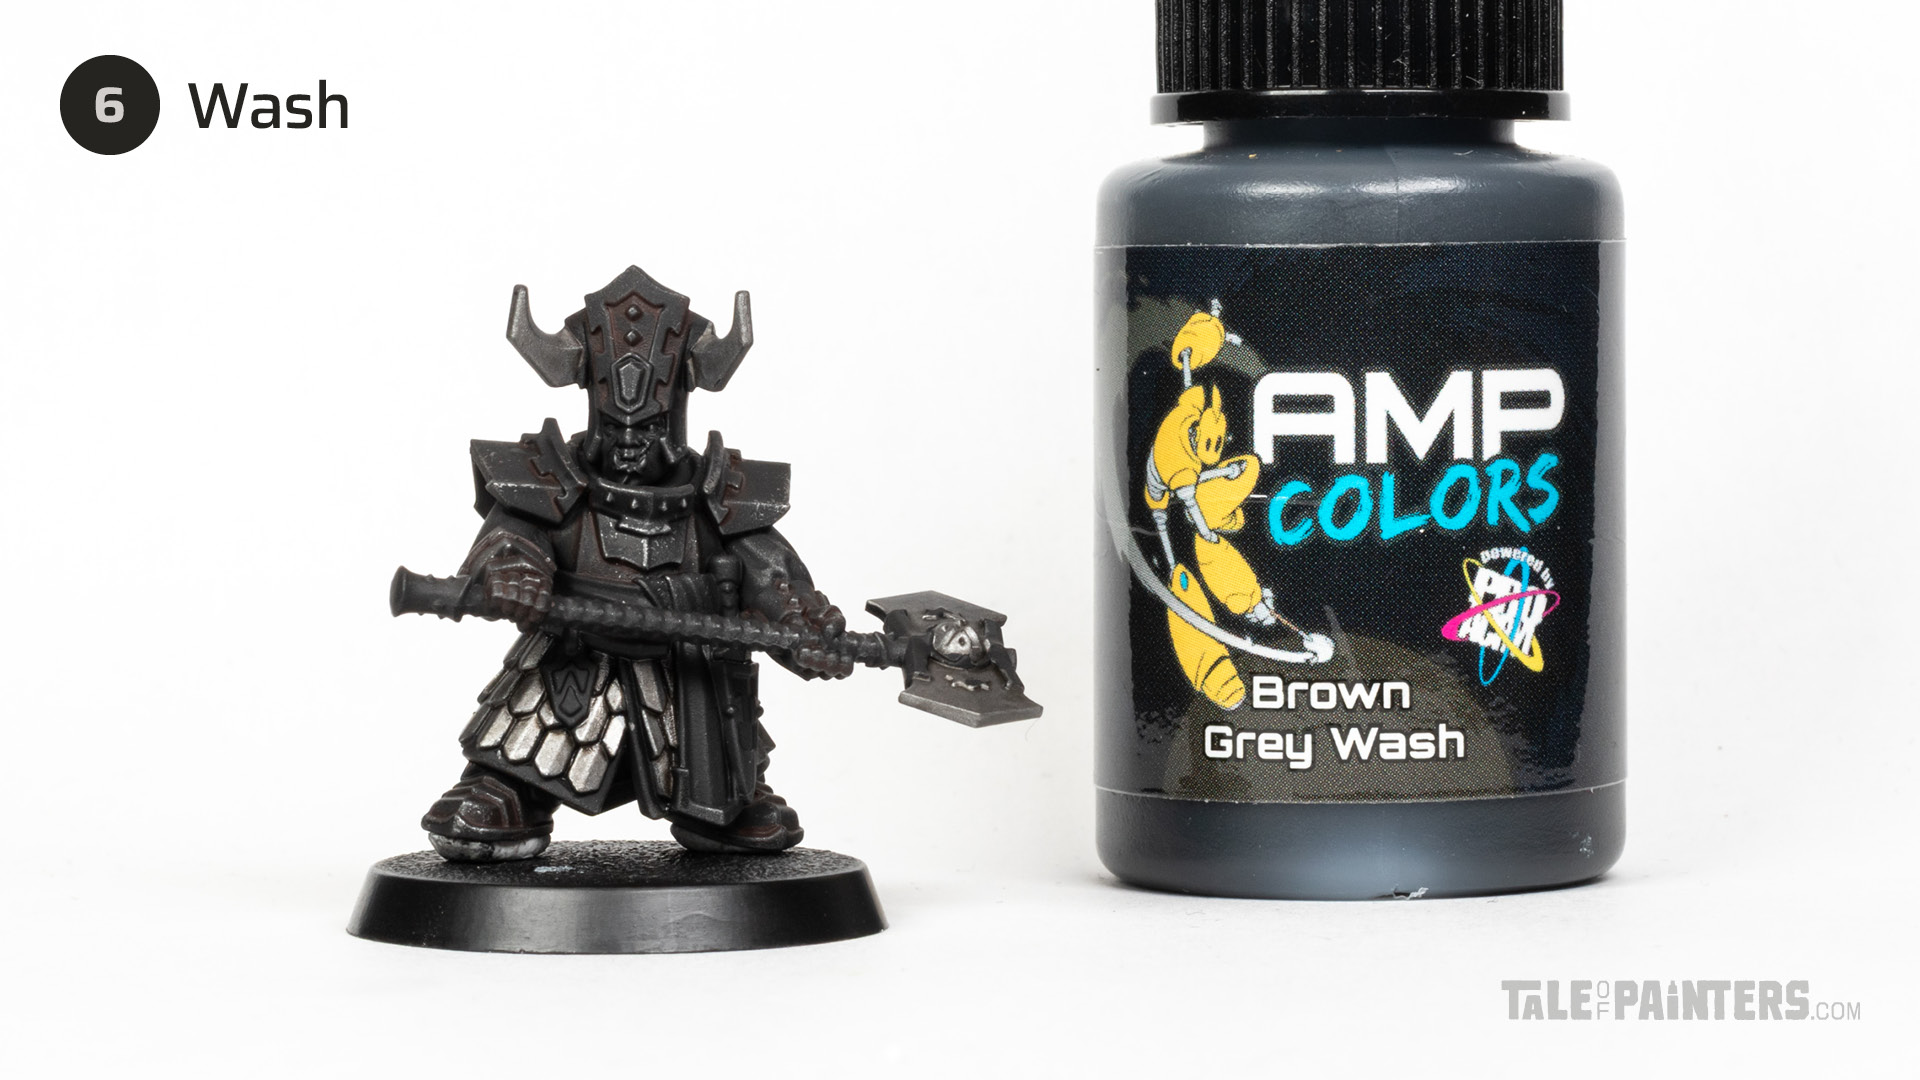
Wash the steel details you basecoated in step with with AMP Brown Grey Wash [or mix Nuln Oil about 2:1 with Agrax Earthshade]. Take care to not let the wash pool on large flat areas such as the axe blade.

Gently drybrush the entire model with Vallejo Model Air Silver [or Runefang Steel / Stormhost Silver]. Also, add some more sponge weathering to the edges of the armour.

Carefully edge highlight the steel details from step 6, such as the scales, blade, and horns, with VMA Silver [or Runefang Steel / Stormhost Silver].

Yellow sashes
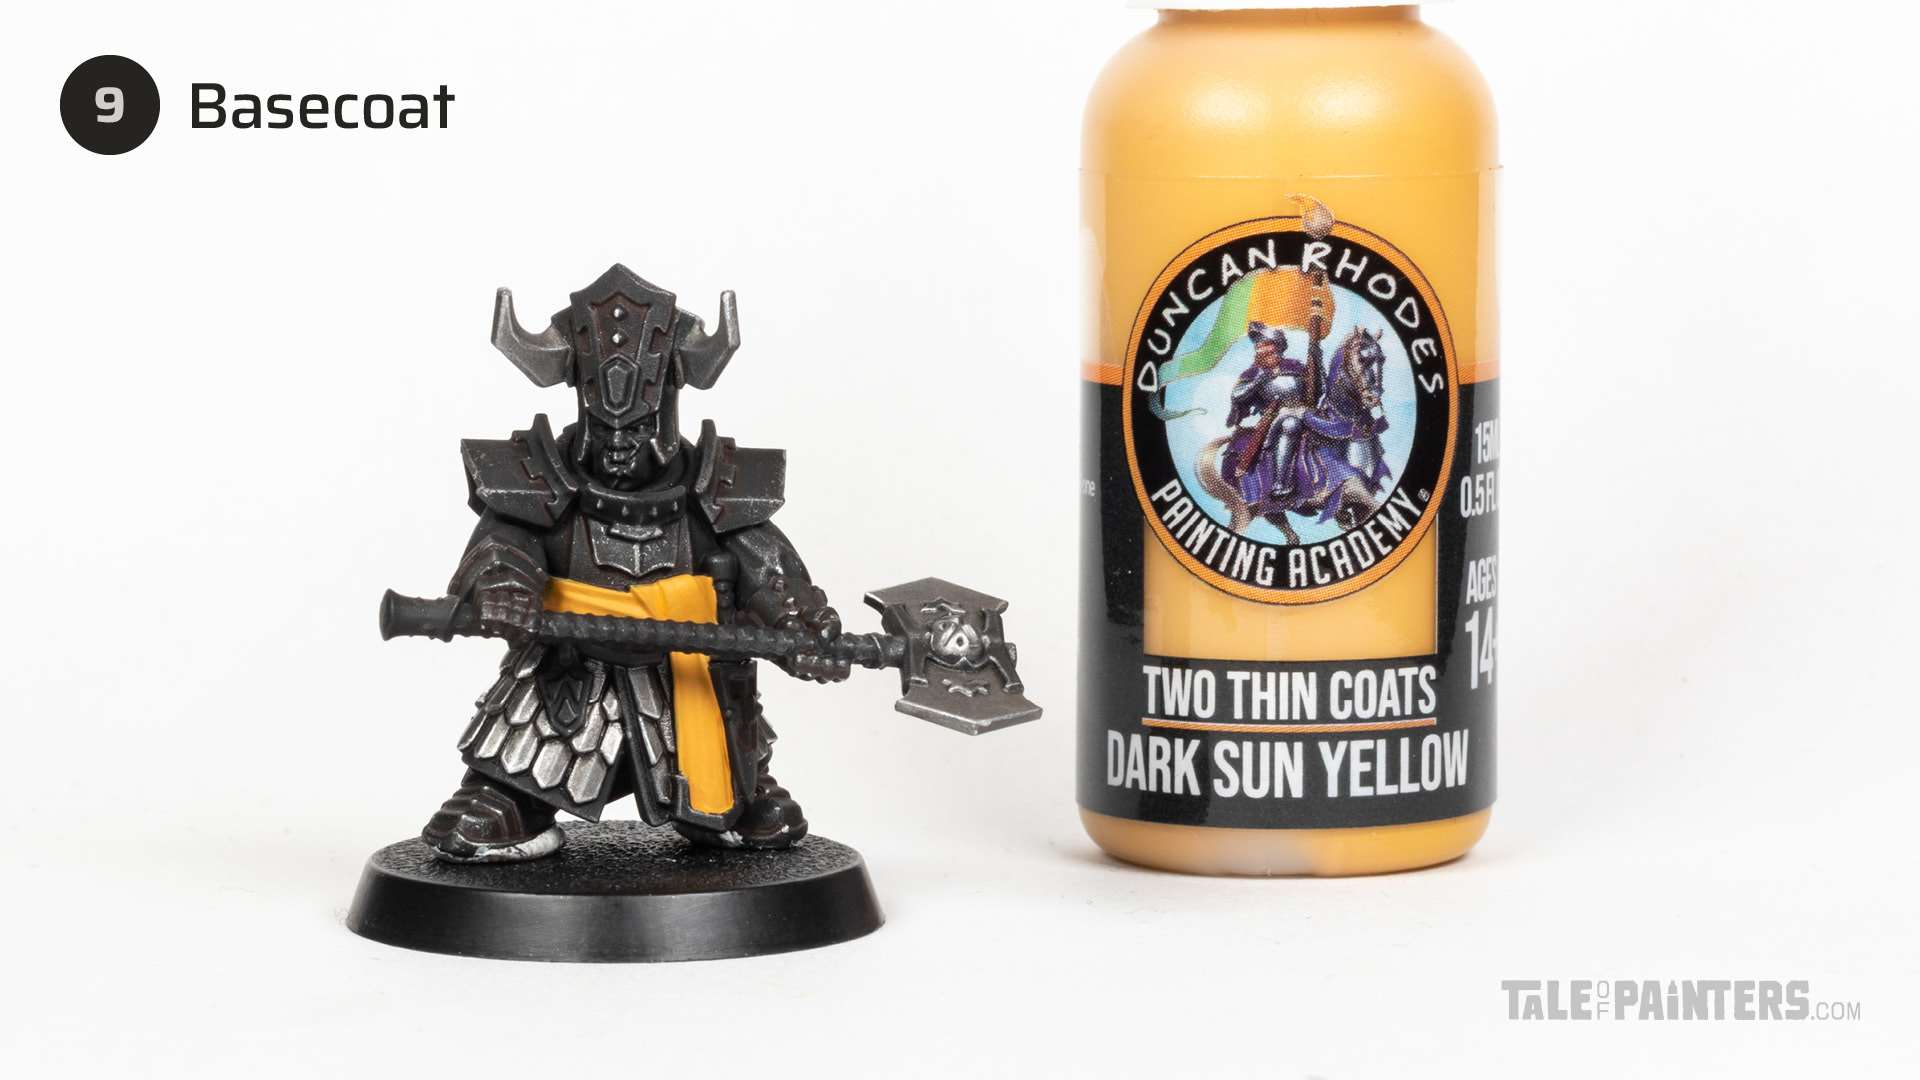
Basecoat the sash with TTC Dark Sun Yellow [or Averland Sunset]. This will take four or five thin coats for an even coverage.

Mix Aggaros Dunes about 1:1 with Conrast Medium and apply it all over the yellow.

Mix a little bit of TTC Noble Steed Brown [or Mournfang Brown] into TTC Dark Sun Yellow [or Averland Sunset]. Use this mix and layer it over the sash to smoothen the transitions the wash created. Then, layer pure TTC Dark Sun Yellow omitting the recesses.

To add more definition to the sash, I mixed increasing amounts of TTC Twin Suns Yellow [or Dorn Yellow] into TTC Dark Sun Yellow [or Averland Sunset] and applied some soft highlights.
Purple undergarments

Basecoat the undergarments and coat with TTC Royal Cloak [or Barak-nar Burgundy].
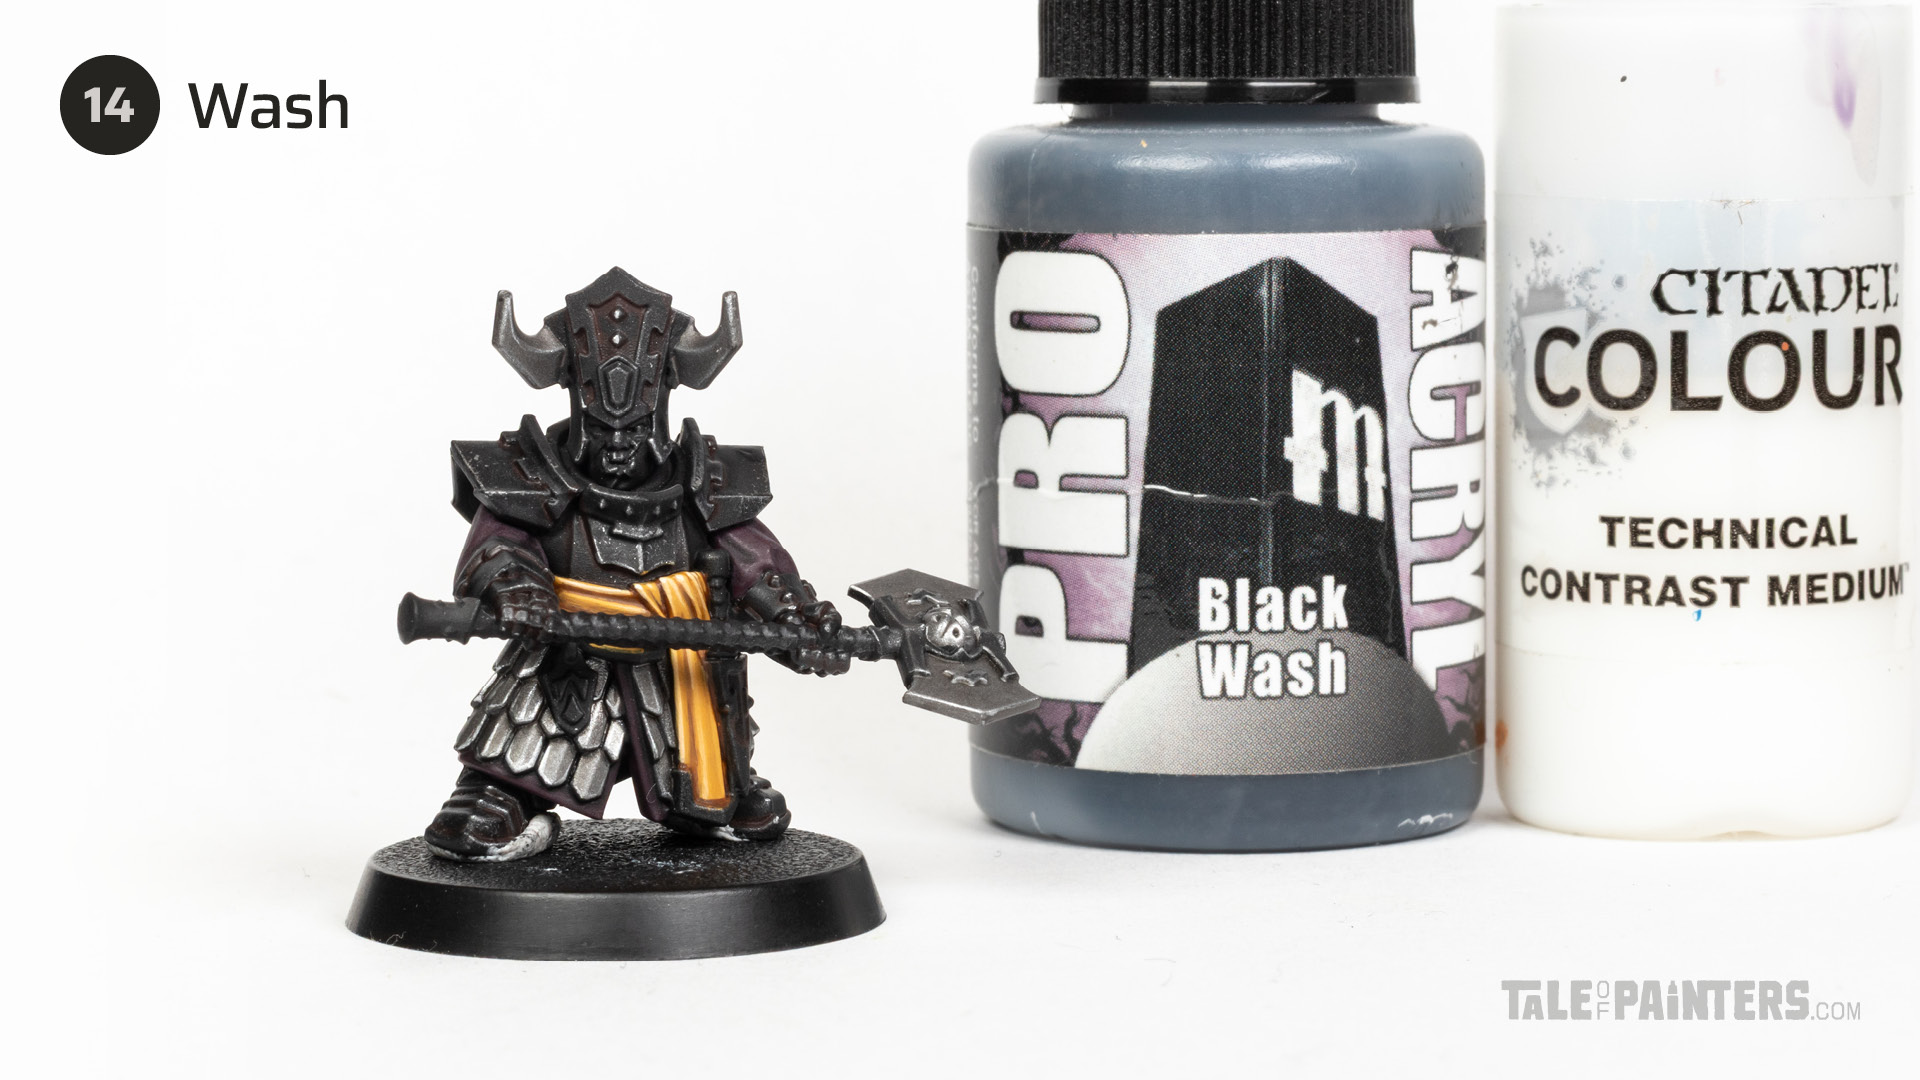
Add a drop of Contrast Medium to Pro Acryl Black Wash [or just use pure Nuln Oil] and apply it all over the garments.

Layer pure TTC Royal Cloak [or Barak-nar Burgundy] where necessary for a soft transition. Then, mix TTC Royal Cloak about 1:2 with TTC Enticing Purple [or Slaanesh Grey], and pick out the folds and edges.
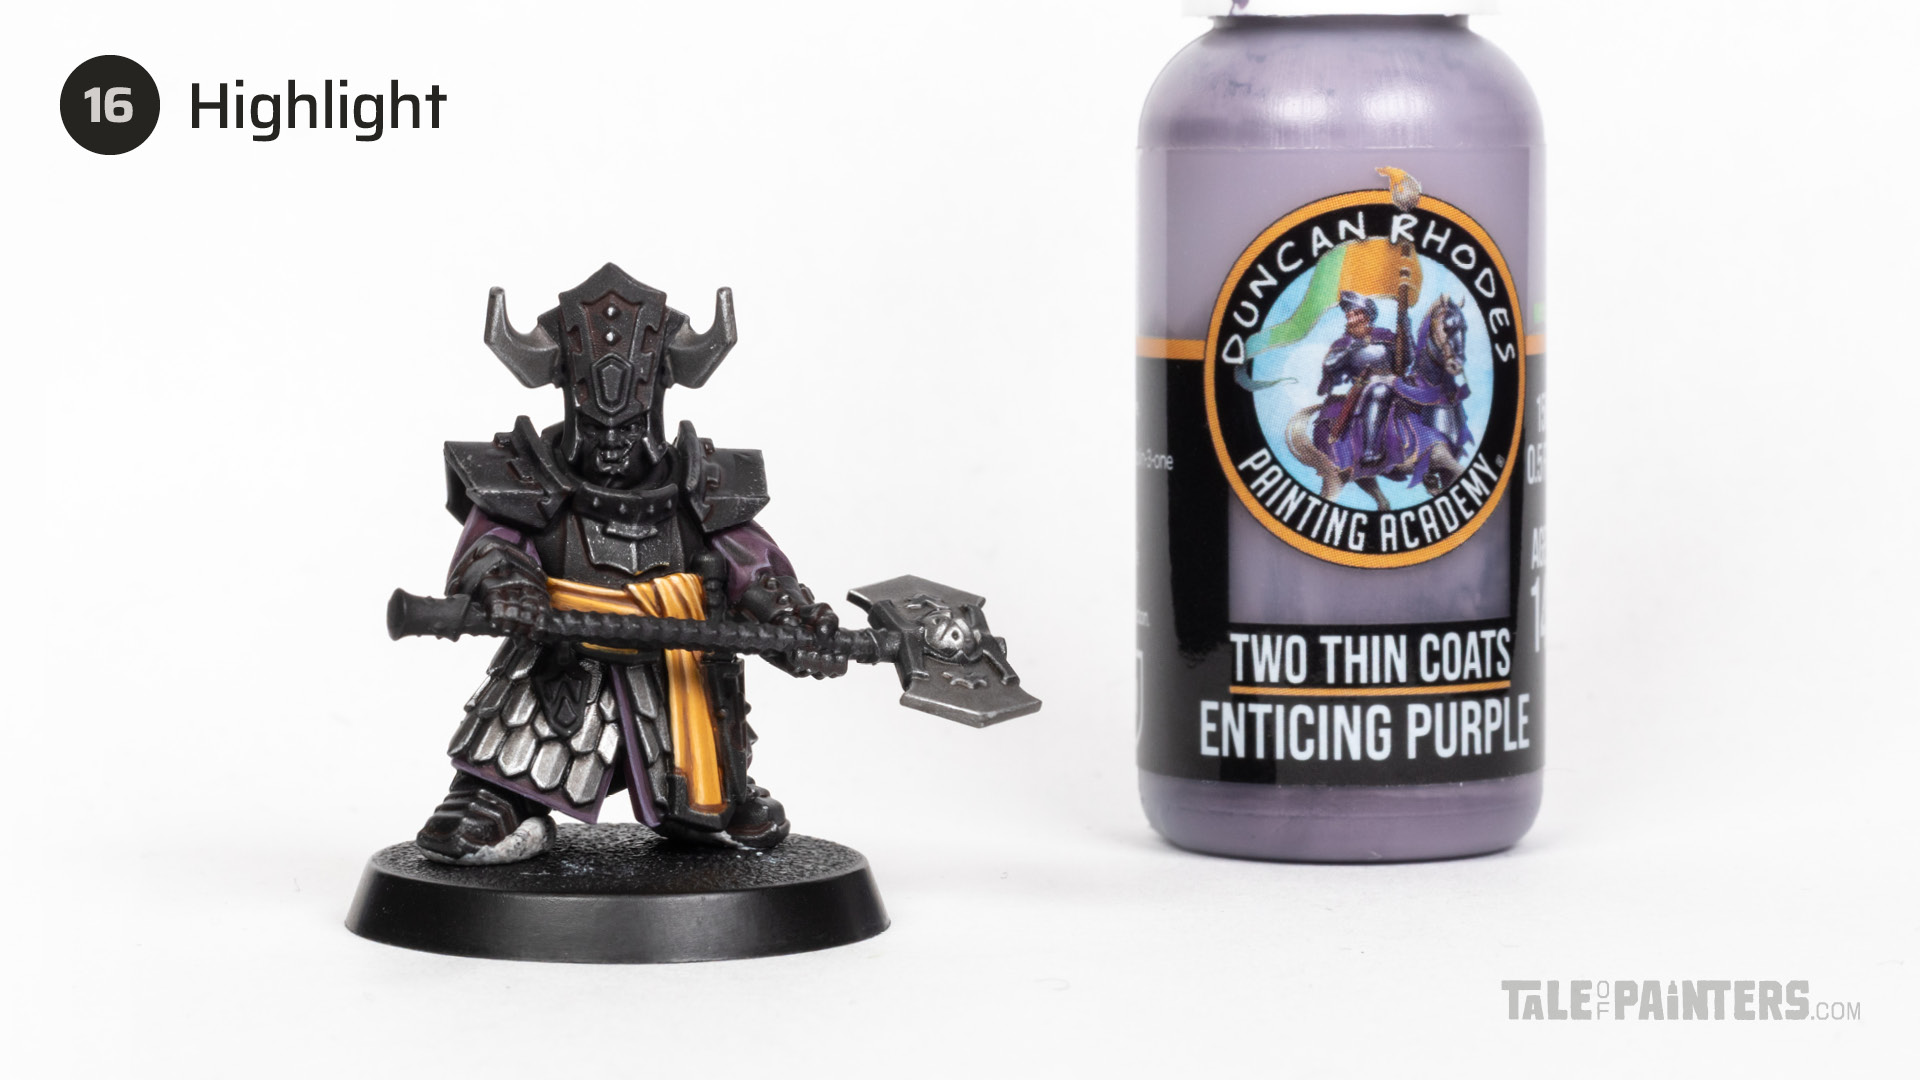
Repeat this process with pure TTC Enticing Purple [or Slaanesh Grey], picking out the sharpest folds and edges with an edge highlight.
Muspelzharr gold
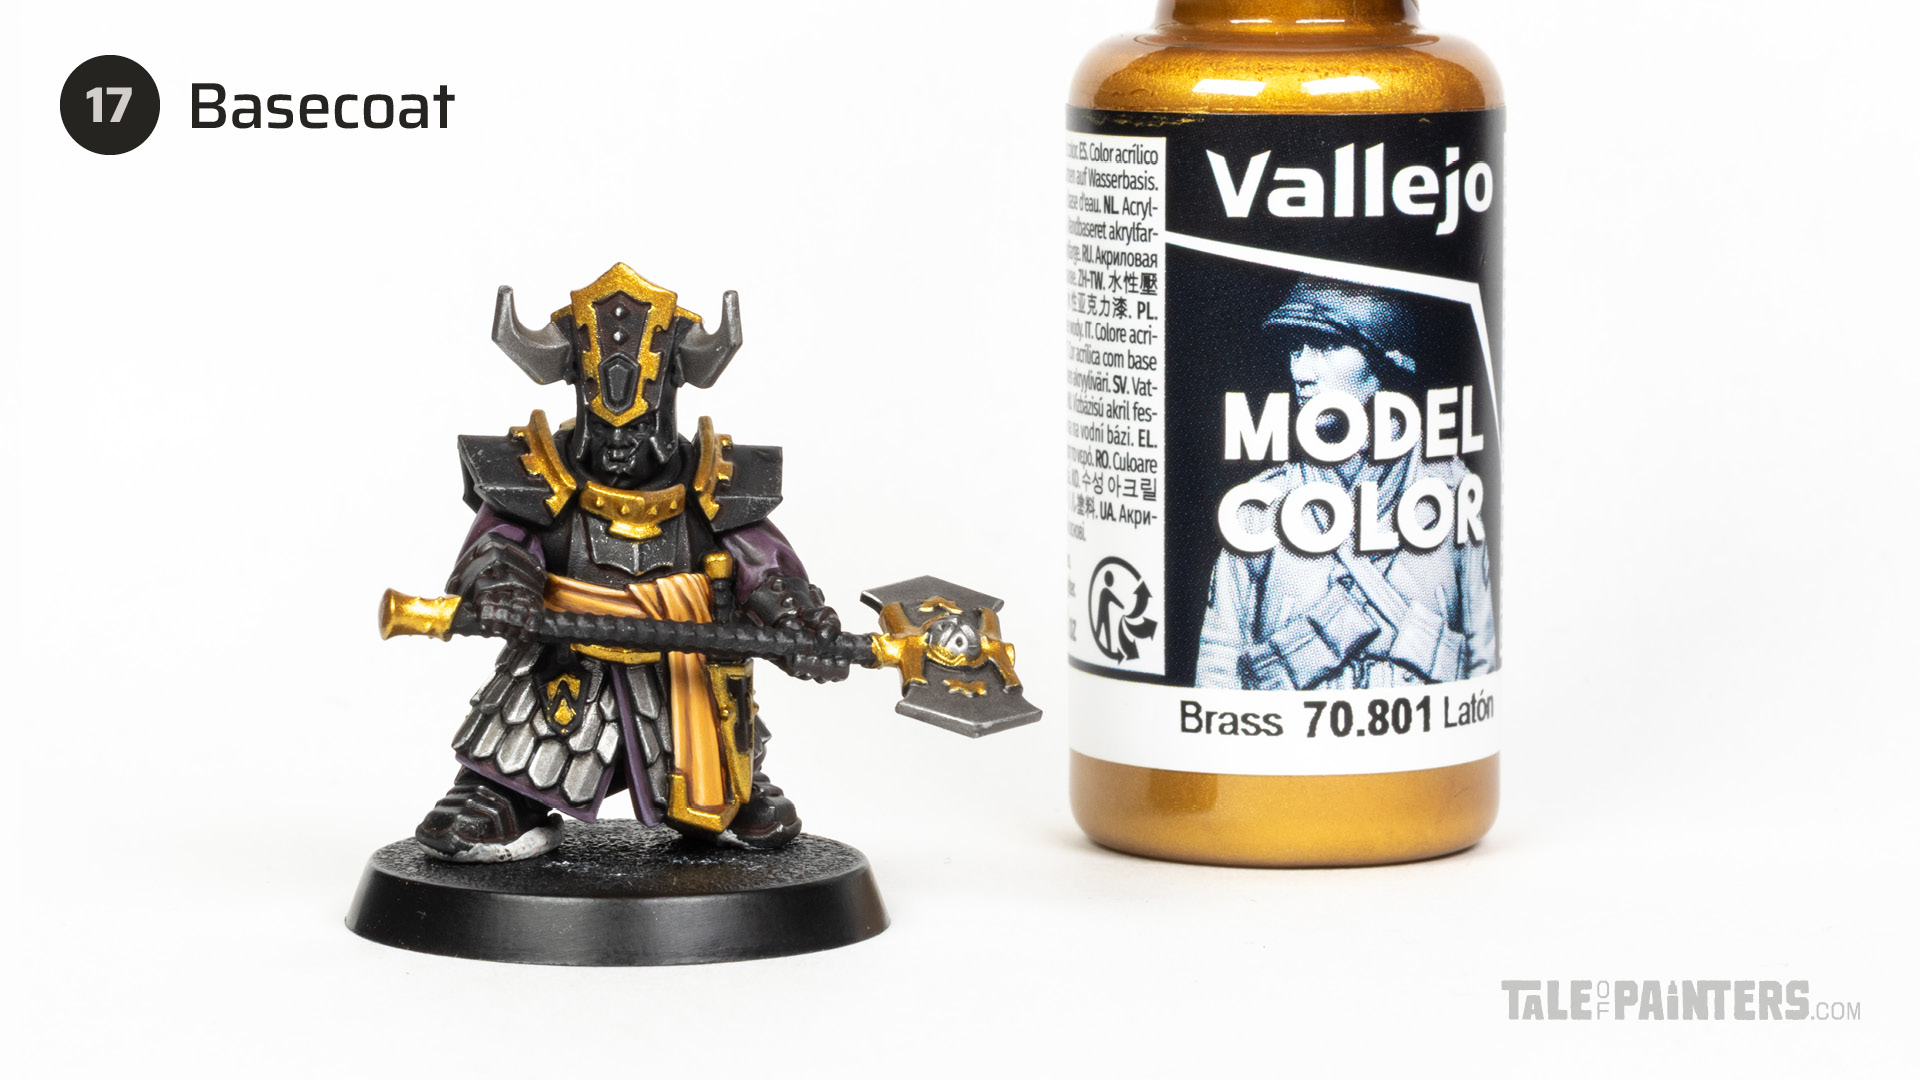
Basecoat the golden trims and details with Vallejo Model Color Brass [or Auric Armour Gold]. This will need a few thin coats.
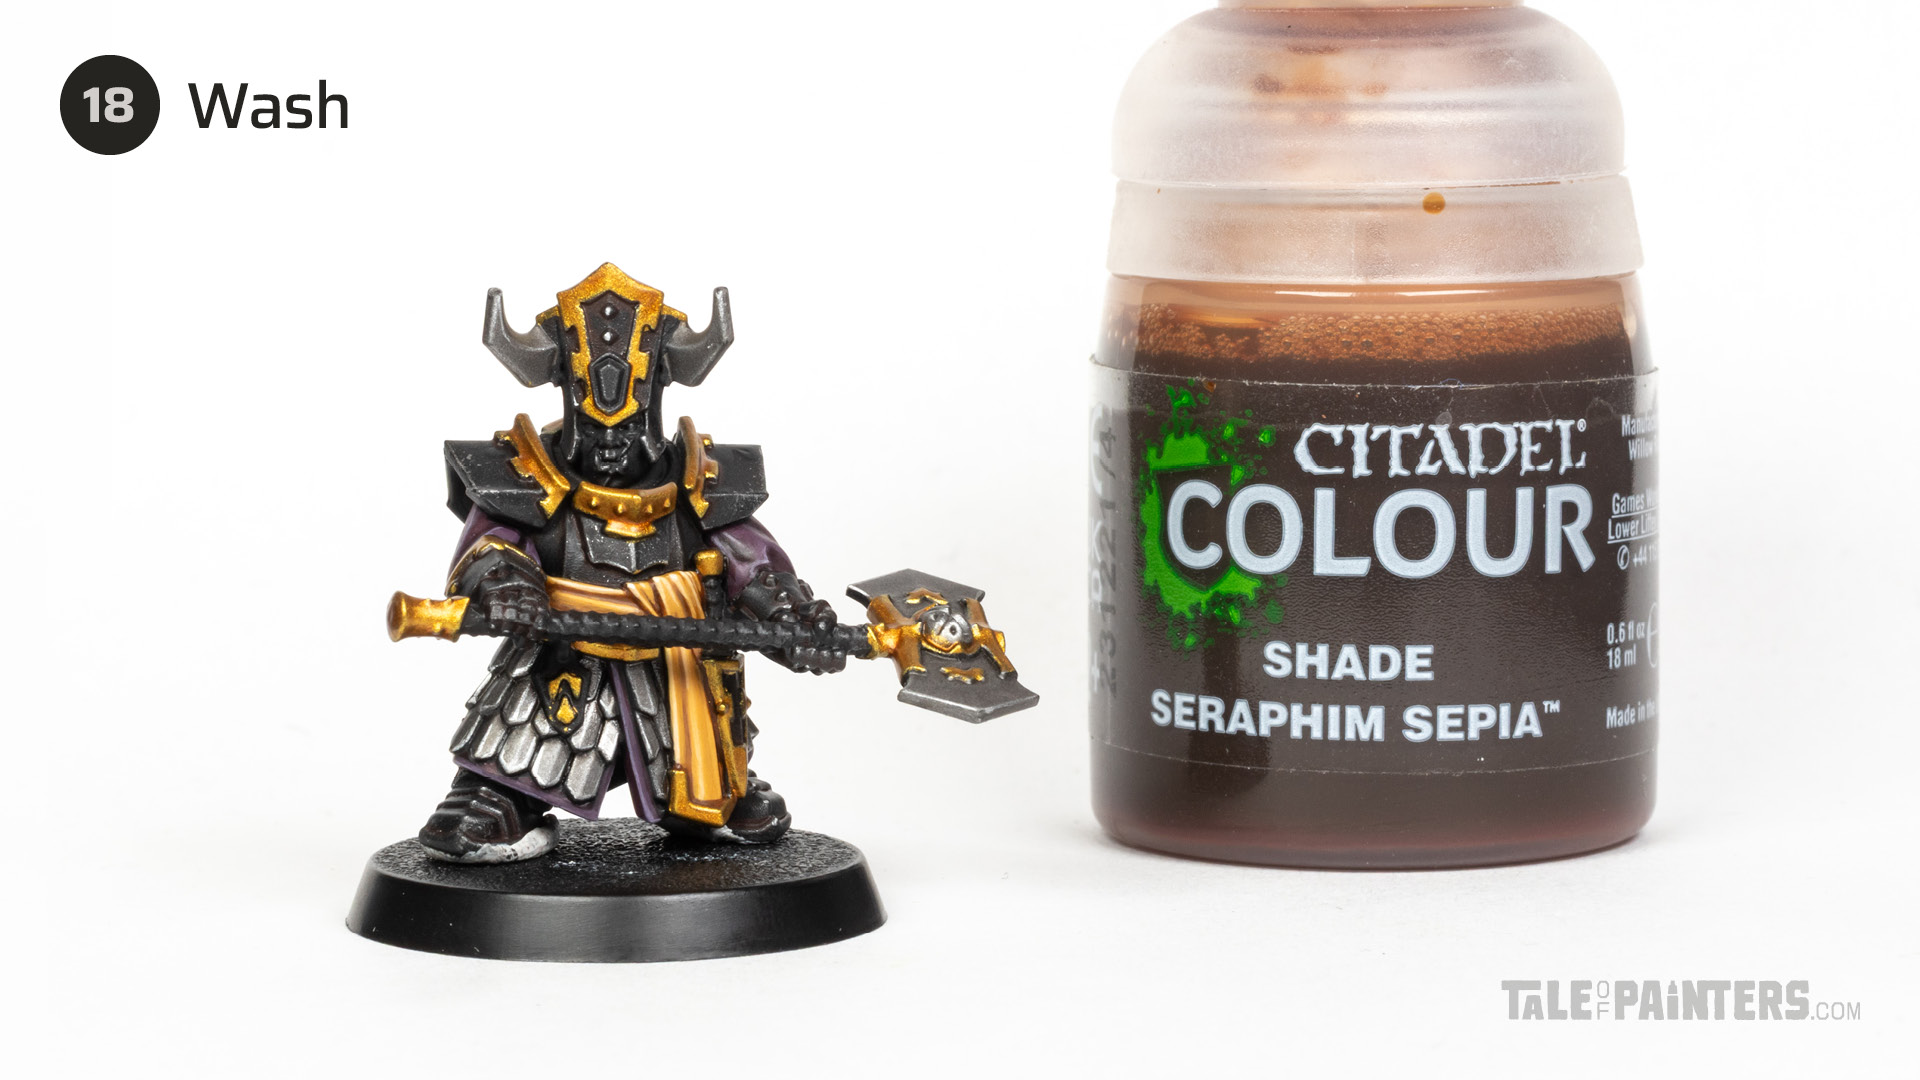
Wash the gold with Seraphim Sepia.

Thin TTC Cuirass Leather [or Rhinox Hide] and use this glaze to darken the shadows with a recess shade.

Mix VMC Brass [or Auric Armour Gold] about 2:1 with VMA Silver [or Runefang Steel / Stormhost Silver] and use this mix to edge highlight the gold.

Apply small dot highlights of VMA Silver [or Runefang Steel / Stormhost Silver] to the rivets and corners of the golden details.
Leather weapon handles
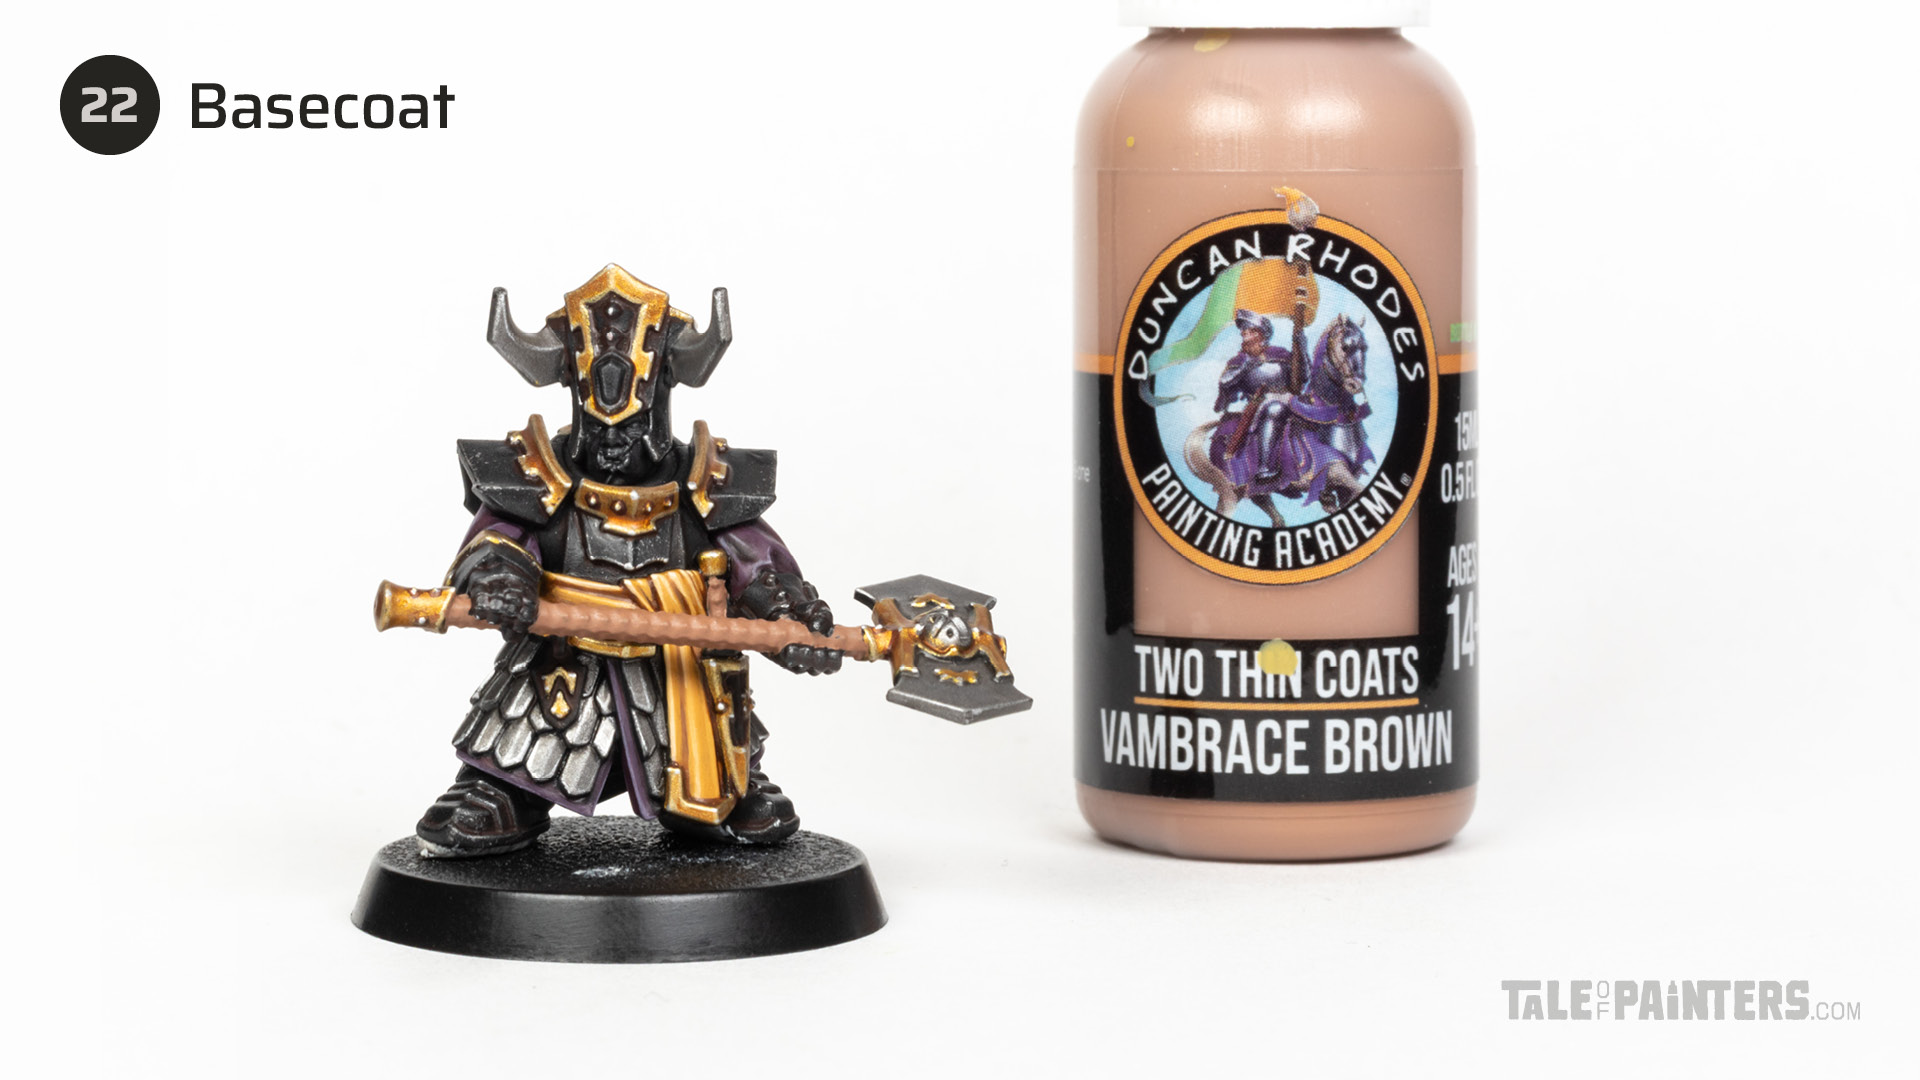
Basecoat the handles of the axe and dagger with TTC Vambrace Brown [or a Mournfang Brown / Wraithbone mix].
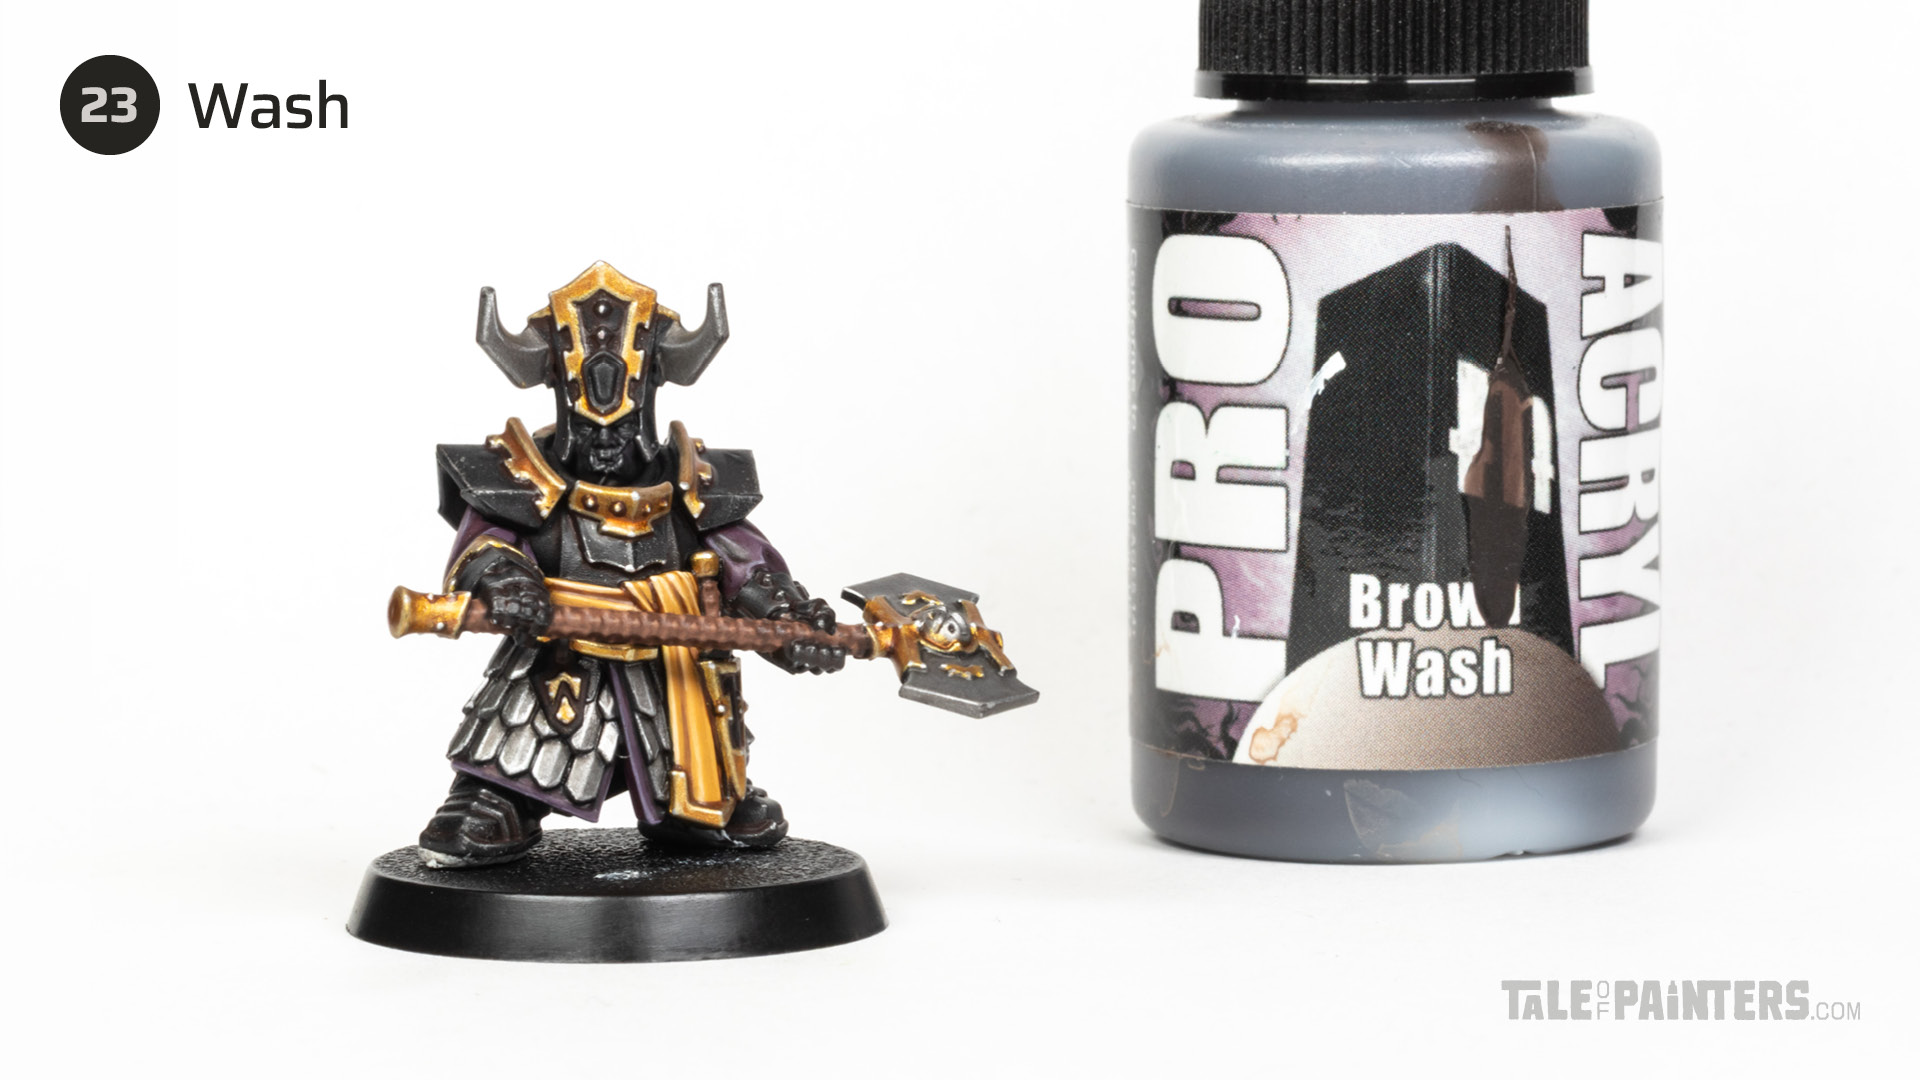
Wash the axe handle with PA Brown Wash [or Agrax Earthshade].

Layer the texture of the handle with TTC Vambrace Brown [or a Mournfang Brown / Wraithbone mix] omitting the darker parts.
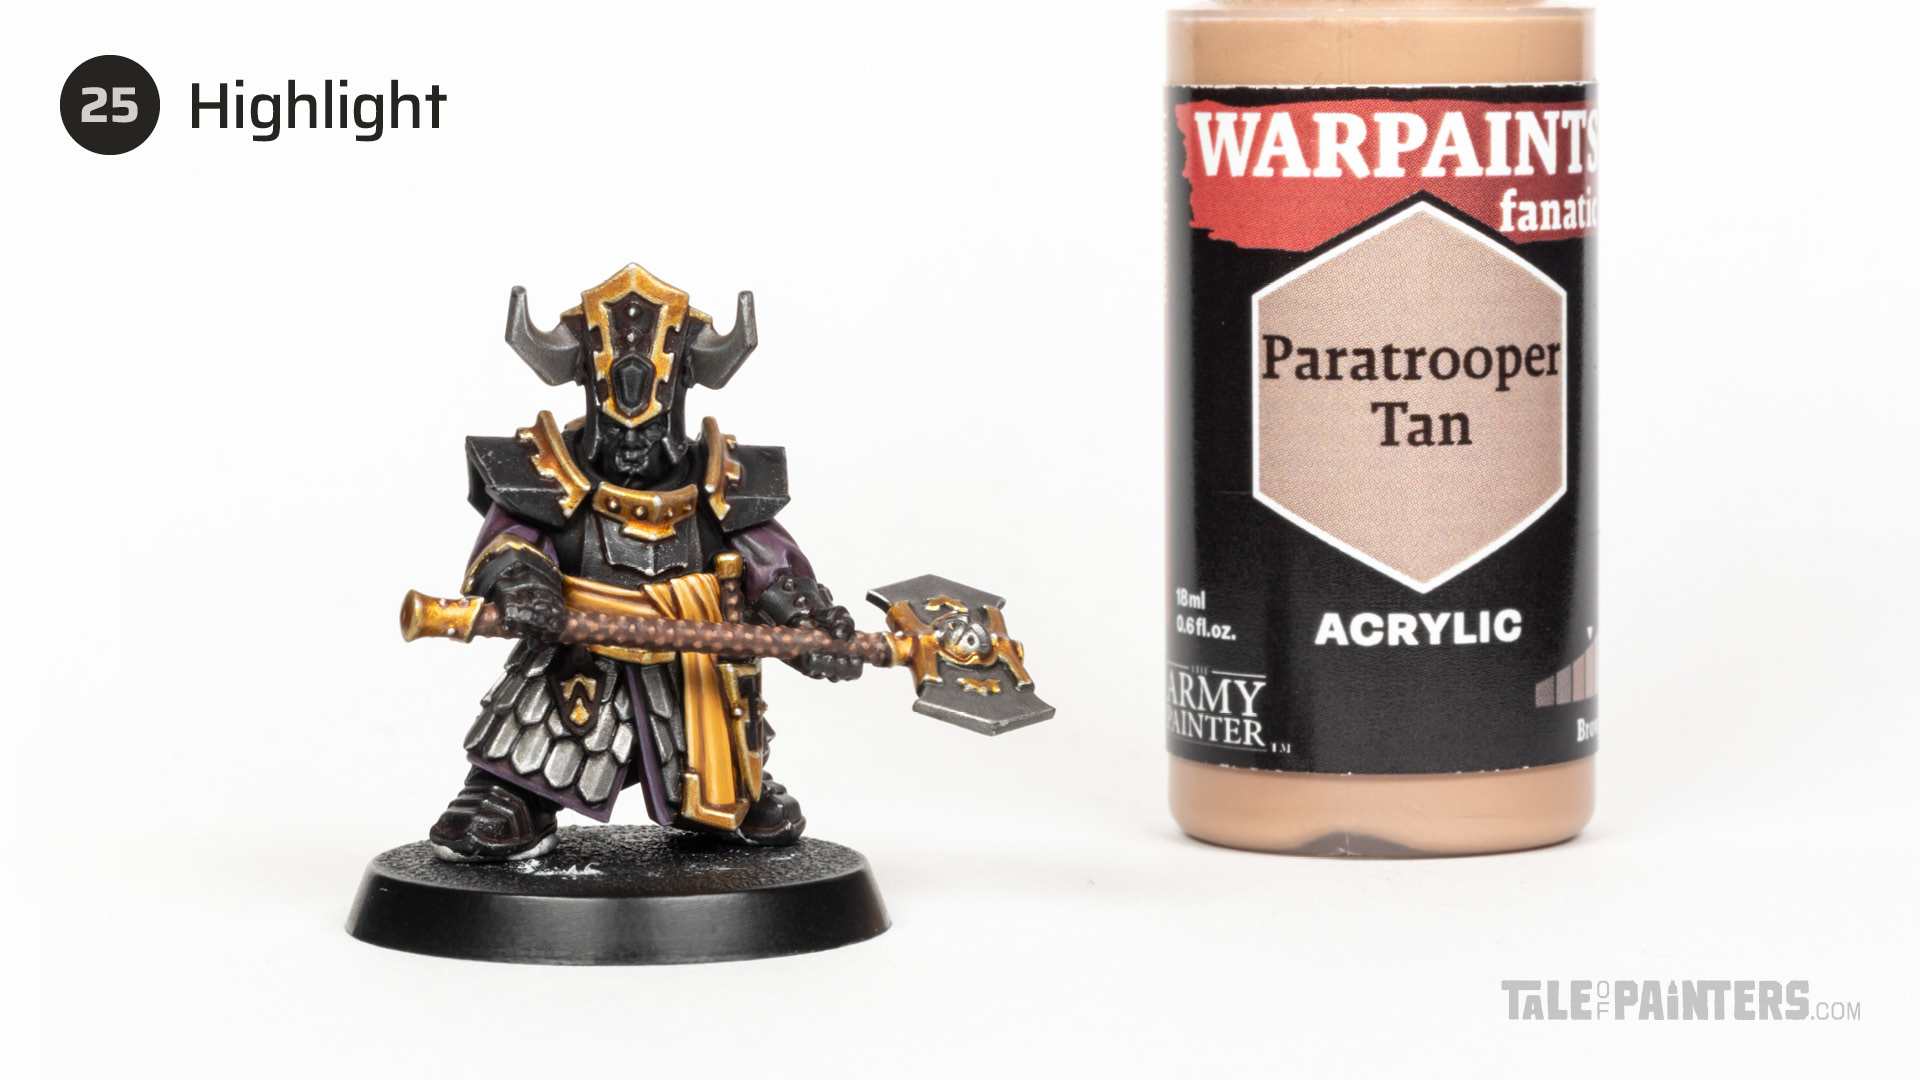
Add some highlights with Warpaints Fanatic Paratrooper Tan [or add more Wraithbone to the Mournfang Brown mix from step 24]
Zwarrdron flesh

Basecoat the flesh with TTC Griffon Claw [or Rakarth Flesh]. At this stage, I also painted the eyes. Check this tutorial for what I think is the easiest way to paint eyes.

Wash the skin with Targor Rageshade.

Layer thin coats of TTC Griffon Claw [or Rakarth Flesh], leaving the recesses dark.

Add successive amounts of TTC Ivory Tusk [or Pallid Wych Flesh] into TTC Griffon Claw to pick out the facial features. You can go up until pure TTC Ivory Tusk if you have the brush control.
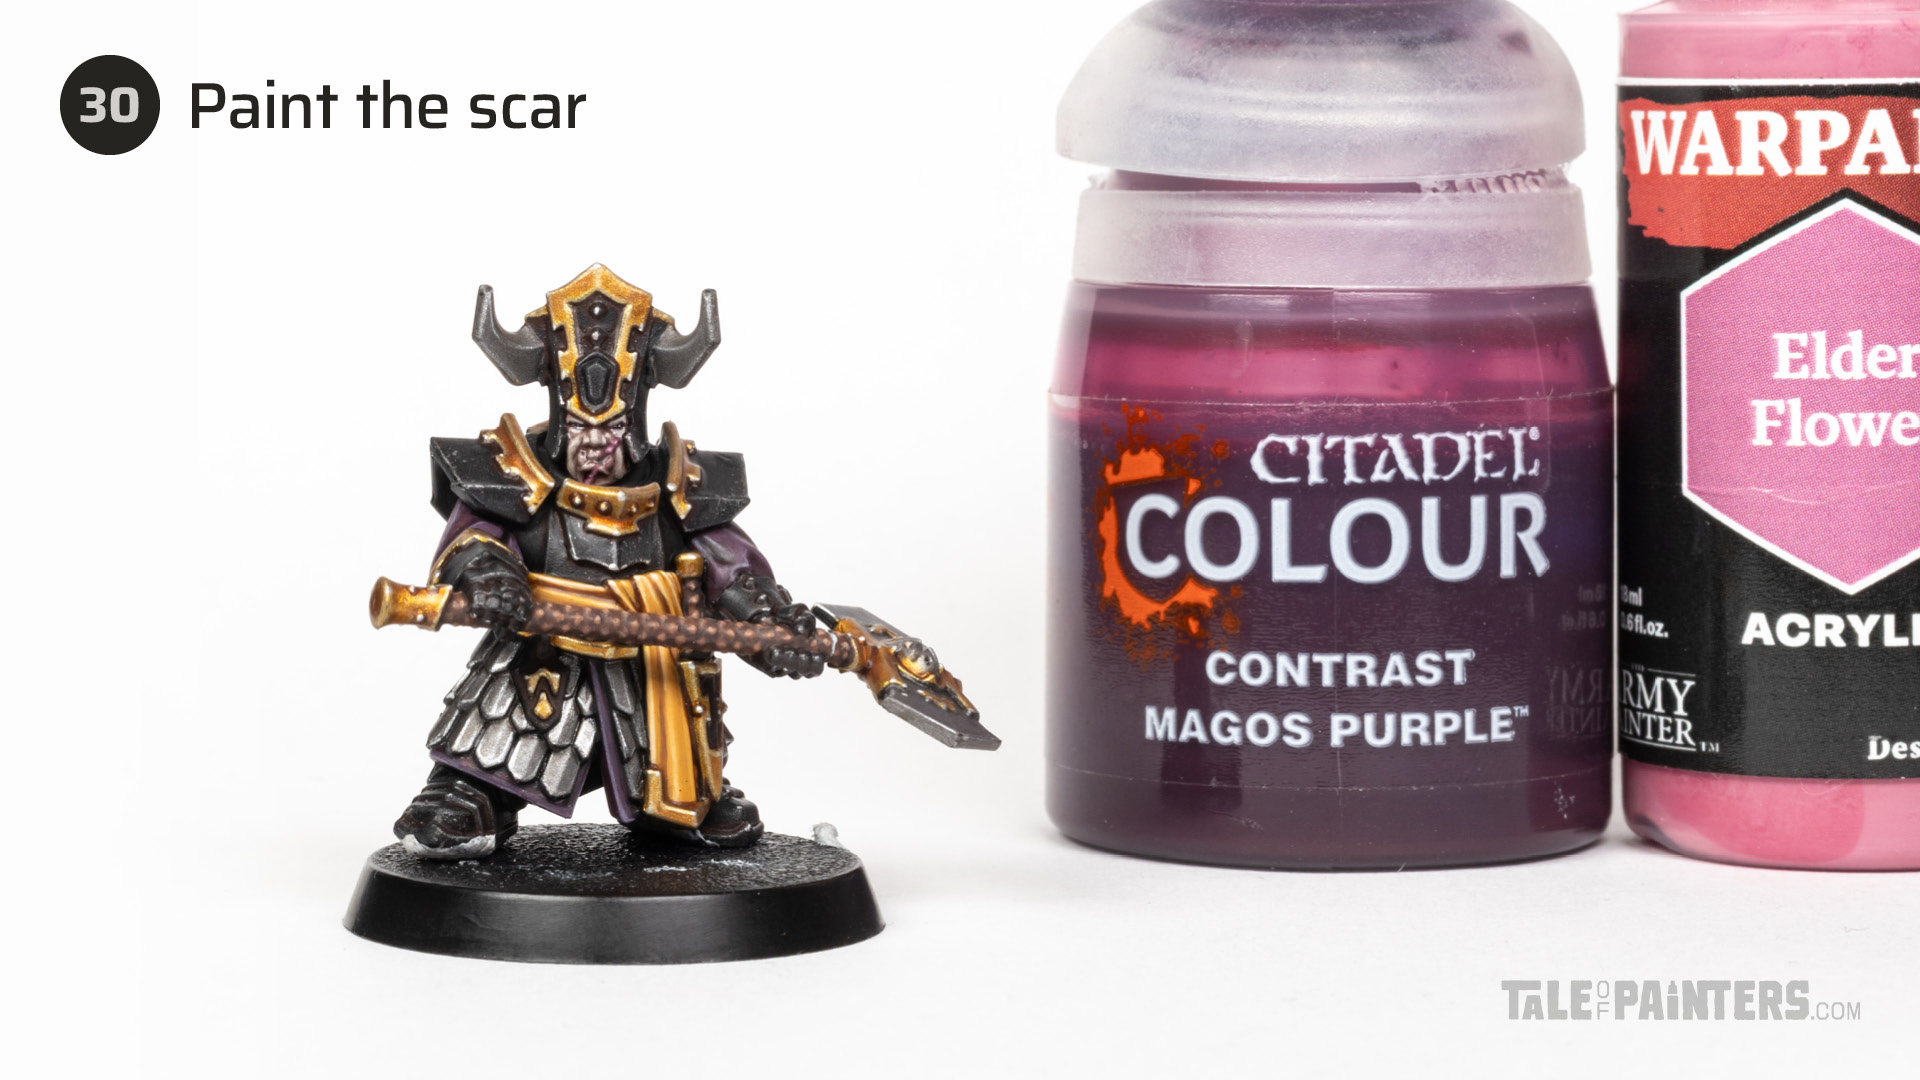
Carefully glaze the scar with a thin coat of Magos Purple. Then, highlight the scar with WPF Elder Flower [or mix a little bit of Pallid Wych Flesh into Pink Horror].

Basecoat the fangs with P3 Umbral Umber [or Dryad Bark], layer with TTC Skeleton Legion [or Morghast Bone], highlight with VGC Bone White [or Screaming Skull], then add a dot highlight of VGC Dead White [or White Scar] to the tips.

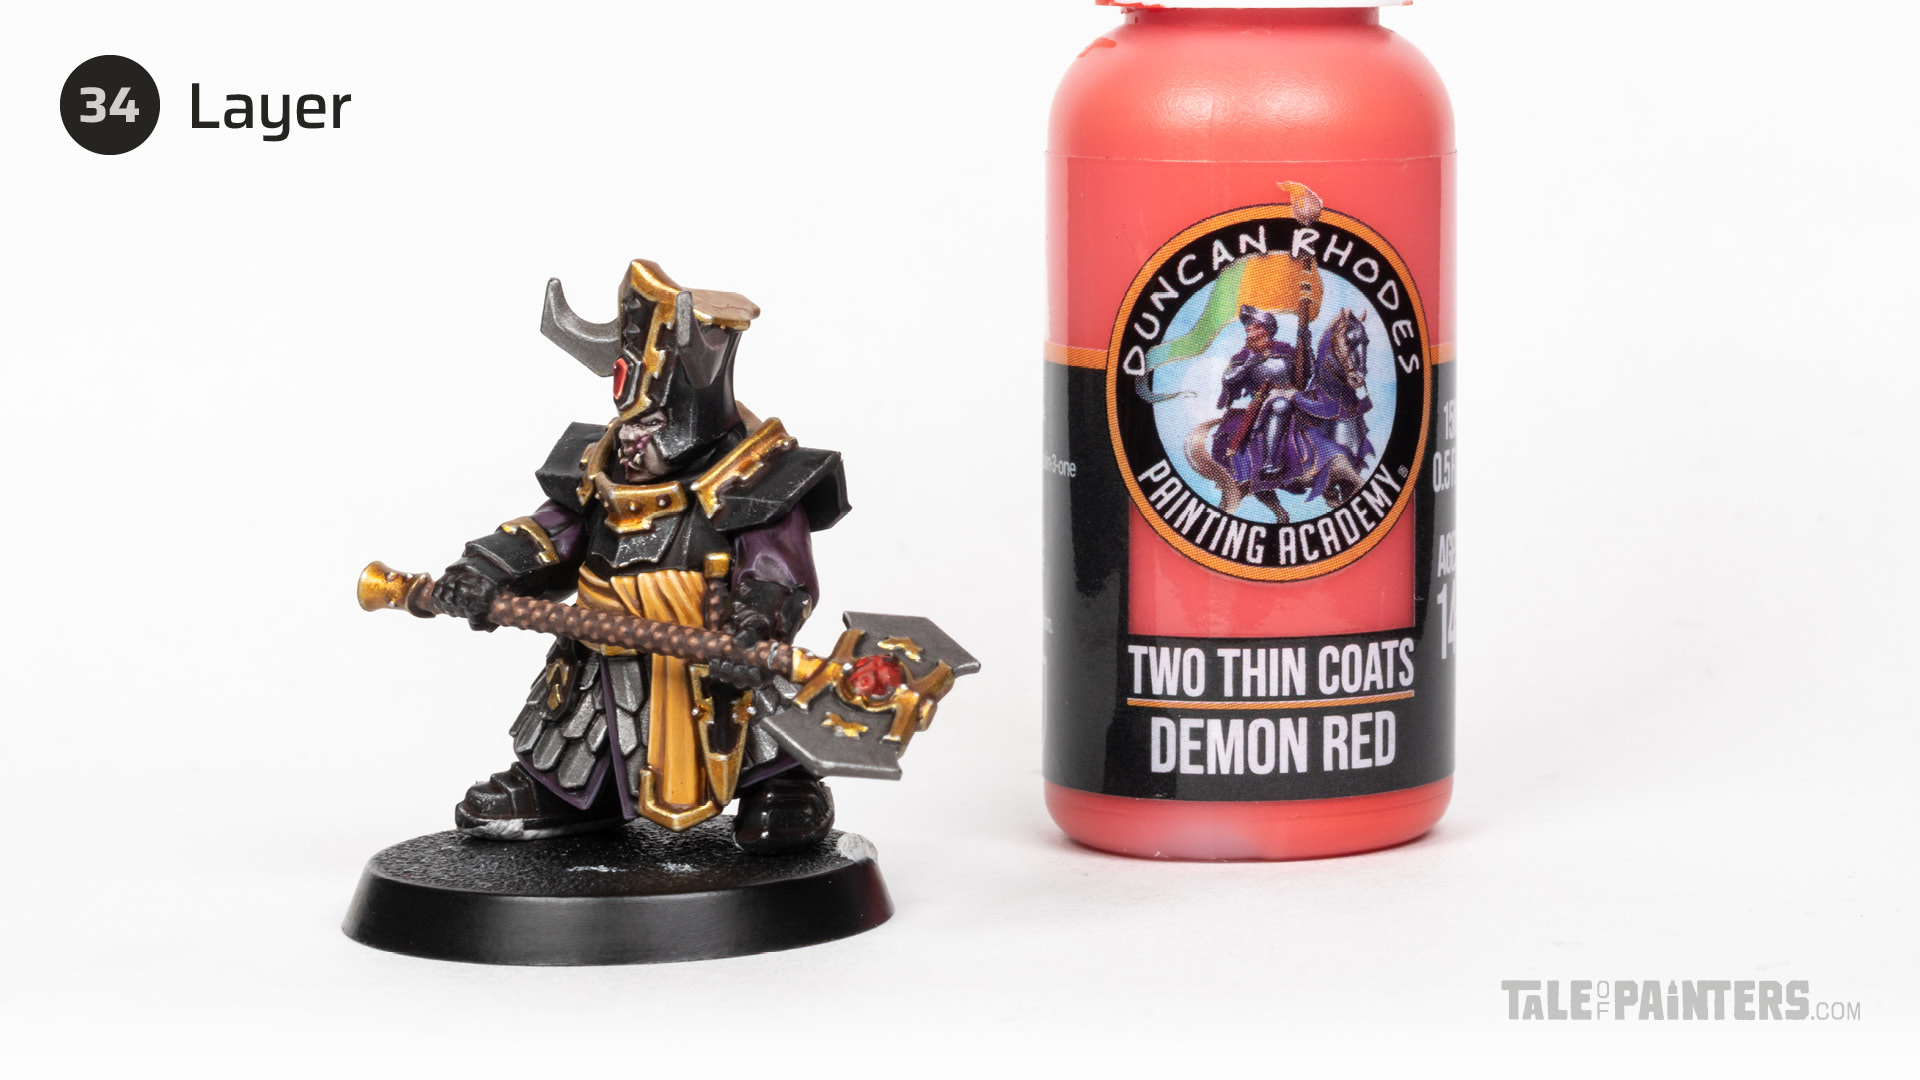
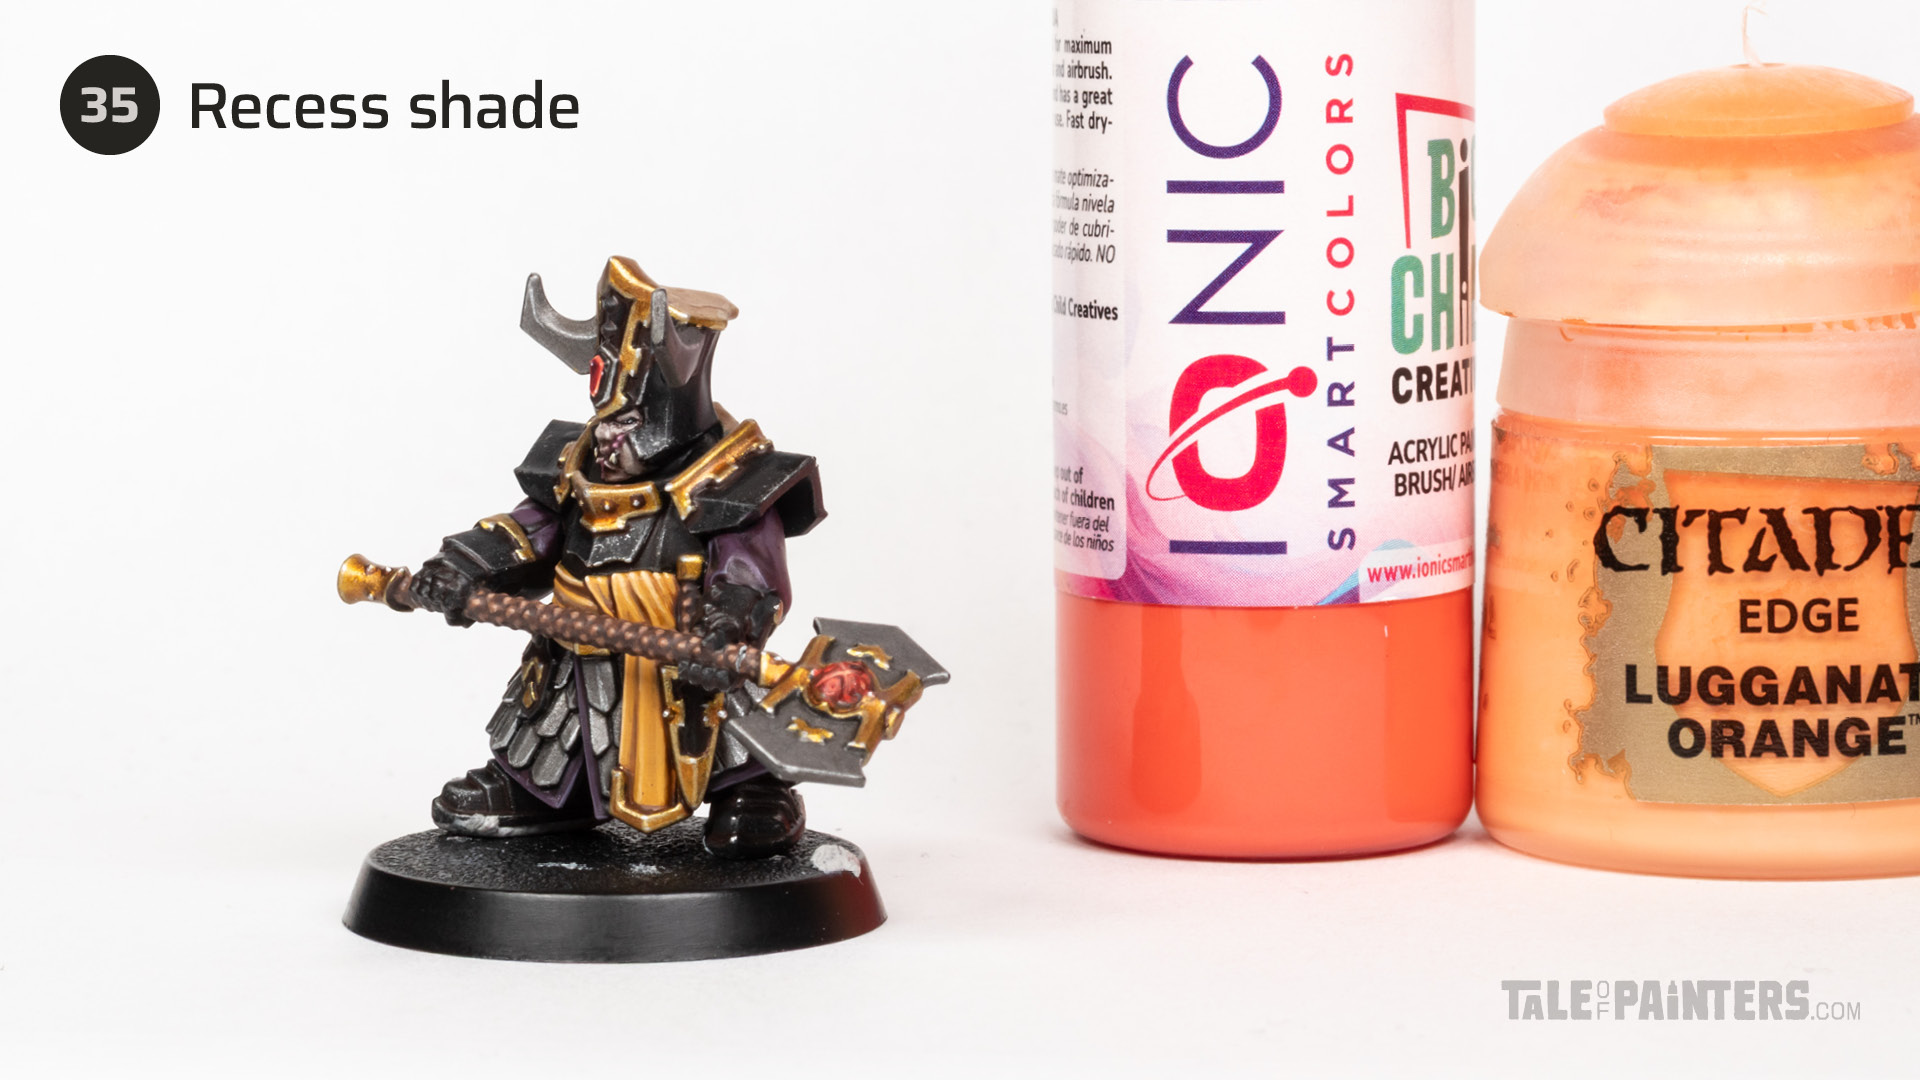
Basecoat the gem on the hat with AK Wine Red [or Khorne Red], then layer with TTC Demon Red [or Evil Sunz Scarlet] leaving some of the darker red showing in the corner. Layer/highlight with Ionic Light Red [or Wild Rider Red], then add a sharp edge highlight of Lugganath Orange to the bottom left corner. Then, add a dot highlight of VGC Dead White [or White Scar].
Final touches and base

For a daemonic energy glow, glaze the daemon furnace cage with Blood Angels Red and feather it out to create a gradient.
Layer the daemon cage struts bits with TTC Demon Red [or Evil Sunz Scarlet].
Paint the recesses of the cage with thinned Lugganath Orange. Then, use thinned Ionic Light Red [or Wild Rider Red] to smooth out the transition.
Finally, I gued the model to the base, painted the trim with TTC Rodent Grey [or Stormvermin Fur], and varnished the model with my custom mix of ultra matt and matt varnish. If you don’t have an airbrush I can recommend Mr Topcoat Premium Flat (you can find a list of more of my matt varnish recommendations here).
Championess of Muspelzharr painted by Stahly

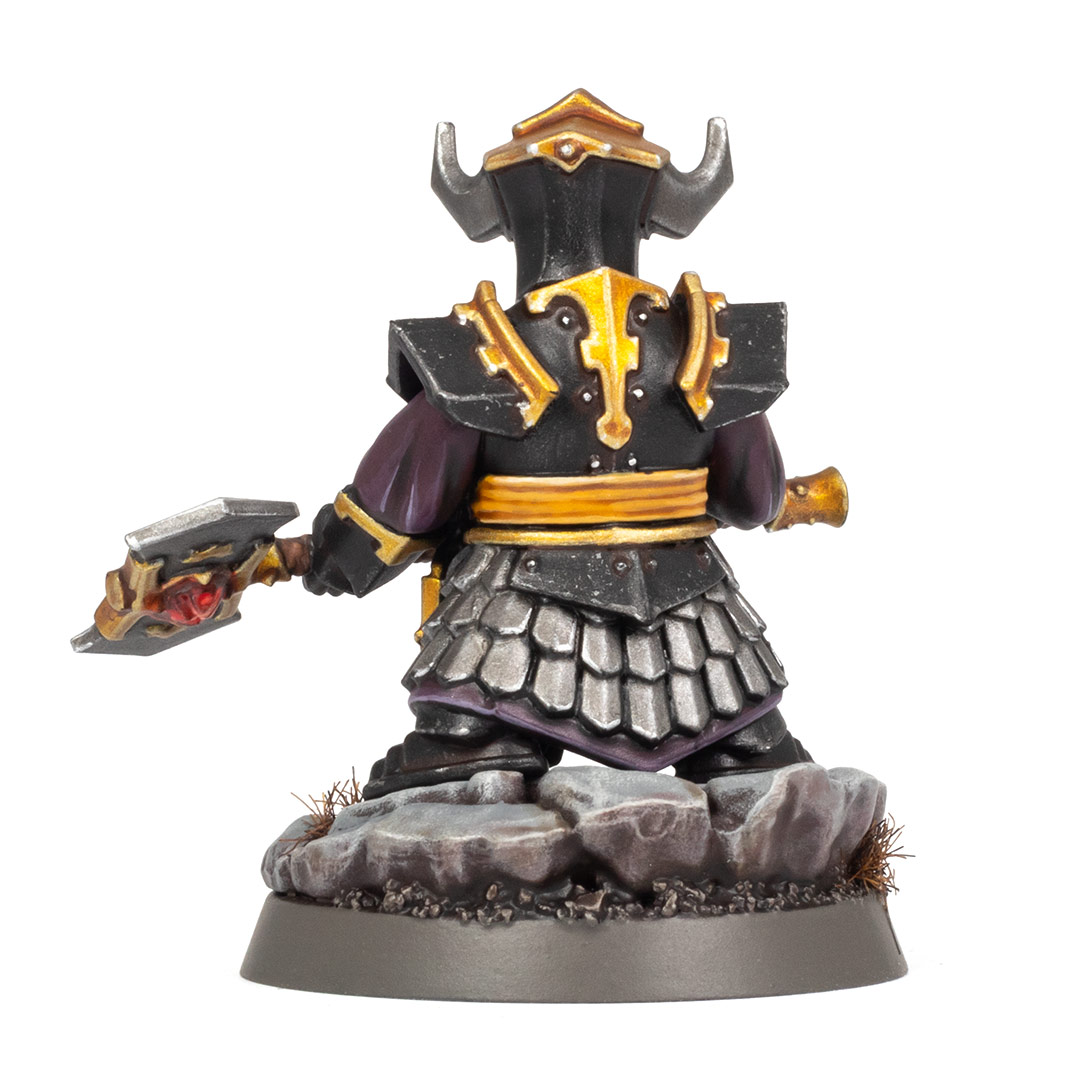
And here is the finished Championess of Muspelzharr; you can find more pictures here. I painted this model for a Warhammer Community Showcase and naturally took extra special care with the individual details. Therefore, this tutorial is not focused on speed, but on achieving a beautiful result, and I spent several hours on the painting. Consequently, I would recommend that you omit one or two of the intermediate steps or final highlights when painting an entire army.
Paints you will need for this tutorial:
Citadel (Games Workshop)
- Aggaros Dunes (Contrast)
- Blood Angels Red (Contrast)
- Contrast Medium
- Lugganath Orange
- Magos Purple (Contrast)
- Seraphim Sepia (Shade)
- Targor Rageshade (Shade)
Two Thin Coats
- TTC Cuirass Leather [or Rhinox Hide]
- TTC Dark Sun Yellow [or Averland Sunset]
- TTC Demon Red [or Evil Sunz Scarlet]
- TTC Enticing Purple [or Slaanesh Grey]
- TTC Griffon Claw [or Rakaarth Flesh]
- TTC Ivory Tusk [or Pallid Wych Flesh]
- TTC Noble Steed Brown [or Mournfang Brown]
- TTC Rodent Grey [or Stormvermin Fur]
- TTC Royal Cloak [or Barak-nar Burgundy]
- TTC Skeleton Legion [or Morghast Bone]
- TTC Twin Suns Yellow [or Dorn Yellow]
- TTC Vambrace Brown [or Mournfang Brown / Wraithbone mix]
Vallejo
- Vallejo Game Color Bone White [or Screaming Skull]
- Vallejo Game Color Dead White [or White Scar]
- Vallejo Mecha Color Dark Steel [or Leadbelcher]
- Vallejo Model Air Silver [or Runefang Silver]
- Vallejo Model Color Brass [or Auric Armour Gold]
Other
- AK Fine Primer Black [or Chaos Black spray]
- AK 3rd Gen Wine Red [or Khorne Red]
- AMP Brown Grey Wash
- Ionic Light Red [or Wild Rider Red]
- P3 Umbral Umber [or Dryad Bark]
- Pro Acryl Black Wash [or Nuln Oil]
- Pro Acryl Brown Wash [or Agrax Earthshade]
- Scale75 Dispel Magic Medium [or Contrast Medium]
- Warpaints Fanatic Elder Flower [or Pink Horror / Pallid Wych Flesh mix]
- Warpaints Fanatic Paratrooper Tan [Mournfang Brown / Wraithbone mix]
Want to conquer the Mortal Realms in the name of Hashut now? Then feel free to use our affiliate link to expand your collection:
You can find the latest GW releases at our 🇬🇧/🇪🇺 partner stores Wayland Games, Element Games, and Firestorm Games, at 🇩🇪 Taschengelddieb and PK-Pro, and at 🇺🇸 Noble Knight Games with a welcome discount of up to 20% over RRP. Using our links helps to support Tale of Painters at no additional cost to you, so thank you very much for using them!
Hope you enjoyed this tutorial. If so, leave a comment or reaction below, and if you got any questions, leave them here so I can answer them for you.
Nice work!