
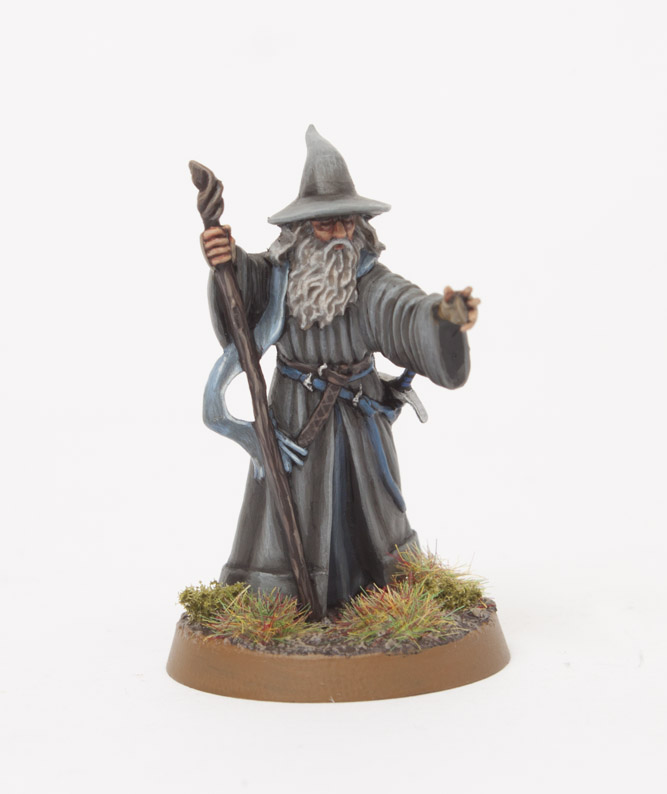
Hot on the heels of my Bilbo Baggins tutorial, I’m pleased to present to you a 23 step tutorial on how to paint the Wizard Gandalf the Grey. None shall pass… until they’ve clicked ‘more after the jump’.
This tutorial assumes you have a basic understanding of how to paint and that you understand terms such as washing, glazing and dry brushing. Each picture below shows four chronological steps. Underneath each picture are the corresponding instructions. Each step shows the paint I used during that step. It’s good to have reference material close to hand to check colours. I used google images for film stills and Games Workshop’s 360º pictures on their website were a great help. We start the tutorial with a Gandalf model already primed black.

1. Paint the face and fingers with Cadian Fleshtone. This might take two coats.
2. Lightly glaze the skin areas with Bloodletter. This will give the flesh a healthy red tint.
3. Water down Rhinox Hide and paint it into recesses such as between fingers, under eyes, frown lines. It’s important to water it down so it flows from the brush and doesn’t drag.
4. Highlight the skin areas with Kislev Flesh. Because Gandalf is squinting, I didn’t even try to attempt painting his tiny eyes. I just lined them with Rhinox Hide.

5. Paint the beard and hair with Baneblade Brown.
6. Highlight the beard by drybrushing on Administratum Grey.
7. Highlight the beard further by using Pallid Wych Flesh.
8. Use The Fang colour to paint Gandalf’s sword belt and inner-cloak.

9. Highlight the previous stage with Alaitoc Blue.
10. Paint Gandalf’s scarf with Russ Grey.
11. Paint most of the scarf again with Fenrisian Grey, leaving Russ grey as shading around creases, overlapping edges and between the end fringing.
12. Highlight the edges of the scarf with Ulthuan Grey.

13. Paint the entire over-cloak with Stormvermin Fur.
14. Mixing in a lot of Lahmian Medium (75%) to Abaddon Black (25%) shade the recesses of the over-cloak. Once each stroke dries, apply it again. Do this 3 to 4 times to build up darker shading as the crease get deeper. This is called glazing and is more accurate then washes but takes precision and patience.
15. Highlight the raised areas of the cloak with Dawnstone. Use Lahmian Medium to soften the blending.
16. Final highlight of Administratum Grey. Use Lahmian Medium to soften the blending.

17. Paint the staff, belt and shoes with Rhinox Hide.
18. Highlight the staff, belt and shoes with Gorthor Brown. Click the picture to see the patterning on the belt and the grain on the staff. These require fine lines, so use a decent tiny sable brush and thin your paints so it flows from the bristles.
19. Highlight staff, belt and shoes sparingly on only the most raised edges with Baneblade Brown. Paint Gandalf’s fingerless gloves with Baneblade brown as well and then wash them with Seraphim Sepia.
20. Highlight the gloves with Karak Stone.

21. Use Ironbreaker to paint Gandalf’s sword Glamdring. Don’t forget to paint his belt buckles as well.
22. Highlight the blades edges with Runefang Steel. Use Macragge Blue to paint the grip of the sword.
23. Base your model to fit in with your collection. I use XV-88 for the base edge and Stirland Mud texture paint on the base. I lightly drybrush this once it’s dry (takes ages) with Baneblade Brown and then glue on some scrub and static grass.
Gandalf was a lot of fun to paint, and I’m pleased with how soft his robes came out all thanks to the glazing. If this tutorial proves popular I might create another one. Maybe the next tutorial will be speed painted Goblins to help people get through all 40 goblin models included in the box.
Do you like our tutorials and reviews? Here is what you can do to support us: Check out the websites of our sponsors, place your next orders at Wayland Games by clicking here or on the banner on the right. Thank you very much, we appreciate any help to keep us going!

thanks a lot, although it's 2017! 😛
I'm not good enough for the highlighting parts on the coat. It just looked horrible, so I ended up drybrushing the whole thing
Another fine tutorial. For step 3 where you water down Rhinox Hide, I'm just wondering why you didn't choose to use a ready made wash, like agrax earthshade?
Is it because they're too watery, not quite the right colour or something else?
Just trying to understand the techniques used.
You can create washes and shades using paints. It gives you more control of the colour used because you're not limited to the selection of colours of shades. it also gives a slightly different effect. It covers better rather then just flowing into the recesses.
Thanks.
Great tutorial, really helpful! I'd love to see more of them!
Nice writeup 🙂
Thanks for the tutorial, another great one and looking forward to any more for the boxed set.
Just a quick second to Moredeth as a Paint List would be a great addition
Yes, please do the goblins next!!!
Great tutorial!
Feedback:
A separate paint list. That way I could print it out and take it to the store rather than having to parse it out of the post.
Excellent tutorial, much like the one for Baggins. Both of which gave me the confidence to try out a few techniques that I have been avoiding.
Cheers
Josh
Lovely work Garfy! I'm almost to go out and buy the box just to paint up Gandalf the way you have! Hopefully you'll make some more tutorials like this.
Cheers,
Ludovic
Garfy, another great tutorial. I love it, and want to thank you for taking the time to do it step by step. Now I am looking forward to paint my own Gandalf!
I'm really looking forward to your goblin tutorial as the white dwarf painting guide seemed v.poor, As a side note I've been checking your blog each day now for sometime and its been a great inspiration to get back into the hobby after a few years break, especially the tutorials.
I really really like these tutorials that your doing Garfy. Especially the fact that you take the time to do the step by steps, and show the exact colors your using as well. Great stuff. And the skin part alone is great for such small models, and will be very helpful for a lot of painters out there!