
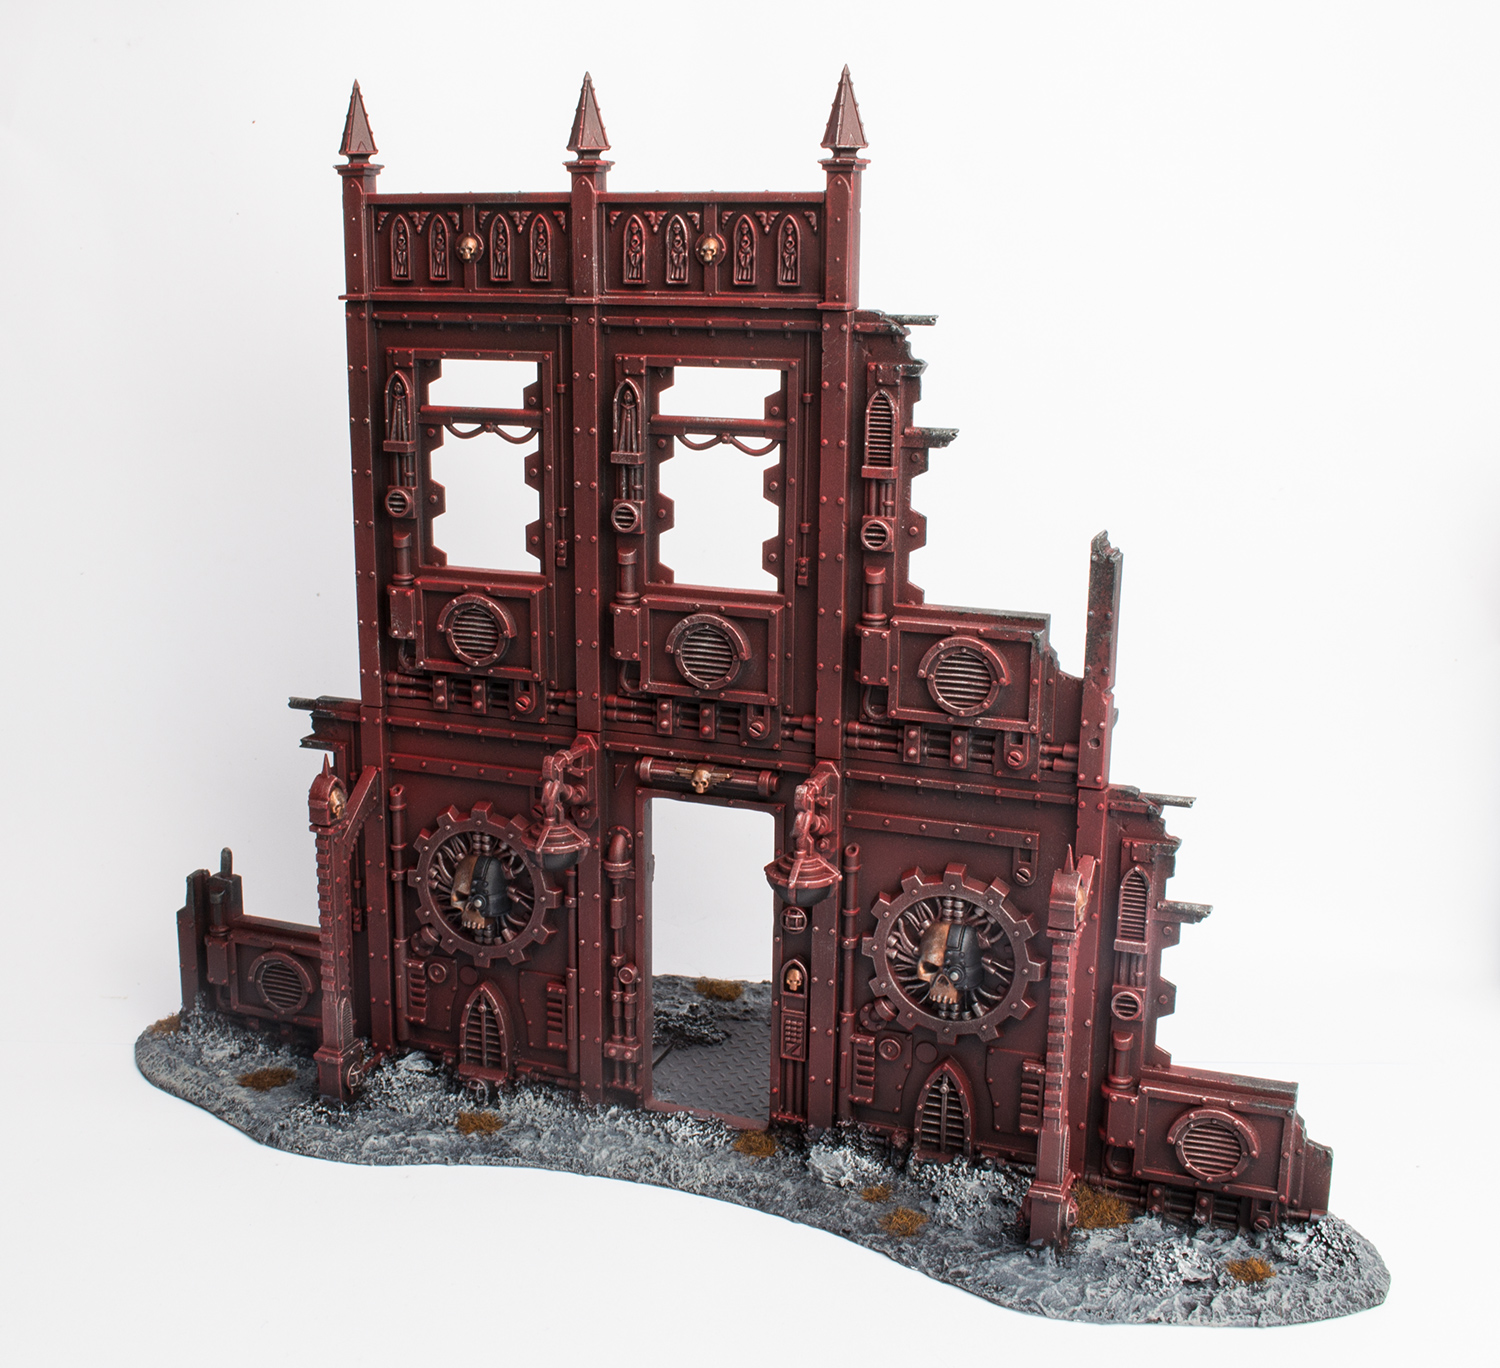
In this tutorial I’ll explain how I painted the Manufactorum above from Games Workshop’s Cities of Death scenery range. It’s the same paint scheme I used for painting the Promethium Relay Pipes I posted a while ago. It’s a quick technique that yields great results and works perfectly for Shadow War: Armageddon terrain. Find out more after the jump.
This tutorial assumes you have a good understanding of how to paint, as it involves non-GW paints and airbrushing. Underneath each picture are the corresponding instructions. Each step shows the paint(s) I used during that step. If a non-GW paint was used, I try my best to give you suitable alternatives [in brackets].
Paints I used for this tutorial:
GW Eshin Grey
GW Dawnstone
GW Charadon Granite [OOP, use a mix of Stormvermin Fur and black]
Vallejo Game Colour Scar Red [Khorne Red is similar]
Vallejo Model Colour German Grey [mix Eshin Grey with black]
Army Painter Warpaints Gun Metal [Leadbelcher]
Army Painter Warpaints Plate Mail Metal [Ironbreaker]
Army Painter Warpaints Strong Tone Ink [old Devlan Mud, or Agrax Earthshade but it’s slightly lighter]

1. The whole model was primed with black primer. I used Army Painter Matt Black and then Vallejo Surface Primer black, fired with my airbrush, to get into every nook and cranny. This is essential, as this coat will provide the shading for the next layers. Of course you could just use black spray primer and then use a brush to apply black to the areas the primer didn’t hit.
2. A zenithal highlight of VGC Scar Red [Khorne Red will work fine as well] was applied with an airbrush. If you don’t know this technique, you basically hold the airbrush at an angle from above while applying paint and let the basecoat show through, which will create a natural shading. Don’t overdo it, just give everything a light dusting of red. If you don’t have an airbrush, a wetbrush (drybrush with more paint on the brush) of Scar Red will do the trick as well.
3. Then I gave the whole building a drybrush of VGC Scar Red for a first subtle highlight. This will also even out the areas where the zenithal highlight didn’t turn out that strong.
4. Then I drybrushed with Mephiston Red. Drybrush by flicking the brush from top to bottom to create natural highlights.

5. Everything was given a gentle drybrush of Army Painter Warpaints Gun Metal (Leadbelcher). With a smaller brush I concentrated on areas such as vents and applied more silver paint with drybrushing.
6. This is another building which I painted grey, but the floors on the red building were painted in exactly the same way at this point. I applied a zenithal highlight of Vallejo Model Color German Grey [mix Eshin Grey with a little bit of black if you don’t have this paint] over black primer, then drybrushed heavily with Eshin Grey.
7. I drybrushed with Dawnstone, again flicking the brush from top to bottom. This completes the work on the grey areas.
8. I picked out some details like skulls and aquilas with Balthasar Gold and applied a wash of Warpaints Strong Tone Ink [Devlan Mud, Agrax Earthshade might works as well though it’s a lighter shade of brown]. The black bionics of the skull were painted as described in stage 6 in 7, although I drybrushed the VMC German Grey instead of airbrushing it.

9. The brassy areas were completed by drybrushing with Warpaints Plate Mail Metal (Ironbreaker).
10. To the blasted and damaged areas I added a scorched effect with sponge weathering. For this technique rip some blister sponge to create an irregular surface. Dip the sponge into paint, wipe off the excess and use it like a stamp on the model. The first layer was applied with Abaddon Black.
11. The second layer of the sponge weathering was applied with old Charadon Granite [Stormvermin Fur is similar but slightly lighter, so add a little bit of black].
12. The scorched edges were gently drybrushed with Longbeard Grey to represent the ash, then the broken girders were drybrushed with Warpaints Gun Metal [Leadbelcher].
Finally I painted the base to match the style of my display board. I also covered the building in gloss varnish first and then in matte varnish, both from Vallejo. The gloss varnish provides better protection, while the matt varnish removes the gloss.
Below you can see the back of the building. The grey floors have been painted as described in stage 6 and 7. If you’re wondering how I built the base, check out my Manufactorum modelling guide.

The finished piece looks great on the battlefield already. Of course, feel free to pick out more details, e.g. cables or the alarm lights. Remember to pick dark and muted colours so that your scenery doesn’t overwhelm the paint jobs of your models.
Hope you enjoyed this tutorial, share your feedback in the comments below! And stay tuned for the showcase post with all three Manufactorum structures on my display board.
Do you like our tutorials and reviews? Here is what you can do to support us: Check out the websites of our sponsors, place your next orders at Wayland Games by clicking here or on the banner on the right. Thank you very much, we appreciate any help to keep us going.
7 Comments
Leave a Reply
Tale of Painters is the unofficial Warhammer hobby magazine run by hobbyists like you. Support our work by using the affiliate links from our 🇺🇸 / 🇨🇦 partner stores for your next orders so we can continue to bring you fantastic FREE content every day:


Or support us directly:


So this is kind of a silly question, and I apologize if this isn't a useful place to ask, but: what exactly are the girders in Cities of Death building kits for? The instruction booklet is pretty poor, and doesn't even acknowledge they exist. Are they intended to reinforce parallel strips of floor tiles?
I really like this tutorial. Do have you have similar tutorial on blue or green hues?
Thanks!
Not really, but it's easy to swap the paints I used. I recommend going for muted hues, like The Fang for blue or Deathworld Forest for green.
No matter the subject, your tutorials are always ace and a pleasure to follow !
They look great! Thanks for the work to write it all up!!
schweetly touched.
Looks sharp. Thanks for the tutorial.