

With the release of a new Dark Elves army book looming ahead, we at Tale of Painters got a request for a Druchii painting tutorial so here we go. This one was written in 2010 actually but except for a few paint names, it still all holds true. So buckle up, this is an in-depth article in which I also go rambling into painting philosophies and why I paint something the way I do in this tutorial and such. Hope that you find it interesting and for myself it’s an interesting look back.
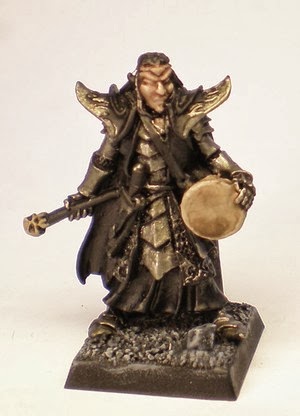
Some people asked me how I paint Dark Elves so I got some blank DE mini (a Blackguard Musician) from an old box, painted it up and documented the procedure as closely as possible.
Step 1 – Building, Basing:
Clean the miniature with soapy water and a toothbrush, clean of ANY soap residue. For the most of you, this is old stuff but I still want to mention it. Clean the miniature of any “flash”, mold lines etc. with a modelling knife. In this example, I primed the miniature before glueing it to the base and sanding the base. I usually don’t do that but this thing was rather unplanned so bear with me. 😉

As you can see, the primed miniature is put onto the slotta base (I had to cut the base a little to fit the metal tab into the slot. No big deal.), applied a little drop of superglue and a pebble, then applied PVA glue (mixed with water. Not too thin because I prefer the stuff not to be runny so I go for a mix of about 70%glue 30% water) and sand. Watch out for that superglue. Even your unglamorous PVA-applying brush will take damage when the bristles are clogged up with super glue so wait until the superglue underneath the pebble is totally dry.
I basecoated the face with Foundation Dheneb Stone while the PVA glue dried. This takes a while and you don’t want to paint or prime the base while the PVA is still wet.
Step 2 – Basecoats:
It looks like quite a lot happened here but it’s all pretty basic stuff. The base was primed. I prefer to have bases primed as well after applying rubble/sand/etc. because it makes the sandy surface much harder and you need that when you drybrush it. Nothing worse than drybrushing over the base and having 50% of all the sand on your brush. So prime the base, wait until it’s dry.
Then I applied the basecoat for the base. For grey bases, I like using VMC German Grey mixed with a little black. The basecoat on the base usually takes quite a while to dry. Again, you have to wait until it’s really dry because the moisture of the new paint tends to weaken the PVA layer again. Next thing I did was drybrushing the base in two layers, both mixes of German Grey and White.

The silvery armour parts were basecoated with Boltgun Metal, chainmail parts were drybrushed with Boltgun Metal and the skull-on-a-stick and the skin on the drum were basecoated with Dheneb Stone again.
Step 3 – Washes:
Now we’re applying shadows to these relatively flat surfaces and give the lighter parts their base colour.
The metal parts got a wash of black. I made this wash myself using black paint, water and some dishwashing liquid. Main reason: I was out of Badab Black and my LGS didn’t have any left. Secondary reason: It’s a bit stronger a wash and doesn’t take the shine away from metallics as much as Badab Black does.
The Skull was washed with a mix of Devlan Mud and Black Wash, the skin on the Drum was washed with pure Devlan mud, watered down of course. I water down everything I paint with so if I forget to mention it, just imagine that I added “(watered down)”.
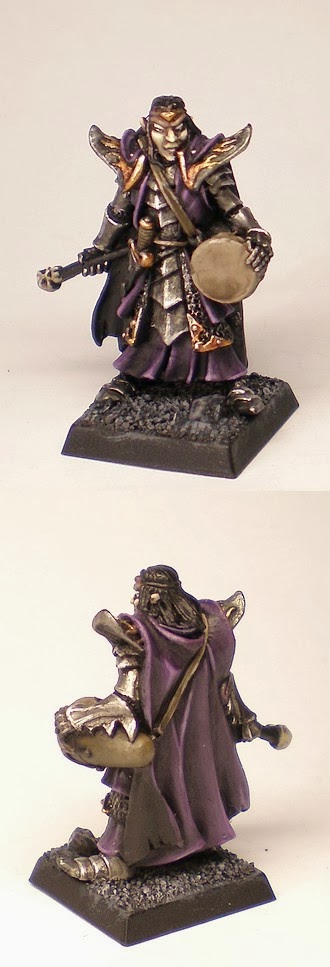
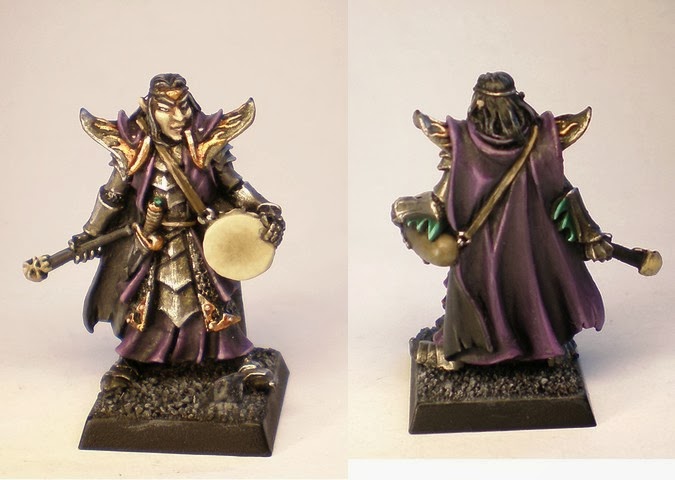
The face was washed with a mix of Devlan Mud, Gryphonne Sepia and Leviathan Purple. It gives the face a very nice, not quite healthy colour with a purple tint that makes it go better with the rest of this rather purple miniature later on.
Step 4 – Gold:
Now it’s time to apply the basecoat for another prominent colour on this guy – gold. Rather often, people ask how to paint Gold and of course there’s not one proper way to paint gold but there is the one golden (hurhur) rule: It’s all about the basecoat. GW Gold of what ever shade doesn’t cover awefully well so you should always use something as a basecoat underneath the gold.

Some like to use brown or even red, I prefer to use metallics to make the gold more shiny. Because if there’s gold, it better be shiny. So for a Gold I want to have look darker and maybe worn in the end, I usually use Tin Bitz for the base and just highlight it with gold which gets you a very stark contrast. I did that on that big Warriors of Chaos army I did earlier this year. On my Dark Elves, I prefer the gold to be more red and more shiny so I use VGC Brassy Brass. It covers very well and overally is a neat brass colour to use.

The next thing that had to be done was adding a little depth to the gold. For doing this, I mixed some Gryphonne Sepia with Leviathan Purple and inked the deeper parts of the golden sections. You have to take care with this step so you keep that ink strictly on the golden parts. You don’t want some red/purple shade on your silver parts of the miniature (unless you really want to “set a mood”, use “limited palette”, etc. but in this case you won’t really read this anyway), it will make the whole job look messy.

I hope the pictures of the metallics look good enough to get the point I want to make.
Step 6 – Mithril!
O noes, we upset mighty Mithril Silver by mixing it with a weakling colour like Shining Gold and now it has come to take revenge on the whole miniature!
Well, at least on the metallics. Maybe you wondered why I didn’t do anything with the silvery metallic parts and went straight to the golden parts. That’s because everything get Mithril Silver highlights now and it would have been kind of a waste of time not to do this in one step. So basically, all the armour parts get some edge highlighting and the chainmail parts get very, very, very subtle highlights as well, only on the most exposed/most reflecting parts (or just parts you make up). The most important thing is that you keep your mithril silver watered down. You can get sophisticated now by paying attention to some imaginary source of light off of which you base the reflections on metallic surfaces but this is just a straightforward paintjob so it’s mostly edge highlighting.

It’s not perfect but it suits the purpose and we can repair terrible parts lateron.
Step 7 – Purple Cloth:
Now we’ll start with what we’re actually here for. I started off with a mix of Chaos Black and VMC Royal Purple for the basecoat of the cloth:

Nothing fancy, just a very dark Purple, to serve as deepest shadow, painted onto the cloth surfaces.
But wait! First, I fixed the front armour things a bit using black wash. As you can see in the picture of step 6, there was a little blob of Mithril silver on the lower end of the second to last armour piece on the font of the miniature. The part of the blob I didn’t want was toned down with a glaze of black wash. Just put the wash onto your brush, mix with water and then pull, starting at the point we want toned down the brush from the lighter to the darker areas. Just swipe from the lighter area into the darker area where the wash won’t do any harm. With each stroke, the overly light part will be darkened until it looks okay.
Then, I applied a layer of purple with only a bit of black mixed in followed by a layer of pure Royal Purple.

I tend to choose a colour from a pot to be the mid-colour, in this case Royal Purple, then I add either a darker colour or just black to it to create the shades, add less and less of the darker colour, then the pure colour, then I start adding a lighter colour like Bleached Bone or white (Bleached Bone gets you much softer tones than white, which gets you more vibrant tones). I rarely use one colour for the base and another one for highlights because these colours usually don’t correspond that well, especially with GW’s range of paints. So I mix all shades and highlights.
Anyway, it’s important that these layers of paint are very, very thin. You want them to blend with the layer underneath as well as possible.
Step 8 – Purple, Purple, Purple:
So we just continue highlighting the cloth..

I just added a little LUKAS Acryl Vanilla paint to the purple. Frankly, I couldn’t decide wether I wanted to use Bleached bone or White so I settled for a colour in between these two. I got that paint at a sale at my LGS recently and wanted to try it out. So I just kept on highlighting. Now the cloth looks pretty good already. At this point, you can decide wether you want to use a wash not to tie the single layers together a bit more and strengthen the shades or not.
Step 9 – Finishing the clothes:
As mentioned before, the next step was giving the purple cloth parts a wash.
I used a 70/30 mix of black and purple wash and as always, it looked better after the wash. It’s not an overly thick wash, just a bit to make it look a bit glazed. If this coat dries a bit shiny, nevermind. We’ll apply matte varnish in the end anyway.
So after this wash, I did the final highlights using an 80/20 mix of Vanilla and VMC Royal Purple. This may come a little late but when I’m writing up ratios of mixes… these are all estimations. I don’t use any sort of measurement but visual judgement.

So I called the clothes finished and started detailling by basecoating handles, leather straps and such with VMC Chocolate Brown.
Step 10 – Detailling:
This step is pretty basic again, just some edge highlighting on the brown parts using two mixes of VMC chocolate bown and bleached bone followed by a little wash.

It doesn’t look perfect but it’s perfect enough for our purposes. If needed, I can fix that later.
Step 11 – The Face:
Now the real fun starts. This is the point where this guy really gets his personality. Is he happy? Is he sad? In pain? Plain stupid? We’ll see. To be honest, I never really know how a face turns out. I usually start with a basecoat and a corresponding wash, as done in earlier stages. Now it’s time to set the final colours and highlights of the face. It’s a Dark Elf, so he better look pale and, as mentioned before, should have a “not quite healthy” facial colour. That’s how I like them at least.
Highlighting was done with basically three colours: Bleached Bone, White and Vanilla. I can’t say much about this stage apart from: Keep your layers thin but don’t load much water onto your brush so take up some of the paint and water onto your brush but wipe all excess off the brush before applying the paint. Try your best not to get the light face colour paint into the recesses (where you do NOT want them) because touching up/”repairing”faces without messing up even more is hard.
What you want to start with is the eyes. An eye can be tricky to paint but the trickiest part is that there are two most of the time.
Anyway, paint the eyeball black, paint it white and leave a small portion or “frame” of black around the white part so you have a conture around it. This usually is pretty hard to do but once you get a grip of that, it goes fairly well. Remember, you don’t need a small brush for that, all you need is a good tip. The smallest brush I use is 0 and I only really use it for very small freehands or eyes.
Alright, now we got a white eyeball. Glowy-white eyeballs may look good on certain miniatures but in my experience, eyes with pupils look way better. This is the really tricky part about painting eyes and I’ll be honest: There are days on which it works and days on which you won’t be able to paint a single halfway decent-looking eye. Some people suggest using needles to do pupils. I tried it once but it doesn’t really work for me. Some suggest to use really fine pens or stylos but that’s not painting.
Anyway, painting a black point in a more or less appropriate size can be achieved. Next problem: The direction the guy looks. Have a look at the miniature and find out where it probably is looking. (the way heads, swords or guns point usually are an indicator 🙂 ).
Here’s something important I learned and which helped me a lot for painting eyes: Make them squint. If you want to make two eyes seem to look in the same direction, make the one that’s on the opposing side of the face look stongly in the direction and the eye that is closer to the point the miniature is looking at should aim less in that direction. It doesn’t make much sense but it looks way better, believe me. When painting GW Dark Elves from the 2000 range, you’re really lucky because they have very nice faces with BIG eyes. They’re rather slitted but they are big.
I like painting lips because you can play around with various colours and you can change the facial expression a bit. For this guy, I went for really purple-looking lips. He might wear lipstick which I think is a thing male Dark Elves would do in their vanity. Anyway, when this mini’s face was just basecoated and washed, I never would have guessed that he’s sport such an evil smirk later on. I don’t want to brag because I really didn’t do that much apart from just highlighting the exposed parts but I really like how this guy’s face came out. And I was really lucky that the face worked so well on this step-by-step dude.
Other stuff I did with this step: Highlighting the skull (Bleached Bone, white) and painted the drum’s torso (this one was a bit trickier. VMC Chocolate brown, chocolate brown/Rackham Kanielle Yellow [wtf?, got it in a sale and wanted to try Reckham paints], later highlights with bleached bone mixed in and lots of layers of washes of devlan mud, gryphonne sepia and black).
Step 12- The Black Parts:
As we all know from experience, highlighting Black is tricky. The main reason for that is that GW black dries quite shiny while greys or black mixed with white usually dry pretty matte AND tend to get pretty obvious “borders” when drying (lighter Greys also tend to change colour when drying which makes me not like painting light grey very much). All this could be solved if I used not white or grey to highlight black but blue or something like that.
But I don’t. So I started off with a mix of black and VMC German Grey. Nevermind if the first – in my case usually darkest – layer is applied a bit sloppily with very visible borders and such. I tend to use this first layer mainly to find out where I really have to paint the highlights i.e. where they work best. It’s all trial and error. Especially on a black basecoat you can make up for mistakes pretty easily.

Here you can see the state of the black parts, just the inner cloak really, after the first two layers. It looks messy as you can see.
Step 13 – Finishing the black surfaces:
In this step, a lot got done but nothing especially tricky or clever was employed to achieve that. It was just plain old “highlighting black surfaces of different kinds”.

So let’s see. First, I finished the inner side of the cloak by applying two more layers of successively lighter greys followed by a black glaze (very thin black paint, not too much on the brush, with the layers pulled from the lighter to the darker areas) to merge the different layers a bit. Highlighting black is tricky and I think that everyone works out his own way to do it properly over the time.
To be honest, each time I highlight black surfaces larger than let’s say a small pouch, I have to make up a whole new recipe or way to do it so explaining doesn’t help much there I’m afaid. I mean, it’s just adding white to the black and painting the exposed parts with these mixes followed by a struggle to merge these layers lateron. And while you’re doing all that, you have to take care that the surface still looks black in the end rather than dark grey. It’s tricky and some days are just better for highlighting black than others. But with some practice, it’s possible to figure out ways to make it look okay.
Now that I got that cloak off the table, all the other black bits on the miniature had to be highlighted. The shaft of the dagger was pretty easy. Just regular edge highlights with two mixes of black and white, that’s it. It’s not really correct (t should be way lighter on the upper part and darker on the lower part) but we’re not painting for Golden Daemons here, we want to get this guy painted to a respectable tabletop level.
The drumstick was similarly simple to paint. Some time ago, I figured that it’s utter ******** to try to do classic highlighting on black staffs. Rather than doing that, I just painted a lighter stripe along the stick where the light might be reflected (= from where people will regularly look at the miniature) with a mid-light grey followed by a thinner stripe in the middle of the first stripe with a lighter grey. Some edge highlighting on the end of the stick, done.
Now for the hair. Black hair is tricky to paint as well and I haven’t quite figured it out but I think I’m on the way. The thing about painting hair is that you shouldn’t drybrush it unless it’s got a really, really strong texture (like the furs on the backs of chaos warriors or the manes of plastic horses). Take a brush with a fine tip and paint tiny little stripes. They don’t necessarily have to go with how the hair is actually modelled as long as it looks right. So much for hair in general. So why is black hair tricky? Because, like all things, you have to avoid making it look like it’s just dark grey. So you have to take a very light grey or just plain white and paint only where the hair actually reflects light. That’s on top of the head and on the ends usually. The hair as I painted it on this guy is far from being perfect. I think I should have gone for an even brighter tone for the highlights. Oh well, I guess I can fix that lateron. But so much for the theory of painting hair.
Last thing I did was the eyebrows. Dark Elves from this range have beautiful faces but weird, HUGE eyebrows and at first I refrained from painting them all black. I was afraid of getting this guy a huge mono-brow so I looked at Coolminiornot.com to see how others did it and what it looks like finished. This is always a good way to see or estimate how stuff’s going to look like if you’re not sure wether you should do it or not. So I looked at a few pictures and it actually looked good to have the whole sculpted brow painted so I went for it and I like how it came out.
Step 14 – Drum:
Time to take care of the last few bits. I went on to face the biggest of these bits first – the skin on the drum. This was fairly classic layering using mixes of graveyard earth, bleached bone and white. These three are a very good combination and they will help you get most light things done. Prachment, bones, skin, teeth, horns. The layers on this one don’t merge very smoothly because the darkening in the middle is meant to stem from this guy beating it with a stick. He may be a well-trained drummer but he won’t always perfectly beat the middle of the drum skin so the darker parts are a little uneven. If that makes sense.

The sides of the skin were painted in a similar manner with simple edge highlighting of more exposed or elevated parts. The little knobs that keep the skin in place were painted with boltgun metal, black wash and got a highlighting dot of mithril silver. Same with the rings that connect the drum’s torso with the leather strap and the tiara-like ring on his head.

Step 15 – Final Details:
I had a look at my other Black Guard miniatures and noticed I had given them green, crystal-or-something-looking bracer decoration things so I went back and repainted these on this mini accordingly. I painted the little gemstone on the handle of the dagger in the same colours.
There are sooo many tutorials on painting gemstones out there and all of them are good because all of them are basically the same. This article has everything you need to know about painting gemstones I think.
As for the green razor…spike….bracer add-on things, here’s how I painted them: Dark Angels green basecoat, black wash, highlights with a mix of DA Green and VMC Deep Green (lighter than DA Green, less spinach-green, more of an emerald green), highlgihts with a mix of Deep Green and white, final highlights using white. I want this to look shiny. The same colour have been used for painting the gemstone in the front.
Okay, everything is painted now, time to varnish. I use these two products to varnish miniatures:

Vallejo matte varnish and GW’s glossy ‘Ardcoat. (both brush-on) First, I applied a layer of gloss varnish.

After this layer completely dried, I painted the borders of the base black. That’s a thing I only started doing in the past months. I think it looks tidier than using the base’s basecolour and it goves the miniature a kind of “frame”. Then I applied a rather thin coat of matte varnish over the whole miniature. I’m pretty pleased with Vallejo’s matte varnish, it has a nice finish and doesn’t change colours a lot (almost not at all) but be cautious not to apply too much and always water it down. I had to apply two to three thin layers to the back of the cloak until it was really matte again.
Now for one not too good photo of the finished piece:
….and that’s it. Thanks for reading, it’s been fun to make this whole point-for-point guide and I hope that maybe it was of help or inspirational to someone.
One last little comment on different brands of paints and such: Personally, I’m not a fan of exact painting guides which tell you to use this and that brand or kind of paint. Nobody can recreate somebody else’s paintjob perfectly (and that’s part of the beauty of model painting). What tutorials help with is inspiration, showing approaches to painting and maybe some technique stuff. What colours exactly are used is secondary so don’t be afraid if you can’t find some LUKAS Acryl paint or something like that. 😉
Hope you enjoyed the tutorial. Just leave a comment if you’ve got any questions, criticism or what ever else you have to say.
Do you like our tutorials and reviews? Here is what you can do to support us: Check out the websites of our sponsors, place your next orders at Wayland Games by clicking here or on the banner on the right. Thank you very much, we appreciate any help to keep us going!
5 Comments
Leave a Reply
Tale of Painters is the unofficial Warhammer hobby magazine run by hobbyists like you. Support our work by using the affiliate links from our partner stores for your next orders so we can continue to bring you fantastic FREE content every day:


![]()
![]()
Or support us directly:


Hi mate I.think you missed a part on painting the gold, did you mix mithril silver and polished gold to paint the highlights??? I was a bit confused caused it jumped straight to the armour. Great tutorial btw!
Beautiful tutorial (was me that requested on fb).
Thank you very much.
A quick question regarding the varnishing at the end:
Does this effect the metallic in anyway?
Thanks,
Edd
Excellent tutorial Sigur 🙂 This will come in useful this weekend with all the new releases for Dark Elves. Good stuff 🙂
Hi Anonymous,
I prefer Model Color, mostly because I've got various other paints ranges at my disposal to cover the more garish colours and I'm not the greatest fan of dropper bottles in the world. I use them very often and without problem but if they came in flip tops I wouldn't be sad.
I do use the metallics from the Game Color range regularly though and probably some single other paints I picked up over time as well. But in general, I'm more of a Model Color man. The more naturalistic tones, the grittier texture and the opacy make them a joy to work with any compliment other paints ranges I use really well.
Do you prefer Model color or game color?