
Following hot on the heels of my DSLR tutorial, I’m proud to present my iPhone photography guide. Let’s get started after the jump…

You’ll need this selfie-stick camera holder minus the stick
Equipment you will need:
iPhone (or any smartphone)
White background paper (art shops sell A2 sheets individually and come in a host of colours)
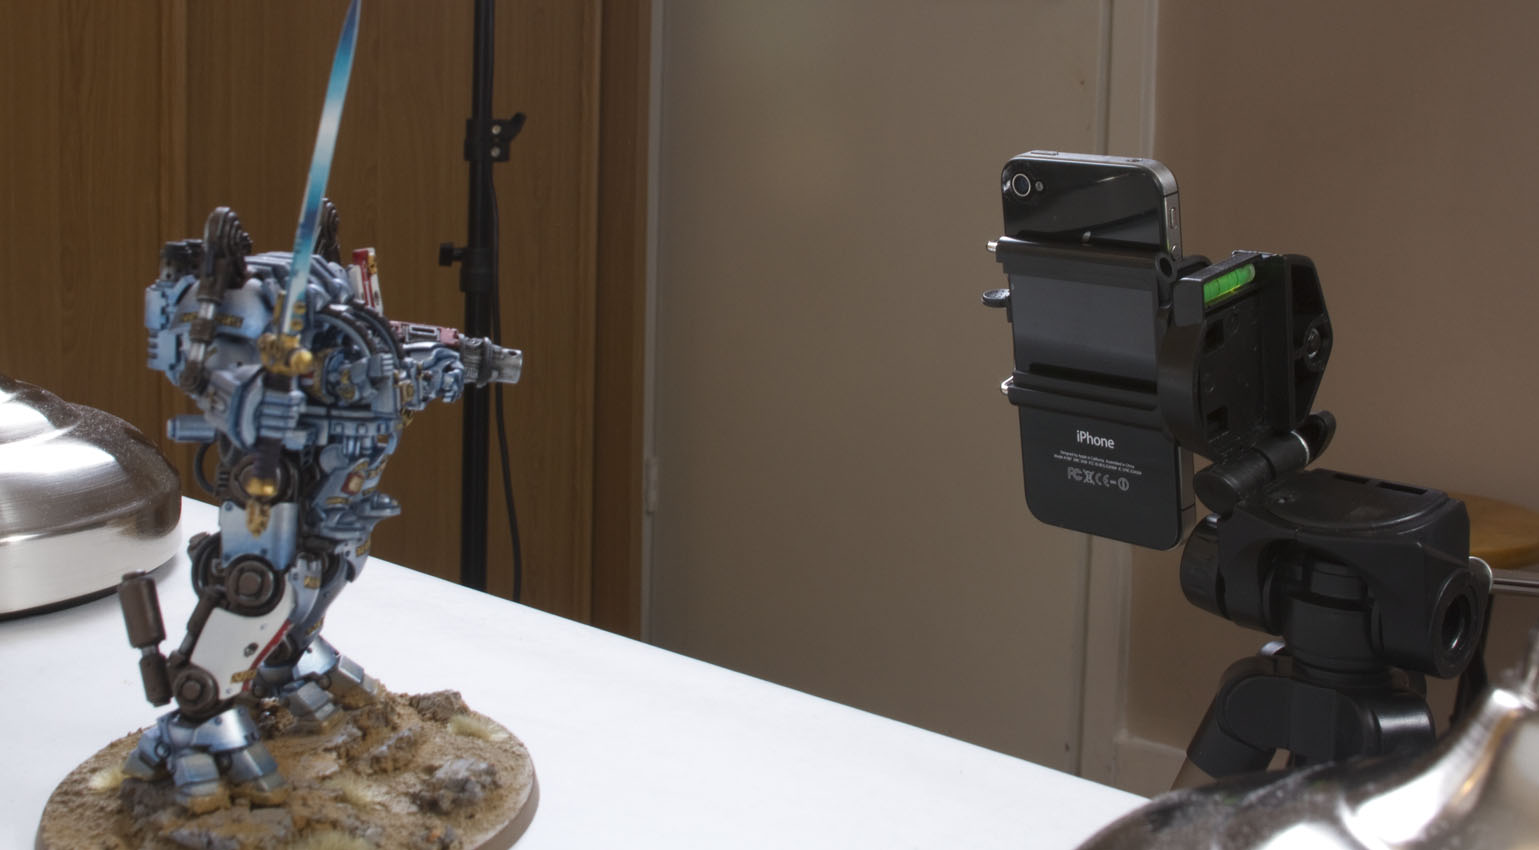
Tripod (I’m using one that costs £12)
A selfie stick camera holder (available on eBay/Amazon, very inexpensive)
Two or more lamps
Camera+ App available on the App store (£2.29) There are Android equivalents, I found one called DSLR Camera Prowhich is similarly priced on the Google Play store.

Set up:
Set the tripod up and screw the camera holder into the top of the tripod and put the iPhone in it. Use a sheet of paper and have it curve upwards, you may need to tape it to something. Set up your lights either side of the subject. Make sure they’re evenly spaced so they cancel out each others shadows.

The picture above was taken with Apple’s in-built camera. As you can see it isn’t very good (read the previous tutorial to find out what makes a good miniature photo). The background isn’t very white and whilst the subject is correctly exposed, the background is underexposed. Sadly there aren’t enough features on the in-built camera app to allow us to fix this.

I’m using an iPhone, so I’ll be using the Camera+ App in the examples below.

When open the App you’re greeted with this view. Top left icon is flash on and off, we’ll want this off. Top right icon is switch camera. Down the right side is a slider for zoom. Bottom left icon takes you to your pictures. The large white circle is the shutter button, the plus sign next to the shutter is the shooting options and the menu on the bottom right is settings. Click on settings and change the quality to Pro. It’s always best to shoot in your highest settings. General rule of thumb is you can reduce an image’s size but you can’t increase it.


Tap the screen on the subject area and the tap will leave a purple square with a plus symbol. Press the plus symbol.

Now this is the cool thing about this App. You can separate the focus and exposure points. Just move them apart with your finger on the screen. Look at the picture on the right above. Click the square targeting reticule and then move the purple square over the subject. Over a head is a good place because you’ll want that in focus. Then click the middle aperture symbol so you can move the exposure orange circle. Move it around and you will see the picture change lighter and darker. Aim for an area of the picture that is dark, this will ensure the dark areas are exposed correctly and mean lighter areas like the background will over expose.

You can also set the exposure manually using the slider below the aperture symbol (see above). You can over expose by sliding for a longer exposure. Because you will expose for longer you will need the tripod to avoid camera shake blur. You can also change the ISO. Keep this as low as possible to avoid grain and noise on the image. Don’t go over 400. The aim here is to get the subject nice and bright and the background as white as possible.


Now we need to set the White Balance. Sadly there isn’t any custom WB option in this App but there are plenty of options. I initially set it to incandescent as I’m using lamps but it’s way to yellow. I click through the options and in the end my best option is Auto White Balance.

With the settings dialled in, we just need to set the timer. Click the Plus symbol next to the shutter button (its turns into a blue cross) to bring up shooting options and set the timer. Take the picture.
Having taken the picture, I press the pictures button on the bottom left to view the camera roll and click my latest picture and then select edit. There are filters at the bottom that you can use to further enhance your image. I clicked standard and then chrome and it really helped brighten the background.

Here is our finished photograph. It’s a vast improvement on the first one we took. It’s not perfect though. It should be possible to get that background perfectly white with enough light.
Check back soon when I post the tutorial on how to colour correct your image using cheap (£22) photo manipulation software called Pixelmator (Mac only, but the tutorial translates perfectly to GIMP which is free for PC and also Photoshop).
Do you like our tutorials and reviews? Here is what you can do to support us: Check out the websites of our sponsors, place your next orders at Wayland Games by clicking here or on the banner on the right. Thank you very much, we appreciate any help to keep us going.

22 Comments
Leave a Reply
Tale of Painters is the unofficial Warhammer hobby magazine run by hobbyists like you. Support our work by using the affiliate links from our 🇺🇸 / 🇨🇦 partner stores for your next orders so we can continue to bring you fantastic FREE content every day:


Or support us directly:


This is useful! I've linked your tutorial in my article about the topic – https://alkony.enerla.net/english/the-nexus/miniatures-nexus/miniature-hobby/miniatures-photographing-miniatures
There's huge amounts of delicate spring up light boxes on Amazon for significantly less expensive than that Foldio setup (not to debilitate you). Besides the delicate ones diffuse light all things considered so you can control your light significantly better.
send gift to bangladesh
Awesome setting here I learn. Thanks to share a lots.
I'd like to see what you could do with an LG G4 on manual mode. It has a great camera and in manual mode you can change pretty much everything (white balance, focus, ISO, shutter speed) except aperture size which is fixed on f/1.8
History books may soon be updated with the most recent (and possibly the greatest) chapter in the Selfie Stick continuing relationship with humankind. That humble tool now enables us to lift our phones and cameras aloft, to take better photos of our surroundings…and ourselves.I know what you are thinking. “If this narcissistic trend was meant to be, we’d have been born with really, really long arms!” I felt the same way when I first started noticing selfie sticks cropping up.
anyone know of a similar Android app?
Wow – thanks for the article, Garfy! I never thought of stripping the holder off of one of those selfie sticks. I'll definitely be playing with DSLR Camera Pro as well. Excellent tutorial!
All these light boxes aren't needed. Look in the article. You won't catch me using one. If I need more light one side or to soften a shadow I'll use a reflector (white/silver or gold) card to bounce light back onto a subject.
You just need a large background sheet. Bigger the better.
Light boxes are restrictive in size. Any large models or group shots aren't possible. So don't bother with one. Honestly, not needed.
What an excellent article Garfy. Thanks for this.
I'll be sure to use the methods you've mentioned here combined with my Foldio setup and post them on the Workshop.
Excellent, a thoroughly useful article.
Fantastic article. I do all my mini photos on my iphone, and have been having alot of issues with the photos. What you have posted will sort most of them out 🙂 I have bought the app and it looks pretty cool so far. I have also invested in a foldio lightbox on their kickstaryer, which should also improve the qualitymof my photos even more
There's tons of soft pop up light boxes on Amazon for a lot cheaper than that Foldio setup (not to discourage you). Plus the soft ones diffuse light from the outside so you can control your light a lot better.
Thanks for the info Deet 🙂 I did try a cheap one from amazon before I decided on the foldio one, but It did not work too well for me. When it arrived it was huge (advertised as small) and I still had trouble with diffusing the light and getting good pics (i might add I only take photos on my phone as I do not have a good camera). I am hoping the foldio will improves matters a little (and I have already paid for it so it is too late now 🙂 )
Congrats on another well-thought-out and concise tutorial. It really helps to know what goes on behind the scenes.
Thanks Garfy and thanks T.O.P. for being a solid source of knowledge!
great work as always!
Very nice tutorial! I've seen that app recommended, but never bothered with it. I'll have to pick it up now. I've seen some other tripods as well, and I'm sure it wouldn't be that hard to fake it until I can find a good one. Anyway, the settings and the app are the goldmine here. Thanks again!
If you're using a long exposure you'll need something to keep the phone perfectly still. It doesn't have to to be a phone holder and tripod. it could be some books. But for roughly £15 the cheap tripod and phone holder is quite inexpensive and offers far greater control of height and angles.
You'd better charge them a commission for all the apps you're about to sell! Great tutorial.
Apps and grey cards… that's where I'll make my fortune.
Very nice tutorial! Impressive quality with just an iPhone.
my hero!
Love this comment.