

Hello everyone, this is Uruk! While still working on a few more showcases of my World Eaters, I did remember quite a few people asking about a tutorial on how I paint them. Why not then? It’s my first ever tutorial, so please bear with me. We’ll start right away after the jump.
My World Eaters are kind of a mix between the oldschool 2nd edition ‘Eavy Metal style, and modern, Forge World-like addons here and there. For this basic power armor tutorial I chose an old World Eater model, mainy because it doesn’t have as much detail as the newer ones and I was able to paint him up rather quickly. Alright, done with my little intro, now let’s grab some brushes and get down to business.

1. I always start with a black basecoat – any kind of matte black primer will do. I used a cheap one I found in a DIY store.
2. The foundation for my bright red is Doombull Brown (or old Dark Flesh), which I gently drybrush over the whole armor in two thin coats, building the color gradually and leaving some black in deepest recesses.
3. Then I use Evil Sunz Scarlet (or Blood Red) to build up the bright red. First layer is a gentle drybrush, over which I layer about two to four thin coats of Scarlet, building the color towards the top of the model, creating a light gradient.
4. When the initial color is done, I mix up my Scarlet with Cadian Fleshtone (or old Dwarf Flesh) in about 1:3 ratio and do an edge highlight on all the armor pieces.
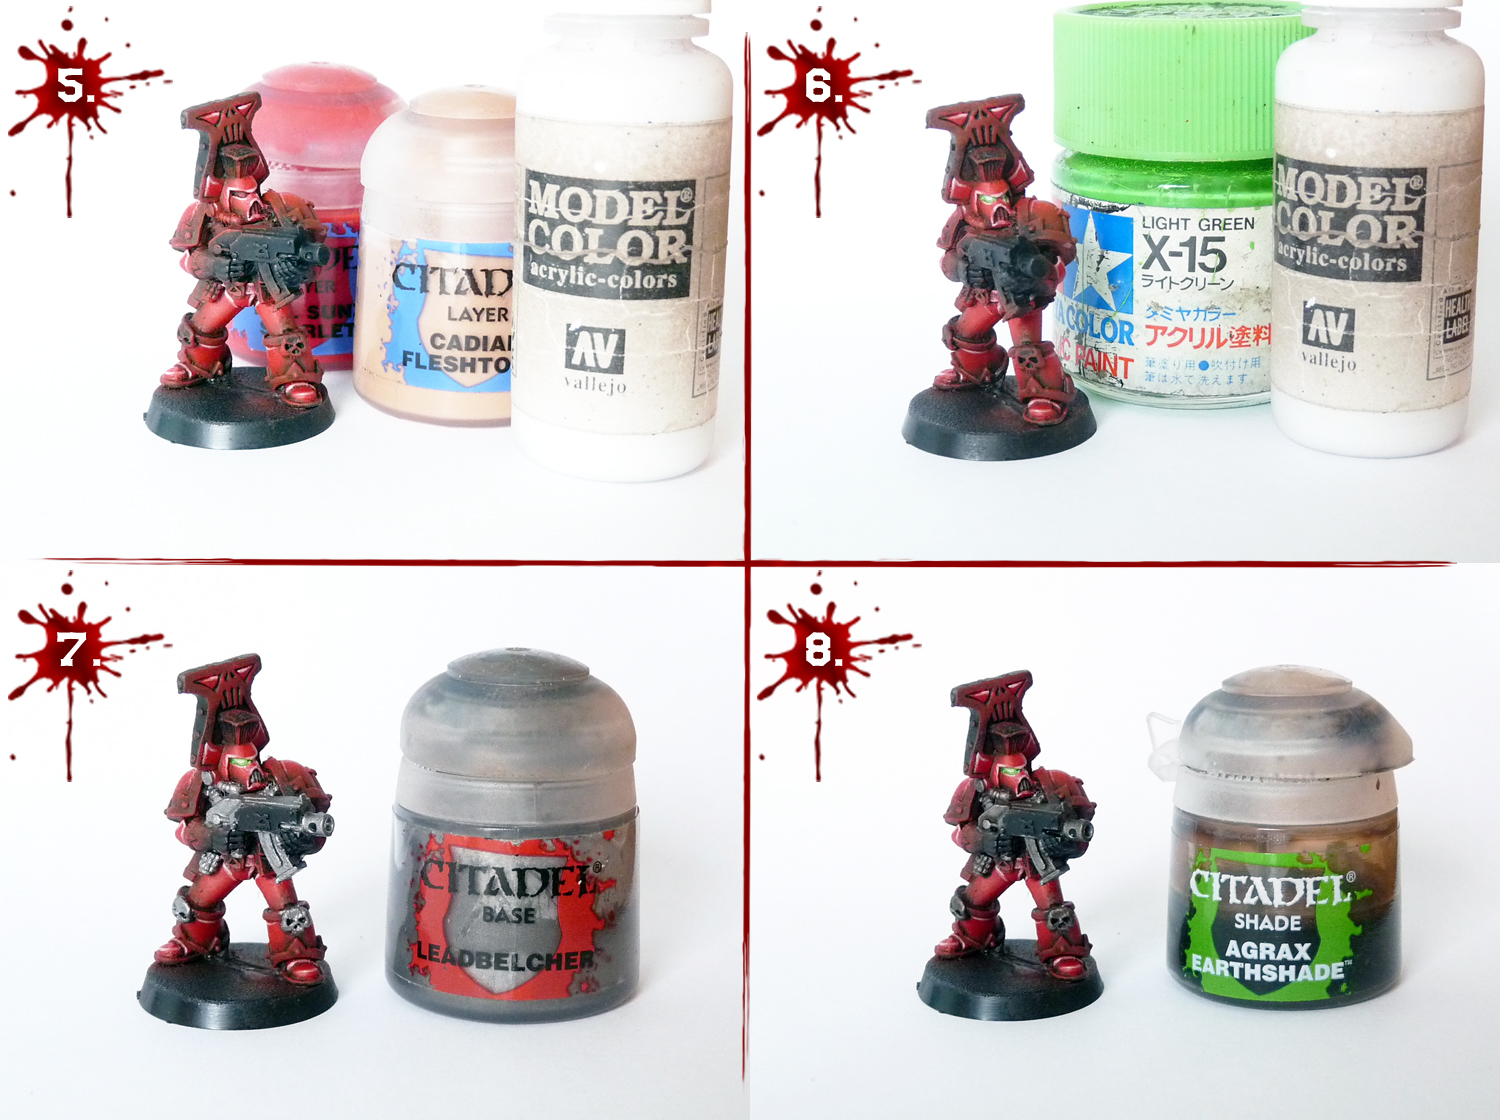
5. To finish the cermite, I add some white to the mix and do another edge highlight, this time focusing on the sharpest edges of the armor.
6. After completing the red, it’s time to paint the eyelenses. I paint them with white, then glaze them with Tamiya Light Green for a really bright glow effect.
7. Let’s move to the metal parts now – I start them off by applying Leadbelcher.
8. When it’s dry, I do a wash of Agrax Earthshade over all of them. I always choose Agrax over Nuln Oil, simply because I like the more dirty look it gives.

9. When the wash is dry, I highlight the edges with Runefang Steel (Mithrill Silver).
10. With silver parts done, let’s focus on the most time consuming part – gold trimming. I start by applying a layer of Gehenna’s Gold (Shining Gold) over all the trims and bits, such as little Khorne symbols etc.
11. I wash the golden areas with thinned down Doombull Brown, and later a mix of DB and black for areas such as around the rivets and other details.
12. After that, I go back to Gehenna’s Gold and do the first edge highlight.

13. Following that, another edge highlight, this time with Runefang Steel with just a little bit of Gehenna’s Gold, just to break the cold silver color.
14. Whoops! That’s the same picture as 13, I dun goofed.
15. Alright, back on track now. Time to paint the remaining details. I used Abaddon Black for the gloves and gun casing, and Doombull Brown for the pouches and holster. When dry, I washed the leather parts with thinned down Abaddon Black.
16. Time for more highlights now. Vallejo Black Grey for the gun casing and gloves, and Doombull Brown for leather. Both applied as edge highlights.

17. Now for the final touches. I highlighted the leather with a 1:1 mix of Doombull and Cadian Fleshtone, followed by a few dots of pure Cadian Fleshtone on the sharpest edges. Same thing for the gun casing, but with a 3:1 mix of white and Black Grey and a few pure white dots here and there.
18. The World Eater is now nearly done. Time for basing. I don’t use any kind of Citadel sand, instead I go outside and collect gravel from kids playgrounds. It has a more random texture, and thus makes a way more interesting base. I undercoat the sand with black and start with a heavy drybrush of Doombull Brown.
19. Then I add another drybrush, this time with Vallejo Desert Yellow.
20. I finish the base off with a few streaks of light grey over the biggest pieces of gravel.

21. After painting the sand, I add a few tufts of static grass, which I then drybrush with Cadian Fleshtone to make it look dry and burnt.
22. I paint the rim of the base with Pactra Glossy Brown.
23. I always paint the backpacks separately and glue them on when I’m done. I used the same techniques as for the marine obviously. I like to paint the cables with a few different colors, as a tribute to the old ‘Eavy metal style of bright and rainbow palettes. I got bashed for the rainbow cables by quite a few people, but I couldn’t care less – just love the way it looks. I mainly use three colors for the cables – Goblin Green, Warlock Purple and Imperial Blue, which I highlight by adding more white to the mix.
After gluing the backpack to the World Eater, we’re finally done! Hope you found this tutorial to be helpful, and thanks for reading! I had a lot of fun creating it, and might try making another one in the future if you wish! Just let me know in the comments what would you like to see. Uruk signing out, see you soon in another showcase! And don’t forget to check out my World Eaters collection by clicking here.
Do you like our tutorials and reviews? Here is what you can do to support us: Check out the websites of our sponsors, place your next orders at Wayland Games by clicking here or on the banner on the right. Thank you very much, we appreciate any help to keep us going.
Great tutorial. Thank you for sharing.
This is a great tutorial! I like how you make the foundation with drybrushes for the red and then blend with layers – makes sense as an alternative to the traditional layering.
Thanks for sharing!
I just wonder, why do you paint the trims of the bases with such a glossy paint? I haven't seen this before and it's the only thing that bugs me when looking at your models 😉
Dunno really, just like the finish. I've been using this paint for long years now, and never had any problems with rubbing off etc. I could ask you why you use those terrible GW texture paints, and I'm sure your response would be similar. Just use whatever works for you right?
I would also be very wrong, since it's Garfy who uses them, not you! LOL
The texture paints are nice. I like the lumpy look they produce. It's an expensive way to base an army though and not that much faster.
Still, I like them.
Thanks a lot folks! I might make another one on painting vehicles, since there's more different techniques on them. Gotta buy one first though…. Dreadclaw maybe?
Great tutorial, thanks Uruk!
Really enjoyed reading through your tutorial. Excellent guidance, thank you.
Awesome, thanks Uruk! I love the recipe for the red armour. Definitely gonna try that one out!
Nice work. Clean with subtle blends. Like GW, but better 🙂
I demand more tutorial from this man! It's awesome!