
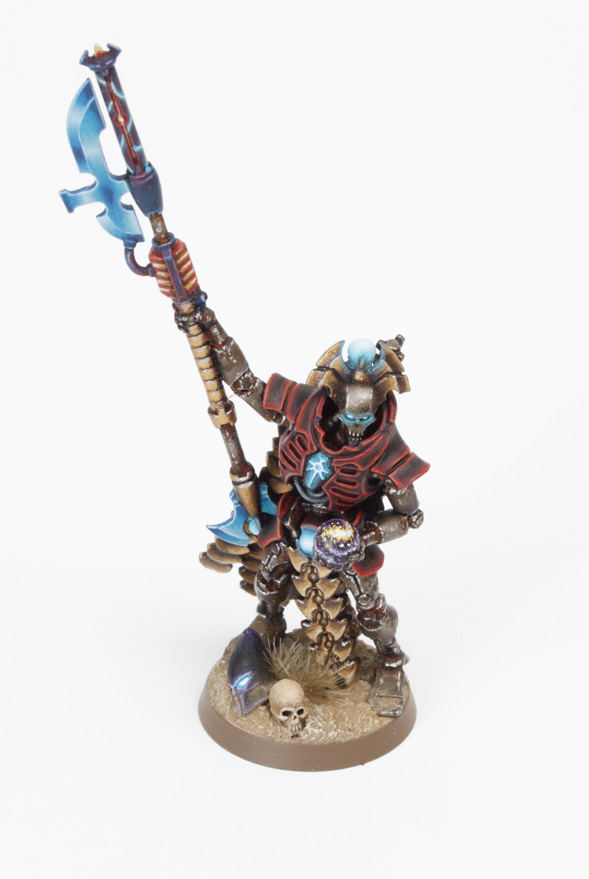
This is the first part of a two part tutorial for my Necron scheme. This guide will show you how to paint the model above and the second guide to follow shortly will teach you the secrets to painting the NMM (Non Metallic Metal) style blade. Read the first part of this tutorial after the jump.
I’ve designed this tutorial so established painters find it interesting but also so new comers to the hobby can learn some basic and advanced techniques. I will use terms such as glazing and washing, don’t worry if you don’t know what these mean because I will elaborate and explain during that step.
Paints you will need for this tutorial:
Black Undercoat spray (I use Vallejo Surface Primer)
Warplock Bronze (base)
Leadbelcher (base)
Agrax Earthshade (shade)
Runefang Steel (layer)
Gehenna’s Gold (layer)
Auric Armour Gold (layer)
Khorne Red (base)
Evil Sunz Scarlett (layer)
Ratskin Flesh (base)
Bloodletter (glaze)
Kantor Blue (base)
Teclis Blue (layer)
Ulthuan Grey (layer)
Mephiston Red (base)
Jokaero Orange (base)
Flash Gitz Yellow (layer)
Ceramite White (base)
Temple Guard Blue (layer)
Screamer Pink (base)
Pink Horror (layer)
Averland Sunset (base)
Dawnstone (layer)
Administratum Grey (layer)
Armageddon Dust (texture)
Steel Legion Drab (base)
Lahmian Medium (technical)
In case you need to expand your paint collection, head over to Wayland Games or Slave to Painting, which both stock a huge selection of paints at competitive prices.
We jump straight into the tutorial with an assembled Necron Lord who has been undercoated black.

1. Paint all the metallic areas (including ares that will be gold) with Warplock Bronze. This should take a single coat because it’s a base paint. GW Metallics are notorious for separating so make sure you shake well, and if you haven’t used it in ages use an old brush to stir it. A touch of Lahmian Medium smooths out metals and makes them much easier to work with.
2. Paint all the silver areas with Leadbelcher, once again a touch of Lahmian Medium will make your life easier. Make sure you leave some Warplock Bronze showing in the armour gaps and joins.
3. For this stage you’ll need to stipple some Rust Effect paint into the joints and creases. Don’t worry about being too messy because that makes it more authentic. If you haven’t got this paint, then you can stipple some XV-88 and then Jokaero Orange instead. Stippling is basically dabbing instead of using strokes. If you don’t have a stippling brush, take an old brush and use scissors to cut the bristles down to around 3mm in height.
4. Wash over the Leadbelcher areas with Agrax Earthshade to dull down the metal and change the hue slightly. Try not to wash over the Rust Effect because the rust is water soluble. Heavy spray varnishing also soaks up the rust effect, so only ever spray lightly from a distance. This is called dusting, it’s your choice if you wish to varnish or not at the end of this tutorial.

5. Using a fine detail brush, add some spotting of Runefang Silver to the edges of the rusty silver to represent chipping.
6. Paint all the gold areas with Gehenna’s Gold. This will take around 3 thin coats. Leave Warplock Bronze showing through the gaps for shading. I’ve also left the Warplock Bronze at the top of each armour plate segment to represent a dark reflection. This dark shading will really make the gold look realistic.
7. Highlight the gold up a further step using Auric Armour Gold. This paint will require thinning with Lahmian Medium and take 2 or 3 coats.
8. Runefang Steel is used to edge highlight each of the gold plates. This will make your gold pop. Try to keep your highlight lines as thin as possible.

9. Use Khorne Red to to paint a band of colour around the edges of the armour. This needs to be thicker then an edge highlight because you will need to paint a couple of edge highlights over the top of this and you want to be able to see the previous layers. Once you’ve painted the band, mix 3 parts Lahmian Medium with 1 part Khorne Red to create a glaze and then use the glaze to blend the band of red into the black armour. The glaze is translucent meaning you can see the black layer through it slightly. Build up a couple of coats and it softens the edge of the red band you painted.
10. Edge highlight the previous layer with Evil Sunz Scarlett.
11. Further edge highlight with Ratskin Flesh.
12. Wash over the entire black/red armour sections with Bloodletter.

13. Paint the Staff of Light with Kantor Blade.
14. Edge Highlight the Kantor Blue using Teclis Blue.
15. Further edge highlight using Ulthuan Grey.
16. OSL is an acronym for Object Source Lighting. It is a term used by painters to describe glow effects. Most people over do source lighting and it doesn’t look realistic for the simple fact the model has been painted and highlighted in a way to suggest daylight. If you’ve ever shined a flashlight onto something in daylight you’ll know that the torch doesn’t light up the area at all. So in my opinion OSL only works if the model has been painted in a low light conditions scheme. So for OSL to be convincing on a daylight model like above it need to be subtle and minimal. Start by painting the power core and recessed area of the Staff of Light barrel with Mephiston Red. Then mix 3 parts Lahmian Medium to 1 part Mephiston Red and glaze the surrounding area around the lenses. Keep it minimal, don’t over do it. It should look lighter then the actual lens.
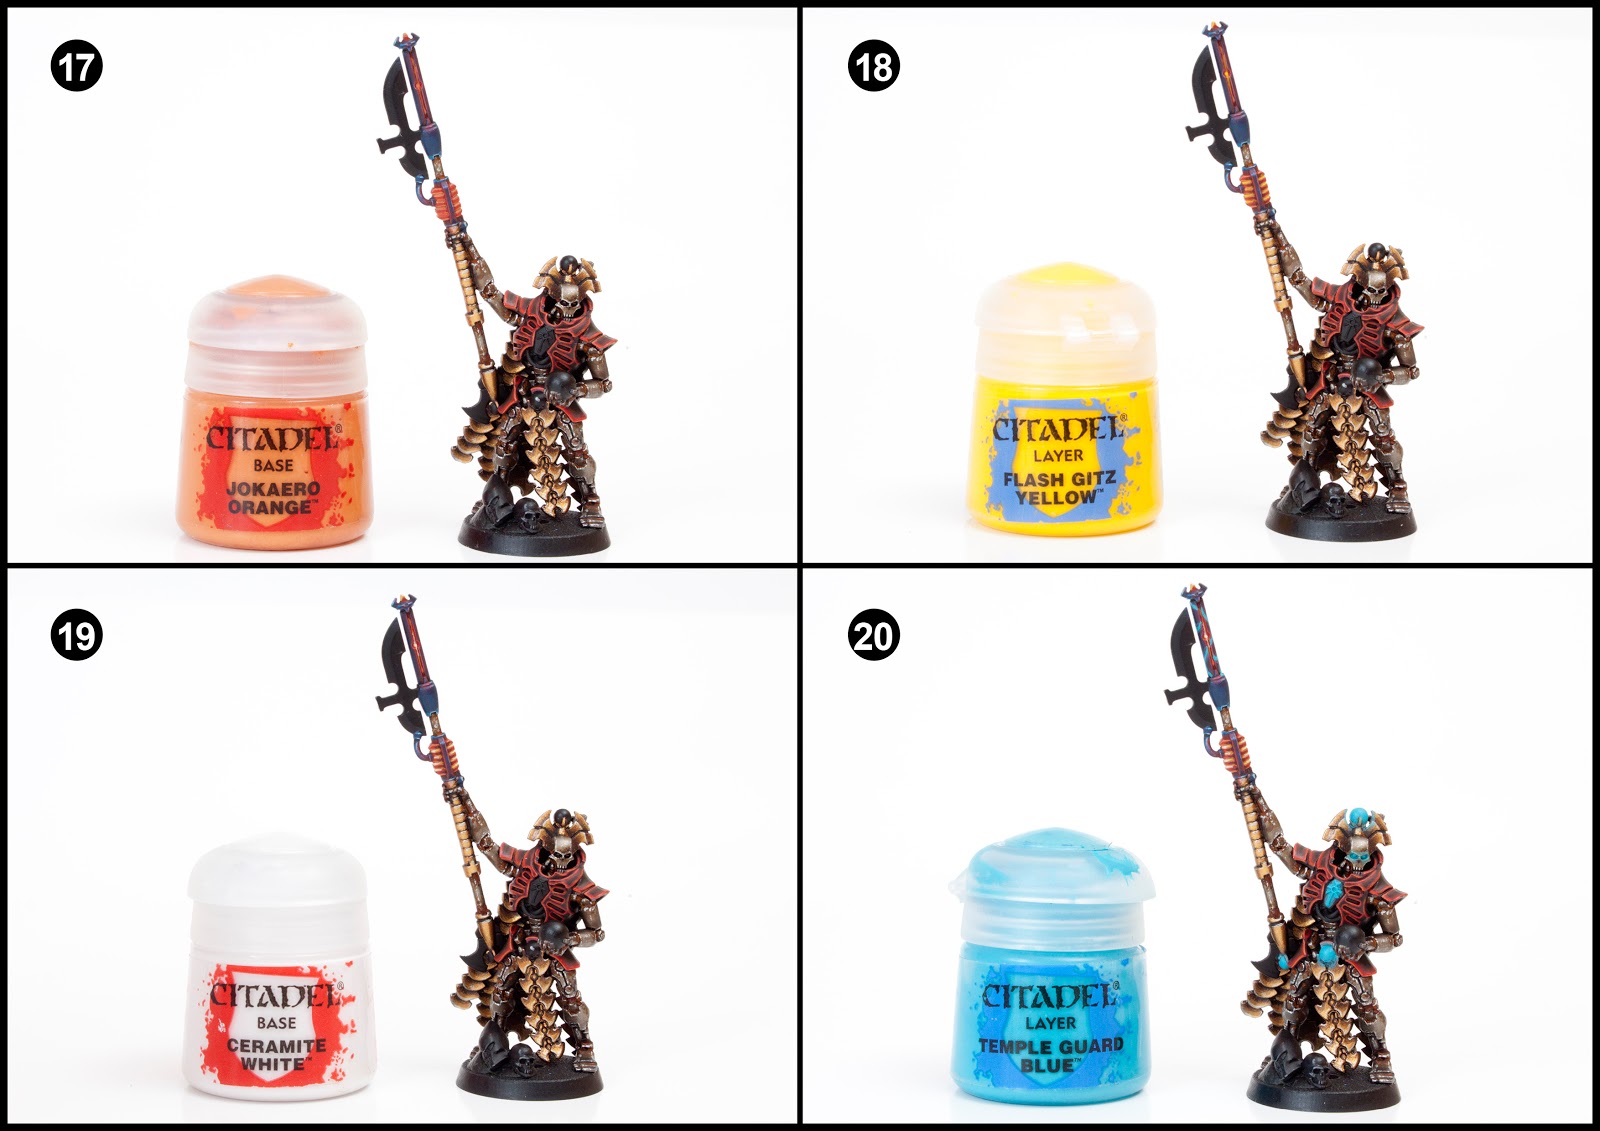
17. Carefully paint Jokaero Orange into the recess gaps of the power core and the barrel.
18. Now carefully paint Flash Gitz Yellow over the Jakaero Orange. Try to leave some orange showing through.
19. Use some Ceramite White to add the final highlight to the glow effect.
20. Now for some more OSL, this time we’ll paint the glowing orbs, chest piece, eyes and some lightning on the barrel. Start by painting some solid Temple Guard Blue onto these areas. It might take two coats. Then make a glaze using 3 parts Lahmian Medium to 1 part Temple Guard Blue and glaze around the surrounding areas of the orbs, chest piece, eyes and lightning. Remember, you’re aiming for a soft translucent layer where you can see through it.

21. Make a mix of 50:50 Temple Guard Blue and White and then turn it into a glaze and blend it into the Temple Guard Blue objects. Make sure you don’t paint over the previous glow layer, just highlight the objects. Then make a Ceramite White glaze and blend that into the previous layer. It should look like it’s glowing now.
22. I painted the Resurrection Orb as a Galaxy, I started by painting lots of tiny dots in a spiral pattern.
23. Repeat the above step with Pink Horror this time
24. Paint more dots using Averland Sunset but only in the centre of the Galaxy.

25a. Give the galaxy a quick wash of Druchii Violet and then when dry dot the final stars using Ceramite White. The largest concentration of stars should be in the centre.
25b. The blade will be covered in a separate tutorial.
26. Highlight the black pipes under the ribcage with Dawnstone.
27. Highlight the previous step further with Administratum Grey.
28. Finally, base the model in a way which fits in with your own army or gaming table. I’ve used Steel Legion Drab for the rim, Armageddon Dust for the base top and then drybrushed with Screaming Skull. Drybrushing is a way of picking out raised detail quickly usually with a lighter colour. To dry brush you need load up your brush with paint and then wipe it off the bristles on a tissue until virtually no paint remains on the brush. Then rapidly and repeatedly drag the side of the brush back and forth over the area to be painted. The skull is painted with XV-88, Tau Light Ochre, Ungor Flesh and finally Screaming Skull. For a guide on how to paint the Dark Eldar Helm check out Stahly’s tutorial here.


This is one of the more complicated tutorials I’ve produced for Tale of Painters with some advanced techniques, but so long as you have steady hands and reasonable brush skills I believe anyone can follow this tutorial. Make sure you check out the tutorials section for other tutorials and check back soon for the second part of this tutorial where I explain in detail how to paint flawless NMM blades.
Do you like our tutorials and reviews? Here is what you can do to support us: Check out the websites of our sponsors, place your next orders at Wayland Games by clicking here or on the banner on the right. Thank you very much, we appreciate any help to keep us going!

25 Comments
Leave a Reply
Tale of Painters is the unofficial Warhammer hobby magazine run by hobbyists like you. Support our work by using the affiliate links from our partner stores for your next orders so we can continue to bring you fantastic FREE content every day:


![]()
![]()
Or support us directly:


Hello, I have a question about the rust paint. GW has a "Ryza Rust" paint that is used to give metals a rust effect (when paired with Typhus Corrosion). My question is: Have you tried it, and prefer the Modelmate Rust Effect instead, or have you not used the GW product? I ask because I have the GW product already, but if you think it doesn't give the same effect, I'd be willing to try the Modelmate instead. Thanks so much for the tutorial!
Also, as a followup, I've tried finding a US-based store that stocks the Modelmates, and I haven't found one yet. Do you know if there is a US-based website that stocks the Modelmates Rust Effect?
Hey garfy,really enjoy your work,on a slightly unrelated note will you be doing any tutorials on any new release hobbit miniatures seeing as how it has been revived by Gw & fw,your old tutorials on the hobbit miniatures were greatly appreciated by many & very informative!
hiya Nallsy, No I have no plans to paint anymore Hobbit models at this point in time. Sorry.
Fantastic Garfy! Your Necrons are one of my favorite looks and it's great that you put together a tutorial for them. It's a ton of steps but it great that you put that much detail into the description
Or a re post from 2013 it seems 🙂
I love this tutorial and used it on my Necrons. Its a shame Garfy quit Tales of Painter.
Haven't quit. Just doing different stuff for the foreseeable future. Never rule out a return.
Amazing Res Orb I never even saw on the finished pic until the basing pic 28… great work Garfy. I'm actually following your Hive Fleet Kraken scheme to test out my Purestrains for the slowly growing Cult, as red and tan matches my Genecult PDF scheme and armour.
Just curious, do you put any varnish or coat afterwards to protect your models?
I don't tend to. I don't game, they just sit their on shelves.
Great tutorial Garfy – really appreciated!
Two questions: Does it look good without the rust effect?
Also, how do you do the red highlights on the black for vehicles if you don't own an airbrush.
Sorry If the questions sound noobish – but that is what I am.
Thanks 🙂 – Keep up the great work guys!
Sorry for the late reply (been away).
Answers to your questions:
1. I think the picture in step two shows a good representation of what it looks like without rust effect. It's very clean and shiny. it's down to personal preference. I think the rust looks good.
2. I'm painting a Spyder at the moment without using my airbrush. Same techniques as seen in this tutorial just with larger brushes. Keep checking the blog for updates on my Spyder to see what I mean.
I think you'll be fine with it Bog Witch. I agree painting onto untreated dusting pigments does tend to end with a lumpy paste but this is alright. I've recently finished my deathmark squad and not had an issue with the silver edge chipping I paint over the rust effect.
My only real concern was it mixing with and staining any paint that was applied over it, some pigments can do that in my experience and it makes it hard to (for example) get a clean edge highlight. It's a very minor issue, really!
Thanks for your kind words. Being compared to a masterclass painting series is a true honour. Thank you.
I'm no scientist/chemist, but I think there is a high amount of alcohol(ethanol) in the paint so it evaporates quickly leaving the pigment on the model in these rusty colours. You can use water to remove and move the pigment about which gives you flexibility.
If you're painting over the top of it then you won't see the rust anymore, so not sure what the problem would be?
Your tutorials are just about my favourite thing on the internet. I've been really missing the old masterclasses in white dwarf for a long time, and these are a more than acceptable replacement. Thanks for taking the time to do them.
Oh, and a question about the liquid rust; it stays soluble after it dries, right? Does that mean you can't reasonably expect to paint over it?
Really good tutorial. Now that WD has stopped running anything remotely close to useful for painters, this is my go to site for all things painting. Keep it up.
Love the galaxy orb, I will definitely be using the idea for a star map on a computer screen for a terrain piece.
I know you said you would do a separate tutorial for the sword.. but it was funny going through the photos and going from black sword to BAM sword done.. 🙂 Nice work overall, and great step by step as always!
Yeah I was a bit annoyed with myself that I missed out those black pipes under his chest, they should have been before the sword tutorial. DOH!
Fantastic, love your work, I'm staggered by the quality of the painting on show here.
When I first saw your scheme, it inspired me to get a Necron army, just wish my Overlord looked that good…
Hey Alex, thank you for the kind words. I'm pleased my painting inspires you. Have you got a link to your Overlord? Would love to see.
I just uploaded a few images onto Dakka:
http://www.dakkadakka.com/gallery/images-51948-33410_Necron%20Wip.html
Those are excellent Alex! I like the fact your Cyrpteks are different colours. Gloss varnishing the ressie orb is a stroke of genius, looks great. I like the army shot the most!