
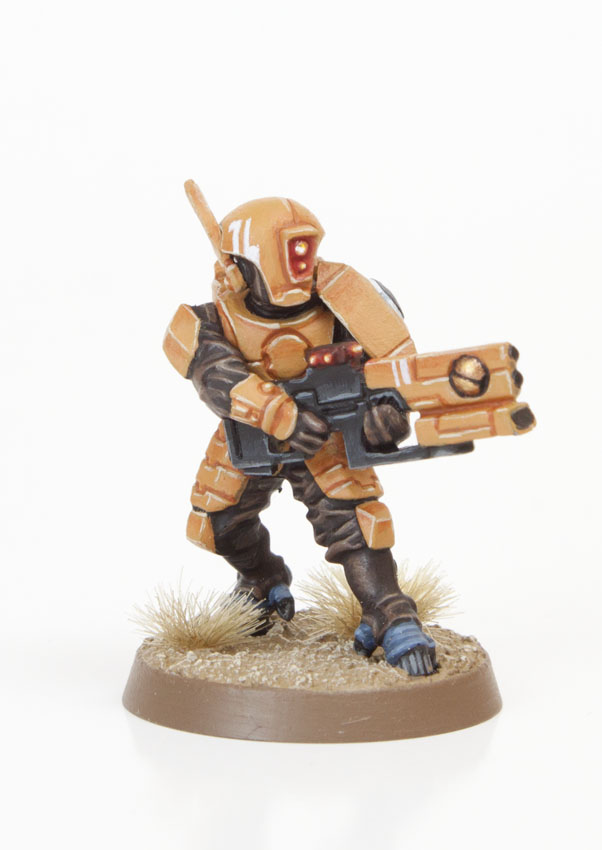
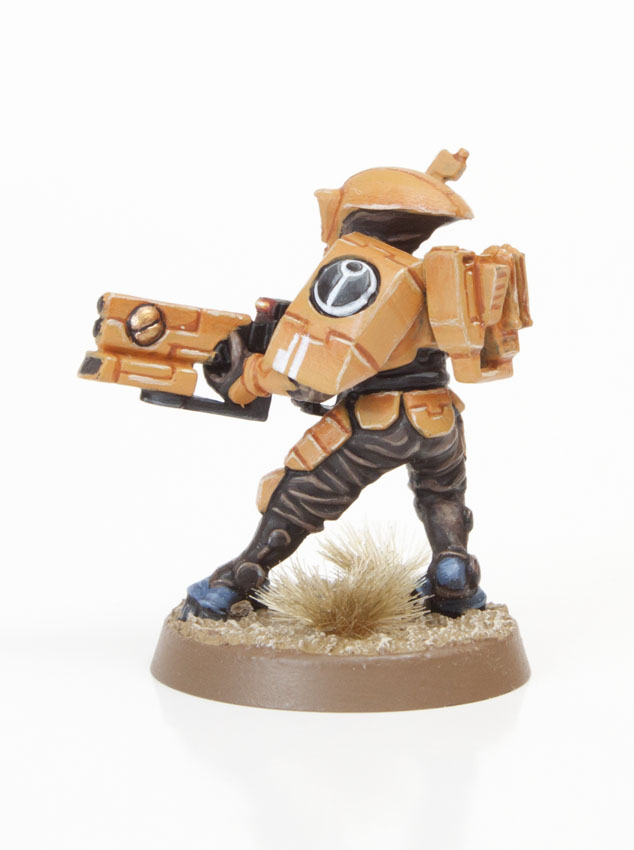
This is a tutorial explaining how to paint the classic Tau/T’au Sept scheme using the latest Games Workshop paints. The model above was painted in 18 steps. I break each step down with a high-resolution picture and detailed instructions. Read the full tutorial after the jump.
I’ve designed this tutorial so established painters find it interesting but also so newcomers to the hobby can learn some basic and advanced techniques. I will use terms such as glazing and washing, don’t worry if you don’t know what these mean because I will elaborate and explain during that step.
Paints you will need for this tutorial:
Black Undercoat spray (I use Vallejo Surface Primer)
Rhinox Hide (base)
Gorthor Brown (layer)
Baneblade Brown (layer)
Agrax Earthshade (shade)
Tau Light Ochre (layer)
Skrag Brown (layer)
Zemesi Desert (layer)
Screaming Skull (layer)
The Fang (base)
Russ Grey (layer)
Mephiston Red (base)
Jokaero Orange (base)
Flash Gitz Yellow (layer)
Ceramite White (base, OOP – use White Scar or any white you prefer instead)
Eshin Grey (layer)
Dawnstone (layer)
Auric Armour Gold (layer)
Steel Legion Drab (base)
Armageddon Dust (texture)
In case you need to expand your paint collection, head over to Wayland Games or Element Games, which both stock a huge selection of paints at competitive prices.
T’au sept painting guide
We jump straight into the tutorial with an assembled Fire Warrior who has been undercoated black.

1. First step is to paint the trousers, sleeves, gloves and balaclava under the helmet faceplate with Rhinox Hide. This is a base paint so goes on with one coat with no need to water down.
2. Now we need to paint the highlights onto the previous layer. We do this by painting Gorthor Brown onto all the raised areas of the cloth leaving Rhinox Hide in the recesses.
3. Highlight the previous stage further using Baneblade Brown.
4. The highlights are a little too bright for military cloth which should be a bit duller and not shiny at all. use Agrax Earthshade to wash over all the cloth areas. This is tone down the colour by tinting it brown. It also helps blend the colours a little.
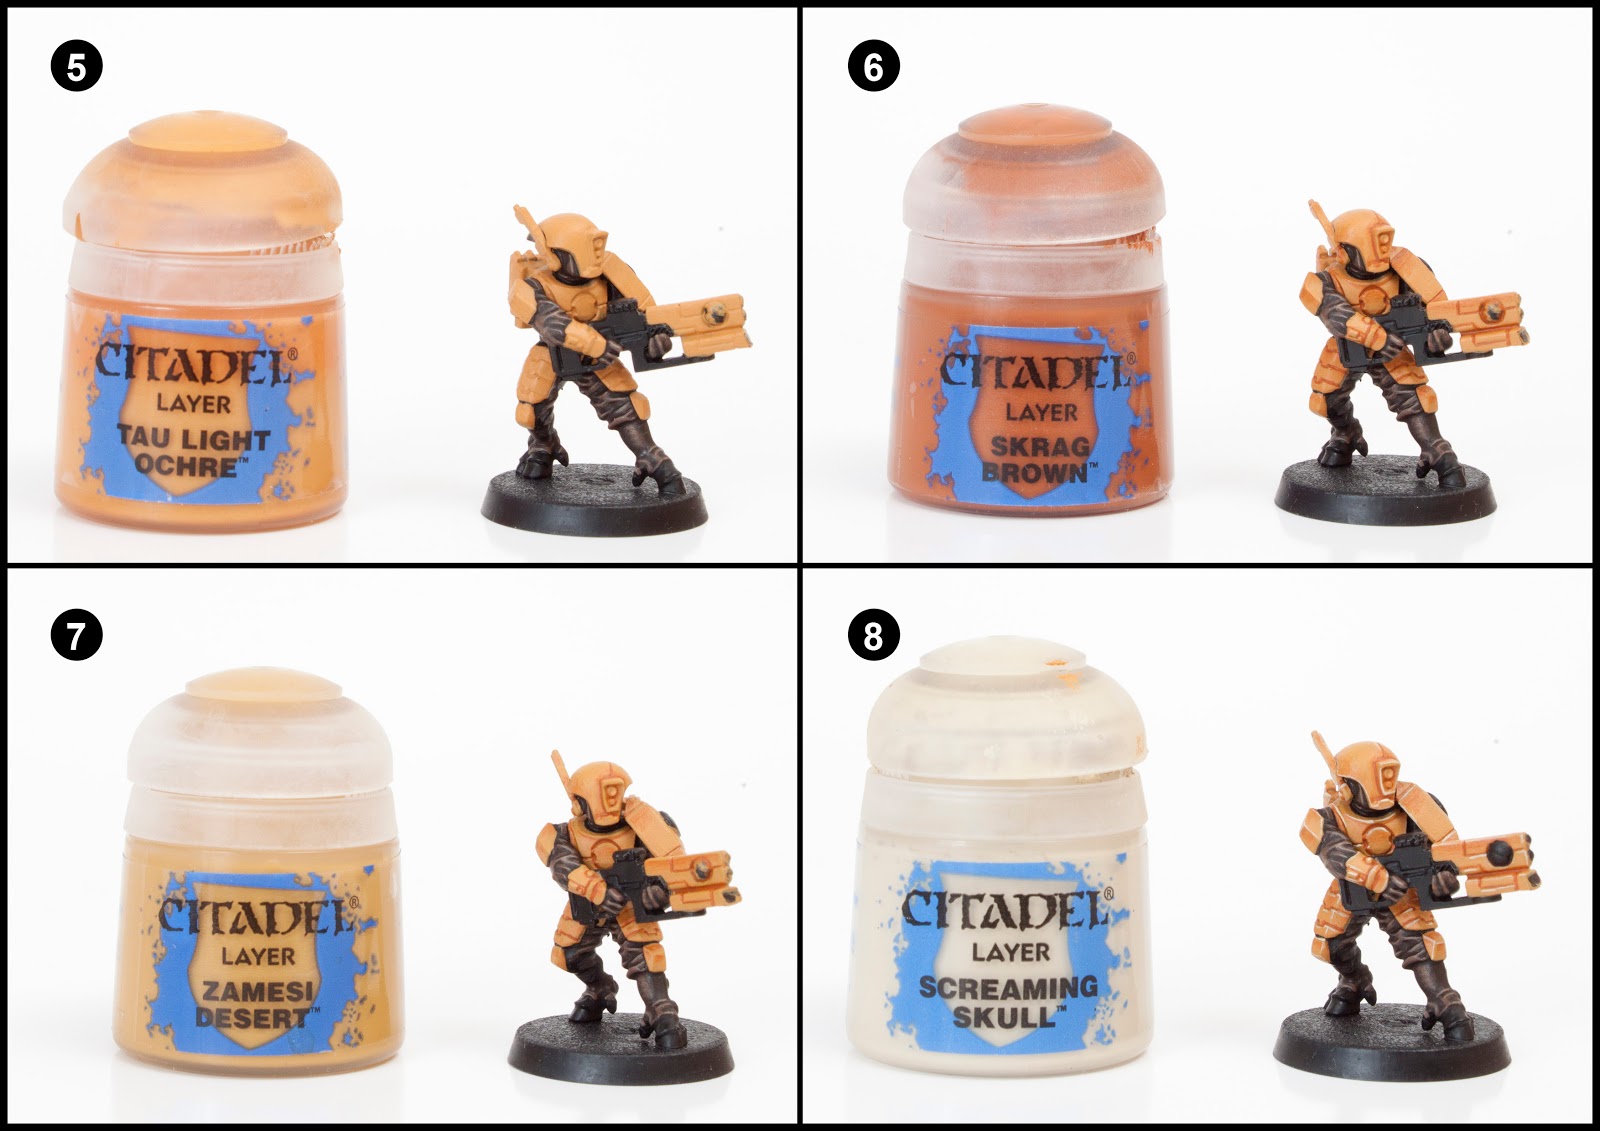
5. Paint all the armour and the weapon’s body with Tau Light Ochre. This is a layer paint so has less pigment in it then a base paint. So you will need to paint three thin coats to achieve an even smooth coat. Do not paint on one thick coat it will cover detail and look lumpy. Each of the three coats should be watered down slightly to keep it smooth. Wait for each coat to be dry before painting the next coat.
6. We’re going to use Skrag Brown in two different ways for this step. Firstly line all the armour joints by painting slightly watered down Skrag Brown into all the lines between the armour. If you accidentally miss, you can usually wipe off a stray brush stroke with a finger if you’re quick. Secondly, you need to use Lahmian Medium to turn Skrag Brown into a Glaze. The ratio should be 4 parts Lahmian Medium to 1 part Skrag Brown. Use this glaze mix to shade the flat armour plates. If you look at the close up you’ll see I’ve shaded the upper parts of the armour panels.
7. Use 1 part Lahmian Medium to 1 part Zamesi Desert mix to highlight the lower quarter of the panels and the top of the helmet.
8. Paint all the upper edges with Screaming Skull. Edge highlighting is easiest when you use the side of the brush on an edge held at a 45º angle. Sometimes this isn’t possible because you’re trying to add a highlight to an armour gap edge in the middle of the shoulder, these tricky ones need to be painted with a steady hand. My advice is brace your wrists on your desk and use watered down paint. Thinned paint flows off the brush easier and means you don’t drag your bristles.
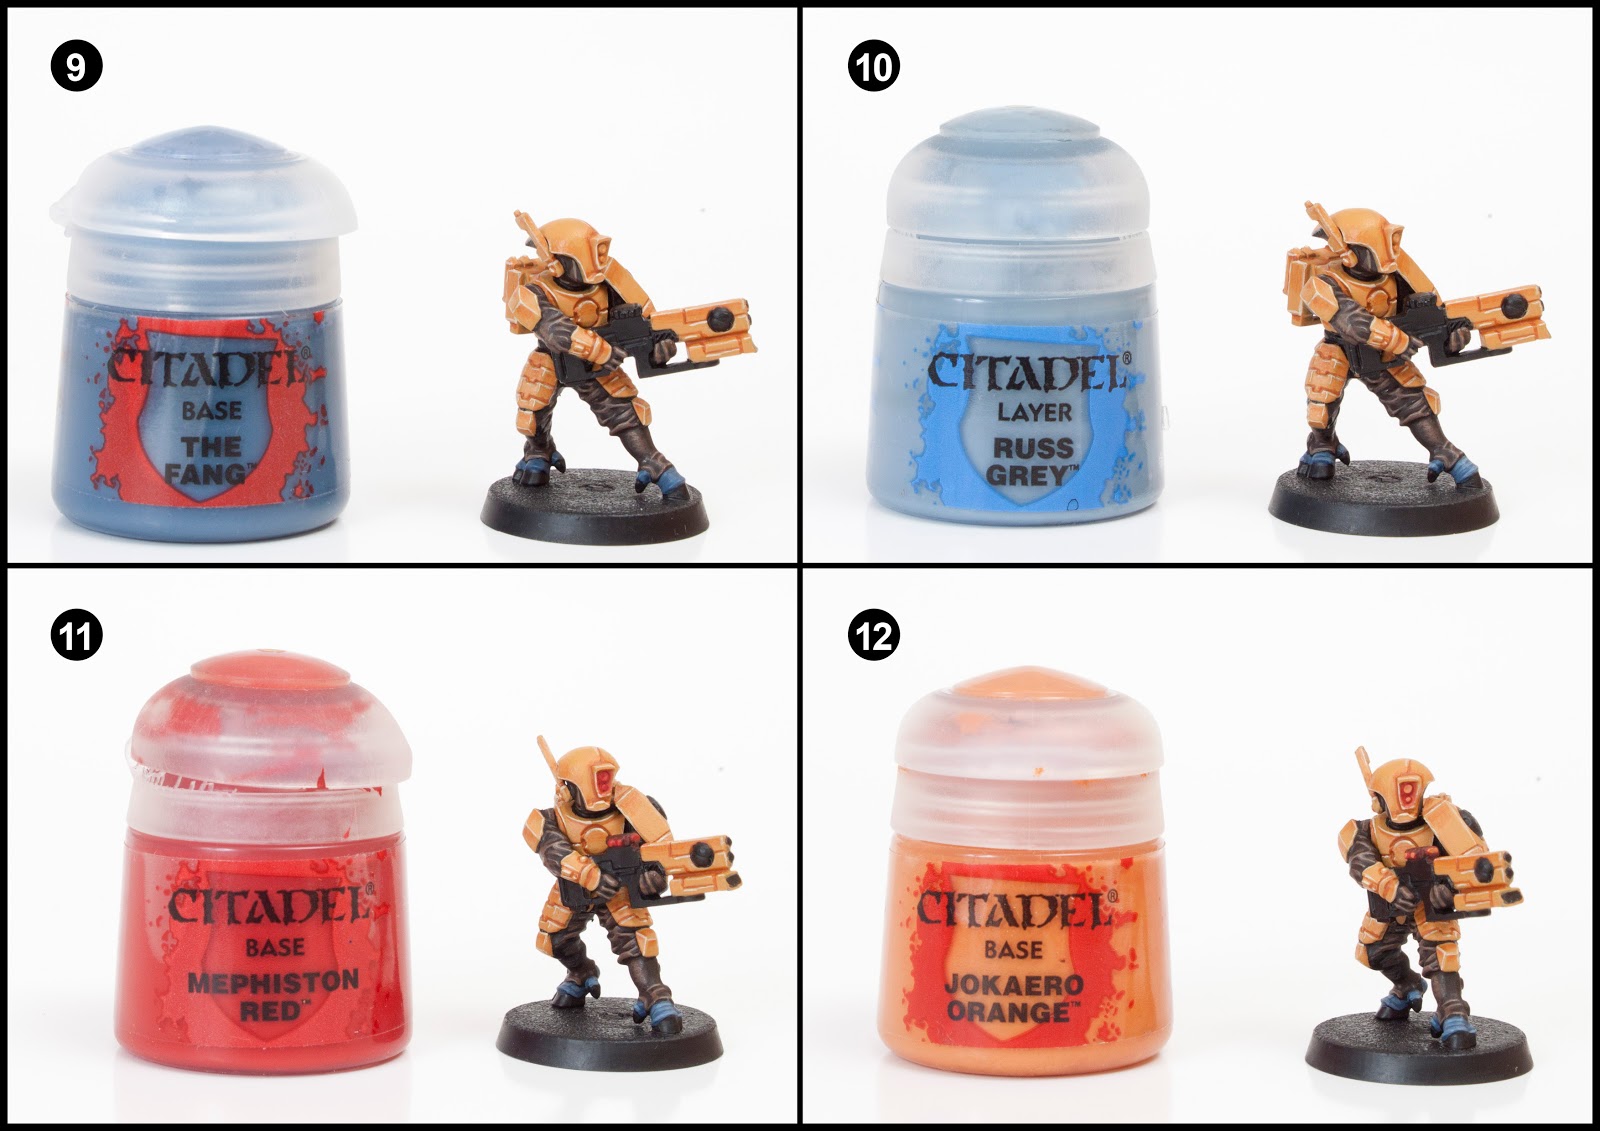
9. Tau skin should be painted with The Fang. One coat straight from the pot is fine.
10. Highlight the skin with Russ Grey. A few horizontal lines to represent creases work perfectly.
11. OSL is an acronym for Object Source Lighting. It is a term used by painters to describe glow effects. Most people over do source lighting and it doesn’t look realistic for the simple fact the model has been painted and highlighted in a way to suggest daylight. If you’ve ever shined a flashlight onto something in daylight you’ll know that the torch doesn’t light up the area at all. So in my opinion OSL only works if the model has been painted in a low light conditions scheme. So for OSL to be convincing on a daylight model like above it need to be subtle and minimal. Start by painting the eye lenses and the weapons lenses with Mephiston Red. Then mix 3 parts Lahmian Medium to 1 part Mephiston Red and glaze the surrounding area around the lenses. Keep it minimal, don’t over do it. It should look lighter then the actual lens.
12. Paint the lenses completely with Jokaero Orange.

13. Paint a dot of Flash Gitz Yellow within the Jokaero Orange leaving some Jokaero Orange showing on the edges.
14. Dot the centre of the lenses with Ceramite White (OOP – you can also use White Scar or any white you prefer). While you have the white out we can paint the Sept Markings. Use the GW website, White Dwarf or the Codex for guides on painting the markings. use watered down paint and outline the shape with lines before filling it. Don’t be afraid to tidy up with some Tau Light Ochre to sharpen the edges. You will also need to paint White on the Tau symbol on the shoulder pad.
15. Paint some vertical lines of Eshin Grey onto the hooves. Mix 1 part Eshin Grey with 1 part Lahmian Medium and then use this mix to highlight the black gun areas. Lahmian Medium is used to soften and thin the paint in this regard helping to blend the grey into the black.
16. Use Dawnstone to paint vertical lines on the hooves. Then use the same colour to edge highlight the black areas of the gun.
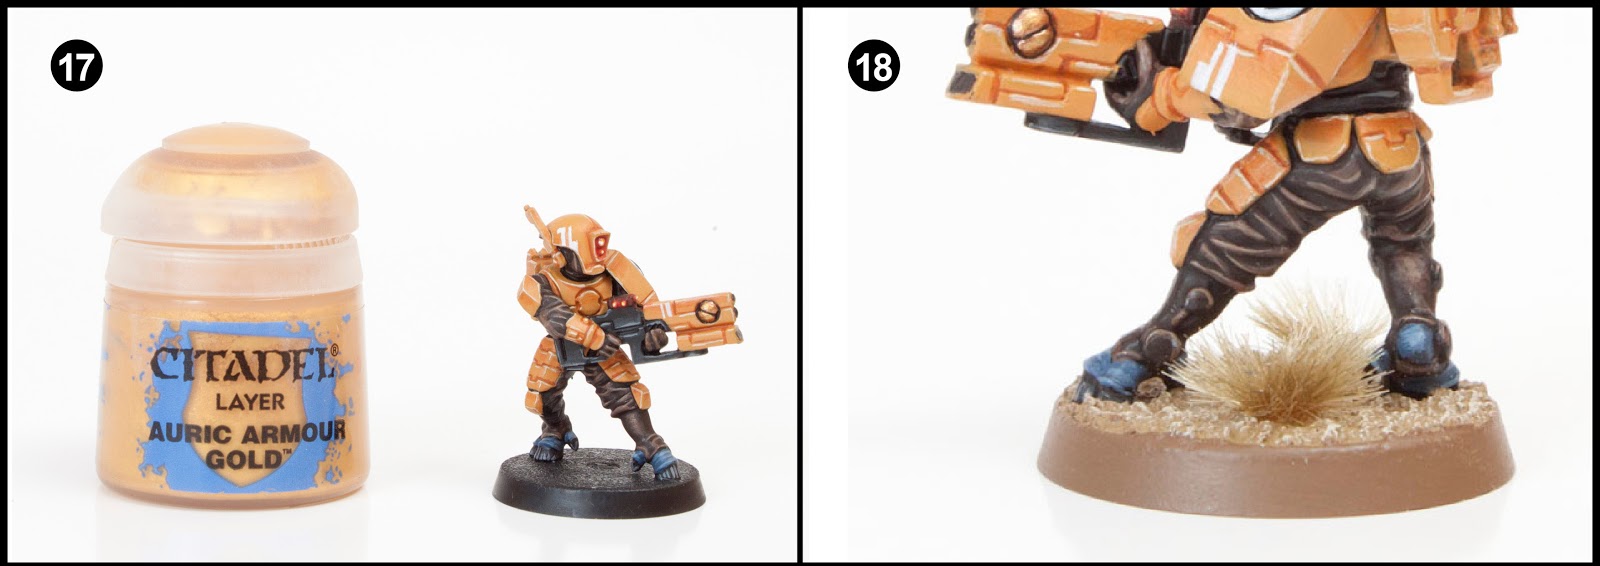
17. Paint the two semi circles on both sides of the gun with Auric Armour Gold. This might take two or three coats.
18. Finally, base the model in a way which fits in with your own army or gaming table. I’ve used Steel Legion Drab for the rim, Armageddon Dust for the base top and then drybrushed with Screaming Skull. Drybrushing is a way of picking out raised detail quickly usually with a lighter colour. To dry brush you need load up your brush with paint and then wipe it off the bristles on a tissue until virtually no paint remains on the brush. Then rapidly and repeatedly drag the side of the brush back and forth over the area to be painted.
This extensive tutorial has been quite time consuming to produce. I like to think that the Tale of Painter’s tutorials are not only the easiest to follow but also of the highest quality on the web. We take great pride in our tutorials and get a massive buzz when people contact us with their completed models they’ve painted using the guides found on this blog, so why not support us using our affiliate links 🙂

43 Comments
Leave a Reply
Tale of Painters is the unofficial Warhammer hobby magazine run by hobbyists like you. Support our work by using the affiliate links from our partner stores for your next orders so we can continue to bring you fantastic FREE content every day:


![]()
![]()
Or support us directly:


Hi Garfy,
I know it’s been a long time since you wrote this guide, so I’m not sure if you’ll still be responding to comments on it, but I’ve just painted a T’au Fire Warrior by following it, and I was wondering if you wouldn’t mind taking a look at him?
There are a few mistakes I made that I am aware of, such as overusing the Skrag Brown and not being careful enough with my Screaming Skull highlighting.
I have a couple of questions too. First, where I’ve used paints mixed with Lahmian Medium, it sometimes comes out a bit shiny. Is this because I’ve used too much medium?
Second, I am planning to do an entire army in this colour scheme, so I was wondering if I can generally follow the same instructions for my Crisis Battlesuits and (eventually) my Riptide?
Finally, do you have any tips for when it comes to painting a Shas’ui with a white helmet/pauldron? I’ve found recommendations for painting online that involve basing with Ulthuan Grey and highlighting up to White Scar, but I wasn’t sure if this would be the best option alongside this guide.
Thank you very much for the guide!
All the best,
Callum
I swear he looks a lot better in real life, but here are some images of my Fire Warrior: https://imgur.com/a/kYaBbFa
Your tau looks great.
The shiny thing is weird. it happens to me. Thing is it never use. I wonder if GW has changed their recipe? I use W&N Matt varnish spray to get rid of the unwanted gloss.
Yep, same instructions for the suits and vehicles. Maybe replace the brown cloth for black areas.
White I’d do Corax white, wash with apothecary contrast and highlight with white scar.
Love this guide. Very informative about how to paint Tau.
Thanks for the tutorial it was a huge eye opener =)
Thanks for the tutorial!
I have a thing to ask you. How do you paint the inner parts if you have already put the arms on?
I've tried quite a few times but I could't reach it. So I usually paint part by parts. Do you have some kind of skills for painting the inner parts?
I ignore them. So long as they're black, they're just part of the shadow now.
yes paint it on flat, nice and thin. It should be translucent, so you can see the armour colour through it. Glazing is a great way to add soft and subtle shading to areas.
Ah okay thanks.
Well I painted my first guy up. Not sure I am getting the glazing concept correct, and I had a lot of trouble getting the little white free-hand sept markings down. If you wouldn't mind, I could use your critique on my pictures, you may be able to tell things like "you added too much skaag brown to your medium" or vice versa or whatever. I also had trouble getting the white/black circle marking on the shield, mine looks pretty bad and I can't figure out why or what an easier way to paint it would be. Though I'm still pretty impressed with some parts of it, like the pants, I've always had trouble with painting clothing. As a new painter, it is kind of cool seeing some of the results I managed to get :D.
Anyways what's the best way to share the finished model with you?
Thanks! And thanks for taking the time to write the tutorial and respond to questions!
Hey,
New painter here, so I'm about to ask some dumb questions :D. I've recently started a Tau army. I have been painting for a bit now, mostly just base coats and washes, I haven't really gotten into highlighting and all of that. I decided I'd like to try and expand my painting skills and take them "to the next level" so to speak, and came across this tutorial while looking for Fire Warrior painting guides. It looks like a very good tutorial that I'm going to try and follow, but first I have some questions.
In step 6, when you mix the Skaag brown with the medium (1 part : 4 parts) and painting it onto the armor plates, are you painting it on almost like a wash? I've never done this before, so I don't quite understand how and where to apply it. Perhaps it is my untrained painters eye, but I can't really tell in the close up where it is you've applied the skaag brown/medium mix.
Same with step 7, I can't quite tell where the Zamesi desert has been painted on, and do I apply it in a similar manner to the Skaag brown in step 6?
Based on reading the tutorial, it sounds something like the top quarter of each panel should be shaded Skaag brown, and middle 50% should stay the basecoat color, and the bottom quarter of each panel should be Zamesi desert, is this roughly correct?
Do you guys have some sort of generalized shading tutorial (I didn't' find anything when I did a search for shading on your blog) or perhaps a diagram showing where on the figure the dark/light mixes should be applied?
Finally, for painting the unit leader who has a bare face (no helmet), would you recommend following the same procedure you used to paint the feet?
Sorry for the probably dumb questions, but as I said, I'm a pretty novice painter who is interested in increasing my painting skills and I want to make sure I understand this tutorial correctly =D.
Step 6. If you compare the picture to step 5 you can see all the armour panels have been lined with Skrag Brown. You need the thin mix so the paint flows into te gaps. You need a steady hand for this. Do not apply it all over as a wash.
Step 7: This is a little bit of area highlighting to so when you do the edge highlighting on step 8 it isn't so much of a jump in colour transitions. You summarised it perfectly.
We don't have a specific highlighting and shading guide. There are too many different ways to do it.
Yes use the skin guide for the feet for the head.
Please share your finished model with me, i'd love to see. Have fun!
Thanks for the reply! I understand lining the armor joints in step 6 with the Skaag Brown, I can see that pretty clearly. The part I'm specifically talking about is this step:
"Secondly you need to use Lahmian Medium to to turn Skrag Brown into a Glaze. The ratio should be 4 parts Lahmian Medium to 1 part Skrag Brown. Use this glaze mix to shade the flat armour plates. If you look at the close up you'll see I've shaded the upper parts of the armour panels. "
I am having trouble understanding this step and how to apply it to the armor plating, that is what I was asking about. It sounds like I just paint it on flat, but don't be liberal with it like I would a wash?
Again sorry for the newbie questions :).
awsome guide. i have been looking for a good guide for a standard paint scheme for the last 2 days. finaly found this… thanks heaps 🙂
Loved the tutorial, but hate to bring up the age old dilemma… what influcneced your decision to prime in black and now grey or white. Since there seems to be a higher percentage of the model a lighter colour in the finished product. Just wondering?
I like the shading you can achieve with a black undercoat. If you paint neatly you can use the black as lining the gaps between the colours.
I just got a Tau Army and was extremely pleased to find this tutorial. It was the best tutorial I found out there. The pictures and detail in each step was great! I thought the parts where he specifically went over when to water a paint down was very helpful. Thanks for posting this tutorial!
Really pleased you like it.
I'm working on a Fire Warrior team using this as my guide (as well as a paint conversion chart so I know which Reaper paints to substitute!) and it's going along nicely. Thanks for posting it.
Happy to help. I really want to do more tutorials but it's finding the time to do them.
Thanks for the tutorial guys. I'm a little confused as to why we're shading the upper parts of the armour a darker colour than the lower parts, but I'm going with it anyway 😀
It's all to do with convex and concave… oh who am I trying to kid, I feel it just looks better lit from the bottom (:
Nice tutorial man! Useful to beginners and pros alike! 🙂 I just started painting my new Tau army and this was helpful in picking out the new paints. Thanks!
Jawaballs
Hello great master of the art.
A big thank you for this one, as I was looking for any tutorial to paint the classic Tau set on a Riptide armour.
Ok the model is just released so I quite understand it will take time to find some (concerning the armour tuto) but I just asume the technics are similars to the ones here.
I did not thought it would requier such a lot of GW paints but as I don't have any skin or clothes on the Riptide armour, I should be able to do it with less.
My biggets fear is to completly miss this huge and how much beautiful armour GW made us with a poor and under valuable paint.
Maybe will I put some pictures once I had had time and courage to launch myself on this painting challenge.
Again a great job here with this tutorial and many thanks for all your work.
No plans at the moment. But never say never.
Hi guys,
Impressive work.
Are you planning on doing any other Tau septs?
I'd love to see in depth paingint guide on sa'cea sept, and this new one http://www.games-workshop.com/MEDIA_CustomProductCatalog/m3110282a_99120113031_2013TauBroadside02_873x627.jpg
Keep up the good work!
I am very much in love with you for this tutorial…
Edd
Thanks Edd, I love all you guys too.
Very nice tutorial.
When you mix your paints (eg. 3 parts Lahmian Medium to 1 part Mephiston Red), what do you use to remove the paint from the pot and measure it? Do you just dip your brush in the pot and dab it on the palette? Or do you have a more reliable method?
Thanks.
Brush from pot.
3 dips of the brush of medium and 1 dip of the brush of paint. It's not chemistry, you really don't have to be that exact. I do it all by feel anyway and as the paints drying you may have to add more water/medium. It's just a rough guide, play with it and try to get a feel for it. Some paints are thicker and require more medium to get that translucent glaze effect.
Excellent tutorial, I have had troubles with glow effects and this helps so much. Looking forward to colour swapping and trying Bork'an style armour with the same techniques. Thank you very much Garfy.
Make sure you send me pictures, I really want to see. Send them to Tale of Painters via our facebook page is probably easier.
This is a great tutorial and the pictures are very crisp! Thanks Garfy!
I pride myself on my photography. I've invested time and cash into producing reliable pictures. With a dedicated photography studio with it's own flash lighting I can take pictures of each stage without having to rely on sunlight.
This is the best guide I've seen for painting Tau models. Thanks for posting it!
No problem, happy painting.
Have to agree, i love the tutorials on this site informative and easy to follow while using citadel paints. I appreciate they may not be the best paints in every situation, but lots of good tutorials online jump from citadel, vallejo, P3 etc. from stage to stage making it almost impossible to follow without buying the exact same paints.
So thanks for keeping it simple but awesome!
I got to say I was an avid user of Vallejo, but I was so impressed with the new GW paints I've switched over completely. I'm getting great results with them.
Vallejo metallics are better, but the GW ones are usable if you stir them and add some glaze medium to them to smooth them out.
I like to keep it simple. These have been designed for ease of use. I find them easier to follow then a youtube vid.
These really are great tutorials, nice painting too 🙂
That's really nice of you to say so.
Great work, Garfy – thanks for that one 🙂
Easy to check what i have to do at each step.
I love they way the "Tale of Painters"- guides are done.
Thanks @ the whole team 😉 Keep painting guys!
Greetings
David
On behalf of everyone at ToP, thank you very much for your kind words.
Hi, just started with Tau and i appreciate your work. Very helpfull tutorials on this site. Go ahead with the good work. Thank you.
Thanks dude.