
Finally, a detailed step-by-step tutorial for painting my pale purple Nighthaunt paint scheme. A lot of people asked for it, and I delayed for a while, but here it is. Find out more after the jump.
This tutorial assumes you have a good understanding of how to paint. Underneath each picture are the corresponding instructions. Each step shows the paint(s) I used during that step. I have a rather eclectic paint collection, so when I use a non-GW or OOP paint, I’ll try to provide you with suitable alternatives from the current Citadel paint range [in brackets].
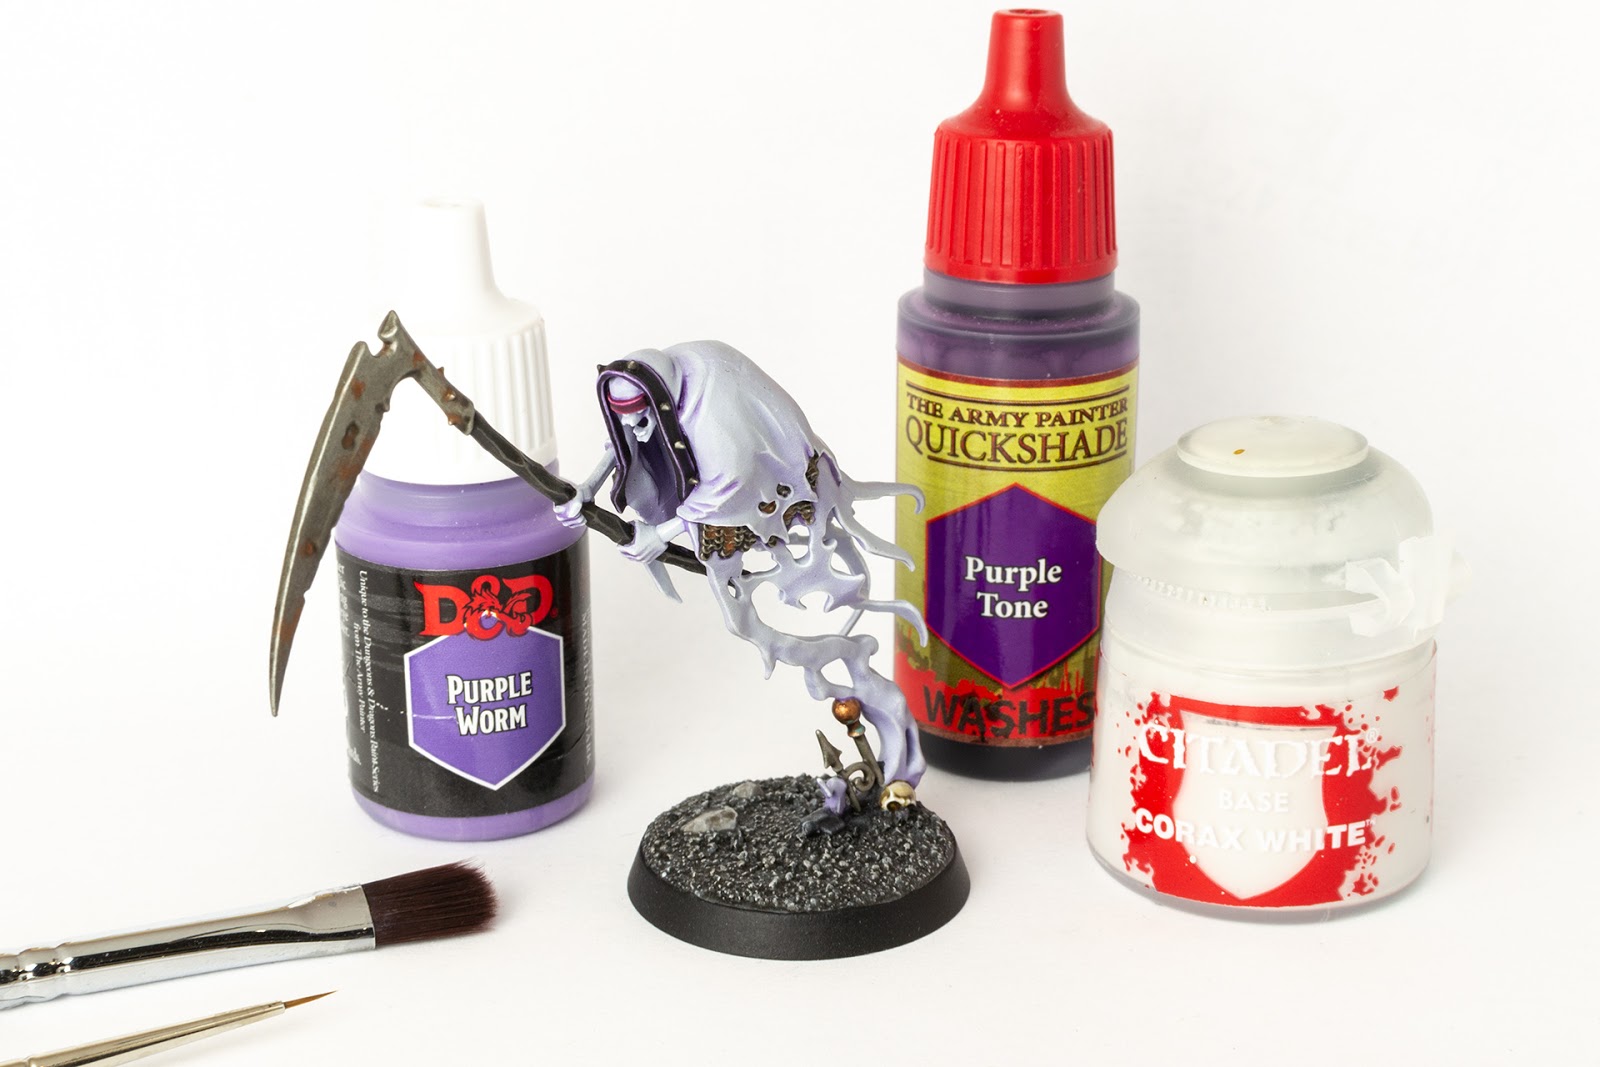
Paints I used for this tutorial:
Army Painter Uniform Grey Color Primer
Citadel Mechanicus Standard Grey
Citadel Corax White
Citadel Nuln Oil Gloss
Citadel Agrax Earthshade
Citadel Basilicanum Grey
Citadel Longbeard Grey
Citadel Agrax Earthshade
Citadel Shyish Purple
Citadel Genestealer Purple
Citadel Dechala Lilac
Citadel Screamer Pink
Citadel Emperors Children
Citadel Skrag Brown
Citadel Nihilakh Oxide
Citadel Contrast Medium
Citadel Foundation Charadon Granite [OOP Skavenblight Dinge]
Army Painter Warpaints Filthy Cape [Stormvermin Fur]
Army Painter Warpaints Dark Tone Ink [Nuln Oil]
Army Painter Warpaints Strong Tone Ink [mix of Nuln Oil and Agrax Earthshade]
Army Painter D&D Purple Worm [Kakophoni Purple]
Vallejo Game Color Brassy Brass [Brass Scorpion]
Vallejo Model Color Dark Grey [Eshin Grey]
Vallejo Model Color Black [Abaddon Black]
Vallejo Model Color White [White Scar]
Scale75 Thrash Metal [Iron Hands Steel]
Formula P3 Jack Bone [mix of Rakarth Flesh and Morghast or Ushabti Bone]
Formula P3 Bastion Grey [Stormvermin Fur]
Reaper Master Series Polished Bone [mix of Rakarth Flesh and Pallid Wych Flesh]
In case you need to expand your paint collection, head over to Wayland Games or Element Games, which stock a huge selection of paints at competitive prices.
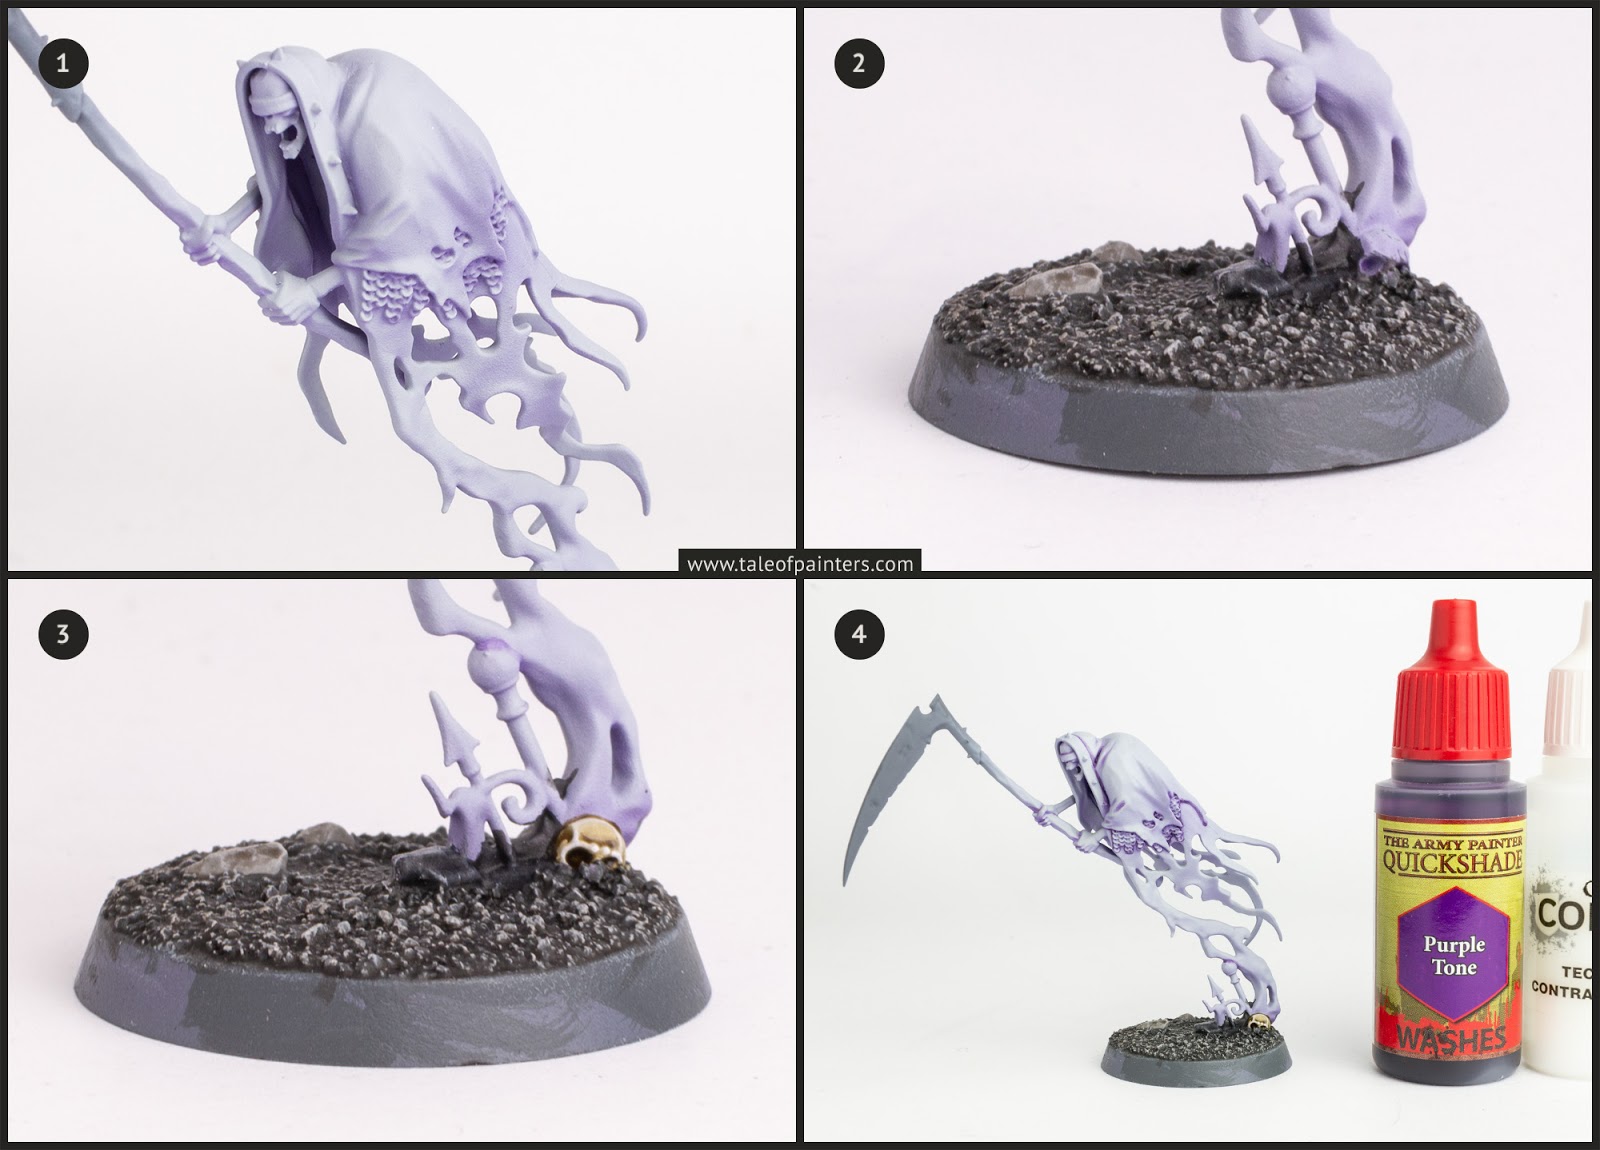
1. This is the airbrushing stage. After priming with Uniform Grey Color Primer from The Army Painter (any medium to light primer will work; I chose a mid-grey one as it’s a good medium colour for purple and compliments the grey texture of my bases), I basecoated the model with Purple Worm from The Army Painter’s D&D line [Kakophoni Purple is very similar]. Then, I carefully build up a zenithal highlight with several thin coats of Corax White (this needs a good amount of airbrush thinner) sprayed at an angle from above. If you’re not familiar with a zenithal highlighting, I recommend browsing YouTube for appropriate tutorials. If you don’t have an airbrush available, you could use Alien Purple Color Primer from The Army Painter for the basecoat, and then some thin coats of Corax White spray from above. You will have much more control with an airbrush, though.
2. Next, I worked on the base. I basecoated the sandy texture with Mechanicus Standard Grey, and the gravestone rubble with Vallejo Model Color Dark Grey [Eshin Grey]. The rubble got a wash of Basilicanum Grey all over, once dry, I drybrushed with Mechanicus Standard Grey, then TAP Filthy Cape, then Longbeard Grey. At this stage, I also hit the sand with Longbeard Grey. Finally, I washed the sand with a 1:1 mix of TAP Dark Tone and Strong Tone Ink [about 2:1 of Nuln Oil and Agrax Earthshade].
3. The skulls were basecoated with Formula P3 Jack Bone [mix of Rakarth Flesh and Morghast or Ushabti Bone], then washed with Agrax Earthshade. Once dry, I added a layer of P3 Jack Bone, then highlighted with Reaper Master Series Polished Bone [mix of Rakarth Flesh and Pallid Wych Flesh], then VMC White [White Scar].
4. I took a good look at the model to locate the recesses where the zenithal highlight overpowered the purple basecoat. I thinned TAP D&D Purple Worm [Kakophoni Purple] with water and a bit of Contrast Medium and built up additional purple shadows in several thin glazes. Then I applied TAP Purple Ink [Druchii Violet] thinned with a little bit of Contrast Medium directly where I wanted to further darken the shadows, usually in the deepest folds and to separate the various layers of the cloak.
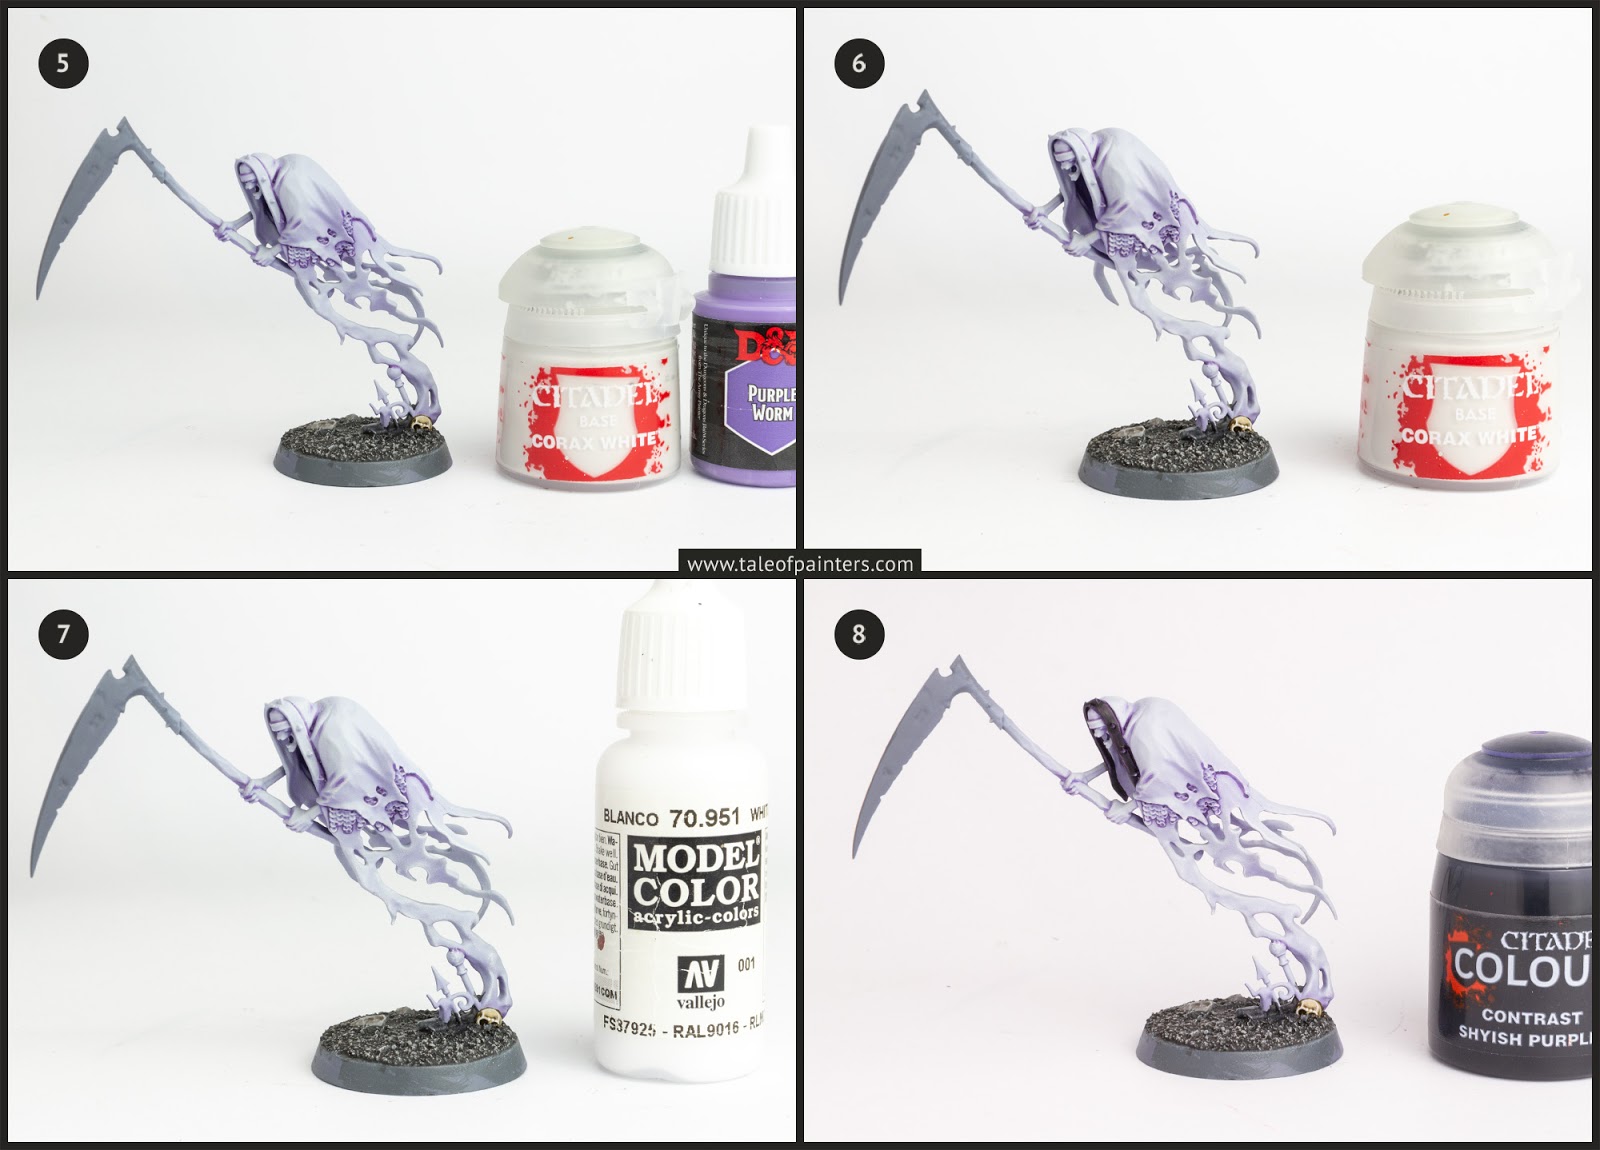
5. I mixed Corax White with a little bit of TAP D&D Purple Worm and used this mix to smooth over the transitions of the purple shading I added in step 4.
6. I gently drybrushed the whole model with Corax White to pick out the creases and folds of the robes. I recommend using a very soft brush to achieve a smoother, less streaky blending. Make-up brushes are excellent for this.
7. I added a second gentle drybrush, this time with pure VMC White [White Scar].
8. I painted the lilac details with two layers of Shyish Purple, about 2:1 mixed with Contrast Medium for a more even result.
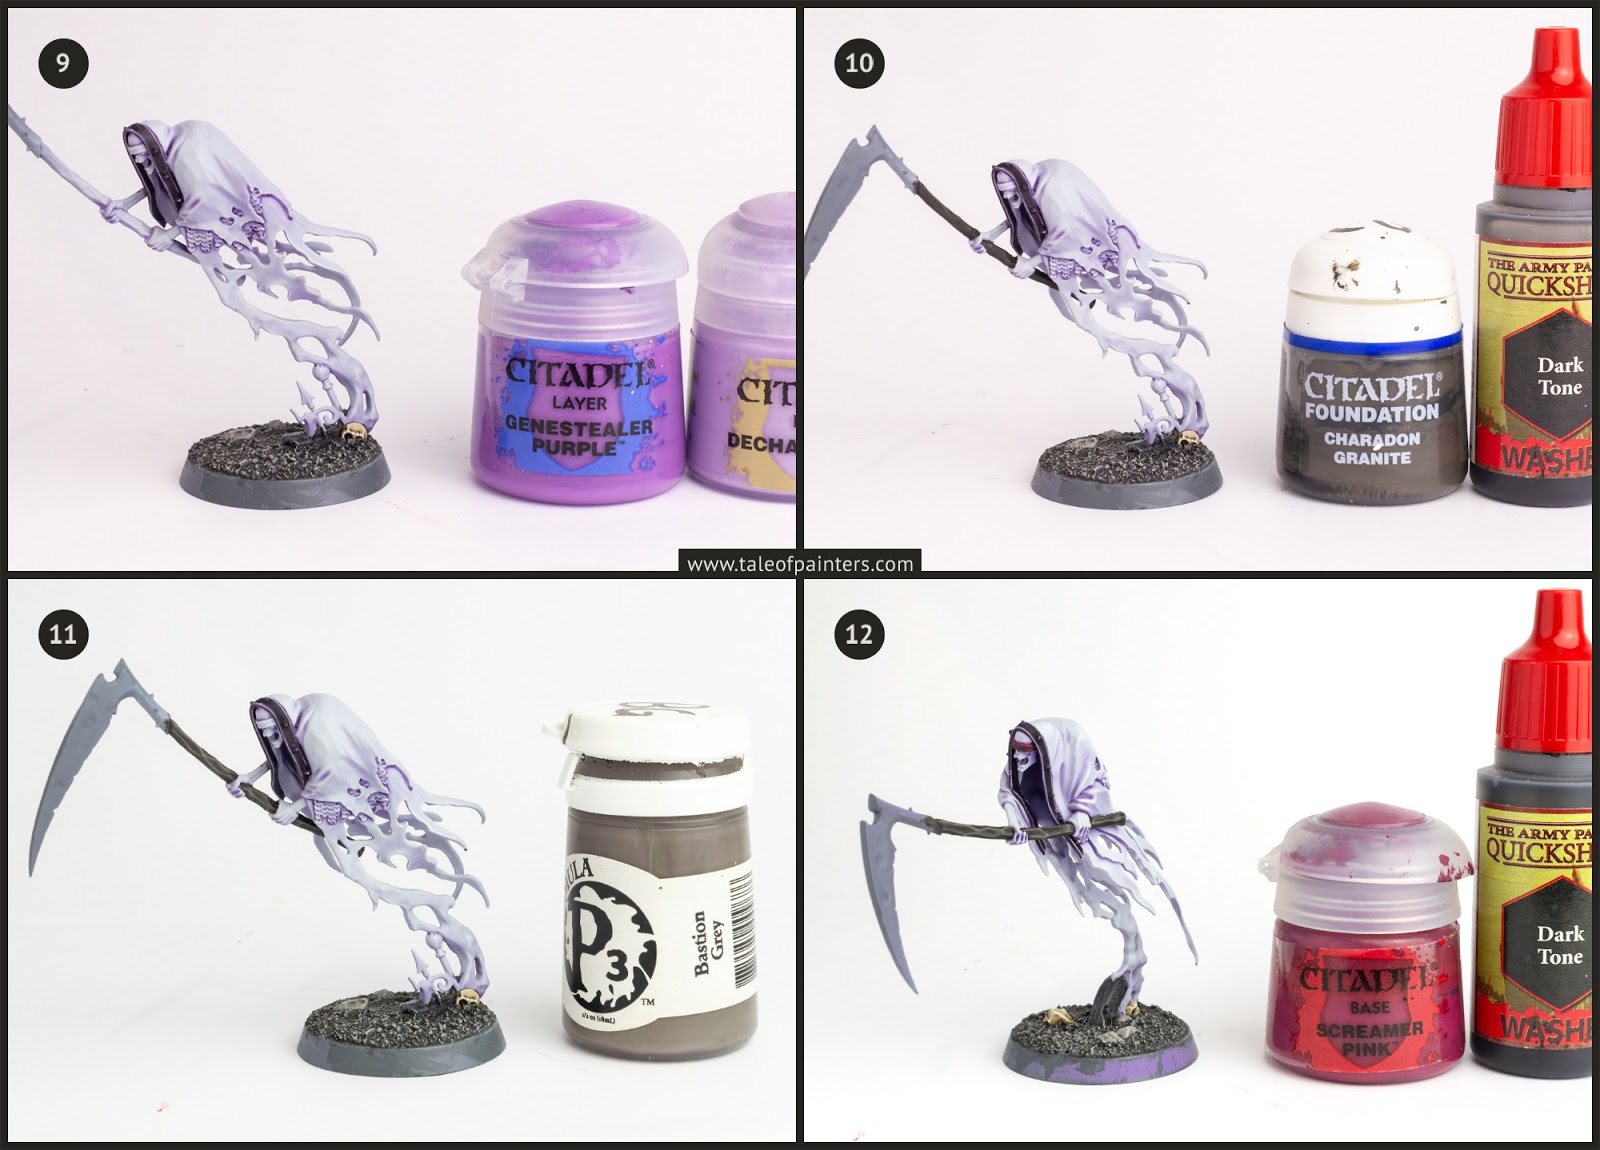
10. I added an edge highlight of Dechala Lilac over the highlights the Shyish Purple Contrast paint has created. I used Genestealer Purple as an intermediate highlight where needed, but the Contrast paint should do most of the groundwork.
10. I basecoated the wood with old Citadel Charadon Granite [Skavenblight Dinge is the closest, though it’s a lot less brownish]. Then I applied a wash of TAP Dark Tone Ink [Nuln Oil].
11. I drybrushed the wood with Formula P3 Bastion Grey [Stormfiend Grey is closest], then added a brush highlight of Bastion Grey where needed.
12. The purple details were basecoated with Screamer Pink, then washed with TAP Dark Tone Ink [Nuln Oil].
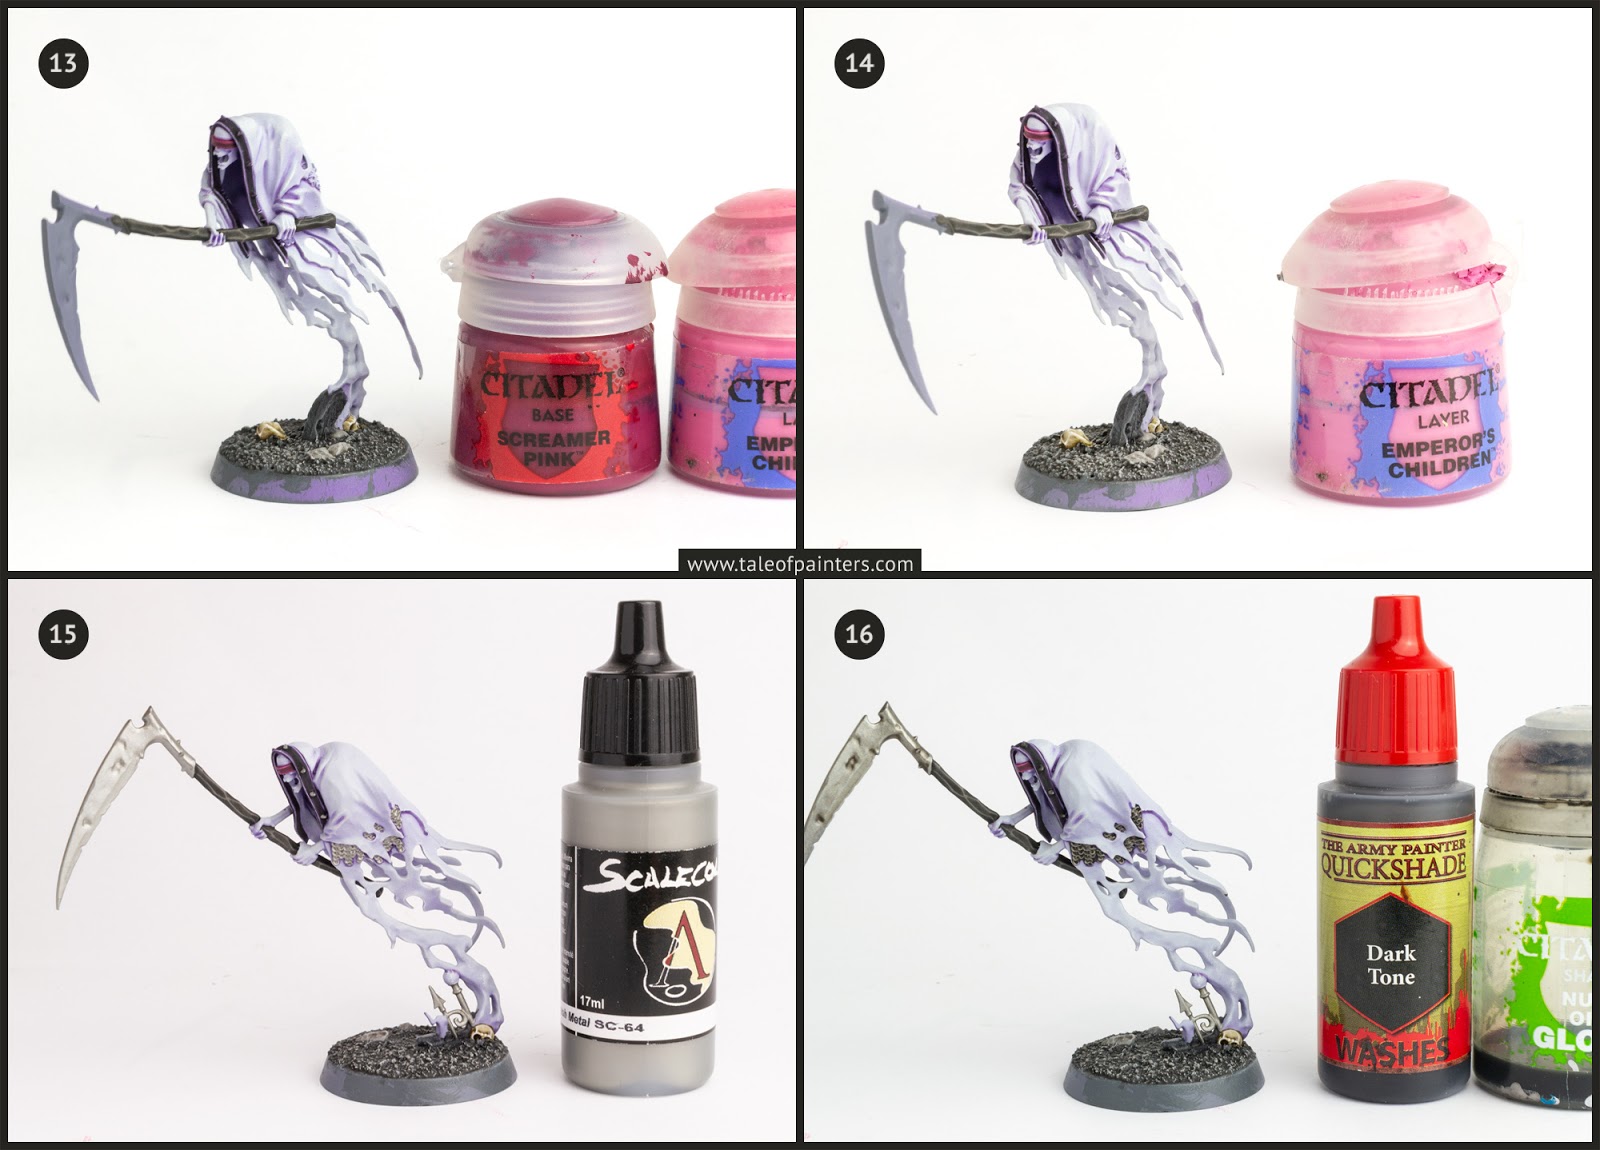
13. I highlighted the purple details with a mix of Screamer Pink and Emperors Children.
14. A final edge highlight of Emperors Children was added.
15. The silver areas were basecoated with Scale75 Thrash Metal [Iron Hands Steel].
16. I washed the metal with a 1:1 mix of TAP Dark Tone Ink [Nuln Oil] and Nuln Oil Gloss.
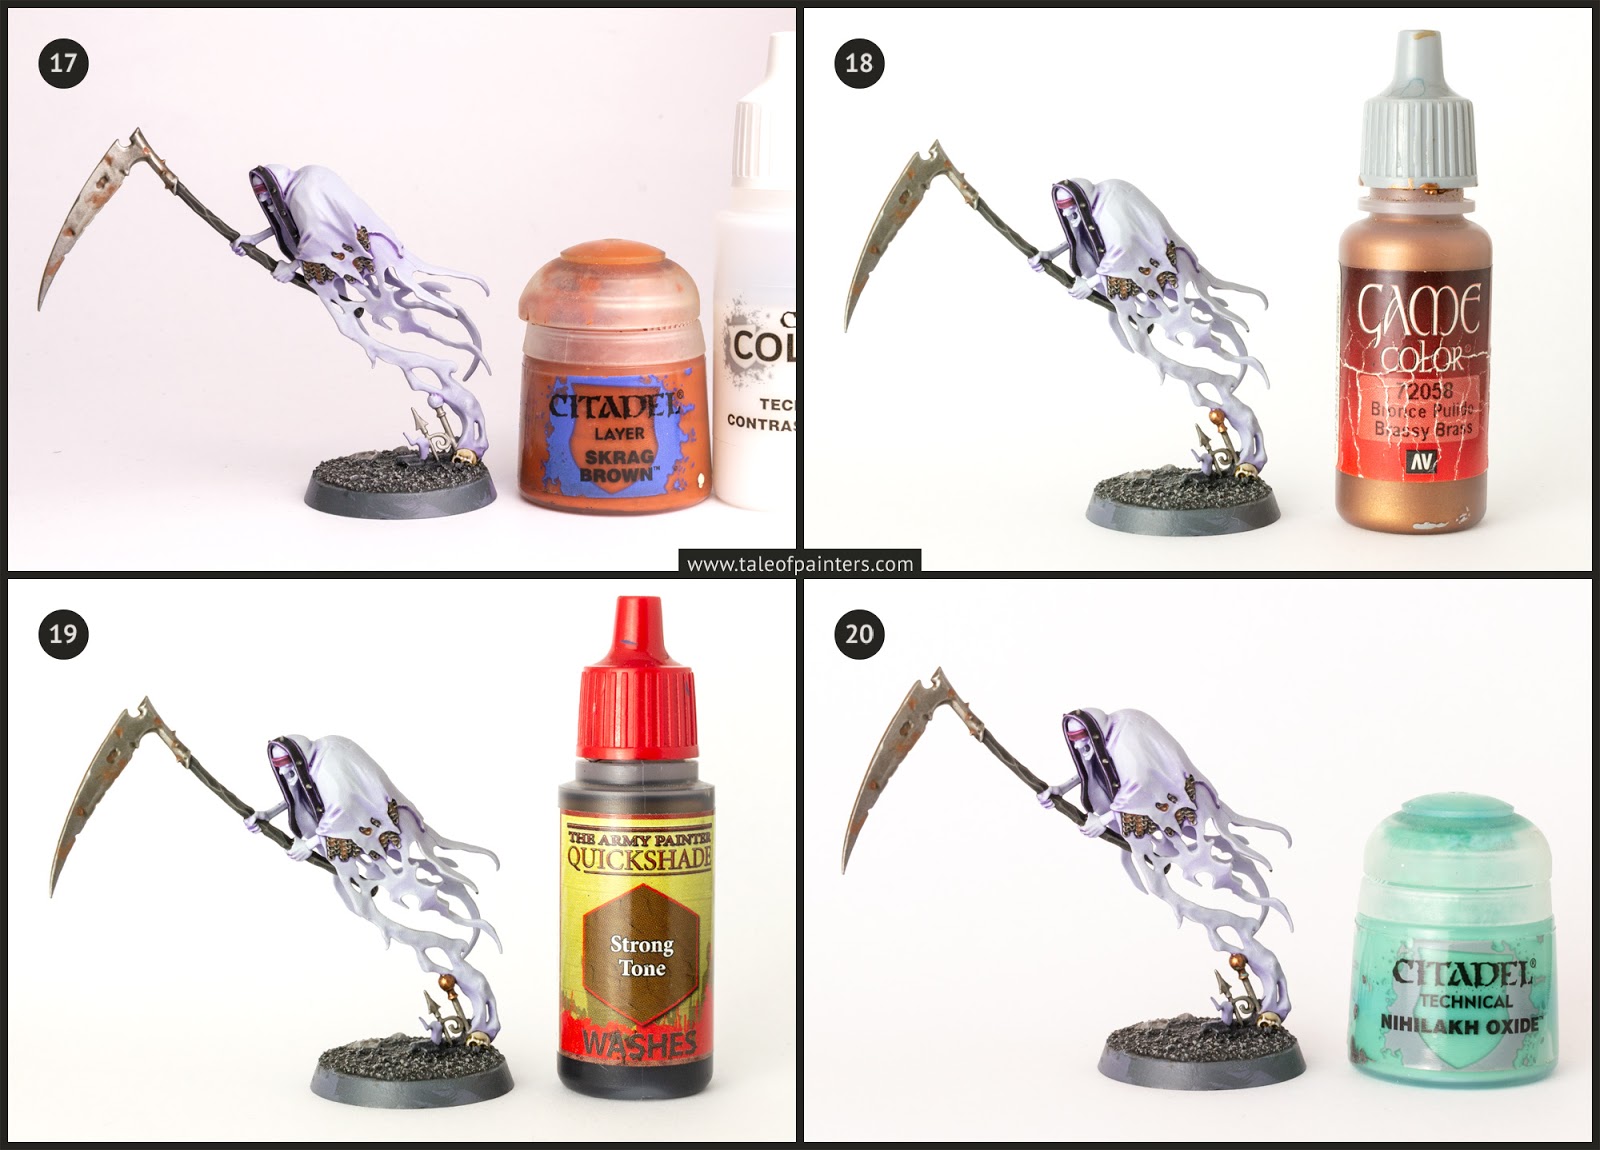
17. A rust effect was added by thinning Skragg Brown with a lot of Contrast Medium and a little bit of water, which was applied into the recesses of the metal in two to three thin layers.
18. The brass details were basecoated with VGC Brassy Brass [Brass Scorpion].
19. The brass was washed with TAP Strong Tone Ink [mix of Nuln Oil and Agrax Earthshade].
20. I added some verdigris by thinning Nihilakh Oxide with a little bit of Contrast Medium and applied it into the recesses in two thin layers.
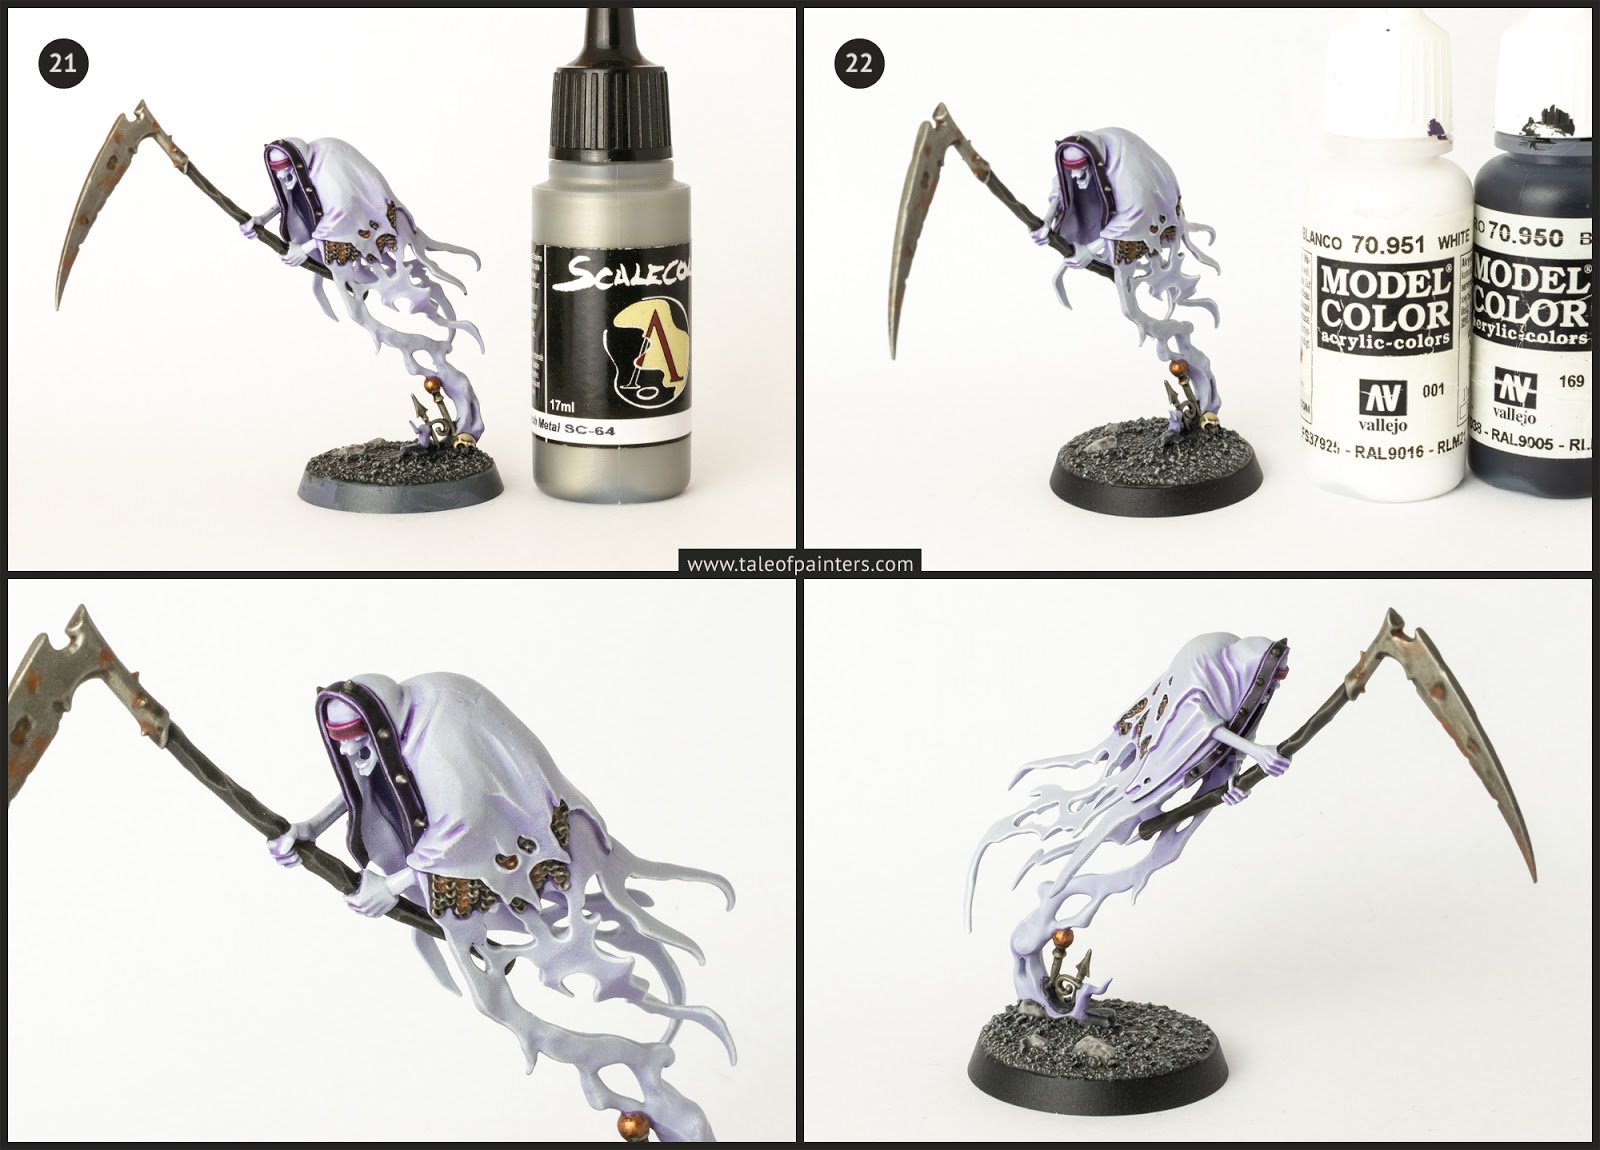
21. I highlighted the brass with Scale75 Thrash Metal [Iron Hands Steel].
22. Last but not least, I cleaned up any spills on the bodies with Corax White mixed with a little bit of TAP D&D Purple Worm [Kakophoni Purple] where needed, and added an edge highlight with thinned VMC White [White Scar]. You could skip this stage to save some time, or limit the highlight to only key areas such as the faces or hands, but the final white edge highlight emphasises the drybrushed highlights from step 7 and 8 and makes the models really pop. Finally, I painted the rim of the base with VMC Black [Abaddon Black].

Finally, some of my other paint recipes: The rope on the Chainrasp on the left was painted with Skeleton Bone over Corax White, then layered with Morghast Bone and highlighted with thinned Wraithbone. The green vines were basecoated with Death Guard Green, washed with Creed Camo with a bit of Contrast Medium, then highlighted with Straken Green and Army Painter Camouflage Green. The blue flame was painted with VMC White, Army Painter Toxic Mist, Baharroth Blue, Temple Guard Blue, and Sotek Green from light to dark.
How do you like my take on painting Nighthaunt? Have you found anything useful in this tutorial for your own projects? Let us know in the comments!
Do you like our tutorials and reviews? Here is what you can do to support us: Check out the websites of our sponsors, place your next orders at Wayland Games by clicking here or at Element Games by clicking here. Thank you very much, we appreciate any help to keep us going.
5 Comments
Leave a Reply
Tale of Painters is the unofficial Warhammer hobby magazine run by hobbyists like you. Support our work by using the affiliate links from our 🇺🇸 / 🇨🇦 partner stores for your next orders so we can continue to bring you fantastic FREE content every day:


Or support us directly:


Absolutely love this color scheme, appreciate the excellent write-up for it. Can’t wait to give it a shot on a NH lot I picked up a while back that needs a repaint!
thank you ! your step by step guides are a god send to a returning painter. You deserve much more exposure. get on youtube 🙂
Thanks mate! Maybe in 2021 😉
I’m going to adapt this for my Daemonettes. Thanks!
Hi Stahly,
You did a wonderful job on thoses Nighthaunt. Really love the purple tone.
I will use your recipe on my unpainted warcry band.
Thanks 🙂