
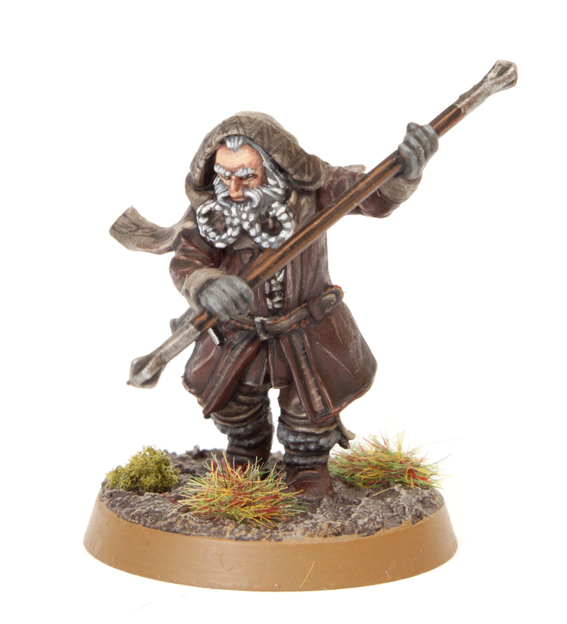
This is it, the last tutorial for the Hobbit boxset. Maybe you’re seeing this for the first time as you undertake your own box set, or maybe you’ve followed this project as it progressed and painted your own set at the same time and now you have a full set painted as well, either way I hope these tutorials have proved useful. Read on to discover how to paint Oin.
This tutorial assumes you have a basic understanding of how to paint. For the beginners, I will explain the techniques as I go along. Each picture below shows four chronological steps. Underneath each picture are the corresponding instructions. Each step shows the paint I used during that step. It’s good to have reference material close to hand to check colours. I used google images for film stills and Games Workshop’s 360º pictures on their website were a great help.
Paints you will need for this tutorial:
Black Undercoat (technical)
Cadian Fleshtone (layer)
Bloodletter (glaze)
Rhinox Hide (base)
Kislev Flesh (layer)
Stormvermin Fur (layer)
Dawnstone (layer)
Pallid Wych Flesh (layer)
Gorthor Brown (layer)
Baneblade Brown (layer)
Karak Stone (layer)
Doombull Brown (layer)
Iron Breaker (layer)
Nuln Oil (shade)
Carroburg Crimson (shade)
Mournfang Brown (base)
Skrag Brown (layer)
Abaddon Black (base)
Stirland Mud (texture)
XV-88 (base)
In case you need to expand your paint collection, head over to Wayland Games or Slave to Painting, which both stock a huge selection of paints at competitive prices.
Undercoat the model. The details are small, so I hand undercoated the model (rather then use a spray) with Imperial Primer.
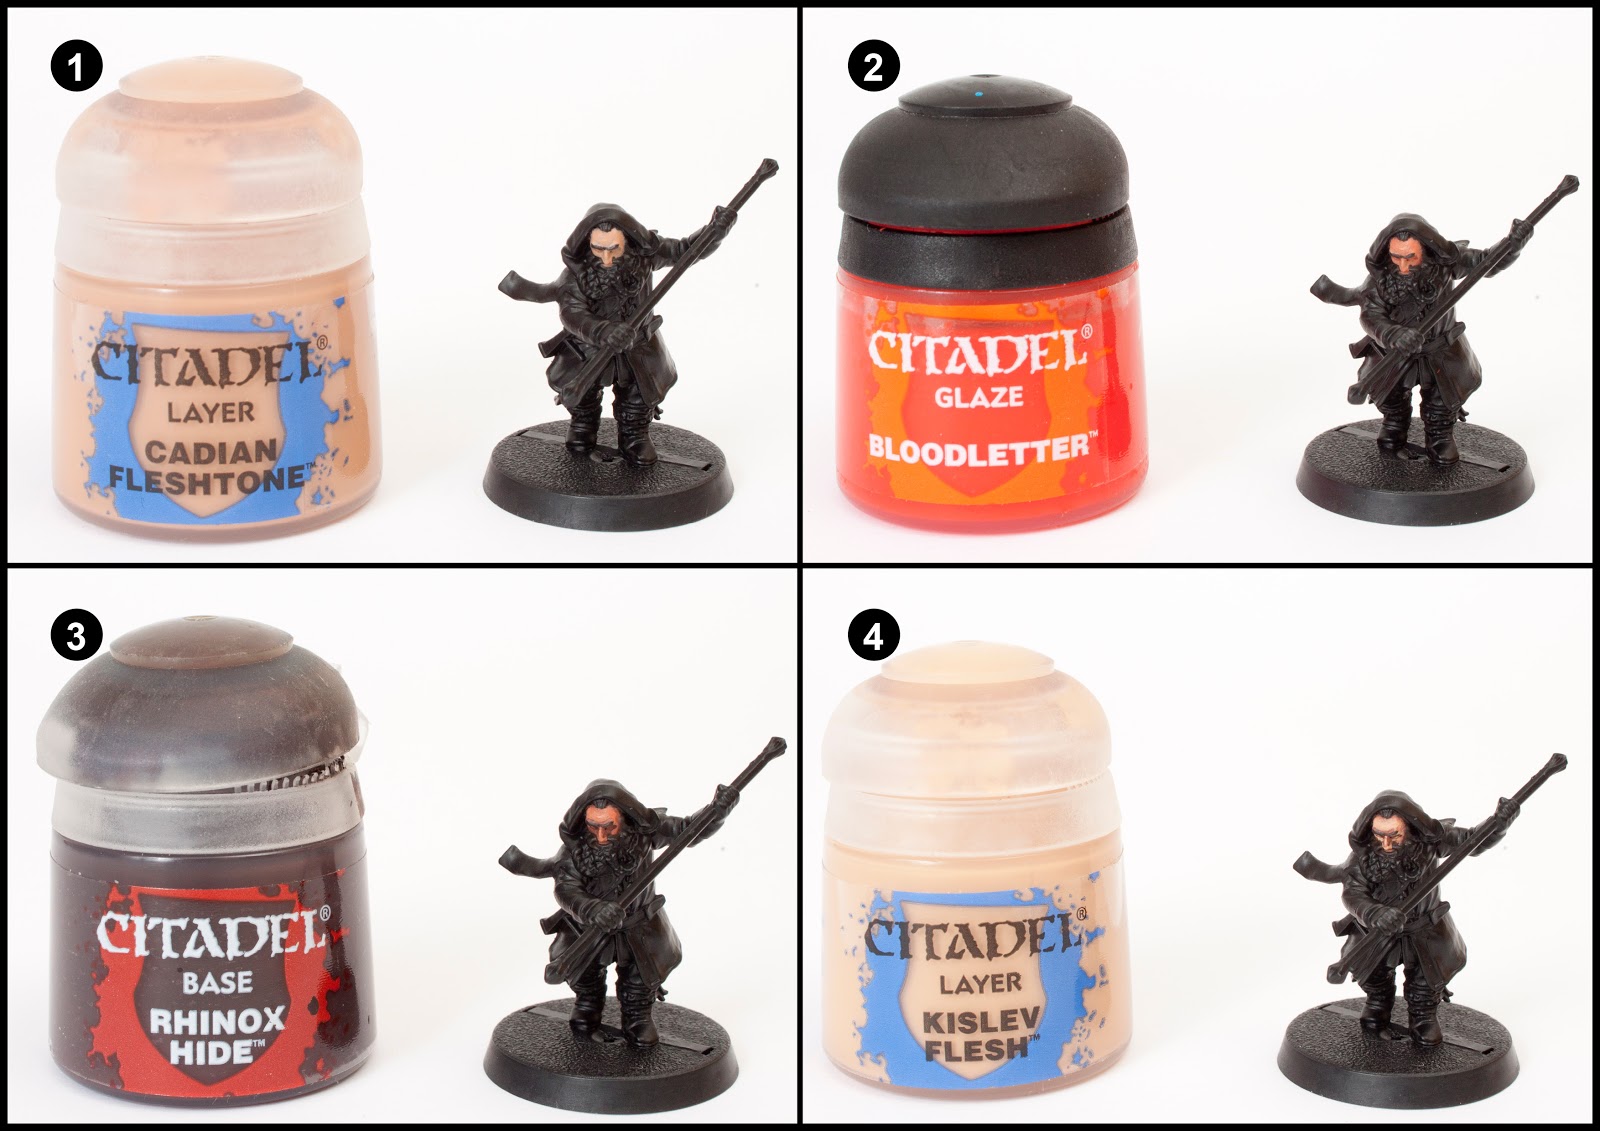
1. I painted the face with Cadian Fleshtone. I painted around the beard.
2. I changed the hue of the skin using Bloodletter glaze. Dwarves are a little more red in complexion then humans.
3. I watered down Rhinox Hide heavily and then shaded around the eyes, nose, inbetween the fingers and around the face.
4. I highlight the face with Kislev Flesh. Also if you’re feeling brave, this is the opportunity to paint the eyes with a thin black line and two white dots.
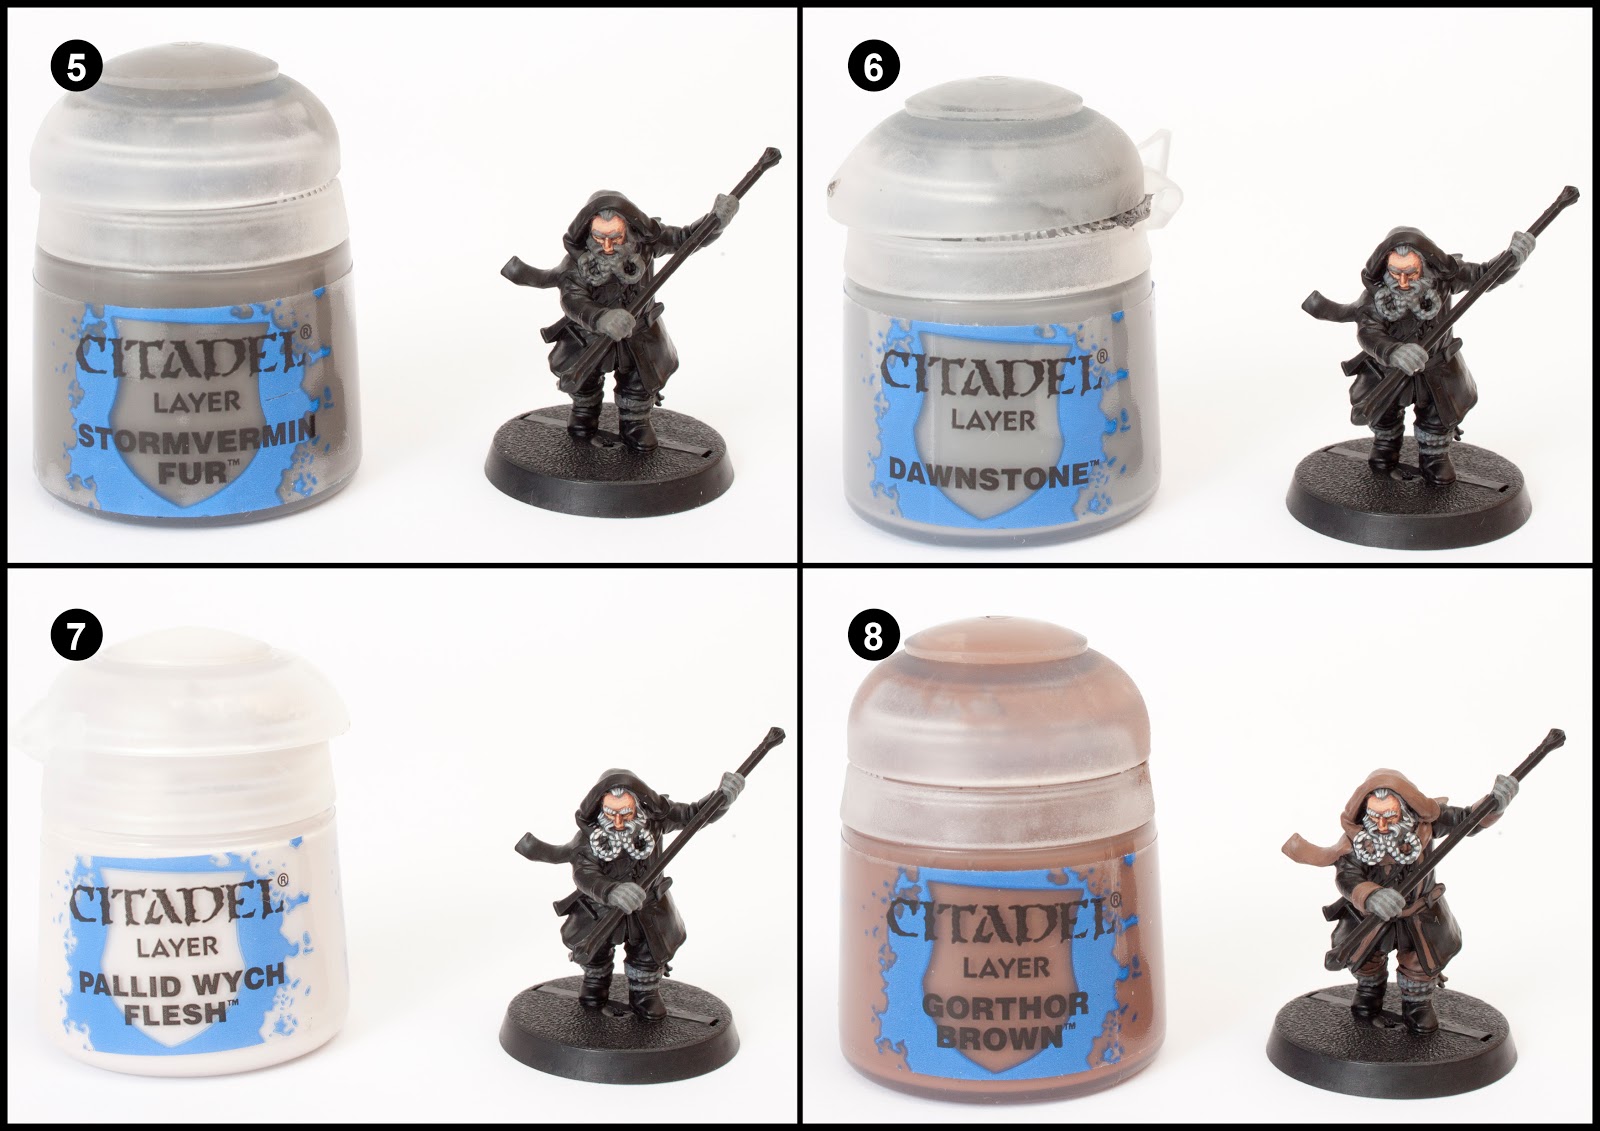
5. Paint the fur lined boots, gloves and eyebrows, hair and beard with Stormvermin Fur.
6. Highlight the previous stage using Dawnstone.
7. Highlight the eyebrows, hair and beard with Pallid Wych Flesh.
8. Use Gorthor Brown to paint the trousers, strapping around the shins, coat cuff, coat edging, scarf and hood.
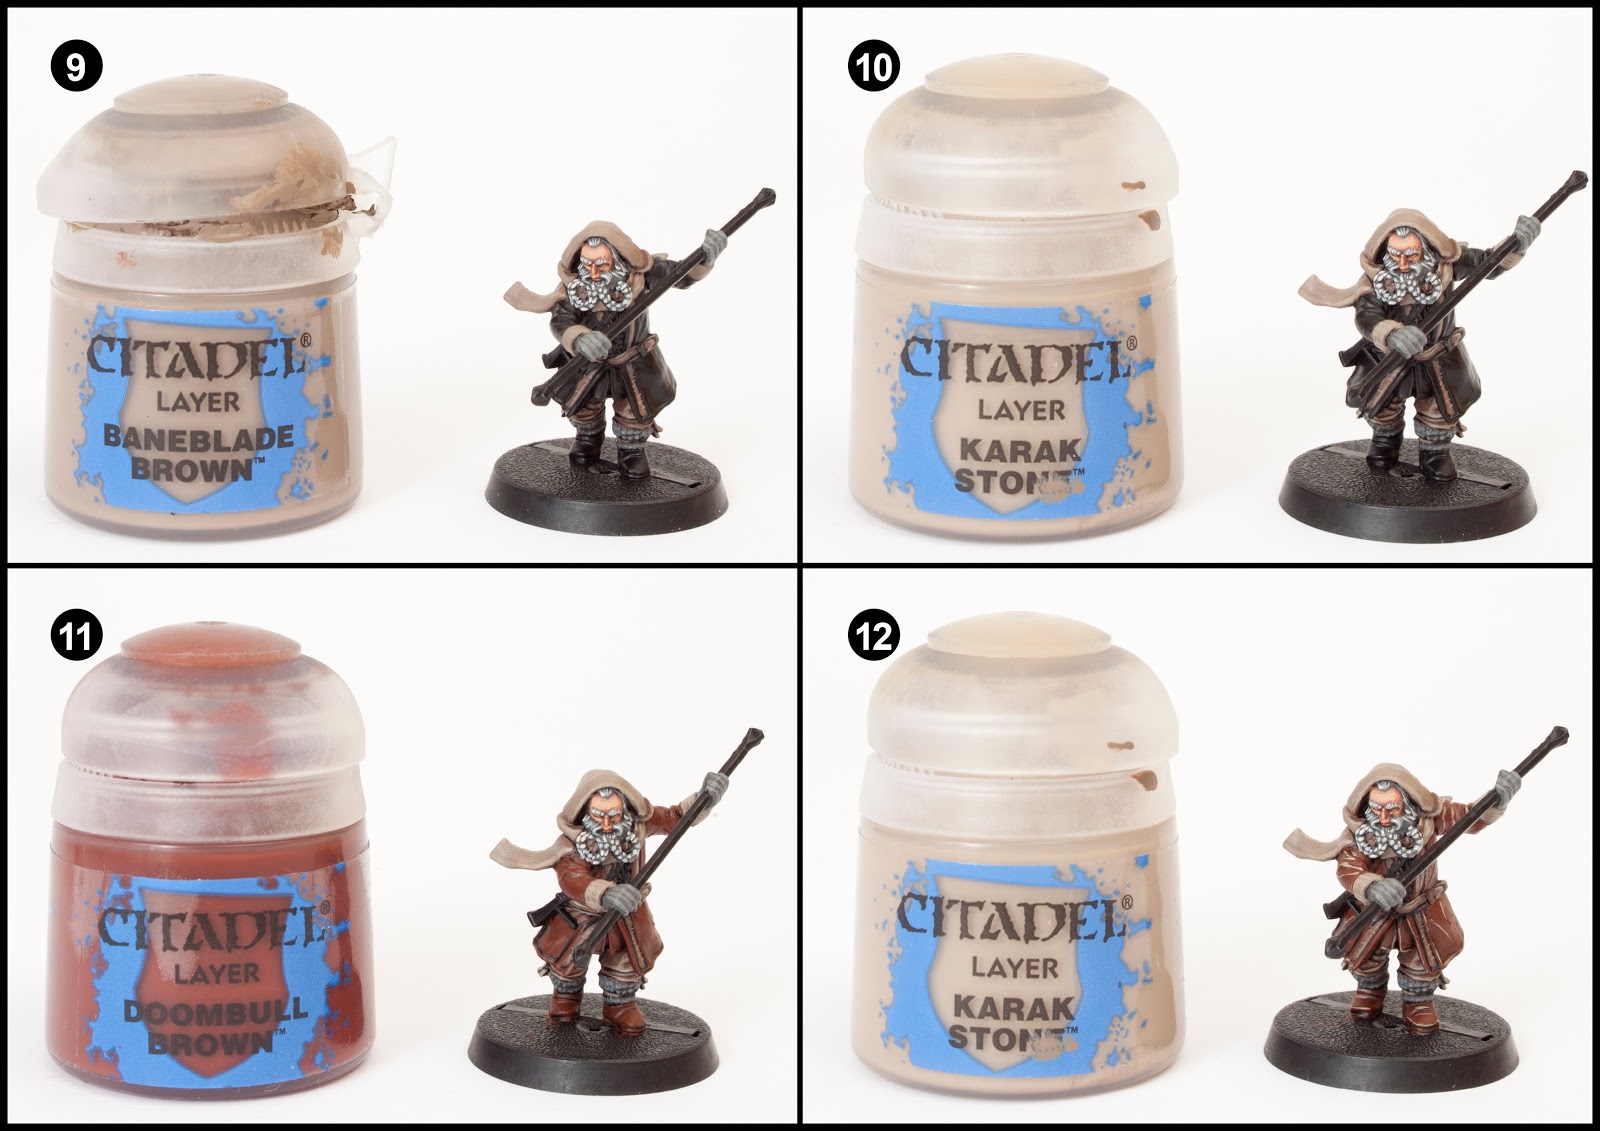
9. Highlight the previous stage using Baneblade Brown.
10. Use some thin edge highlights of Karak Stone to highlight the previous stage further.
11. Paint the coat and boots using Doombull Brown.
12. Add some thin highlight lines to the coat and boots using Karak Stone.
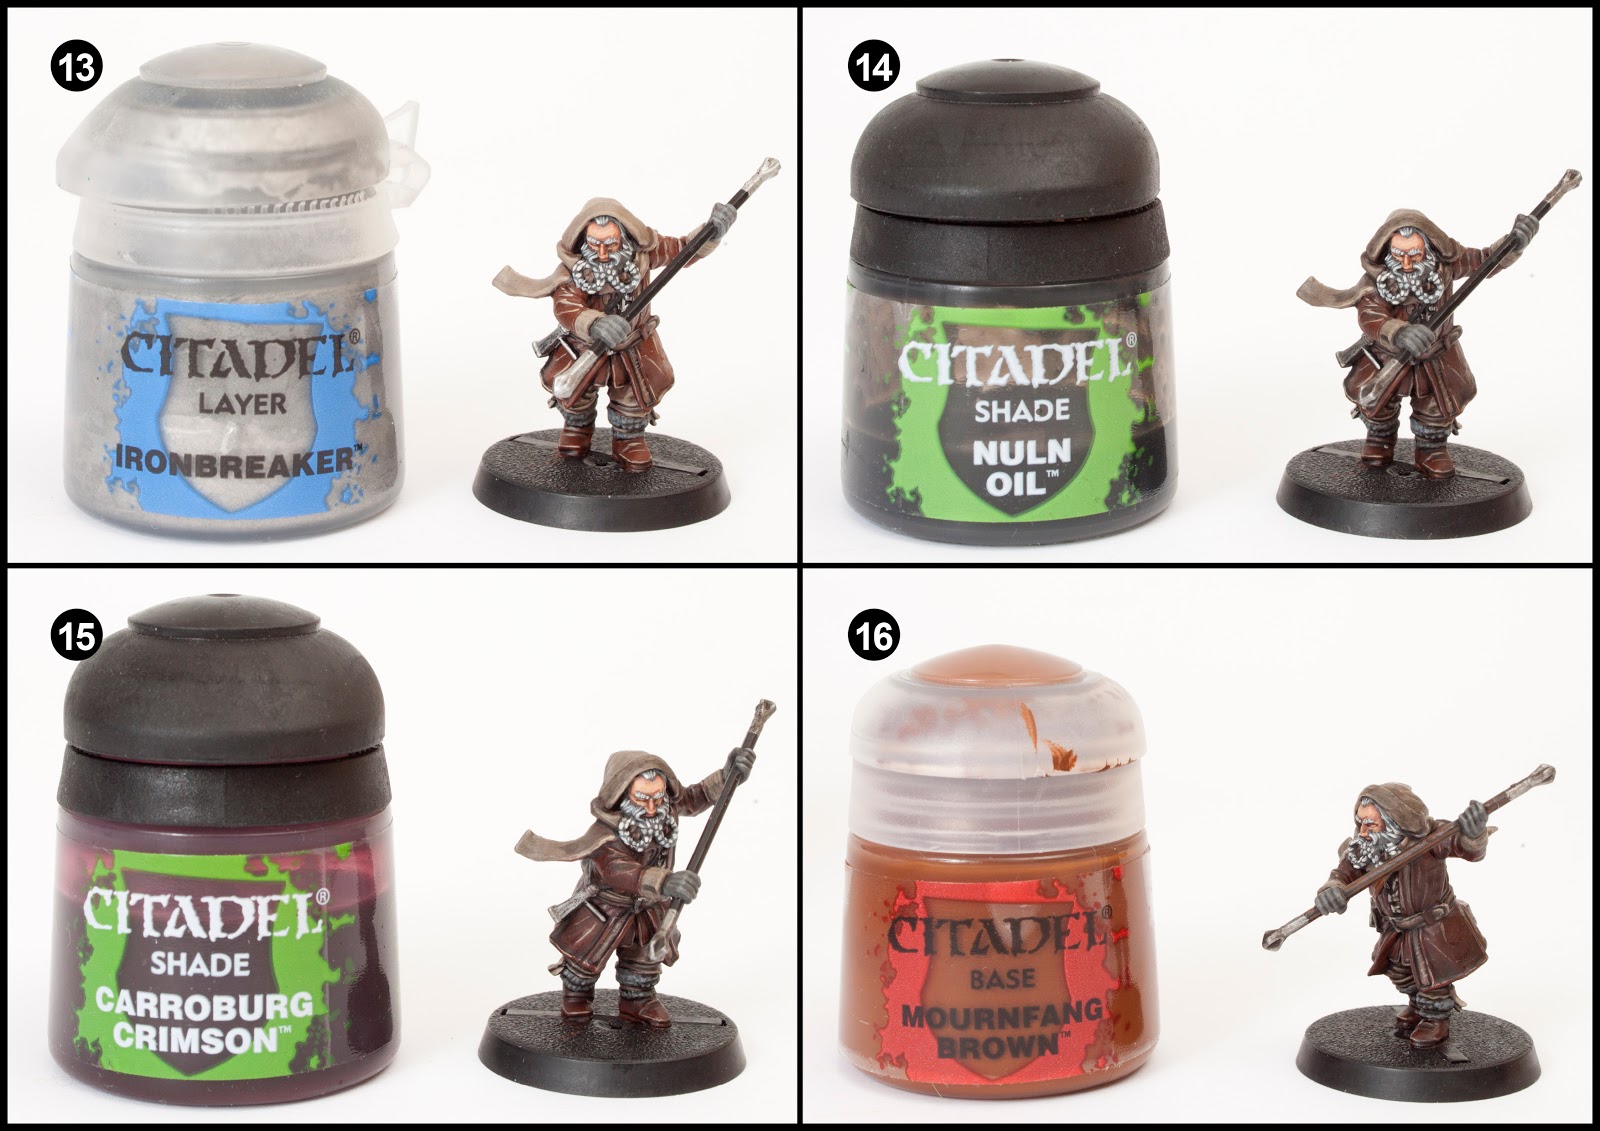
13. Paint the belt buckle, the item hanging from the belt, chest armour and both ends of the staff with Ironbreaker.
14. Use Nuln Oil to wash the following areas: Coat, cuffs, scarf, hood, boots, gloves, trousers and all metal areas.
15. Once the previous layer is completely dry, change the hue of the coat and boots by applying two coats of Carroburg Crimson.
16. Highlight the edges of the staff to create a grain effect by using Mournfang Brown.
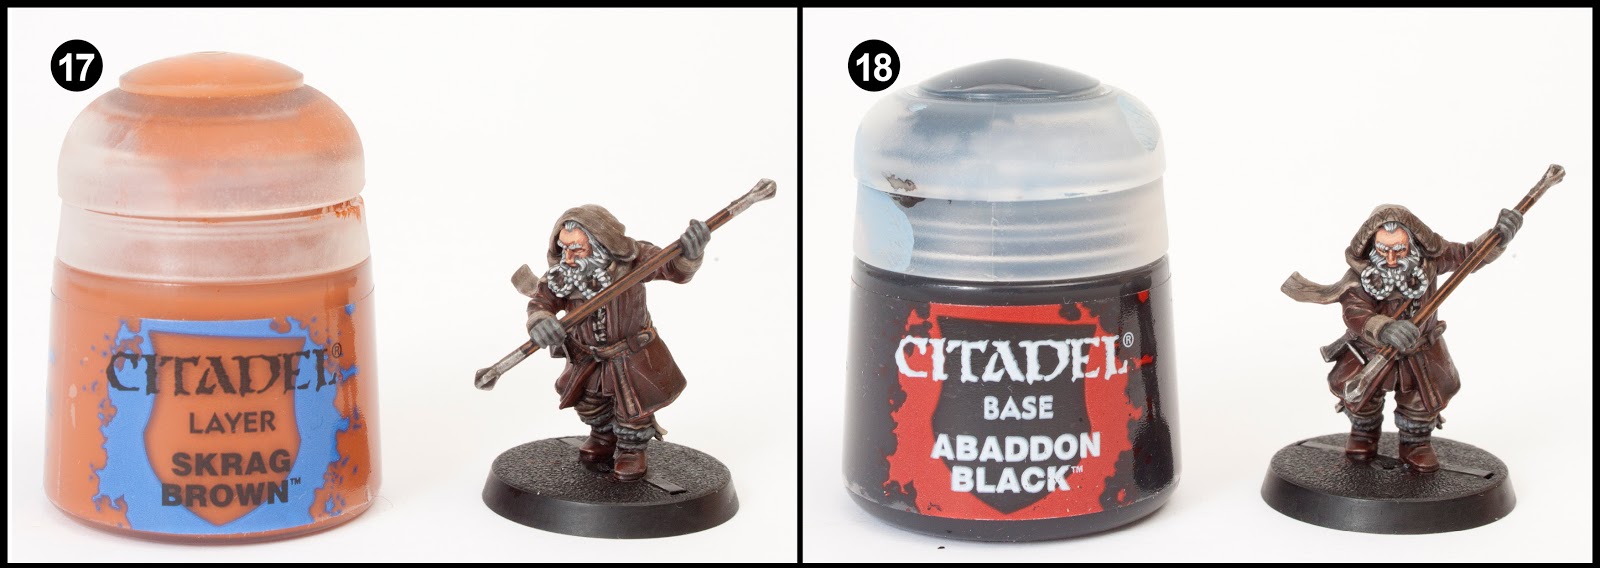
17. Repeat step 16 but use Skrag Brown this time. Paint the diagonal strap across the body with Skrag Brown. Add some tiny texture dots to the edge of the belt using Skrag Brown.
18. Use watered down Abaddon Black and a fine detail brush to paint the patterning on the hood and scarf.
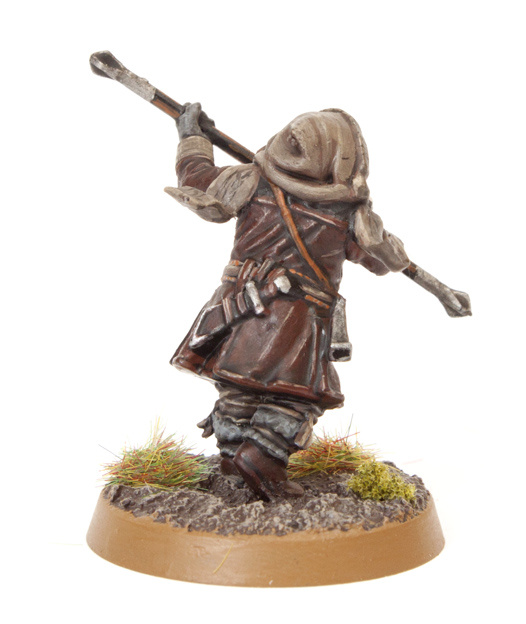
Finally base the model in a way which fits in with your collection. I used Stirland Mud texture paint highlighted with Karak Stone and the base edge was painted with XV-88. Static grass and scrub were glued on in small clumps.
For more Hobbit tutorials check out my Bilbo, Gandalf, Thorin, Gloin, Bombur, Ori, Dwalin, Balin, Kili, Dori, Fili, Nori, Bofur, Radaghast, Bifur and Goblin tutorials. If you found this tutorial useful, let me know in the comments.
That’s it, all done. I might revisit the Hobbit in a few months and paint some trolls and/or eagles… Maybe one of our sponsors would like to send me some to paint? 😉
Check back soon for the group shot of the set. Big thanks to all the readers for all the support. Don’t think I could have finished this project if it wasn’t for the over whelming encouragement. Thank you.
Do you like our tutorials and reviews? Here is what you can do to support us: Check out the websites of our sponsors, place your next orders at Wayland Games by clicking here or on the banner on the right. Thank you very much, we appreciate any help to keep us going!

18 Comments
Leave a Reply
Tale of Painters is the unofficial Warhammer hobby magazine run by hobbyists like you. Support our work by using the affiliate links from our partner stores for your next orders so we can continue to bring you fantastic FREE content every day:


![]()
![]()
Or support us directly:


Excellent tutorial, i'm really happy with the result. Thanks
I am no novice painter, but I have been using your tutorials as I move through my Thorins Party. Only have made a few adjustments based on style or paints available, but so far am loving it. Very easy to follow, takes a lot of the color homework out of the equation, so thanks man.
You're welcome. I'm pleased they're still of use to people.
Hi Garfy,
I've been following your tutorials carefully to paint my Dwarves, it is taking me some time and it's difficult to even get to a tabletop standard at my level. thanks for posting these, but do you have a tutorial for Bifur? there's no link on this page. thanks
http://taleofpainters.blogspot.co.uk/2013/02/tutorial-how-to-paint-bifur-dwarf-from.html
There you go.
Hi Garfy,
my son David (9) love your hobbit-tutorials. Games Workshop should you pay for this. We also never have painted in our lives. Just two questions: Do you lightly thin the paints as other painting-guides recommend? Which fine detail brush do we need? Next week I will buy the hobbit-box because of you – garfy! Love your Ultramarines also…
Hi Anonymous. it's so great to hear people getting excited about the Hobbit box set. it's one of the best starter games ever. The detail on the dwarves is incredible for plastics and you gets lots of bad guys and a monster sized creature too. It's such a good set. I'm really enjoying adding to it as well with my Eagles and Wargs. Might get Grim Hammers next.
In answer to your question, watering your paints is no bad thing. A touch of water can completely change the feel of paint on a brush, it will be more fluid and you're less likely to 'drag' the brush leaving brush marks. The downside is you might need to paint another coat or two which takes time.
You can't go wrong with Kolinsky Sable brushes. Get a range of sizes to cover yourself. 000, 0, 2 etc.
Hello,
I want to thank you for the tutorials. I got the box from The Hobbit as a gift from my boyfriend, but I have never painted in my life. I have learnt a lot from your tutorials. Thank you very much.
You're more then welcome. Do you have pics of your models? I would love to see them.
a guide to the new Thror model would be amazing, so many intricate details on him and he looks badass!
No plans for Thror at the moment, but I am assembling two Great Eagles and will be producing a painting tutorial.
Next tutorial I have planned is a Necron Warrior for the Tale of Mega Painters project Stahly and I are working on.
Wonderful!! What will be you next tutorials? I hope you continue with them.
Cheers Garfy 😀 Another fantastic tutorial!
Any chance we might see a tutorial for the Grimhammers in the future?
Impressive thats All i i have to say from germany
Thank you so much for all these excellent tutorials. As I have said before, these are really helpful and unique.
Your work has kept me coming back every day, Thanks again!
Sir, you are a hero. I've been following these tutorials and I can honestly say that they not only helped me finish the box to great result, but your step by step pictures helped me finally understand how to properly highlight up to lighter colors properly.
So thank you, not just for these amazing tutorials, but especially for helping me improve as a painter.