
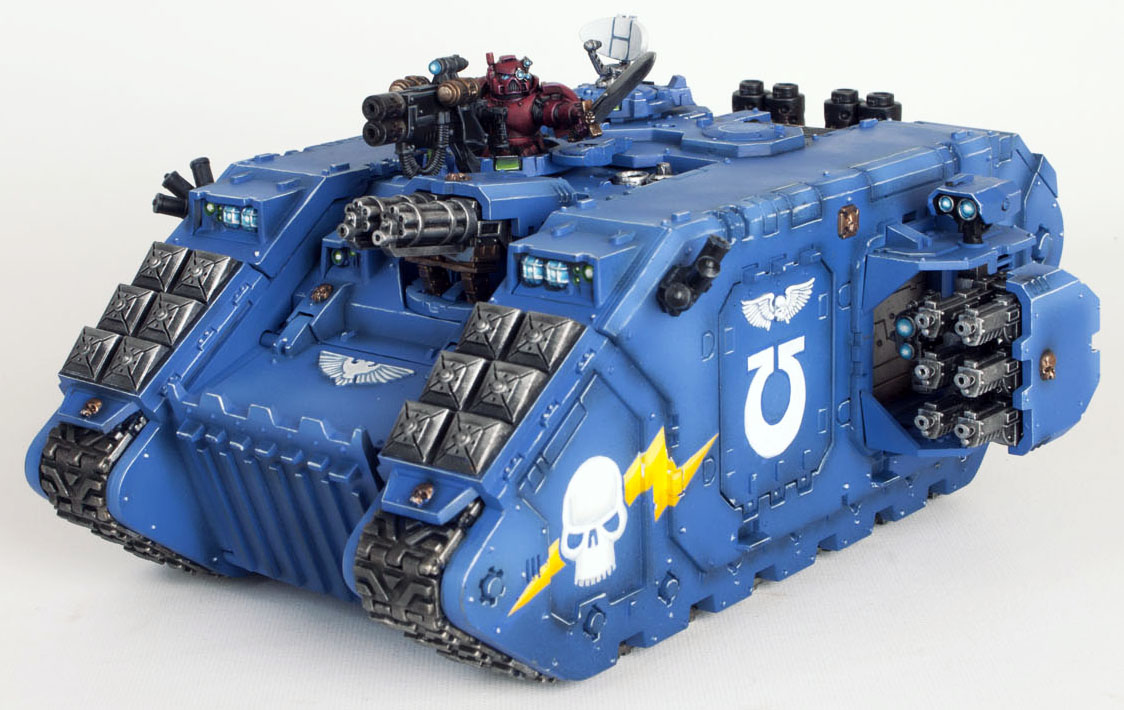
In part one of this stage by stage photo tutorial, I will explain how I paint my Ultramarine vehicles to a factory clean standard. Part two of the tutorial will explain weathering. Part one starts after the jump.
I will list the paints as I go through the tutorial in each step. You will also need a large dry brush (old GW tank brush is perfect) and a dual action airbrush capable of airbrushing thin consistent lines. Occasionally I will link to existing reviews or tutorials. This is to save on repetition and to allow for an in depth explanation should you require it.

1. Don’t glue the main hull together. We need to paint the interior and it’s easier in sub assemblies.
2. Undercoat the inside. I use Vallejo Surface Primer in my airbrush.
3. Using a large brush, dry brush the interior lightly with Kantor Blue.
4. Repeat the drybrushing process with Alaitoc Blue. It’s better to do this several times with a very dry brush rather then one single heavy coat.

5. Drybrush Leadbelcher on to the floorpan and rear engine block.
6. Highlight this with Runefang Steel, I used an old large GW brush and circular motions in the centre of the floor panels.
7. At this point I painted the purity seals with Mephiston Red and Ungor Flesh. Then wash this and the metal areas down with Devlan Mud or if using the new paints Agrax Earthshade.
8. To paint the screens first paint them with Warpstone Glow, then paint a backwards L shape in the lower right corner of each screen using Moot Green. Use Abaddon Black in the top left corner. Use Ceramite white to paint a thin backwards L over the top of the Moot Green and apply a tiny white dot in the top left corner. Finally wash this with Biel-Tan Green. You can gloss varnish the screens if you wish.

9. With the interior complete, it is time to assemble the model. It’s wise to leave the weapon systems as separate pieces to aid painting. Once it’s assembled in it’s sub assemblies it’s time to undercoat. Make sure you use masking tape on the inside to block the exposed hatch and turret holes. You don’t want to wreck your interior paint job with black spray.
10. Using your airbrush, basecoat the armour with Vallejo Ultramarine Blue. I mix Tamiya X-20A Thinner into my paint. You can see here I’ve removed the gun pieces from this step.
11. Now for the tricky part. Mix Vallejo Black, Stormy Blue and Tamiya X-20A thinners together and setting the airbrush up for thin lines, line all recesses of the armour panels. Don’t worry about going over edges as this is normal.
12. Hopefully you’ll still have some Ultramarine blue and thinners mix left over in your glass jar because you’ll now want to set the airbrush up for a large spray. This is called misting. Don’t pull the trigger back all the way and keep a good distance from the model and this will blend in the harsh shading from the previous stage.

13. Mix Wolf Grey, Ultramarine Blue and X-20A together and airbrush on as area highlights. At this point it’s useful to use an offcut of card with a straight edge as a mask. Just butt it up against a raised piece of armour on the roof and it allows you to highlight the edge without getting paint onto the recess you’re already shaded.
14. That’s it for the airbrush. Back to trusty old brushes as you black in all the detail.
15. Heavily drybrush all the metal areas with Ironbreaker.
16. Wash the metal areas with Badab Black or Nuln Oil. A quick light drybrush of Runefang Steel helps the metals pop on the edges.

17. Paint any raised icons (crux/skulls etc) and chain fed ammo feeds with Hashhut Copper. For smooth metallics make sure you shake the pot well and then add some GW Lahmian Medium or Vallejo Glaze Medium to the mix.
18. Wash over the Hashhut Copper areas with Devlan Mud or Agrax Earthshade.
19. Highlight with Runelord Brass then assemble all the parts. I don’t glue my cupolas (hatches) or turrets so they’re interchangeable. I can put the twin-linked Assault Cannons onto one of my razorbacks or take my Rhino’s Storm Bolter hatch and place it on my Land Raider instead of the Multi-Melta.
20. To paint the engine’s smoke stacks and the Multi-Melta barrels, leave the top black and paint the lower 2/3 Warplock Bronze. Then paint the bottom 1/3 with Ironbreaker.

21. Highlight the black edges of the Multi-Melta and smoke launchers with Dawnstone and then Administratum Grey. Thinner the better.
22. To paint the white Aquilla symbols start with a basecoat of Russ Grey. Then carefully paint each feather with Ulthuan Grey. Finally highlight these feathers with Ceramite White. This is the best way to paint these symbols for maximum crispness and depth. You can use a wash, but I find this way gives a superior result.
23. Now for some symbols. At this stage you can apply transfers if you wish. I prefer freehand as you can make it any size you wish. I mark out my design with a pencil. Then just slowly paint it on with lots of thin layers. Afterwards tidy up the edges and use a wet tissue to remove any stray pencil lines. Here is a tutorial on painting the U symbol.
24. I shaded the freehand skull and lightning bolt. I really like this retro looking nose art.

25. In this final stage (before part II: weathering) we have to paint the remaining detail which is the Techmarine gunner, lenses, lights and edge highlighting the blue armour using Vallejo Wolf Grey. For the green lenses just refer back to step 8. For the blue lights they are Teclis Blue then Temple Guard Blue and finally Ceramite White. Ignoring the Techmarine’s sword for the moment (“Drive me closer I want to hit him with my sword”) his armour was painted using Khorne Red, Nuln Oil wash, Wazdakka Red and final edge highlights of Wazdakka mixed with white. His black armour joints were highlighted as per step 21 and the sword uses the same metallic effects as mention previously. For guidance on how to paint swords that feature that nice blending on one half and reverse blending on the other half check out my Grey Knight tutorial but replace the blues with metallics.
Bookmark us, follow us, sign up to our facebook page to keep an eye out for part II, where I will explain how I weather my vehicles.
Do you like our tutorials and reviews? Here is what you can do to support us: Check out the websites of our sponsors, place your next orders at Wayland Games by clicking here or on the banners on the right, or at Total Wargamer by clicking here or at the banners on the right. Thank you very much, we appreciate any help to keep us going!

15 Comments
Leave a Reply
Tale of Painters is the unofficial Warhammer hobby magazine run by hobbyists like you. Support our work by using the affiliate links from our partner stores for your next orders so we can continue to bring you fantastic FREE content every day:


![]()
![]()
Or support us directly:


thank you
Hi! I just started a new Land Raider and I wanted to follow the tutorial for the 3rd time (man, I do love this way of painting LR). But I would like to know if you can send or put a link to a higher resolution picture of the 8th step, the one of the screens. Thanks!
Sorry, I don't have a bigger picture then that. What are you stuck on? Maybe I can help.
I cant believe i just found this only now…!! Argh! another great tutorial though!
Garfy, I'm new to painting warhammer Vehicles, can you tell me more about "area highlights" ?
Much appreciated!
Hi Anonymous, if you open the link below in your browser, you'll see a guide I wrote years ago on area highlighting. I should convert it and update it for Tale of Painters at some point.
http://i74.photobucket.com/albums/i278/Gareth_tyranids/Misc/Highlightblack.jpg
Thank you! Much Appreciated!
Yeah absolutely dude, that's why i prefer to do it by eye.
Cool – yeah, I was just thinking if it was half-and-half or like two drops to one or something. Sometimes even just a slight difference – especially when adding white – can make a significant change in the resulting final color.
Just brilliant! Thanks a million for putting time into doing this!
I will use most of the tips in this for my DA vehicles!
Keep up the good work!
@ Zab – You can read my review of the product by clicking the link in the text stage 2 above. Suffice to say though it gets a thumbs up.
@ Minijunkie – I get asked ratios all the time and my honest answer is – who measures out their paint? I do everything by eye. I just keep mixing colour in until it's the shade I want. So for the highlights, mix in as much or as little as you want until you're happy. If you've never mixed paint together before start with 50:50 and then tweak from there.
Fantastic. What are the ratios you use for the mixes of paint, for example the ultramarine and white.
Wow, it's nice to see how you work. How are you liking the vallejo primer? I'm about to start using the same thing since I can't spray outside in Canada anymore during the fall and winter.
An outstanding tutorial, thank you for taking the time to make it. Cant wait for part two!
Awesome! Great tutorial.