In this tutorial, I’ll show you how to paint the new Aeldari / Eldar Voidscarred Corsairs from the Kill Team: Nachmund box, which will be released next week. While there is no official paint scheme yet, the crimson and gold could represent the Twilight Swords, but it’s also the ideal starting point to paint the Visarch, Ynnari, or even Craftworld Altansar. You’ll also learn how to paint a blaster glow effect, scales, and gems, so here we go.
This tutorial assumes you know the basic grips of painting Warhammer miniatures. Step-by-step I explain all the paints and techniques I used. I have a rather eclectic paint collection, so when I use a paint that is not from Games Workshop (or out of production), I’ll try to provide you with suitable alternatives from the current Citadel paint range [in brackets]. However, if you want to achieve exactly the same result as shown, I recommend expanding your paint collection. You’ll find a list of all the paints used in this tutorial at the end of the post.
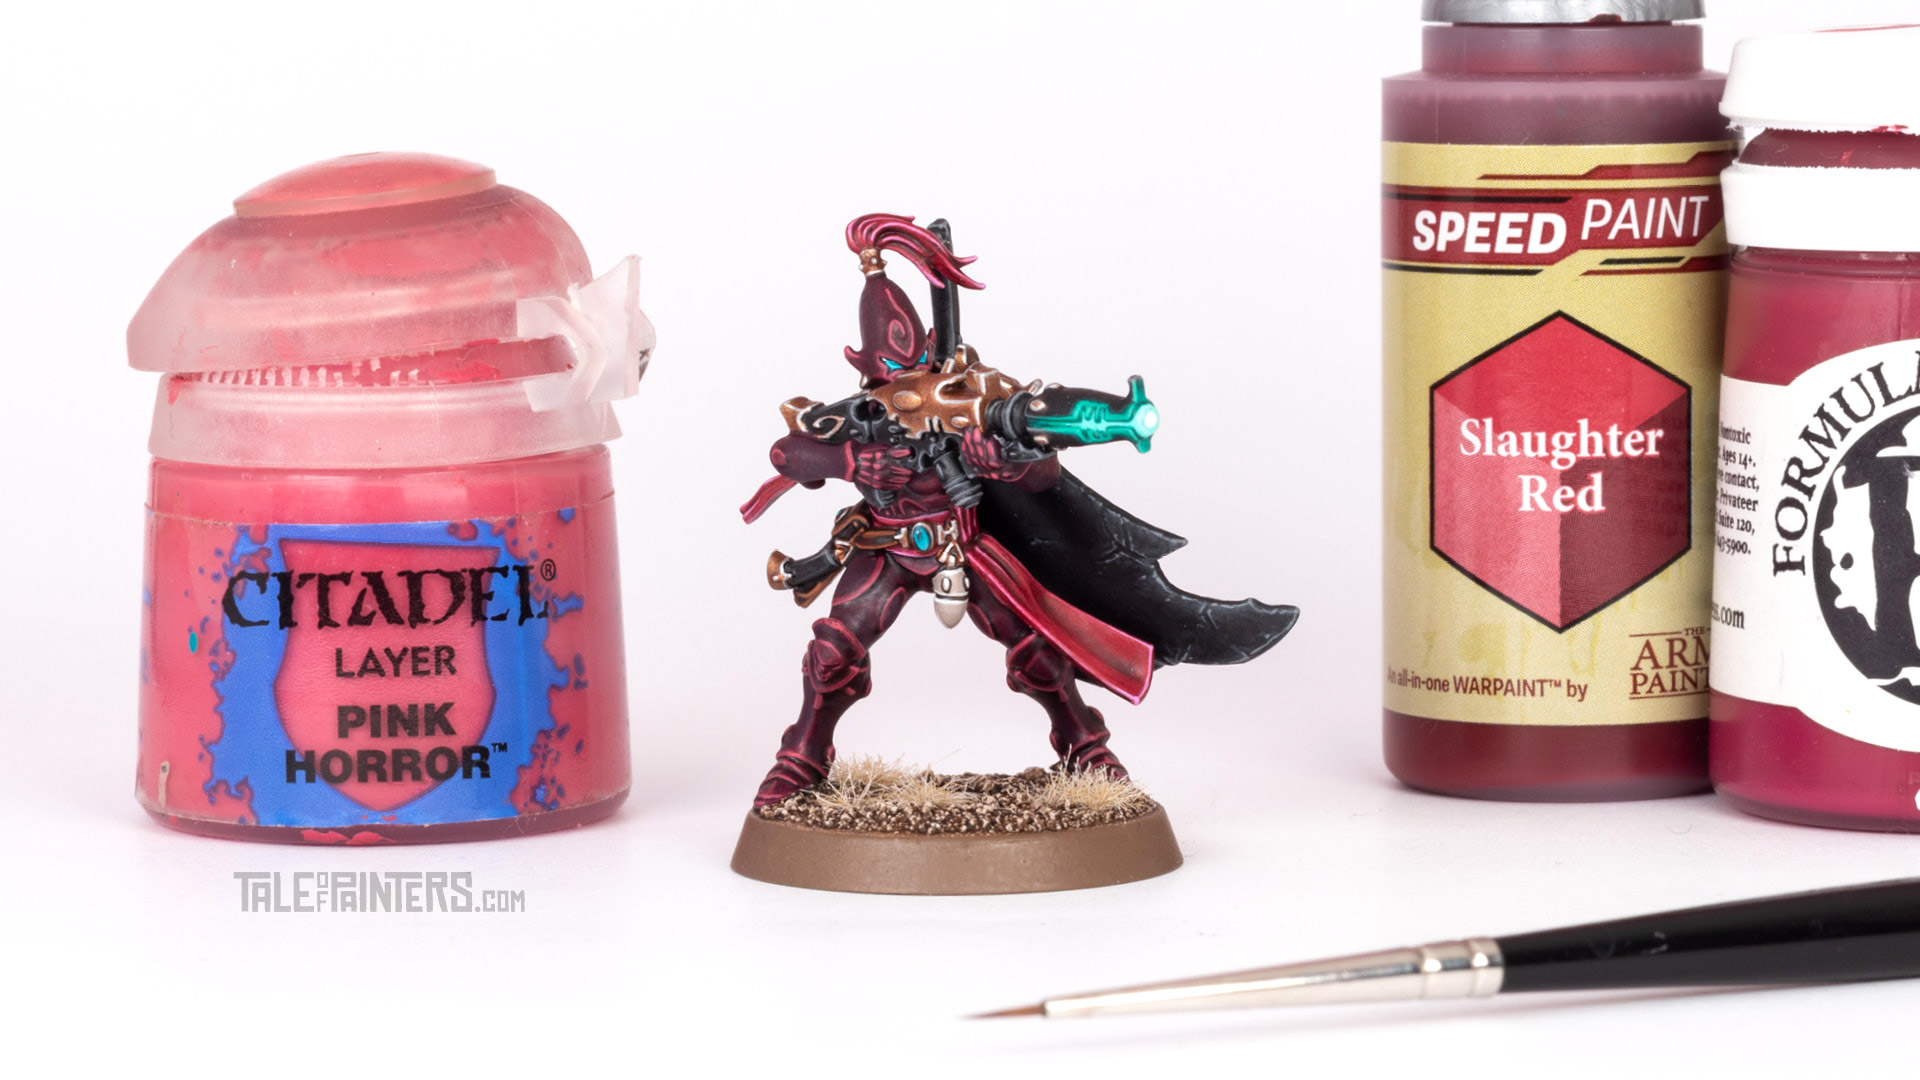

How to paint Aeldari Corsairs
The “Anhrathe” from Kill Team: Nachmund are such a great kit. Three sprues packed with so many options. You can arm the ten models with either shuriken rifles, power swords and shuriken pistols for the 40k Voidreavers troop choice, or build all the specialist operatives for Kill Team and the 40k Elite Voidscarred version. There are also enough Visarch-style helmets for the whole squad, as well as a selection of bare heads with an eclectic mix of mohawks, anime-style hair, and more traditional Aeldari haircuts. For this tutorial, I decided to build a gunner with a Drukhari-style blaster:
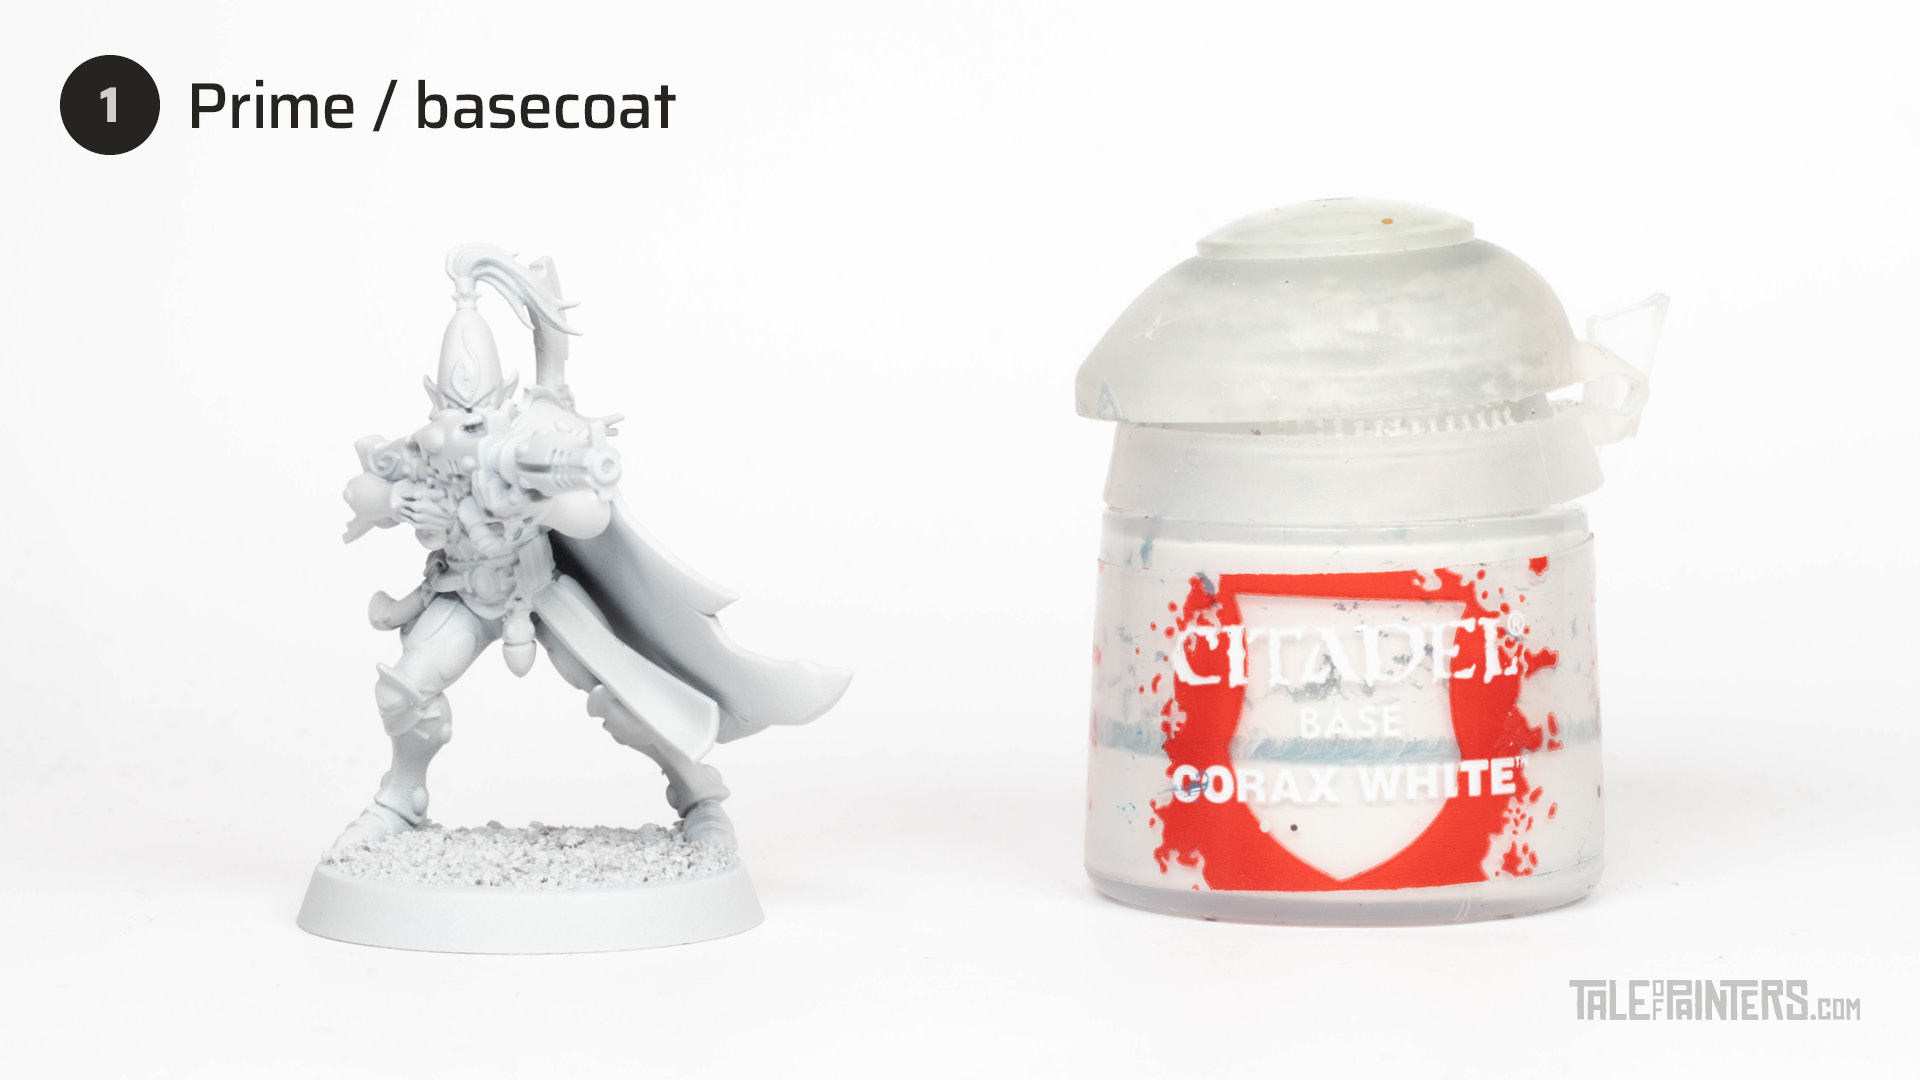

Even though the finished model will be rather dark, spray the model with Corax White primer, as we want to use Contrast paints and washes on certain elements to speed things up. Then paint any areas the primer didn’t reach with Corax White base paint.
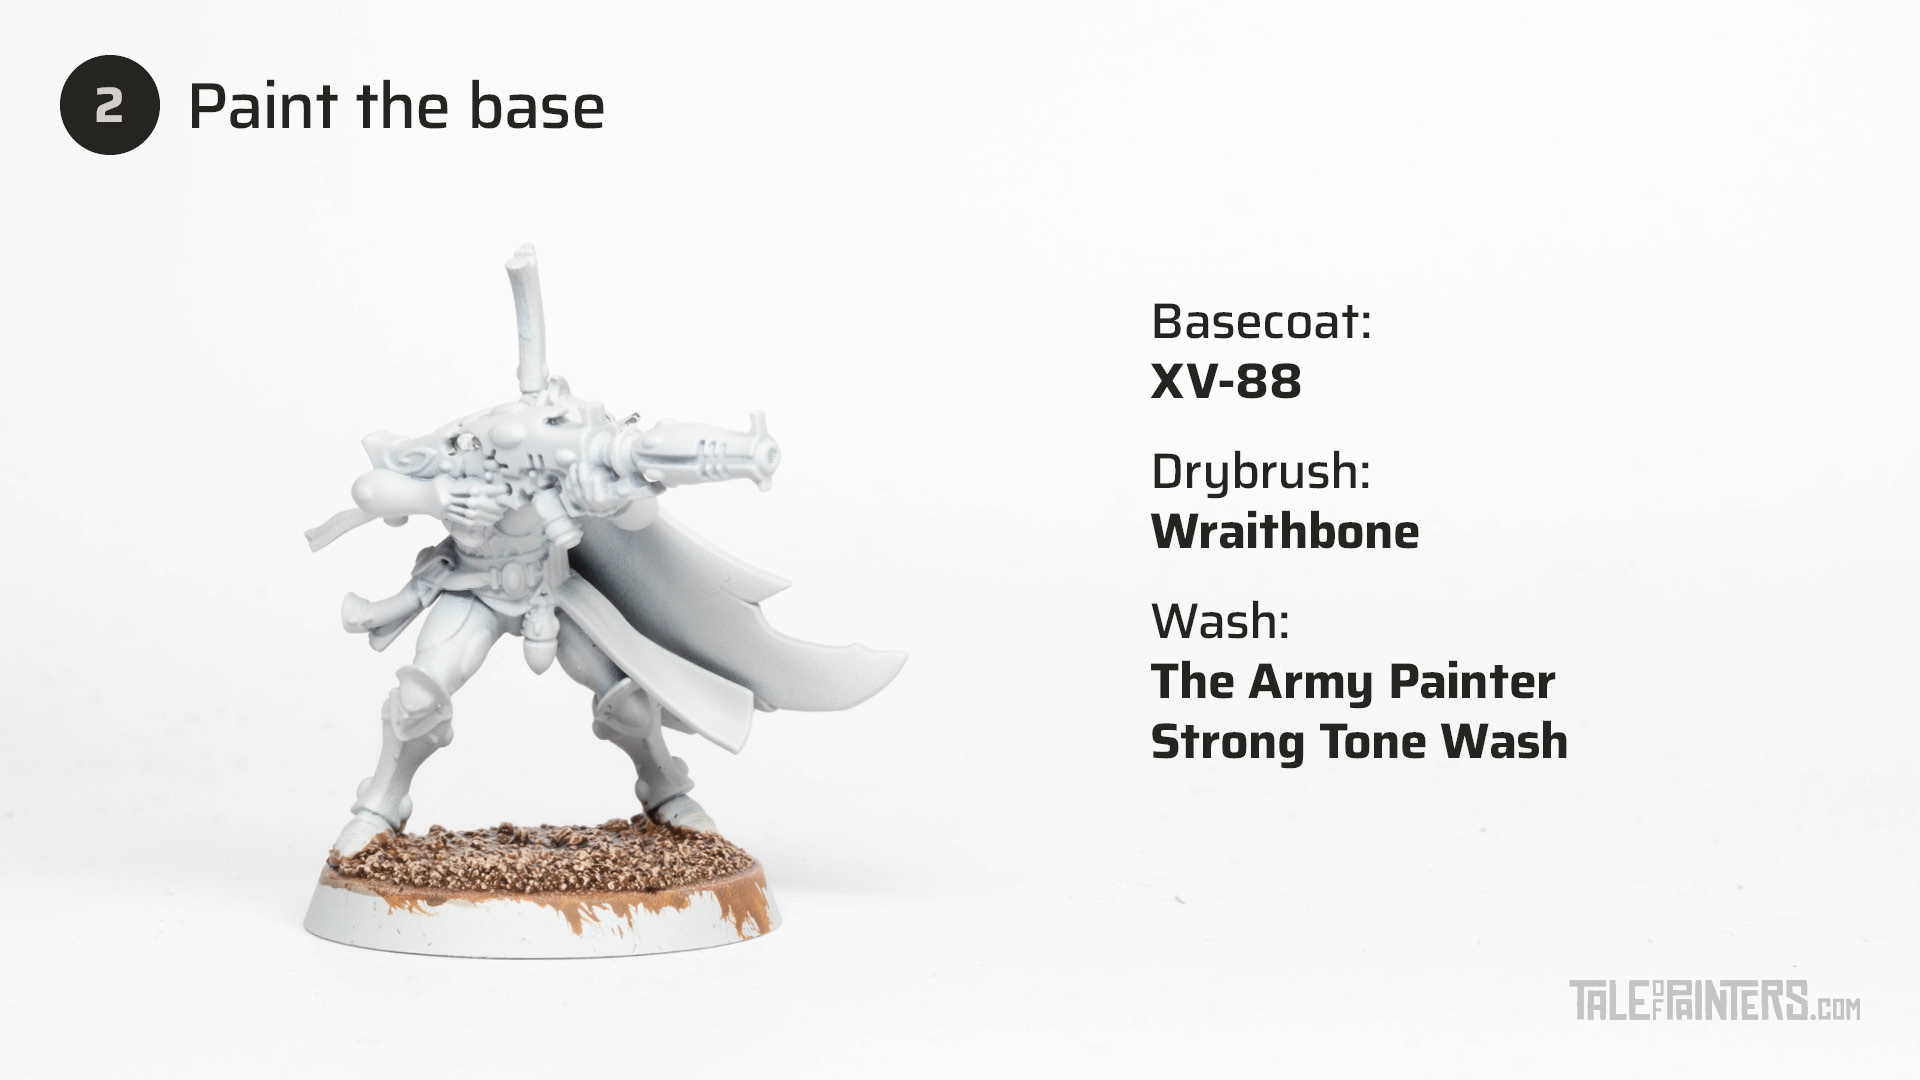

Paint the texture of the base with XV-88, then drybrush the sand with Wraithbone base paint or Terminatus Stone. Wash the sand with The Army Painter Warpaints Strong Tone Wash [or Agrax Earthshade].
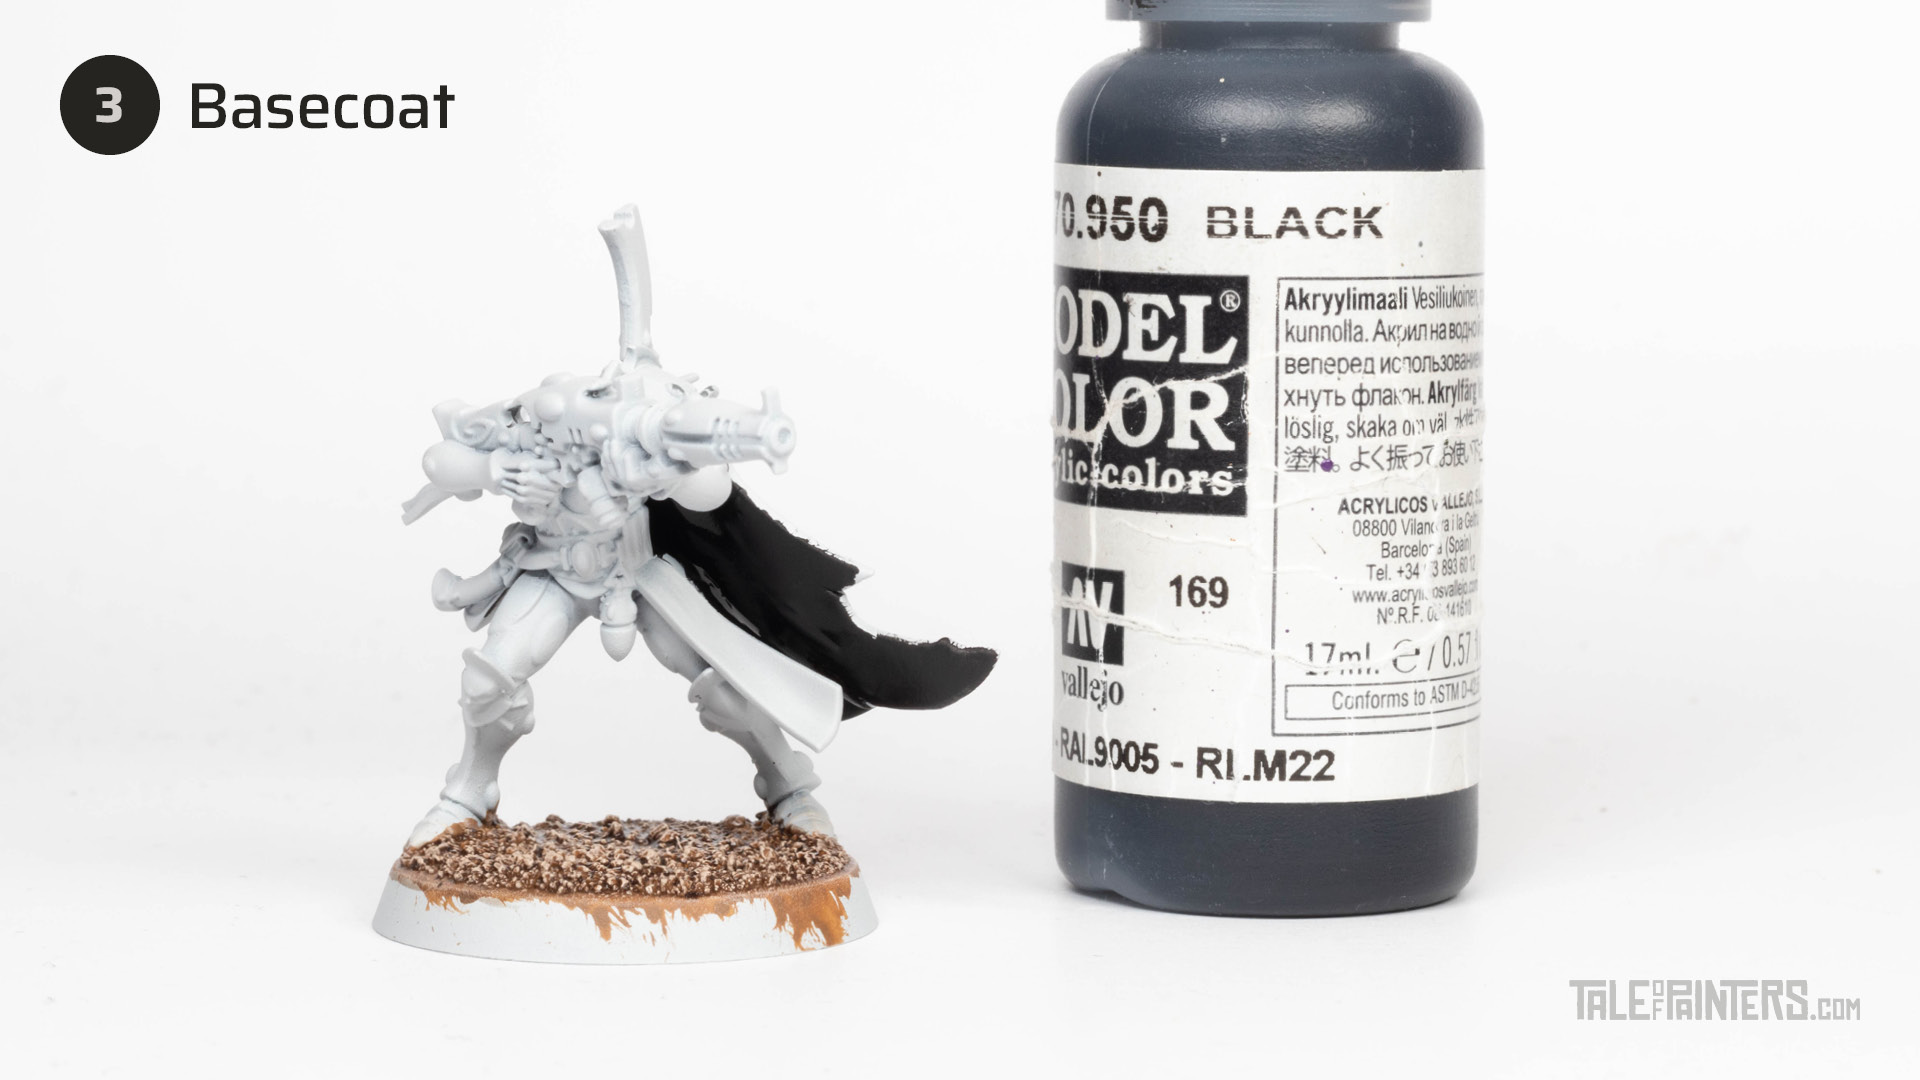

Paint the inside of the coat with Vallejo Model Color Black [or Abaddon Black], and also the parts of the armour that cannot be seen later or are difficult to reach with a brush, so that the bright Corax White does not peek out from some nook or cranny at the end.
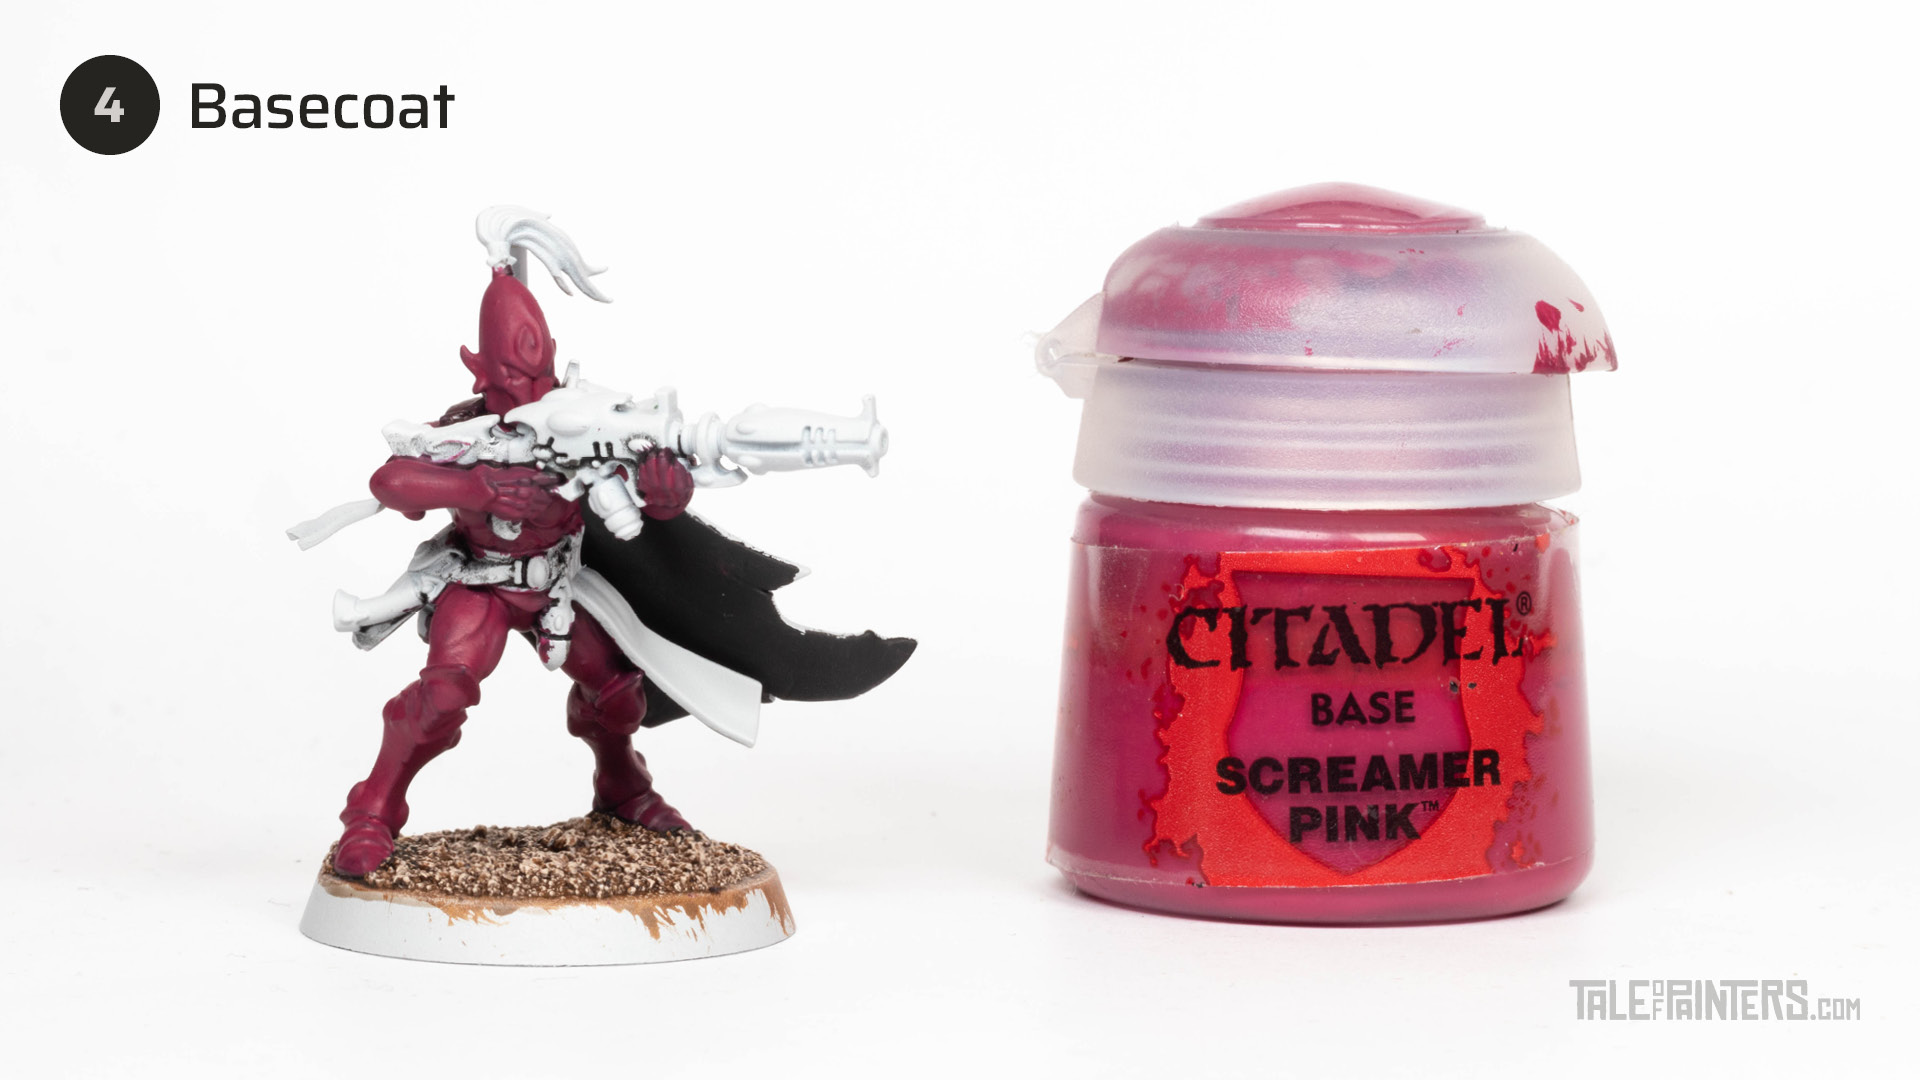

Basecoat the armour with Screamer Pink. Multiple thin coats are needed to cover the white.
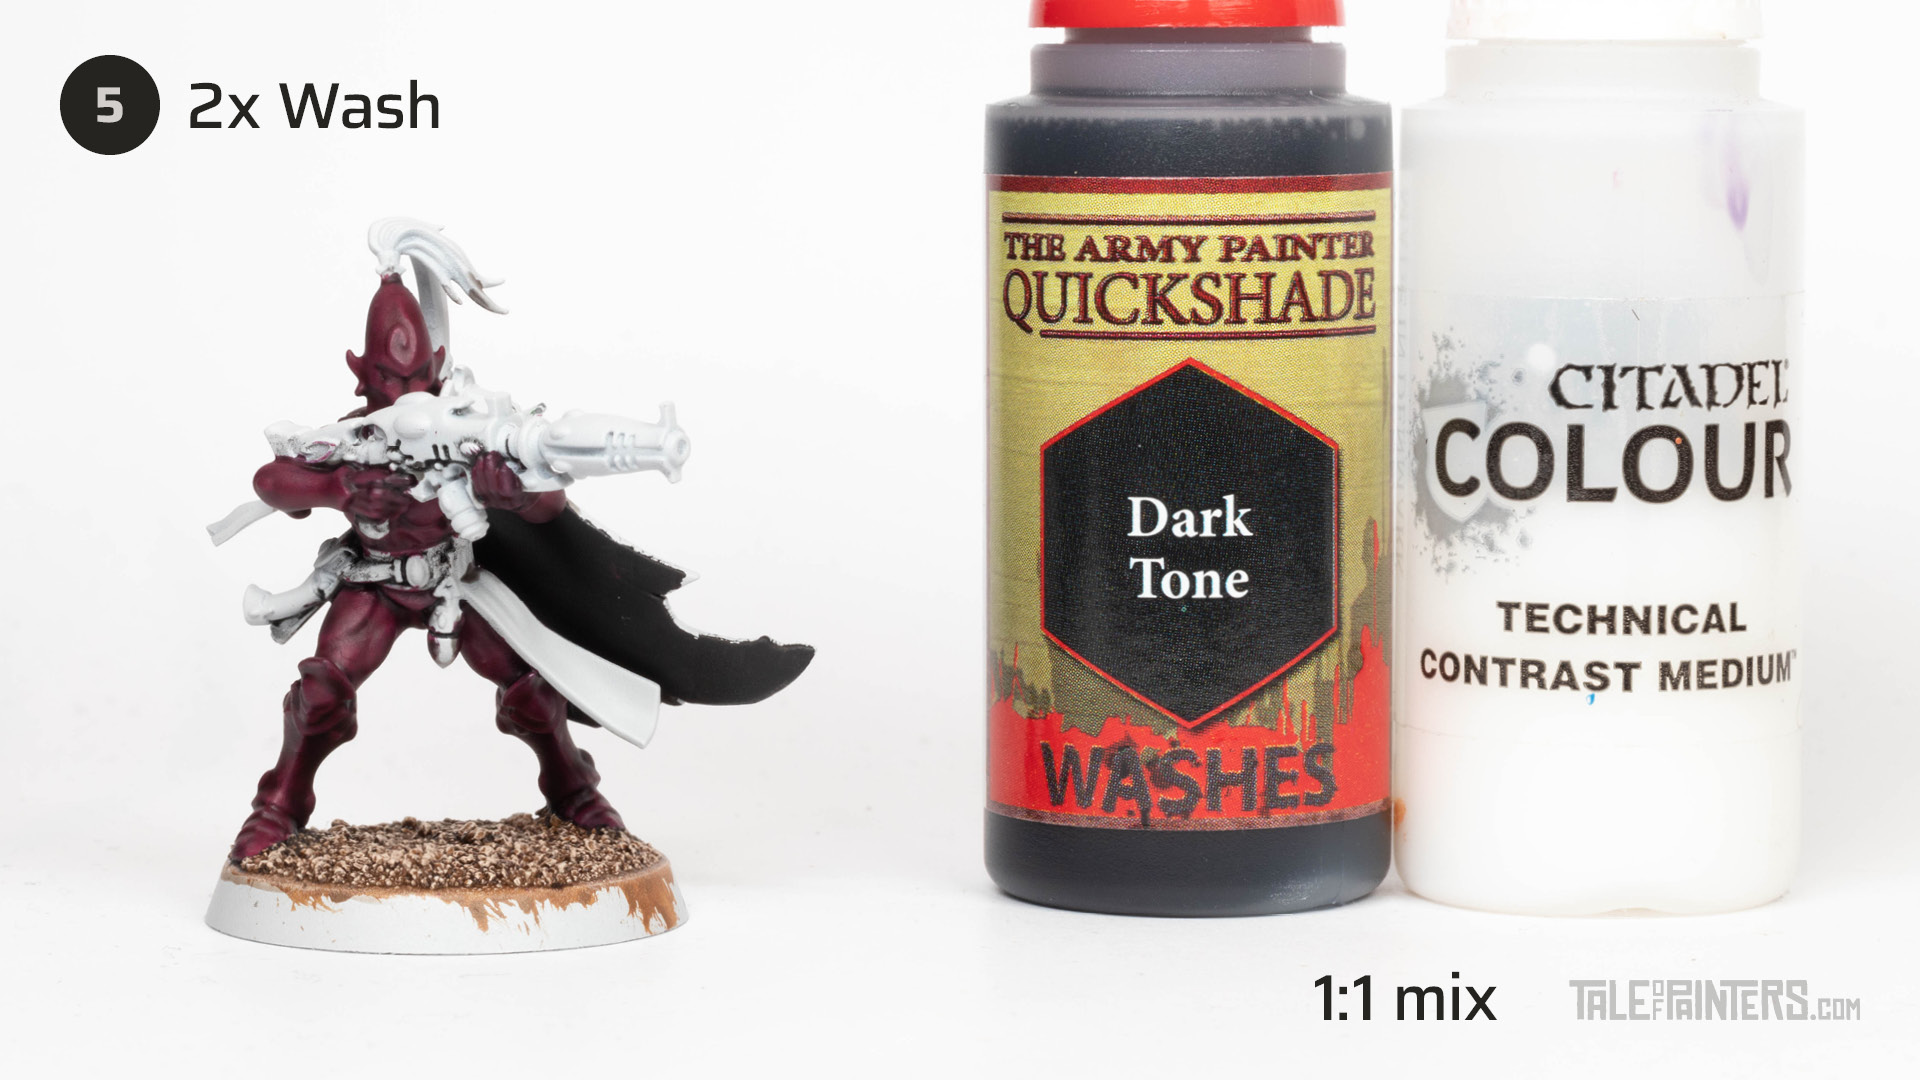

Mix Warpaints Dark Tone Wash [or Nuln Oil] 1:1 with Contrast Medium and apply it all over the armour. Soak up any excess with a damp brush to minimize pooling. Once dry, repeat the process.
If you hit the right consistency with the washes, the armour should now have a subtle shading and the colour should be pretty much identical to Barak Nar Burgundy.
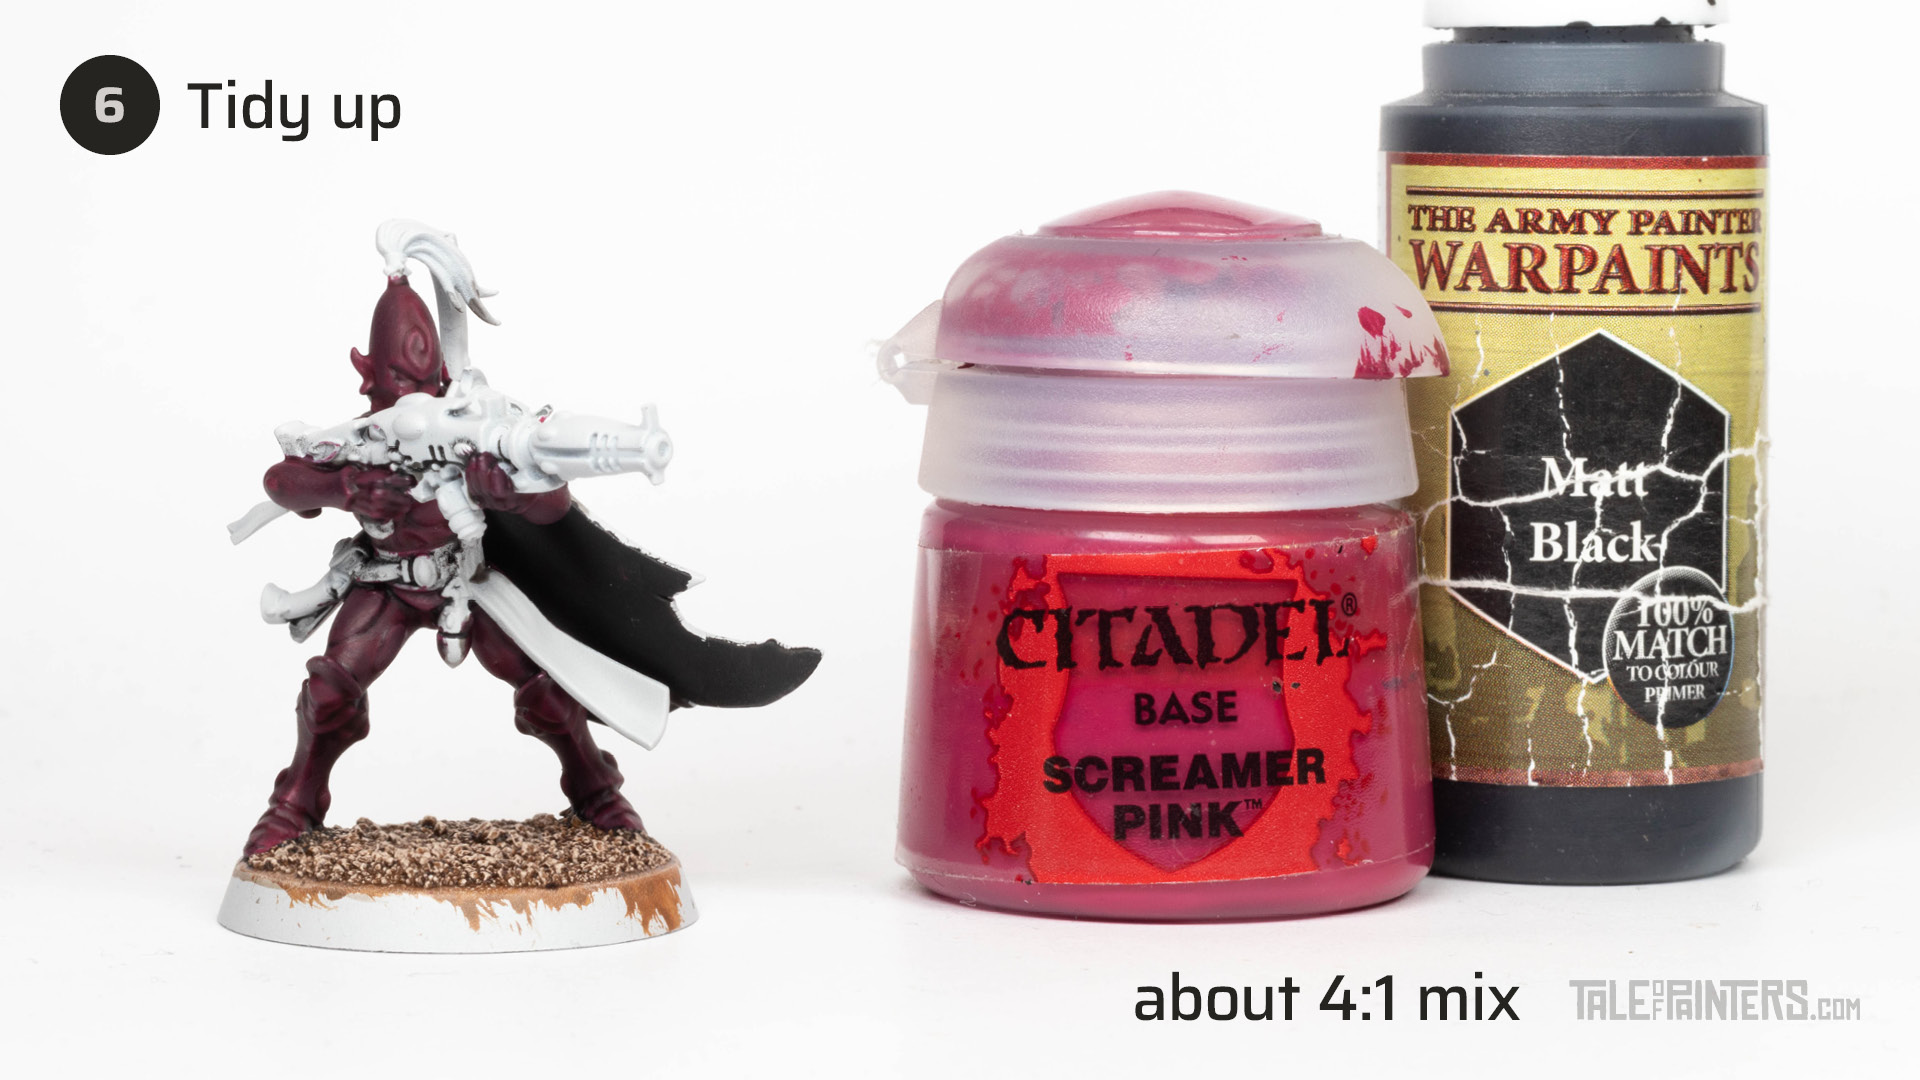

Tidy up the armour by mixing a little bit of black into Screamer Pink (or use Barak Nar Burgundy) and layer the mix over any areas where the wash dried unevenly. You can also use thinned black to pick out any armour panels or recesses that need deeper shading.
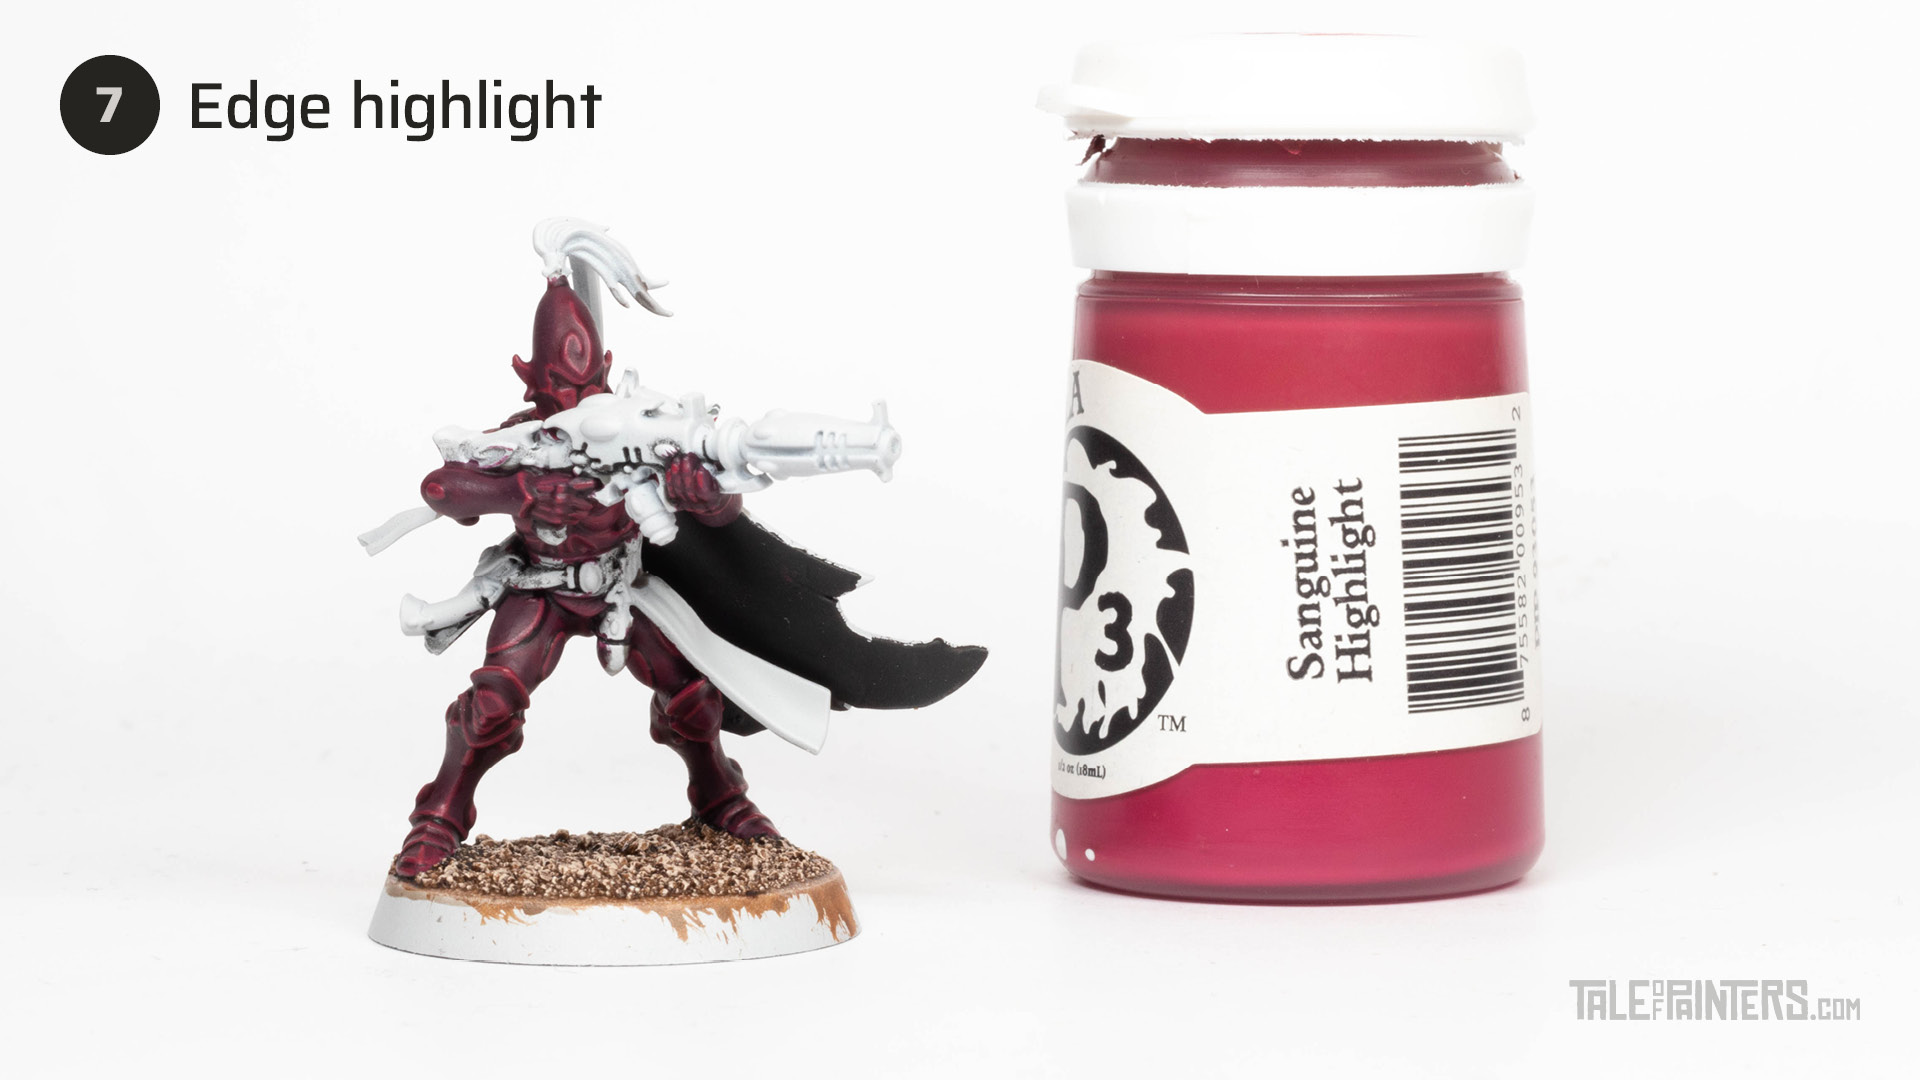

Apply a chunky edge highlight of Formula P3 Sanguine Highlight [or a Screamer Purple / Wazdakka Red mix] to the armour.
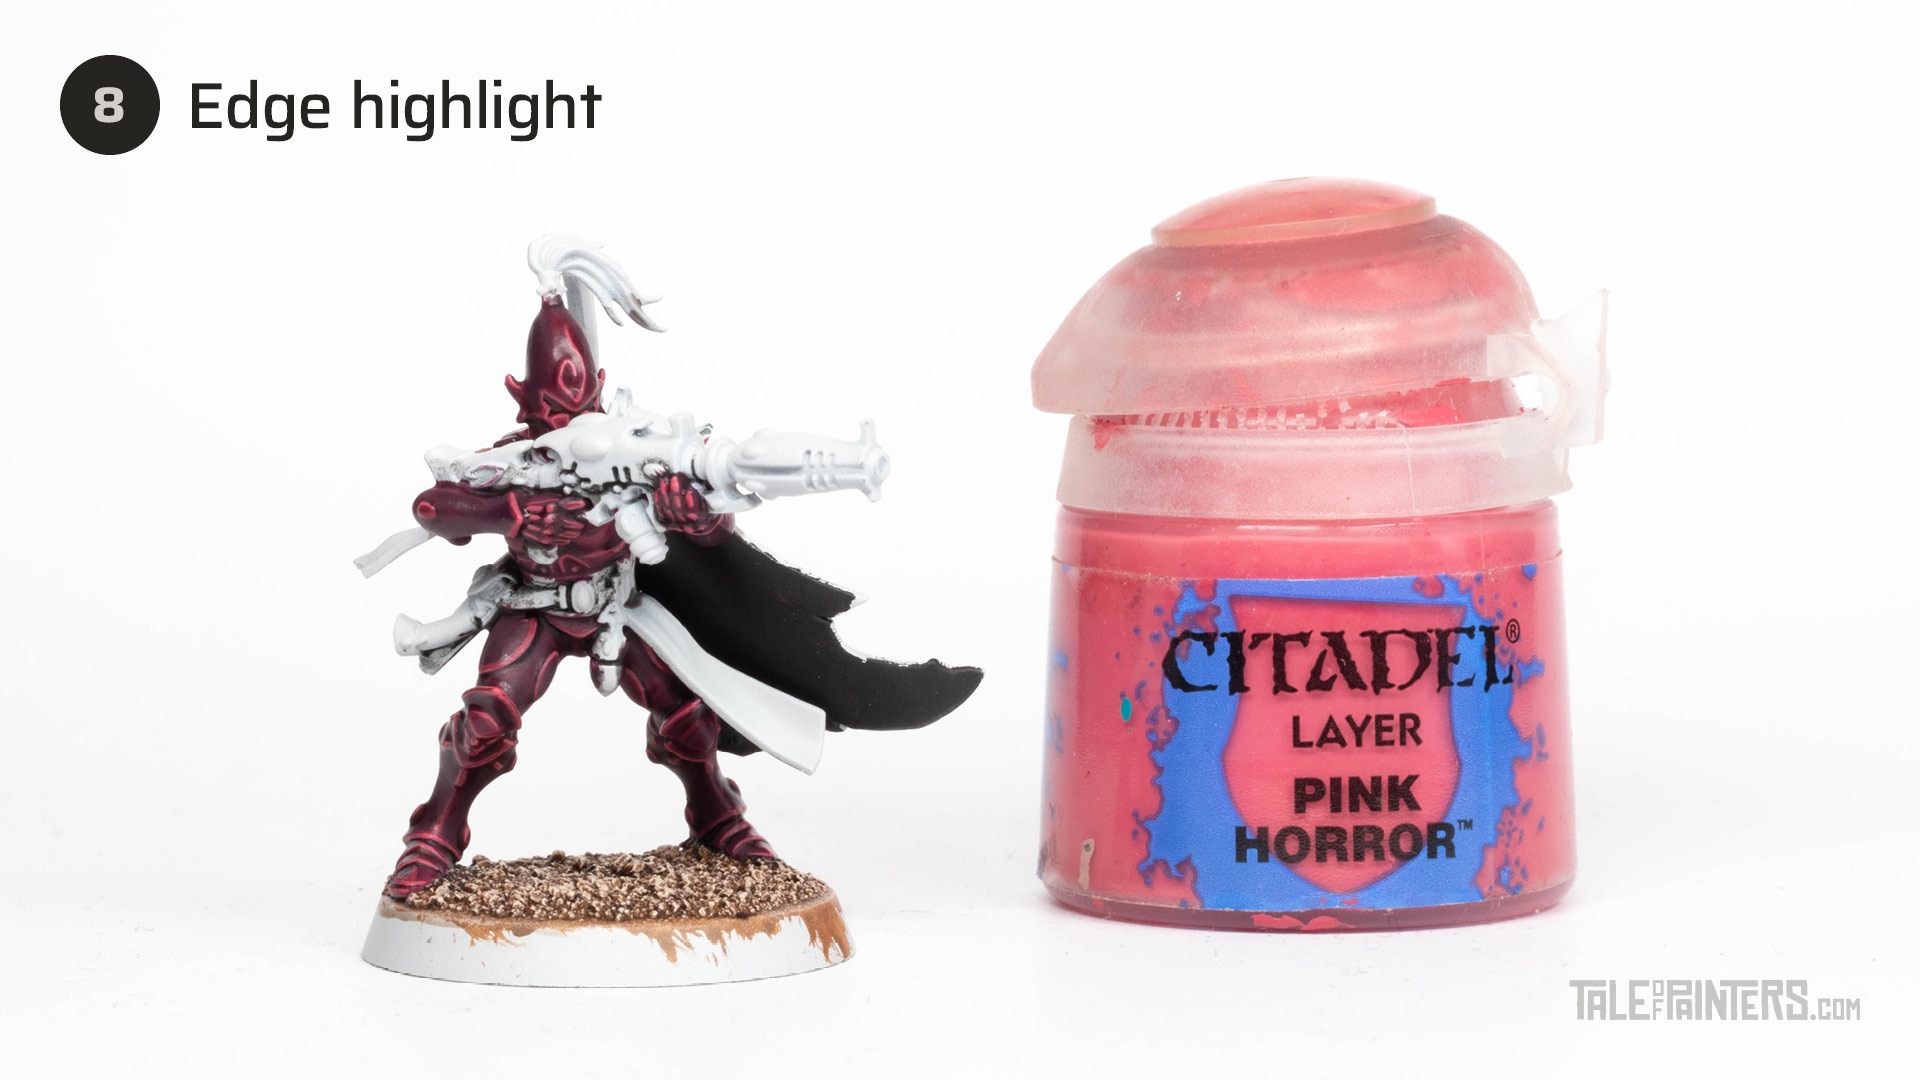

Edge highlight the armour with Pink Horror.


Apply Slaughter Red from The Army Painter’s new Speedpaint range over the ribbons, sashes, and topknot [or use Flesh Tearers Red with a little bit of Volupus Pink mixed in]. Sorry, I forgot to put the helmet on for this photo.
As I pointed out in my review, Speedpaint can reactivate when you paint over it, so you might want to apply a coat of matt varnish, for example Anti-Shine Matt Varnish from The Army Painter, but I found that for a few thin edge highlights this is not really needed.
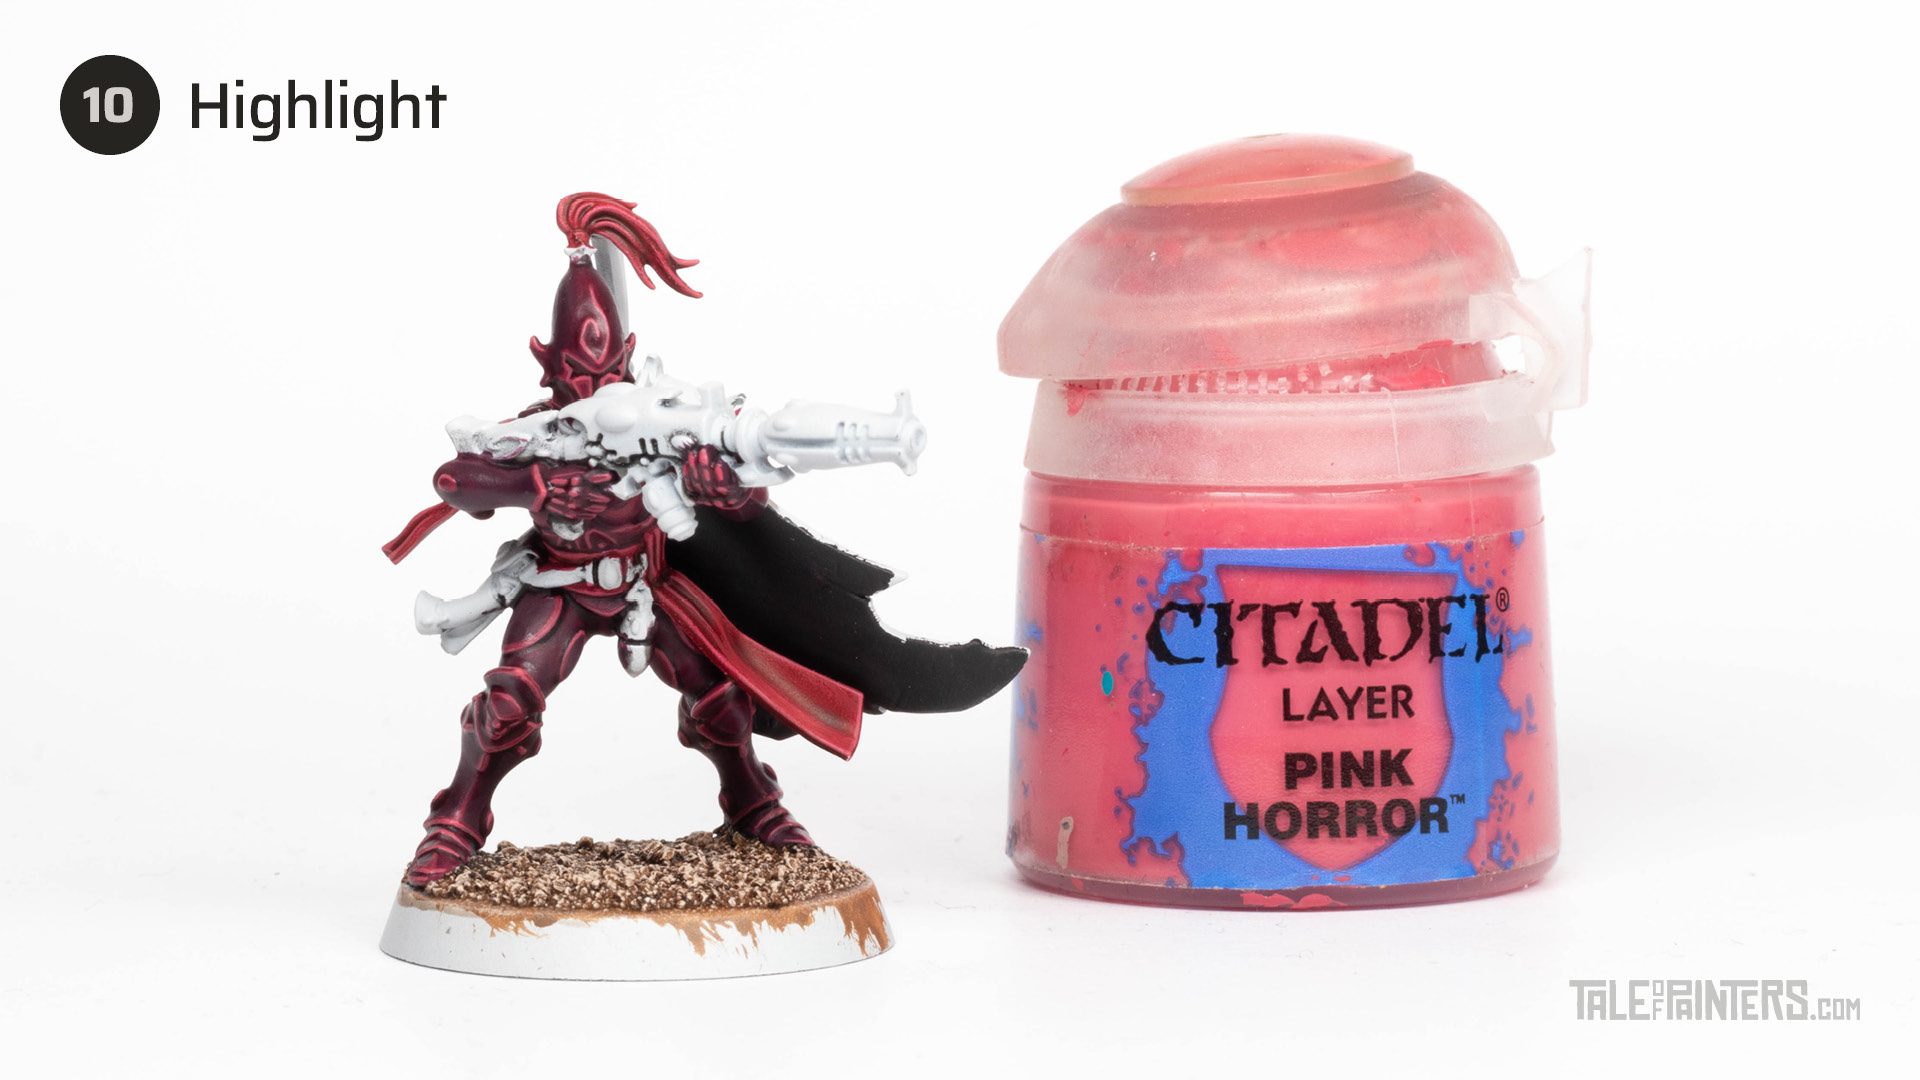

Highlight the crimson details with Pink Horror.
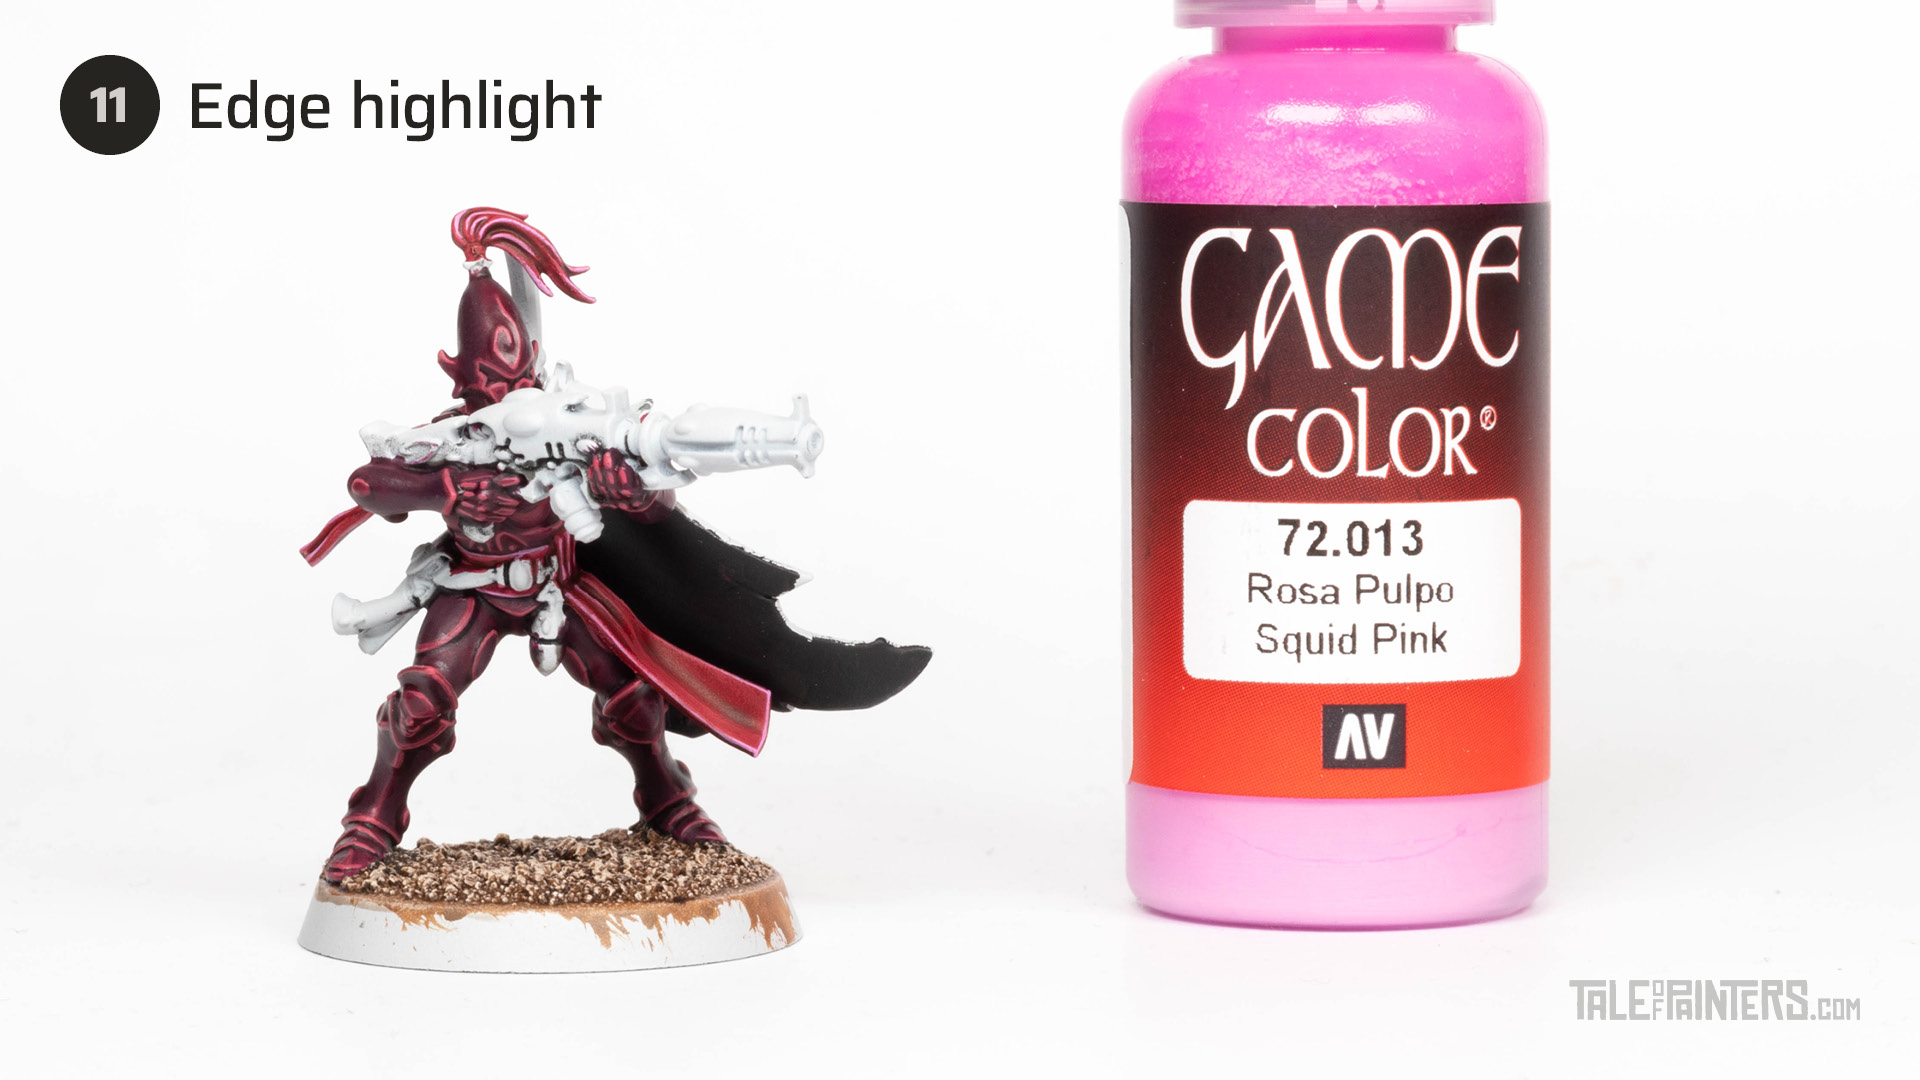

Apply a fine edge highlight of thinned Vallejo Game Color Squid Pink [or Fulgrim Pink or Pink Horror mixed with White Scar].
How to paint the Anhrathe reptile leather coat
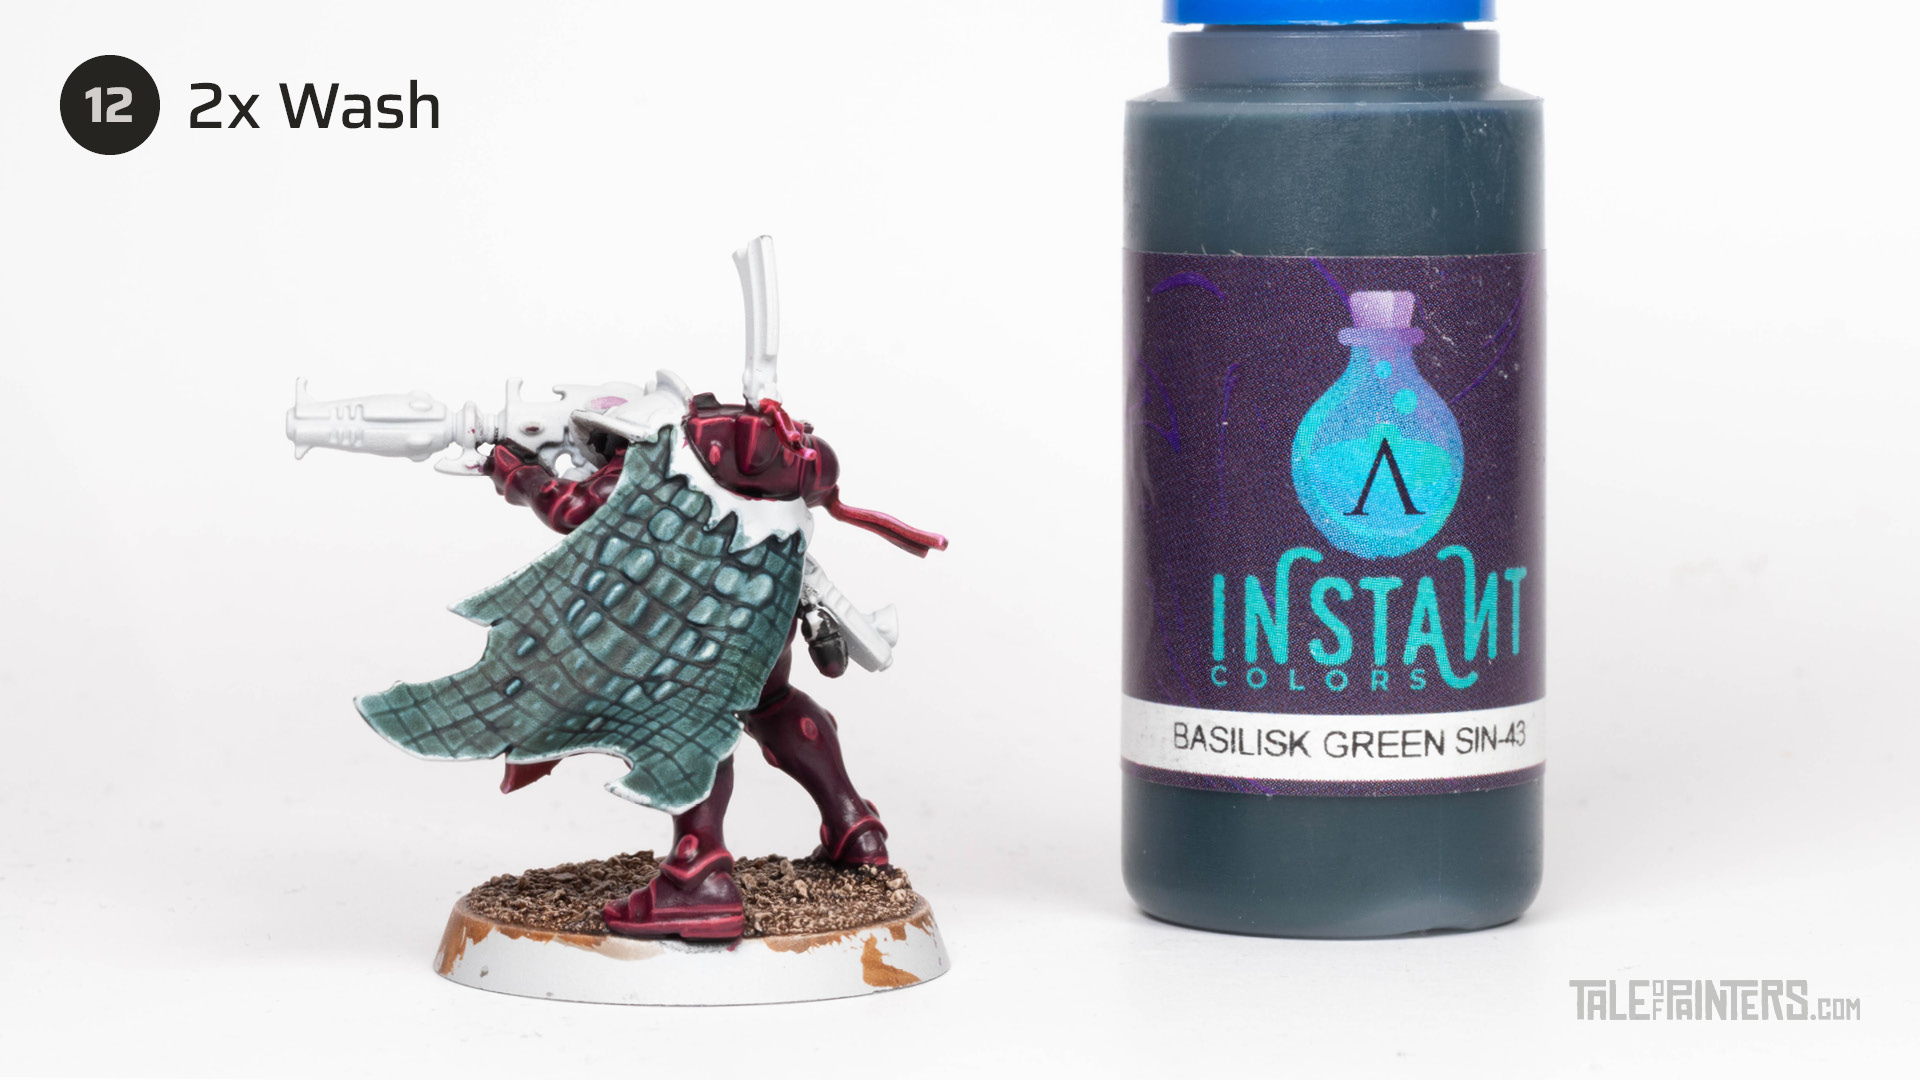

Wash the reptilian hide with two coats of Scale75 Instant Color Basilisk Green [Terradon Turquoise thinned with Contrast Medium might achieve a similar effect]. Soak up any excess with a damp brush, and let the model dry horizontally to prevent gravity from pulling the wash downwards.
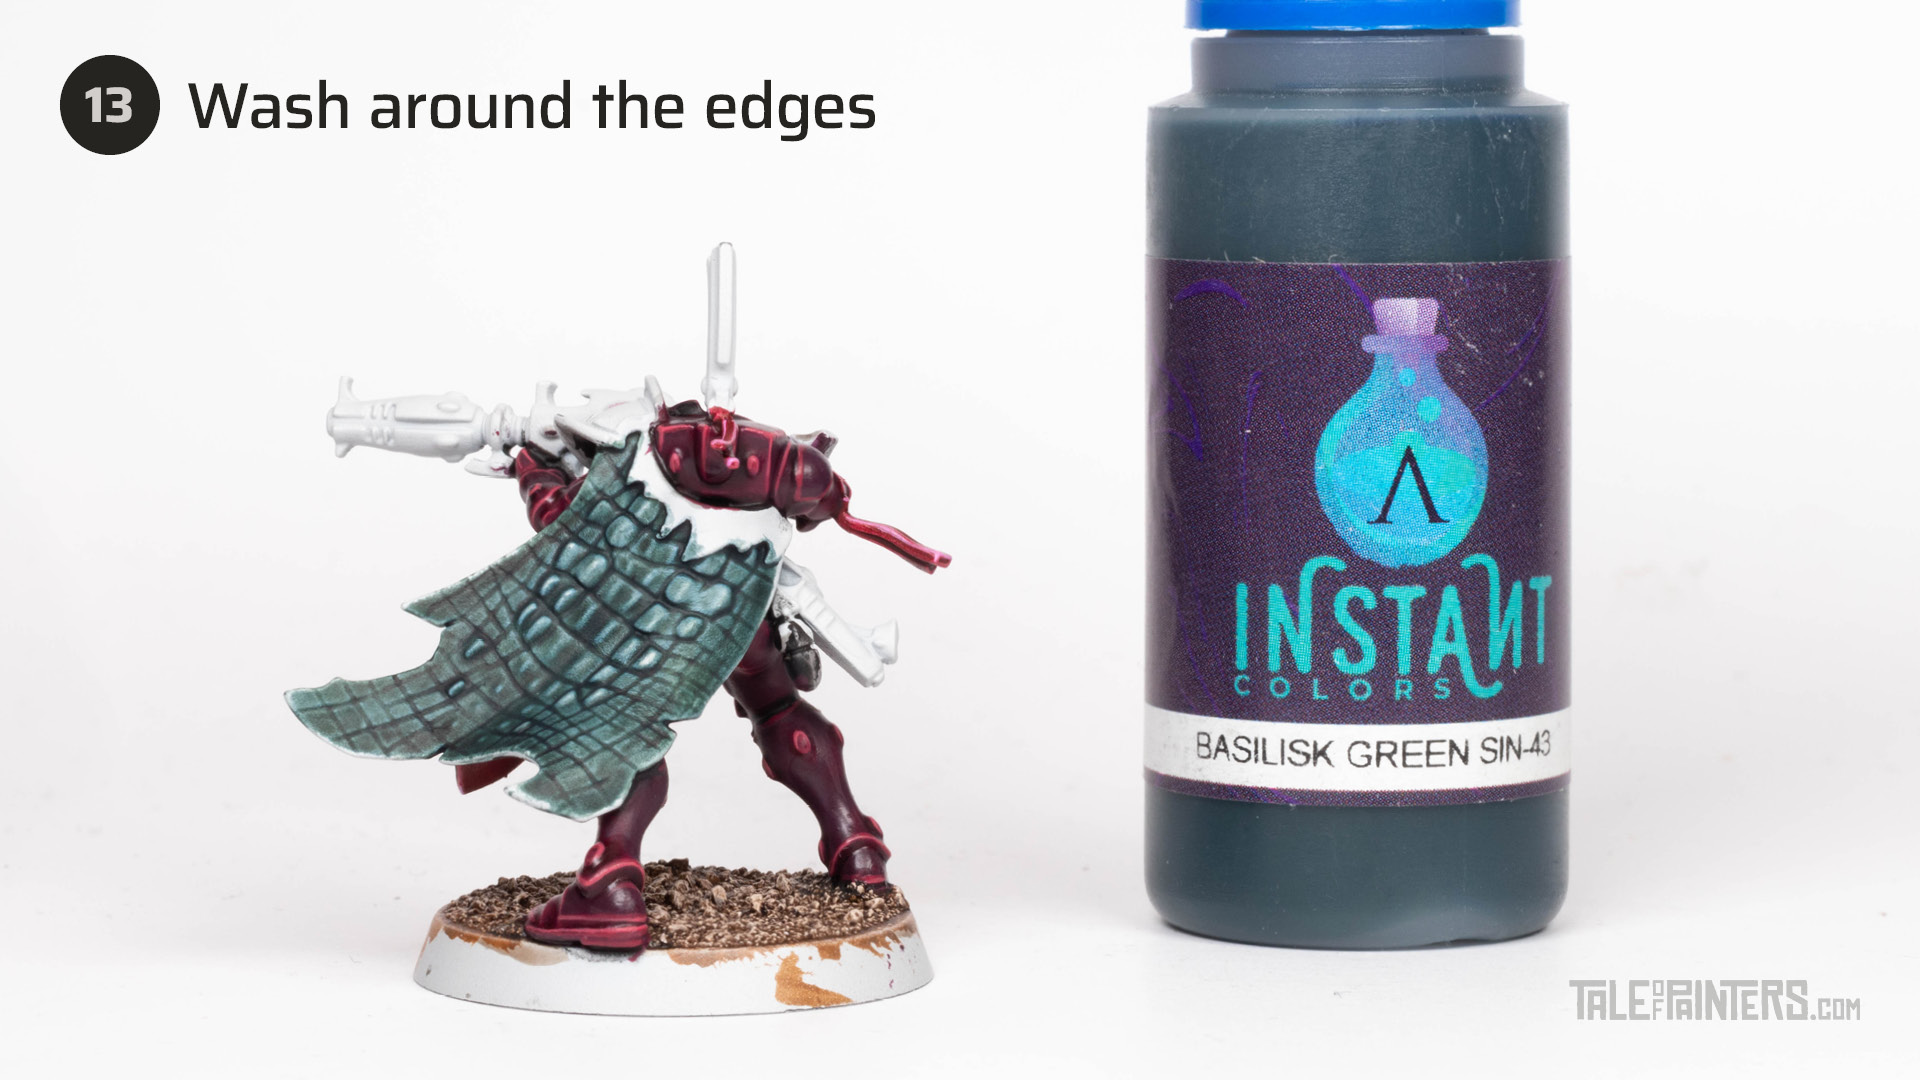

Apply a third coat of Basilisk Green, but this time spare the centre of the coat.
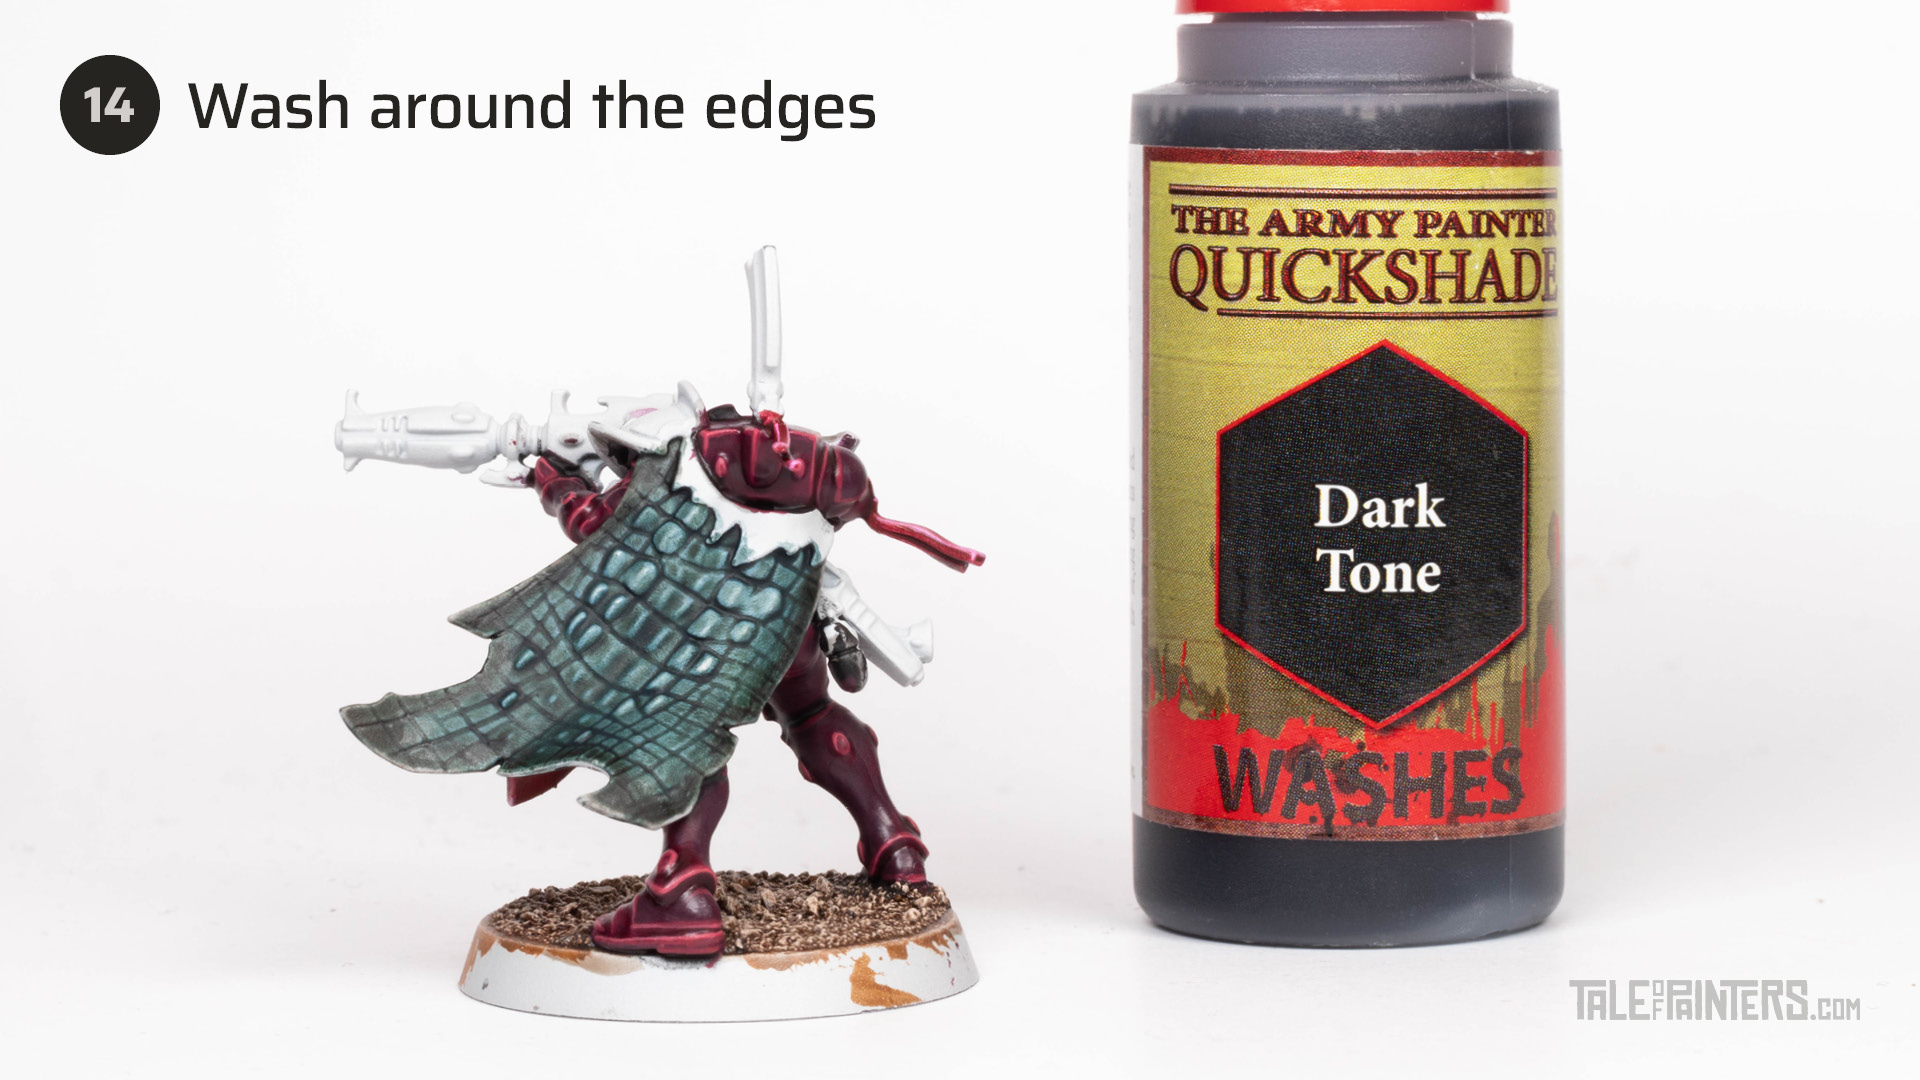

To build up a dark gradient toward the edges, apply a coat of Dark Tone Wash around the edges.
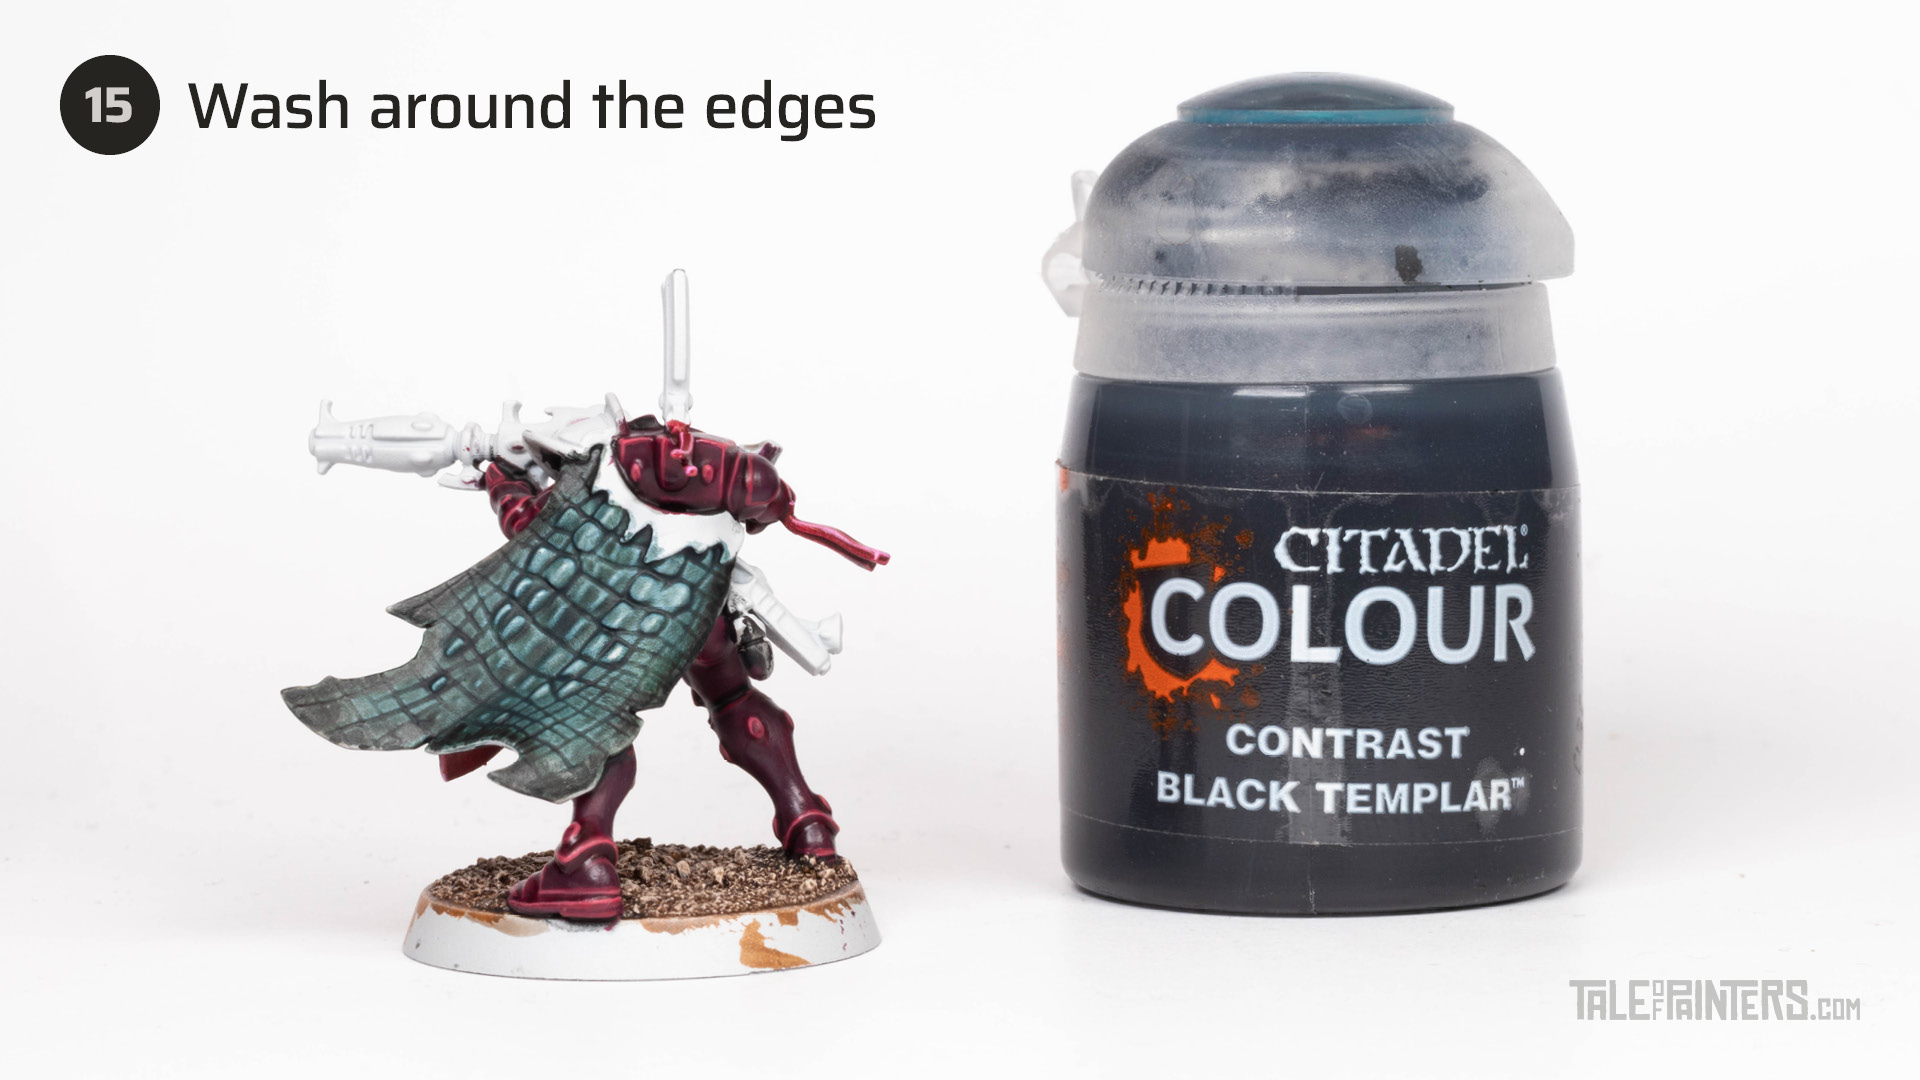

Wash the outmost edges and corners of the coat with Black Templar (thinned Abaddon Black is also fine).
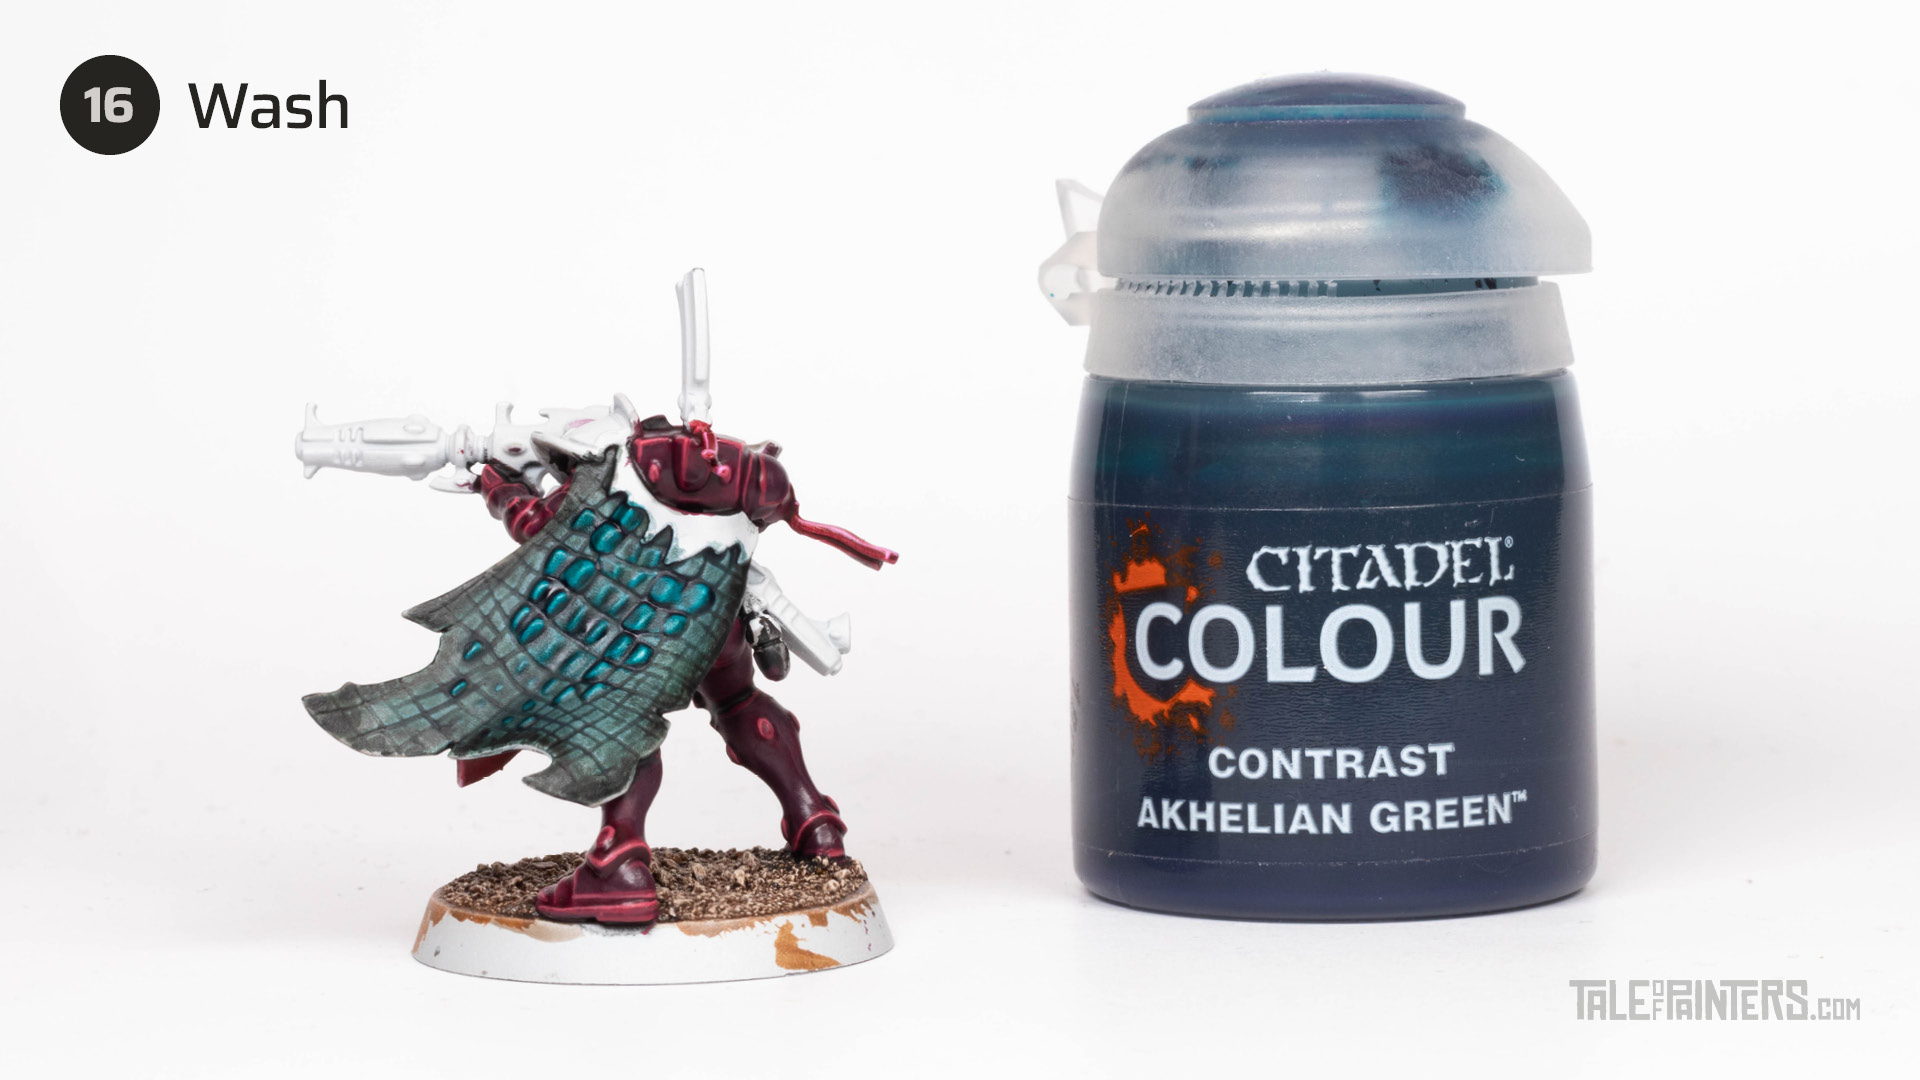

Pick out the scales with a wash of Akhelian Green.
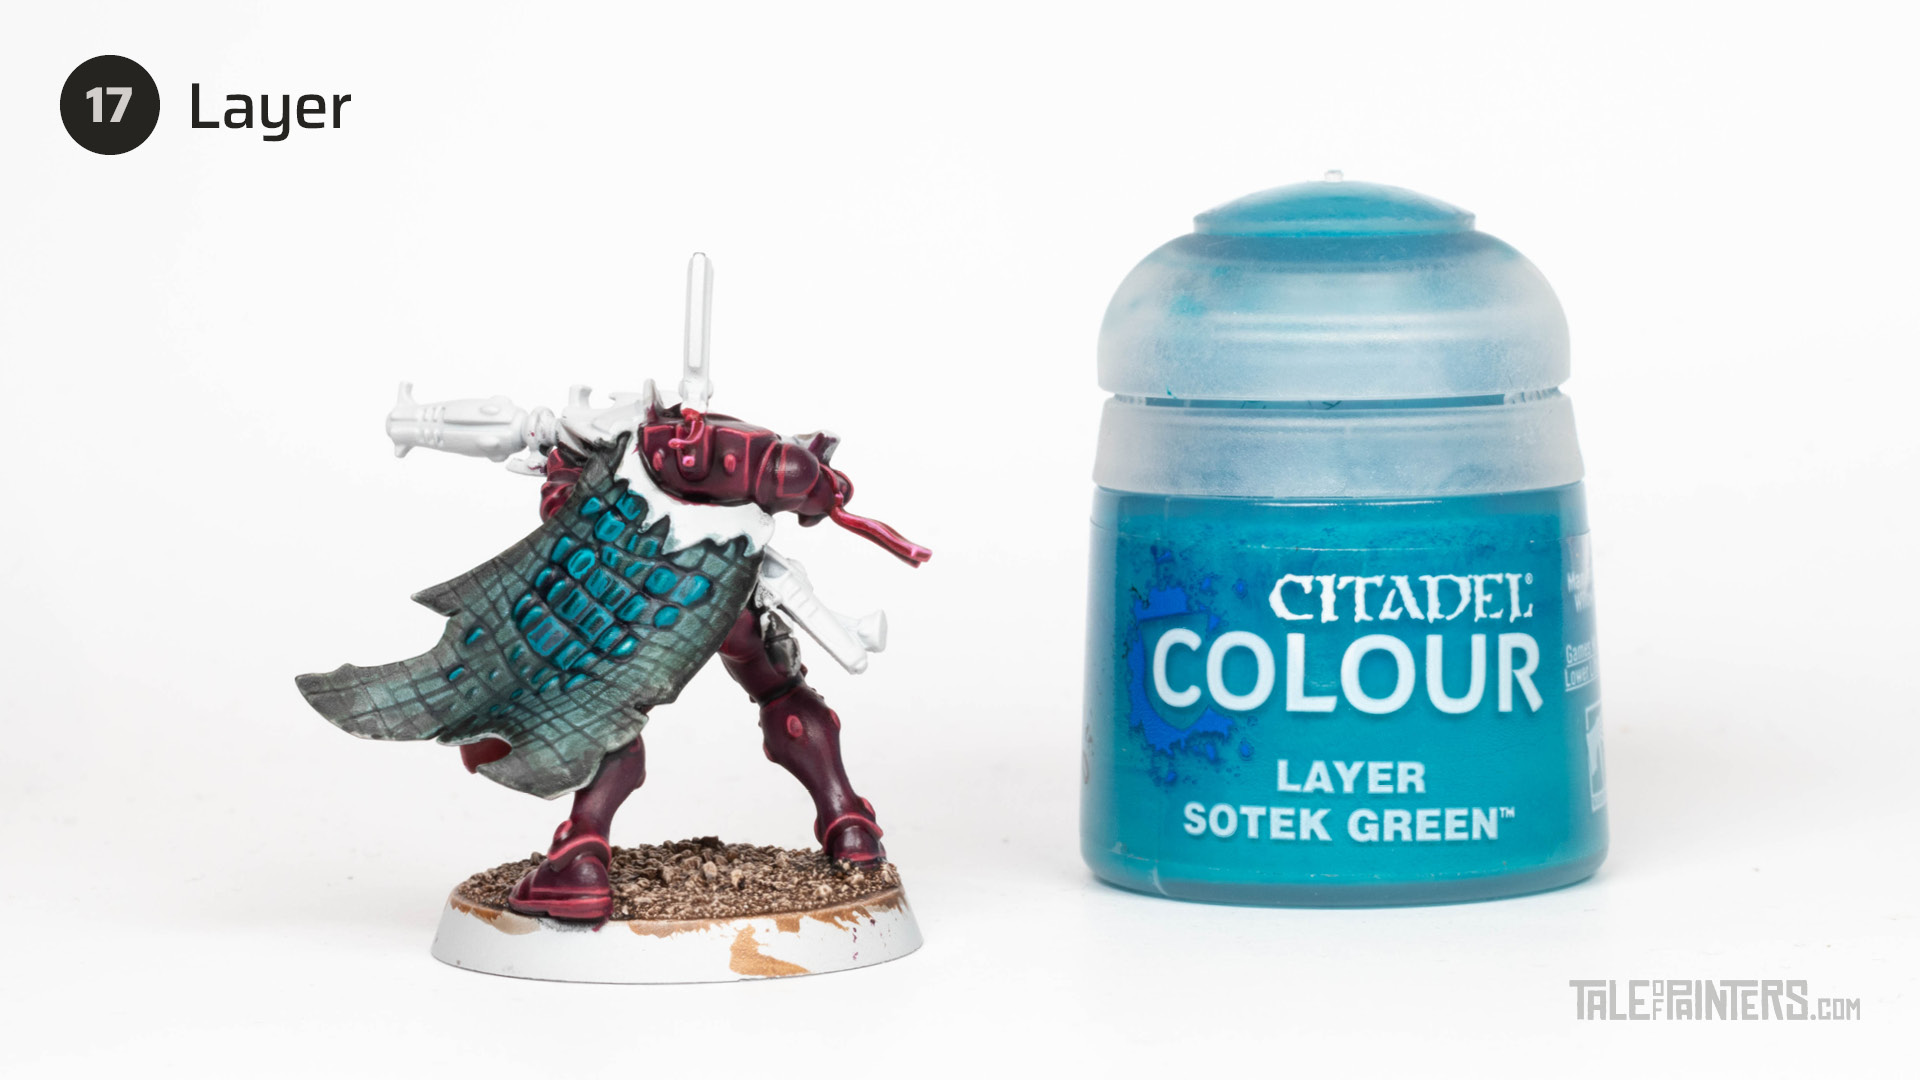

Give the scales a chunky edge highlight of Sotek Green.
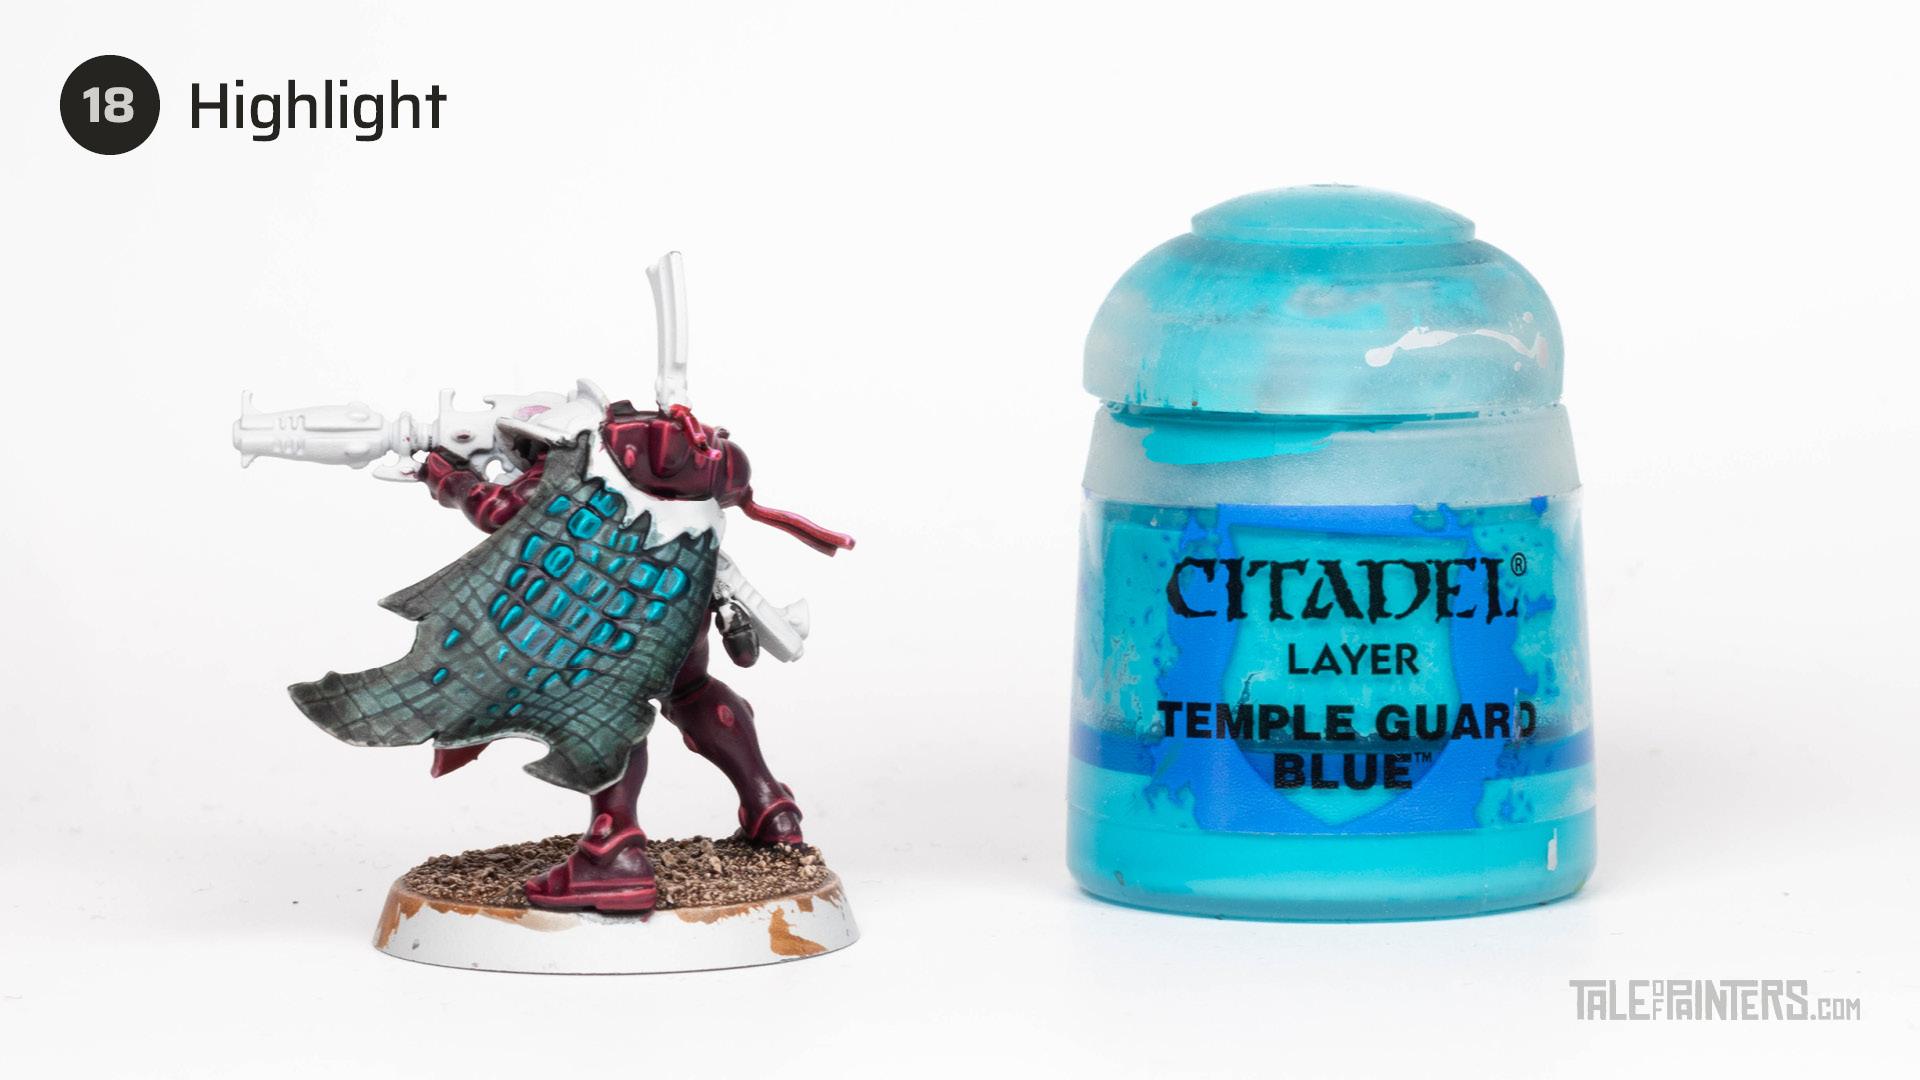

Apply a finer edge highlight of Temple Guard Blue.
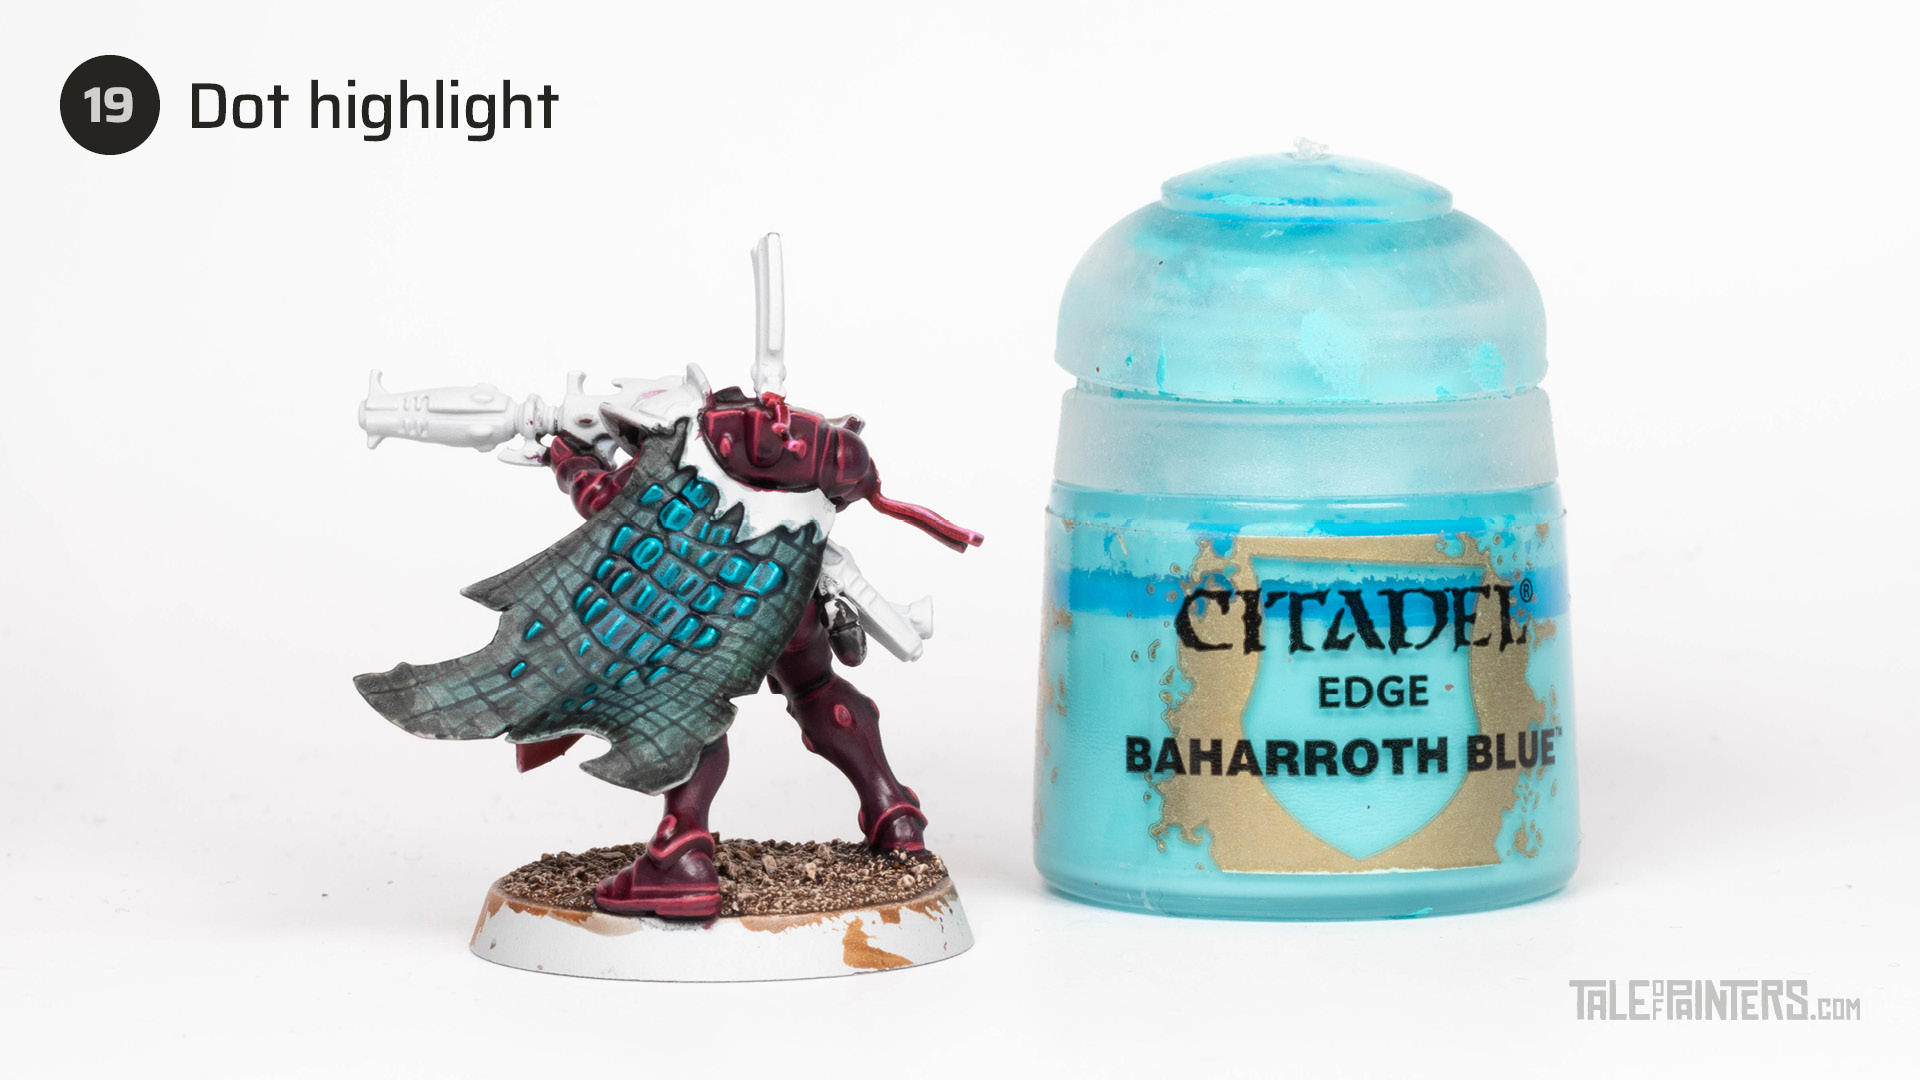

Give the sharpest corners of the scales a dot of Baharroth Blue to make them look glossy and reflective.
How to paint the black, bronze, and leather
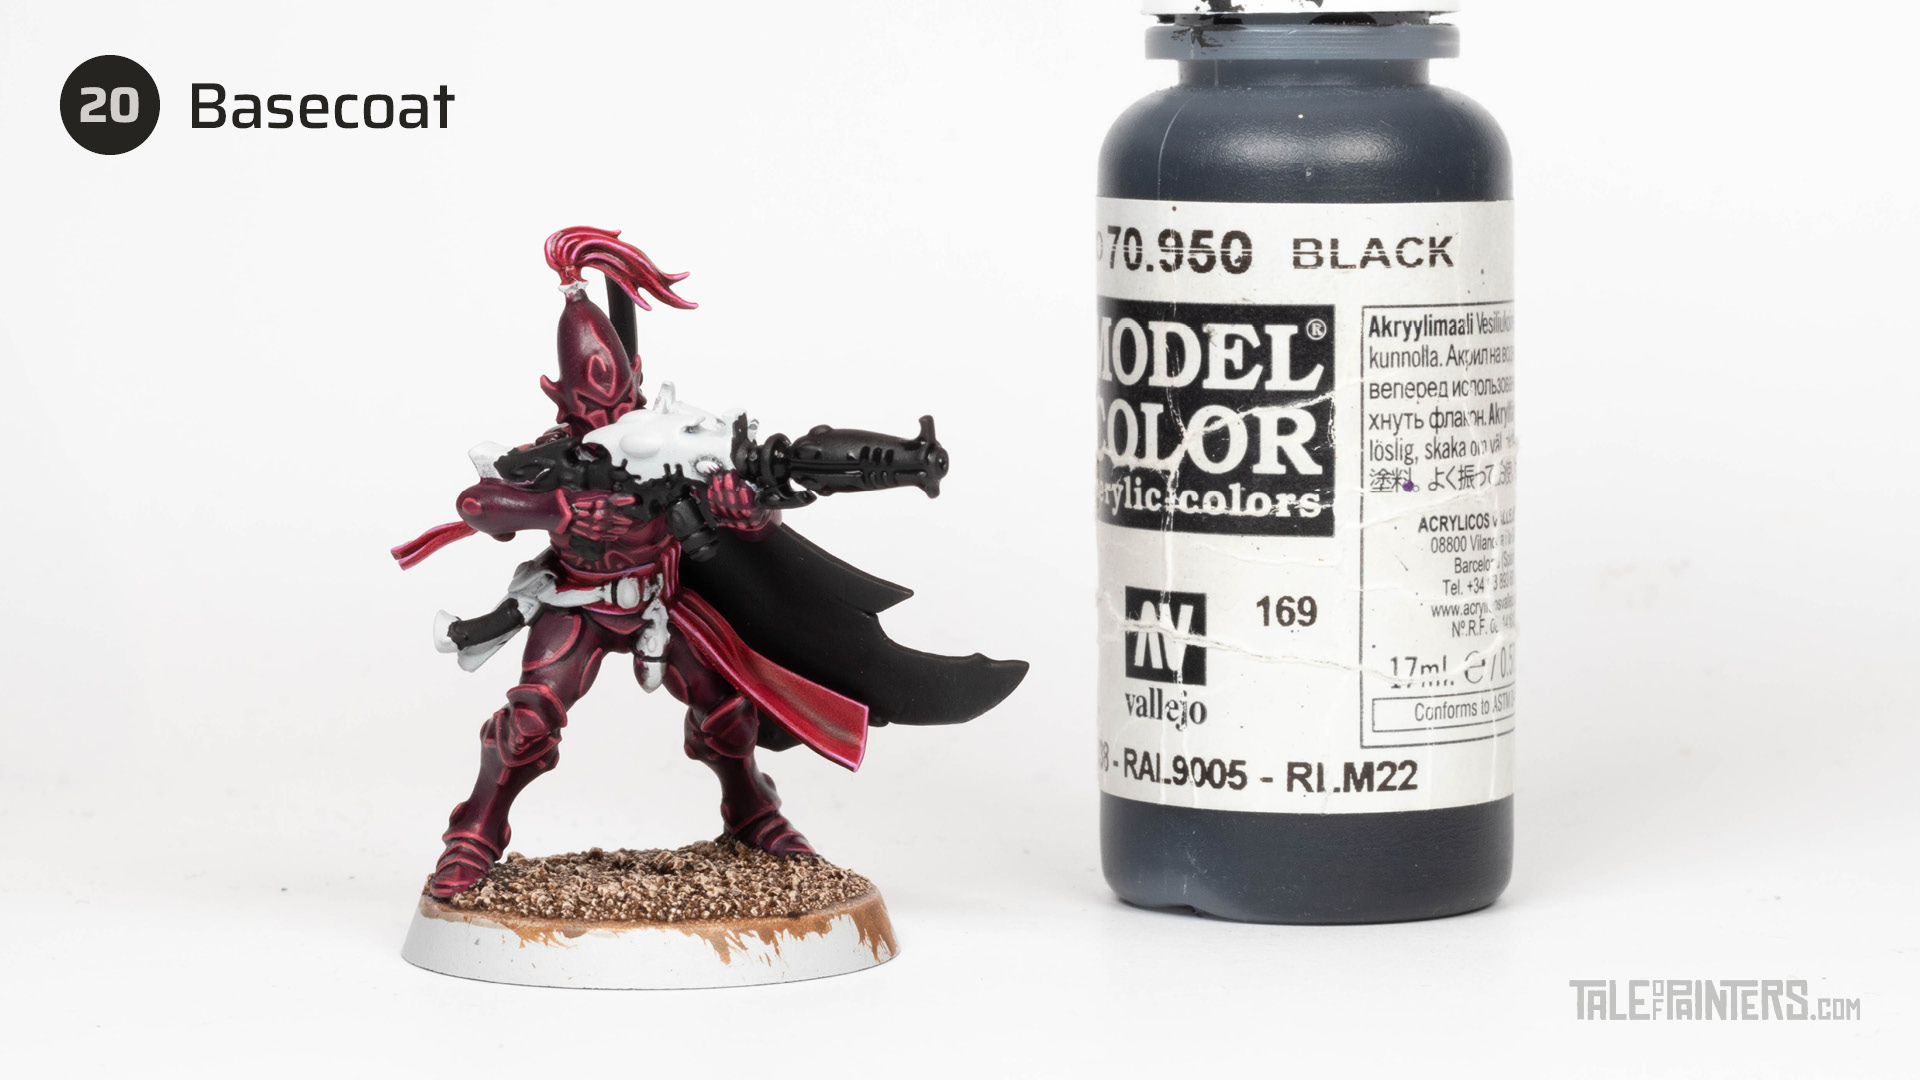

Paint the remaining black details on the gun and back fin with VMC Black [or Abaddon Black].
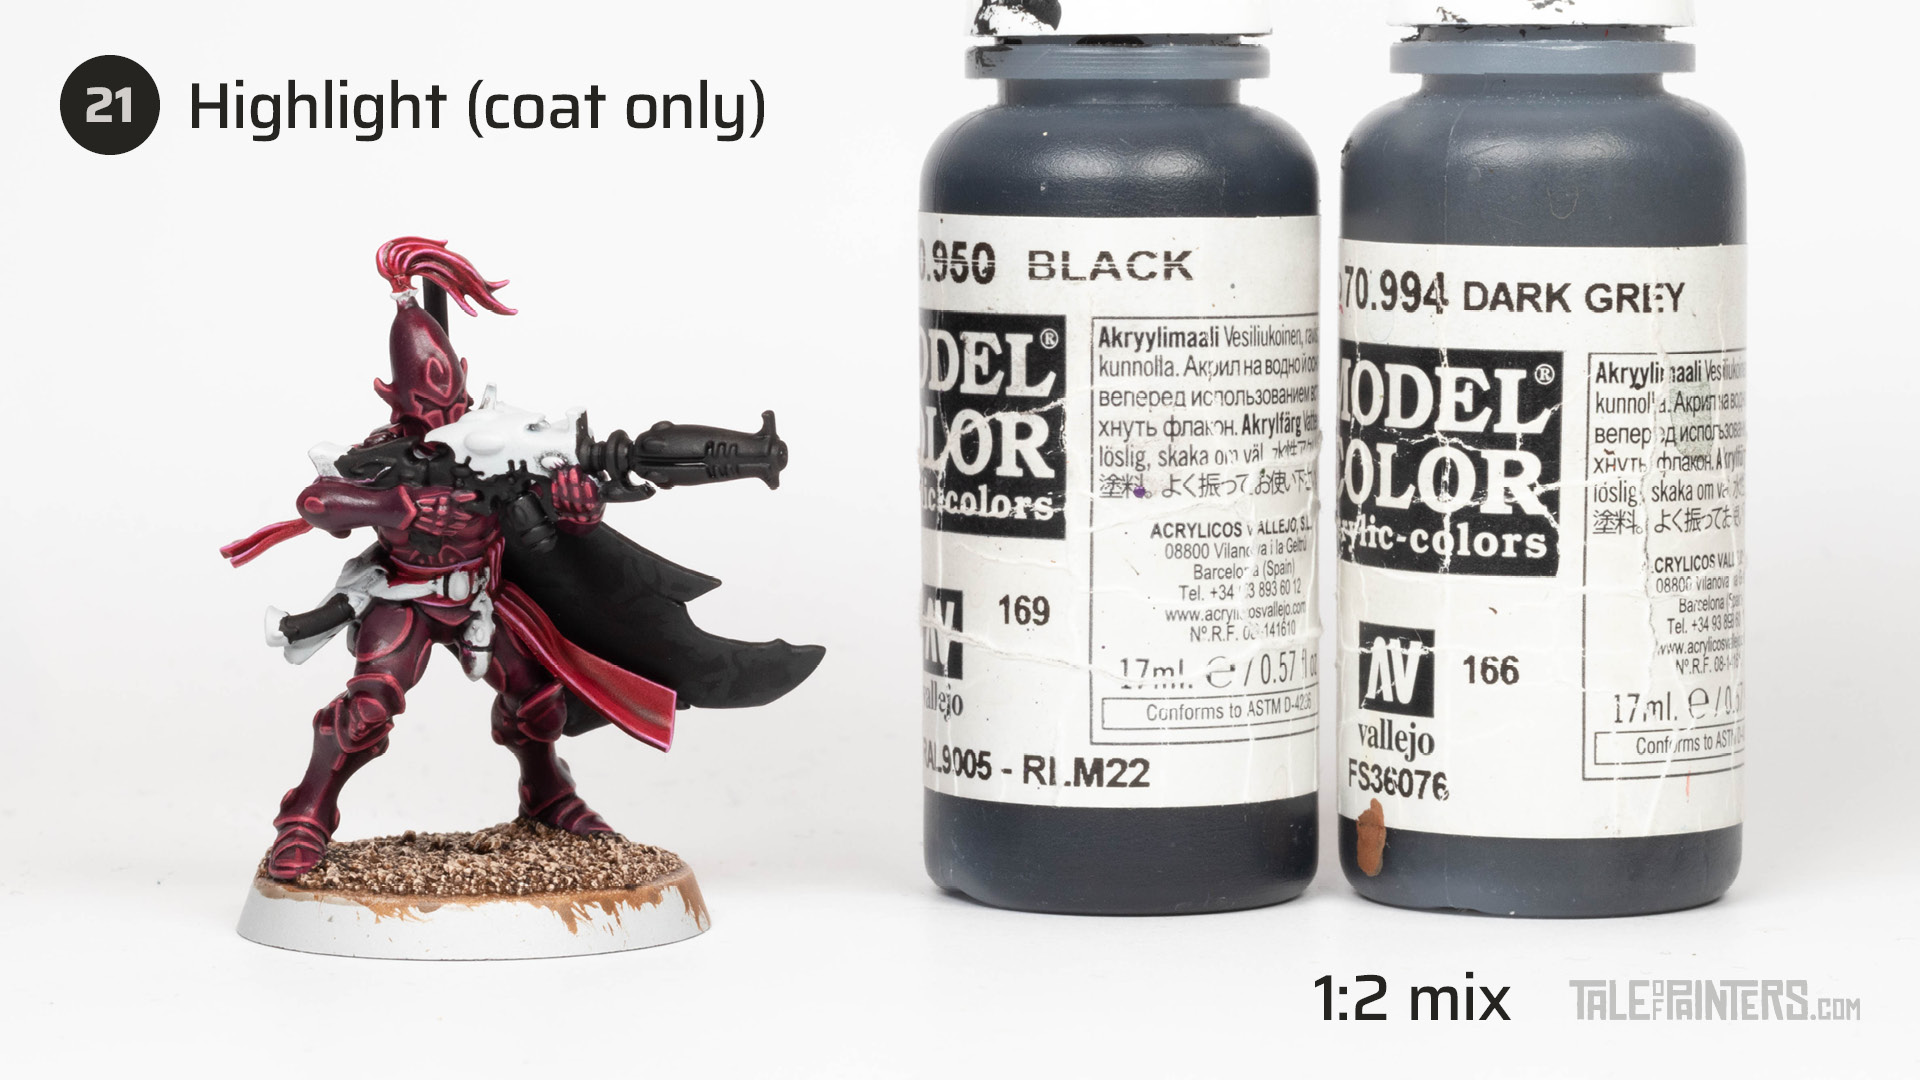

Mix VMC Black [or Abaddon Black] with VMC Dark Grey [or Eshin Grey] and apply a soft highlight on the cape only.
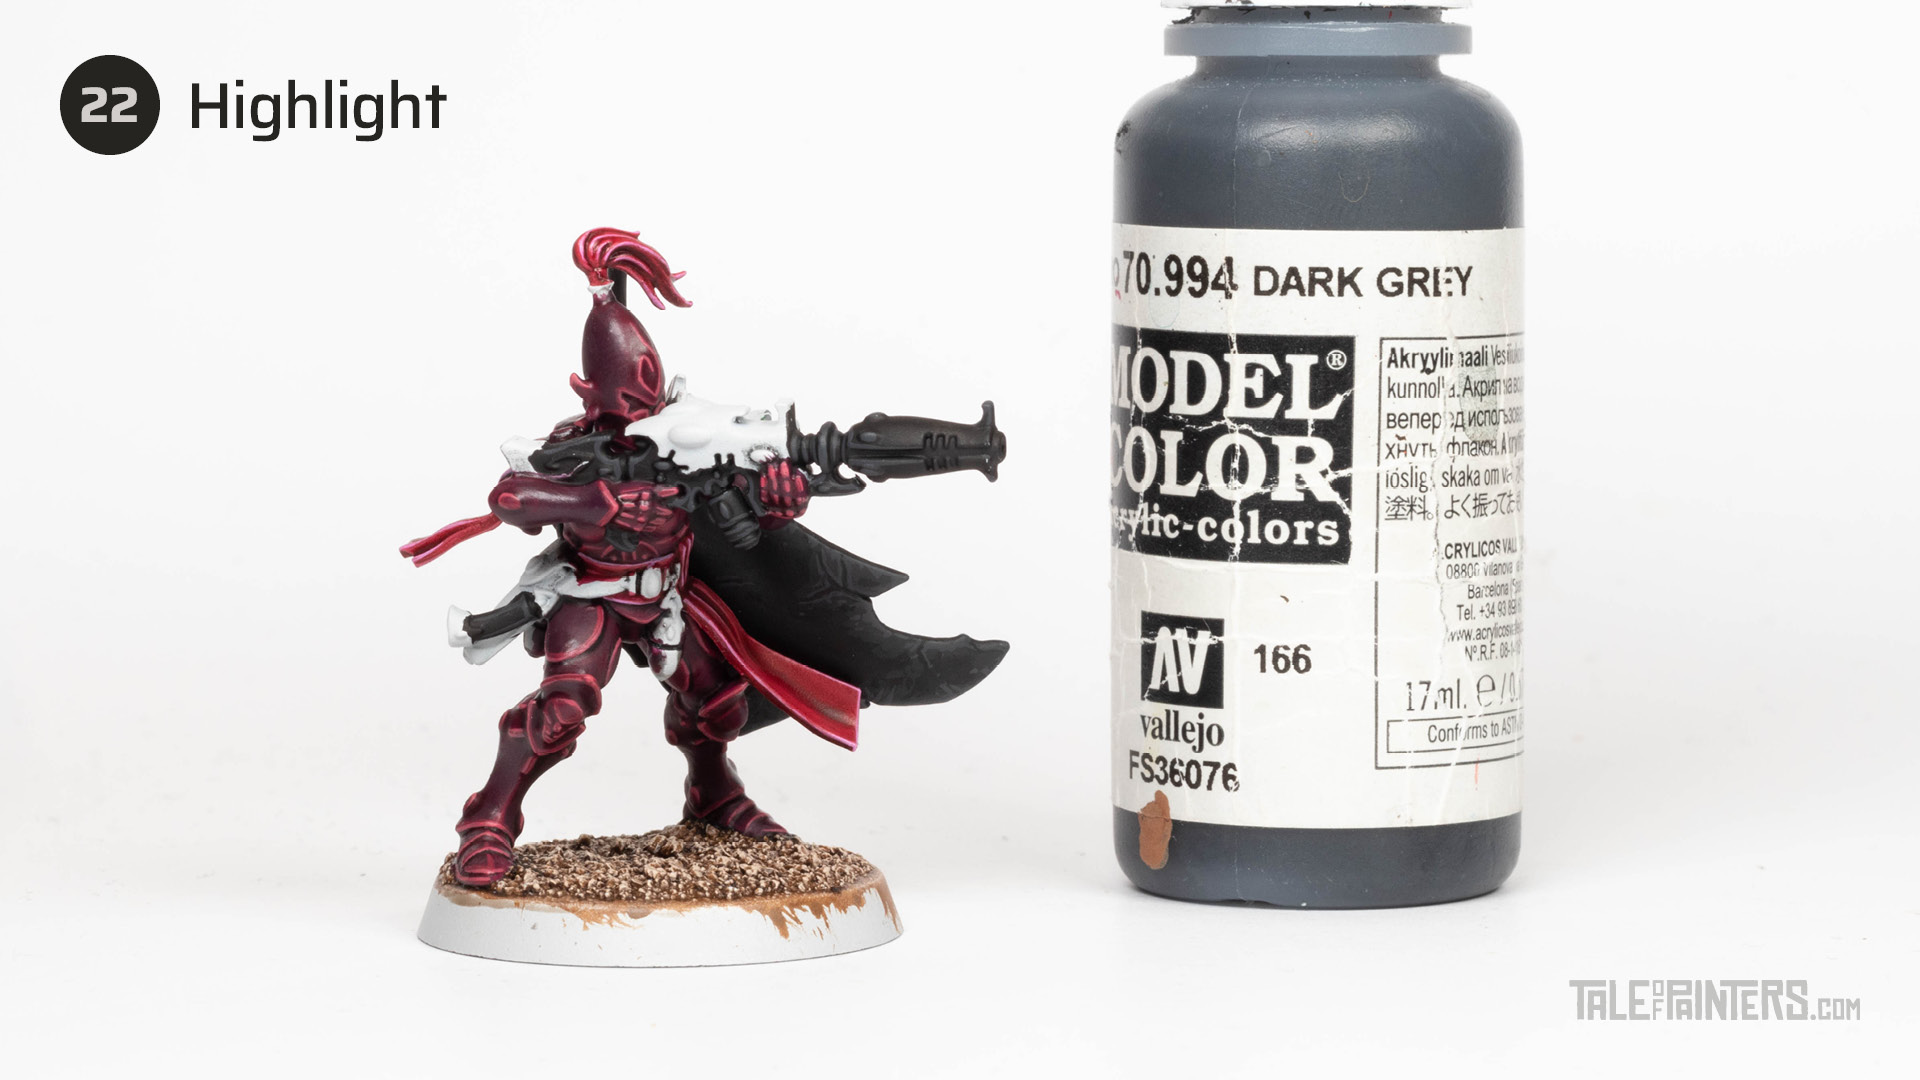

Highlight all the black areas with VMC Dark Grey [or Eshin Grey].
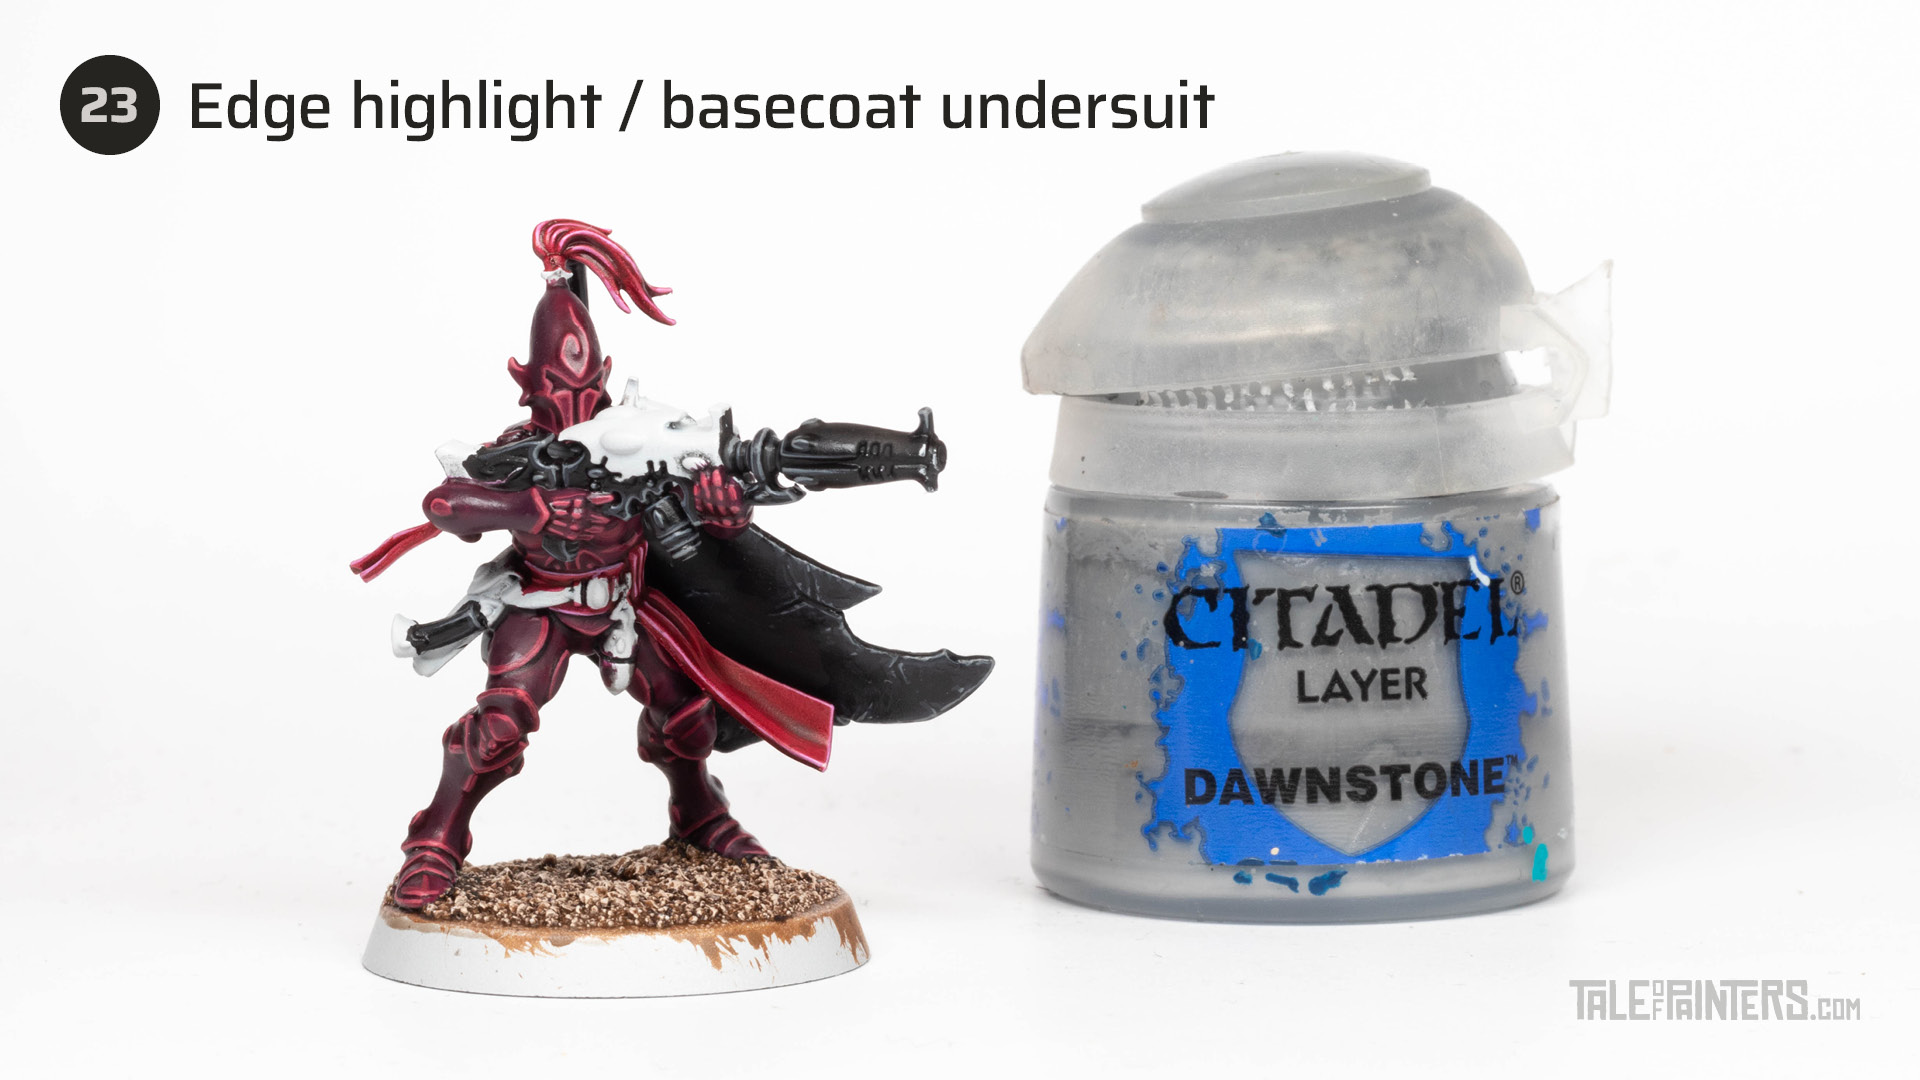

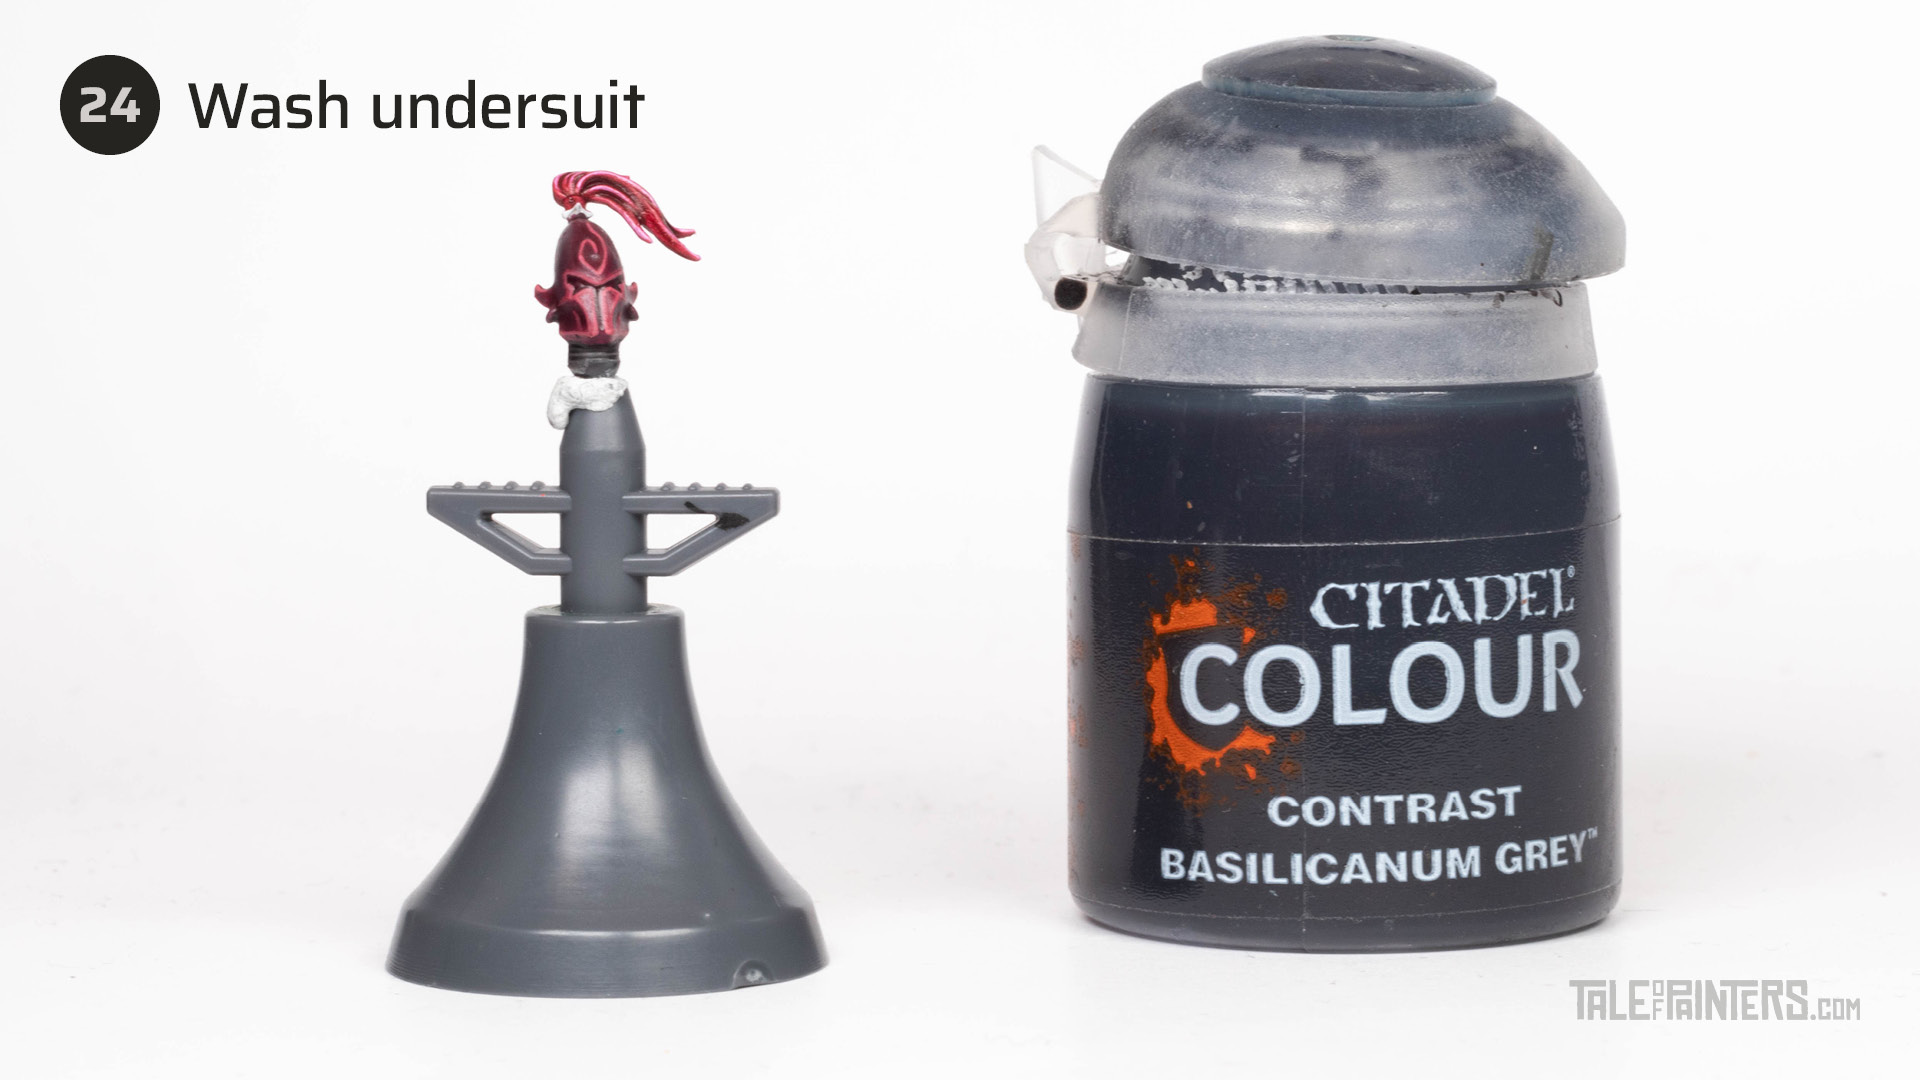

Wash the ribbed undersuit with Basilicanum Grey.
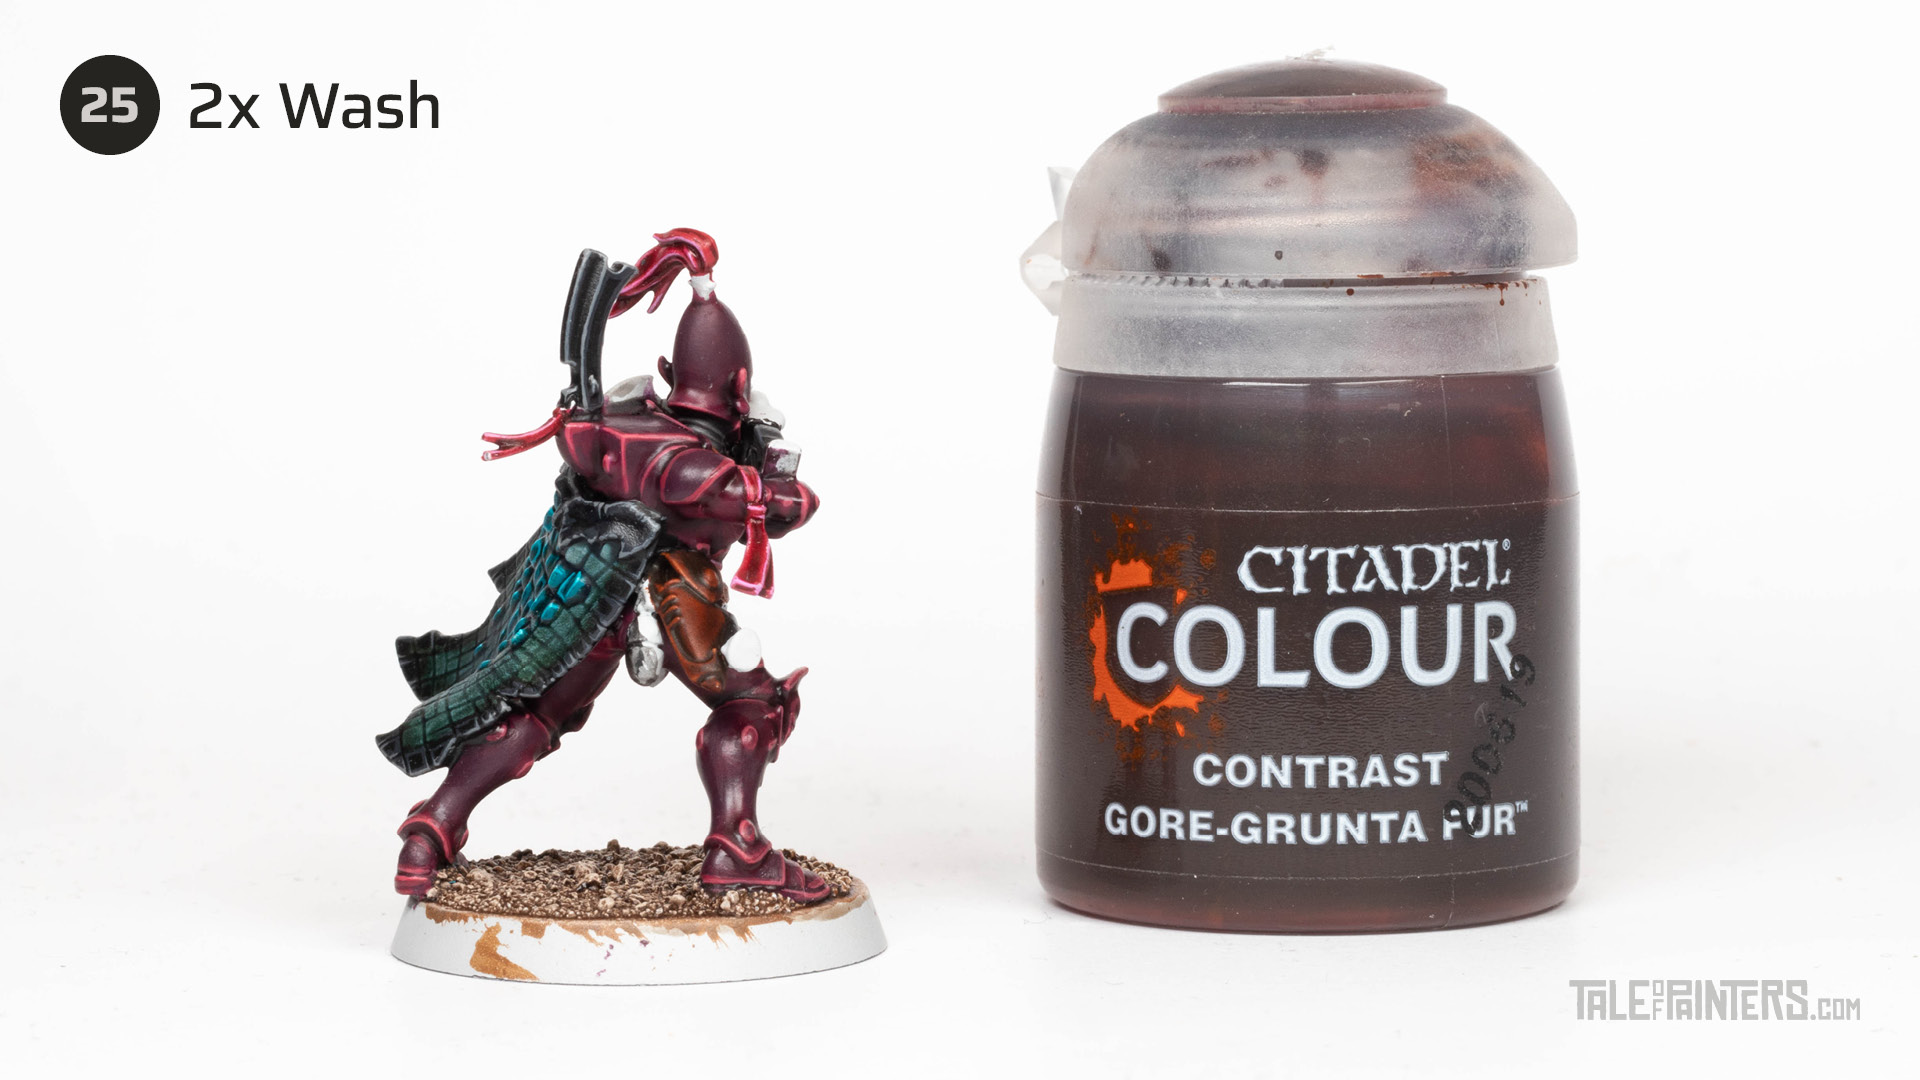

Tidy up the Corax White basecoat if necessary and apply two coats of Gore-grunta Fur over any leather details.
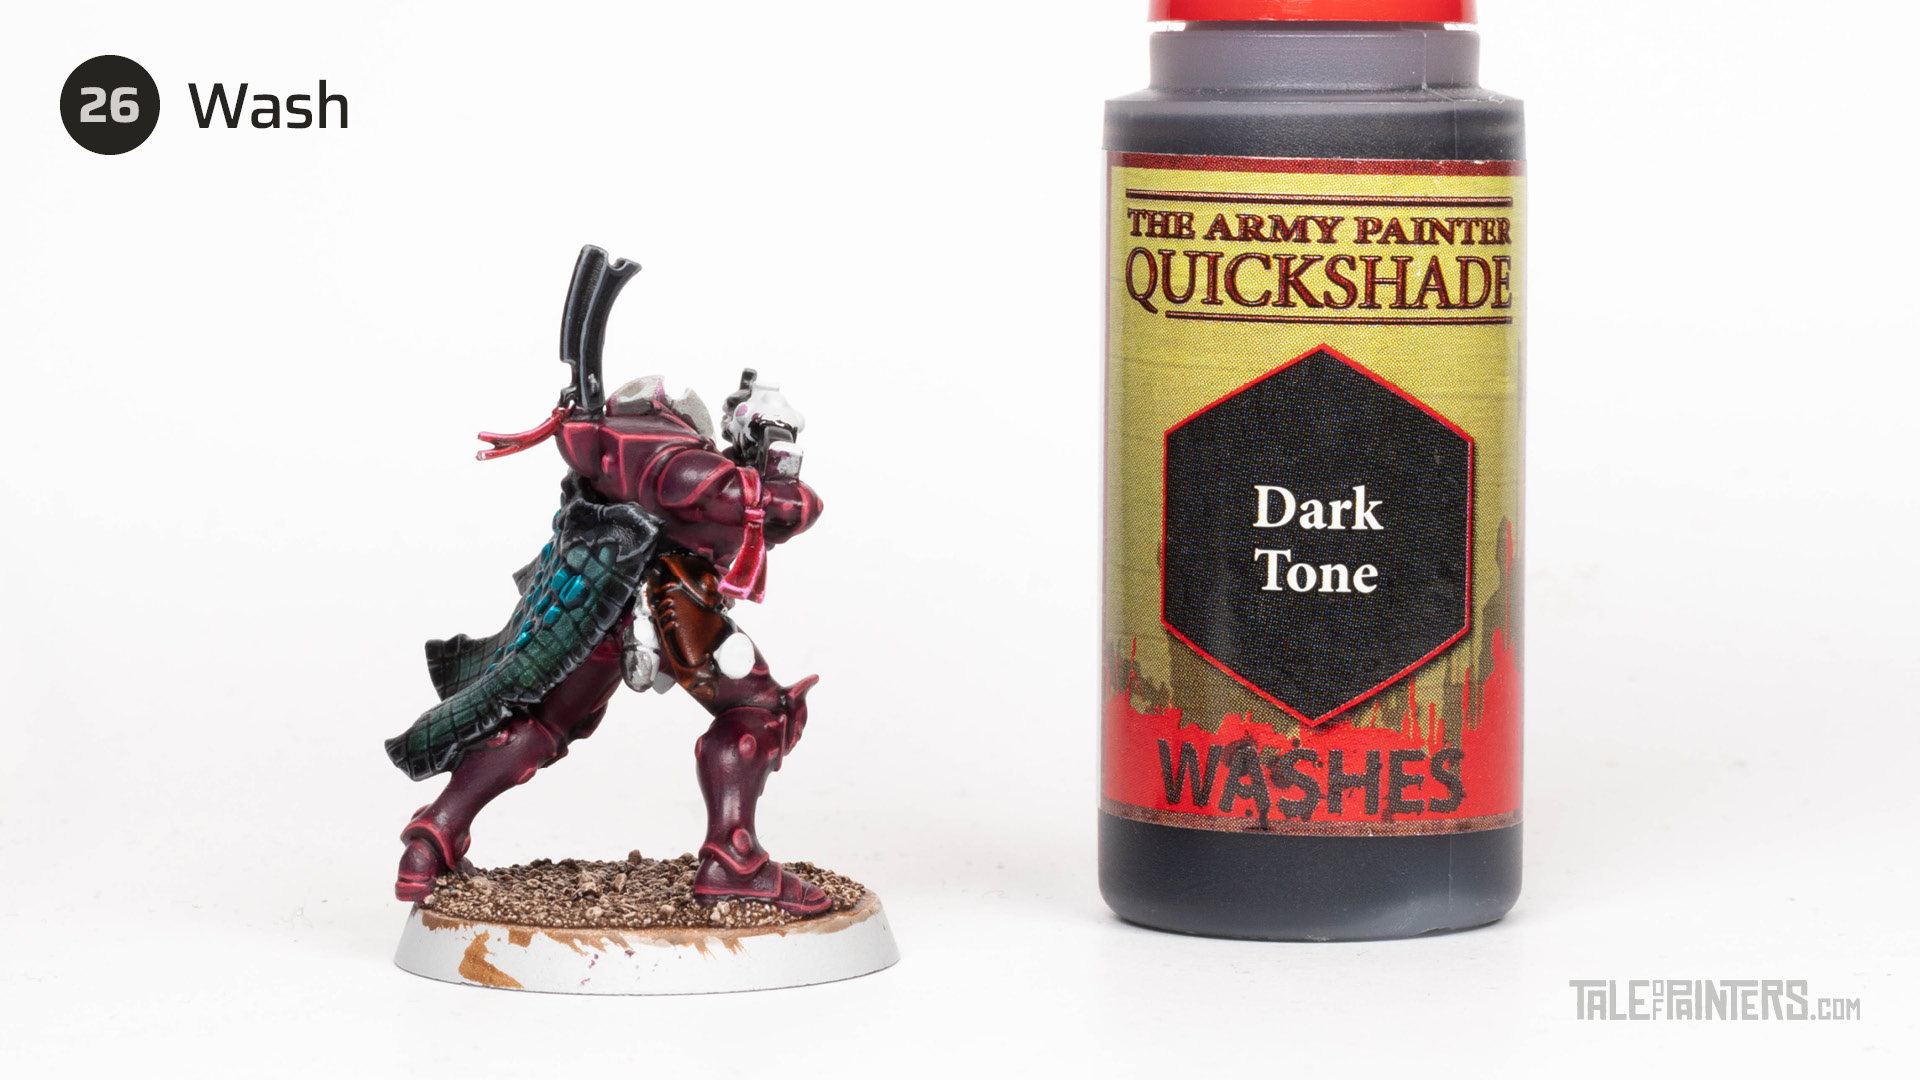

Wash the brown leather with Warpaints Dark Tone Wash [or Nuln Oil] to make it even darker.
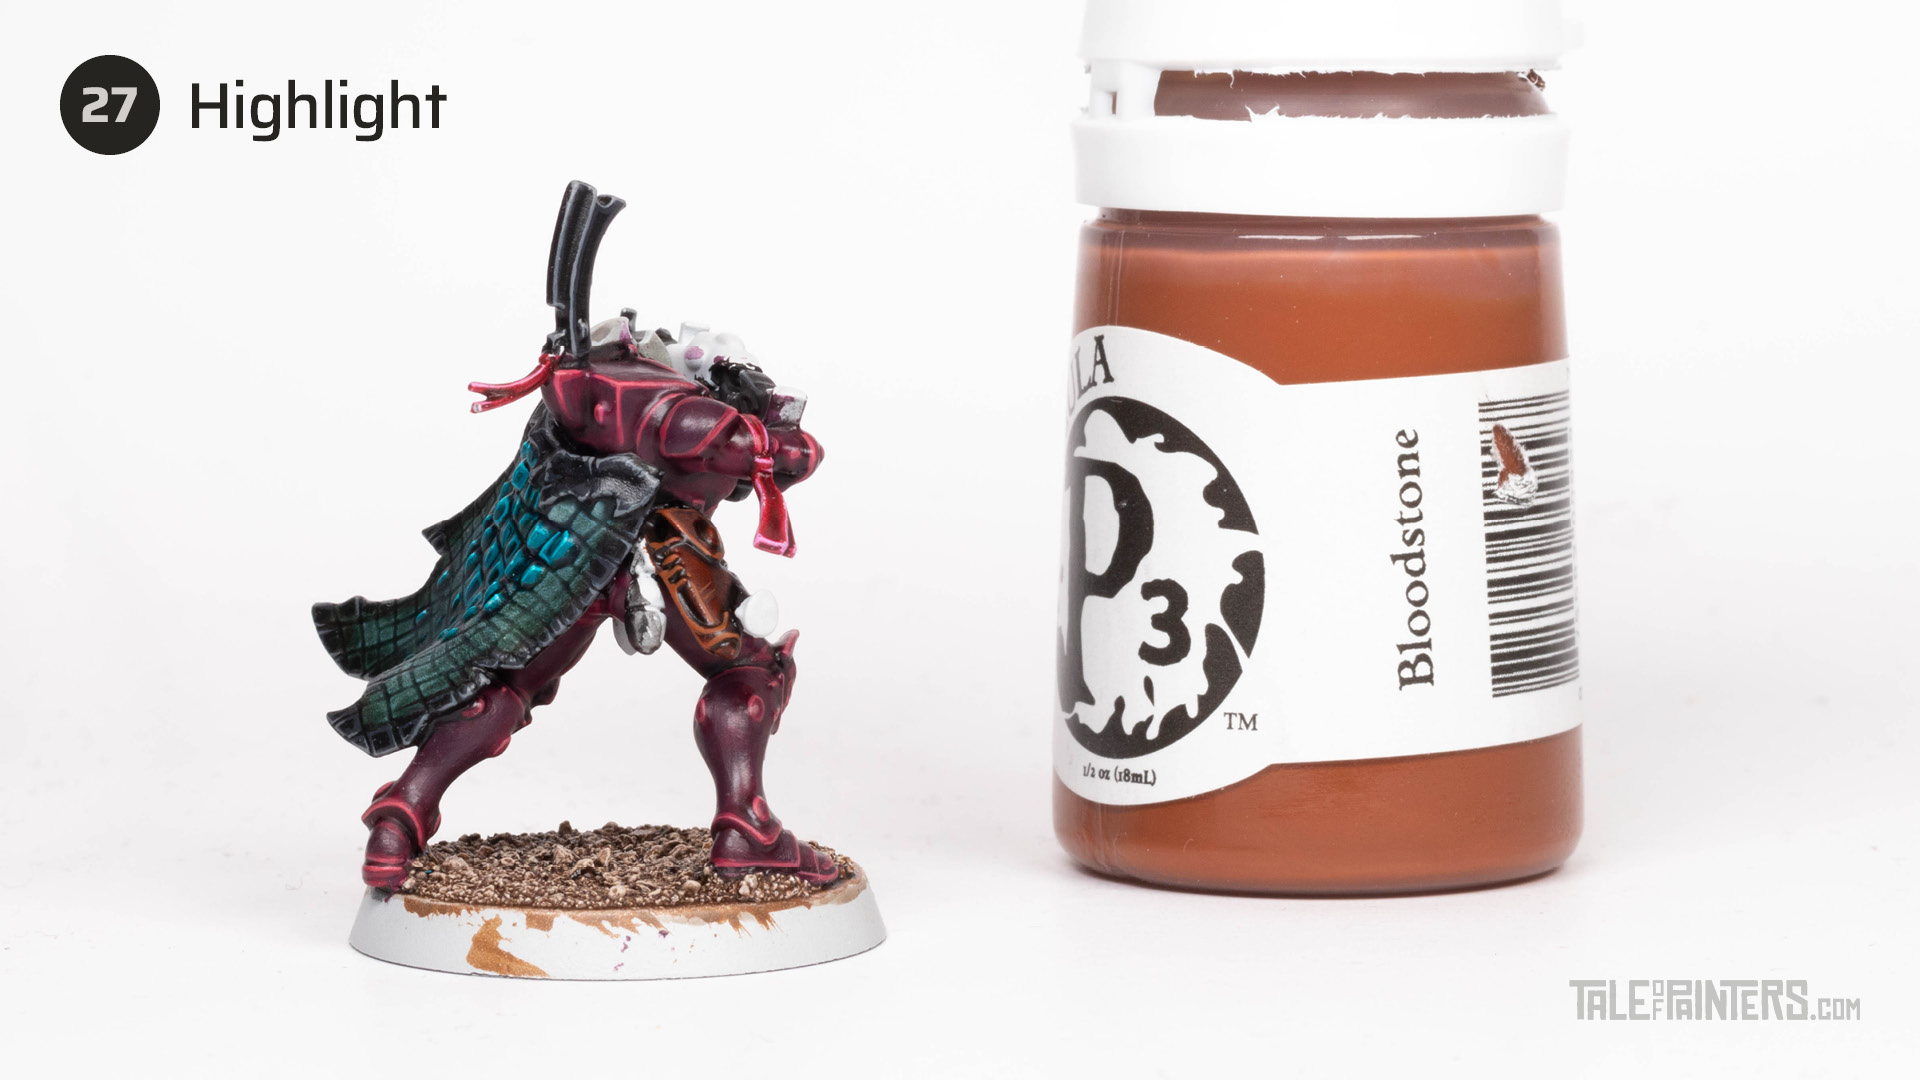

Highlight the leather with P3 Bloodstone [or mix a little bit of Doombull Brown into Skrag Brown or Deathclaw Brown].
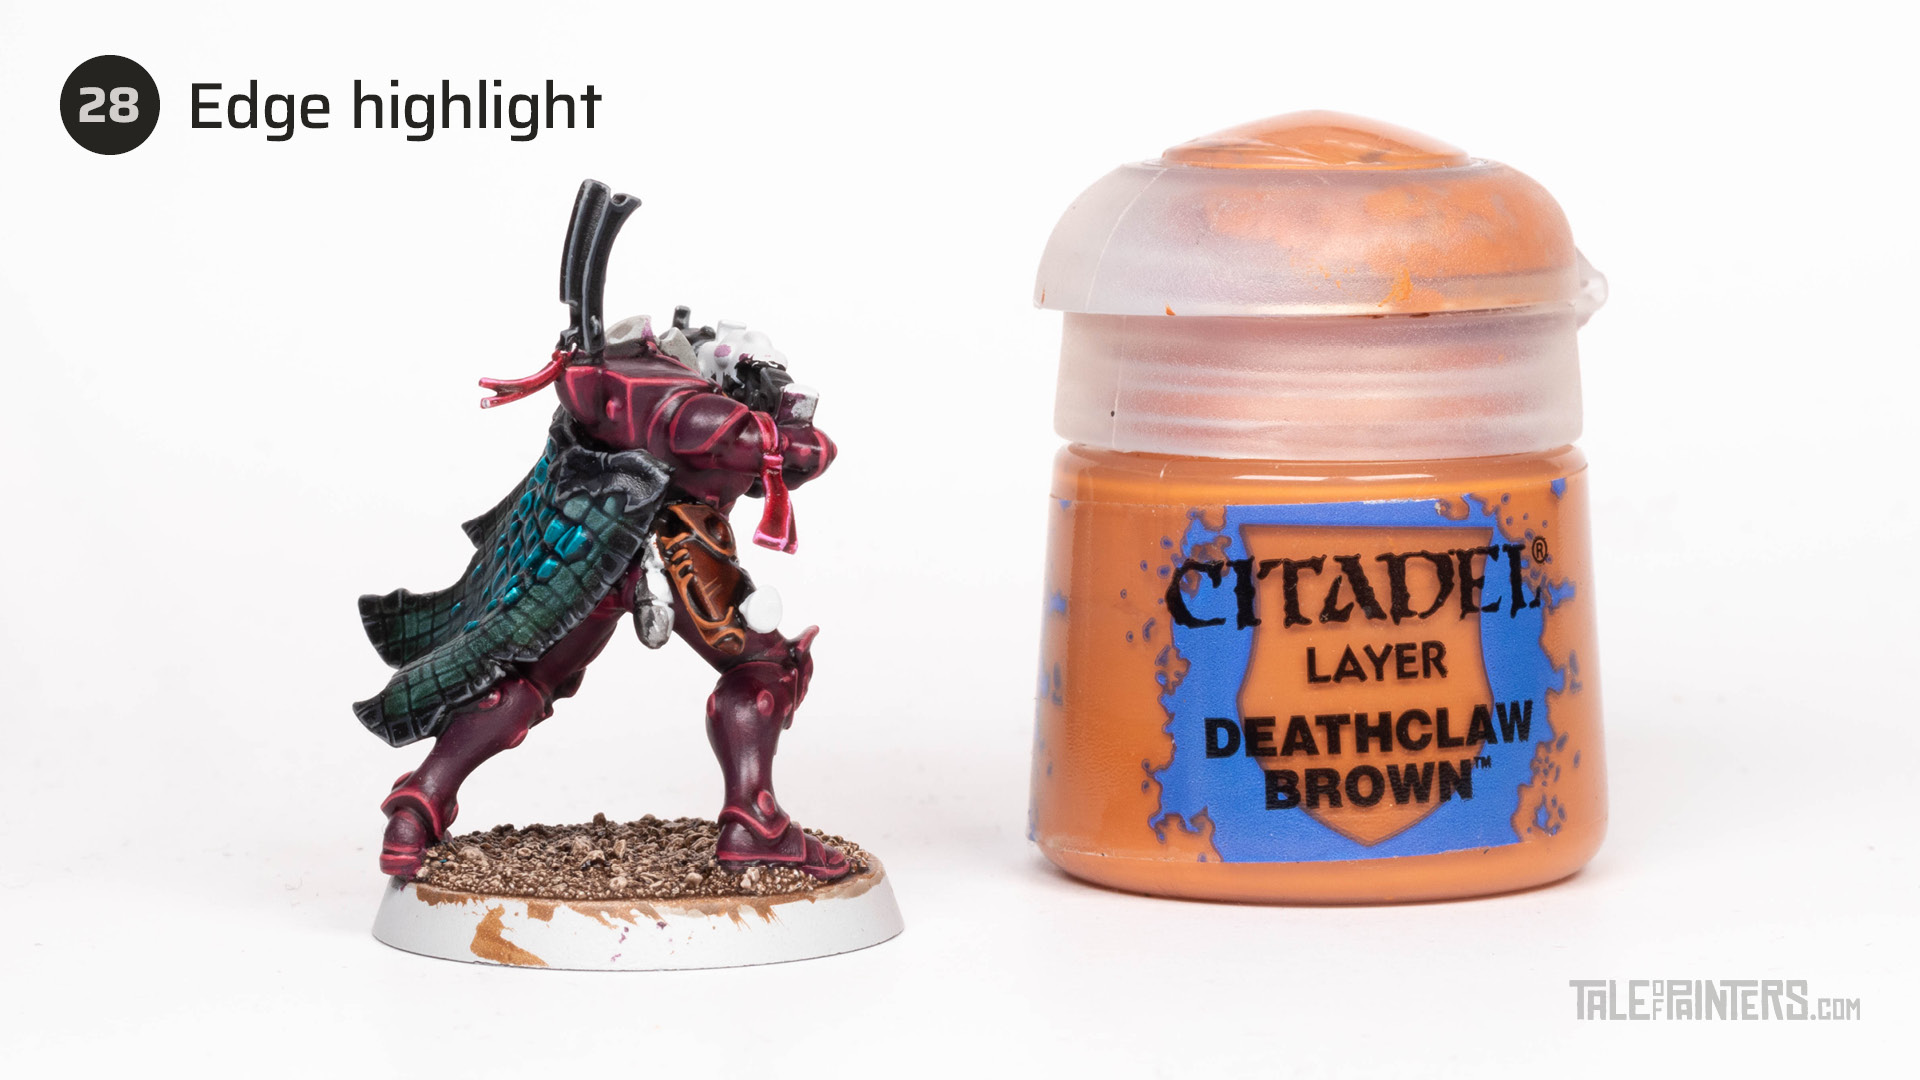

Complete the leather by applying an even finer highlight of Deathclaw Brown.
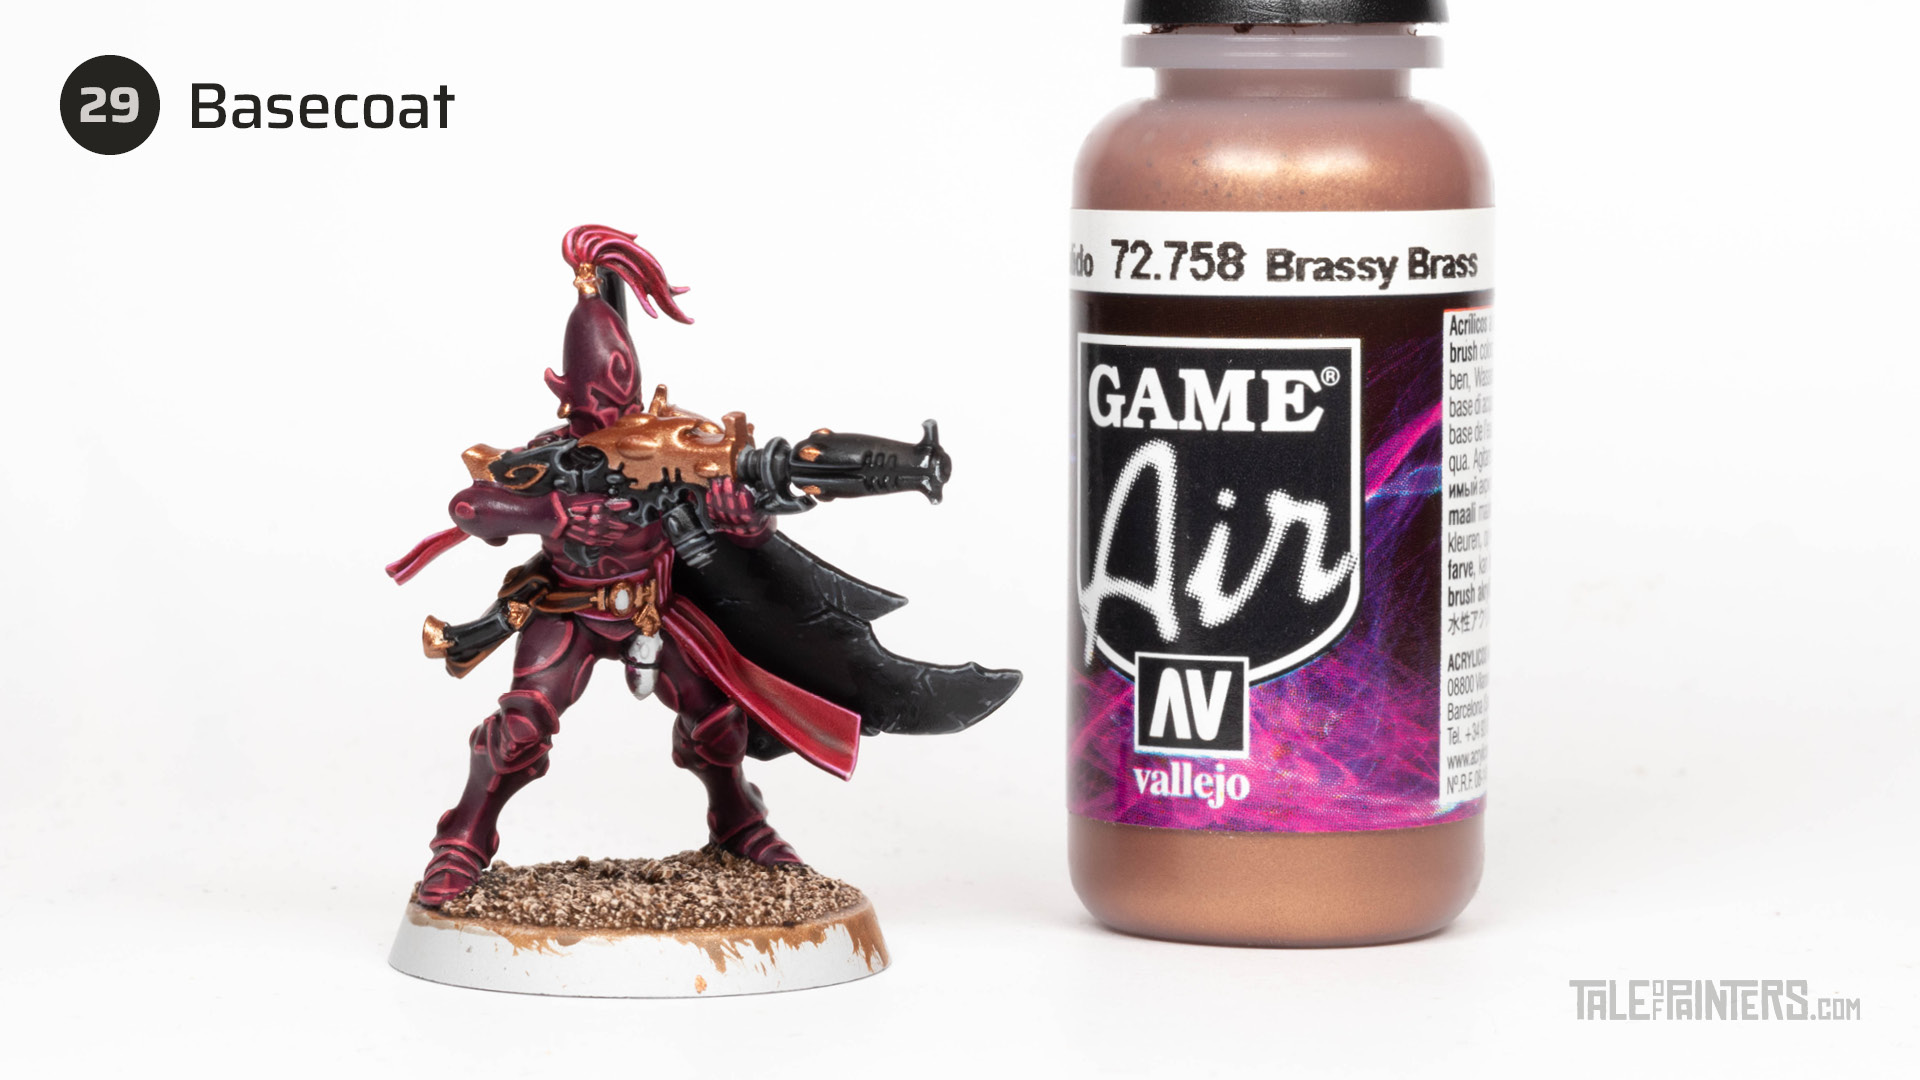

Basecoat bronze details with VGC Brassy Brass (I prefer the consistency of the Air version but the regular one is also fine) [or Brass Scorpion].
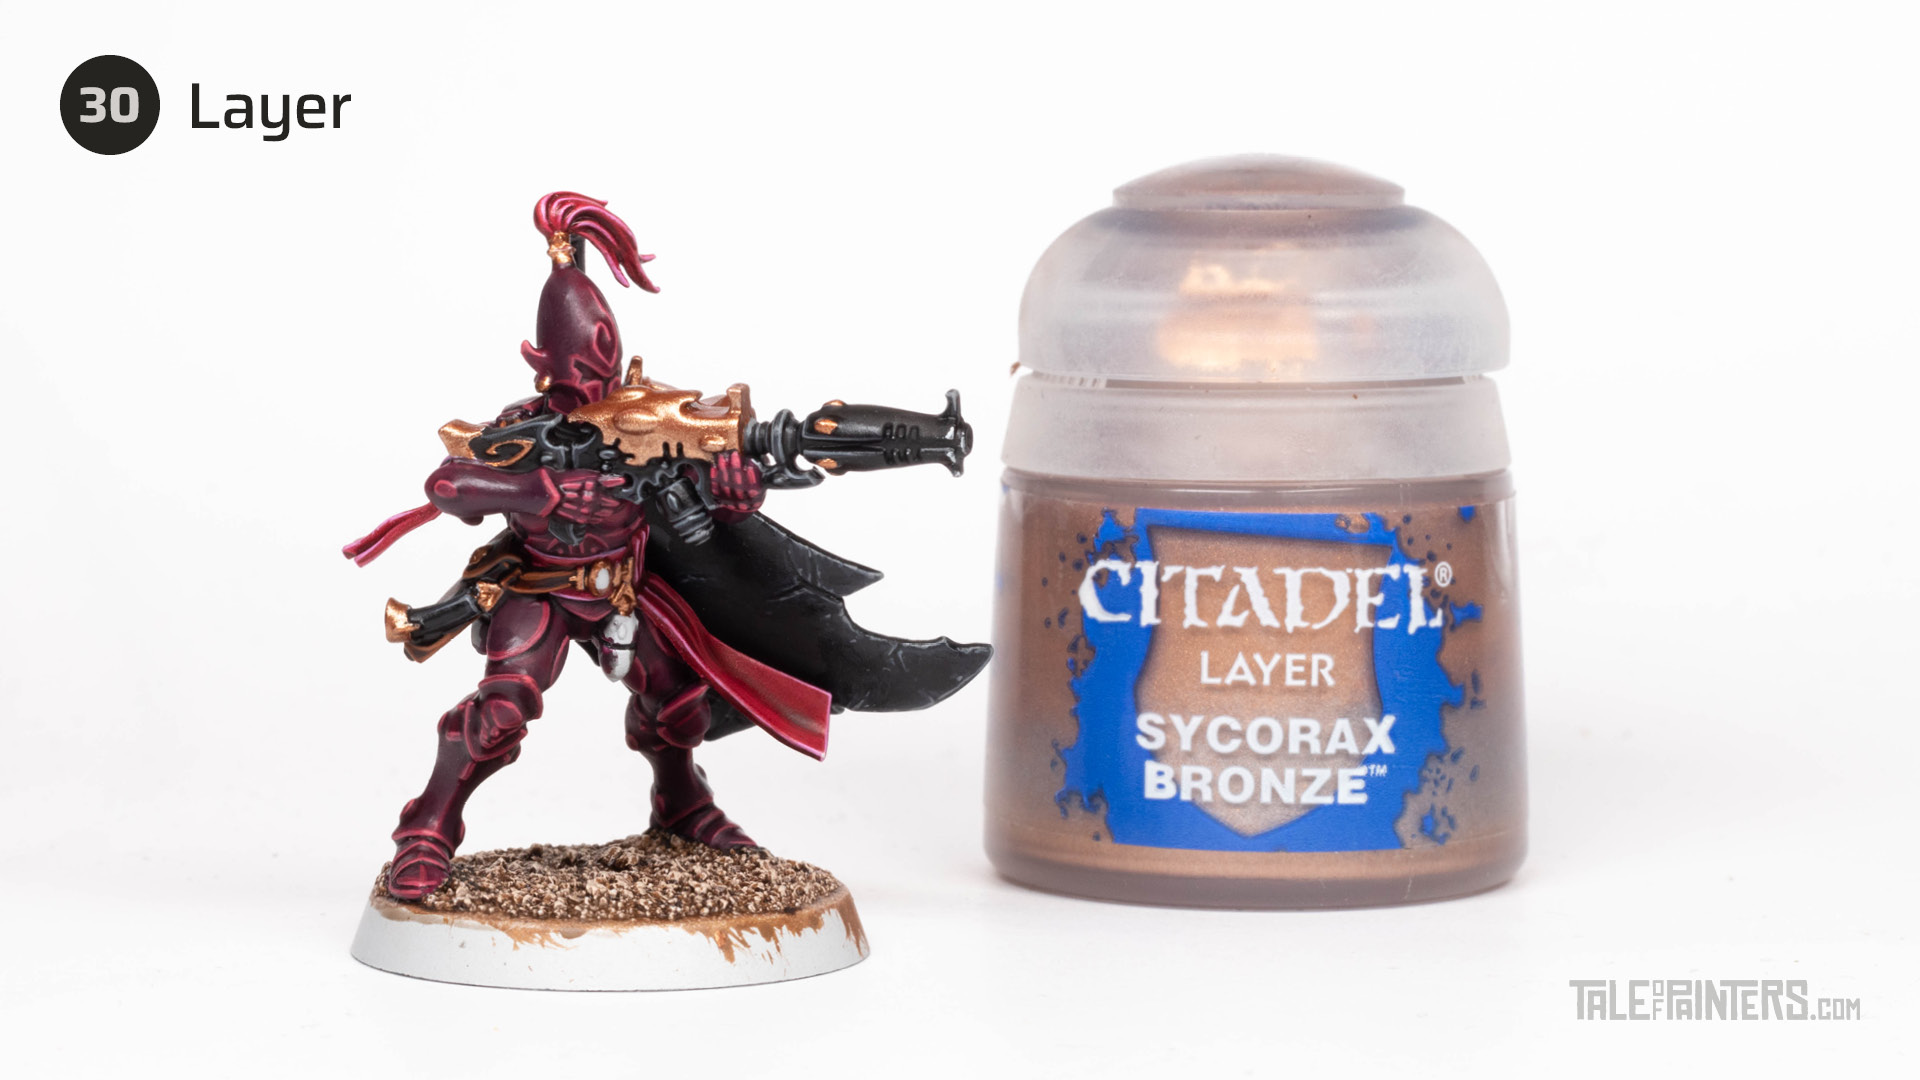

Apply a soft highlight of Sycorax Bronze. This is only needed on larger bronze parts such as the gun casing and shoulder guard.
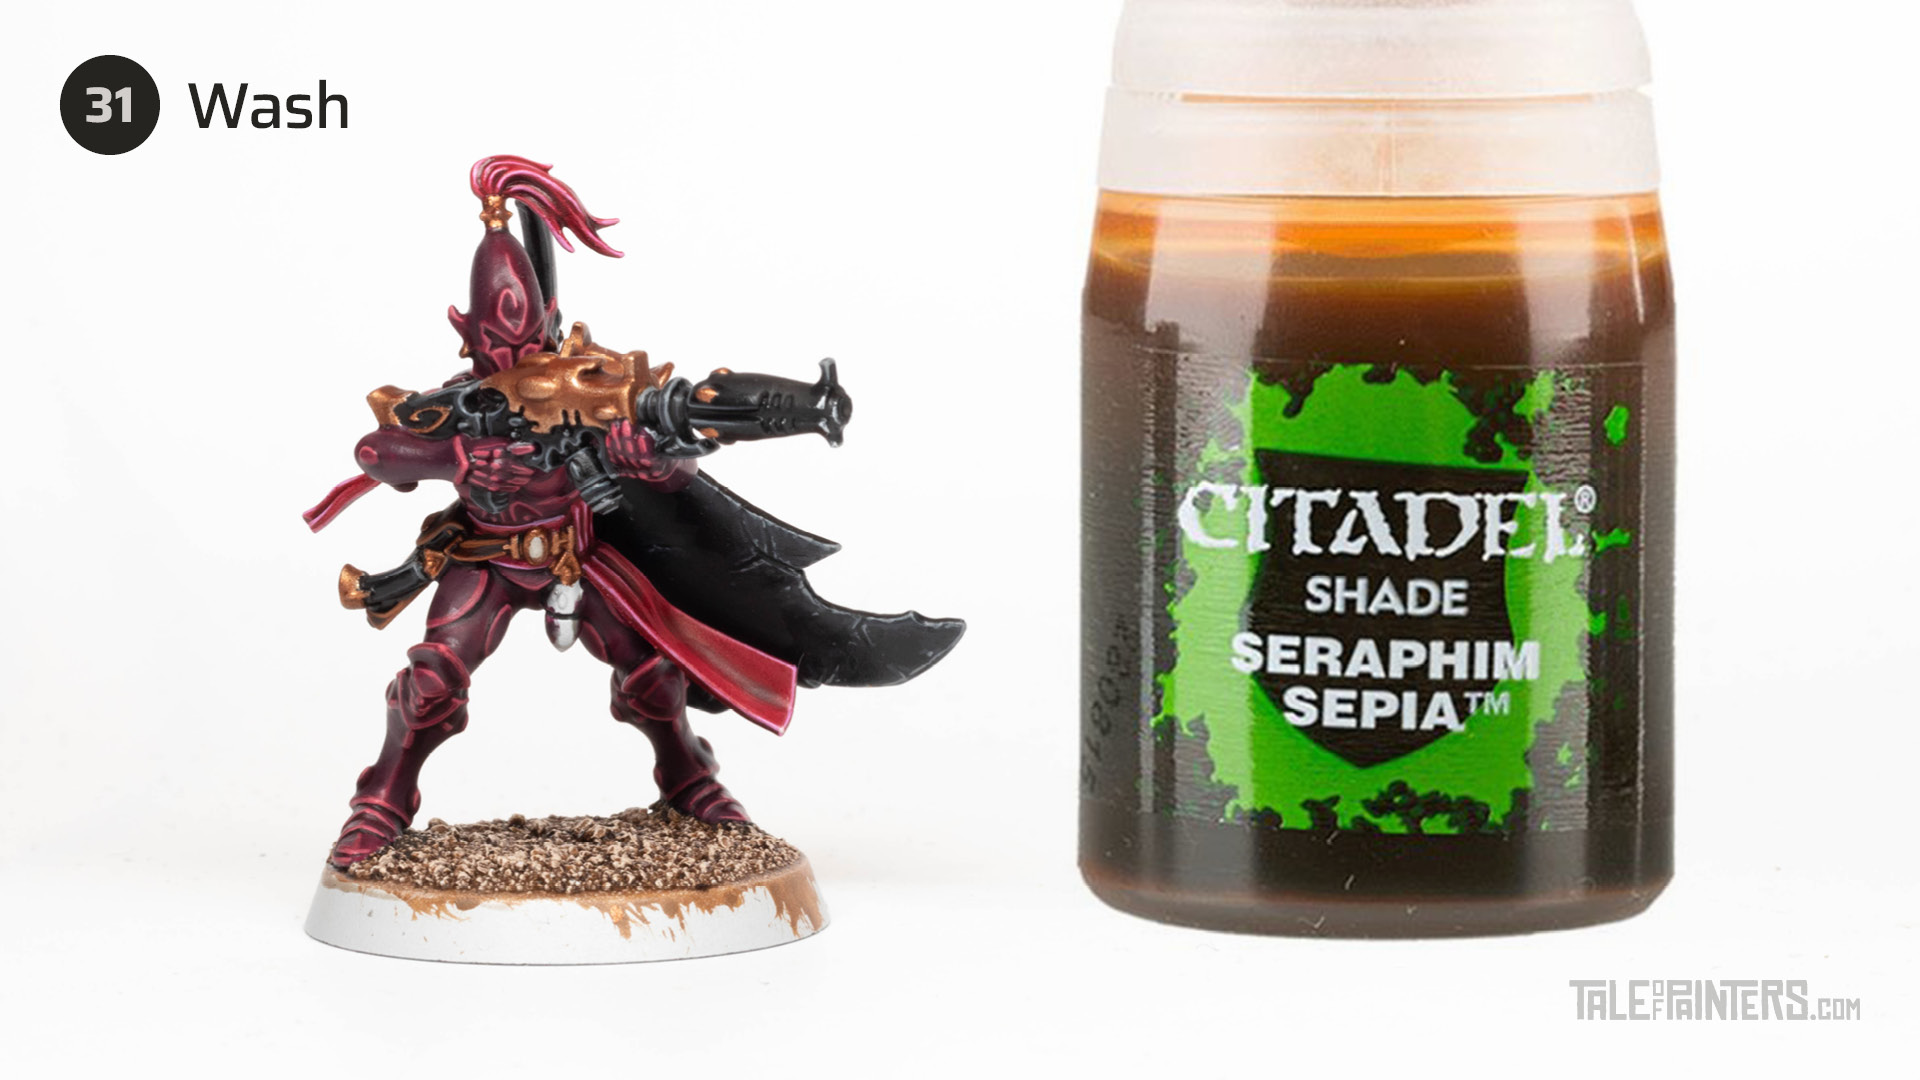

Wash the bronze areas with Seraphim Sepia.
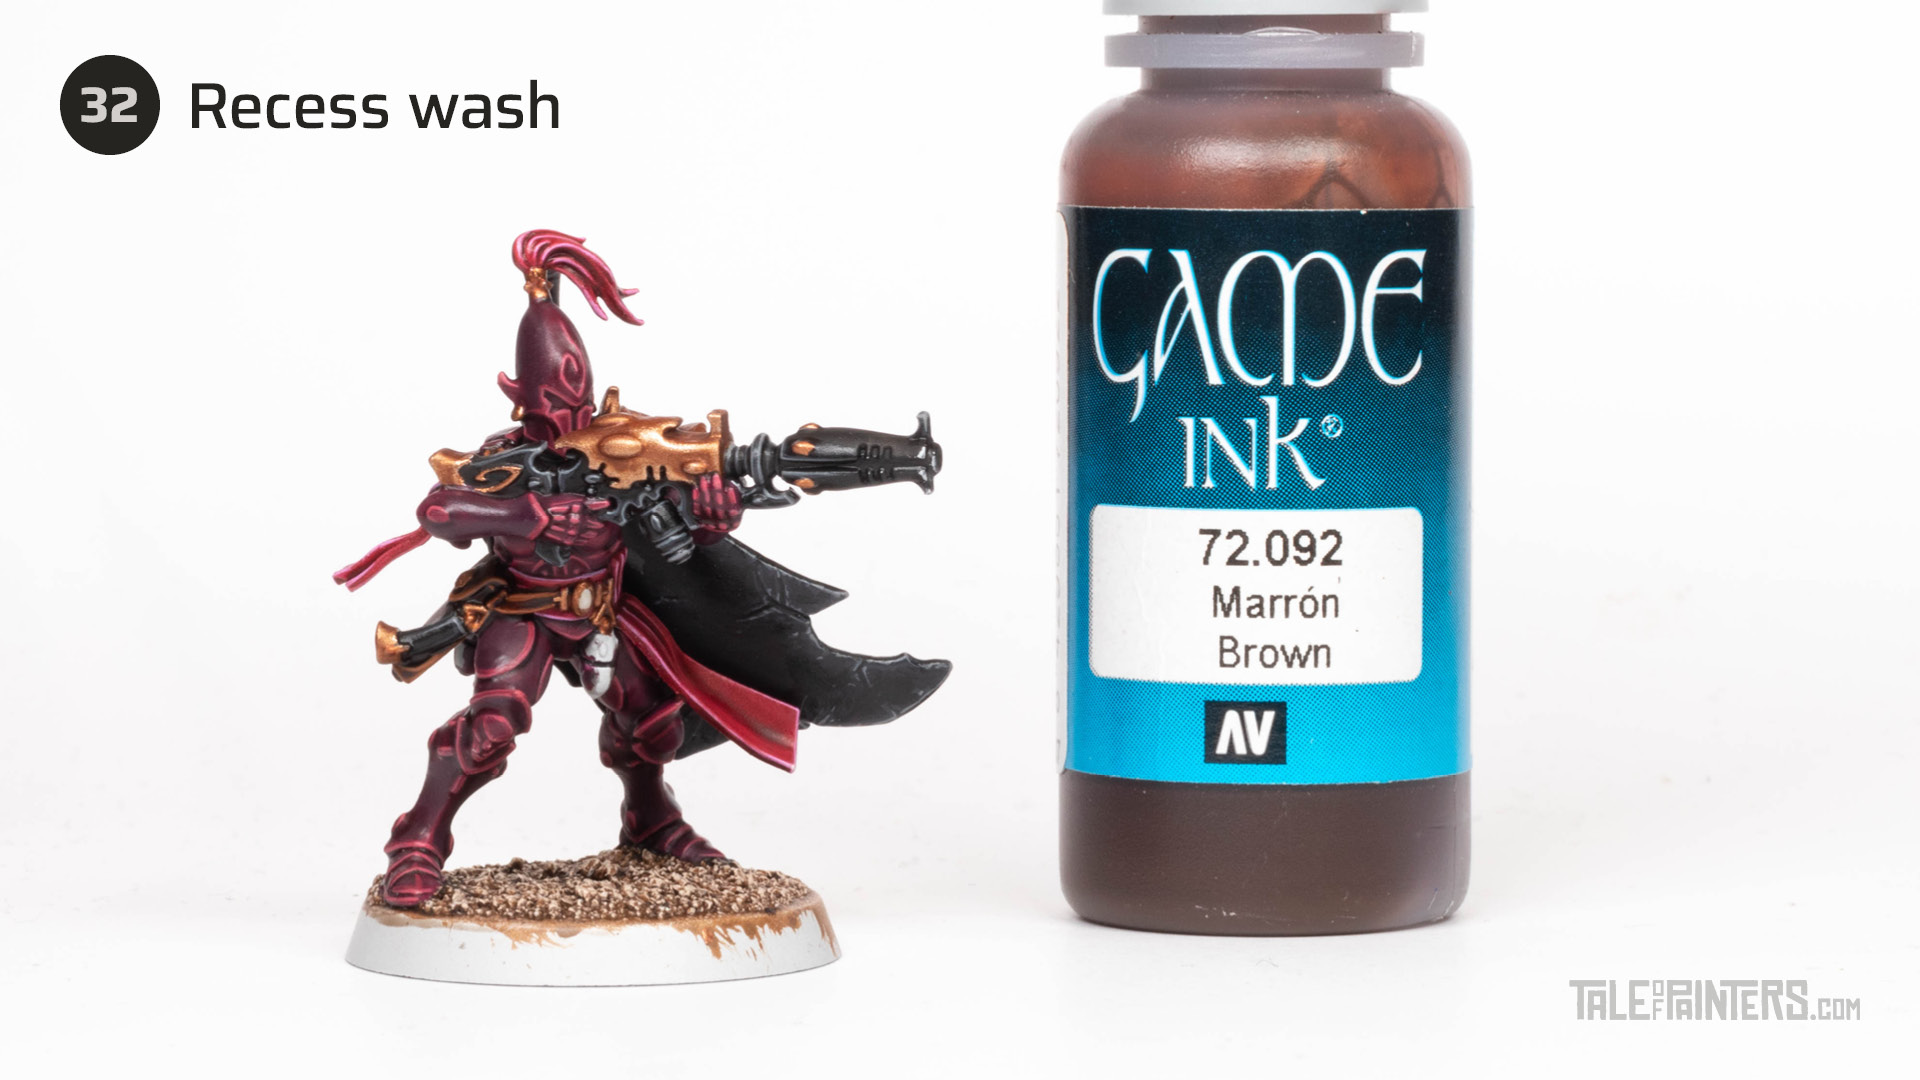

Deepen the shading by applying VGC Brown Ink [or Gore-grunta Fur] directly into the recesses.
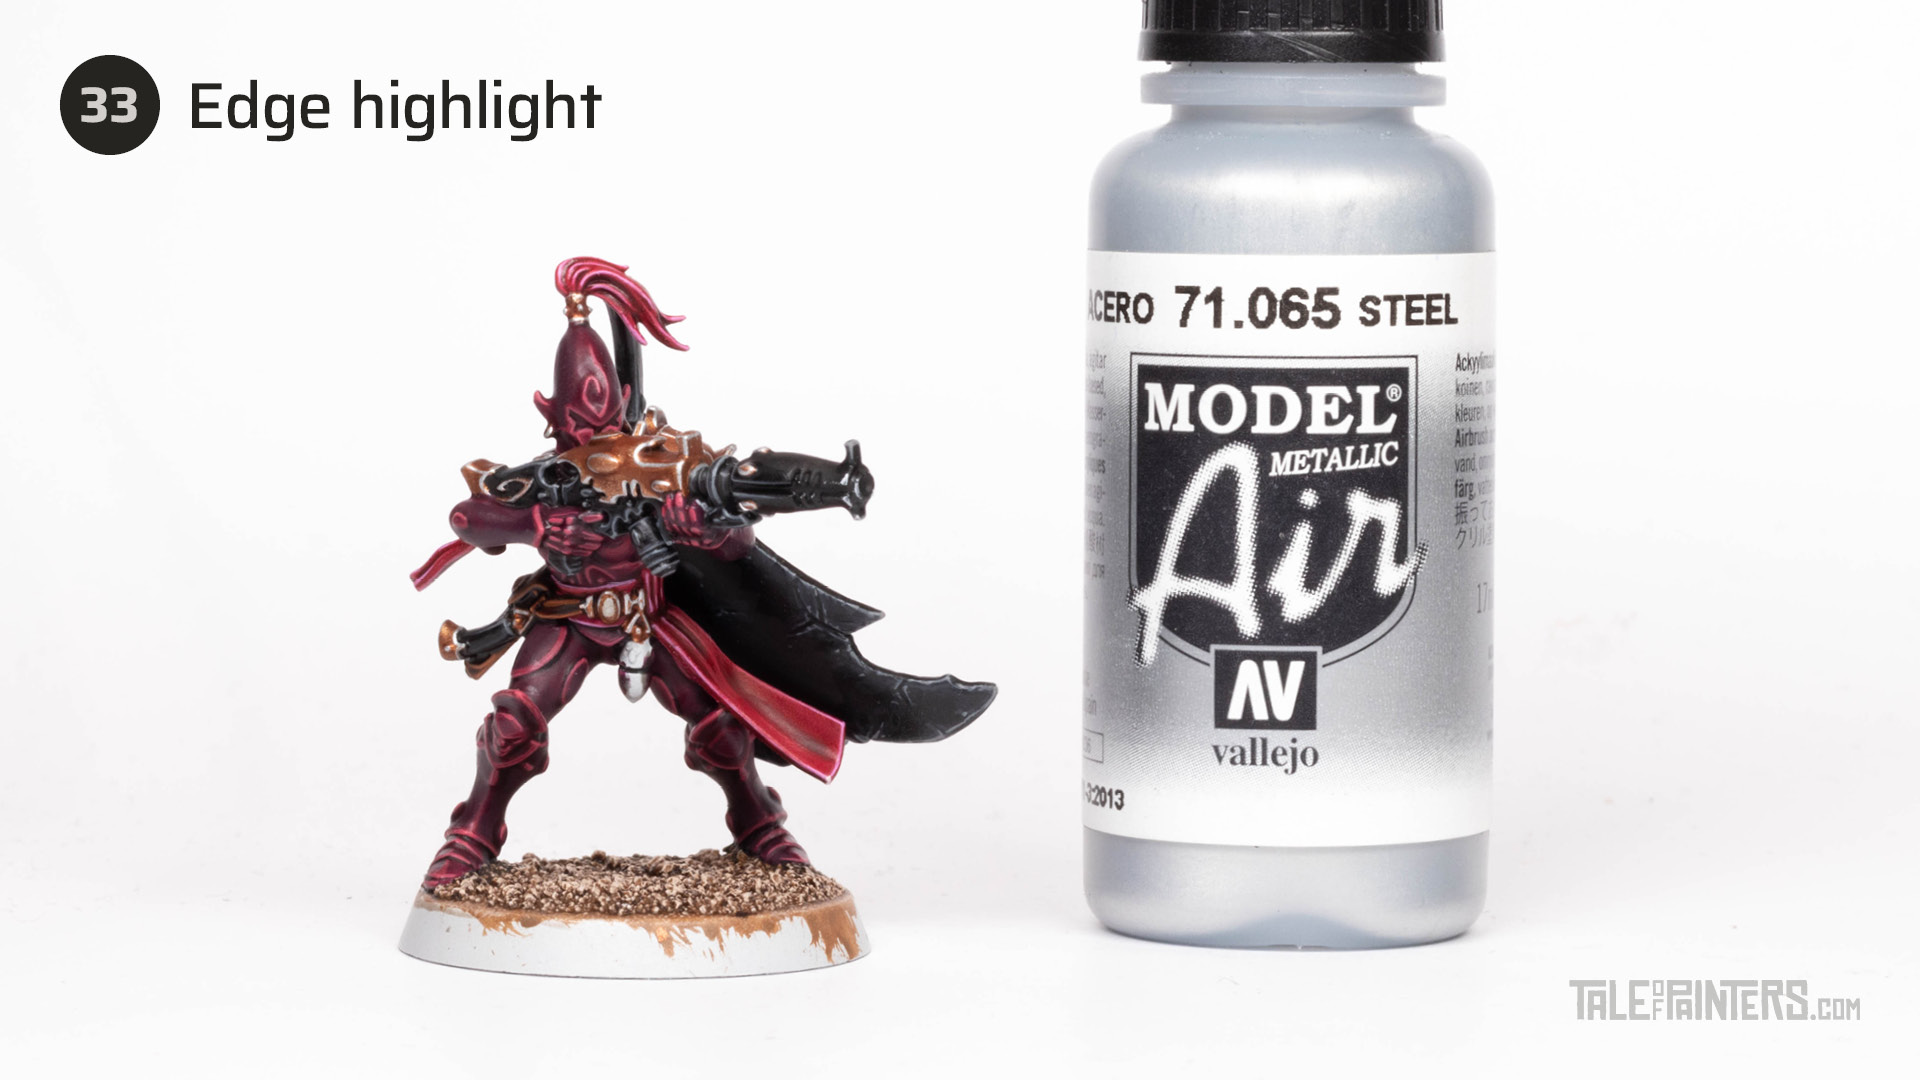

Highlight the bronze with VMC Air Steel [or Stormhost Silver].
How to paint a jade green blaster glow effect
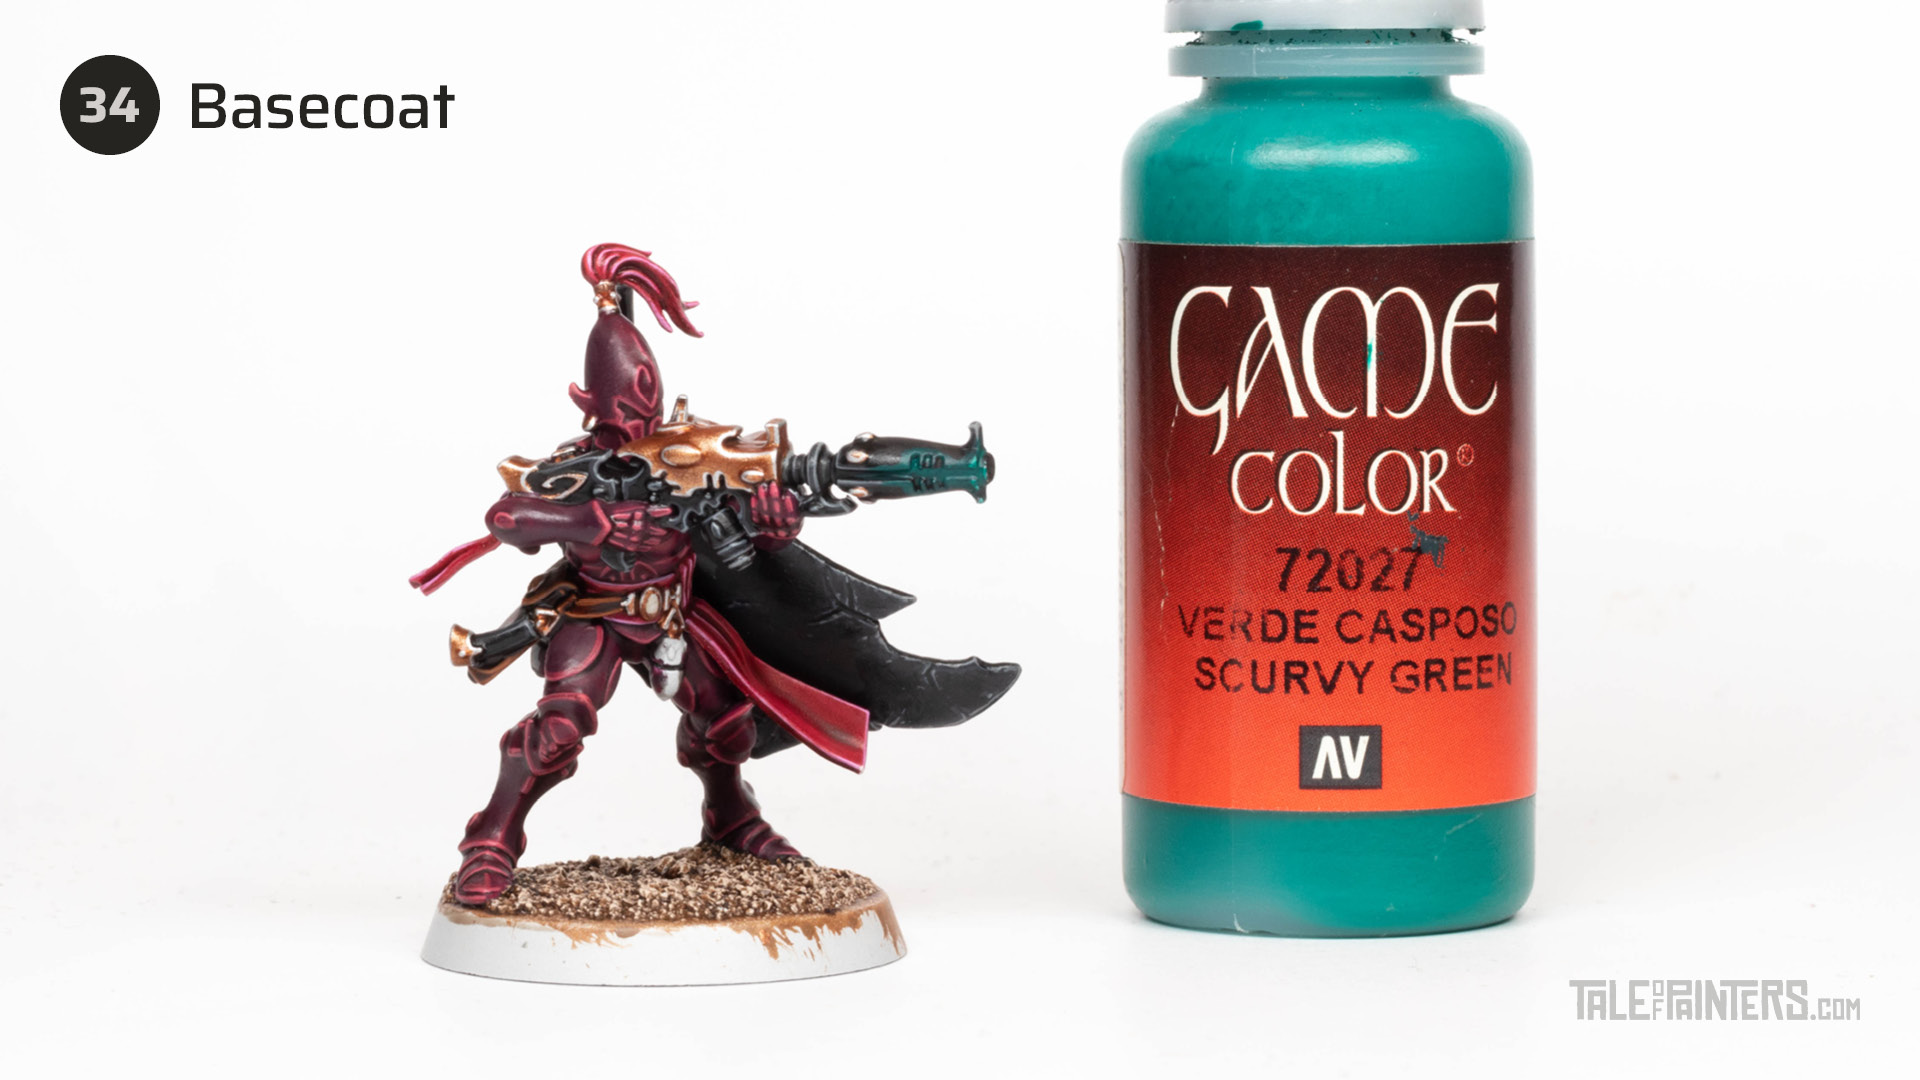

Paint the core of the blaster barrel with VGC Scurvy Green [or Lupercal Green], and also apply a chunky edge highlight on the front two-thirds of the barrel to build up the source lighting effect.
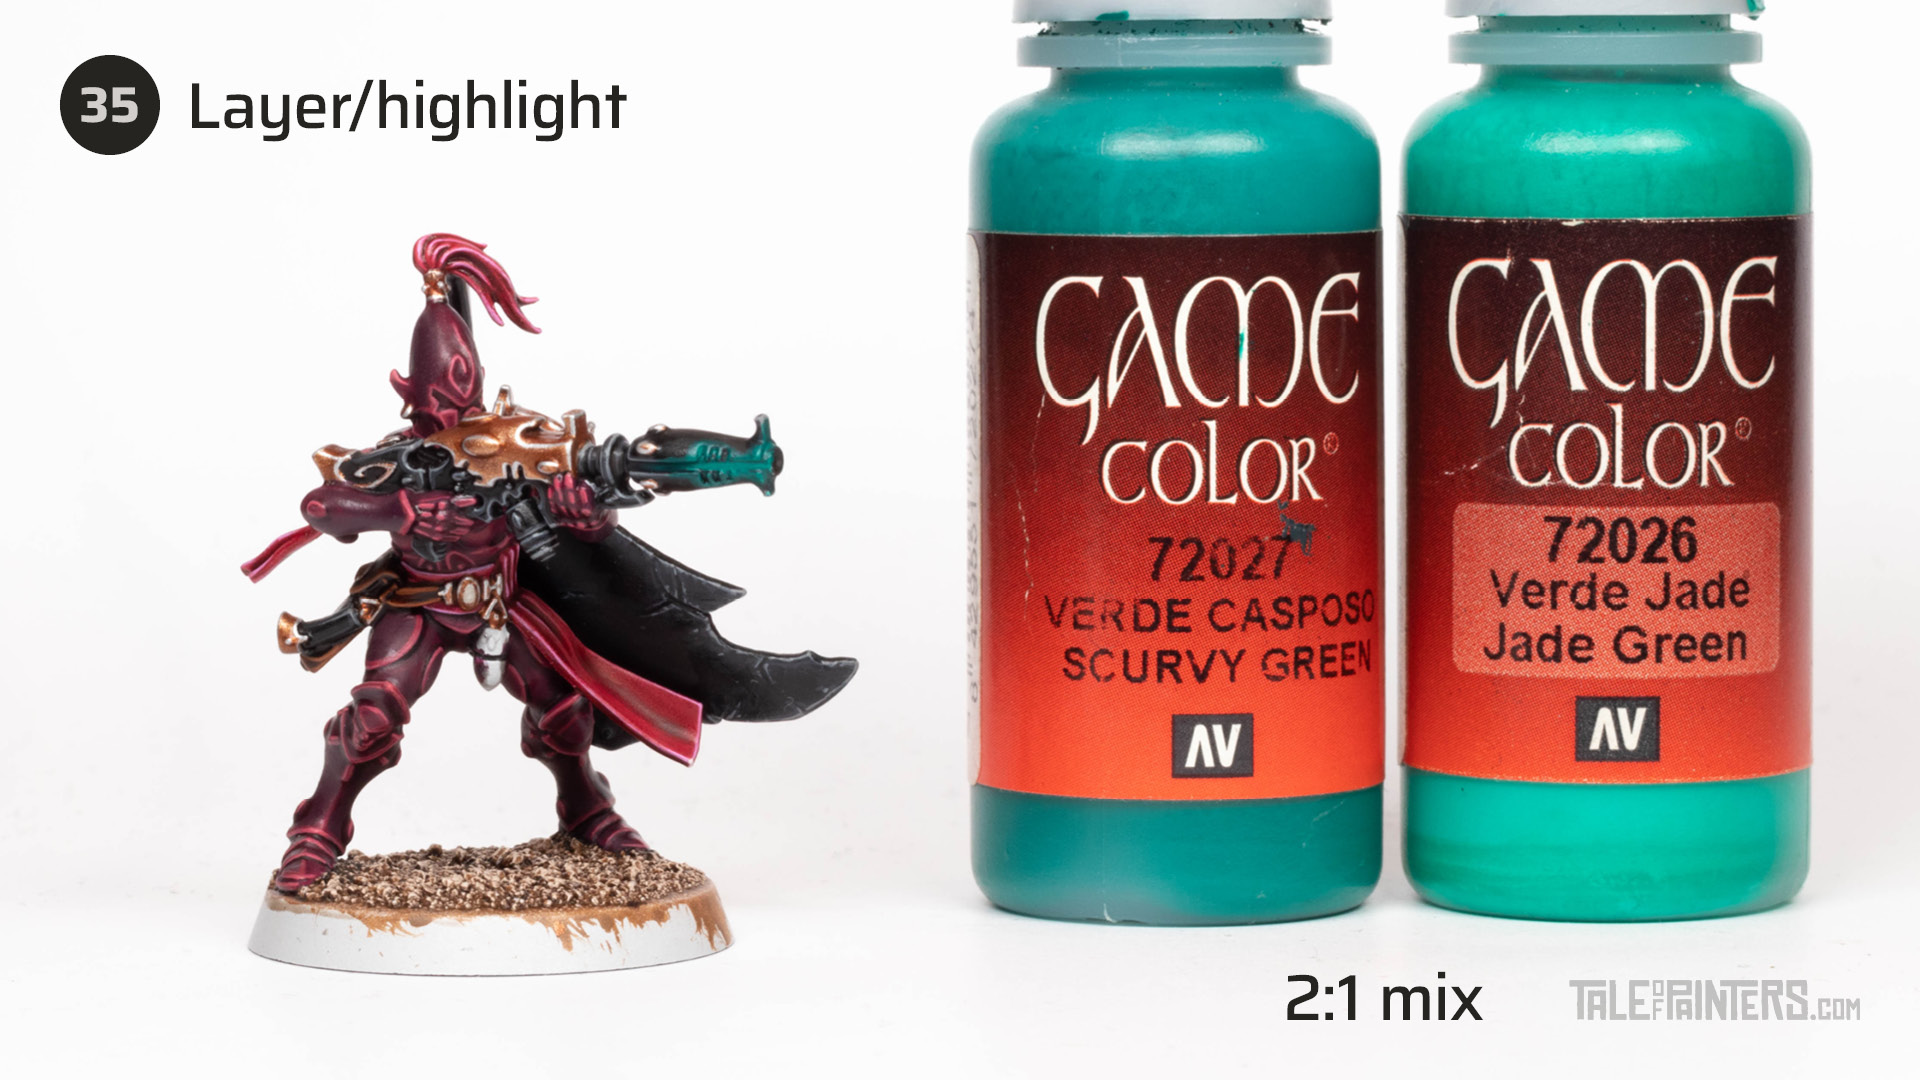

Paint the front half of the core with a 2:1 mix of VGC Scurvy Green and VGC Jade Green [or Lupercal Green and Kabalite Green].
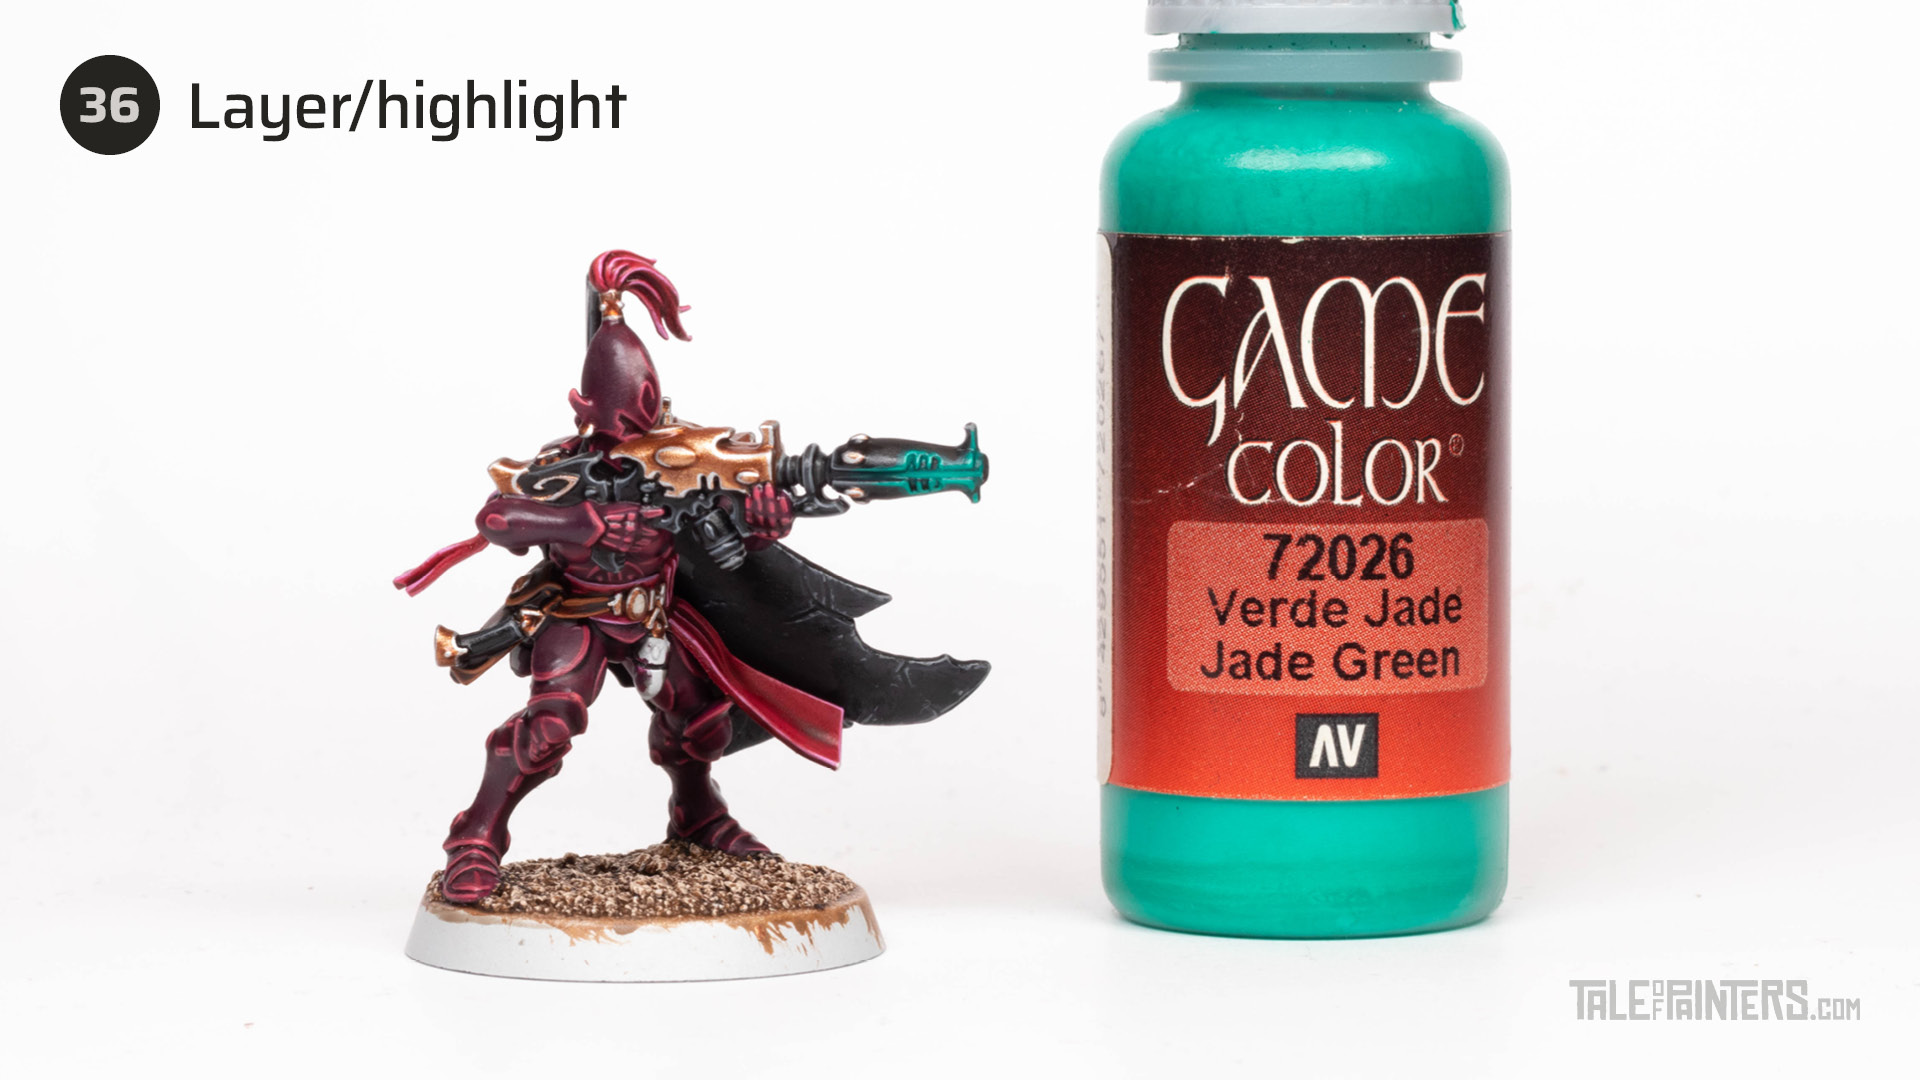

Paint the front two-thirds of the core with VGC Jade Green [or Kabalite Green] and also apply an even finer edge highlight.
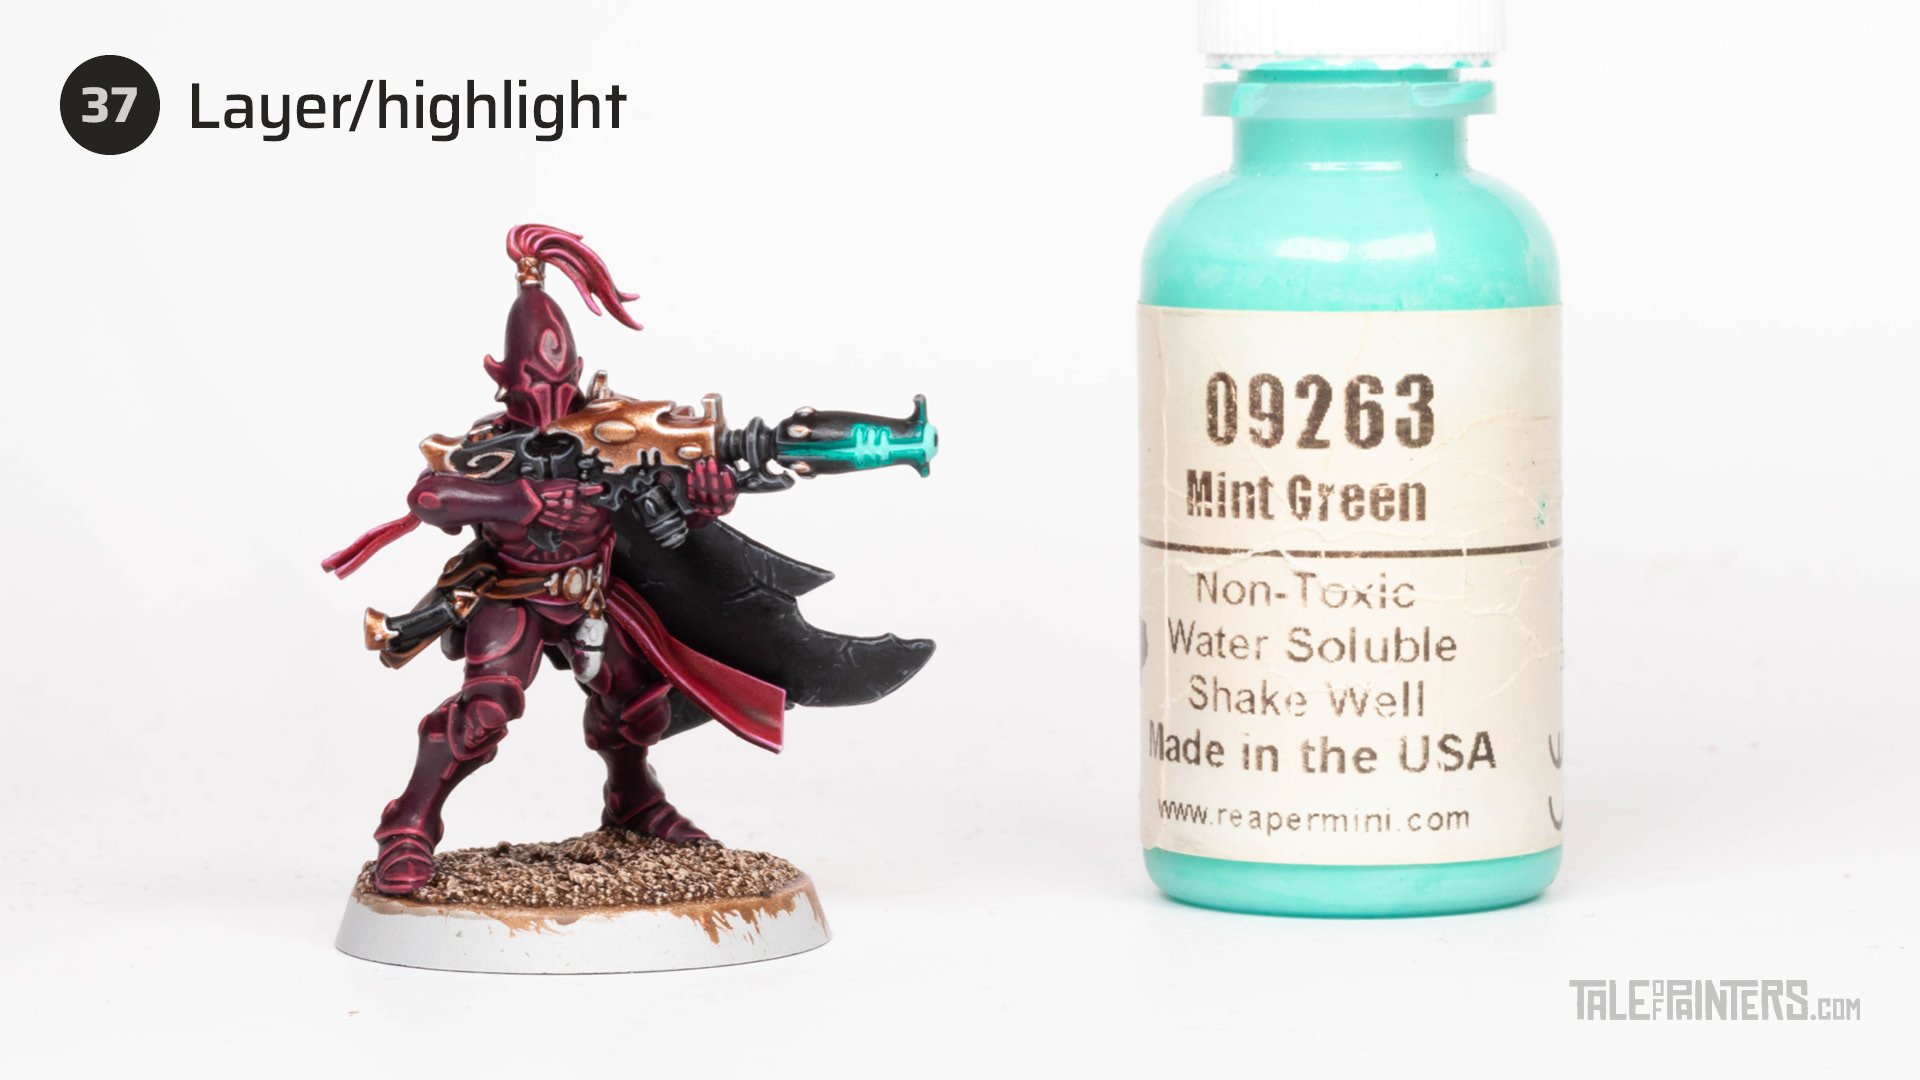

Paint about half of the core and the nozzle with Reaper Master Series Mint Green [or Gauss Blaster Green].
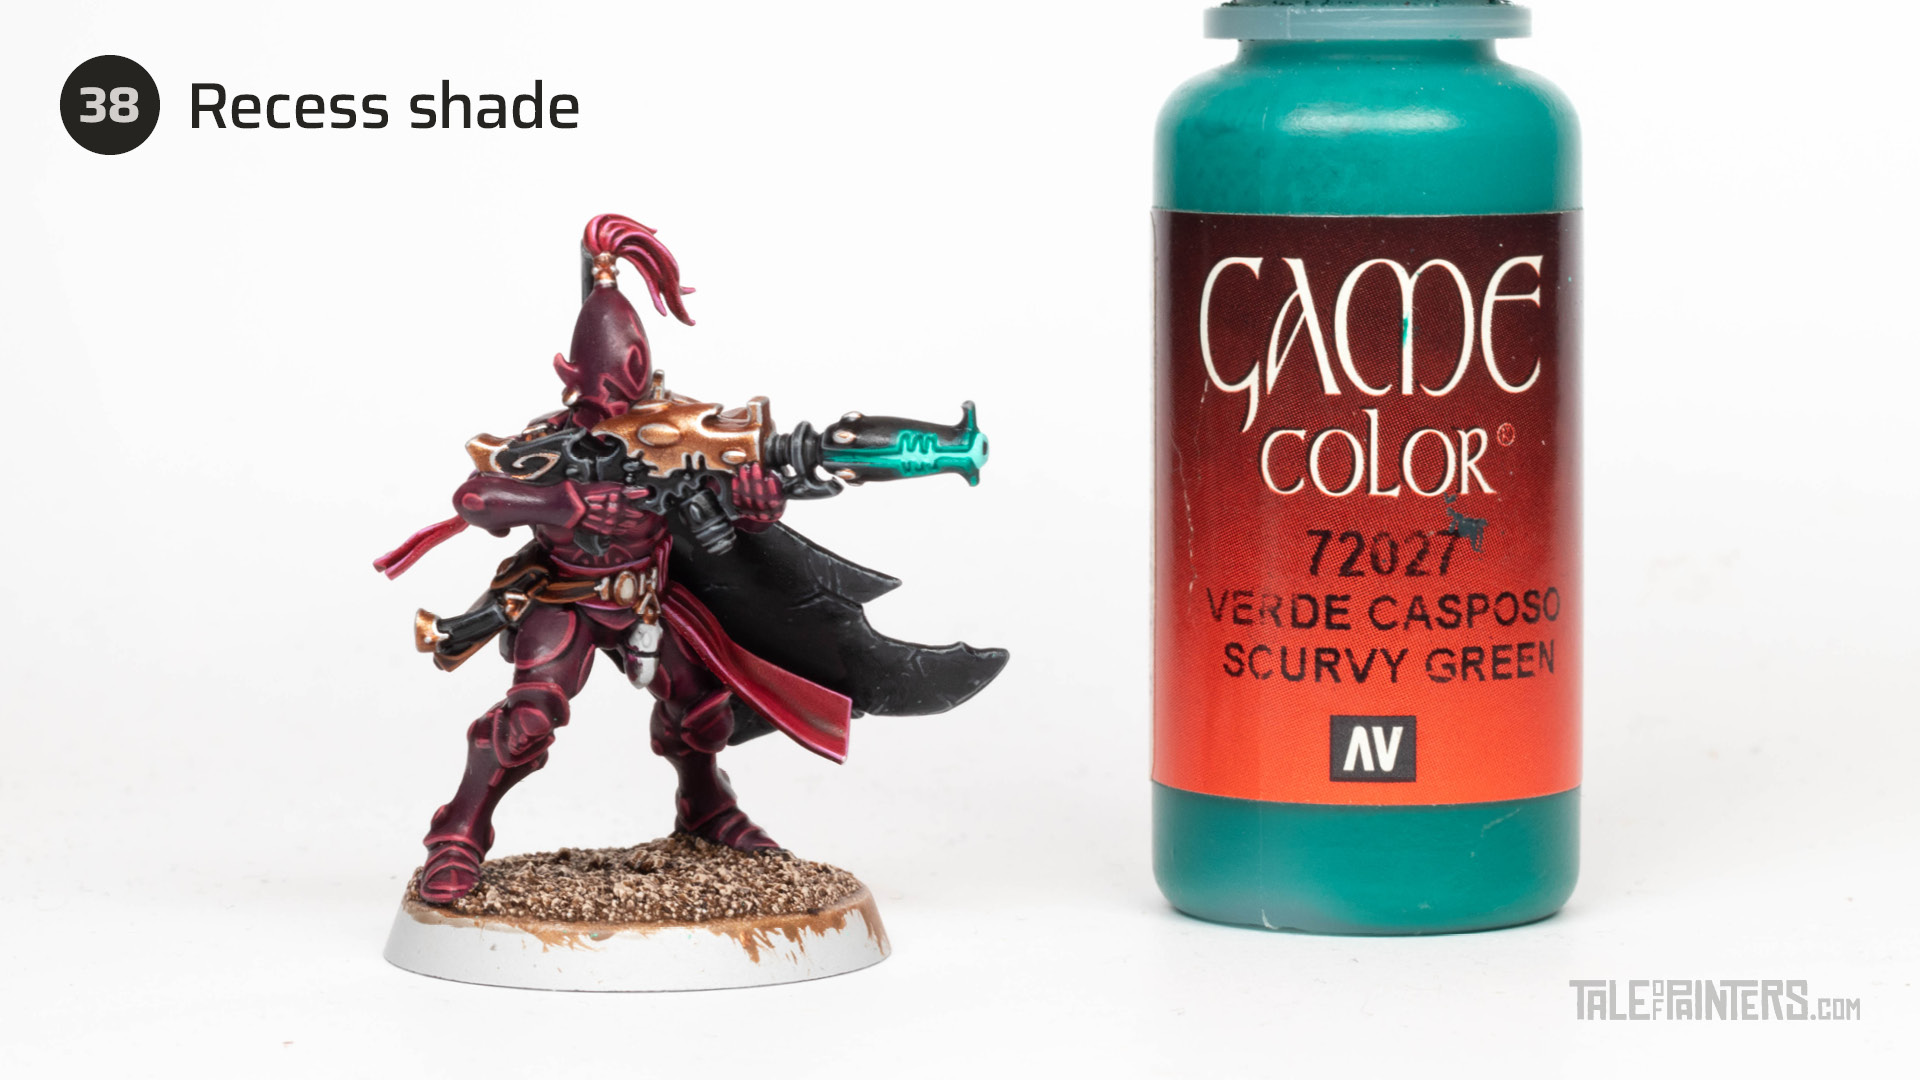

Add a thin line of VGC Scurvy Green [or Lupercal Green] to separate the core from the casing.
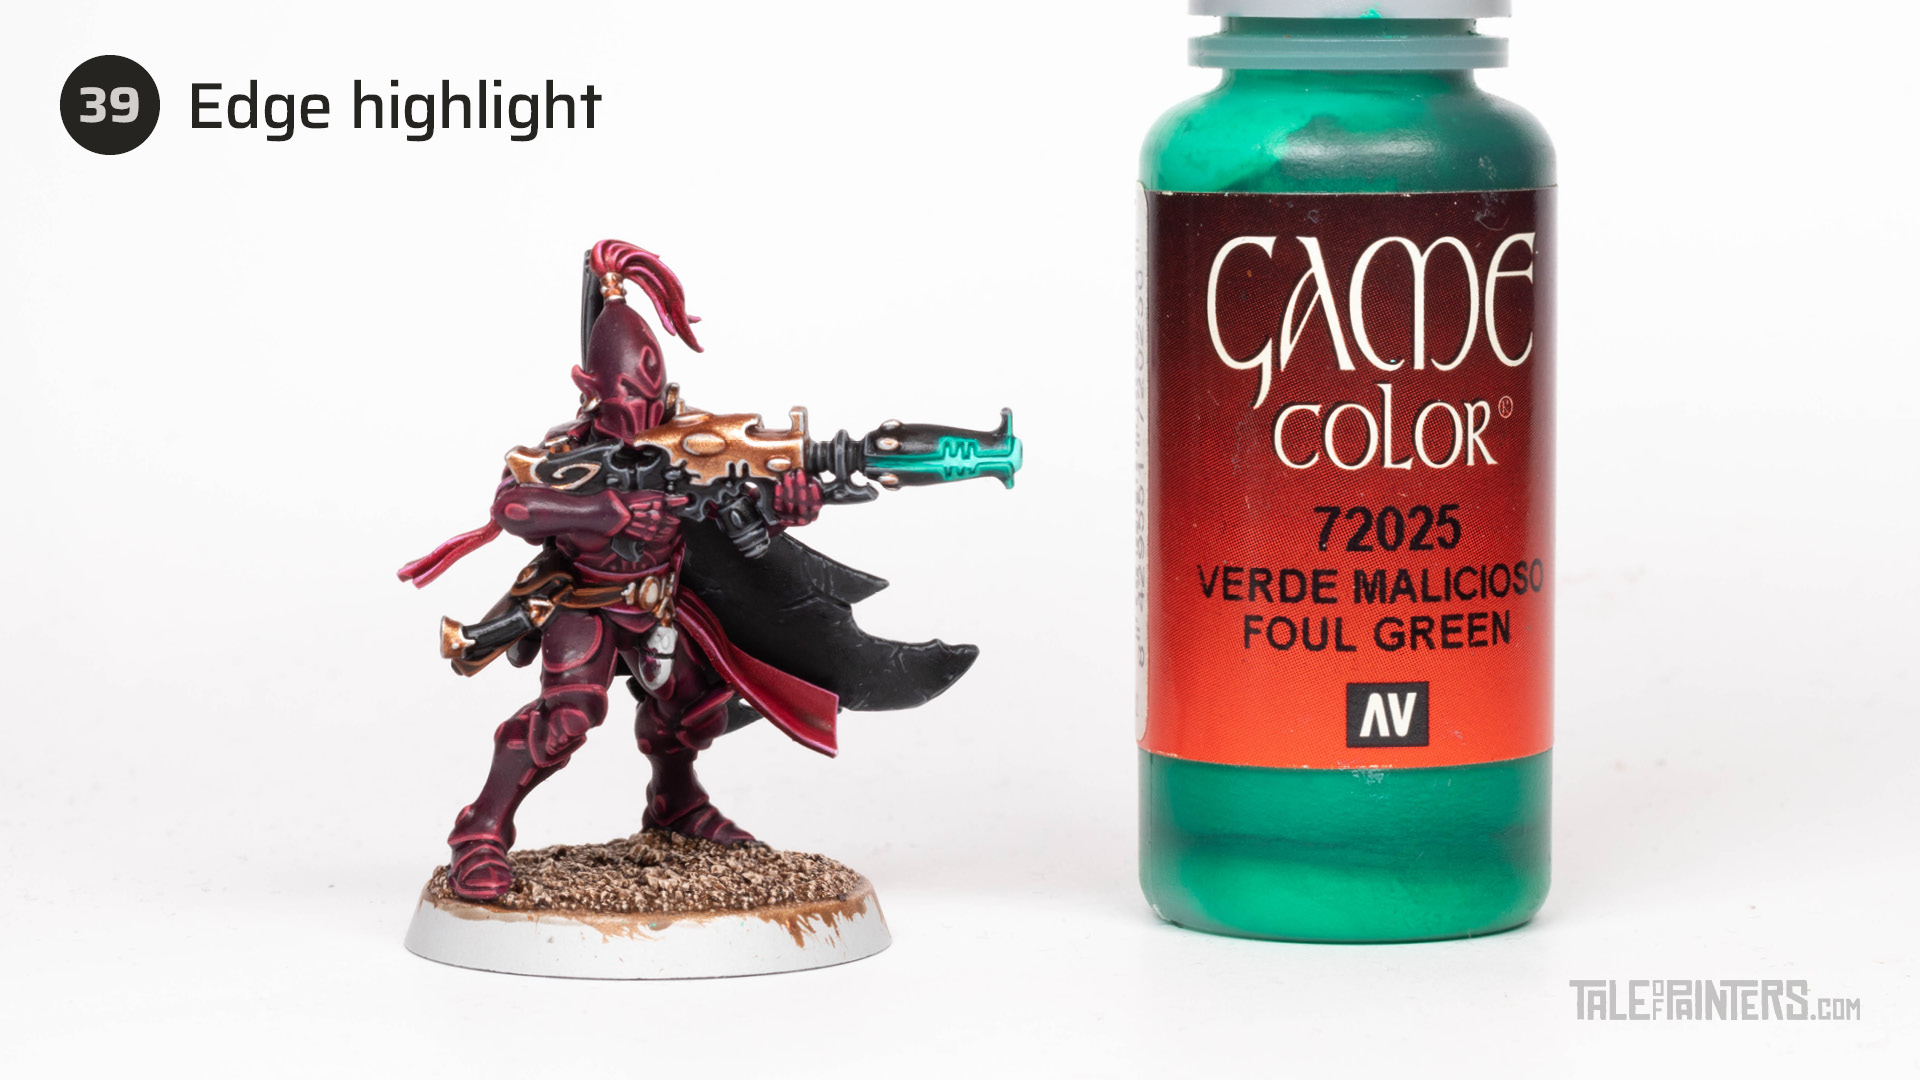

Use VGC Foul Green to smoothen the gradient of the core section and to highlight the front of the barrel to intensify the source lighting effect.
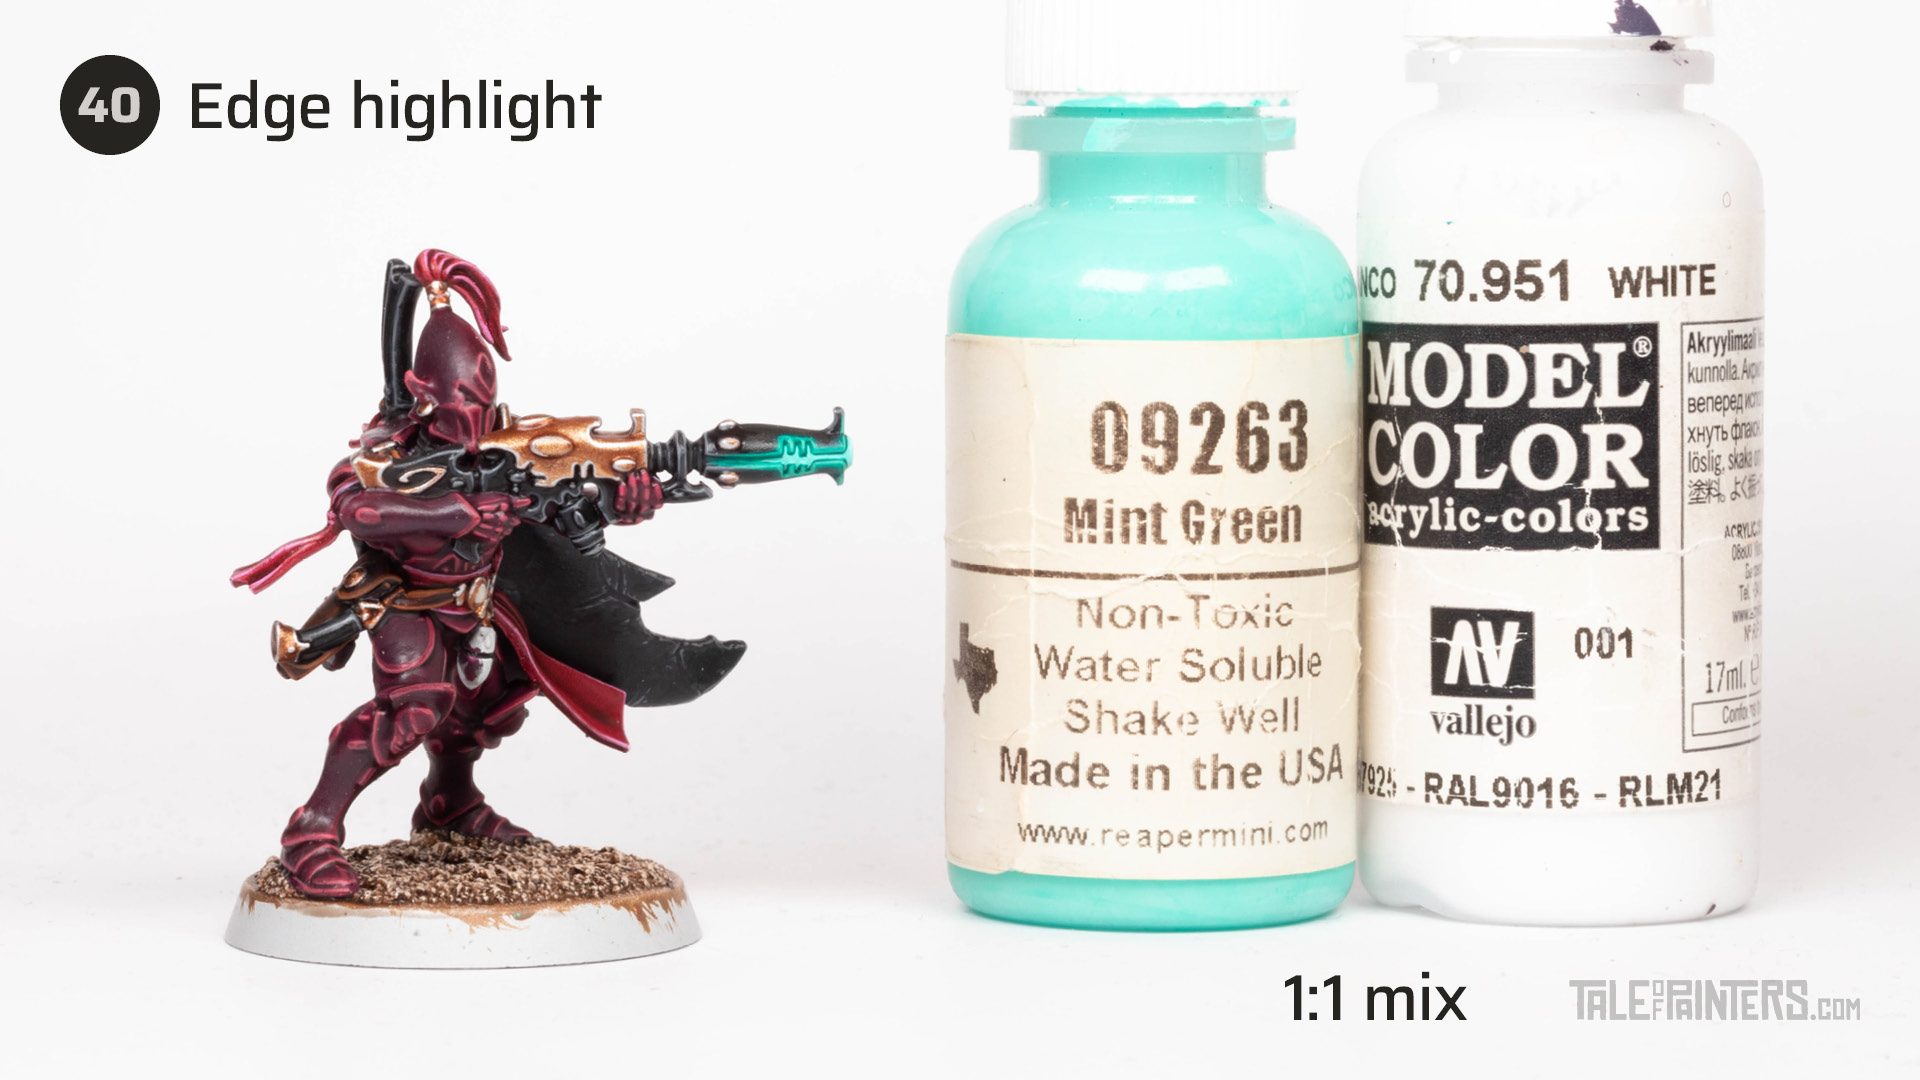

Highlight the nozzle with a mix of RMS Mint Green and VMC White [or Gauss Blaster Green and White Scar].


Place a dot of VMC White [or White Scar] in the barrel.
I also have a slightly easier & faster glow tutorial that utilizes the unique properties of Nihilakh Oxide technical paint, check it out here.
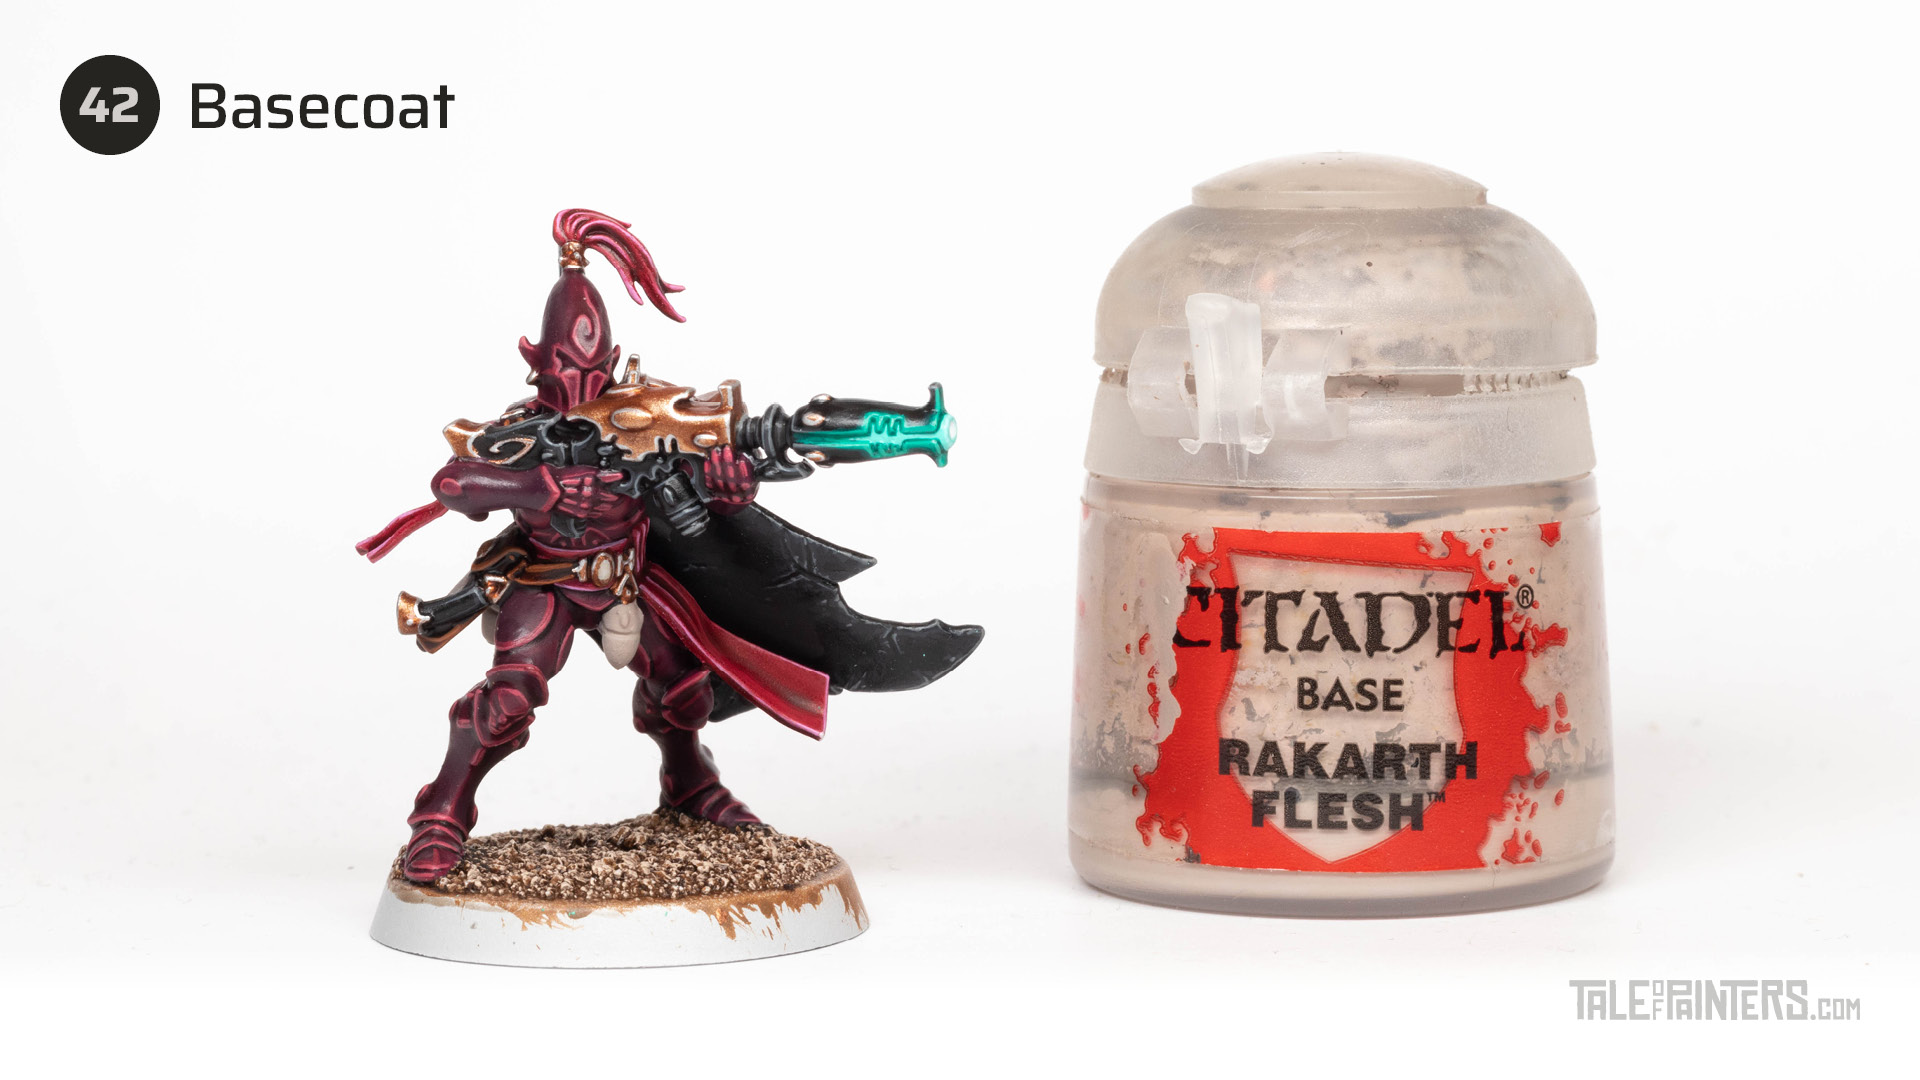

Basecoat the grenades with Rakarth Flesh.
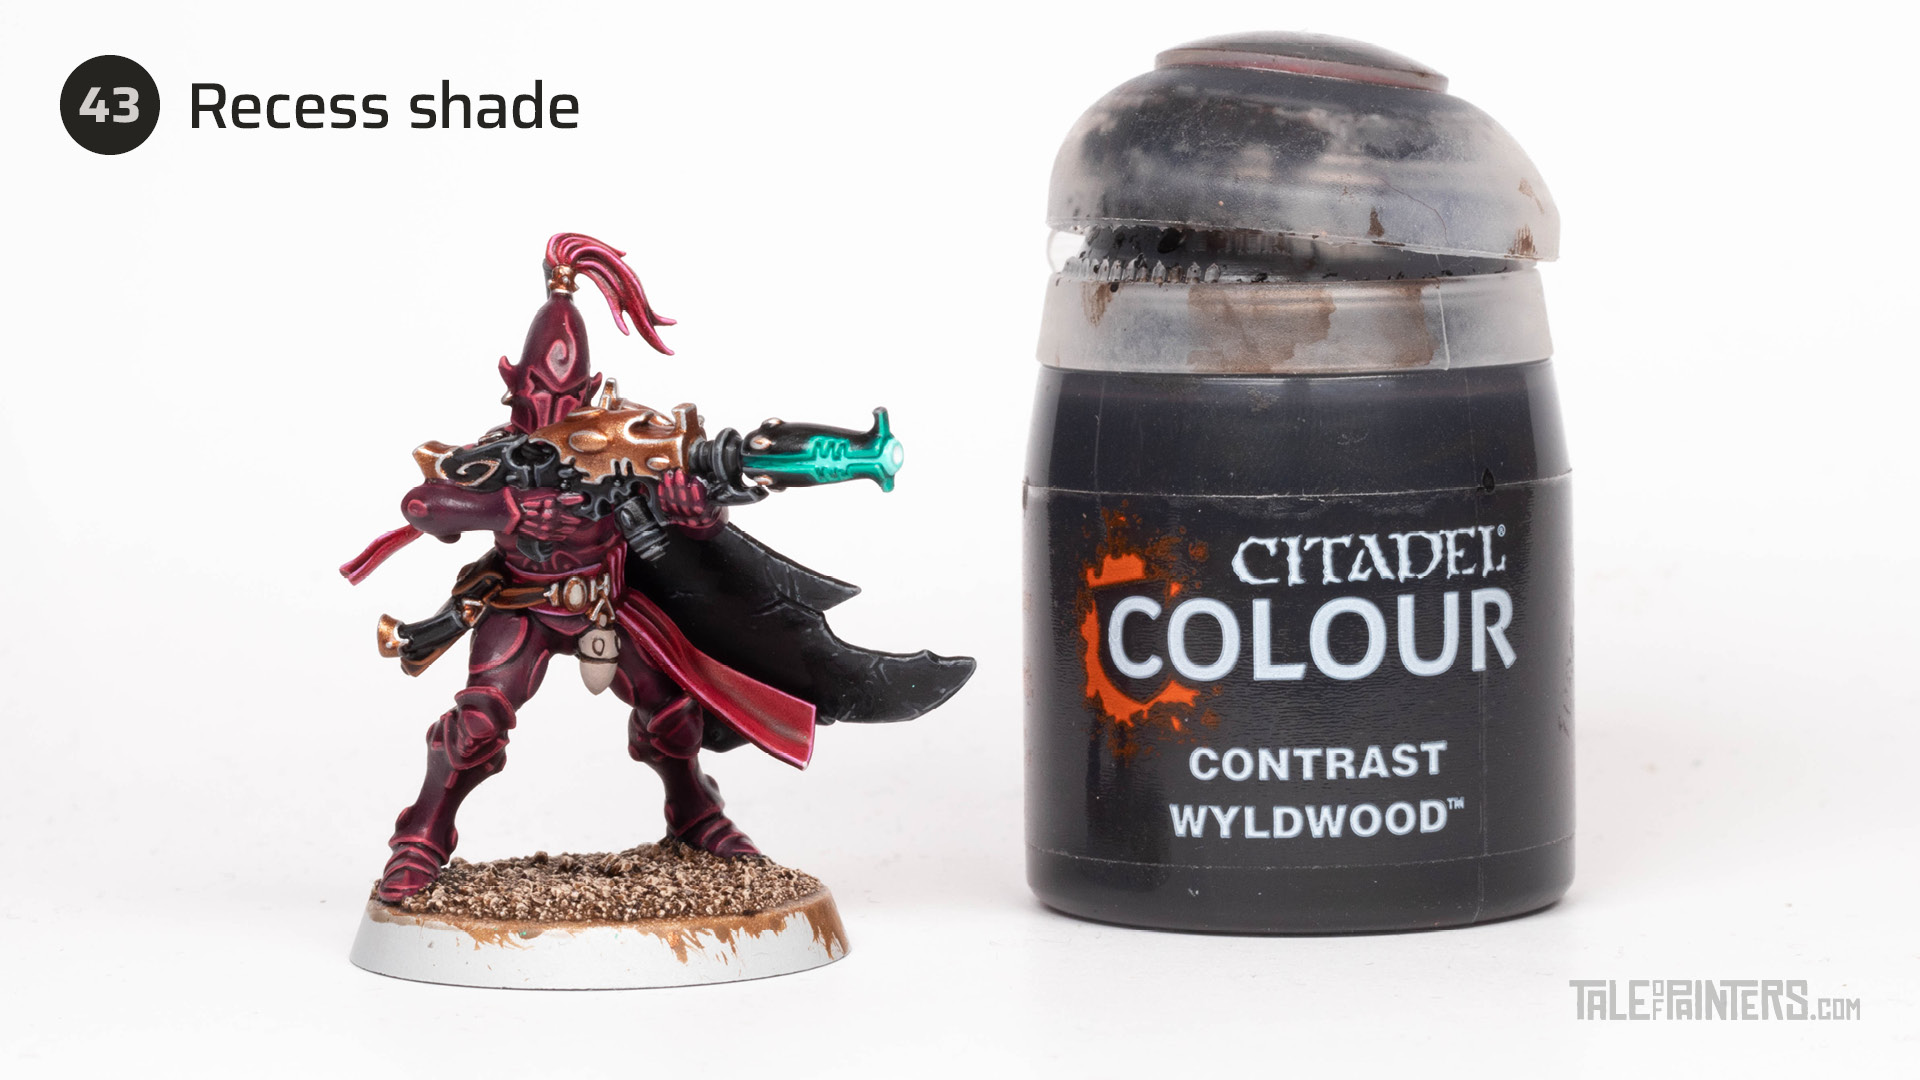

Apply a recess wash of Wyldwood, then clean up with Rakarth Flesh.
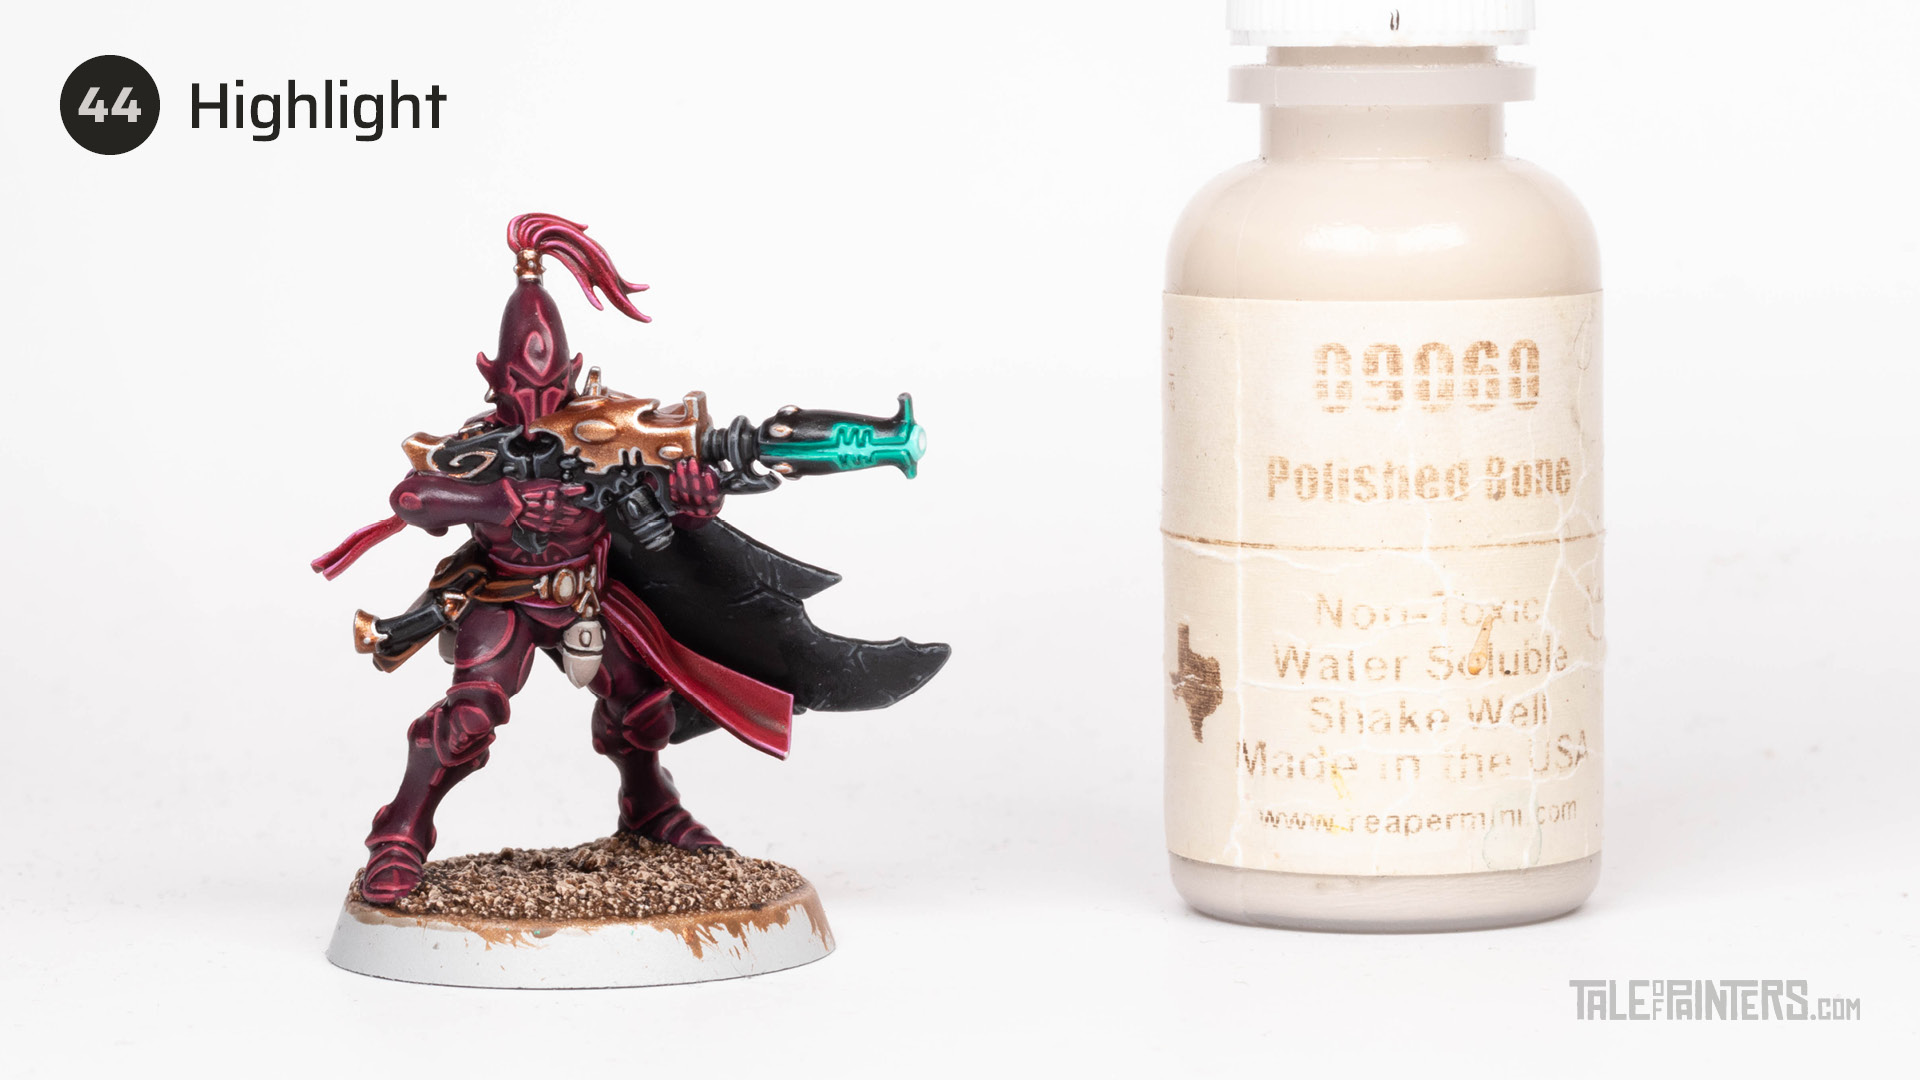

Highlight the grenades with Reaper Master Series Polished Bone [or mix Rakarth Flesh with Pallid Wych Flesh or White Scar].
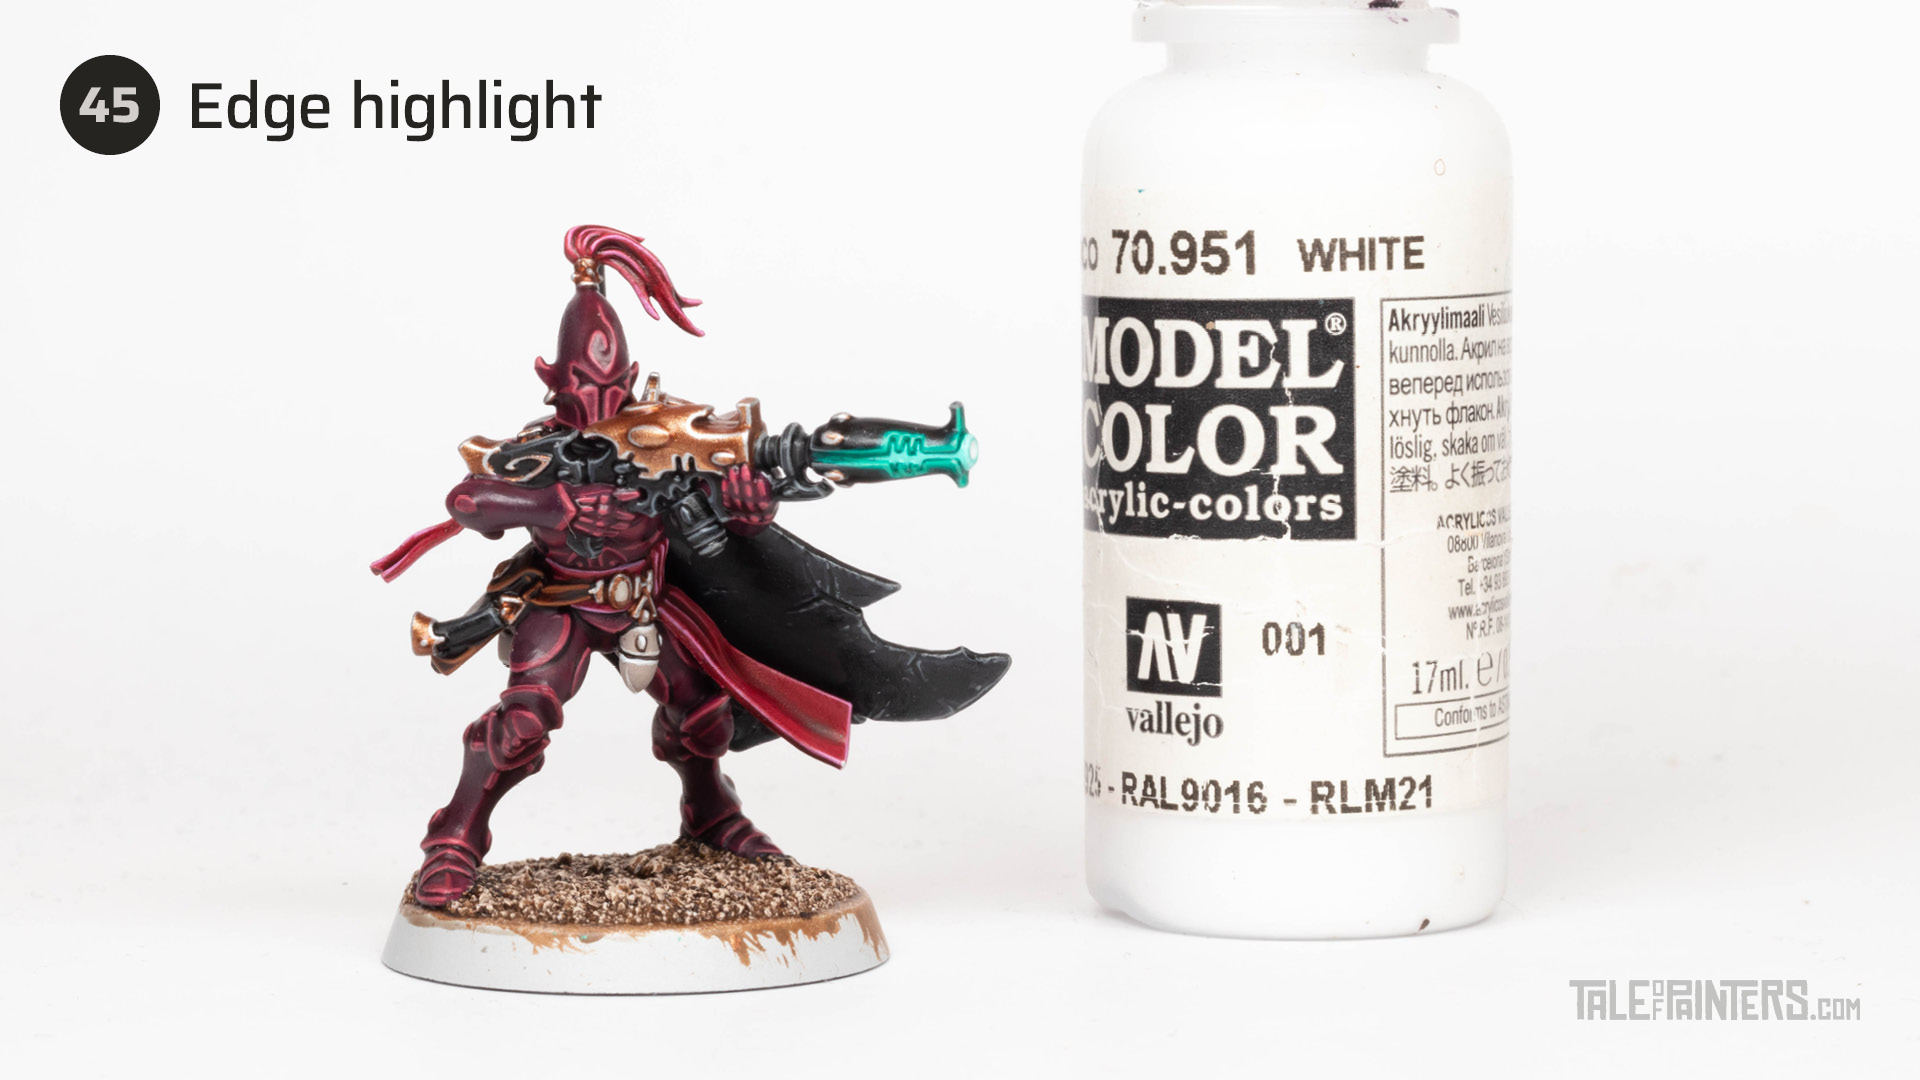

Add a finer edge highlight of VMC White [or White Scar].
How to paint Aeldari Corsairs – gems and lenses
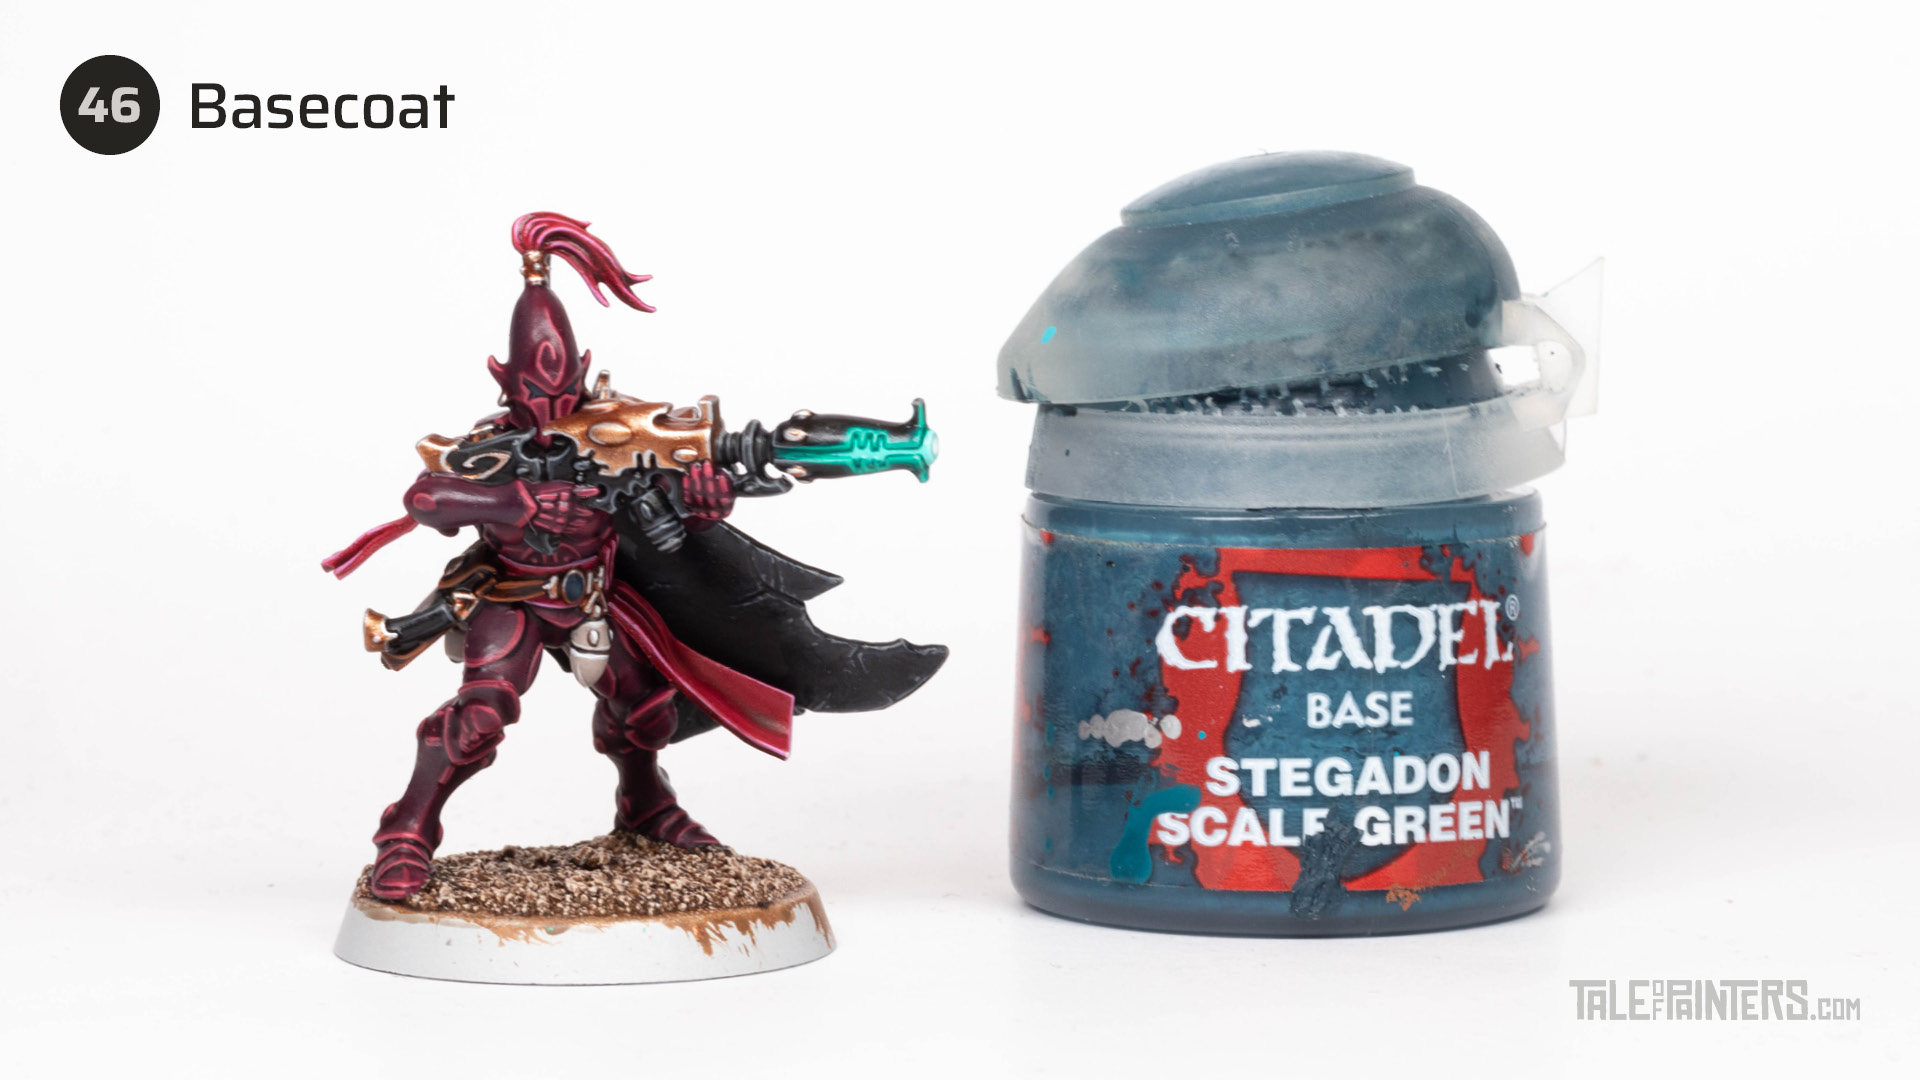

Basecoat the gems and eye lenses with Stegadon Scale Green.
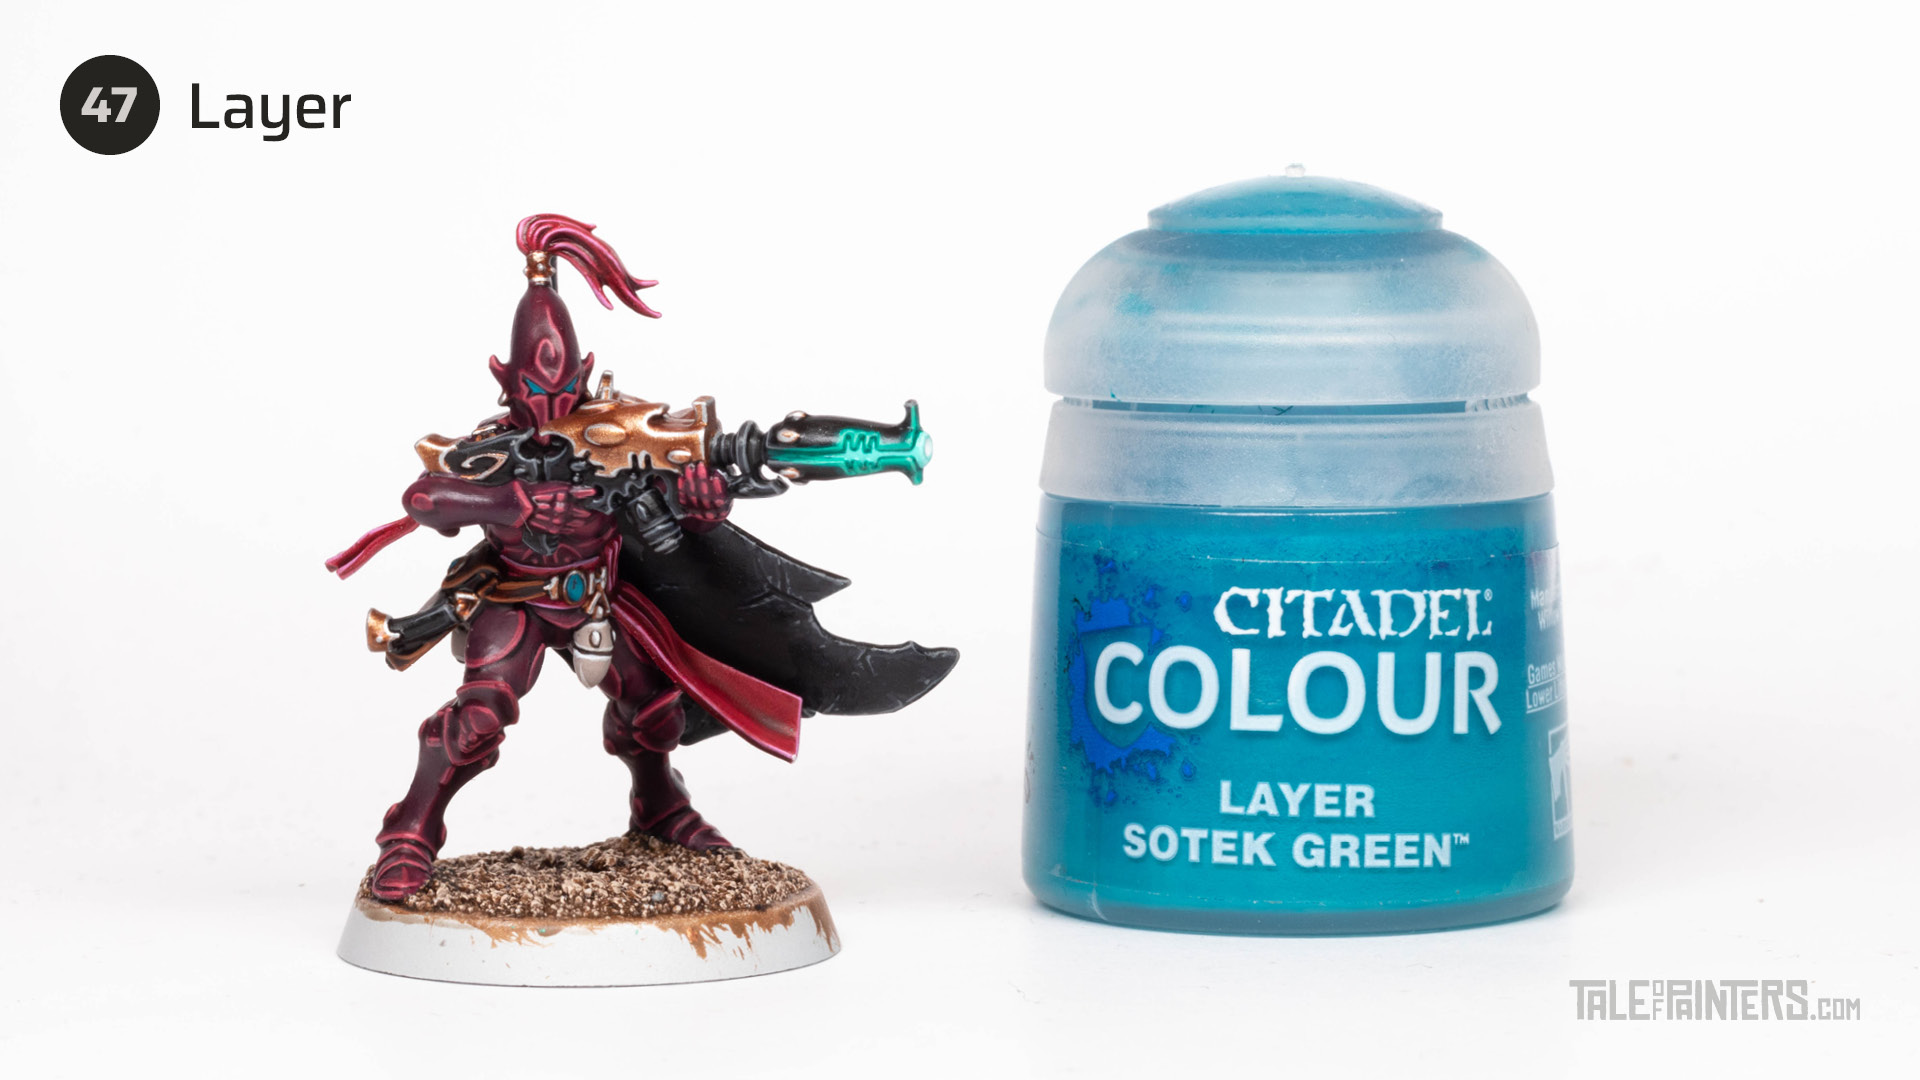

Layer the gems with Sotek Green while sparing a circle in the upper left corner. Also, paint the eye lenses, but leave a thin line of Stegadon Scale Green visible.


Highlight the lower third of the gems with Temple Guard Blue.
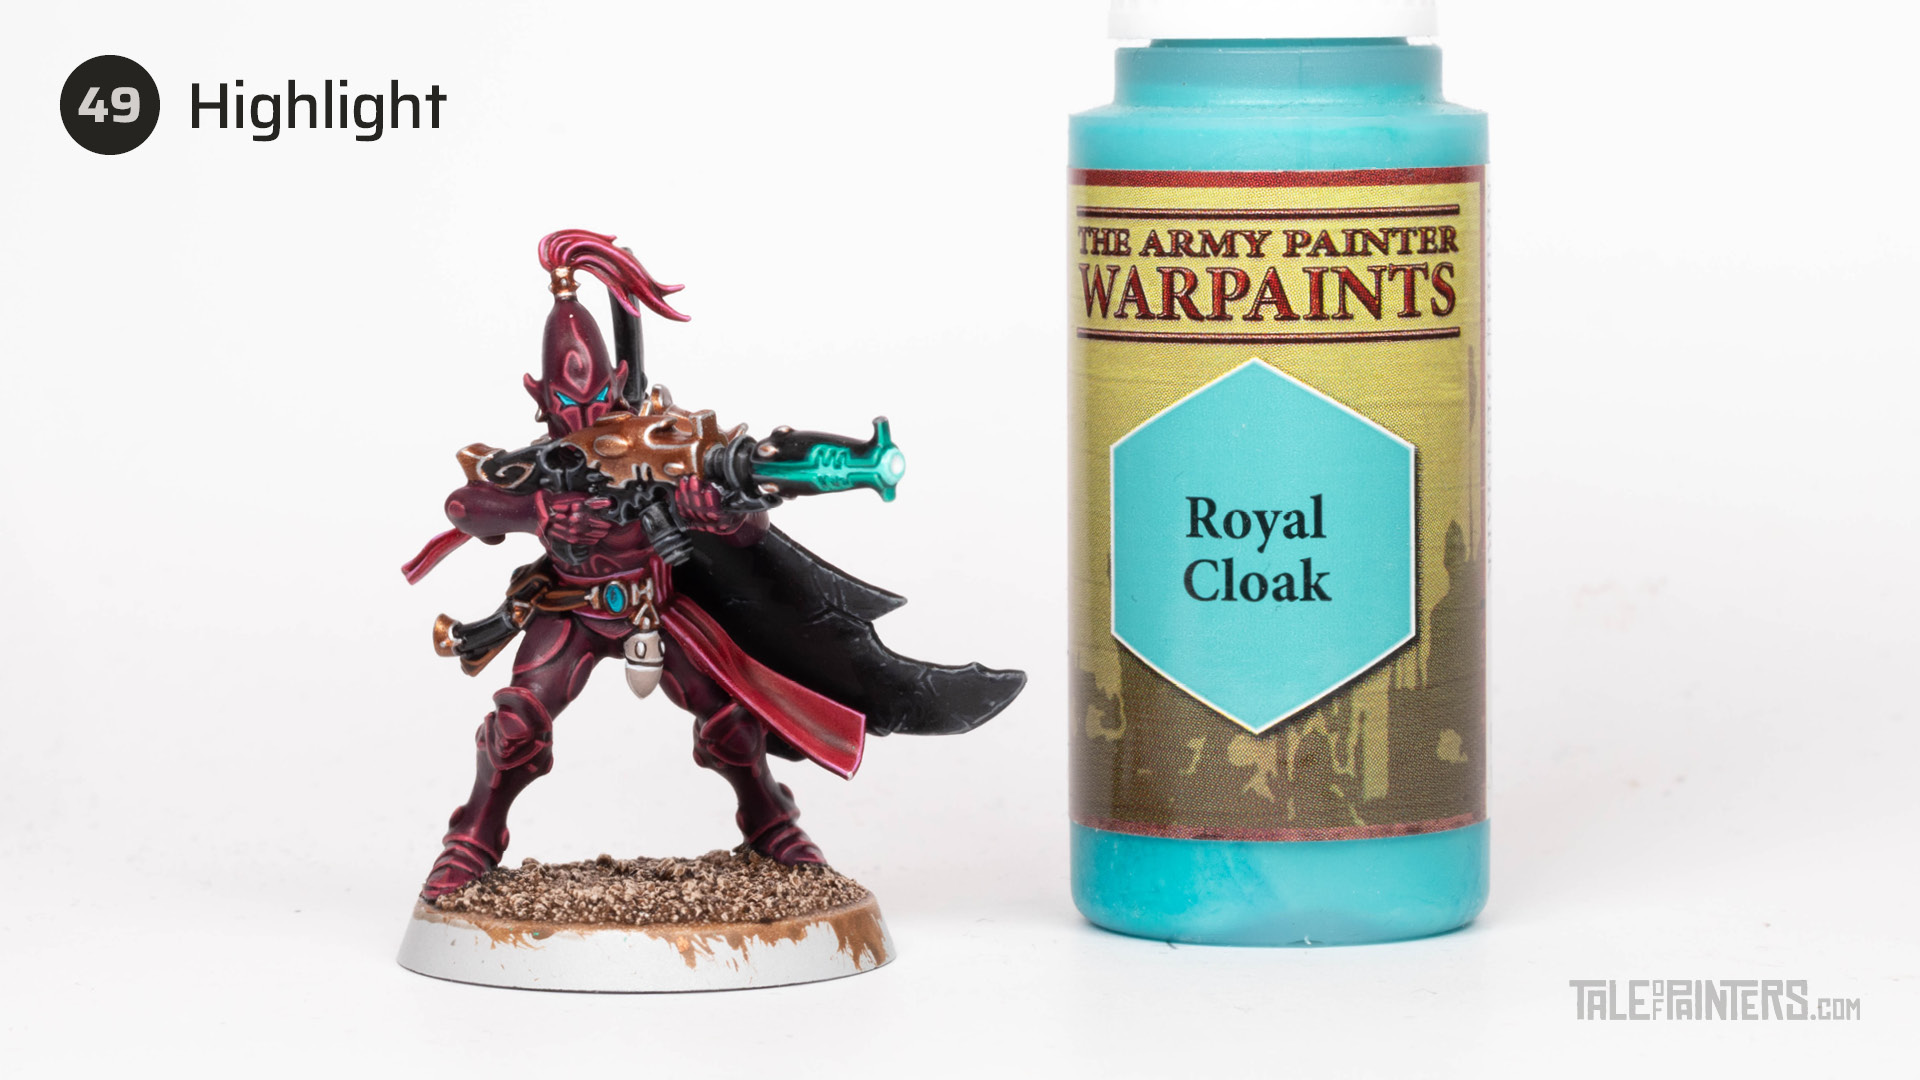

Add an even thinner highlight of TAP Royal Cloak to the lower right corner of the gems. Also highlight the lower edge of the lenses as well.
By the way, you can find a more detailed tutorial about painting gemstones here.
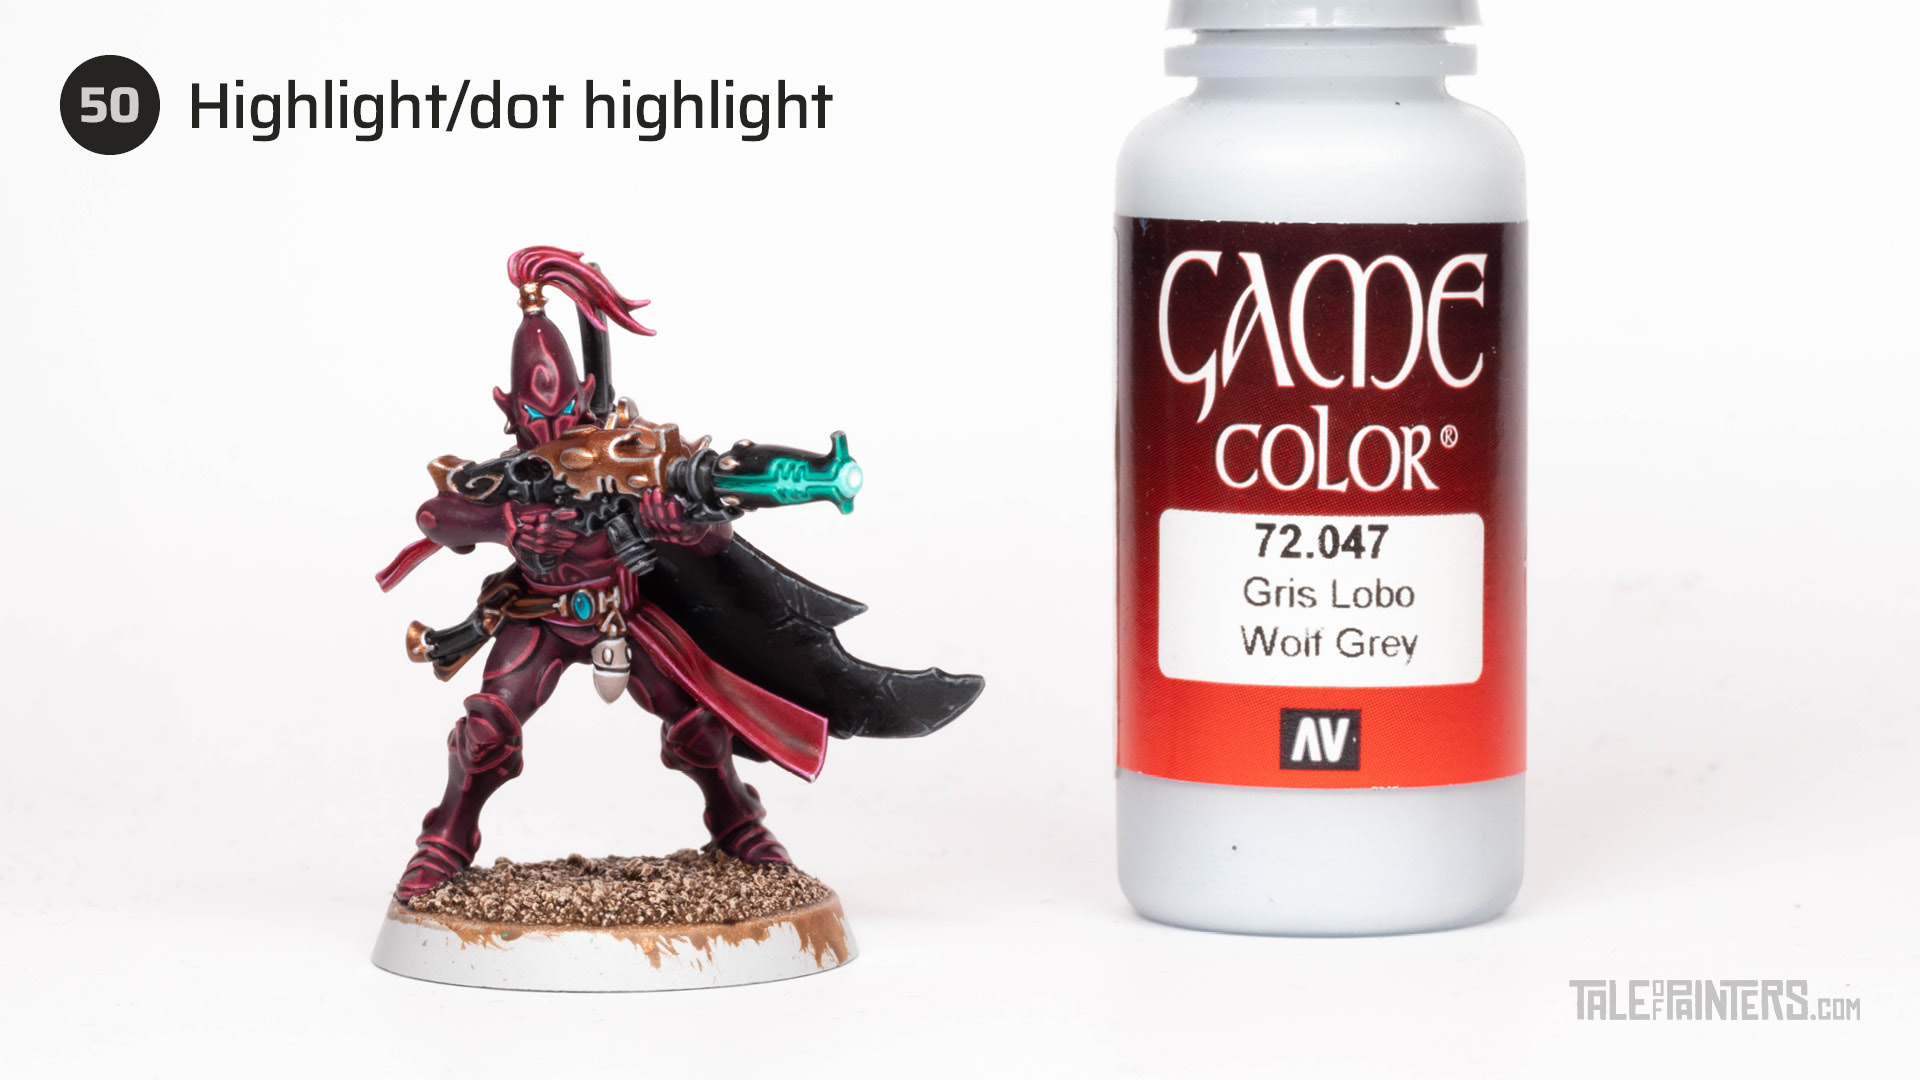

Highlight only the lower right corner of the gems with a little bit of VGC Wolf Grey [or Blue Horror] and place little dots in the upper corners of the lenses and gems.
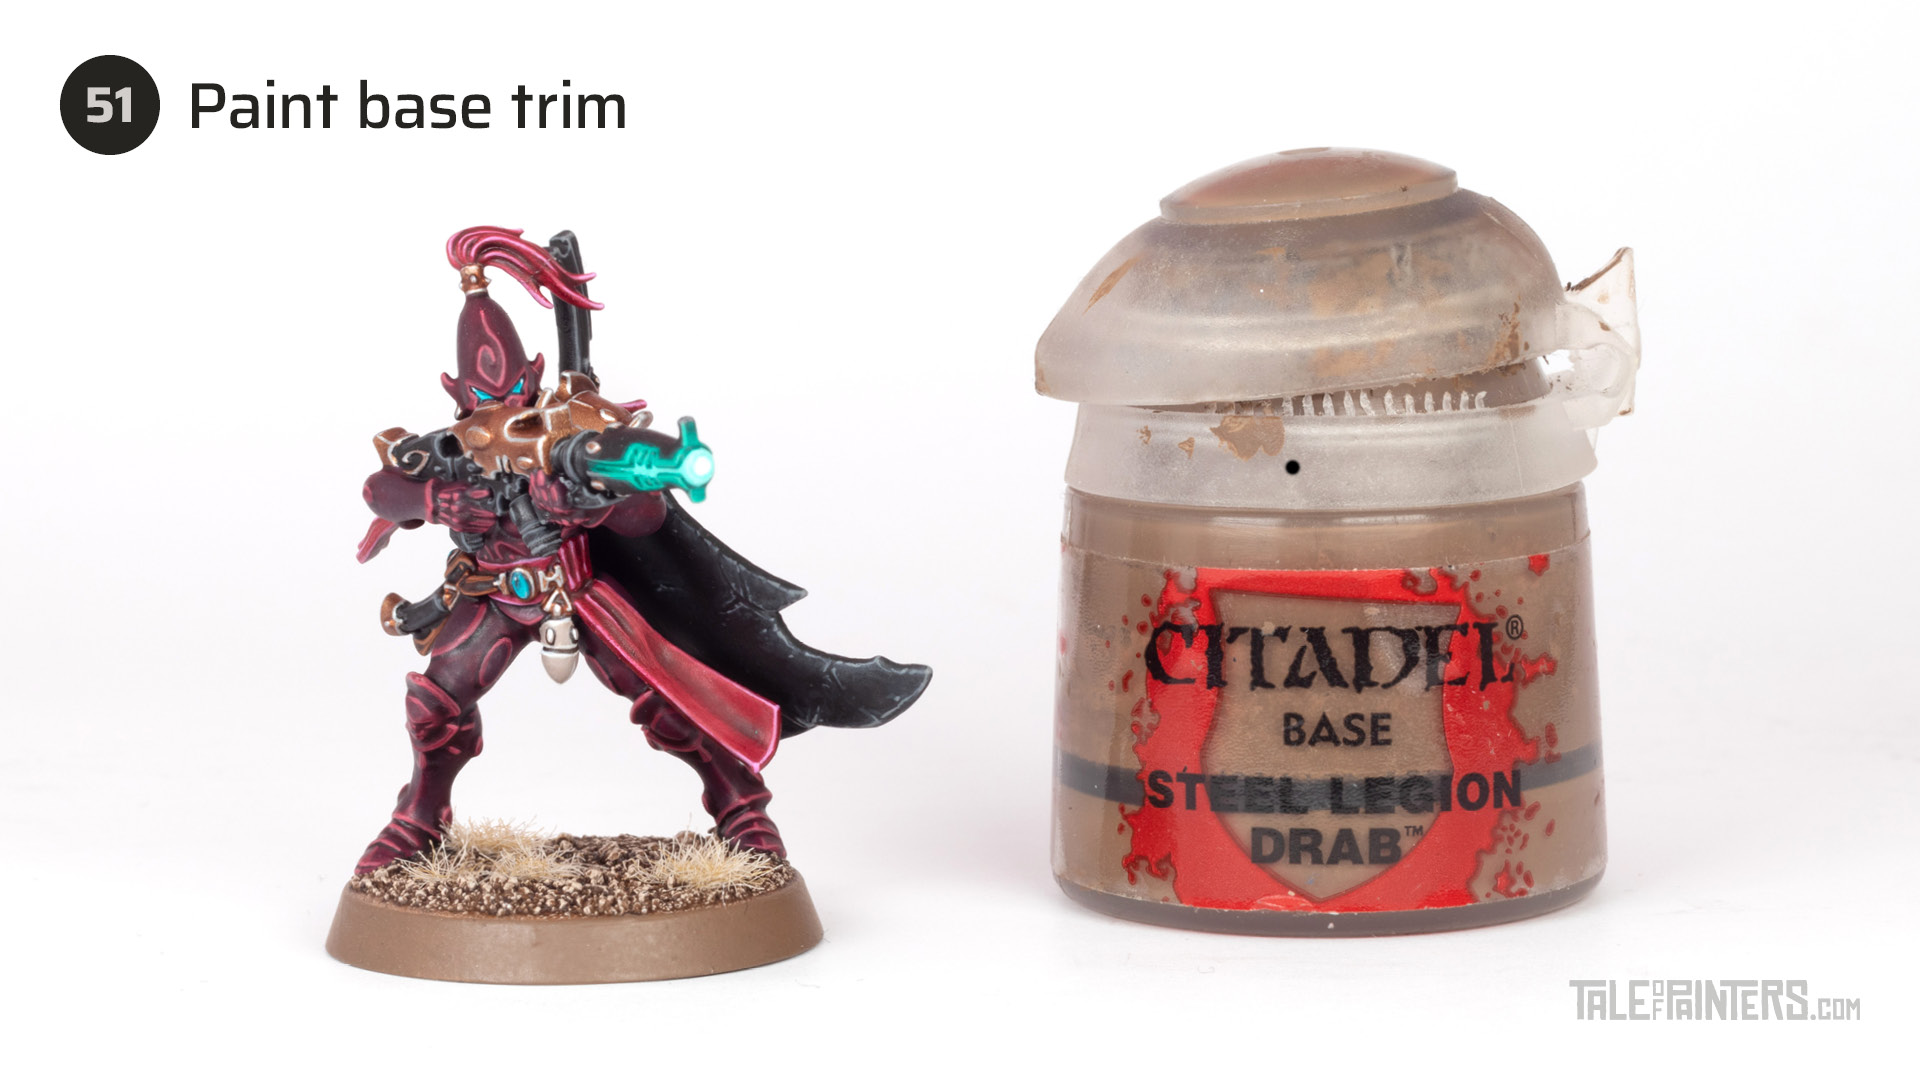

Paint the trims of the base with a few thin coats of Steel Legion Drab.
Finished model & paint list
And here we have the finished Aeldari Voidscarred Corsair. I added some arid static grass from Gale Force 9 and gave it a coat of Mr Topcoat Premium Flat (you can find my favourite matt varnishes here). I imagine this Voidreaver to be from the Twilight Swords. There is no official paint scheme for these yet, but from the background section, we know these are clad in red and gold, which would be a nice fit for my deep red and bronze paint scheme.
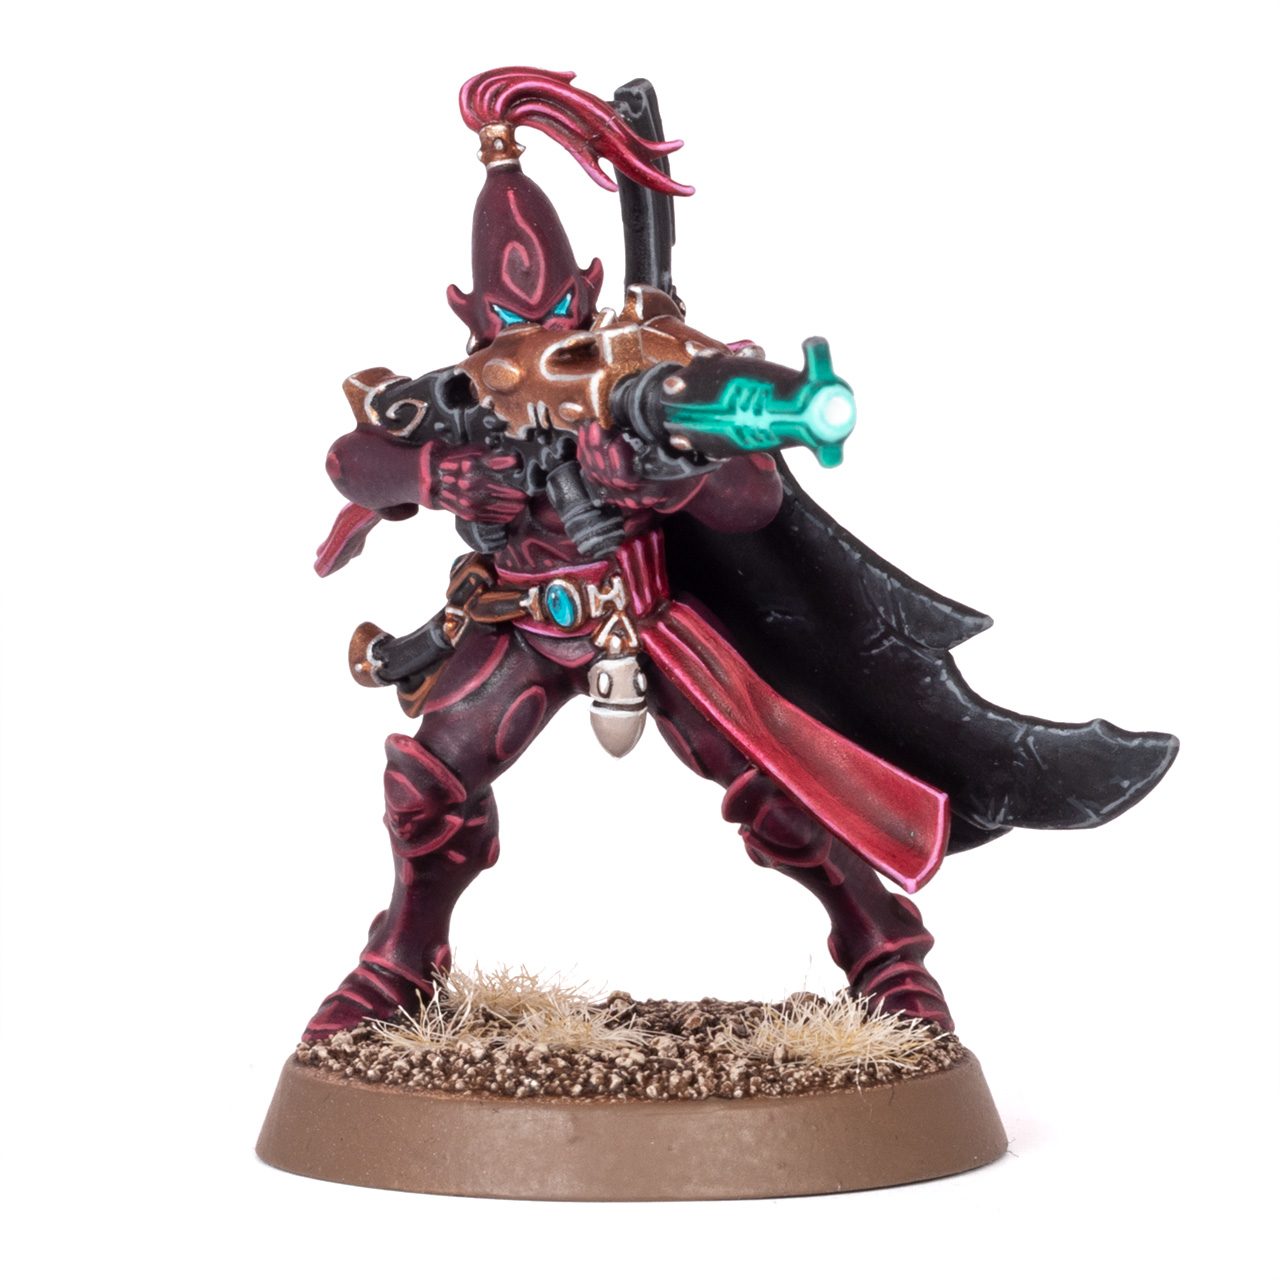

The crimson sashes and details could also represent a Corsair warband aligned with the Ynnari, and you could also use this tutorial to paint a more burgundy Visarch. If you paint the helmets black and bone, this tutorial also makes a great painting guide for Craftworld Altansar.
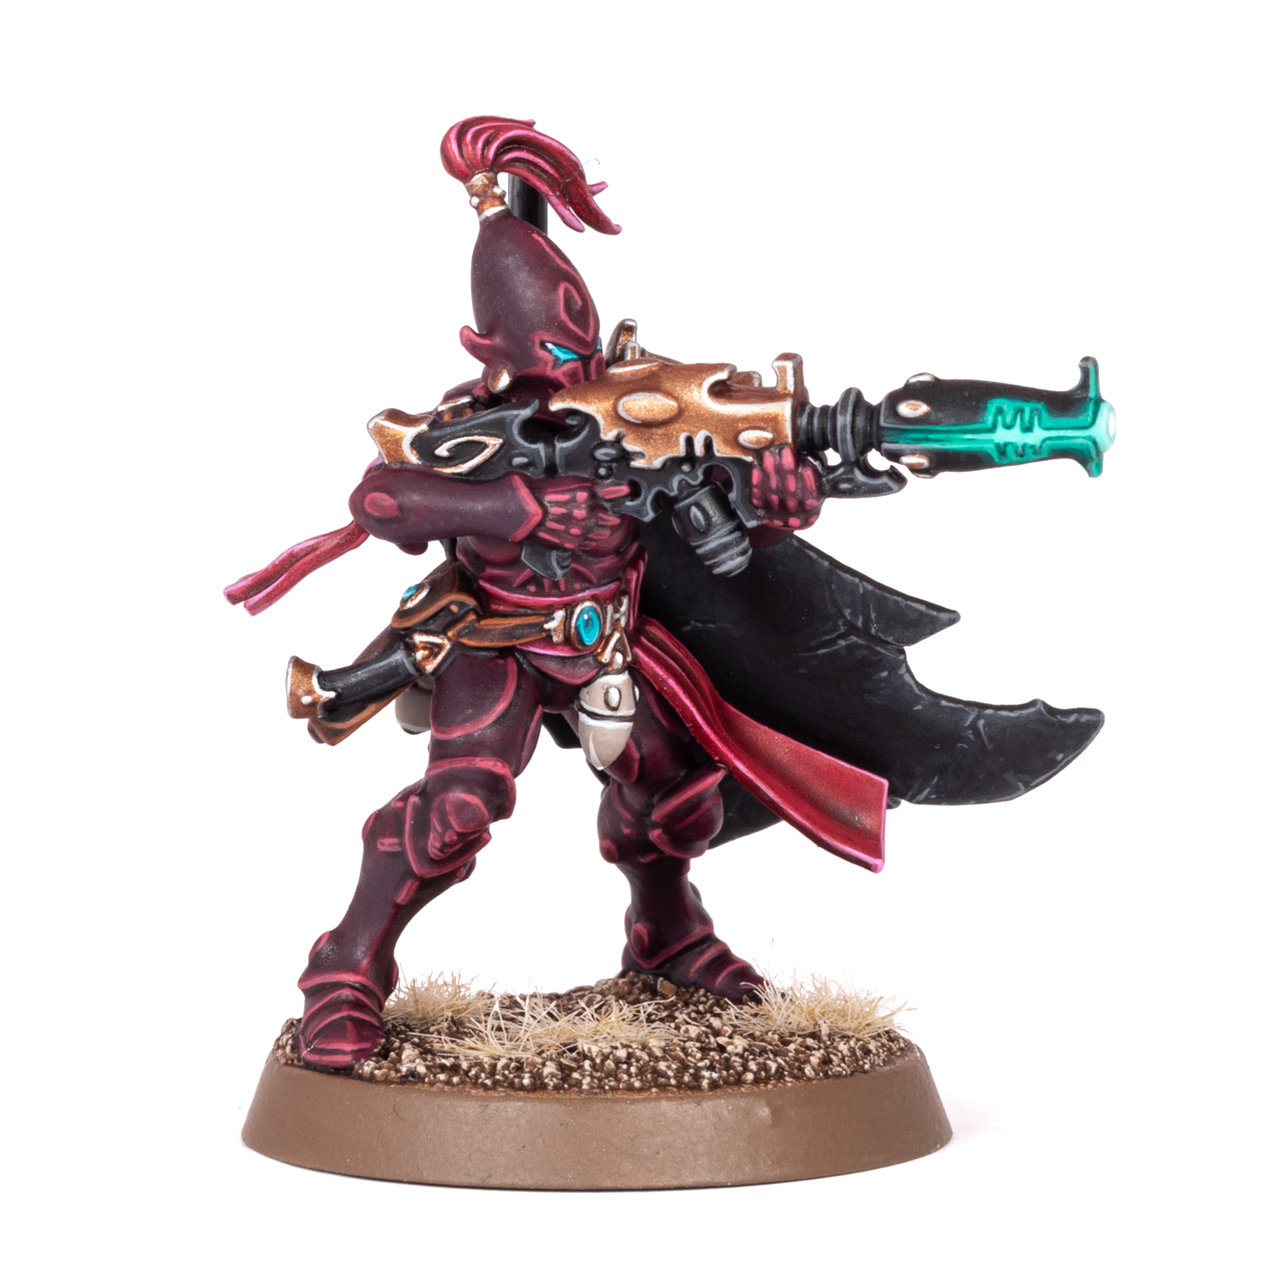

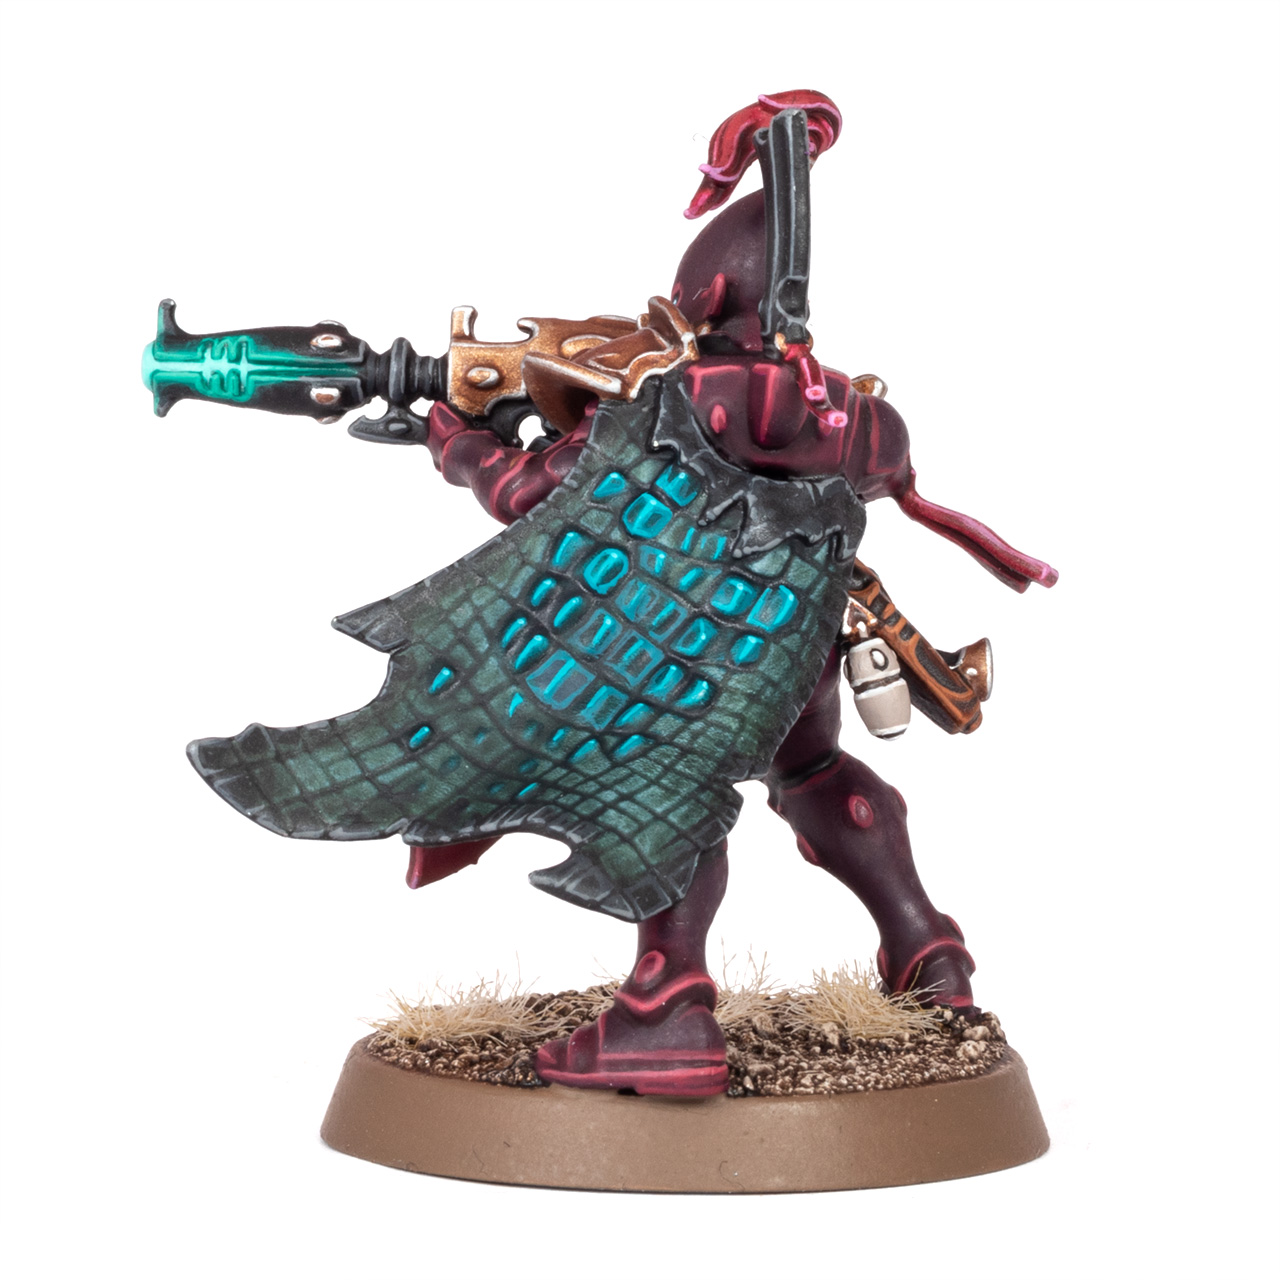

If you want to have your own squad of Voidreaver Corsairs, you can preorder the Kill Team Nachmund box from our partner stores Wayland Games, Element Games and Taschengelddieb with up to 20% discount and support us at the same time. Remember, this box is another of those single print run boxes Games Workshop loves so much lately, so when it’s gone, it’s gone. Judging from the Kill Team: Chalnath box, it will take at least three months for the kits to be released separately, and buying all the individual releases will of course be much more expensive than the box set.
Check out here if the box is still available:
Paints you will need for this tutorial:
Citadel (Games Workshop)
Corax White primer
Corax White
Screamer Pink
Pink Horror
Sotek Green
Stegadon Scale Green
Temple Guard Blue
Baharroth Blue
Dawnstone
Deathclaw Brown
Sycorax Bronze
Rakarth Flesh
Steel Legion Drab
Seraphim Sepia
Wyldwood (Contrast)
Gore-grunta Fur (Contrast)
Akhelian Green (Contrast)
Basilicanum Grey (Contrast)
Contrast Medium
Formula P3
Sanguine Highlight [or Screamer Pink / Wazdakka Red mix]
Bloodstone [or Skrag Brown / Doombull Brown mix]
The Army Painter Warpaints
Matt Black [or Abaddon Black]
Royal Cloak [or Baharroth Blue]
Dark Tone Wash [or Nuln Oil]
Strong Tone Wash [or Agrax Earthshade]
Slaughter Red Speedpaint [or Flesh Tearers Red / Volupus Pink mix]
Vallejo Model Color
VMC White [or White Scar]
VMC Dark Grey [or Eshin Grey]
Vallejo Model Air Steel
Vallejo Game Color
VGC Squid Pink [or Fulgrim Pink]
VGC Scurvy Green [or Lupercal Green]
VGC Jade Green [or Kabalite Green]
VGC Foul Green [or Sybarite Green]
VGC Wolf Grey [or Blue Horror]
VGC Brown Ink [or Gore-grunta Fur]
Vallejo Game Air Brassy Brass [or Brass Scorpion]
Reaper Master Series
RMS Polished Bone [or Rakarth Flesh / Pallid Wych Flesh mix]
RMS Mint Green [or Gauss Blaster Green]
Scale 75
Instant Colors Basilisk Green [or Terradon Turquoise thinned with Contras Medium]
If you need to expand your paint collection to follow the tutorial, check out our partner stores Wayland Games and Element Games, which offer an amazing range of paints at a discount.
Fancy more Aeldari tutorials? Then check out my classic tutorial for painting Craftworld Iybraesil Guardians:
Hope you enjoyed this tutorial. If so, leave a comment or reaction below, and if you got any questions, leave them here so I can answer them for you.


