
Hey guys, recently I got a nice box full of toys from Wayland Games (who also happen to sponsor Tale of Painters so consider the banner in the right if you want to go to Wayland’s site) and
thought I could write up a review article about one of said toys – the
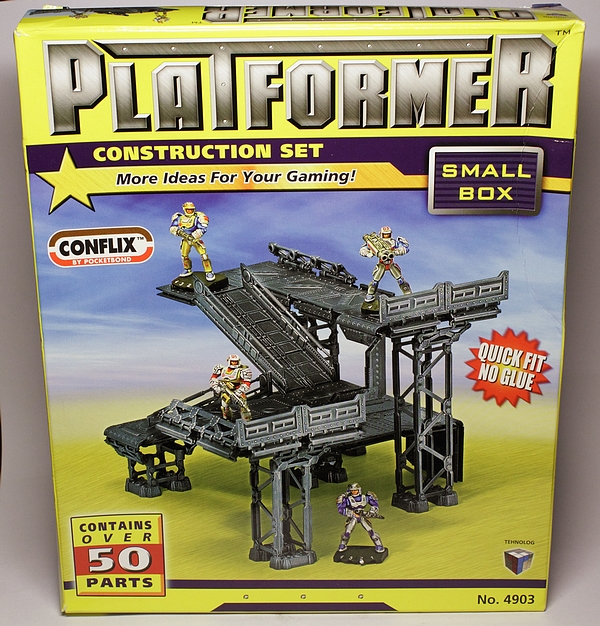
Platformer Construction Set (small box variant). Made in Russia,
distributed by several companies actually. Most notably by CONFLIX and
Pegasus Hobbies.
I’ve had my eyes on this set for a while now, mostly out of curiosity.
It’s not really a beauty judging from the pictures but it surely is
interesting to see how this can be used for tabletop wargaming and the
box promises that it requires no glue at all and it’s all snap-fit.
Let’s see how it really works.

The back of the box showes two more possible configurations and has
the typical blurb which most interestingly lets us know that this set it
meant to build “defensive fortifications”. Judging from the pictures
and kneehigh-at-best walls on the kit this doesn’t exactly scream
“fortifications”. Looks like much fun though as as sort of industrial
area or oil rig.
Now let’s take a look at the sprues you find in the box:


You get one of the sprue in the left and four of the
sprue in the right. The pieces are hard plastic as you will know it from
other manufacturers of plastic models. It’s about as hard as the
plastic Games Workshop use for example but it tends to be a little more
brittle so be careful when cutting these bits from the sprue.
Apart from these five sprues you get an instruction leaflet.


The instructions are clear and well illustrated. This kit doesn’t
require degrees in spaceship engineering but it’s good to have these
instructions so you get an idea how the system works. A curious thing I
noticed – weird stains. Looks a bit like blood. The less asked the
better. 😉
It is also stated how you can use plastic glue if you like but it’s
not required. Just to be sure they also made sure to clarify what glue
does. (“If cement is used the parts cannot be seperated again” ). I
decided to look for myself wether I would use glue or not.
Next let’s take a closer look at the parts:

In terms of casting and detail the parts are very nice actually. Details
are worked out well and casting is sharp along with some elevated parts
giving the single tiles a bit of depth as well. There are very
prominent mould lines in parts but they are usually very well hidden so
that I’d almost say that you don’t have to bother with removing them
(unless they are really, really visible). On the larger parts you will
see varying colouring on the plastic. It may look a bit weird but there
are no notable differences between the shades of colour any any way and
ther are no recesses or anything between them. You can see this on
larger GW minis as well from time to time. The colour of the plastic is a
matte metallic silvery grey by the way.

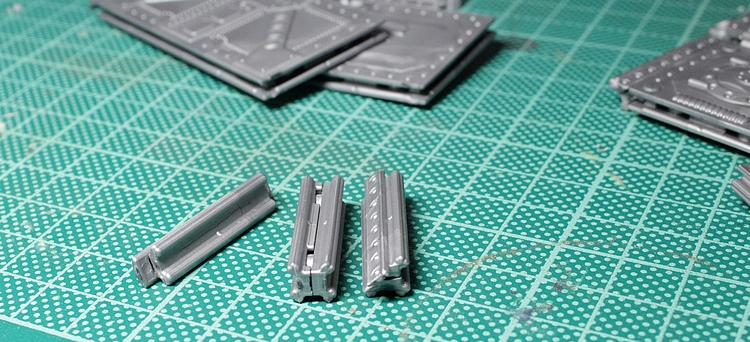
From left to right you got the railings bit for the ramps which
connect levels. Pretty straightforward. The next part is meant to be
used for the aforementioned ramps with each ramp planned to consists of
two of these parts next to each other. The little tweezer-like things on
the ends are positioned at such an angle that it can more or less only
be positioned in one angle (even though the kit allows for leeway in
this regard. More on this later.). The next four parts are more or less
the bread and butter of the kit and the whole building system. It’s
sections of either 6cm by 3cm or 3cm by 3cm. For each section two of
these parts are required and stuck together. If you ever worked with
Oreo cookies you’ll be familiar with the system.
The assembly itself is very simple. The instructions don’t lie when
it’s telling you that glue is not required (but advised). You basically
press the two parts together until there is an audible click when the
little nubs lock into place. Once that’s done the parts are VERY hard to
get apart again (not that you’d want to anyway). I glued all but the
first part right away though just to be sure. Once you’ve done that you
end up with a number of tiles sections of either 3cm by 3cm or 3cm by
6cm as mentioned above. These are put together with the help of little
connectors which come in either T-, L- or cross-shape, either by
clipping them into place or sliding them in sideways.
This is basically how it works:

In the right you see some single sections whilst in the left you see two
sections put together with an L-shaped connector. These are rounded on
the edge, giving it a bit of a smooth Sci-Fi look. In the middle
foreground you see two T-shaped connectors.
In the above picture you can see the connectors again. From left to
right: L-shape, cross-shape, T-shape. All the connectors consist of two
pieces but again due to the very comfortable snap-fit system you don’t
have to wait until the glue is completely dry. Put a bit of plastic glue
on, snap the pieces together and you can use them right away without a
thought lost to the parts maybe coming apart again.You get a very good
amount of these connectors in the box. Maybe it’s just the way my brain
works but I could have done with maybe two more T-shaped connectors
while the cross-shaped ones I find a bit less useful in general. But
still, you will be fine for almost everything you will want to build
from this.
Sliding or clipping the tiles together works very well. It’s not too
hard (maybe a tad too easy/loose sometimes if anything) and for the most
part the parts stay together very well. I have one thing to note though
– there are pretty prominent mould lines on the connectors. I removed
them and I’m not sure if that was the smartest of moves because I think
they give the whole thing additional structural strength and keep the
single tiles from wobbling around. I did remove these mould lines quite
rigorously of some parts and I wish I hadn’t. It’s not like they don’t
work any more or fall apart, I just think that the fit would have been
tighter with the mould lines on. In general though the fit is pretty
good and I would imagine that it would be even better once the pieces
are basecoated/painted/whatever.
So after lots of cleaning (maybe a bit too much as mentioned above)
and putting together I worked out a sort of thing I was rather pleased
with and which makes use of almost all parts that come in the box:

I also added some 28mm miniatures for scale. So what did I notice during
putting this thing up – Firstly, the girders/supports aren’t exactly
the epitomy of structural strength. These things love to move to weird
angles. In general, the L-shaped connectors seem to prefer acute angles
over right angles so you will have to rearrange the girders sometimes.
I’ve read reports of people liking to actually glue the bottom parts of
the girders to bases to stop them from moving around. Speaking of the
girders – those come in three sizes and also can be connected (like the
ones in the left) so you get taller ones.

The ramps, as I mentioned before, come in two narrow parts. This may
seem weird at first but does serve a purpose. The thing is that they are
exactly 30mm wide and if you add the railings you end up with a ramp
that is just wide enough to have a miniature on a 25mm round base
move between it. If you happen to use lipped bases like many skirmish
wargamers like to do I suggest either not using the railings or use a
third piece of plank to make it wider. Those three won’t fit together
completely due to the way the snap-fit system works but it’s a way to
make the ramps work for larger bases. Alternatively you just don’t glue
the railings to the ramps of course but I think that these really add to
the nice look of the kit. If you use them though I strongly suggest
gluing them in place or use some pins to strengthen the conections. When
I assembled the piece or moved it around the railings kept on falling
out from the smallest moves.

The overall stability, once all is assembled, is absolutely
sufficient which means that you could put a metal Warjack or Dreadnought
on top of the platform without any trouble. This kit will allow you to
build all kinds of weird thing you can think of from a radio station to
oilrig-looking things, elevated listening posts and so on and so forth.
One more thing is adressed in the instructionst – unsightly gaps:

In this picture you can see how the connecttors don’t reach over the
full length of each section and they often end up not quite in place (as
I masterfully recreated for this picture especially). This was taken
care of too in a way by the inclusion of these:

These little gap fillers are meant to be glued into these gaps in
case you want to make the build permanent. They fit really well and if
you glue them in place properly they will be hardly noticable.
Now the box lets you know that the scale of the model is 28mm but you
won’t have a problem using this for games with models of any scale
really. Okay, the one part which depicts a control panel might look a
tad out of place if you’re using 6mm scale models but apart from that I
think that you won’t have much trouble integrating this kit into your
sci-fi/space opera/steampunk/dieselpunk or even modern wargaming tables
if you are willing to stretch your imagination a little. What I found
though is that the railings and “cover” you can add (unless you add
whole walls) would work remarkably well for 20mm scale models. For those
and 15mm scale models you might even make this kit work for several
smaller earth-level buildings. Here is a possible version of that with a
28mm scale model and a 10mm scale model next to it.

Too small for the Scout Sergeant in the right, too big (and
thematically unfitting anyway) for the Musketeer in the left but for
models between that it should work nicely I think.
Now, as usual the last part of my reviews, the price. This is where
this kit really, really shines. I got mine for less than seven British
Pounds and they don’t cost more anywhere else. You won’t be able to
fill a whole gaming table with this small box but, apart from there
being a large variant which has double the amount of sprues, this kit
will get you a rather fetching building or at the very least a heap of
cool bits to jazz up your gaming table with and at this price point you
can hardly do anything wrong. Heck, you even get your money’s worth if
you hack everything up and turn the pieces into piles of cityfight
debris.
At this price you also can’t expect miracles. Overall, I was
pleasantly surprised with this kit. It’s good quality, good casting,
well thought out and the system works. Okay, some parts are a tad wobbly
and I think I’ll end up glueing together some “modules” and not leave
everything interchangable simply for painting purposes and the hassle of
always being tempted to build something new.

This kit is well worth its price and I think that it can be used to
bring something new to any wargaming table. Especially players of
Necromunda will love this kit especially. Terrain always seems to be a bit of the red-headed stepchild of wargamers. If people have the choice of spending money on new miniatures or a bunch of rocks they usually will go for the miniatures and terrain itself often is expensive. In this case though and especially at
this price you can’t do much wrong.
I hope you enjoyed this review. Feedback is always appreciated and if you have any questions or requests, just let me know via the comments section or on Facebook, e-mail and so on.
Do you like our tutorials and reviews? Here is what you can do to support us: Check out the websites of our sponsors, place your next orders at Wayland Games by clicking here or on the banner on the right. Thank you very much, we appreciate any help to keep us going!
11 Comments
Leave a Reply
Tale of Painters is the unofficial Warhammer hobby magazine run by hobbyists like you. Support our work by using the affiliate links from our 🇺🇸 / 🇨🇦 partner stores for your next orders so we can continue to bring you fantastic FREE content every day:


Or support us directly:


If you can get hold of one, the chemical plant set by the same company is also fantastic, and can be used to add detail to many other terrain pieces as well as being a stand-alone kit. The larger Bio-Toxin Plant kit also includes the Platformer sprues you reviewed here.
I had purchased 2 kits (not exactly this one, but similar) and found them really well done, but just a tiny bit too small in scale for my preferences for 40K and other 28-30 mm games where the models have oversized weapons or odd poses (infinity, looking at you). Just like the example with the scout sergeant up above, fitting models under the terrain could be a bit frustrating, but the connectors, walls, and bridge/walkway bits are great unless you have 40mm based models. Thankx for the review! Josh
I have plenty of the Robogear sets, but it seems that this actually comes with different connectors. The Robogear stuff (that I have at least) just has small connectors in the middle of each section, rather than fitting along the whole edge.
Glad you found the review helpful! 🙂
Very detailed review, thanks. I've also been pondering getting some of these sets but had the same concerns as dnyarak. So now off to raid the Coin Jar 🙂
Thanks for the review, I have been considering getting some of those sets to build up but wasn't sure of the quality/scale would be a fit for 40k. Your review helped put that at ease.
Excellent review; I have a few Pegasus sets now and am overall very impressed with the creative potential and quality of each one, and all are reasonably priced.
Yeah, those plastic terrain kits were sold under all kinds of licenses over the years. If you look closely you'll find that the models in the front picture on the box are actually robogear minis. The very same picture (albeit with different background) has been used when the kit was sold under the robogear brand. 🙂
We have loads of snap fit buildings like that at our club. We have got ours from a game called 'robogear'. Not sure if the stuff is still in production but definetely worth a look if you want more buildings.
For this plan I'd say that this kit is almost perfectly suited. 🙂
Thanks for the review! Really makes this kit getting interesting for me, as I was just recently looking for stuff to fill up a table for Necromunda quickly – and this might just be the right stuff for that.