
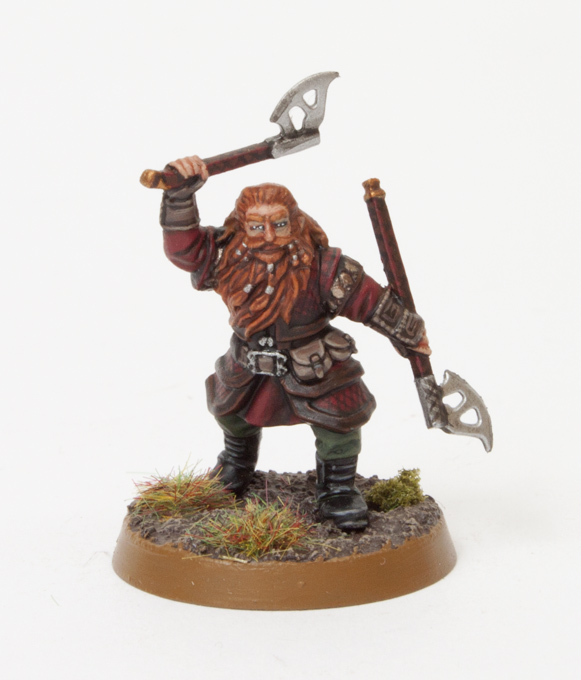
If I had to describe what a Dwarf looks like, I would pretty much describe Gloin. This model is all dwarf, from his red fiery beard to his twin axes. He was great to paint as well. These models are smaller then what I’m use to painting so I’m finding it a refreshing challenge of trying to paint such fine detail. Read on to discover how I painted this model in just 22 steps!
This tutorial assumes you have a basic understanding of how to paint. For the beginners, I will explain the techniques as I go along. Each picture below shows four chronological steps. Underneath each picture are the corresponding instructions. Each step shows the paint I used during that step. It’s good to have reference material close to hand to check colours. I used google images for film stills and Games Workshop’s 360º pictures on their website were a great help.
Paints you will need for this tutorial:
Black Undercoat (technical)
Cadian Fleshtone (layer)
Bloodletter (glaze)
Doombull Brown (layer)
Kislev Flesh (layer)
Skrag Brown (layer)
Jokaero Orange (base)
Rhinox Hide (base)
Khorne Red (base)
Gorthor Brown (layer)
Baneblade Brown (layer)
Waaagh! Flesh (base)
Caliban Green (base)
Loren Forest (layer)
Eshin Grey (layer)
Dawnstone (layer)
Iron Breaker (layer)
Gehenna’s Gold (layer)
Runelord Brass (layer)
Abaddon Black (base)
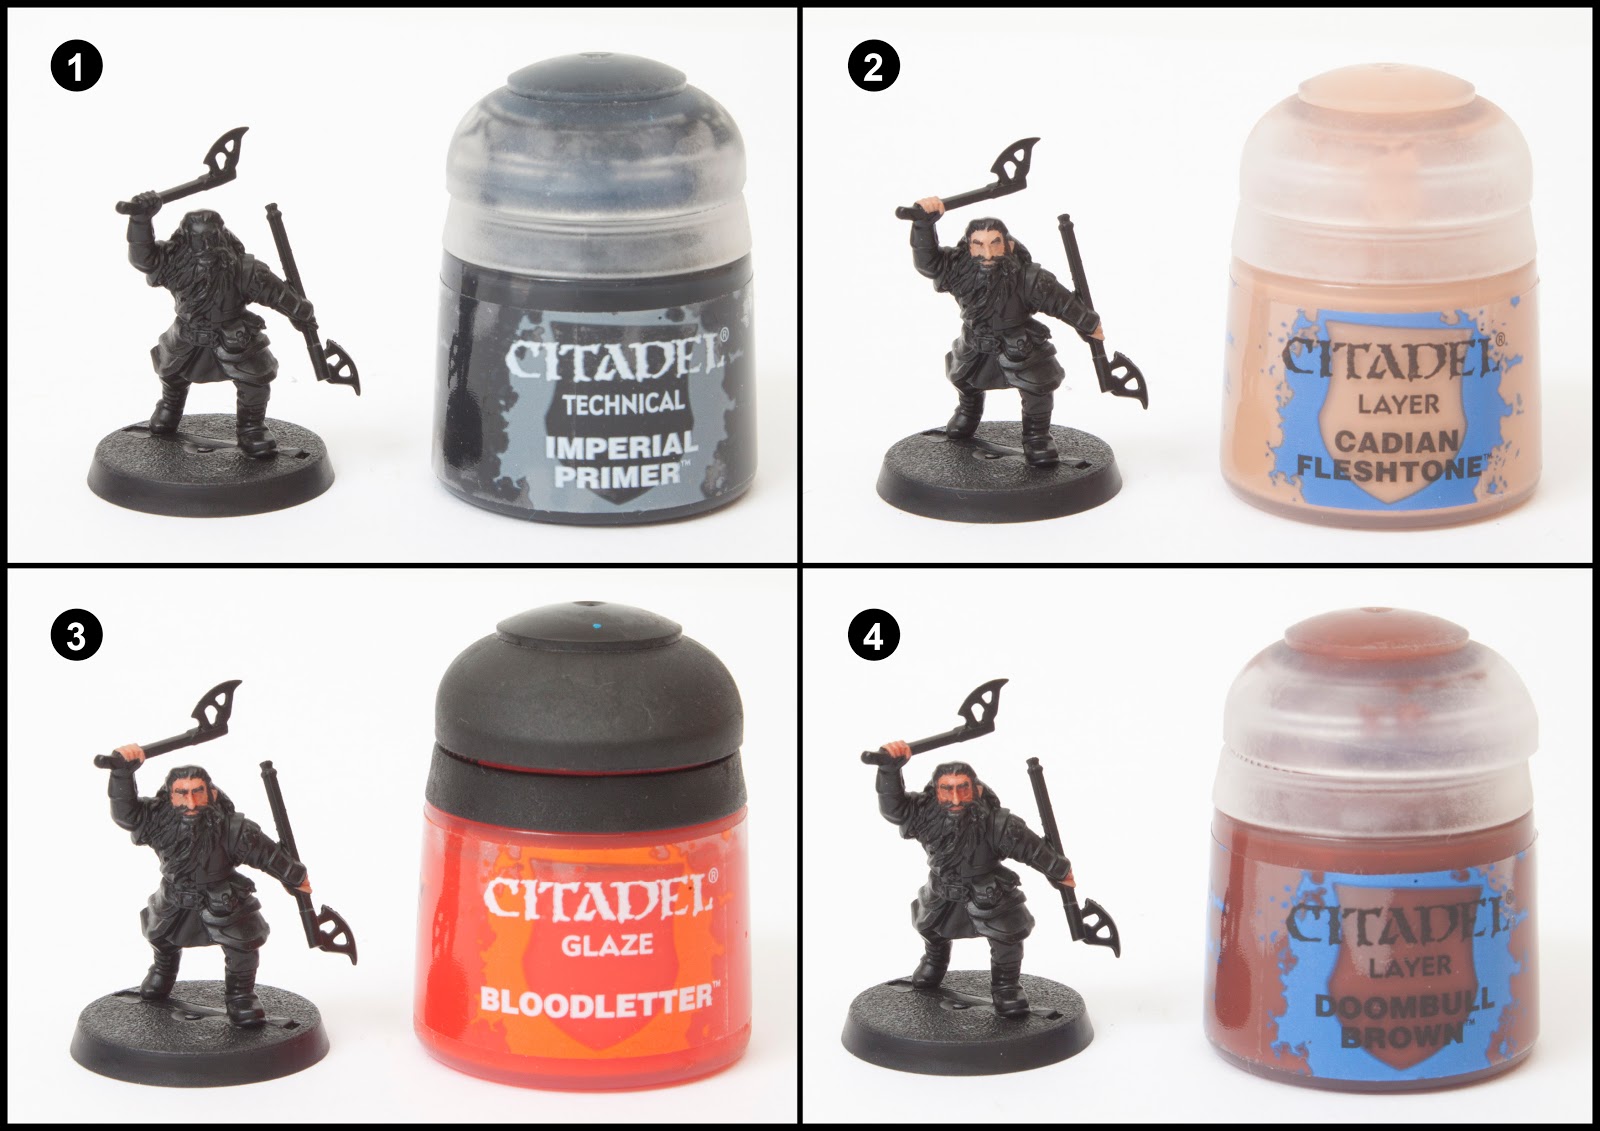
1. Undercoat the model. The details are small, so I hand undercoated the model (rather then use a spray) with Imperial Primer.
2. I painted the face and fingers with Cadian Fleshtone. I painted around the beard.
3. I changed the hue of the skin using Bloodletter glaze. Dwarves are a little more red in complexion then humans.
4. Doombull Brown is a red based brown, I watered it down heavily and then shaded around the eyes, nose, inbetween the fingers and around the face.

5. I highlight the face with Kislev Flesh. You’ll notice I highlight the nose, but in the finished pics the nose is more red. This is because I later go over the nose with Bloodletter glaze. Also if you’re feeling brave this is the opportunity to paint the eyes with a thin black line and two white dots.
6. Skrag Brown is used to paint the hair and beard.
7. Highlight the raised areas of the beard and hair with Jokaero Orange.
8. Mix Doombull Brown with Lamium Medum to create a wash. Apply this all over the beard.

9. Paint Rhinox Hide over the tunic/armour, forearm guards, axe shafts and pouches.
10. On the armour trim paint the edges with Doombull Brown. Then paint the armour panels, arms, tunic and axe shafts with Doombull Brown.
11. Paint over the armour panels, arms, tunic and axe shafts with Khorne Red. Make sure you don’t paint over the forearm guards, belt, pouches and the trim of the armour.
12. Paint the forearm guards, belt and pouches with Gorthor Brown. The forearm guards have a patterning to the back of them.

13. Highlight the previous stage with Baneblade Brown.
14. Basecoat the trousers with Waaagh! Flesh.
15. Water down Caliban Green and paint it into the trouser recesses.
16. Highlight the raised areas of the trousers with Loren Forest.
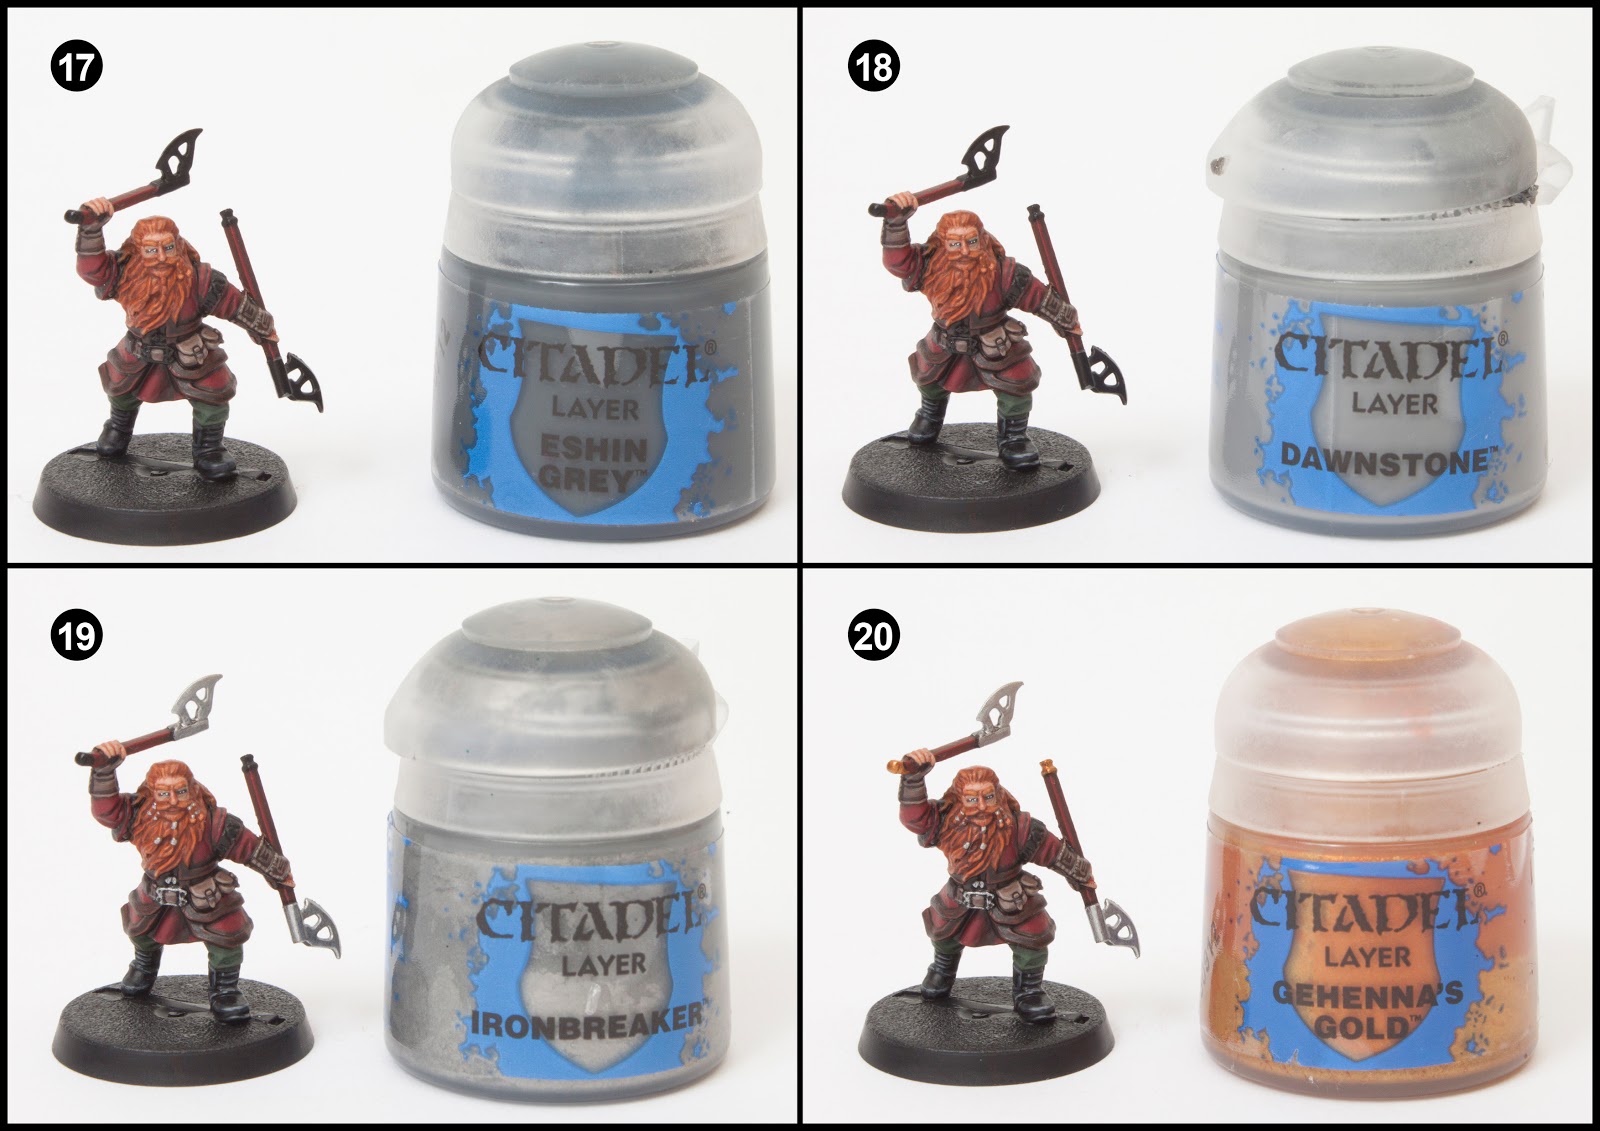
17. Highlight the boots with Eshin Grey. Checkout the close up to see whereabouts I applied the highlights.
18. Using a fine detail brush paint edge highlights of Dawnstone over the top of Eshin Grey.
19. Paint the belt buckle, beard braid holders and axe heads with Ironbreaker.
20. Gehenna’s Gold is used on the ends of the axe.

21. Gloin’s armour has some brass sectioning on the upper arms. Paint this with Runelord brass. Make sure you leave the dark colour behind in the gaps for definition and depth.
22. Heavily water down Abaddon Black and then using your finest brush, carefully paint on straight, diagonal, parallel lines and then reverse this to make a diamond pattern.
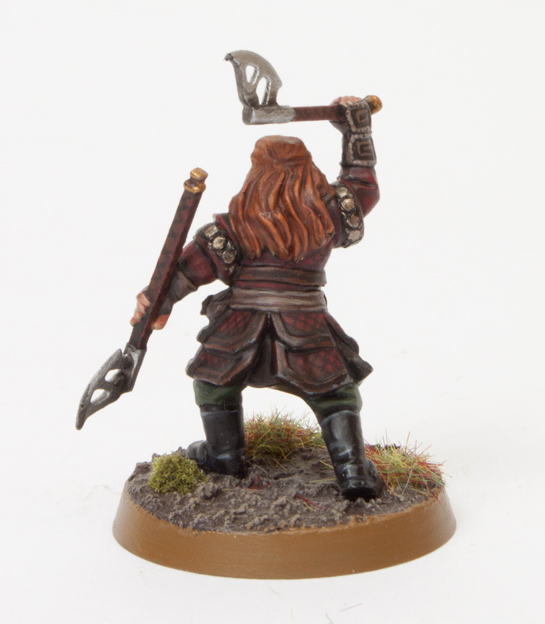
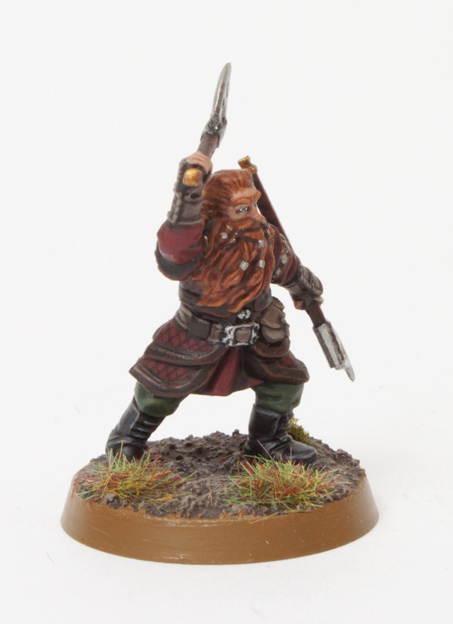
Finally base the model in a way which fits in with your collection. I used Stirland Mud texture paint highlighted with Karak Stone and the base edge was painted with XV-88. Static grass and scrub were glued on in small clumps.
For more Hobbit tutorials check out my Bilbo, Gandalf, Thorin and Goblin tutorials. If you found this tutorial useful, let me know in the comments. I may add another one. I would really love to see your models you’ve painted using these guides.
Do you like our tutorials and reviews? Here is what you can do to support us: Check out the websites of our sponsors, place your next orders at Wayland Games by clicking here or on the banner on the right. Thank you very much, we appreciate any help to keep us going!

10 Comments
Leave a Reply
Tale of Painters is the unofficial Warhammer hobby magazine run by hobbyists like you. Support our work by using the affiliate links from our 🇺🇸 / 🇨🇦 partner stores for your next orders so we can continue to bring you fantastic FREE content every day:


Or support us directly:


Green for Dwalin, well for lighter green I would go with Waaagh Flesh>Loren Forest>Elysian Green. For the darker green of his over jacket I would go with Caliban Green>Castellan Green>Waaagh Flesh.
Hope this is helpful.
Thats brilliant, thank you very much
Could you recommend a green for Dwalin? And A colour for Bofur? p.s. Your tutorials are amazing and have been a great help
Thanks for this! Very complete. My 7 years old was just working on this today… the WD article doesn't give near enough details.
That Bombur clip is great. I might just have to paint Bombar next after batch 3 of goblins.
Wonderful! Thanks a lot for this tutorials! =D
It's awesome.
PS: Bombur deserves a tutorial… He's the most metal dwarf… http://www.youtube.com/watch?v=_RnN0j41uJY
This comment has been removed by the author.
Outstanding!!! I wish these tutorials would go on for all the rest of the models, but I understand that you probably have other fish to fry!
Thanks for all of the hard word!!!!!
Another brilliant tutorial. Thank you for all the hard work and good advice!
Thank you very much !