
This tutorial covers how to paint Ogors. Some nice paint recipes for skin, rust and oxidised copper are covered including more. Check it out after the jump.
This tutorial assumes you have a basic understanding of how to paint. For the beginners, I will explain the techniques as I go along. Each picture below shows four chronological steps. Underneath each picture are the corresponding instructions. Each step shows the paint I used during that step.
Paints you will need for this tutorial:
Black Undercoat
Cadian Fleshtone (layer)
Bugman’s Glow (base)
Doombull Brown (layer)
Kislev Flesh (layer)
Ryza Rust (dry)
Iron Breaker (layer)
Nuln Oil (shade)
Runefang Steel (layer)
Hashut Copper (layer)
Runelord Brass (layer)
Nihlikh Oxide (technical)
Gorthor Brown (layer)
Baneblade Brown (layer)
Karak Stone (layer)
Stormvermin Fur (layer)
Dawnstone (layer)
Alaitoc Blue (layer)
Calgar Blue (layer)
Hoeth Blue (layer)
Kantor Blue (layer)
Fenrisian Grey (layer)
The Fang (base)
Russ Grey (layer)
Steel Legion Drab (base)
Armageddon Dust (texture)
In case you need to expand your paint collection, head over to Wayland Games or Slave to Painting, which both stock a huge selection of paints at competitive prices.
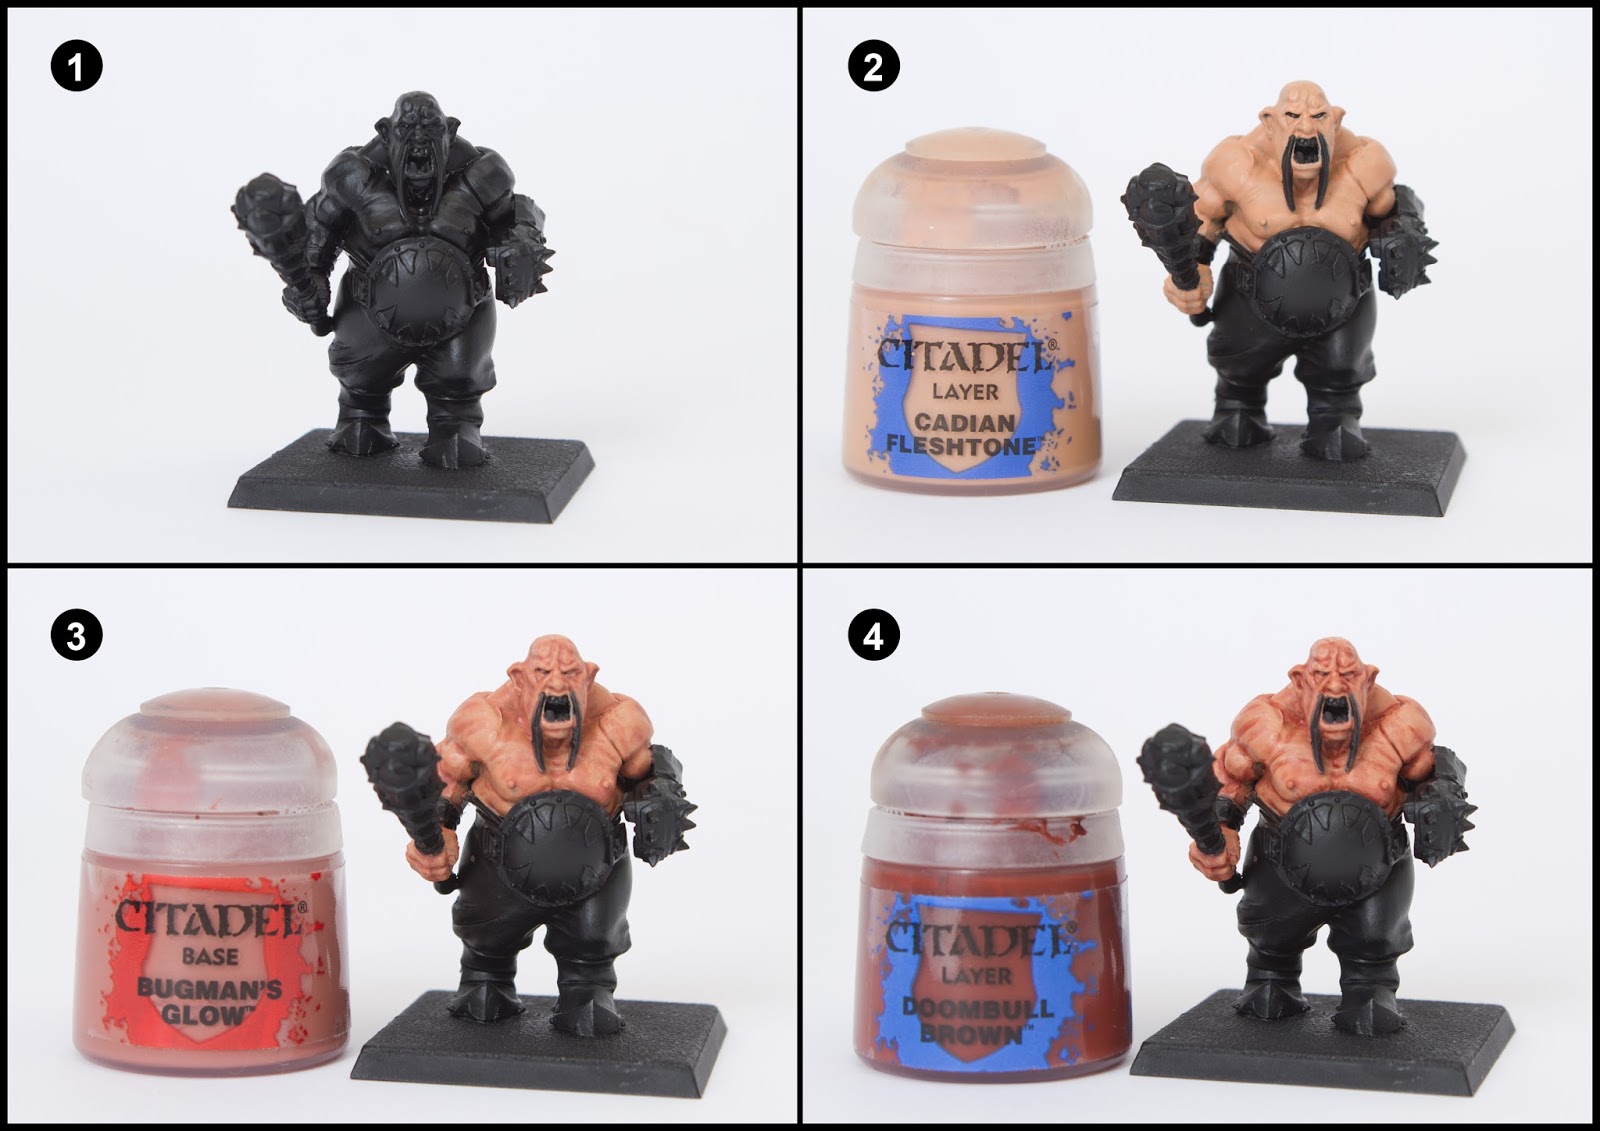
1. Undercoat the model black. I use Vallejo Surface Primer.
2. Basecoat all the flesh with Cadian Fleshtone. This will take around three coats. An airbrush would speed up this process for army painting. It’s quite easy to mask off the areas you wish to keep black.
3. Create a wash by mixing Bugman’s Glow with Lahmian Medium. Start with a 50:50 mix of the two paints on a mixing palette and continually mix more and more Lahmian Medium into the mix until you end up with a paint with the consistency of a wash. Paint this all over the skin.
4. Water down some Doombull brown (water or Lahmian Medium is fine for this step) and run the watery mix into just the creases and recesses of the skin.

5. Highlight the skin with Cadian Fleshtone. For nice soft highlighting mix Lahmian Medium (about 25%) into the Cadian Fleshtone and build up a two or three layers gradually allowing each layer to dry.
6. Highlight the skin further using Kislev Flesh. The Lahmian Medium trick above can be used to make these highlights softer as well.
7. Using a stippling brush (or an old brush with the bristles snipped off) dab on Ryza Rust to create an uneven pattern. You might want to do this again to bring up the intensity of the orange.
8. Using your stippling brush dab on some iron breaker on the raised areas. This is to represent chips and constant wear showing fresh metal.
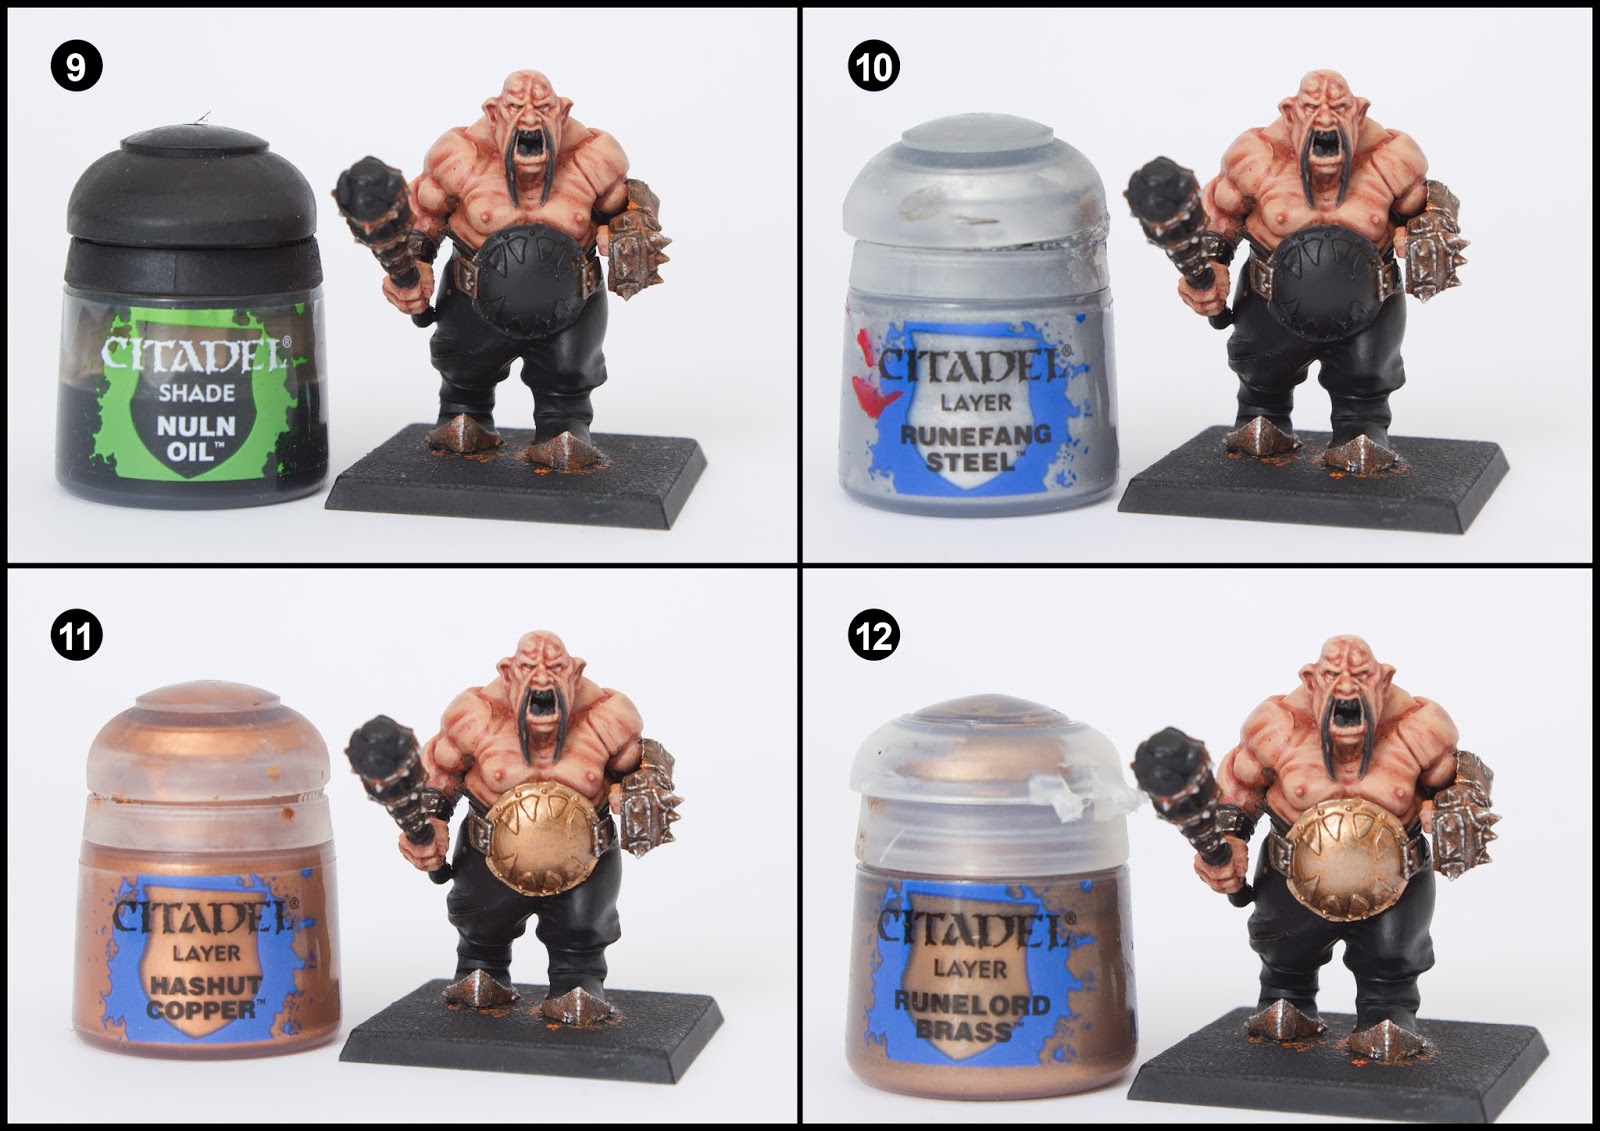
9. Wash over all the rust areas with Nuln Oil.
10. Using a detail brush pick out some metal chips on the raised edges using Runefang Steel.
11. Paint the copper belly plate using Hashut Copper. Do this with three thin coats to ensure a smooth finish. Lahmian Medium is great at thinning metals. The mix should be about 20% of the medium.
12. Highlight the copper with Runelord Brass.

13. Wash around the raised detail of the belly plate using Nihlikh Oxide. It’s a really watery paint that separates easily so shake it well before use.
14. Paint the wooden handle with Gorthor Brown.
15. Paint some thin lines of Baneblade Brown to represent bark grain lengthways on the handle. Paint the strapping around the write with Baneblade Brown.
16. Highlight the bark further using Karak Stone. Also, highlight the wrist strapping.

17. Paint the stones on the club head with Storm Vermin Fur. Highlight the moustache with Storm Vermin Fur.
18. Highlight the edges of the stones with Dawnstone. Highlight the moustache with Dawnstone.
19. Basecoat the trousers with Alaitoc Blue. This will take three thin coats. Thin with water.
20. Highlight the main flat areas and edges of the creases with Calgar Blue. Mix a touch of Lahmian Medium and paint on two to three thin coats to ensure a softer, smoother blend between Calgar Blue and Alaitoc Basecoat.

21. Continue to highlight the main flat areas and edges of the creases with Hoeth Blue. Mix a touch of Lahmian Medium and paint on two to three thin coats to ensure a softer, smoother blend.
22. Create a wash of Kantor Blue by mixing Lahmian Medium with it. Start with a 50:50 mix of the two paints on a mixing palette and continually mix more and more Lahmian Medium into the mix until you end up with a paint with the consistency of a wash. Apply this mix several times into the creases of the fabric and areas that would naturally shadow. Let each application dry before applying the next.
23. Highlight the trouser creases with thin lines of Fenrisian Grey. Add a touch of water to the paint so the paint flows from the bristles smoothly. You’ll get straighter, thinner lines this way if you don’t have to ‘drag’ the brush to get the paint off the bristles.
24. Highlight the black boots and belt with The Fang. Medium thickness lines are perfect.
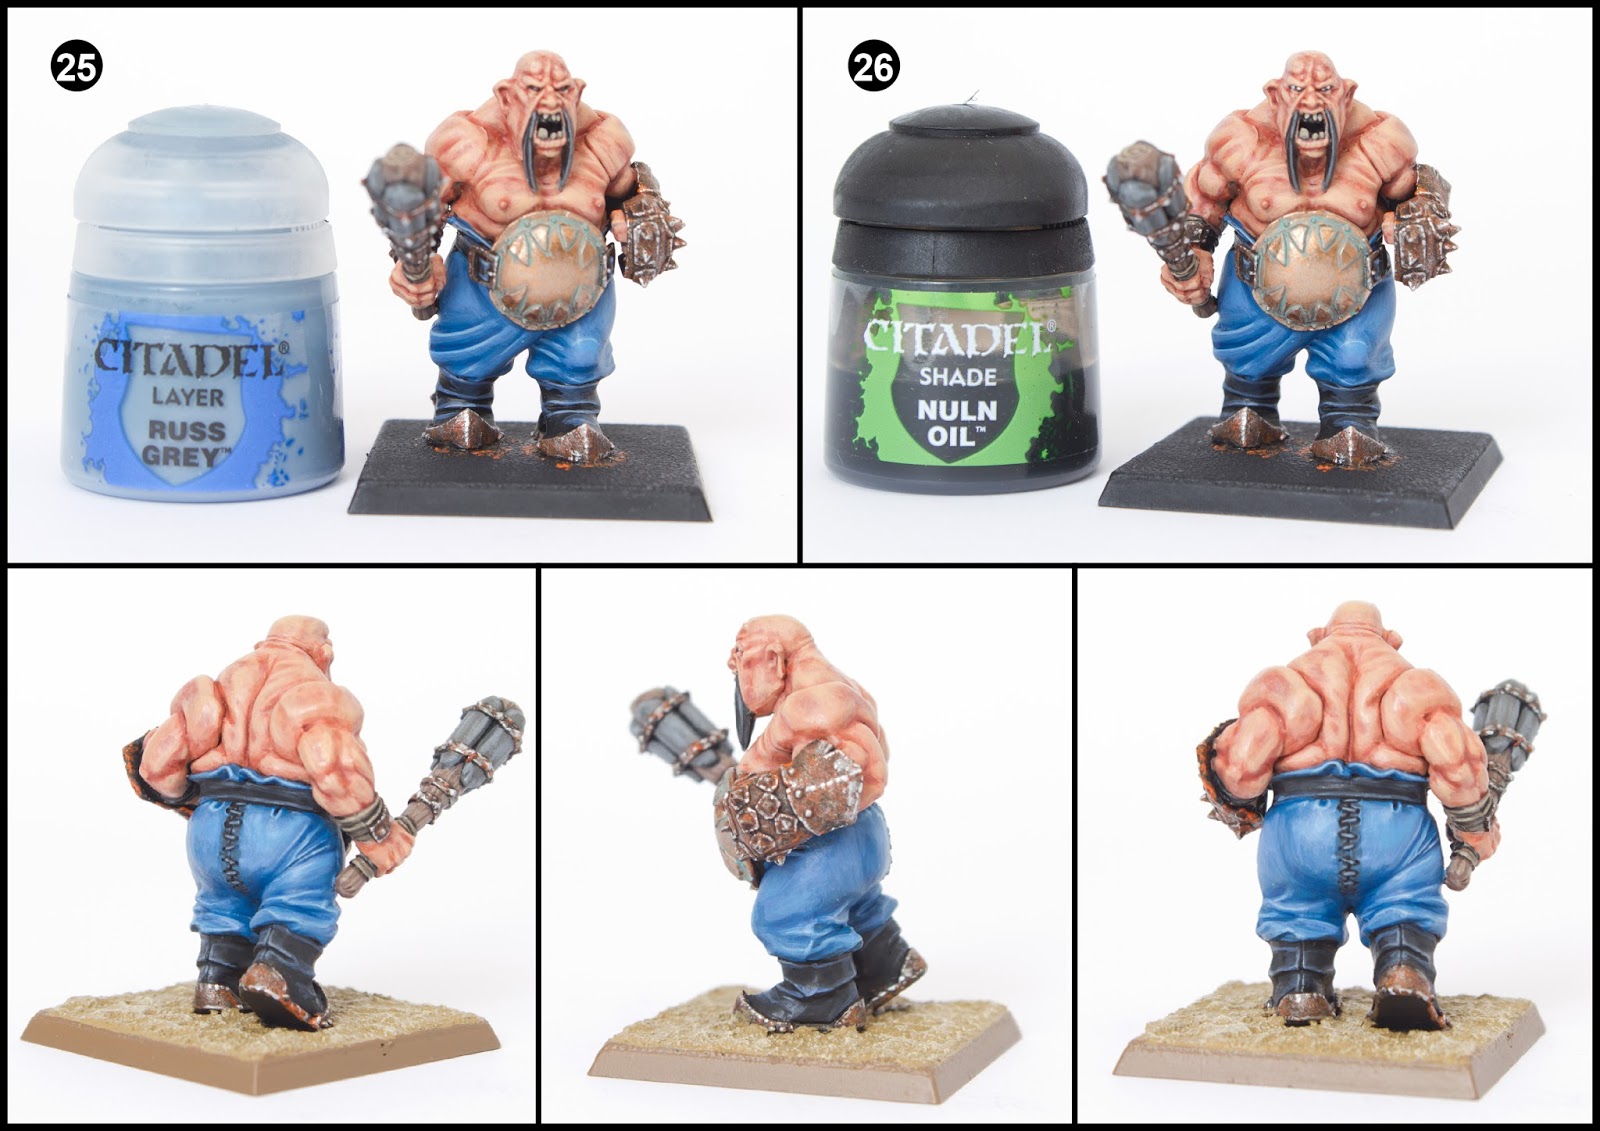
25. Use Russ Grey to edge highlight the black boots and belt further. Thinner lines within the previous lines works well.
26. Tie the two previous highlight layers together with a wash of Nuln Oil all over the black areas.
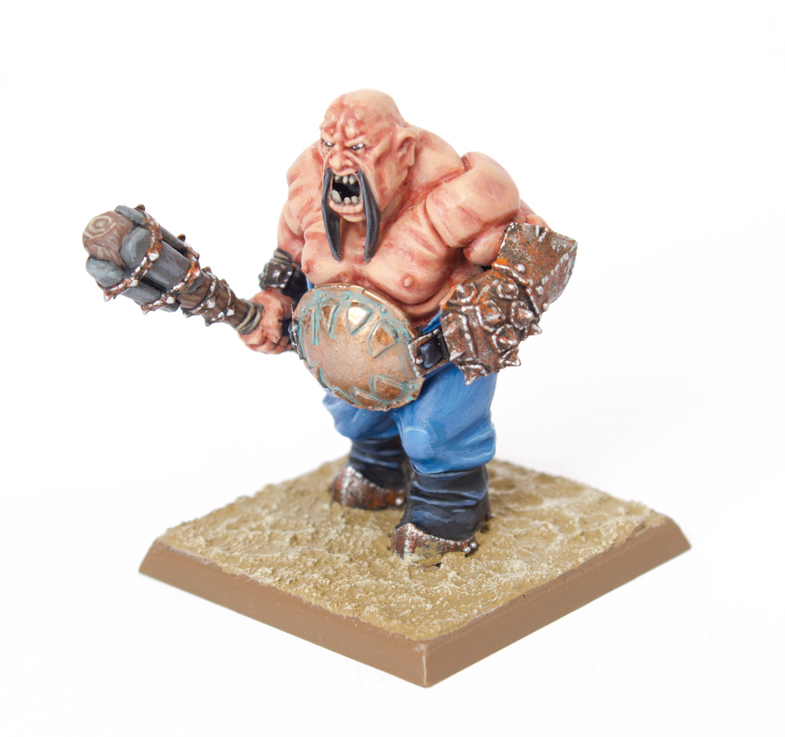
Finally, base the model in a way which fits in with your collection. I used Armageddon Dust texture paint highlighted with Screaming Skull and the base edge was painted with Steel Legion Drab.
Do you like our tutorials and reviews? Here is what you can do to support us: Check out the websites of our sponsors, place your next orders at Wayland Games by clicking here or on the banner on the right. Thank you very much, we appreciate any help to keep us going.


7 Comments
Leave a Reply
Tale of Painters is the unofficial Warhammer hobby magazine run by hobbyists like you. Support our work by using the affiliate links from our 🇺🇸 / 🇨🇦 partner stores for your next orders so we can continue to bring you fantastic FREE content every day:


Or support us directly:


Excellent! So glad I found this – Ogres have recently caught my eye as my 2015 project, but I've never done flesh before, which had been putting me off. Now at least I feel more able to tackle it! Thanks very much!
Best paint tutorial online!
Lahmian medium: art store equivalent? I have matte medium, do you think that works the same?
Garfy, may I ask why you do not seem to use "Base" paints but prefer to use multiple coats of the "Layer" instead?
That isn't a rule I live by. Sometimes I do use Base colours and highlight up. Certain colours or certain textures (like cloth or skin) require a different approach and it's better to start with your medium colour and then 'shade down' and then 'highlight up'.
You have more control painting in this way.
Awesome Garfy. Another brilliant tutorial. I am going to share this one with a couple buddies in my gaming group who are starting up their Ogre armies.
Decent stuff!
Do you not use the "Rust effects" I have seen on you use on older tutorials?
Is this because you are no longer satisfied with the results?
Thanks,
Edd
I still use it on my Necrons. I just really like this stippling approach. It's more accessible for people as well.