
In this post, I’ll show you how to paint Dagnai Holdenstock from Warhammer Quest Cursed City in 29 easy to follow steps. You’ll learn how I paint warm brass and rich golds with Contrast Paints and more. Find out how in this tutorial.

This tutorial assumes you have a good understanding of how to paint Warhammer miniatures. With each picture is the corresponding instruction. Each step shows the Citadel paint(s) I used. You’ll find a list of all the paints used in this tutorial at the end of the post.
How to paint Dagnai Holdenstock

Undercoat your model with Black undercoat spray.

Add a touch of Lahmian Medium to Retributor Armour and paint the backpack, body of the harpoon gun, beard and other ornamental areas. Apply a second coat to ensure an even covering.

Wash the previous areas with Contrast Aggaros Dunes.

Important missing step: Paint the pressurised canisters on the backpack and underneath the harpoon gun with Gryph Hound Orange. Also paint the metal sphere and the hanging ornaments with Gryph Hound Orange. Paint the boots, harpoon, axe head and other metal details with Ironbreaker.

Paint the inside of the coat, collar and cuffs with Khorne Red.

Paint the outside of the coat with Kantor Blue. Highlight the black pipes with a wide line of Kantor Blue as well.

Wash the entire miniature with Basilicanum Grey. If it pools into specific areas wick it away with another brush.

Paint the shirt with Lothern Blue. I painted around the buckles but you can paint over them if easier.

Paint a wide highlight line of Mephiston Red over all the previous red step.

Paint the trousers and shirt buckles with Zandri Dust. Apply a second coat to get an even coverage.

Paint the rolled up map with two coats of Screaming Skull.


Wash the trousers, buckles and map with Seraphim Sepia.

Paint the gloves, axe shaft, eye patch strap and belt with Doombull Brown.

Wash the gloves, axe shaft, eye patch strap and belt with COntrast Wyldwood.

Paint the skin with Cadian Fleshtone. Do this with two coats that are thinned with a touch of water to ensure they go on smooth.

Create a mix of 50:50 Bugman’s Glow with Lahmian Medium and wash the skin areas.

Highlight the skin areas with Kislev Flesh leaving some of the previous shading showing through in the creases.
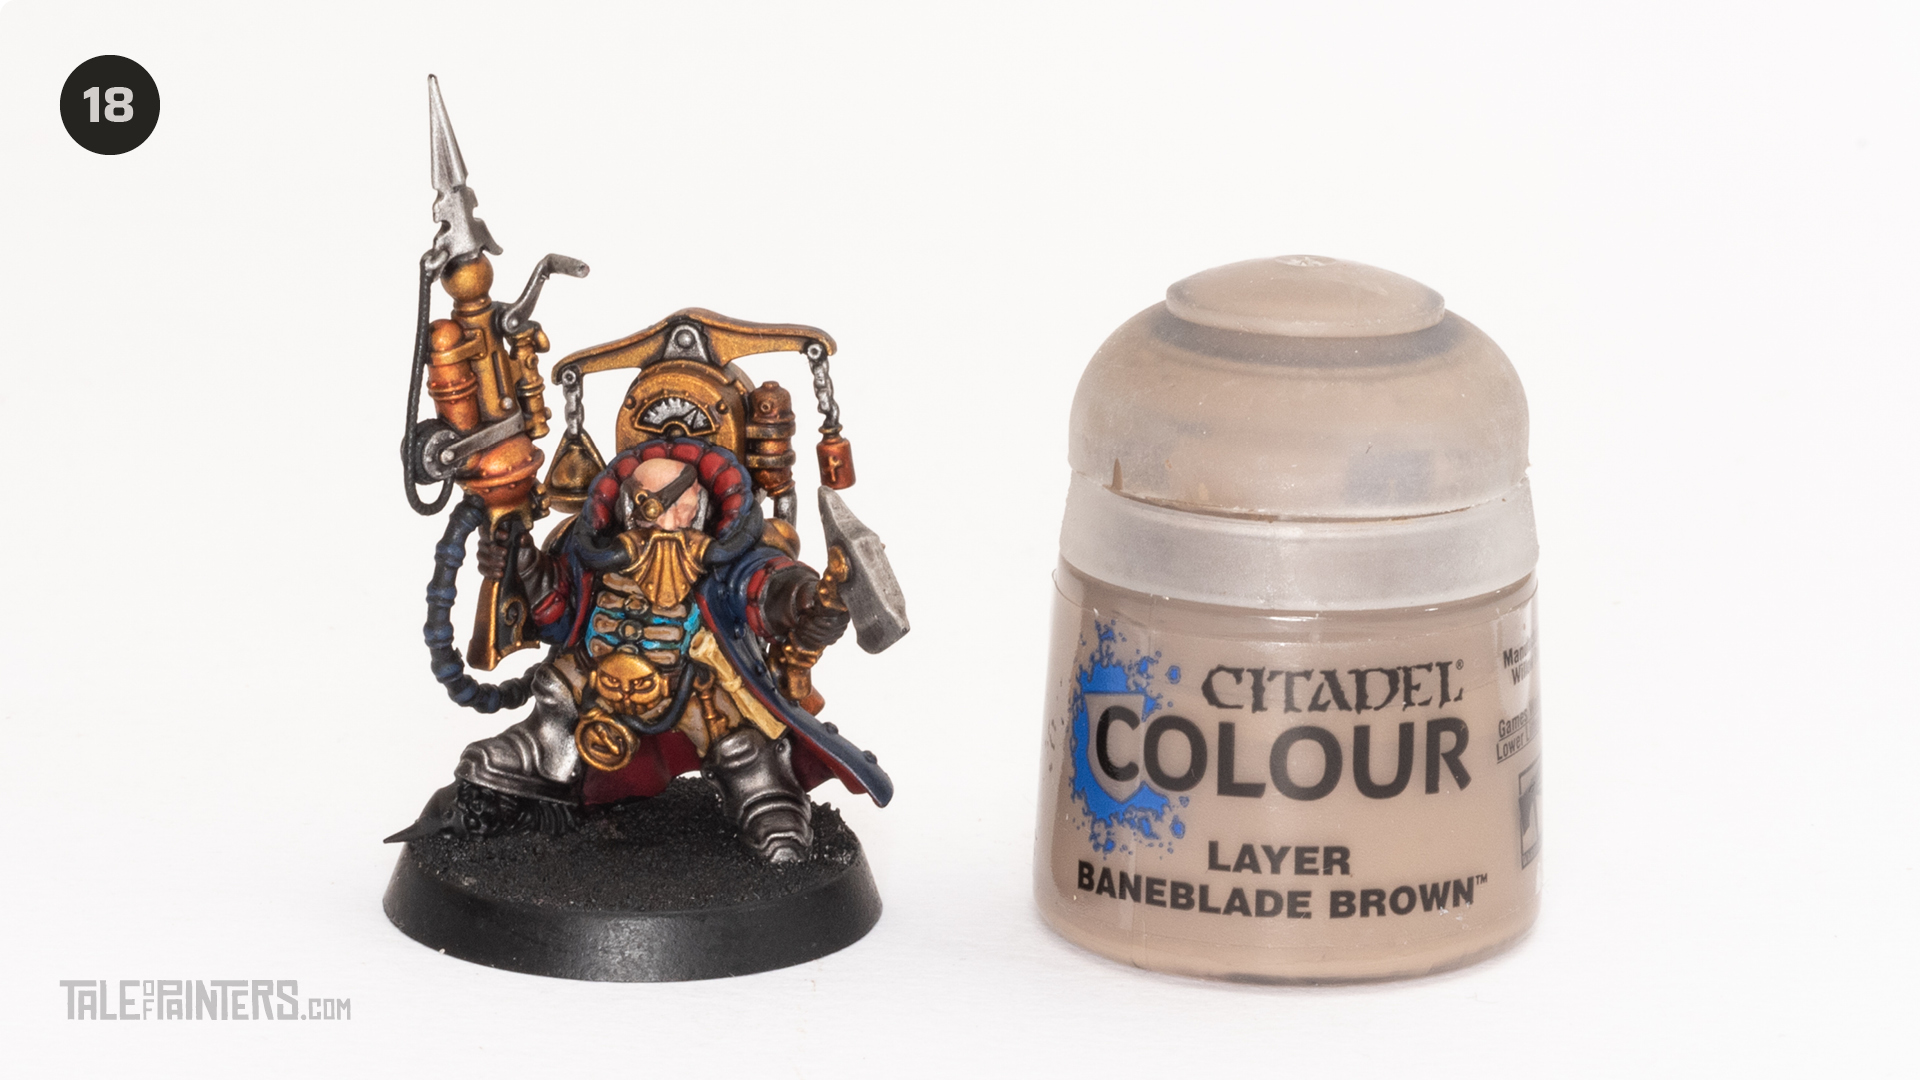
Highlight the trousers and shirt buckles with Baneblade Brown.

EdGe highlight the the gloves, axe shaft, eye patch strap and belt with thin lines of Skrag Brown.

Edge highlight the map and shirt buckles with Screaming Skull. Paint the harpoon rope with Screaming Skull.

Wash the harpoon rope with Skeleton Horde.

Paint the exposed eye with Abaddon Black

Apply thin edge highlights of Pallid Wych Flesh to the rope and map edges. Add two dots to the eye leaving black in the middle to be a pupil.

Add edge highlights of Wild Rider Red to all the red areas.

Edge highlight the black pipes with Celestra Grey.

Apply a wide highlight of Macragge Blue to the blue overcoat.

Apply a thin edge highlight of Teclis Blue to the shirt and the overcoat. Paint the glass on the eye patch with Teclis Blue.

Highlight all the gold areas with a wide line highlight of Auric Armour Gold.

Thin edge highlight all the gold and metal areas with Runefang Steel. Also dot all the rivets including the ones on collar and cuffs.

The sand is painted with Dryad Bark, drybrushed with Steel Legion and then final drybrushed with Karak Stone.

Paints you will need for this tutorial:
- Black undercoat spray
- Retributor Armour (base)
- Aggaros Dunes (contrast)
- Gryph Hound Orange (contrast)
- Ironbreaker (layer)
- Khorne Red (base)
- Kantor Blue (base)
- Basilicanum Grey (Contrast)
- Lothern Blue (layer)
- Mephiston Red (base)
- Zandri Dust (base)
- Screaming Skull (layer)
- Seraphim Sepia (shade)
- Doombull Brown (layer)
- Wyldwood (contrast)
- Cadian Fleshtone (layer)
- Bugman’s Glow (base)
- Lahmian Medium (technical)
- Kislev Flesh (layer)
- Baneblade Brown (layer)
- Skrag Brown (layer)
- Skeleton Horde (contrast)
- Abaddon Black (base)
- Pallid Wych Flesh (layer)
- Wild Rider Red (layer)
- Celestra Grey (base)
- Macragge Blue (base)
- Teclis Blue (layer)
- Auric Armour Gold (layer)
- Runefang Steel (layer)
Paints you’ll need for the base:
- Dryad Bark (base)
- Steel Legion Drab (base)
- Karak Stone Layer
If you need to expand your paint collection to follow the tutorial, check out our partner stores Wayland Games and Element Games, which offer an amazing range of paints at a discount.
Check out my previous tutorials on How to Paint Corpse Rats and Bat Swarms, Ulfenwatch Skeletons, Deadwalker Zombies, Kosargi Night Guard, Vargskyr, Vyrkos Blood-born, Gorslav the Gravekeeper, Torgillius the Chamberlain, Radukar the Wolf, Qulathis the Exile, Brutogg Corpse-eater, Emelda Braskov, Jelson Darrock, Cleona Zeitengale and Octren Glimscry. Want to learn more about painting Warhammer Quest Cursed City models, stay tuned for more tutorials, in the mean time you can check out my review of Warhammer Quest Cursed City.
Hope you enjoyed this tutorial. If so, leave a comment or reaction below, and if you got any questions, leave them here so I can answer them for you.

2 Comments
Leave a Reply
Tale of Painters is the unofficial Warhammer hobby magazine run by hobbyists like you. Support our work by using the affiliate links from our partner stores for your next orders so we can continue to bring you fantastic FREE content every day:


![]()
![]()
Or support us directly:


great paiting tutorial. you even cover the bading which many leave out. thank you!!
[…] Quest Cursed City Tutorial: How to paint Octren Glimscry from Warhammer Quest Cursed City Tutorial: How to paint Dagnai Holdenstock from Warhammer Quest Cursed City Tutorial: How to paint Glaurio Ven Alten III from Warhammer Quest Cursed […]