
Before we begin with another tutorial in this series, I wanted to shout out my friend’s blog. Henry South is currently documenting painting his Empire army and his demigrypth Knights are a real treat. His blog is called 4gotowar. Check it out.
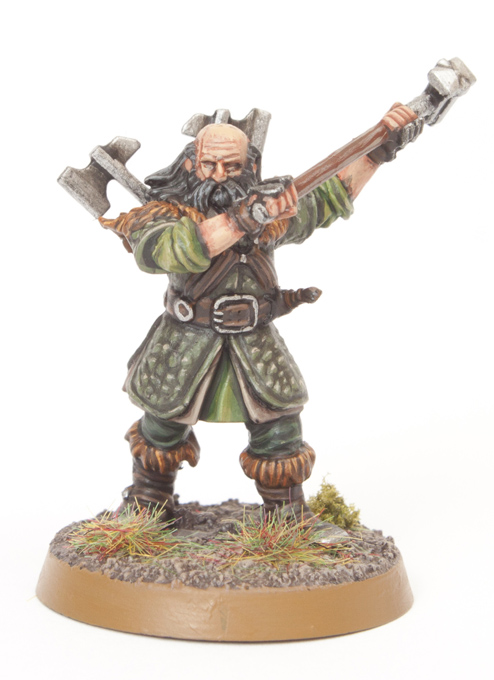
Dwalin is the eighth miniature in the series of tutorials I’ve been producing. I think he’s one of the more complicated models in the set to paint because of the number of colours. This is reflected in the number of steps for this guide… 26 in total! If you’re feeling brave enough to paint this model, read on.
This tutorial assumes you have a basic understanding of how to paint. For the beginners, I will explain the techniques as I go along. Each picture below shows four chronological steps. Underneath each picture are the corresponding instructions. Each step shows the paint I used during that step. It’s good to have reference material close to hand to check colours. I used google images for film stills and Games Workshop’s 360º pictures on their website were a great help.
Paints you will need for this tutorial:
Black Undercoat (technical)
Cadian Fleshtone (layer)
Bloodletter (glaze)
Rhinox Hide (base)
Kislev Flesh (layer)
Stormvermin Fur (layer)
Abaddon Black (base)
Dawnstone (layer)
Caliban Green (base)
Waaagh! Flesh (base)
Castellan Green (base)
Loren Forest (layer)
Gorthor Brown (layer)
Baneblade Brown (layer)
Karak Stone (layer)
Elysian Green (layer)
Biel-Tan Green (shade)
Mournfang Brown (base)
Skrag Brown (layer)
Tau Light Ochre (layer)
Doombull Brown (layer)
Ironbreaker (layer)
Stirland Mud (texture)
In case you need to expand your paint collection, head over to Wayland Games or Slave to Painting, which both stock a huge selection of paints at competitive prices.

1. Undercoat the model. The details are small, so I hand undercoated the model (rather then use a spray) with Imperial Primer.
2. I painted the face and fingers with Cadian Fleshtone. I painted around the beard.
3. I changed the hue of the skin using Bloodletter glaze. Dwarves are a little more red in complexion then humans.
4. I watered down Rhinox Hide heavily and then shaded around the eyes, nose, inbetween the fingers and around the face.

5. I highlight the face with Kislev Flesh. Also if you’re feeling brave, this is the opportunity to paint the eyes with a thin black line and two white dots.
6. Paint the hair (what there is of it) and beard with Stormvermin Fur.
7. Water Abaddon Black down heavily with water or Lahmian Medium and wash the hair/beard.
8. Highlight the hair/beard with Dawnstone. Thin lines work better then dry brushing.

9. Paint the trouser knees with Caliban Green.
10. Highlight the trousers with Waaagh! Flesh.
11. Paint Dwalin’s armour with Castellan Green.
12. Highlight the armour with Loren Forest. I picked out each bump carefully rather then drybrush. Then paint the tunic (sleeves/ area between legs)

13. There is a piece of garment between the tunic and armour that needs to be picked out with Gorthor Brown.
14. Highlight the previous step with Baneblade Brown.
15. Highlight the previous step with Krarak Stone.
16. Elysian Green is used to highlight the tunic (sleeves and area between legs).

17. Wash the tunic, trousers and armour with Biel-Tan Green.This should shade lightly and change the hue ever so slightly.
18. Paint the belt, chest straps, boots and gloves with Rhinox Hide.
19. Paint the shoulder and boot fur with Mournfang Brown. Highlight all the strapping from step 18 with Mournfang Brown.
20. Highlight the boots and strapping with Gorthor Brown. Thin lines on the edges work best.

21. Highlight the shoulder and boot fur with Skrag Brown.
22. Add some fine edge highlights to the fur using Tau Light Ochre.
23. Paint the shafts of the hammer and axes with Doombull Brown.
24. Paint some grain lines on the shafts using Baneblade Brown.

25. Paint the axe heads, hammer head, buckles, steel toe cap boots and metal knuckle dusters with Iron Breaker.
26. Now I want to shade the model completely. To do this I water down Abaddon Black to a wash like consistency and then carefully paint thin lines between the fur strands, the armour lumps, between strapping and where colours butt up against each other. It’s worth clicking on the above pic to see the close up difference this subtle stage adds to the piece. I also use this paint to shade the hammer and axe heads and finally paint the tattoos on the head.


Finally base the model in a way which fits in with your collection. I used Stirland Mud texture paint highlighted with Karak Stone and the base edge was painted with XV-88. Static grass and scrub were glued on in small clumps.
For more Hobbit tutorials check out my Bilbo, Gandalf, Thorin, Gloin, Bombur, Ori and Goblin tutorials. If you found this tutorial useful, let me know in the comments.
Do you like our tutorials and reviews? Here is what you can do to support us: Check out the websites of our sponsors, place your next orders at Wayland Games by clicking here or on the banner on the right. Thank you very much, we appreciate any help to keep us going!

10 Comments
Leave a Reply
Tale of Painters is the unofficial Warhammer hobby magazine run by hobbyists like you. Support our work by using the affiliate links from our partner stores for your next orders so we can continue to bring you fantastic FREE content every day:


![]()
![]()
Or support us directly:


thanks a lot, followed it step by step and it looks cool.
Great work – Dwalin is the boys favorite model.
cheers for the shout out mate! will be following this tutorial for my empire mercenaries! 🙂
Thanks guys. I've been working on Kili and Dori today. Almost finished painting and photographing each stage. These will be tutorial 10 and 11. Tutorial 9 is coming next week and will be Balin.
Keep following, we're getting there slowly!
Thanks! Wonderful, as always =))
Thanks again, excellent as previous 🙂
Brilliant tutorial, as ever.
You could definitely see your enthusiasm in the article you write.
The arena hopes for even more passionate writers such as you who are
not afraid to say how they believe. Always follow your heart.
Here is my web site ; online slots real money
I as well. You've got me coming here on a daily basis.
Again, another excellent tutorial.
I really appreciate the work you put into each one.
Thanks