
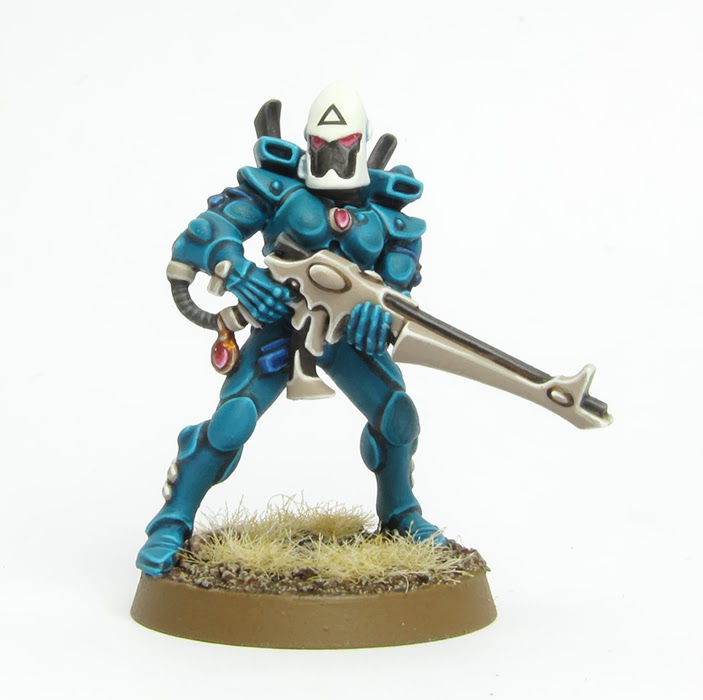
You’ve seen the test models I did for my upcoming Eldar army of Craftworld Iybraesil, and I promised you a tutorial. Well, here it is. Enjoy the complete step-by-step tutorial for a Guardian Defender of Craftworld Iybraesil after the jump.
This tutorial assumes that you are familiar with the fundamental techniques of painting Warhammer miniatures. I will guide you step-by-step through the paints and techniques I utilized. Since my paint collection is quite varied, I will offer suitable alternatives from the current Citadel paint range [in brackets] whenever I use a paint that is not from Games Workshop or is out of production. However, if your goal is to replicate the exact outcome displayed, I suggest expanding your paint collection.
How to paint Iybraesil Guardian Defenders
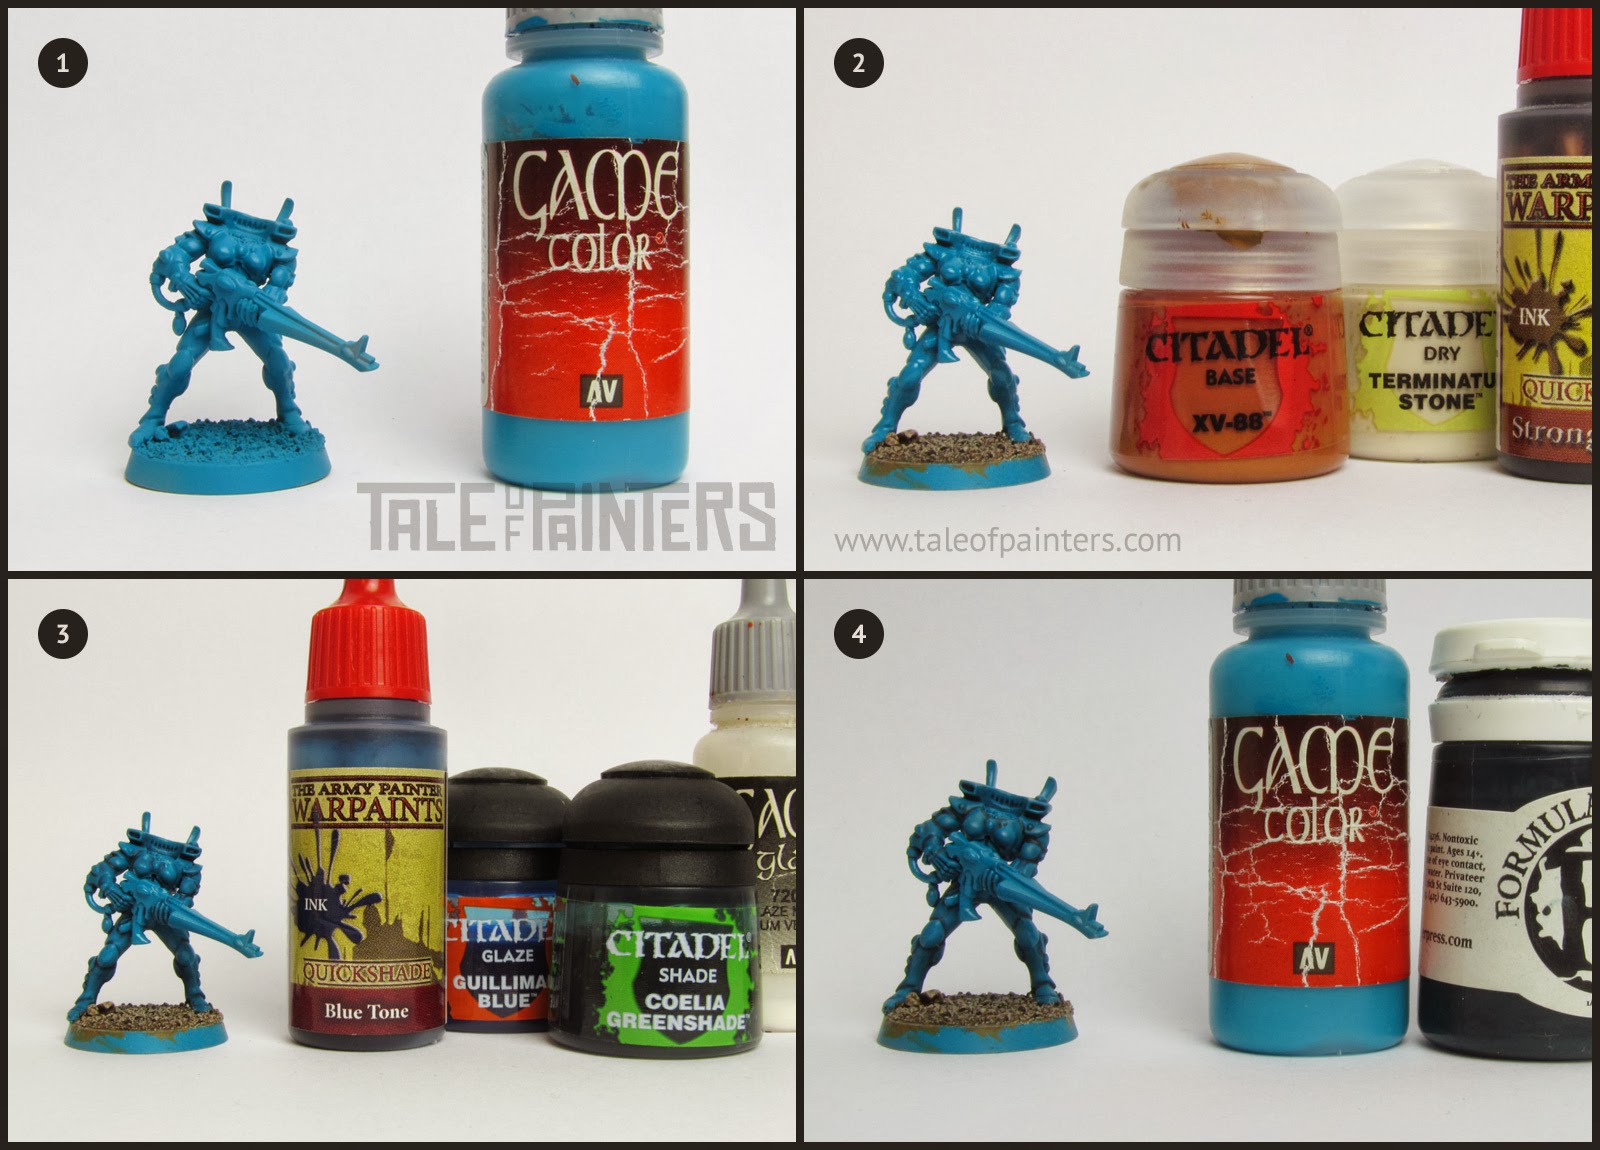
1. The model was primed with a Army Painter’s Uniform Grey Colour Primer [any primer will do, but a medium grey makes a great undercoat for turquoise]. As you notice I kept the heads seperately, to be primed in a different colour later on. Once the primer was dry, I used my airbrush to apply an even coat of Vallejo Game Color Turquoise [you can also use Sotek Green, but it’s slightly darker and not as vibrant]. Finally I applied a thin coat of Vallejo Gloss Coat, with my airbrush as well. This will help with the wash later. If you don’t own an airbrush, you can apply multiple thin coats with a big brush instead.
2. I painted the sand texture of the base with XV-88. I drybrushed heavily with Terminatus Stone Dry paint [you can also use Wraithbone] and applied a generous wash of Warpaints Fanatic Strong Tone Ink [or Agrax Earthshade or a similar dark brown wash]. Where I hit the feet I restored the base colour and reapplied the gloss coat.
3. Originally I created a custom wash, made up of old Warpaints Blue Tone Ink, Coelia Greenshade, Guilliman Blue and Vallejo Glaze Medium at the (rough) ratio of 3:1:1:2. These days I use a mix of 2:1:1 Drakenhof Nightshade, Coelia Greenshade, and Contrast Medium instead. Also, the new Warpaints Fanatic Pine Hollow Grave wash from the John Blanche Masterclass paint set is perfect as well. I applied the wash all over the bodysuit. You’ll see there will be very little pooling – if there is still too much, add more glaze medium for a better result.
4. In this step I checked the model and refined the shadows with P3 Coal Black [or Stegadon Scale Green], if needed. I mixed a little bit of P3 Coal Black into VGC Turquoise, to match the colour of the bodysuit after the wash, and cleaned up any areas where the wash left an uneven result.

5. I mixed a little bit of VGC Dead White [White Scar or your favourite white paint] into VGC Turquoise and applied a first edge highlight.
6. I mixed more VGC Dead White into the base colour and applied a second highlight to the most pronounced areas. As you can see, I prepared a larger amount of both paint mixes in spare bottles.
7. I basecoated the gun and the armour details with Rakarth Flesh [Two Thin Coats Griffon Claw is a perfect match and bit smoother, which is what I use these days].
8. For this step I created a custom ink wash of VGC Black Ink, VGC Brown Ink and VGC Sepia Ink (which is now OOP) in a ratio of about 2:2:1. You can also use Wyldwood Contrast paint or thinned Two Thin Coats Scorched Earth, or use thinned Dryad Bark. I applied the ink directly into the recesses and cleaned up the result with the base colour where needed.

9. I painted all black areas with Abaddon Black.
10. I edge-highlighted the bone areas with Two Thin Coats Ivory Tusk [in fact, back then I used RMS Polished Bone from Pegasus Farben, which are relabeled Reaper Master Series paints, it’s essentially the same shade as TTC Ivory Tusk or Pallid Wych Flesh].
11. Finally I applied a second edge highlight with VGC Dead White [back then I used old WPF Matt White, but any white will do].
12. I highlighted the black areas with Eshin Grey.

13. I painted the hose that comes out of the grip with Adeptus Battlegrey [Mechanicum Standard Grey or Warpaints Fanatic Deep Grey] and washed it with slighty thinned VGC Black Ink [you can also use Basilicanum Grey or WPF Dark Tone wash].
14. I applied a second highlight of Dawnstone to the black areas (back then I used old Codex Grey). Highlight the hose of the catapult with Dawnstone, too.
15. I basecoated the blue ribbon with VGC Imperial Blue [or Kantor Blue], washed with Warpaints Fanatic Dark Tone wash [or Nuln Oil] and reapplied the base colour while leaving the recesses dark.
16. I applied a highlight of Caledor Sky.
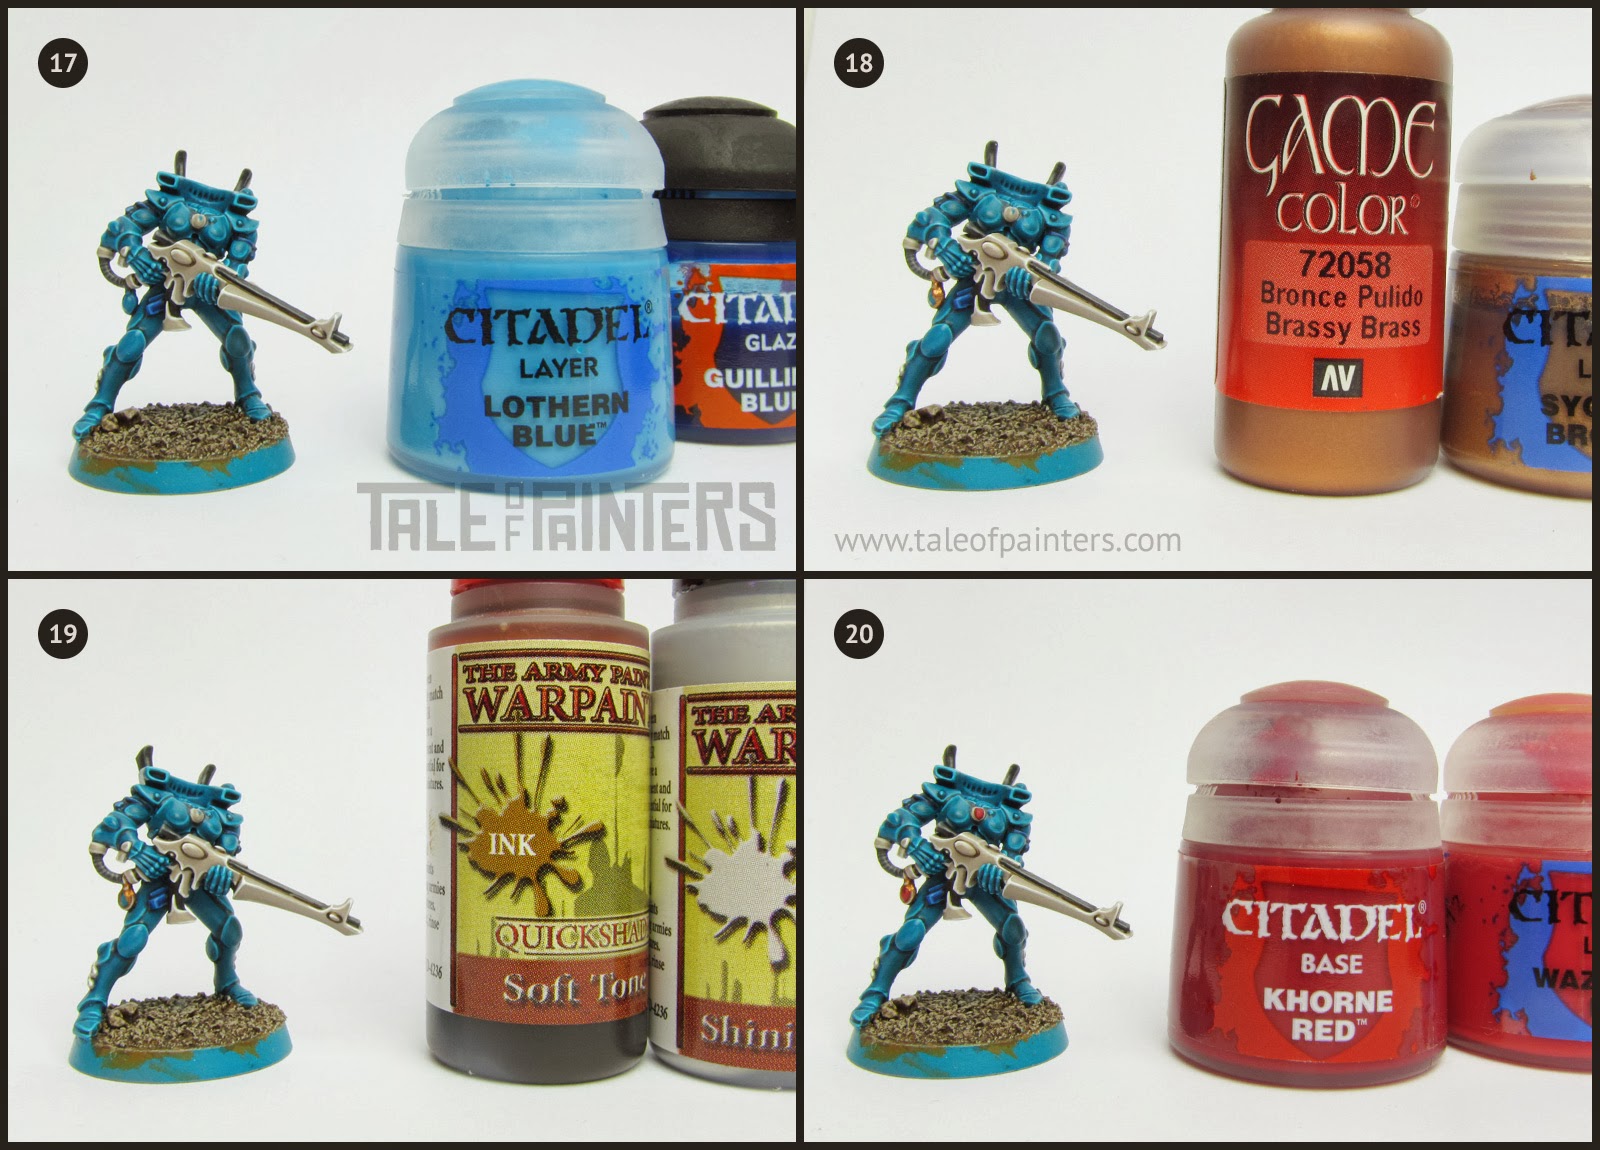
17. Then I applied a second highlight of Lothern Blue and glazed the whole ribbon with Guilliman Blue [which is now OOP, so use either Talassar Blue thinned with some Contrast medium or the blue glaze from the Two Thin Coats range]. Don’t use the glaze like a wash, just take a little on your brush and spread it thinly over the ribbon to intensify the hue, don’t drown the model with it.
18. I basecoated the jewelry with VGC Brassy Brass and highlighted with Sycorax Bronze.
19. Back then I washed the jewelry with Warpaints Soft Tone [which had a different tone than WPF Soft Tone wash, so use Seraphim Sepia instead]. Once dry, I applied a final highlight of WPF Shining Silver [you can also use Runefang Steel, these days I prefer Vallejo Model Air Steel].
20. I basecoated the gems with Khorne Red and applied a first highlight with Wazdakka Red. When highlighting gems, concentrate more and more on the lower right half with every successive highlight.

21. I added two more stages of highlighting with Pink Horror and VGC Squid Pink.
22. I added a final highlight of P3 Carnal Pink [you can also mix white with Squid Pink instead] and a little dot in the upper left of the gem.
23. Finally it was time to paint the helmet. I primed the helmet with white spray primer from AK, but White Scar spray works just as well. I painted the eye lenses with Wazdakka Red and highlighted the lower half with Emperors Children. Paint the black faceplate as laid out in stage 9, 12 and 14.
24. I created a wash by mixing VGC Wolf Grey with Vallejo Glaze Medium [these days I use Contrast Medium instead, which is much better] about 2:3 and applied the mix into the recesses of the white helmet. I know, you can hardly make it out on the picture.

25. Then I took VGC Steel Grey [Fenrisian Grey], thinned it with some water and added an even darker shade to thelmet.
26. Finally I used several thin coats of WPF Matt White [or White Scar, or VGC Dead White] to neaten up the white helmet. The trim of the base was painted with Steel Legion Drab.
To complete the model, I added some bleached static grass (arid static grass by Gale Force 9), added a transfer with the guardian rune with the help of Microsol (check out the tutorial here) and applied a coat of matt varnish.
Finished Eldar / Aeldari Guardians & more tutorials
And here is the finished Guardian Defenders Squad in the glorious turquoise of Craftworld Iybraesil:

Paints you will need for this tutorial:
Citadel Colour
- Adeptus Battlegrey [OOP – use Mechanicum Standard Grey]
- Codex Grey [OOP – use Dawnstone]
- Caledor Sky
- Coelia Greenshade
- Contrast Medium
- Emperors Children
- Eshin Grey
- Guilliman Blue [OOP – use Talassar Blue thinned with Contrast Medium]
- Khorne Red
- Lothern Blue
- Pallid Wych Flesh
- Pink Horror
- Rakarth Flesh
- Steel Legion Drab
- Sycorax Bronze
- Terminatus Stone
- Wazdakka Red
- XV-88
- Warpaints Blue Tone Ink
- Warpaints Dark Tone Ink
- Warpaints Soft Tone Ink
- Warpaints Strong Tone Ink
- Warpaints Shining Silver
- Warpaints Matt White
- Uniform Grey Colour Primer
Vallejo
- Vallejo Game Colour Black Ink
- VGC Black Ink
- VGC Brassy Brass
- VGC Brown Ink
- VGC Turquoise
- VGC Imperial Blue
- VGC Sepia Ink
- VGC Steel Grey
- VGC Squid Pink
- VGC Wolf Grey
- Vallejo Gloss Coat (100% acrylic version)
Other
- P3 Carnal Pink
- P3 Coal Black
Do you want to free the maiden worlds from the taint of Chaos and Mon-keighs now? Or do you need to get some of those paints to recreate the tutorial? Then feel free to use our affiliate link to expand your collection:
You can find the latest GW releases at our 🇬🇧/🇪🇺 partner stores Wayland Games, Element Games, and Firestorm Games, at 🇩🇪 Taschengelddieb and PK-Pro, and at 🇺🇸 Noble Knight Games with a welcome discount of up to 20% over RRP. Using our links helps to support Tale of Painters at no additional cost to you, so thank you very much for using them!
I also have more Eldar / Aeldari themed tutorials here:
And, always helpful, a guide for painting gemstones:
How do you like my Craftworld Iybraesil paint scheme? Leave a comment or question below!
12 Comments
Leave a Reply
Tale of Painters is the unofficial Warhammer hobby magazine run by hobbyists like you. Support our work by using the affiliate links from our 🇺🇸 / 🇨🇦 partner stores for your next orders so we can continue to bring you fantastic FREE content every day:


Or support us directly:


Great tutorial. Can someone please clue me in as to what brush to use for the edge detail? I totally understand the process here and have painted hundreds of minis that all fall apart when it comes to doing the highlighting. Any advice? TIA.
I use Series 7 M brushes from Winsor & Newtwon, specifically Size 00 and 000 for highlighting. I solely use these brushes for highlighting, not basecoating or washing, treated this way they'll last for years. The XS Artificer brush from GW should be a decent option as well (manufactured by W&N, should be pretty identical to Series 7 brushes), though more expensive.
A reply from the master himself! Thanks for taking the time. I will definitely look into those brushes. Much appreciated. I hope my Eldar turn out even close to yours. Thanks again.
love it! thank you so much once again!
Absolutely amazing! Particularly love the colour scheme for the weapons.
Thought I'd share my efforts with you, if that's okay?
http://s1124.photobucket.com/user/EvilEdwin/media/Iybraesil%20Guardians/IMG_0059.jpg.html?sort=3&o=0
Hi. Really love your painting and your tutorials. They are an inspiration and a big help to someone new to painting like me. I'm trying to follow your tutorial here and I've having trouble with shading the bodysuit after basecoat, uneven colours, recess not being pronounced enough. Do you water down the custom ink? I tried that at first but it tool forever to dry! Do you just use one coat of the custom ink? Should I use the gloss coat? Also, I can only find Vallejo Gloss Varnish or Gloss Medium?
Sorry for all the questions!
Superb work as always. The gems must have been a pain to get through.
For models with lensed eyes (space marines, eldar, etc.) what kind of brush do you use? Even with the finest tip I get a boatload of paint in the sockets and ruin models. What is your trick?
I use a Winsor & Newton Series 7 M size 00 for such work. The trick is to paint the lenses first and the black faceplate. So you can be messy, and then paint the black around to neaten it up.
It's nice that you're using the same format that Garfy's been using for tutorials but also refreshing that you don't purely use the new Citadel paints. I'm the same with a mix of colours from across the board.
Also I'm jealous of how clean your models always look.
Where do I get the Pegasus paints?
This is the only link I found: http://www.tellurian-games.de/Farben-Pegasus But from what I can gather, Pegasus stopped selling them so all there is available are probably remnants. But Pegasus Farben are relabeled Reaper Master Series paints, so just get them instead.
Wow, that is amazing. The level of technical detail that you go into is brilliant.
I started reading this blog for Garfy's hobbit stuff, and I know he has made those intentionally more basic for the unwashed masses such as myself to be able to replicate them. Having you show the (insane) level of detail that you guys normally go to in producing your minis is much appreciated, breathtaking, and terrifying!
Brilliant guide Stahly, danke.