
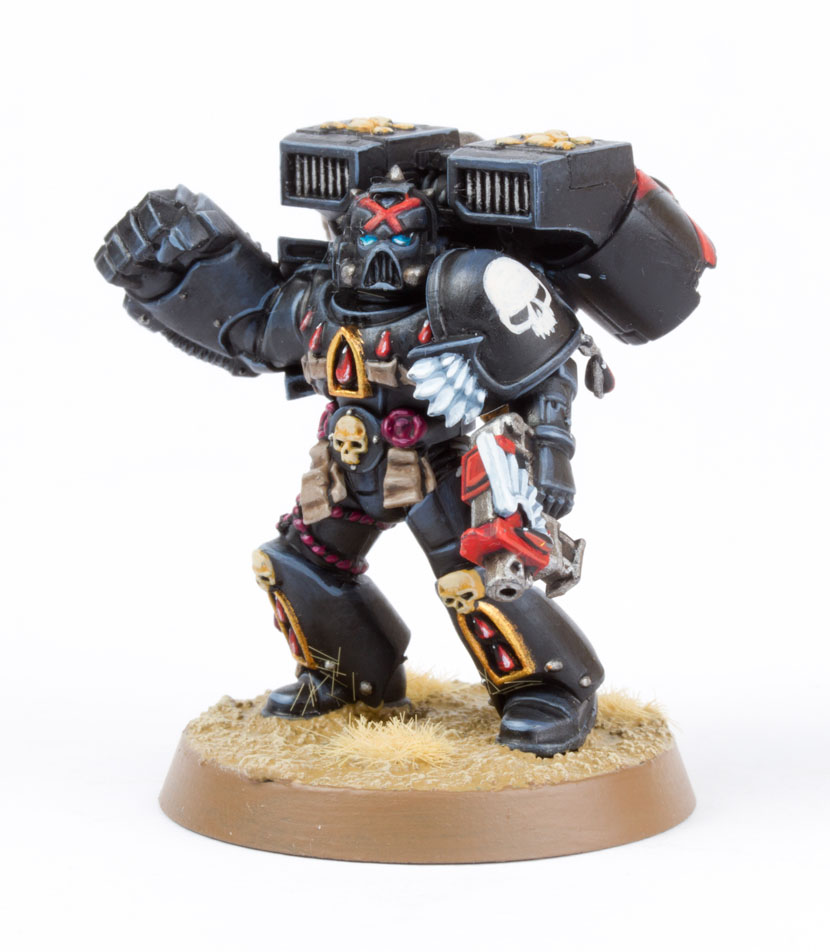
In today’s post I share with your a complete photo tutorial guide to paint the Death Company Blood Angel pictured above. What are you waiting for, more after the jump!
This tutorial assumes you have a basic understanding of how to paint. For the beginners, I will explain the techniques as I go along. Each picture below shows four chronological steps. Underneath each picture are the corresponding instructions. Each step shows the paint I used during that step.
Paints you will need for this tutorial:
- Black Undercoat
- Eshin Grey (layer)
- The Fang (base)
- Russ Grey (layer)
- Nuln Oil (shade)
- Leadbelcher (base)
- Agrax Earthshade (shade)
- Iron Breaker (layer)
- Khorne Red (layer)
- Evil Sunz Scarlett (layer)
- Wild Rider Red (layer)
- Fenrisian Grey (layer)
- Ceramite White (base)
- Zamesi Desert (layer)
- Ushabti Bone (layer)
- XV88 (base)
- Baneblade Brown (layer)
- Rakarth Flesh (base)
- Dawnstone (layer)
- Warplock Bronze (base)
- Brass Scorpion (layer)
- Teclis Blue (layer)
- Temple Guard Blue (layer)
- Gehenna’s Gold (layer)
- Auric Armour Gold (layer)
- Pallid Wych Flesh (layer)
- Armageddon Dust (Texture)
If you need to expand your paint collection, check out our 🇬🇧/🇪🇺 partner stores Wayland Games, Element Games, and Firestorm Games, at 🇩🇪 Taschengelddieb and PK-Pro, and at 🇺🇸 Noble Knight Games, which all offer an amazing range of paints and hobby products at a discount. Using our links helps to support Tale of Painters at no additional cost to you, so thank you very much for using them!
Death Company painting guide

1. Undercoat the model using a black undercoat. I use Vallejo surface primer with my airbrush.
2. Create a mix of Eshin Grey and Lahmian Medium (50:50) and paint a thin layer (a glaze) over all the rounded areas of the armour that would catch natural light. Once dry, repeat to build the intensity. It’s these thin layers that create such nice soft blends.
3. Create another glaze but this time it’s a 50:50 mix of the Fang and Lahmian Medium. Paint a couple of thin coats of this mix over the top of the previous layer being careful to blend it in.
4. With a fine detail brush, paint the upper sharp edges of the armour with Russ Grey to represent glints of light on the edges.

5. Nuln Oil is used as a thin layer over our blending to help tone it down and blend it all together.
6. Pick out any metal areas with Leadbelcher.
7. Wash the metallic areas with Agrax Earthshade.
8. Highlight the edges of the metals with Iron Breaker using a fine detail brush.

9. Using Khorne Red, paint the bolter casings, red crosses and diagonal bottom areas of the tear drop gems (basically leaving the top corner black.
10. Highlight the previous areas with Evil Sunz Scarlett.
11. Edge highlight the red areas with Wild Rider Red and a fine detail brush.
12. Basecoat any feathers with Fenrisian Grey.

13. Carefully pick out each individual feather with Ceramite White. This might take a couple of coats to get a solid coat. Water your paint a touch to make it flow from the brush easier. It makes for a more accurate method. Also add white edge highlights and dots to the gems.
14. Paint any skulls (and the chest Aquilla if you’re using a different model) with Zamesi Desert.
15. Highlight the skulls and chest Aquilla with Ushabti Bone. Make sure you leave some Zamesi Desert showing through for shading.
16. Water down some XV-88 and use it to shade the skulls and Aquilla. Just paint thin lines in the recesses.

17. Paint any scrolls or parchments with Baneblade Brown.
18. Highlight the scrolls/parchments with Rakarth Flesh.
19. Run a wash of Agrax Earthshade over the scrolls and parchment areas.
20. Paint thin edge highlight lines of Dawnstone onto the rubberised areas under the armour pieces (elbows, back of knees, groin etc).

21. Paint the wax seals and braided rope with screamer pink. Leave some black showing through for shading.
22. Highlight the previous step using thin lines of Emperor’s Children.
23. The eyes actually require three steps. Firstly paint Teclis Blue into the lens leaving a black area showing in the upper most corner furthest from the nose. Then paint a line of Temple Guard Blue along the bottom of the lens. Finally, paint a thinner white line below the line of Temple Guard Blue and paint a white dot in the middle of the black area you left.
24. Paint all the gold areas with Gehenna’s Gold. This might take a couple of coats. Thin the metals with Lahmian Medium to make your paints smoother.
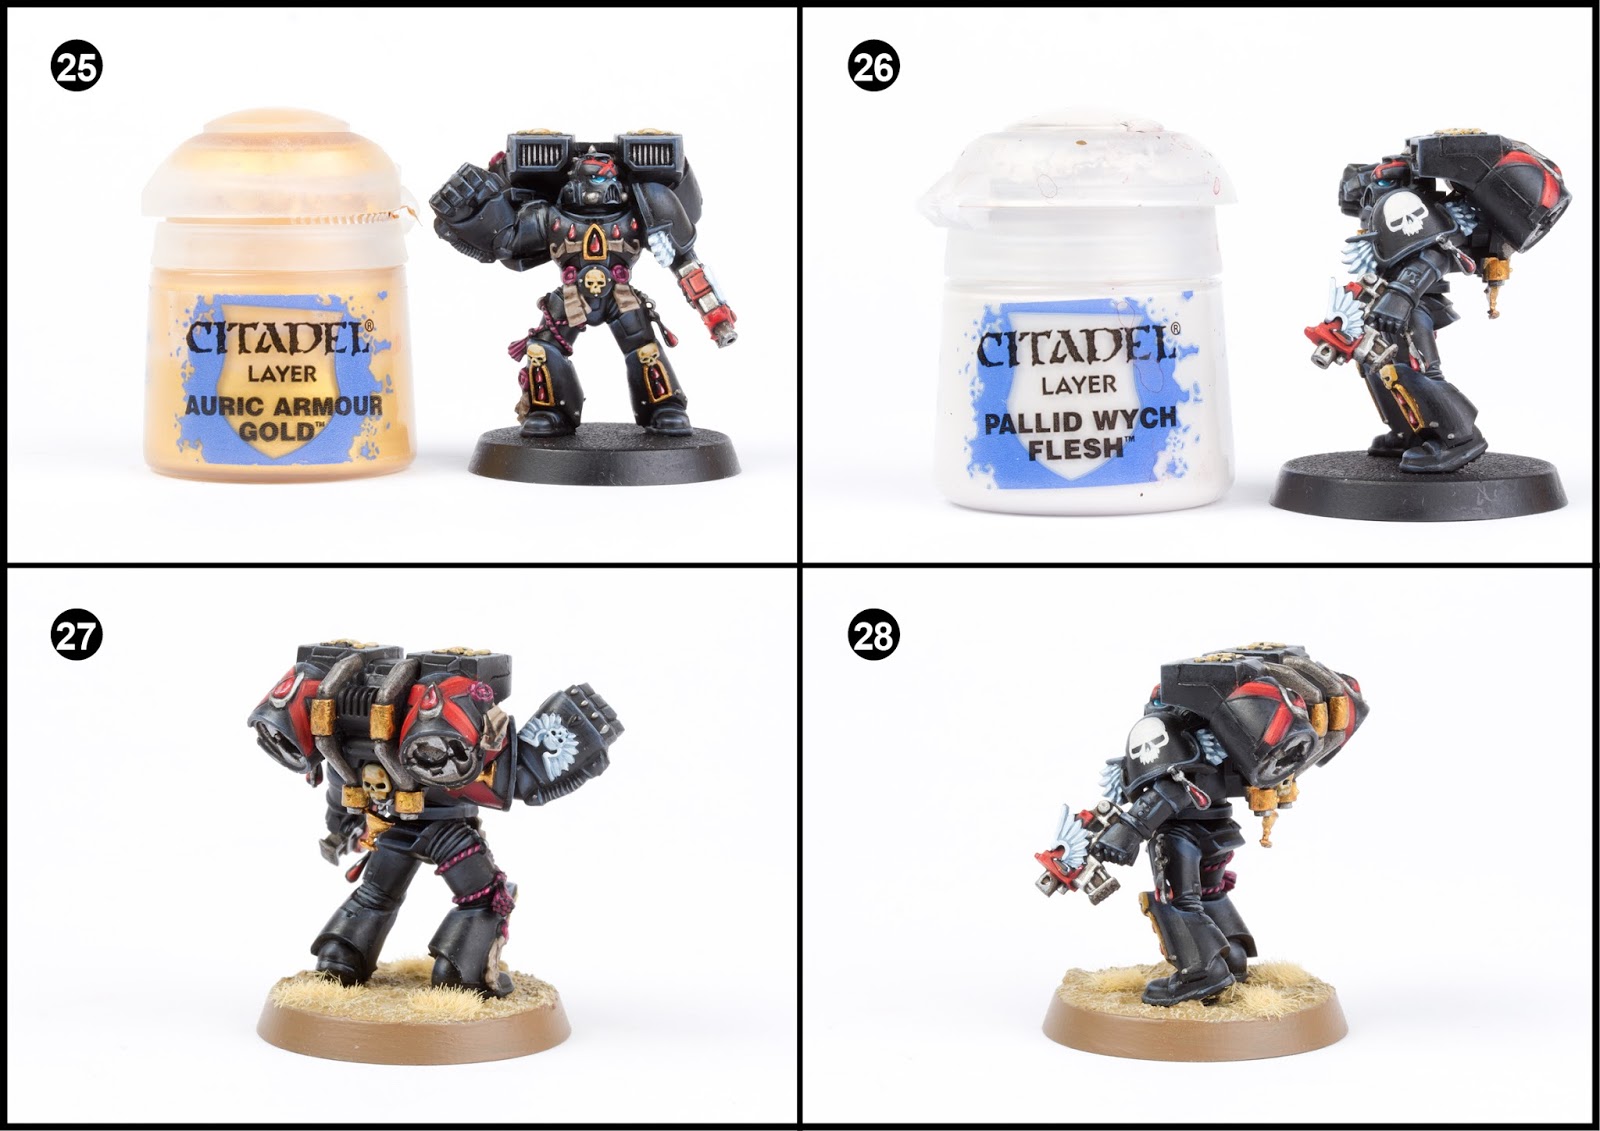
25. Highlight the Gold areas with Auric Armour Gold.
26. Any large blank areas are great for decals. Use them for squad or chapter markings. I painted this skull on the shoulder pad using Pallid Wych Flesh.
27./28. Finally, base the model in a way which fits in with your collection. I used Armageddon Dust texture paint highlighted with Screaming Skull and the base edge was painted with Steel Legion Drab.
Come back soon as a couple more Space Marine tutorials in the pipeline. Hope you enjoyed this one. Last but not least, also check out Stahly’s Death Company tutorial for a totally different way of painting black power armour.

7 Comments
Leave a Reply
Tale of Painters is the unofficial Warhammer hobby magazine run by hobbyists like you. Support our work by using the affiliate links from our 🇺🇸 / 🇨🇦 partner stores for your next orders so we can continue to bring you fantastic FREE content every day:


Or support us directly:


Just want to say thank you for posting this. I've been trying out the black armour technique on an Eldar Death Jester and it seems to be working out okay.
Now I just need to practice 🙂
Very good tutorial, will be trying this on my next black armour. I might even pick up some Death Company just to try this technique out
Great post, thank you. Are the first 3 steps with the airbrush or just the base coat?
Steps two and three are thin layers applied by brush. Gradually built up to blend the layers together.
The black/blue looks like a great alternative to the black/grey that you usually see. I'm about to start painting a LOT of Death Company, so this is a well timed tutorial – thanks!
Btw, check some of the recipe instructions that you've lifted from the bike tutorial (Ravenwing?) as there are still a couple of references to tyres and headlights in the instruction paragraphs.
Love the cool blue tones to that black. Nice work 🙂
Nice tutorial! Cheers for sharing