
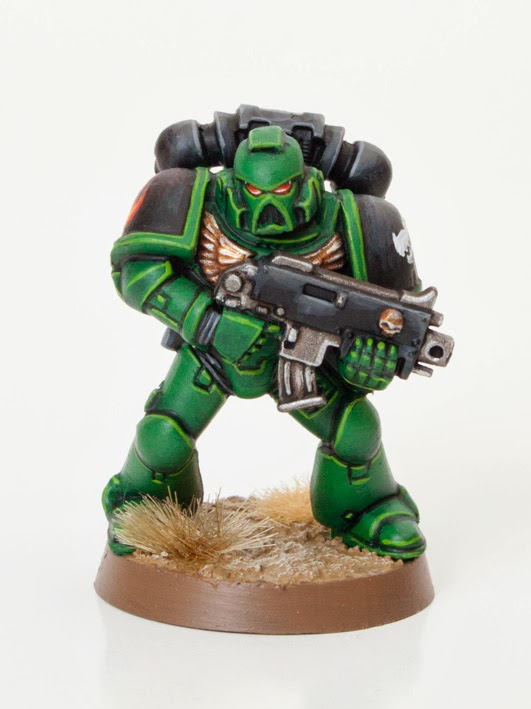
This is the first of three tutorials voted for by the Tale of Painters Facebook group. This is a tutorial explaining how to paint Salamander Space Marines using the latest Games Workshop paints. The model above was painted in 15 steps. I break each step down with a high resolution picture and detailed instructions. Read the full tutorial after the jump.
I’ve designed this tutorial so established painters find it interesting but also so new comers to the hobby can learn some basic and advanced techniques. I will use terms such as glazing and washing, don’t worry if you don’t know what these mean because I will elaborate and explain during that step.
Paints you will need for this tutorial:
Black Undercoat spray
Caliban Green (base)
Abaddon Black (base)
Moot Green (layer)
Gehenna’s Gold (layer)
Leadbelcher (base)
Agrax Earthshade (shade)
Runefang Steel (layer)
Eshin Grey (layer)
Storm Vermin Fur (layer)
Dawnstone (layer)
Evil Sunz Scarlett (layer)
Fire Dragon Bright (layer)
Yriel Yellow (layer)
Ceramite White (base)
Armageddon Dust (texture)
In case you need to expand your paint collection, head over to Wayland Games or Slave to Painting, which both stock a huge selection of paints at competitive prices.

1. Undercoat the model black and then basecoat the model with Warpstone Glow. This will take two or three coats by hand.
2. Use 3parts Lahmian Median and 1 part Caliban Green to create a glaze and use it to shade the lower half of the armour segments. Do this again once it’s dry to increase the intensity of the shading. A third time is good if you want really dark shading. This method of glazing produces nice blends.
3. Black in all the detail such as chest eagle, bolter and backpack. Then add some water to the black to thin it down and paint all the armour gap lines carefully with a fine detail brush.
4. Edge highlight all the armour panels with Moot Green. Thinner the better, use your smallest brush. Thick lines can look unsightly.

5. Paint the chest eagle and bolter icon with Gehenna’s Gold. A touch of Lahmian medium really smooths out this paint.
6. Paint the metallic areas of the bolter with Leadbelcher.
7. Wash the metal areas and the gold areas with Agrax Earthshade.
8. Edge highlight the metal areas and the gold areas with Runefang Steel.

9. Highlight the upper areas of the black with a Eshin Grey. A touch of Lahmian medium can really soften the layers and aid blending into the previous layer.
10. Highlight the Eshin Grey areas using Stormvermin Fur and a touch of Lahmian medium.
11. Edge highlight the Stormvermin Fur layer with a fine detail brush and Dawnstone.
12. Paint half the eye lens with Evil Lens Scarlett. Then paint the flame symbol on his right shoulder pad. You can do this freehand, or mark it out with a pencil first or even paint over a transfer.

13. Use Fire Dragon Bright to paint a smaller flame icon within the previous red one. Also paint a line of orange following the bottom line of the eye lens.
14. Paint another flame icon this time using Yriel Yellow and ensure you can see the orange layer still.
15. Using Ceramite White paint on the Chapter Symbol. it’s quite tricky so feel free to use a transfer if you’d prefer. Then paint on a final white flame within the previous yellow layer on the right shoulder pad. Then add a dot of white in the corner of the eye lens and paint a hairline white line along the bottom of the lens.
Finally, base the model in a way which fits in with your own army or gaming table. I’ve used Steel Legion Drab for the rim, Armageddon Dust for the base top and then drybrushed with Screaming Skull. Drybrushing is a way of picking out raised detail quickly usually with a lighter colour. To dry brush you need load up your brush with paint and then wipe it off the bristles on a tissue until virtually no paint remains on the brush. Then rapidly and repeatedly drag the side of the brush back and forth over the area to be painted.
Keep checking back regularly as I still have an Sons of Horus, Minotaurs and Ultramarine tutorials still to post.
You can view other Space Marine tutorials using these quick links. Imperial Fist, White Scars, Iron Hands.
Do you like our tutorials and reviews? Here is what you can do to support us: Check out the websites of our sponsors, place your next orders at Wayland Games by clicking here or on the banner on the right. Thank you very much, we appreciate any help to keep us going!

19 Comments
Leave a Reply
Tale of Painters is the unofficial Warhammer hobby magazine run by hobbyists like you. Support our work by using the affiliate links from our 🇦🇺 partner stores for your next purchases so we can continue to bring you fantastic FREE content every day:


![]()
![]()
Or support us directly:


Fantastic, I can't wait to try this, I am pretty good at painting not to toot my own horn or anything but flat panels like space marine armour or vehicles I just suck at. This should help, thank you
Undercoat black, base coat warpstone, airbrush caliban green shading into the lines of the vehicles then mist spray with warpstone. Edge highlight by brush with moot green.
On vehicles would base coat it black then base coat it with Warpstone glow then what im using an airbrush and im a bit stuck on the next steps to take any advice?
Would WAAA! Flesh do for the green?
To replace which of the three greens I used?
How to paint Ultramarine Vehicles
http://taleofpainters.blogspot.co.uk/2012/10/tutorial-how-to-paint-ultramarine.html
How to weather vehicles
http://taleofpainters.blogspot.co.uk/2012/11/tutorial-how-to-weather-vehicles.html
Just replace the colours in those guides with the paints from this Salamanders tutorial. Easy.
Thanks
Hi Garfy,
I found this tutorial really helpful but I think it would be even more helpful if you put up a tutorial on how to paint a tank and a walker in the same chapter colours as this would make it easier for people to successfully convert the chapter colours to other units such as speeders or bikes.
Thank you.
This is one of the best tutorials I have seen! Thanks for the terrific outline!
Great tutorial dude. Love the step by step pictures you guys do. Keep up the good work 🙂
Hi Garfy,
Big thanks for all of the tutorials!
I notice that you tackle black differently model-to-model.
Black legion end up with a very pitch black appearance. Iron Hands have a nice blueish tint. (both Iron Hands and Black Legion black have the highlights knocked back with a black wash).
The black you have done on the Salamanders/White Scars/Imperial Fists have all ended with a highlight with Dawnstone with no wash of Nuln Oil after.
Is this because the predominately black models tend to be too garish without a wash?
Would you still use the 'black method' you originally used for Black Legion? or have you completely changed the way you tackle painting black (Iron Hands tutorial)?
You use Eshin/Dawnstone for the White Scars and Imperial Fists.
You use Eshin/Stormvermin/Dawnstone for the Salamanders
Is there a reason behind the differences in methods above?
I am sooooooooooooooo sorry for this long boring question 🙁
I am a loyal follower of your tutorials and just wanted to know the reasoning hehe.
Many thanks,
Edd
Hi Edd, thank you so much for your kind words and taking the time to write a comment. I really appreciate it dude.
You're very observant to notice the different blacks and I guess there are multiple reasons.
1. If black is a predominant colour or covers larger areas, I'm going to put in more layers. The Iron Hands, Black Legion and Salamander all have large areas of black. The White scar and Imperial fist model is pretty much just small pouches so a single edge highlight of Dawnstone is adequate.
2. The different colours I use in highlighting black depends on a couple of reasons as well;
i) The overall look of the model. Iron hands can tend to look quite monotone and dull so I was sure to get some blue in the metallics and use bluey greys (like the fang) to highlight the armour. It still looks black, but I think it has way more depth and life to it. My black legion have a lot going on so I wanted a flatter black.
ii) Depending on the material black reflects light differently. Cat woman's pvc shiny black catsuit has almost pure white highlights, where as batmans almost stealthlike black cape hardly reflects any light and would only have really dark shadows and dull grey highlights. Highlights is just light reflecting off an object.
3. If I didn't use some different colours occasionally some of the models and painting would get samey. I'd much rather offer you guys some options in highlighting black instead one single version. I'm quite adaptable like that. I don't mind flipping a paint scheme on it's head half way an army. I would rather get better at painting then lock myself into a set way of painting. Not saying that's the right way to do it, just my way of doing it, which is probably wrong 😀
4. The Nuln oil wash is used to tie together the layers. I use it as a thin glaze just to help blending. It's not needed on small models, it's only used on the bigger areas. I also don't tend to use it on perfectly flat large surfaces like tanks because it pools. It could be I forgot the Nuln wash on the Sallie, or I just felt at the time it didn't need it.
5. I'm always tinkering with paint recipes. I like to try new colours out. I'm never 100% happy with my models and want to make them better and better.
I'm so sorry for this quite long and boring reply. I hope it helped though.
Garfy.
Hi Garfy,
You answered the hell out of my question!
Thank you very much.
I have just started a Black Legion army using your tutorials as a guide (so far I have painted 3 test models).
I found my Nuln Oil went on a little thick and so I had a couple of shiny patches here and there.
I will thin out the wash with a little water next time.
Thanks again,
Edd
Make sure you send me pictures. Post them on the facebook group if you can, I'm bound to see them there.
I will try and take some pictures tomorrow (wont be pretty).
The standard of paint job isn't even close to the stuff you guys put on this site lol!
Legend, thanks Garfy. And awesome to see your ultras in white dwarf 🙂
Thanks dude. Glad you liked them.
Nice work .. would this kind of green work for Dark Angels or maybe a darker shade is required?
Hi Kurt, check out Stahly's popular Dark Angel tutorial.
http://taleofpainters.blogspot.co.uk/2012/09/tutorial-how-to-paint-dark-angels-from.html