
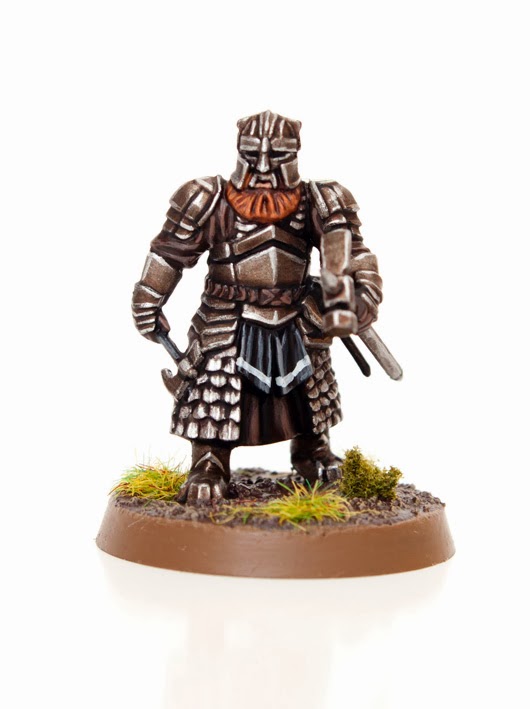
I’ve been itching to paint some more models from the Hobbit for a while now and I’m always being asked if I’m going to do more tutorials for the Hobbit. I thought I’d kill two goblins with one throwing axe and do both. Read on for the full detailed tutorial on how to paint Grim Hammers.
This tutorial assumes you have a basic understanding of how to paint. For the beginners, I will explain the techniques as I go along. Each picture below shows four chronological steps. Underneath each picture are the corresponding instructions. Each step shows the paint I used during that step. It’s good to have reference material close to hand to check colours. I used google images for film stills and Games Workshop’s 360º pictures on their website were a great help.
Paints you will need for this tutorial:
Black Undercoat (technical)
Iron Breaker (layer)
Nuln Oil (shade)
Leadbelcher (base)
Agrax Earthshade (shade)
Runefang Steel (layer)
Rhinox Hide (base)
Gorthor Brown (layer)
Eshin Grey (layer)
Dawnstone (layer)
Ulthuan Grey (layer)
Skrag Brown (layer)
Ratskin Flesh (base)
Stirland Mud (texture)
In case you need to expand your paint collection, head over to Wayland Games or Slave to Painting, which both stock a huge selection of paints at competitive prices.
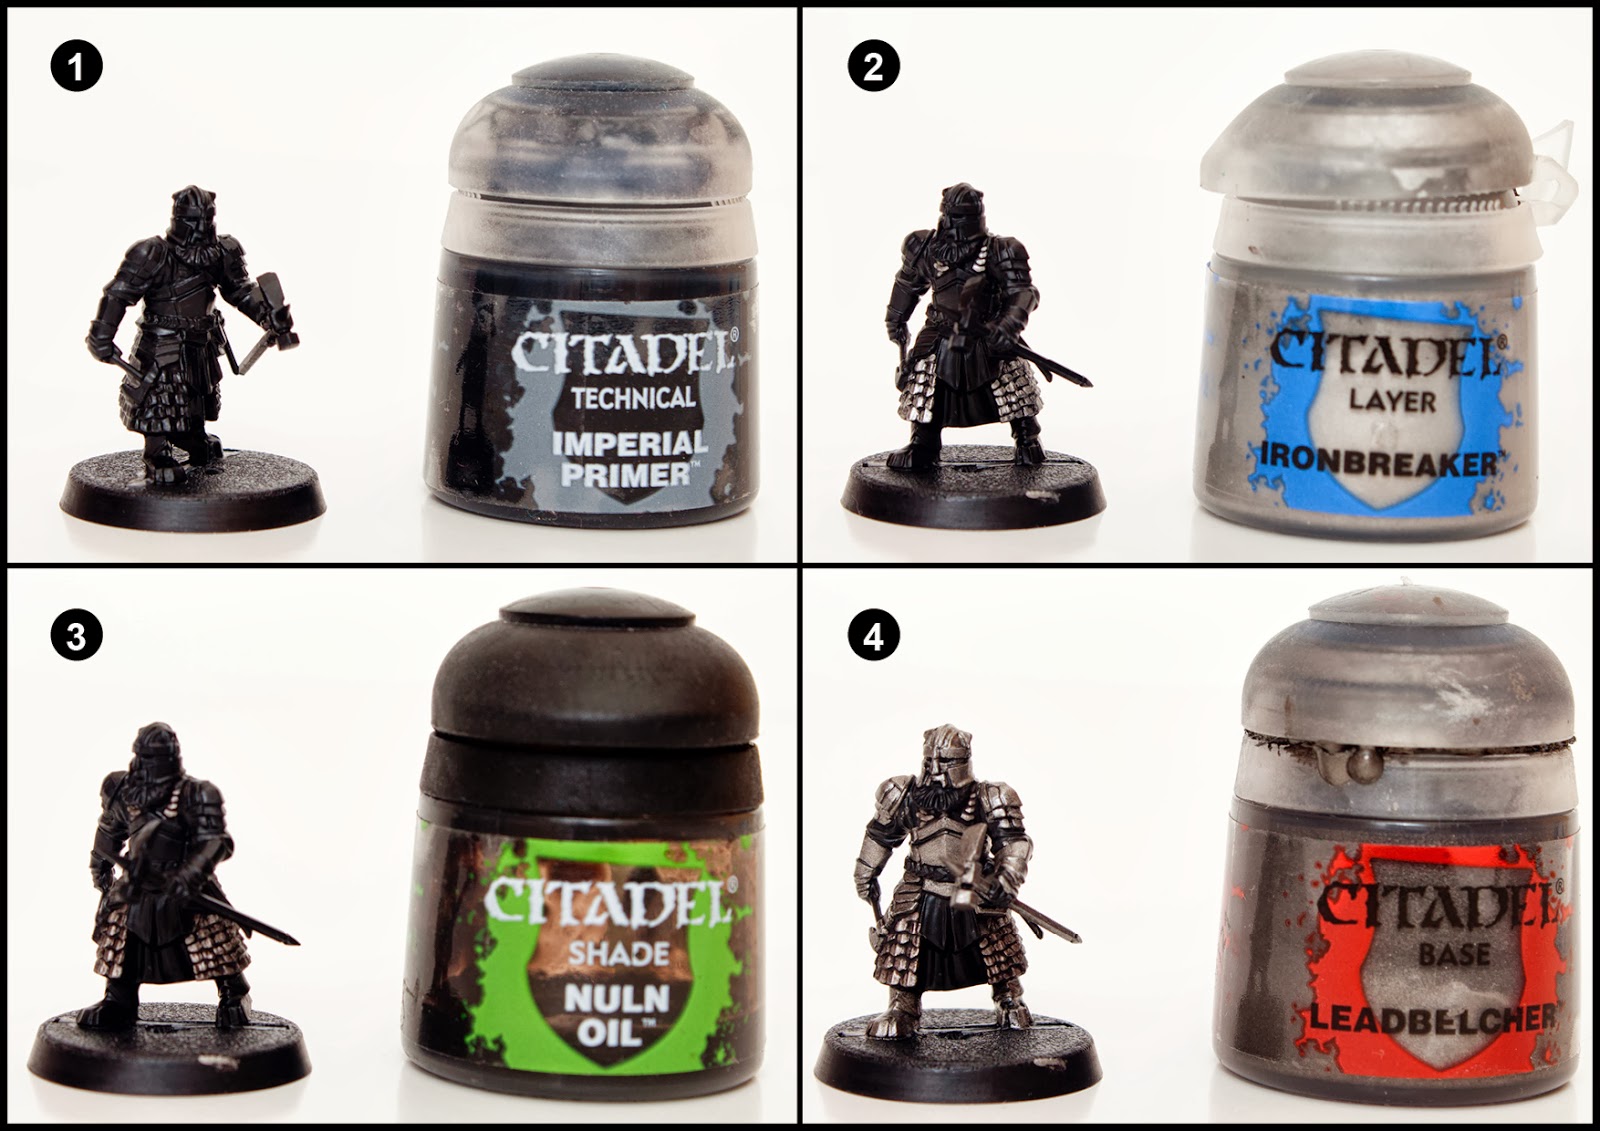
1. Undercoat the model. The details are small, so I hand undercoated the model (rather then use a spray) with Imperial Primer.
2. Paint the scales of the chain mail with Ironbreaker. I painted these individually leaving black showing through where they overlap. You can drybrush if you wish to speed it up.
3. Wash the chain mail with Nuln Oil.
4. Basecoat all the plate mail, helmet and weapons with Leadblecher.

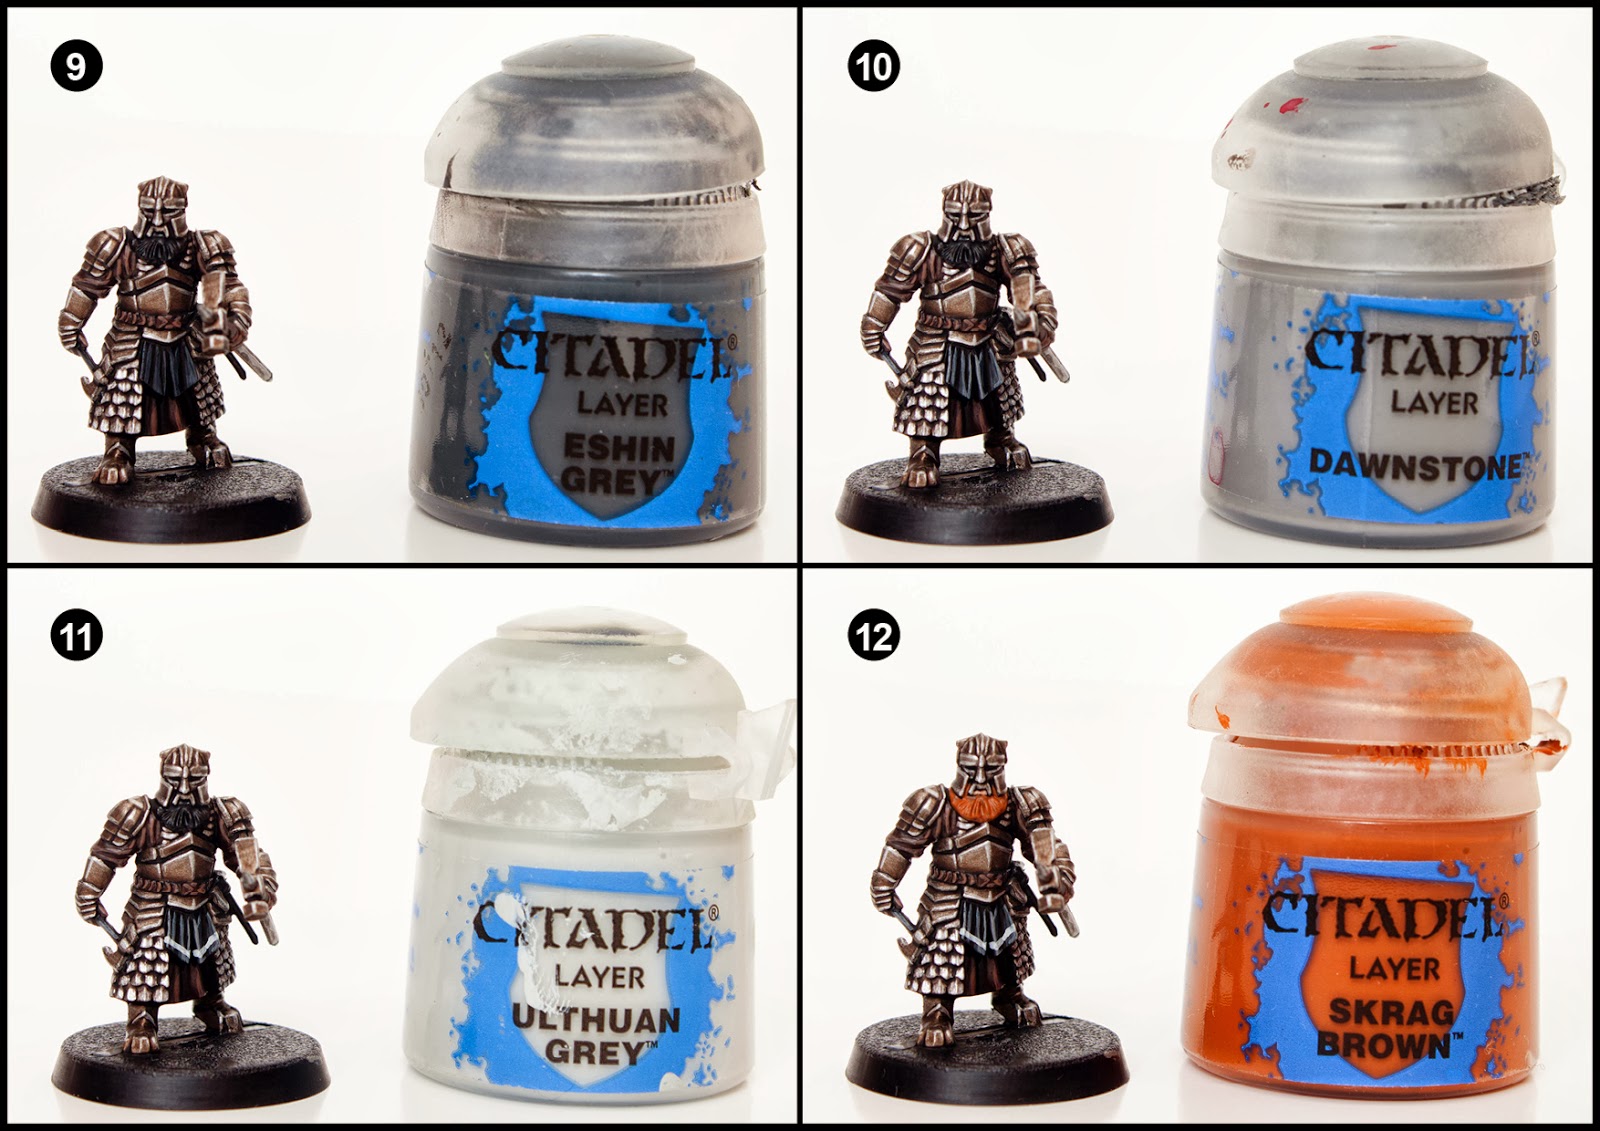
5. Wash over the plate mail, helmet and weapons with Agrax Earthshade. Because the model is predominately metal I wanted to try to make it more interesting by having two different types of metal A brighter shinier chainmail and a more worn and dirty plate mail.
6. Paint the scales of the chain mail again with Runefang Steel. Then highlight just the edges of the plate mail, helmet and weapons with Runefang Steel.
7. Paint the tunic (between legs and on the arms) with Rhinox Hide.
8. Highlight the previous layer with Gorthor Brown.
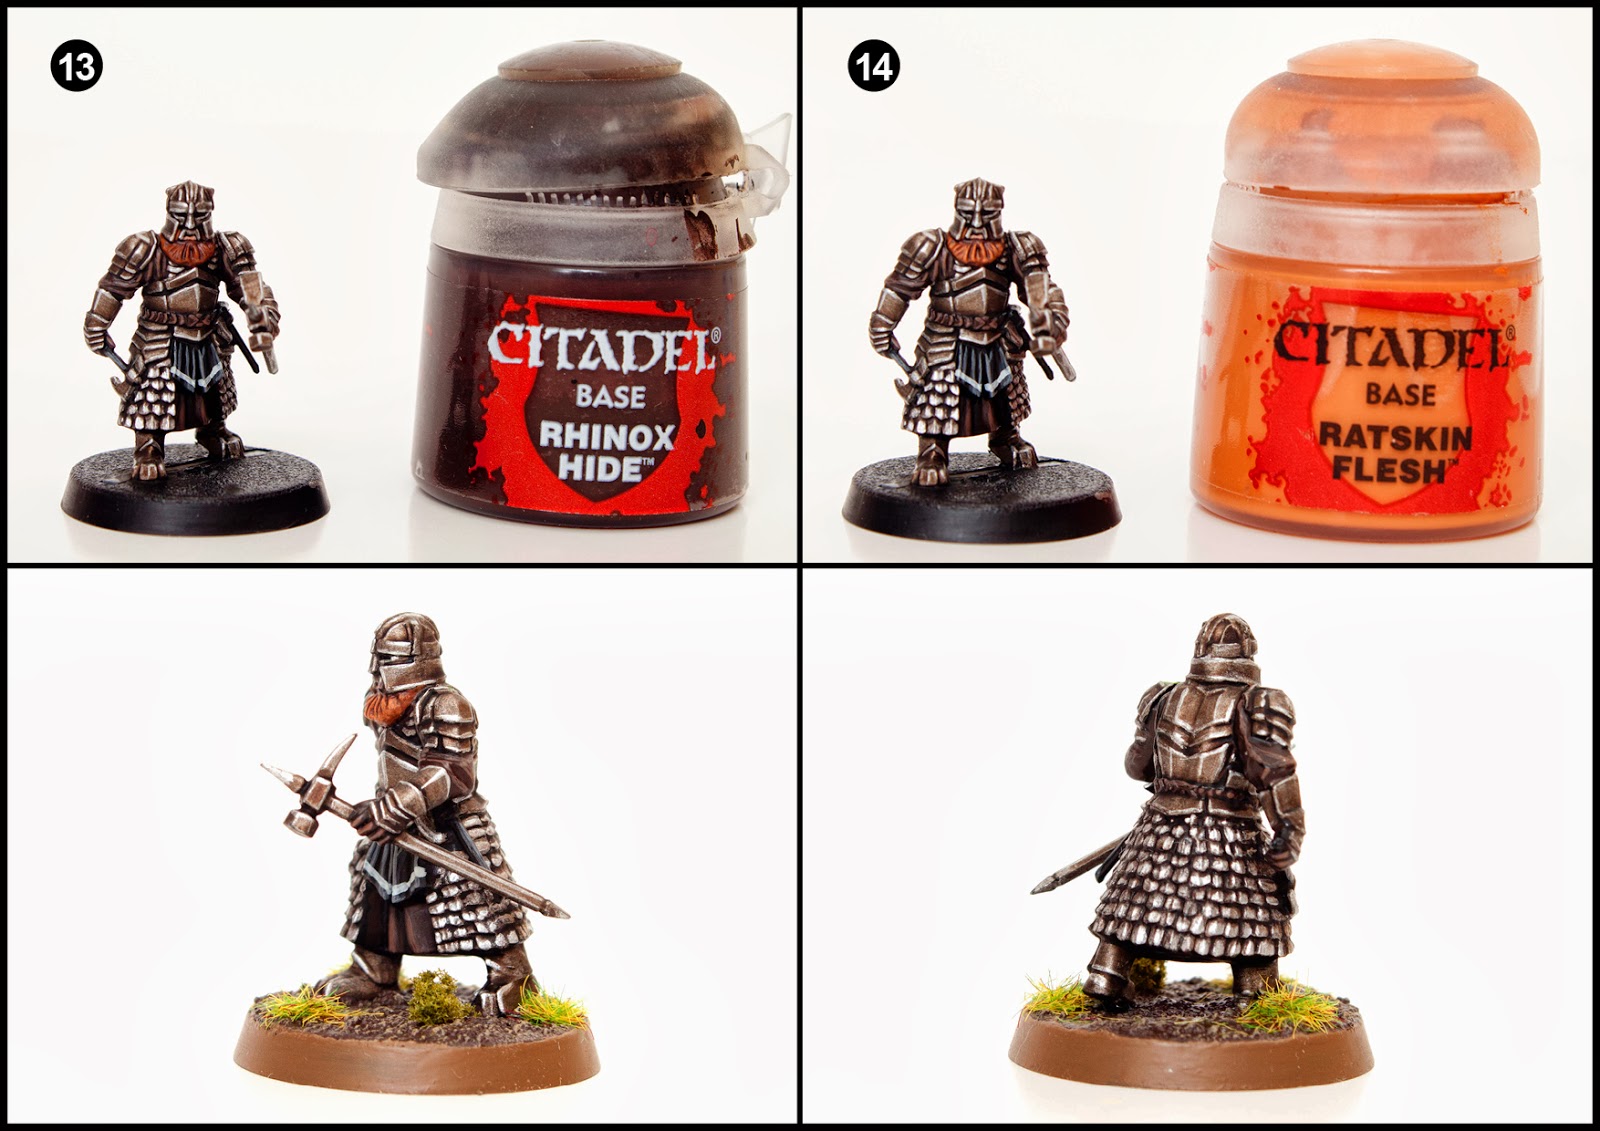
9. Highlight the black loin cloth with Eshin Grey.
10. Further highlight the loin cloth with Dawnstone.
11. Use Ulthuan Grey to paint a horizontal line along the bottom of the loin cloth.
12. Paint his beard with Skrag Brown.
13. Make a 50:50 mix of Lahmian Medium and Rhinox hide and run it into gaps of the beard to shade.
14. Highlight the raised areas of the beard with Ratskin Flesh.
Finally base the model in a way which fits in with your collection. I used Stirland Mud texture paint highlighted with Karak Stone and the base edge was painted with XV-88. Static grass and scrub were glued on in small clumps.
Tale of Painters has a whole host of Hobbit tutorials for you to check out.
Do you like our tutorials and reviews? Here is what you can do to support us: Check out the websites of our sponsors, place your next orders at Wayland Games by clicking here or on the banner on the right. Thank you very much, we appreciate any help to keep us going

14 Comments
Leave a Reply
Tale of Painters is the unofficial Warhammer hobby magazine run by hobbyists like you. Support our work by using the affiliate links from our partner stores for your next orders so we can continue to bring you fantastic FREE content every day:


![]()
![]()
Or support us directly:


i understand man. i hope to see warriors of dale and erebor soon. thank you.
why smaug ? few person have them. the other more generic can be more interresting for use no ?
The tutorials have always been chosen based on what I want to add to my collection. I'm picking smaug up today, so smaug is next. Sure few people will need it but actually quite the tutorial for assembly's will be useful to any one working with a huge resin kit.
Would still LOVE to see a Smaug tutorial! Am very lucky to have one but have yet to start.
hey garfy ? new tutorial from the hobbit coming soon ? like palace guard, warrior of erebor, warrior of dale, thror. thank you and good job man.
Smaug is probably going to be next.
Awesome tutorial! How many layers of imperial primer do you use?
If I'm painting a single model, which is small with fine detail then I'll use Imperial Primer. If it's a Warband then I'll use Vallejo Surface Primer in my airbrush.
Coats are 2 or 3. It isn't very hard wearing. I sometimes just brush on Vallejo Surface Primer as well.
Thanks! Can you maybe do a tutorial on Thrain?
You're welcome. I had to use an online translator and got this…
Thank you once again from Spain. Your work improve ours. curesinking
Fantastic Garfy!, gracias una vez más desde España. Tus trabajos mejoran los nuestros. curesinking.
Very nice Garfy – I think it'll make a nice change to do some plastic from all the "restic" I've been assembling lately !
Thanks for another great tutorial! I really like that you painted the metal in two different ways. Your Grimhammers look more interesting then those of Games Workshop in my opinion.
Thanks dude. Yeah, I wanted mine to look different from the eavy metal ones which feature a darker almost black metal look to them. I decided I wanted a bright gleaming chainmail and a slightly dirtier plate mail. I like the contrast. It's subtle, but it's enough to add interest. Thanks for noticing.